
Chapter 7
Vertex Color Maps
What Are Vertex Color Maps?
Vertex color maps are a way that you can add color to the points (vertices) in your model’s mesh. You can use them to add simple colors to your models without having to actually texture them or to add colors to an existing texture in your Surface Editor (vertex coloring is multiplied to the surface’s base color and textures applied).
The following image shows William Vaughan’s pug model with vertex coloring. There is a tutorial on NewTek’s web site detailing the creating of the vertex coloring for this model.

Figure 7-1
As you can see, the colors of a vertex color map are visible in your shaded viewports.
How exactly is this useful? Well, when working in games, you can use these maps to create illumination maps for geometry, because of the way in which the vertex colors are added. As mentioned, they are multiplied (in other words, the RGB values of each color are literally multiplied with the surface’s RGB values to produce new colors) to the surface, which means that they behave in the same way as a layer in the Texture Editor that uses Multiply as its Blending Mode. You can therefore create (or bake, using the Surface Baker) lighting to geometry. However, you can of course simply use it to create colors on a model for the purposes of coloring alone.
Creating Vertex Color Maps
To create a new vertex color map, go to the Map tab in Modeler, and click on the New Color Map button under the Color heading.
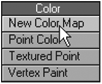
Figure 7-2
A new window titled Create Vertex Color Map pops up, allowing you to enter the initial settings and name for the map.
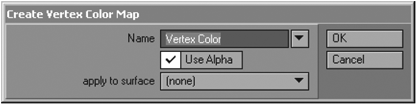
Figure 7-3
Enter an appropriate name for the map in the Name field. The Use Alpha option can be switched on or off, and the surface to which you wish to apply the vertex color map is selected from the Apply to Surface drop-down menu.
The Use Alpha option allows you to assign an alpha value for each vertex. This allows for more control over the way in which the vertex color map blends with the surface, because as we know alpha values are transparency values. We generally leave the Use Alpha option on since most vertex color maps will utilize alpha values to some degree, simply because they allow that greater level of blending control and flexibility.
NOTE: Something to bear in mind when working with all kinds of vertex maps is that the number of points within the model limits the level of detail. Because the changes you make to a vertex map are made at the points (vertices) only, this means that models with a lower number of points will have a far more limited level of detail possible. For example, you cannot draw a pattern across a single polygon, because the changes are made only at the points between polygons. So basically the higher the number of points within the model, the higher the level of detail you can create in your vertex maps.
When working with vertex color maps, we have a couple of tools at our disposal, which are discussed in the following sections.
The Airbrush Tool
The first tool that we can use to paint our vertex colors is the Airbrush, found under the General heading in Modeler. If you have ever worked with weights before in Modeler, you will already be familiar with the Weights tool, which works in a similar fashion to the Airbrush tool.
Select the Airbrush tool and hit “n” to open its numeric control panel. Here you find all the options for controlling the effect that the Airbrush has on the vertex map.
First, ensure that you have the vertex color map you wish to affect selected from the Vertex Map menu. The rest of the options simply control the effect that the tool has. The Radius setting controls the size of the actual Airbrush when painting; alternatively you can use the right mouse button when working within your viewport to interactively change the radius size.
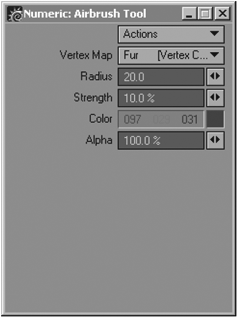
Figure 7-4
The Strength setting determines the intensity that the color you are painting with will have on the map, almost like setting the Opacity of the brush itself (not to be confused with the Alpha setting though). Figure 7-5 shows the difference between a low Strength setting (on the left) and a high Strength setting (on the right). The model is by William Vaughan.
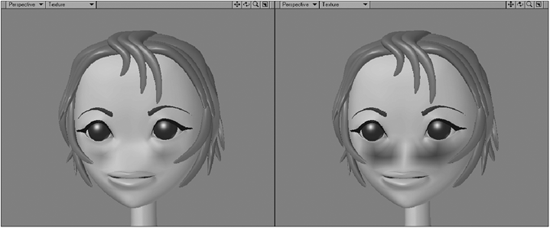
Figure 7-5
The Color swatch allows you to mix and select a color for the Airbrush to paint with using RGB values. You can click on the individual values and drag with your cursor to adjust them or you can click on the little swatch to open the Color window where you can mix a new color.
The Alpha percentage determines the alpha value that will be applied to the points of the vertex map when using the Airbrush. As discussed earlier, the alpha values allow for flexible blending of the vertex color map with the surface and textures applied to it. Because the Airbrush tool works with individual points, this means that each point on the model can have its own alpha value as well as a color value in the vertex map. A value of 100% allows the color in the map to remain opaque, while lower values cause the color to blend with that of the surface and any textures applied to it.
To paint with the Airbrush, simply set it up as you would like it, and then click on the model (be sure to click on the points themselves) and drag the cursor left or right to actually affect and adjust the color of the points.
Vertex Paint
The other tool that you can use for interactively painting your vertex color maps (as well as weight maps) in Modeler is the Vertex Paint plug-in. This plug-in opens a little window with a bunch of controls and options, as well as a window showing your model within which you can paint directly onto your surface.

Figure 7-6
You can rotate and navigate within the window just as you do within Modeler’s viewports, using the same shortcut keys for rotating, panning, etc., inside.
All the tools for painting color maps are found under the Color tab on the left-hand side, where you can mix colors, set your brush size and shape, and obviously also select which color map you would like to work on, as well as create new maps.
Let’s look at each of these tools and options.
At the top of the panel we have our Brush Size option. Simply type a value into the field or use the spinner (little button with the arrows) to adjust the size of the brush.

Figure 7-7
When painting onto the model, all faces that lie in the direction in which you are painting are affected by the brush. However, clicking on the Front button will cause only the front polygons to receive color from the brush.
Click on the little button with a black circle on it to change the shape of the brush to a square.
Select the color map you wish to edit from the drop-down menu labeled Color Map. Alternatively, you can create a new vertex color map by going to the Edit menu at the top and selecting Create Vertex Color Map.

Figure 7-8
You can choose to have an alpha channel for blending the vertex map by selecting RGBA (the default) or no alpha channel by selecting RGB, next to the Color Map selection.

Figure 7-9
There are three Paint Modes to choose from — Color/Point (the default), Color/Index, and Color/ Polygon.

Figure 7-10
Painting with the Color/Point mode applies the brush effect to points only. The effect of the brush is spread out from the point onto all adjacent polygons.

Figure 7-11: Color/Point mode
Color/Index affects only the nearest point index of a polygon. A point index is a unique reference given to the points of each polygon. When using this mode, clicking anywhere on a polygon will apply the color to the nearest point, and the effect will affect only that particular polygon. The Face and Brush Size options are ignored when using this option.

Figure 7-12: Color/Index mode
Lastly, the Color/ Polygon option applies the color to the entire polygon that is clicked on. As with the Color/Index option, the Face and Brush Size options are ignored.

Figure 7-13: Color/Polygon mode
To the right of the Paint Mode selection menu we find a few options that determine the manner in which the color is added to the current vertex color. We have four options — Add, Subtract, Replace (the default), and Erase. Their overall effect is controlled by the Strength percentage value as shown in Figure 7-14.

Figure 7-14
Add basically adds the color to the underlying vertex color, the blending of which is obviously determined by the Strength value. Subtract is the opposite of Add. It subtracts the value of the paint color (the RGB value) from the existing vertex color. Replace simply replaces the current vertex color with the new color, while Erase sets the value of the existing color back to 0.
Below these options we have sliders for mixing the actual colors. You can use the sliders to individually select values for each color channel (RGB or HSV), or you can click anywhere within the colored box to select a color from the range.
These are your basic options for creating and editing vertex color maps.
For more in-depth information on using Vertex Paint, refer to your LightWave manual, where it is covered in extensive detail.
Applying Vertex Color Maps
Once you have created your vertex color maps, you can blend them with your surface simply by going to the Advanced panel in the Surface Editor, selecting the map from the Vertex Color Map drop-down selection list, and using the Vertex Coloring value to blend it with the actual surface.
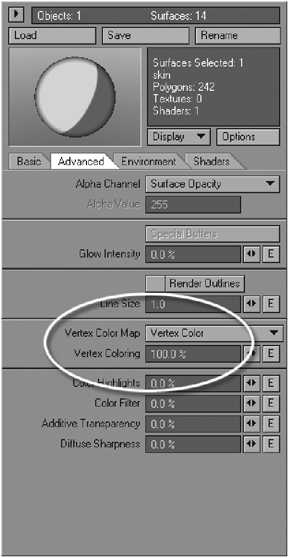
Figure 7-15