
Chapter 2
Lighting Basics
Observing Light and Its Effects
Essentially, what we are doing when we create surfaces for objects is defining the manner in which light will affect the surface. This is because everything that we see, we are able to see because of light. Without sufficient light, we are unable to see colors and details on things because that information is carried to our brains via waves (and particles) of light. Light bounces off objects and those rays then enter our eyes, transmitting the information about what those surfaces look like to our brains. Therefore, when we are setting up the surface of an object, we are actually defining the information that will be carried to the brains of the viewers by providing the surface colors and details to transmit via rays of light.
Because of this, as texture artists we need to have a basic understanding of light and how it affects surfaces that it touches. We also need to have an idea of basic lighting setups within LightWave so that we can render our textured models and show off our textures to their full potential.
NOTE: LightWave v9 Lighting by Nicholas Boughen (1-59822-039-X) covers this topic in depth. I will only briefly cover the subject of lighting for the purposes of this book, and recommend reading Nicholas’s book for more information.
The properties of surfaces in the real world that pertain most directly to light are color, diffuseness, specularity, glossiness, reflection (in the real world the last three are the same thing, although they are split up in the world of computer graphics), and luminosity. You can read about each of these in Chapter 4, “Surface Attributes.” LightWave obviously offers a number of other surface attributes to play with, but these particular properties of a surface are the ones that are most affected by the lighting in your LightWave scene since they essentially shade the surface. By shading I mean that these attributes will determine the manner in which the lighting in your scene will affect your surface most noticeably, and will thereby essentially create the tangible quality of the surface as we see it.
It is important to have a good understanding of how these surface properties work so that you can shade your surface correctly, making it act more realistic in regard to its environment and therefore more believable.
Basic Light Options in LightWave
LightWave offers a nice toolset of options for setting up lights and lighting environments in Layout.
There are five different types of lights that you can create in LightWave, each having its own specific characteristics and effects. The different types are distant lights, spotlights, point lights, area lights, and linear lights. You can create these from your Items menu in Layout.

Figure 2-1
Distant Lights
By default, whenever you create a scene in Layout, a distant light is created within the scene. Distant lights are supposed to simulate sunlight in LightWave, as they project infinite parallel rays of light that have no falloff in whichever direction they are facing.
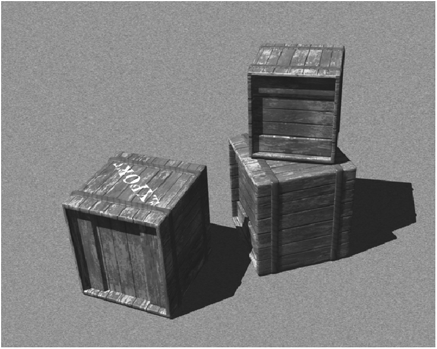
Figure 2-2: Scene lit with distant light
Distant lights have sharp-edged shadows and the light has no set radius, so it essentially lights everything that lies in its path equally, unlike a spotlight that has a cone radius that will only light objects where the actual beam of light within that cone lies.
The position of the light is irrelevant, so you can place it anywhere in your scene. It is only the direction of the light that matters. The light also has no defined origin, as the direction simply focuses the rays from an infinite source.
The advantages that distant lights offer is that they do a relatively decent simulation of sunlight and they render quickly. The drawback, however, is that they only offer sharp-edged shadows (as opposed to fuzzy-edged shadow maps), and if you study sunlight, you’ll see that the shadows become softer farther away from the object casting them. Also, because the rays coming from the light are all parallel, the shadows cast by objects will remain exactly the same size and shape, regardless of how far from the object the shadow falls. This is not technically accurate (in terms of real sunlight), although it isn’t always noticeable in shots, especially when the shadows are mostly in the background.
Spotlights
The second type of light that we have is the highly versatile spotlight. These lights are extremely useful as they can be used to create a number of effects, and they can imitate other lights such as area lights and point lights (discussed in a moment) and even distant lights with a few tweaks of their settings.
A spotlight creates a cone of light that emanates from a single point and casts a circle of light onto subjects in the scene.
One of the most useful things about spotlights is that they can produce both sharp-edged shadows as well as soft, fuzzy shadow maps, as shown in Figure 2-4.

Figure 2-3: Spotlight

Figure 2-4: Spotlight with fuzzy shadows

Figure 2-5: Spotlight with gobo effect
By experimenting with the cone angle and the shadow settings, you can simulate the effects of using point lights, distant lights, or area lights. You can also project images through spotlights for creating what are known as gobo lighting effects. A gobo lighting effect is a method used predominantly in theater and film where plates that have shapes cut into them are placed in front of the light so that the projected light can appear to, for example, be coming through a canopy of leaves in a forest, as shown in Figure 2-5.
Aside from these advantages and uses, spotlights are relatively fast to render, especially when using shadow maps, since this requires no ray tracing. One disadvantage to using these lights is that when using them with ray tracing, their shadows can be extremely hard (like distant lights). Another disadvantage of spotlights is that their shadow maps are physically inaccurate and can sometimes look very strange, especially with high fuzziness settings, which can often give the illusion that the shadows are not properly “attached” to the objects that are casting them.
Point Lights
Point lights, often also called omni lights, cast light in all directions (omnidirectionally) from a single, nondimensional point in 3D space. They are technically inaccurate in the sense that all lights in the real world have physical dimension, whether it is the sun or the filament of a lightbulb. Not having any real dimension means that the light appears to have no scale, which makes it impractical for creating the lighting of something as large as a lightbulb, although it can be useful for creating quick illumination for things like LED lights on a VCR since the scale of such an item is so small anyway.
Point lights have ray-traced shadows, which create hard shadows with no softening whatsoever.
The most common use of point lights is simply for creating some ambient illumination in your scene, usually with the shadows switched off.

Figure 2-6: Scene lit with point light
Area Lights
Area lights look great and they create very cool-looking shadows. As they are more physically accurate than any of the other light types in LightWave, they are capable of producing very realistic lighting.
One of the best things about area lights is that their size is adjustable, which makes them extremely useful for any type of lighting source that needs physical dimension. Because the light has a dimension, it is capable of producing realistic shadows that are hard near the source and gradually grow softer as the shadow falls farther from the object. The only drawback to using area lights is that they take much longer to render than other light types. However, this price may be worth the effect that they create.

Figure 2-7: Scene lit with area light
Linear Lights
Lastly, we have linear lights, which are similar to area lights in the sense that they appear to have dimension. While an area light is essentially like a two-dimensional rectangular array of ray-traced point lights, a linear light is like an adjustable one-dimensional row of point lights. This creates a lighting effect that casts shadows along the axis on which the light lies.

Figure 2-8: Scene lit with linear light
Linear lights are useful for things such as fluorescent lighting tubes, since they have the same shape. However, their shadows can sometimes be a bit strange, and are often best left turned off.
Creating Basic Lighting Setups
While we are in the process of creating textures and setting up surfaces on our objects, we ideally need to be able to view those surfaces in the best possible way so that we can keep track of how the surfaces look.
The best way to ensure that your textures look the way that they should is to light them in such a way as to illuminate the entire model so that all the surfaces are totally visible and not hidden or obscured in any way by shadow.
Even if your final lighting setup is going to be dim or colored in some way, it is best to set up the textures with a relatively neutral lighting setup, as this gives us the best indication of the “natural” look of the surfaces. If the surfaces look right under neutral lighting, then chances are they will work well under any other type of lighting (as this is how things work in reality) with minimal tweaking.
One of the most neutral and efficient lighting setups for this process is a studio style setup, such as would be used in any photographic studio. This type of lighting rig is often called “three-point lighting,” as it usually consists of three lights, or three areas of illumination: the key light, fill light, and backlight. This lighting is great because it ensures the subject is totally illuminated from all angles without looking too unnatural.
Nicholas Boughen, the author of LightWave v9 Lighting, totally hates three-point lighting, but I have to recommend this type of setup because it really is efficient when setting up texturing!
Let’s take a look at each of the three lighting sources and examine their purpose.
The Key Light
The key light is the primary source of illumination. It can consist of a single light or a number of lights, depending on your scene. This light is usually placed above your subject (although it can actually be placed anywhere — there is no hard-and-fast rule about its placement in a scene), and generally provides illumination for approximately three-quarters of your subject. This light is typically the brightest point of illumination in the scene.
Figure 2-9 shows some crates being lit by a key light only, in this case an area light.

Figure 2-9: Scene lit with key light only
The Fill Light
The purpose of the fill light is to provide illumination in the shadow areas not illuminated by the key light, so that there are no areas that are totally black (as this is not possible in the real world, unless your scene takes place in a black hole!). As with the key light, your fill light does not necessarily have to be an actual light. It can be created using radiosity, a sky dome, or anything else that provides a secondary source of illumination in your scene. Generally the fill lighting is of a fairly low intensity.
Figure 2-10 shows our crates being illuminated by both the key light and the fill light, which is positioned off to one side of the objects.
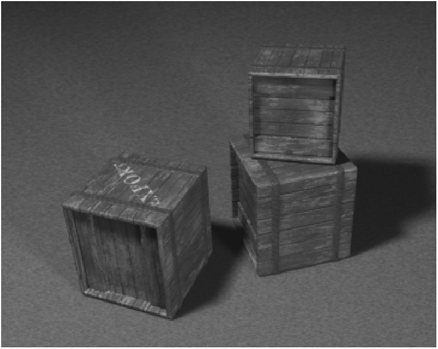
Figure 2-10: Scene lit with key light and fill light
The Backlight
Also called a rim light, a kicker light, the highlight, and a variety of other names, the backlight is simply there to create highlights on a surface so that the object stands out from its background. This light often casts no shadows.
Figure 2-11 shows our lovely little crates being lit by all three lights. The backlight is positioned directly behind the crates in the scene. Notice how it catches the specularity along the edges of the crates, making them stand out slightly from their surroundings.

Figure 2-11: Scene lit with key light, fill light, and backlight
Starting off your scene with just a basic three-point lighting setup using these elements generally provides a decent starting environment for creating your surfaces.
These are really just the basics, and I would highly recommend doing some further reading on the subject of lighting, especially if you would like to specialize in the areas of shading and texturing, as a solid knowledge of lighting can benefit you greatly in this regard.