
Chapter 20
Creating Hair and Fur with Worley Labs’ Sasquatch
This isn’t texturing, is it? Well, no, strictly speaking, hair and fur are rendering affairs, but since they are intrinsically linked to surfacing as a whole, I thought it would be good to have some coverage of an excellent hair and fur solution for LightWave, Worley Labs’ Sasquatch plug-in.

Figure 20-1
Sasquatch is a very vast and powerful plug-in, and to really discuss it in depth would require an entire book, but we’ll take a cursory look at its uses here.
NOTE: LightWave ships with a limited version of this plug-in called Saslite. For the purposes of this chapter, we will be looking at the full version of the plug-in, as it contains all of the Saslite options as well as a host of other controls for creating great-looking hair.
Adding the Plug-in to Your Scene
Once you have installed the plug-in, Sasquatch works in Layout as a displacement on your model, and as a pixel filter for the rendering stage. To assign it to a particular layer in your scene, you simply open the Object Properties window (press “p”) and assign it to the Add Displacement list under your Deform tab.
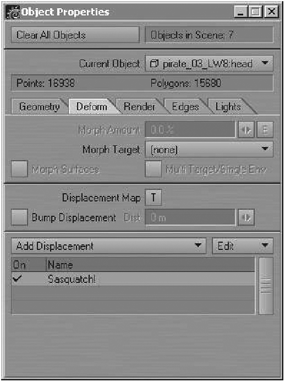
Figure 20-2
To open the plug-in’s control panel, double-click on the Sasquatch name in the list. The initial panel that opens can be quite daunting at first!
Be warned that this is just one of nine such panels. Sasquatch, like G2, comes with a superbly written manual, so there is no need for me to go into every one of these options here.
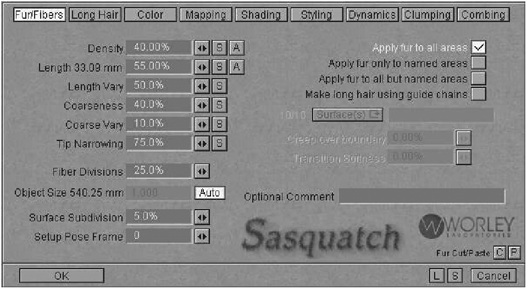
Figure 20-3
Sasquatch Features at a Glance
Let’s look at the shading options of the hair.
The Shading panel in Sasquatch contains a number of settings that you’ll find familiar, since they are very similar to the surface attributes that we deal with in the Surface Editor.
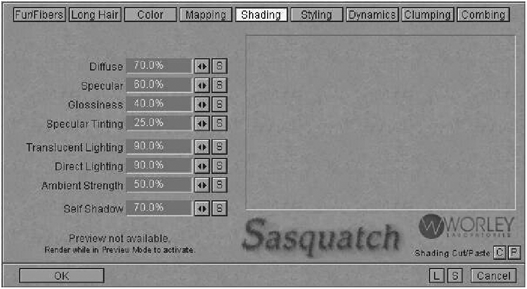
Figure 20-4
The Diffuse, Specular, and Glossiness settings work much the same as their standard surfacing counterparts in the Surface Editor. Use the Diffuse setting to brighten or darken the hair, and use the Specular and Glossiness values to determine how shiny it is. Taking the latter two values up very high will give the hair a wet look. The Specular Tinting option works like the Color Highlights option we have in the Surface Editor — it tints the specular highlights with the color of the surface.
The remaining controls on the Shading panel give us options for controlling how light affects the hair.
You can place hair on the model using a number of different options. You can apply hair to the entire model, you can apply it to a certain surface, you can attach it to guide chains (splines) that you model, or you can use weight maps or alpha images to determine where it appears as well as how it looks, in terms of density, coarseness, etc. Using weight maps is probably the most interactive way of controlling short- to medium-length hair, and is my favorite way of using Sasquatch.
Simply create a weight map in Modeler for whichever attribute you want to control, such as Density, Coarseness, Length, etc., and use high weight values to specify higher values of that attribute or lower weight values for lower values of the attribute.
Density also acts as a method of actually determining where the hair will appear. For example, if you were creating a weight map for Density, you would make the areas where you want a lot of hair a very bright orange in the weight map, and where you didn’t want any hair at all you could leave those areas green, or even make them blue.
Once you use a weight map within Sasquatch, you can determine how those values are then taken into account when the hair is rendered.

Figure 20-5
To give the hair color, the Color panel offers a number of controls for us to play with.

Figure 20-6
You can set basic color options here, as well as determine how the color changes along each strand of hair and how the color is randomized through the hair, so that it is not simply a single, unchanging color (which looks very unnatural).
You can also apply mapping to your hair in the Mapping panel.

Figure 20-7
This allows you to use either an image or a vertex color map to color the hair. Very handy indeed! Sasquatch comes with a number of demo files that demonstrate each of these options.
Apart from shading options and mapping options, Sasquatch offers a vast array of styling tools and dynamics tools as well. While the plug-in can take some time to fully master, it is easy to get started, and since it provides such a great hair solution for LightWave, I highly recommend it to anyone who is serious about character work, since hair is such an important part of that facet of 3D.
Visit Worley Labs’ site at www.worley.com for more information about Sasquatch, as well as demo files, a gallery, and tutorials.