© Ted Hagos 2020
T. HagosLearn Android Studio 4https://doi.org/10.1007/978-1-4842-5937-5_11

11. Running in the Background

Ted Hagos1 
(1)
Manila, National Capital Region, Philippines
 
What we’ll cover:
  • Basic thread concepts

  • The UI thread

  • How to create and use Java threads

Knowing how to run codes in the background is an essential skill for every developer. Making adept use of threads can boost your app’s performance. Users love that. The bar is very high right now on application performance. No one wants to use an app that runs like molasses. Jittery and janky apps are quickly forgotten nowadays.

In this chapter, we’ll explore the wonderful world of Threads.

Basic Concepts

When you launch an app, a process is created, and it’s allocated some resources like memory, among other things. It’s also given one thread.

A thread, loosely speaking, is a sequence of instructions. It’s the thing that executes your code. During the time the app is alive, this thread will utilize the process’ resources. It may read or write data to memory, disk, or sometimes even the network I/O. While the thread is interacting with all these, it is just waiting. It can’t take advantage of CPU cycles while it’s waiting. We can’t let all those CPU cycles go to waste. Can we? We can create other threads so that when one or more threads are waiting for something, the other threads can utilize the CPU. This is the case for multithreaded applications.

When the Android Runtime creates an instance of an app, that process will be given one thread. It’s called the main thread; some developers call it the UI thread, but we’ll be given just the one thread and no more. The good news is we can create more threads. The UI thread is allowed to spawn other threads.

The UI Thread

The UI thread, also known as the main thread, is responsible for launching the main activity and inflating the (XML) layout file. Inflating the layout file means turning all the View elements into actual Java objects, for example, Buttons, TextViews, and so on. In short, the main thread is responsible for displaying the UI. When we make calls like setText() or setHint() on a TextView object, these calls aren’t executed right away; instead, it is as follows:
  1. 1.

    The call is placed in a MessageQueue.

     
  2. 2.

    There it will stay until a handler picks it up for execution.

     
  3. 3.

    Then, it gets executed on the main thread.


The main thread is not only used for displaying UI elements, it’s also used for everything else that happens in your app. You may recall that Activity has lifecycle methods like onCreate, onStop, onResume, onCreateOptionsMenu, onOptionsItemSelected, and other methods. Whenever the code runs on these blocks, the runtime cannot process any message in the queue. It’s in a blocked state; a blocked state means that the main thread is waiting for something to finish before it can continue to go about its business—this is not good for user experience.

Most of the time, the calls we make don’t take that much time to run. The calls are cheap, so to speak, in terms of computing resources. So, it’s not really a big deal. It becomes a big deal when we make calls that take quite a while to complete. The Android development team’s guidance is that we should limit our calls to no more than 15 milliseconds; anything more than that, then we should consider running those codes in a background thread. This guidance was from Project Butter, which was released around the time of Jelly Bean (Android 4.1); it was meant to improve Android apps’ performance. When the runtime senses that you’re doing too much on the main thread, it’ll start dropping frames. When you’re not making expensive calls, the app runs at a very smooth 60 frames per second. If you hog the main thread, you will start noticing sluggish performances because the frame rates begin to drop. In the Android world, this is known as jank. Doing too much processing on the main thread will cause slow UI rendering, which results in dropped or skipped frames, which results in the app’s perceived stuttering. The app becomes janky.

Note

Before Project Butter, if the UI thread senses that you’re doing way too much on the UI thread, for example, opening a large file, creating a network socket, or anything that takes a long time, the runtime may slap you with the ANR (Android Not Responding) screen. ANRs are rarely seen nowadays; jank is more the concern.

If you want to avoid jank, you need to know how to run time-consuming or I/O-related codes in the background.

You don’t need to get overexcited and start running everything in the background. Be reasonable and use your judgment. The following call, for example, doesn’t need to be in a background thread:
txt1.setText(String.format("%d", (2 * 2 * 2)));

It is merely setting the Text property of a TextView to a calculated field. The calculation isn’t complex.

Even Listing 11-1 isn’t considered an expensive code to run. It does some rudimentary calculation of the GCF (greatest common factor), but it uses the Euclidean algorithm to get at the results. This algorithm performs efficiently. The number of loop cycles doesn’t grow wildly regardless of how large the input values are; the time complexity doesn’t change much whether we’re finding the GCF of 12 and 15 or 16,848,662 and 24. So, it’s quite okay to put this in the main thread.
private void gcfCalculate(int firstNo, int secondNo) {
  int rem, bigno, smallno = 1;
  if (firstNo > secondNo) { bigno = firstNo; smallno = secondNo;}
  else {bigno = secondNo; smallno = firstNo;}
  while(!((rem = bigno  % smallno) == 0)) {
    bigno = smallno;
    smallno = rem;
  }
  String msg = String.format("GCF = %s", smallno);
  Toast.makeText(this, msg, Toast.LENGTH_LONG).show();
}
Listing 11-1

GCF calculation

Listing 11-2, on the other hand, is an expensive call. It looks contrived right now, but you’ll be surprised to find that these kinds of codes actually exist and are probably more common than you think—when you sit in for code reviews often enough, you’ll know what I mean. Anyway, you want to watch out for codes like this because, even if it doesn’t have any network or I/O call, it hogs the UI thread to calculate a Cartesian product—a Cartesian product mathematical set that’s the result of multiplying other sets. A code that’s similarly structured is best placed in a background thread.
private void nestedCall() {
  for(int i = 1; i < 10000; i++) {
    for(int j = 1; j < 10000; j++) {
      for(int k = 1; k < 10000; k++) {
        System.out.printf("%d", i * j * k);
      }
    }
  }
}
Listing 11-2

Nested calls

Another example of code that needs to run in the background is Listing 11-3. It uses the Internet to fetch information from GitHub.
private String fetch(String gitHubId) {
  String userInfo = "";
  String url = String.format("https://api.github.com/users/%s", gitHubId);
  OkHttpClient client = new OkHttpClient();
  Request request = new Request.Builder()
      .url(url)
      .build();
  try(Response response = client.newCall(request).execute()) {
    userInfo = response.body().string();
  }
  catch(IOException ioe) {
    Log.e(TAG, ioe.getMessage());
  }
  return userInfo;
}
Listing 11-3

Get GitHub info

The Android Runtime will smack you with a NetworkonMainThreadException if you try to run this on the UI thread. Any code that uses network connectivity can’t run in the UI thread.

When you find yourself in a situation where you either need to (1) fetch or write data using the network, (2) fetch or write data using file I/O, or (3) perform a resource-intensive operation (like in Listing 11-2), you need to run that code in a background thread. There are a couple of ways to do that; see the list that follows:
  • Java threads, which are from Java

  • AsyncTask, which is part of the Android framework

  • Handlers and Messages, which are also part of the Android framework

Whichever technique you use, the principle will remain the same; and that is
  1. 1.

    Spawn a background thread when executing long-running or resource-consuming tasks.

     
  2. 2.

    If you need to do something in the UI thread (like setting the property of a View) while inside a background thread, you have to find a way to go back to the UI thread before working on the View element.


Of all the ways to run codes in the background, the Thread will be the most familiar with Java programmers, but it will also be the most rudimentary.

Threads and Runnables

We can run statements in the background by spawning new threads. Thread objects are created either by extending the java.lang.Thread class or by implementing the Runnable interface. A thread object describes a single thread of execution, and that execution happens inside the Thread class’ run() method.

Extending the Thread class is the simplest way to create a thread object. Listing 11-4 shows the typical structure of a Thread class.
class Worker extends Thread {
  public void run() {
    // things you want to run in
    // background
  }
}
Listing 11-4

class Worker

The Worker class simply extends java.lang.Thread. You need to override the run() method of the thread and put all the statements you want to run in the background inside it. After that, what’s left to do is to instantiate Worker and run it, as shown in Listing 11-5.
Worker worker = new Worker(); ❶
worker.start(); ❷
Listing 11-5

How to create and run a thread

Create an instance of the Thread class.

Invoke the start() method. If you forget this, the thread won’t run. Calling the start() method kickstarts the thread.

Another way to create a thread is by implementing the Runnable interface, as shown in Listing 11-6.
class Worker implements Runnable {
  @Override
  public void run() {
    // things you want to run in
    // background
  }
}
Listing 11-6

The Worker class implements the Runnable interface

As you can see, it’s not that different from our previous sample; instead of extending the Thread, we simply implemented the Runnable interface. You still need to override the run() method and put the statement you’d like to run in the background in the run() method. The difference won’t be in the Worker class structure, but in how the Worker class is instantiated and ran, which is shown in Listing 11-7.
Worker worker = new Worker(); ❶
Thread thread = new Thread(worker); ❷
thread.start(); ❸
Listing 11-7

How to use a Runnable object

Create an instance of the Worker.

Create an instance of a Thread class by passing an instance of the Runnable class (the Worker instance) to the Thread’s constructor.

Now we can kickstart the thread by calling the start() method.

Now that we have a conceptual idea on how to use Threads, let’s use it to fetch user information from GitHub. Listing 11-8 shows the steps on how to call the GitHub API using OkHttpClient.
private String fetchUserInfo(String gitHubId) { ❶
  String userInfo = "";
  String url = String.format("https://api.github.com/users/%s", gitHubId); ❷
  Log.d(TAG, String.format("URL: %s", url));
  OkHttpClient client = new OkHttpClient(); ❸
  Request request = new Request.Builder()
      .url(url)
      .build();
  try(Response response = client.newCall(request).execute()) { ❹
    userInfo = response.body().string();  ❺
  }
  catch(IOException ioe) {
    Log.e(TAG, ioe.getMessage());
  }
  return userInfo;
}
Listing 11-8

fetchUserInfo

We want to take the GitHub userid as a parameter.

Let’s construct a String URL that incorporates the GitHub userid.

We’ll use the OkHttpClient from Square, Inc. OkHttpClient is an open source project designed to be an efficient HTTP client. It supports the SPDY protocol. SPDY is the basis for HTTP 2.0 and allows multiple HTTP requests to be multiplexed over one socket connection; you can learn more about SPDY at https://en.wikipedia.org/wiki/SPDY. As of Android 5.0, OkHttpClient is a part of the Android platform and is used for all HTTP calls. This example is lifted from OkHttpClient’s web page at https://square.github.io/okhttp/.

Let’s use the try with resources block, so we don’t have to worry about cleaning up later; when the try block goes out of scope, all the resources we opened within that block will be automatically closed.

If all our previous setup went well, we could get the response from the GitHub API.

We want to run the fetchUserInfo() method in a background thread to get the NetworkonMainThreadException error. Let’s create a small demo project for this. Create a project with an empty Activity. Let’s build a simple UI with the following elements:
  • EditText—Where we can input the GitHub userid.

  • Button—Which will trigger the user action.

  • TextView—Where we will display the results of our fetch call from GitHub.

  • ScrollView—We will wrap the TextView here, so that the displayed text is multiline, and it can scroll.

Figure 11-1 shows the app’s layout.
../images/457413_2_En_11_Chapter/457413_2_En_11_Fig1_HTML.jpg
Figure 11-1

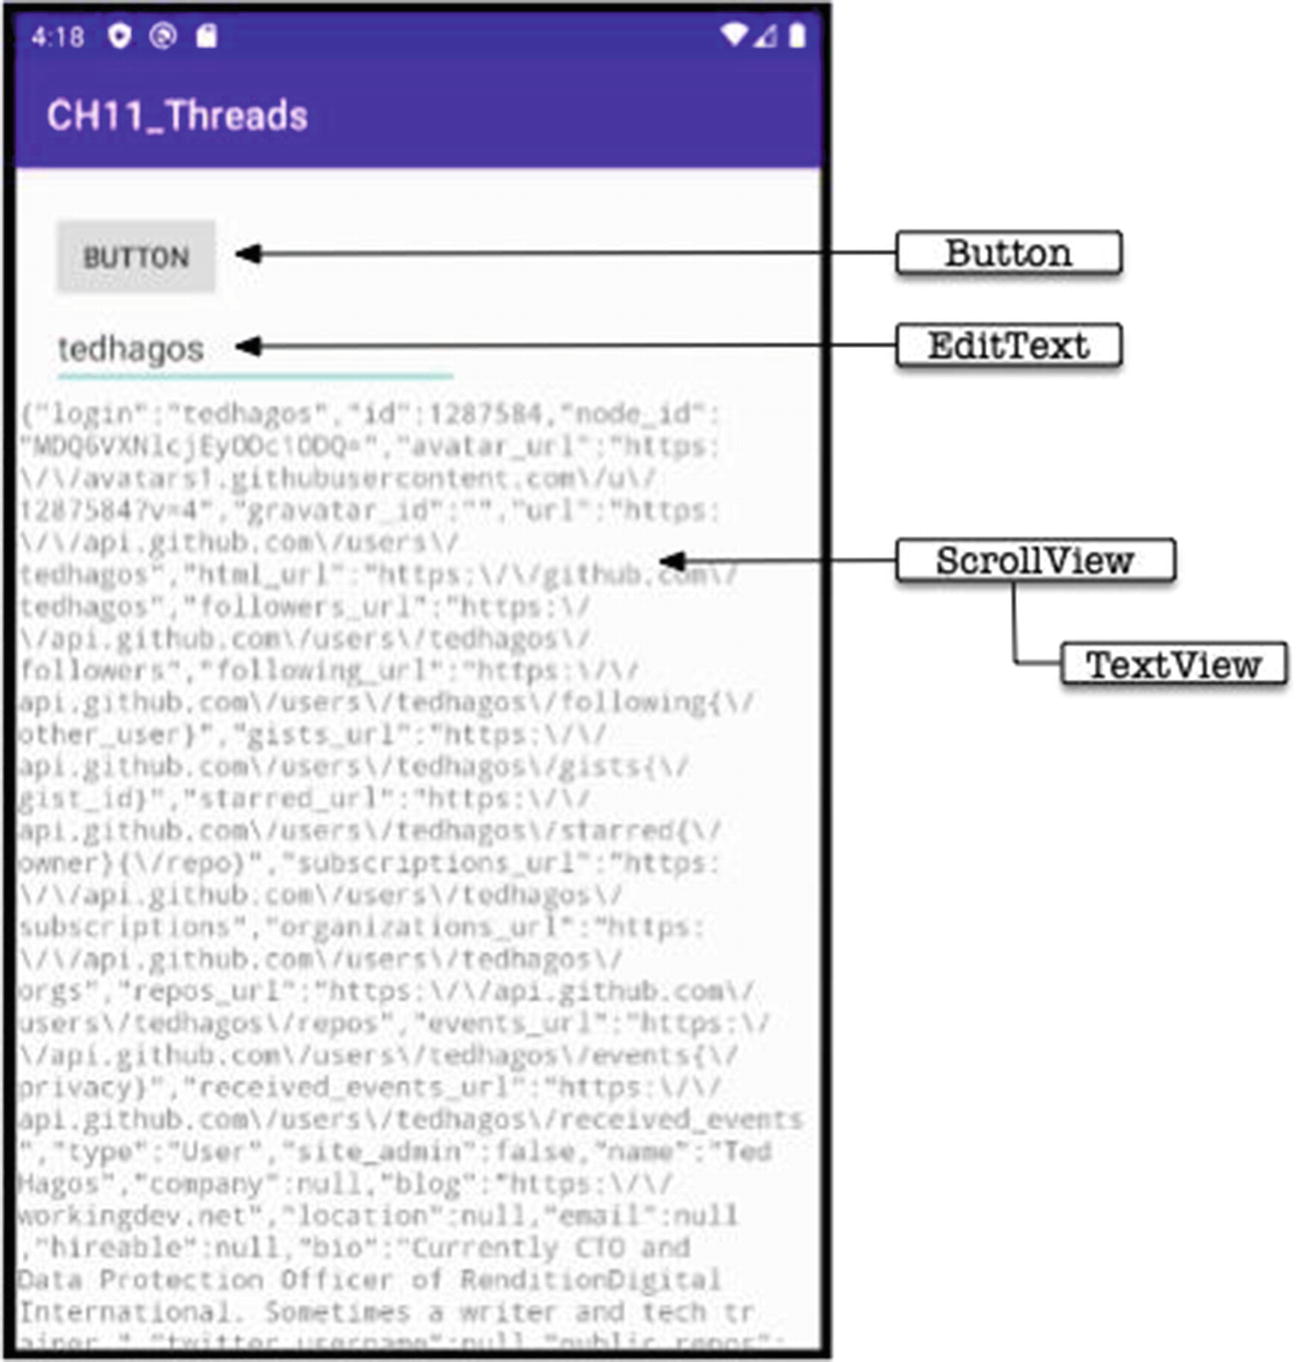
The layout of the app

Open activity_main.xml for editing and modify it to match Listing 11-9.
<?xml version="1.0" encoding="utf-8"?>
<androidx.constraintlayout.widget.ConstraintLayout xmlns:android="http://schemas.android.com/apk/res/android"
  xmlns:app="http://schemas.android.com/apk/res-auto"
  xmlns:tools="http://schemas.android.com/tools"
  android:layout_width="match_parent"
  android:layout_height="match_parent"
  tools:context=".MainActivity">
  <Button
    android:id="@+id/button"
    android:layout_width="wrap_content"
    android:layout_height="wrap_content"
    android:layout_marginStart="18dp"
    android:layout_marginTop="21dp"
    android:layout_marginBottom="46dp"
    android:text="Button"
    app:layout_constraintBottom_toTopOf="@+id/scrollView"
    app:layout_constraintStart_toStartOf="parent"
    app:layout_constraintTop_toTopOf="parent" />
  <EditText
    android:id="@+id/txtName "
    android:layout_width="wrap_content"
    android:layout_height="wrap_content"
    android:ems="10"
    android:inputType="textPersonName"
    app:layout_constraintStart_toStartOf="@+id/button"
    app:layout_constraintTop_toBottomOf="@+id/button" />
  <ScrollView
    android:id="@+id/scrollView"
    android:layout_width="0dp"
    android:layout_height="0dp"
    android:layout_marginStart="1dp"
    android:layout_marginEnd="1dp"
    android:layout_marginBottom="1dp"
    app:layout_constraintBottom_toBottomOf="parent"
    app:layout_constraintEnd_toEndOf="parent"
    app:layout_constraintStart_toStartOf="parent"
    app:layout_constraintTop_toBottomOf="@+id/button">
    <TextView
      android:id="@+id/textView"
      android:layout_width="match_parent"
      android:layout_height="wrap_content"
      android:textAlignment="viewStart"
      android:typeface="monospace" />
  </ScrollView>
</androidx.constraintlayout.widget.ConstraintLayout>
Listing 11-9

activity_main.xml

Next, let’s take care of the manifest file. We need to access the Internet when we call the GitHub API; so, let’s declare that in the AndroidManifest file. Insert the INTERNET uses permission in the manifest, as shown in Listing 11-10.
<?xml version="1.0" encoding="utf-8"?>
<manifest xmlns:android="http://schemas.android.com/apk/res/android"
  package="net.workingdev.ch11_threads">
  <uses-permission android:name="android.permission.INTERNET" />
  <application>
    ...
  </application>
</manifest>
Listing 11-10

AndroidManifest.xml

Next, let’s deal with the Gradle file. There are two changes we need to make on the app module’s Gradle file. First, we need to add the dependency entry for OkHttpClient. Second, we need to add an entry to enable View binding.

We don’t have to use View binding for this example, but I thought it’s a good way to introduce new features that can make our programming lives easier. View binding lets us write code that interacts with the Views. Once View binding is enabled in a module, it generates a binding class for each XML layout file present in that module. An instance of a binding class contains direct references to all views with an ID in the corresponding layout. In most cases, View binding replaces findViewByID. Edit the module’s Gradle file and modify it to match Listing 11-11.
apply plugin: 'com.android.application'
android {
  buildFeatures {  ❶
    viewBinding = true
  }
  compileSdkVersion 29
  defaultConfig {
    ...
  }
  buildTypes {
    release {
      ...
    }
  }
}
dependencies {
  implementation 'com.squareup.okhttp3:okhttp:4.7.2' ❷
  ...
}
Listing 11-11

build.gradle (Module:app)

Insert this block to enable View binding. Setting the viewBinding to true allows View binding for this module.

Insert this dependency so we can use OkHttpClient.

You will need to sync the Gradle file after editing it.

Since Android Studio 3.6, you can already replace findViewById calls with View binding; when it’s enabled for a module, it generates a binding class for each XML layout file that the module contains. Each binding class contains references to the root view and all views that have an ID. The name of the binding class is generated by converting the XML file’s name to camel case and adding the word "Binding" to the end—for example, in our project, we only have activity_main.xml; so, a class called ActivityMainBinding will be generated for us.

Listing 11-12 shows the annotated use of View binding in the MainActivity class.
import androidx.appcompat.app.AppCompatActivity;
import okhttp3.OkHttpClient;
import okhttp3.Request;
import okhttp3.Response;
import android.os.Bundle;
import android.util.Log;
import android.view.View;
import android.widget.TextView;
import net.workingdev.ch11_threads.databinding.ActivityMainBinding;
import org.json.JSONException;
import org.json.JSONObject;
import java.io.IOException;
public class MainActivity extends AppCompatActivity {
  private final String TAG = getClass().getName();
  private TextView txtUserInfo;  ❶
  @Override
  protected void onCreate(Bundle savedInstanceState) {
    super.onCreate(savedInstanceState);
    final ActivityMainBinding binding = ActivityMainBinding.inflate(getLayoutInflater()); ❷
    View view = binding.getRoot(); ❸
    setContentView(view); ❹
    txtUserInfo = binding.textView; ❺
    binding.button.setOnClickListener(new View.OnClickListener() { ❻
      @Override
      public void onClick(View view) {
        Log.d(TAG, "Click");
        String username = binding.txtName.getText().toString(); ❼
        new RunBackground(username).start(); ❽
      }
    });
  }
}
Listing 11-12

MainActivity

I declared the TextView as a member because we will use this later, outside of the onCreate() method.

Call the inflate() method (statically) to create an instance of the binding class for MainActivity to use.

Get a reference of the root view by calling getRoot().

Instead of passing the name of the layout file (activity_main), pass the root view instead.

Let’s get a reference to the TextView object; this is where we will send the results of the GitHub API call.

Let’s set up a click listener for the Button.

Get the content of the EditText.

Then, instantiate the Thread object and kickstart it. We haven’t defined the Thread object yet; we will do that shortly. Listing 11-13 shows the RunBackground class implemented as an inner class in MainActivity.

public class MainActivity extends AppCompatActivity {
  private final String TAG = getClass().getName();
  private TextView txtUserInfo;
  @Override
  protected void onCreate(Bundle savedInstanceState) {
    super.onCreate(savedInstanceState);
    ...
  }
  class RunBackground extends Thread { ❶
    String userName;
    RunBackground(String userName) { ❷
      this.userName = userName;
    }
    public void run() {  ❸
      String userInfo = fetchUserInfo(userName); ❹
      Log.d(TAG, userInfo);
      Log.d(TAG,"Run in thread");
      try {
        final JSONObject jsonreader = new JSONObject(userInfo); ❺
        Log.d(TAG, jsonreader.toString());
        runOnUiThread(new Thread() { ❻
          public void run() {
            Log.d(TAG, "runOnUiThread");
            txtUserInfo.setText(jsonreader.toString()); ❼
          }
        });
      }
      catch(JSONException e) {
        Log.e(TAG, e.getMessage());
      }
    }
  }
  private String fetchUserInfo(String gitHubId) {
    ...
  }
}
Listing 11-13

RunBackground inner class

Let’s extend the Thread class because we want this to run in the background. We’re implementing this also as an inner class to have access to the members of the outer class (MainActivity).

Let’s take the GitHub username as a parameter to this class' constructor.

Override the run() method. Everything inside this method is what will run in the background.

Let’s call the fetchUserInfo() method.

The GitHub API will return the result as a String. If you need to work with the returned object as JSON, you need to use JSONObject, as shown here. This way, if you want to extract specific parts of the userInfo, you can make calls like userInfo.getString("id").

While you’re in a background thread, you cannot make calls to any UI element, for example, if you want to set the text of either TextView or an EditText, you won’t be able to do that. To make changes to the UI element while running in a background thread, you have to go back to the UI thread; and the way to do that is by calling the runOnUiThread() method. The runOnUiThread() method takes a Thread object as a parameter; override this Thread object’s run() method, and that is where you write the codes to make changes to the UI (as shown here).

Now we can write the results of the GitHub call to the TextView.

Now, run the application either in an emulator or a device and try to fetch your own GitHub info.

Summary

  • When you try to do too much on the main thread, the runtime may start dropping frame rates, which results in jank.

  • The UI thread is responsible for creating the UI elements, among other things. Don’t overburden this thread. If you need to do some time-consuming or resource-consuming tasks, spawn a background thread and do that task there.

..................Content has been hidden....................

You can't read the all page of ebook, please click here login for view all page.
Reset
52.15.63.145