Getting Android Studio
Configuring the IDE
Basic parts of the IDE
Developing Android applications wasn’t always done in Android Studio (AS). In the early days of Android, developers built apps using just the bare SDK, a bunch of command-line tools, and Ant build scripts (Apache Ant)—it was quite the old school; soon after, the Android Developer Tools (ADT) for Eclipse was released. Eclipse became the dominant tool for Android development until Android Studio came along.
Android Studio came in 2013. To be sure, it was still on beta, but the writing on the wall was clear; it was going to be the official development tool for Android development. Android Studio is based on JetBrains’ IntelliJ; it’s a commercial Java IDE, which also has a nonpaid or community version. It was the community version of IntelliJ that served as the basis for Android Studio.
Setup
At the time of writing, Android Studio 4 was on preview release; the version I used for this book was Canary 9. Android Studio 4 might be on stable release by the time you’re reading this book; hopefully, the diagrams and screenshots won’t be too different by then. To download Android Studio 4 (preview release), you can go to https://developer.android.com/studio/preview.
The installer is available for Windows (both 32- and 64-bit), macOS, and Linux. I ran the installation instructions on macOS (Catalina), Windows 10 64-bit, and Ubuntu 18. I work primarily in a macOS environment, which explains why most of the screen grabs for this book look like macOS. Android Studio looks, runs, and feels (mostly) the same in all three platforms, with very minor differences like key bindings and the main menu bar in macOS.
Microsoft Windows 7, 8, or 10 (32- or 64-bit)
macOS 10.10 (Yosemite or higher)
Linux (Gnome or KDE Desktop), Ubuntu 14.04 or higher; 64-bit capable of running 32-bit applications
GNU C Library (glibc 2.19 or later) if you’re on Linux
4GB RAM minimum (8GB or more recommended)
2GB of available HDD space (4GB is recommended)
1280 x 800 minimum screen resolution
The preceding list came from the official Android website (https://developer.android.com/studio); of course, more is better.
There are no prerequisite software for Android Studio. It used to be that you needed to install a Java Development Kit prior to installing Android Studio; starting from Android Studio 2.2, the installer includes an embedded OpenJDK—you no longer need to bother with installing a separate JDK.
Download the installer from https://developer.android.com/studio/, and get the proper binary file for your platform.
- 1.
Unpack the installer zipped file.
- 2.
Drag the application file into the Applications folder.
- 3.
Launch Android Studio.
Android Studio will prompt you to import some settings if you have a previous installation. You can import that—it’s the default option.
If you have an existing installation of Android Studio, you can keep using that version and still install the preview edition. Android Studio 4 can coexist with your existing version of Android Studio; its settings will be kept in a different directory.
- 1.
Unzip the installer file.
- 2.
Move the unzipped directory to a location of your choice, for example, C:UsersmynameAndroidStudio.
- 3.
Drill down to the “AndroidStudio” folder; inside it, you’ll find “studio64.exe”. This is the file you need to launch. It’s a good idea to create a shortcut for this file—if you right-click studio64.exe and choose “Pin to Start Menu,” you can make Android Studio available from the Windows Start menu; alternatively, you can also pin it to the Taskbar.
The Linux installation requires a bit more work than simply double-clicking and following the installer prompts. In future releases of Ubuntu (and its derivatives), this might change and become as simple and frictionless as its Windows and macOS counterparts, but for now, we need to do some tweaking. The extra activities on Linux are mostly because AS needs some 32-bit libraries and hardware acceleration.
The installation instructions in this section are meant for Ubuntu 64-bit and other Ubuntu derivatives, for example, Linux Mint, Lubuntu, Xubuntu, Ubuntu MATE, and so on. I chose this distribution because I assumed that it is a very common Linux flavor; hence, the readers of this book will be using that distribution. If you are running a 64-bit version of Ubuntu, you will need to pull some 32-bit libraries in order for AS to function well.
- 1.
Unpack the downloaded installer file. You can unpack the file using command-line tools or using the GUI tools—you can, for example, right-click the file and select the “Unpack here” option, if your file manager has that.
- 2.
After unzipping the file, rename the folder to “AndroidStudio”.
- 3.
Move the folder to a location where you have read, write, and execute privileges. Alternatively, you can also move it to /usr/local/AndroidStudio.
- 4.
Open a terminal window and go to the AndroidStudio/bin folder, then run ./studio.sh.
- 5.
At first launch, Android Studio will ask you if you want to import some settings; if you have installed a previous version of Android Studio, you may want to import those settings.
Configuring Android Studio
- 1.
Get some more software that we need so we can build programs that target specific versions of Android.
- 2.
Make sure we have all the tools we need.
- 3.
(optionally) change the way we get updates.

Go to “Preferences” from Android Studio’s opening dialog
SDK Platforms
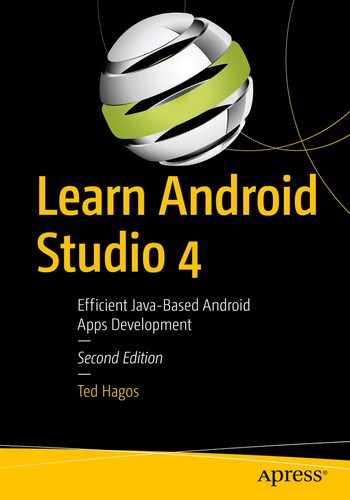
When you get to the SDK window, enable the "Show Package Details" option so you can see a more detailed view of each API level. We don’t need to download everything in the SDK window. We will get only the items we need.
SDK levels or platform numbers are specific versions of Android. Android 10 is API level 29, Android 9 or “Pie” is API level 28, Android 8 or “Oreo” is API levels 26 and 27, and Nougat is API levels 24 and 25. You don’t need to memorize the platform numbers, at least not anymore because the IDE shows the platform number with the corresponding Android nickname.
Download the API levels you want to target for your applications, but for the purpose of this book, please download API level 29 (Android 10). That’s what we will use for the sample projects. Make sure that together with the platforms, you will also download "Google APIs Intel x86 Atom_64 System Image." We will need those when we get to the part where we test run our applications.
Choosing an API level may not be a big deal right now because at this point, we’re simply working with practice apps. When you plan to release your application to the public, you may not be able to take this choice lightly. Choosing a minimum SDK or API level for your app will determine how many people will be able to use your application. At the time of writing, 17% of all Android devices are using “Marshmallow,” 19% for “Nougat,” 29% for “Oreo,” and only 10% for “Pie”; the stats for Android 10 were not out yet. These stats are from the dashboard page of the official Android website. It’s a good idea to check these statistics from time to time; you can find it here: http://bit.ly/droiddashboard.
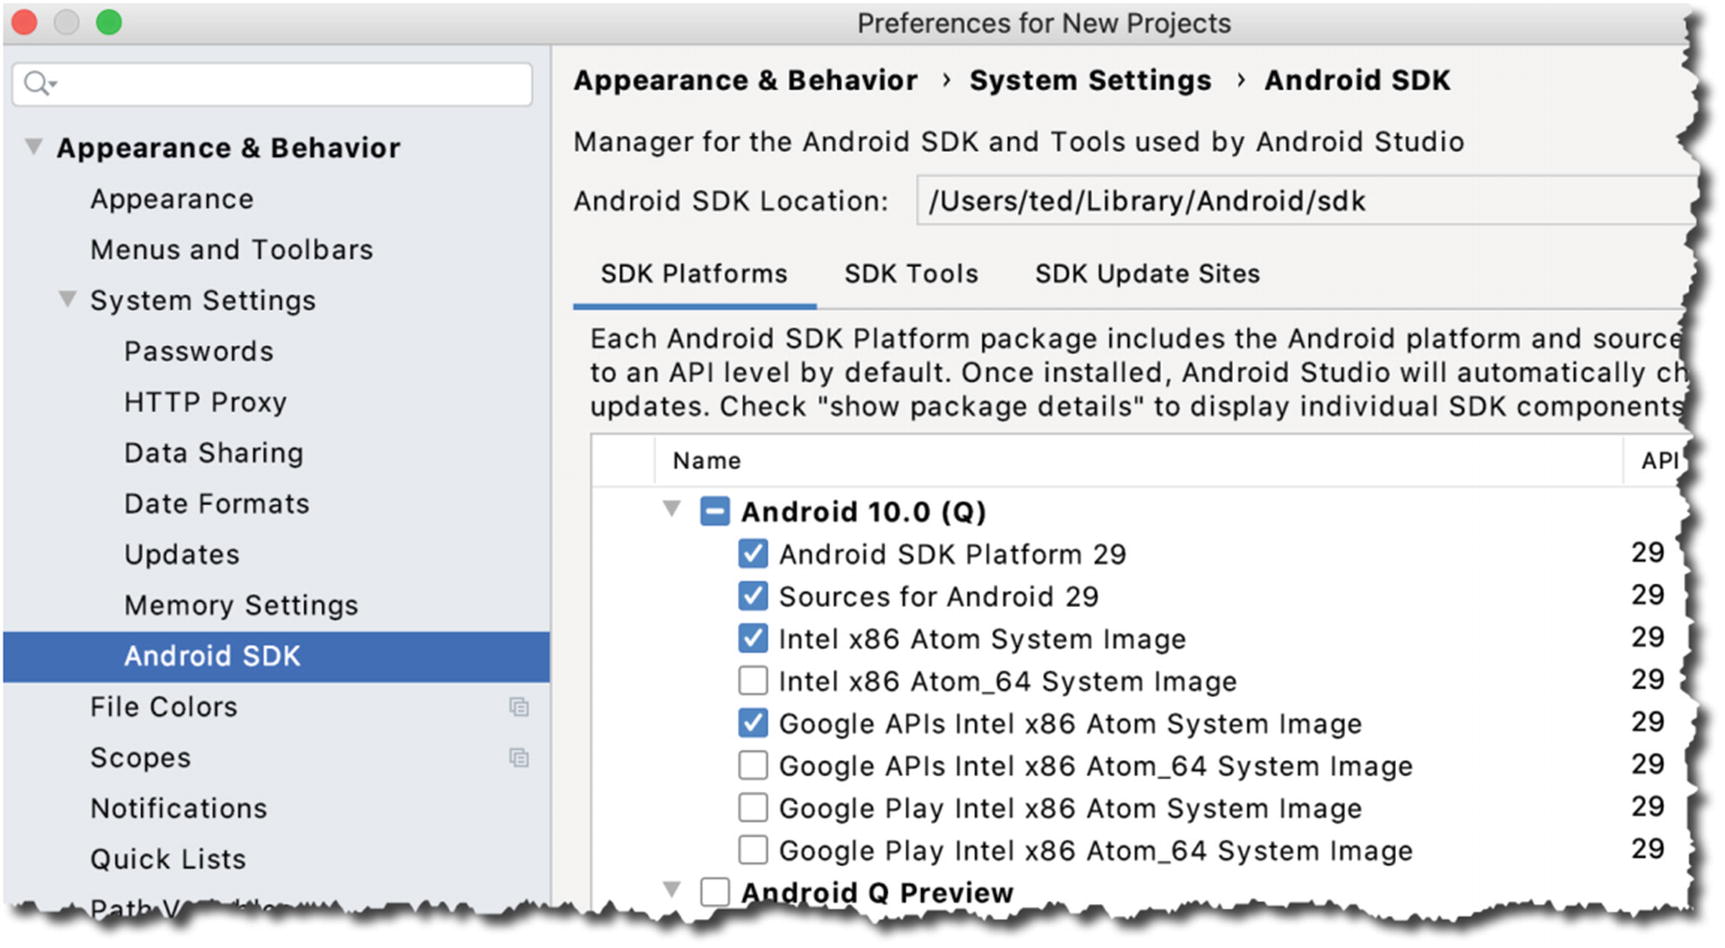
SDK Tools
Android SDK Build Tools
Android SDK Platform Tools
Android SDK Tools
Android Emulator
Support Repository
HAXM Installer
If you are on the Linux platform, you cannot use HAXM even if you have an Intel processor. KVM will be used in Linux instead of HAXM.
Once you’re happy with your selection, click the “OK” button to start downloading the packages.
Hardware Acceleration
As you create applications, it will be useful to test and run it sometimes in order to get immediate feedback and find out if it is running as expected or if it is running at all. To do this, you will use either a physical or a virtual device. Each option has its pros and cons, and you don’t have to choose one over the other; in fact, you will have to use both options eventually.
An Android Virtual Device or AVD is an emulator where you can run your apps. Running on an emulator can sometimes be slow; this is the reason why Google and Intel came up with HAXM. It is an emulator acceleration tool that makes testing your app a bit more bearable. This is definitely a boon to developers. That is if you are using a machine that has an Intel processor which supports virtualization and that you are not on Linux. But don’t worry if you’re not lucky enough to fall on that part of the pie, there are ways to achieve emulator acceleration in Linux, as we’ll see later.
macOS users probably have it the easiest because HAXM is automatically installed with Android Studio. They don’t have to do anything to get it; the installer took care of that for them.
Downloading it from https://software.intel.com/en-us/android. Install it like you would any other Windows software, double-click, and follow the prompts.
Alternatively, you can get HAXM via the SDK manager; this is the recommended method.
For Linux users, the recommended software is KVM instead. KVM (Kernel-based Virtual Machine) is a virtualization solution for Linux. It contains virtualization extensions (Intel VT or AMD-V).
- 1.
Make sure that virtualization is enabled on your BIOS or UEFI settings. Consult your hardware manual on how to get to these settings. It usually involves shutting down the PC, restarting it, and pressing an interrupt key like F2 or DEL as soon as you hear the chime of your system speaker, but like I said, consult your hardware manual.
- 2.
Once you made your changes, and rebooted to Linux, find out if your system can run virtualization. This can be accomplished by running the following command from a terminal: egrep –c '(vmx|svm)' /proc/cpuinfo. If the result is a number higher than zero, that means you can go ahead with the installation.
Commands to install KVM
You may have to reboot the system to complete the installation.
Hopefully, everything went well, and you now have a proper development environment. In the next chapter, we will familiarize ourselves with the various parts of Android Studio IDE.
Summary
Android Studio is based on the community edition of IntelliJ. If you have used IntelliJ before, all the techniques and keyboard shortcuts you’ve learned can be used in Android Studio.
You can use different versions of Android Studio side by side; you don’t have to uninstall previous editions of Android Studio in order to try out the Preview edition.
Install the hardware accelerator (HAXM) if you can; it will make your testing activities a lot more pleasant. If you’re on Linux, use the Kernel-based Virtual Machine (KVM) instead of HAXM.