
Types of testing
Unit testing
Testing basics
About instrumented testing
How to create UI test interactions
Basic test interactions
Implementing test verifications
Test recording
We’ve done a bit of programming work in the previous chapters. Next, we go through some testing concepts and techniques. The development lifecycle goes through a testing phase to find all errors and inconsistencies in the code. A polished app doesn’t have rough edges. We need to test it, debug it, and make sure it doesn’t hog computing resources.
Types of Testing
Functional testing. Functional testing is a standard way of testing an app. It’s called functional because we’re testing the app’s features (also known as functionalities) as they are specified in the requirement specification—the requirement specification is something you or a business analyst would have written during the planning stages of the app. The requirement specifications would have been written in a document (usually called functional requirement specification). Examples of what you might find in a functional specification are “user must log in to the server before entering the app,” “user must provide a valid email for registration,” and so on. The testers, usually called QA or QC (short for quality assurance and quality control, respectively), are the ones who carry out these tests. They will create test assets, craft a test strategy, execute them, and eventually report on the executions’ results. Failing tests are usually assigned back to the developer (you) to fix and resubmit. What I’m describing here is a typical practice for a development team that has a separate or dedicated testing team; if you’re a one-person team, the QA will most likely be you as well. Testing is an entirely different skill, and I strongly encourage you to enlist other people, preferably those who have experience in testing, to help you out.
Performance testing. You could probably guess what this type of testing does just from its name. It pushes the app to its limits and sees how it performs under stress. What you want to see here is how the app responds when subjected to above-normal conditions. Soak testing or endurance testing is a kind of performance testing; usually, you leave the app running for a long time and in various modes of operation, for example, leave the app for a long time while it’s paused or at the title screen. You’re trying to find here how the app responds to these conditions and how it utilizes system resources like the memory, CPU, network bandwidth, and so on; you will use tools like the Android Profiler to carry out these measurements.
Another form of performance testing is volume testing; if your app uses a database, you might want to find out how it will respond when data is loaded to the database. What you’re checking is how the system responds under various loads of data.
Spike testing or scalability testing is also another kind of performance testing. If the app depends on a central server, this test will usually raise the number of users (device endpoints) connected to the central server. You’d want to observe how a spike in the number of users affects the user experience—is the app still responsive, was there an effect on frames per second, are there lags, and so on.
Compatibility testing is where you check how the app behaves on different devices and configurations of hardware/software. This is the situation where AVDs (Android Virtual Devices) will come in handy; because AVDs are simply software emulators, you don’t have to buy different devices. Use the AVDs whenever you can. Some apps will be difficult to test reliably on emulators; when you’re in that situation, you have to fork over money for testing devices.
Compliance or conformance testing. If you’re building a game app, this is where you check the game against Google Play guidelines on apps or games; make sure you read Google Play’s Developer Policy Center at https://bit.ly/developerpolicycenter. Ensure you are also acquainted with PEGI (Pan European Game Information) and ESRB (Entertainment Software Rating Board). If the game app has objectionable content that’s not aligned with a specific rating, they need to be identified and reported. Violations could be a cause for rejection, which may result in costly rework and resubmission. If you’re collecting data from the users, you might want to audit the app to check if it is compliant with applicable data privacy regulations.
Localization testing is essential, especially if the app is for global markets. App titles, contents, and texts need to be translated and tested in the supported languages.
Recovery testing. This is taking edge case testing to another level. Here, the app is forced to fail, and you’re observing how the application behaves as it fails and how it comes back after it fails. It should give you insight into whether you’ve written enough try-catch-finally blocks or not. Apps should fail gracefully, not abruptly. Whenever possible, runtime errors should be guarded by try-catch blocks; when the exception happens, try to write a log and save the app’s state.
Penetration or security testing. This kind of testing tries to discover the weaknesses of the app. It simulates the activities that a would-be attacker will do to circumvent all the security features of the app; for example, if the app uses a database to store data, especially user data, a pen tester (a professional who practices penetration testing) might use the app while Wireshark is running—Wireshark is a tool that inspects packets; it’s a network protocol analyzer. If you stored passwords in clear text, it would show up in these tests.
Sound testing. If your app uses sounds, check if any errors are loading the files; also, listen to the sound files if there’s a cracking sound and so on.
Developer testing. This is the kind of testing you (the programmer) do as you add layers and layers of code to the app. This involves writing test codes (in Java as well) to test your actual program. This is known as unit testing. Android developers usually perform JVM testing and instrumented testing; we’ll discuss unit testing more in the following sections.
Unit Testing
Unit testing is a functional testing that a developer performs, not the QA or QC. A unit test is simple; it’s a particular thing that a method might do or produce. An application typically has many unit tests because each test is a very narrowly defined set of behavior. So, you’ll need lots of tests to cover the complete functionality. Android developers usually use JUnit to write unit tests.
JUnit is a regression testing framework written by Kent Beck and Erich Gamma. You might remember them as the one who created extreme programming and the other from Gang of Four (GoF, Design Patterns), respectively, among other things.
Java developers have long used JUnit for unit testing. Android Studio comes with JUnit and is very well integrated into it. We don’t have to do much by way of setup. We only need to write our tests.
JVM Test vs. Instrumented Test
If you look at any Android application, you’ll see that it has two parts: a Java-based and an Android-based one.

JVM test and instrumented test in Android view

JVM test and instrumented test in Project view
As you can see from either Figure 13-1 or 13-2, Android Studio went the extra mile to generate sample test files for both the JVM and instrumented tests. The example files are there to serve as just quick references; it shows us what unit tests might look like.
A Simple Demo
Factorial.java
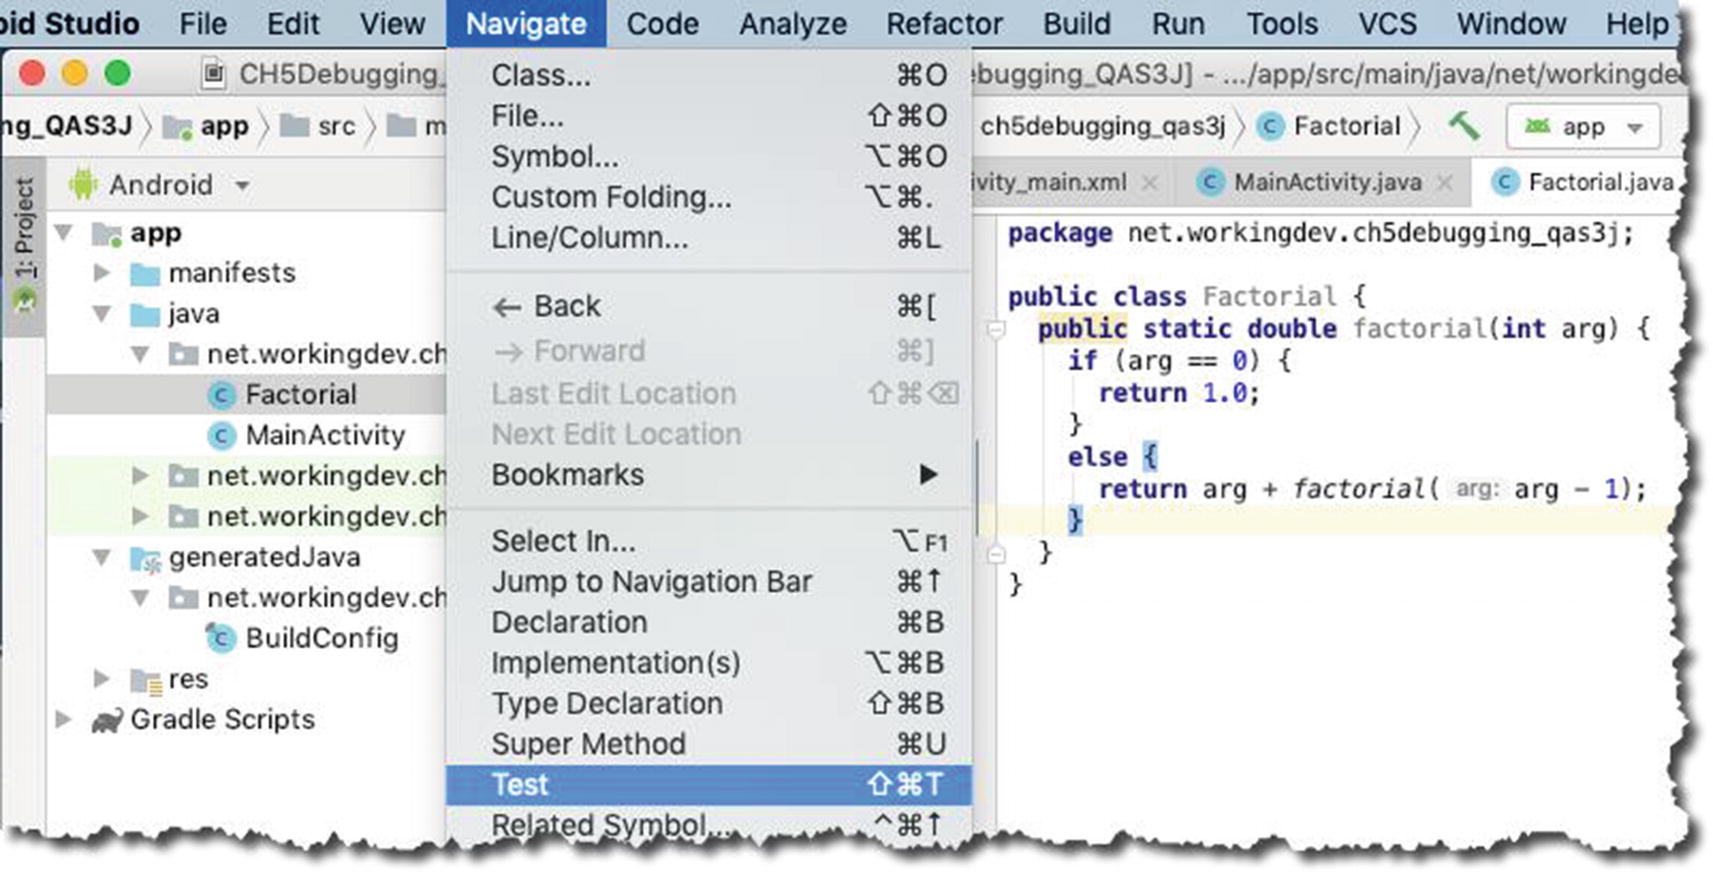
Create a test for Factorial.java

Create New Test pop-up
Right after creating a new test, you’ll see another pop-up dialog.
❶ | You can choose which testing library you want to use. You can choose JUnit 3, 4, or 5. You can even choose Groovy JUnit, Spock, or TestNG. I used JUnit4 because it comes installed with Android Studio. |
❷ | The convention for naming a test class is “name of the class to test” + “Test.” Android Studio populates this field using that convention. |
❸ | Leave this blank; we don’t need to inherit from anything. |
❹ | We don’t need setUp() and tearDown() routines, for now, leaving them unchecked. |
❺ | Let’s check the factorial() method because we want to generate a test for this. |

Create FactorialTest

Choose Destination Directory
❶ | The file Factorial.java was created under the test folder. |
❷ | A factorial() method was created, and it’s annotated as @Test. This is how JUnit will know that this method is a unit test. You can prepend your method names with “test,” for example, testFactorial(), but that is not necessary; the @Test annotation is enough. |
❸ | This is where we put our assertions. |

FactorialTest.java in Project view and main editor
See how simple that was? Creating a test case in Android Studio doesn’t involve that much in terms of setup and configuration. All we need to do now is write our test.
Implementing the Test
Common assert methods
Method | Description |
|---|---|
assertEquals() | Returns true if two objects or primitives have the same value |
assertNotEquals() | The reverse of assertEquals() |
assertSame() | Returns true if two references point to the same object |
assertNotSame() | Reverse of assertSame() |
assertTrue() | Tests a Boolean expression to see if it’s true |
assertFalse() | Reverse of assertTrue() |
assertNull() | Tests for a null object |
assertNotNull() | Reverse of assertNull() |
FactorialTest.java
Our FactorialTest class has only one method because it’s for illustration purposes only. Real-world codes would have many more methods than this, to be sure.
Notice that each test (method) is annotated by @Test. This is how JUnit knows that factorial() is a test case. Notice also that assertEquals() is a method of the Assert class, but we’re not writing the fully qualified name here because we’ve got a static import on Assert—it certainly makes life easier.
❶ | The Expected value is your control data; this is usually hard-coded in the test. |
❷ | The Actual value is what your method returns. If the expected value is the same as the actual value, the assertEquals() passes—your code behaves as expected. |
❸ | Delta is intended to reflect how close the actual and expected values can be and still be considered equal. Some developers call this parameter the “fuzz” factor. When the difference between the expected and actual values is higher than the “fuzz factor,” then assertEquals() will fail. I used 0.0 here because I don’t want to tolerate any kind of deviation. You can use other values like 0.001, 0.002, and so on; it depends on your use case and how much fuzz your app is willing to tolerate. |
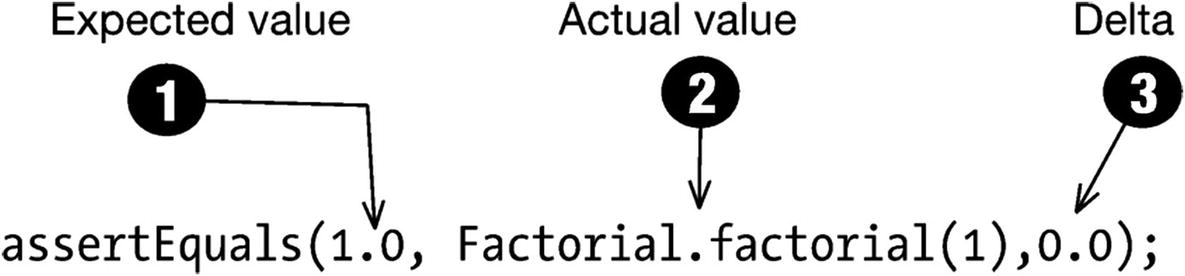
assertEquals method
Now, our code is complete. You can insert a couple more asserts in the code so you can get into the groove of things if you prefer.
There are a couple of things I did not include in this sample code. I did not override the setUp() and tearDown() methods because I didn’t need it. You will typically use the setUp() method to set up database connections, network connections, and so on. Use the tearDown() method to close whatever it is you opened in the setUp().
Now, we’re ready to run the test.
Running a Unit Test

FactorialTest.java in the main editor
Similarly, you can also run the main menu bar test and go to Run ➤ Run.
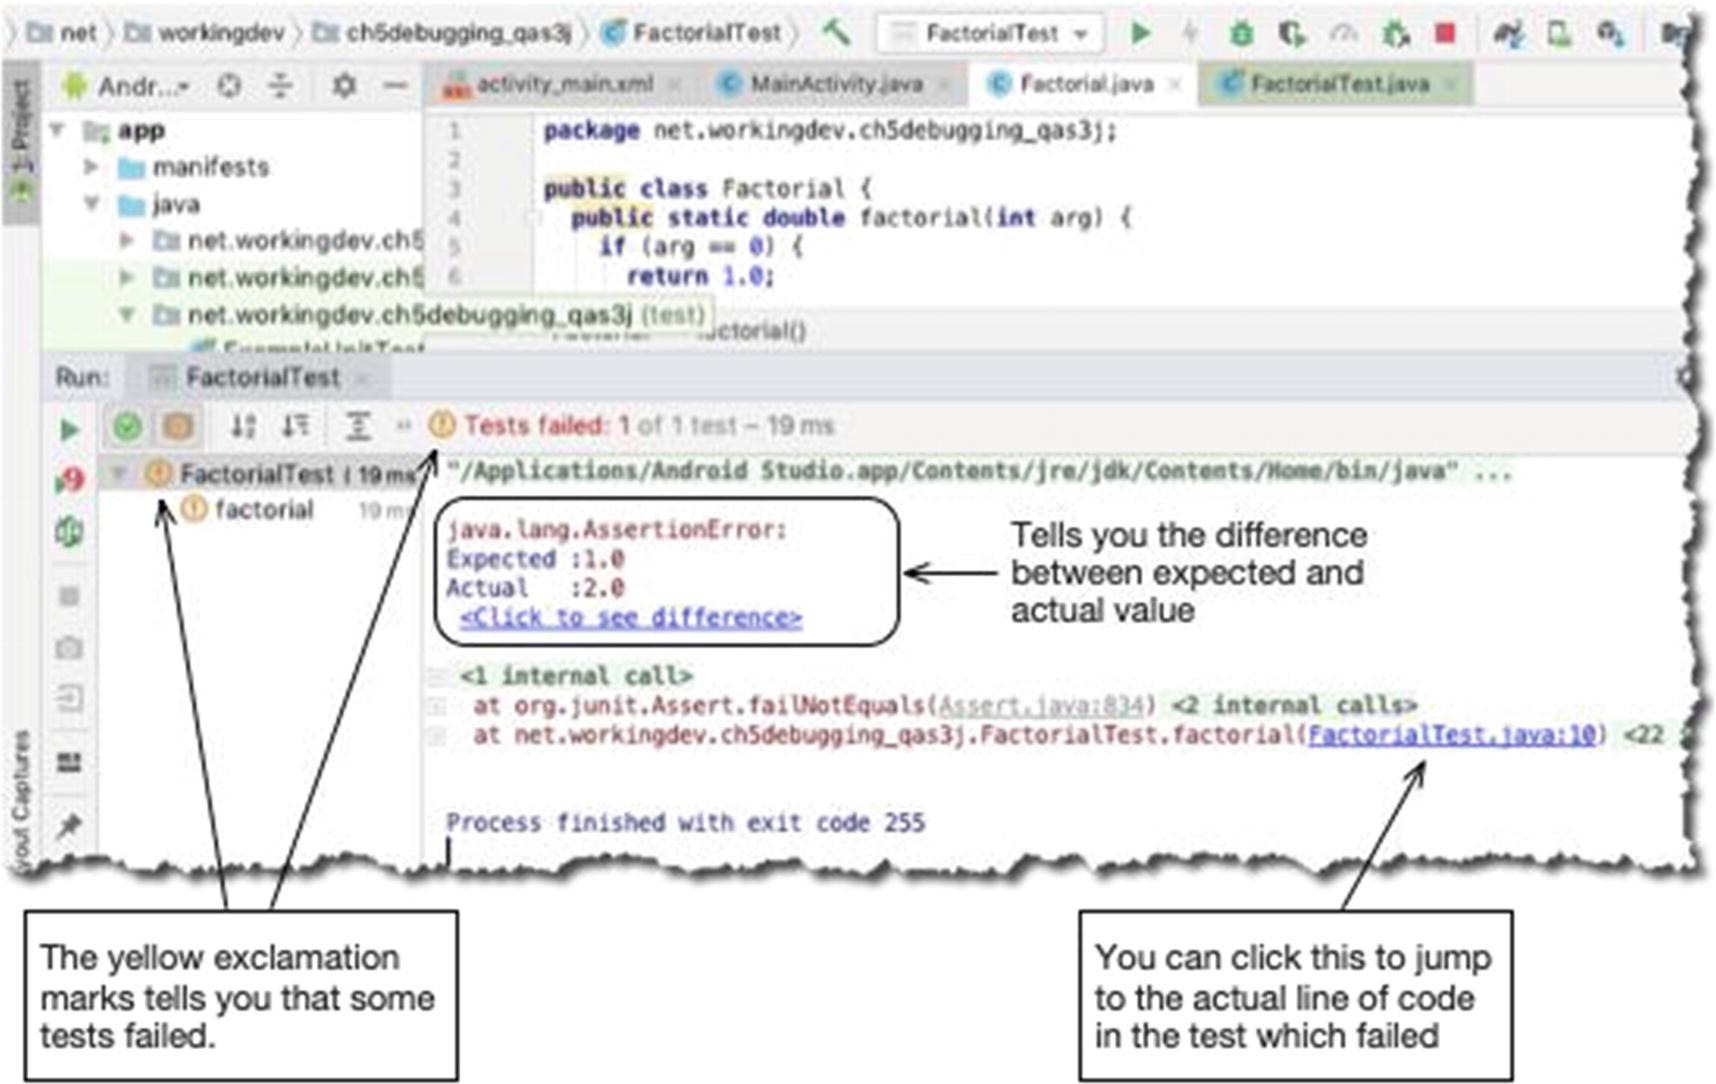
Result of running FactorialTest.java
Android Studio gives you plenty of cues so you can tell if your tests are passing or failing. Our first run tells us that there’s something wrong with Factorial.java; the assertEquals() has failed.
When a test fails, it’s best to use the debugger to investigate the code. FactorialTest.java is no different than any other class in our project; it’s just another Java file; we can debug it. Put some breakpoints on your test code’s strategic places, and then instead of “running” it, run the “debugger” so you can walk through it.
Our test failed because the factorial of 1 isn’t 2, it’s 1. If you look closer at Factorial.java, you’ll notice that the factorial value isn’t calculated correctly.
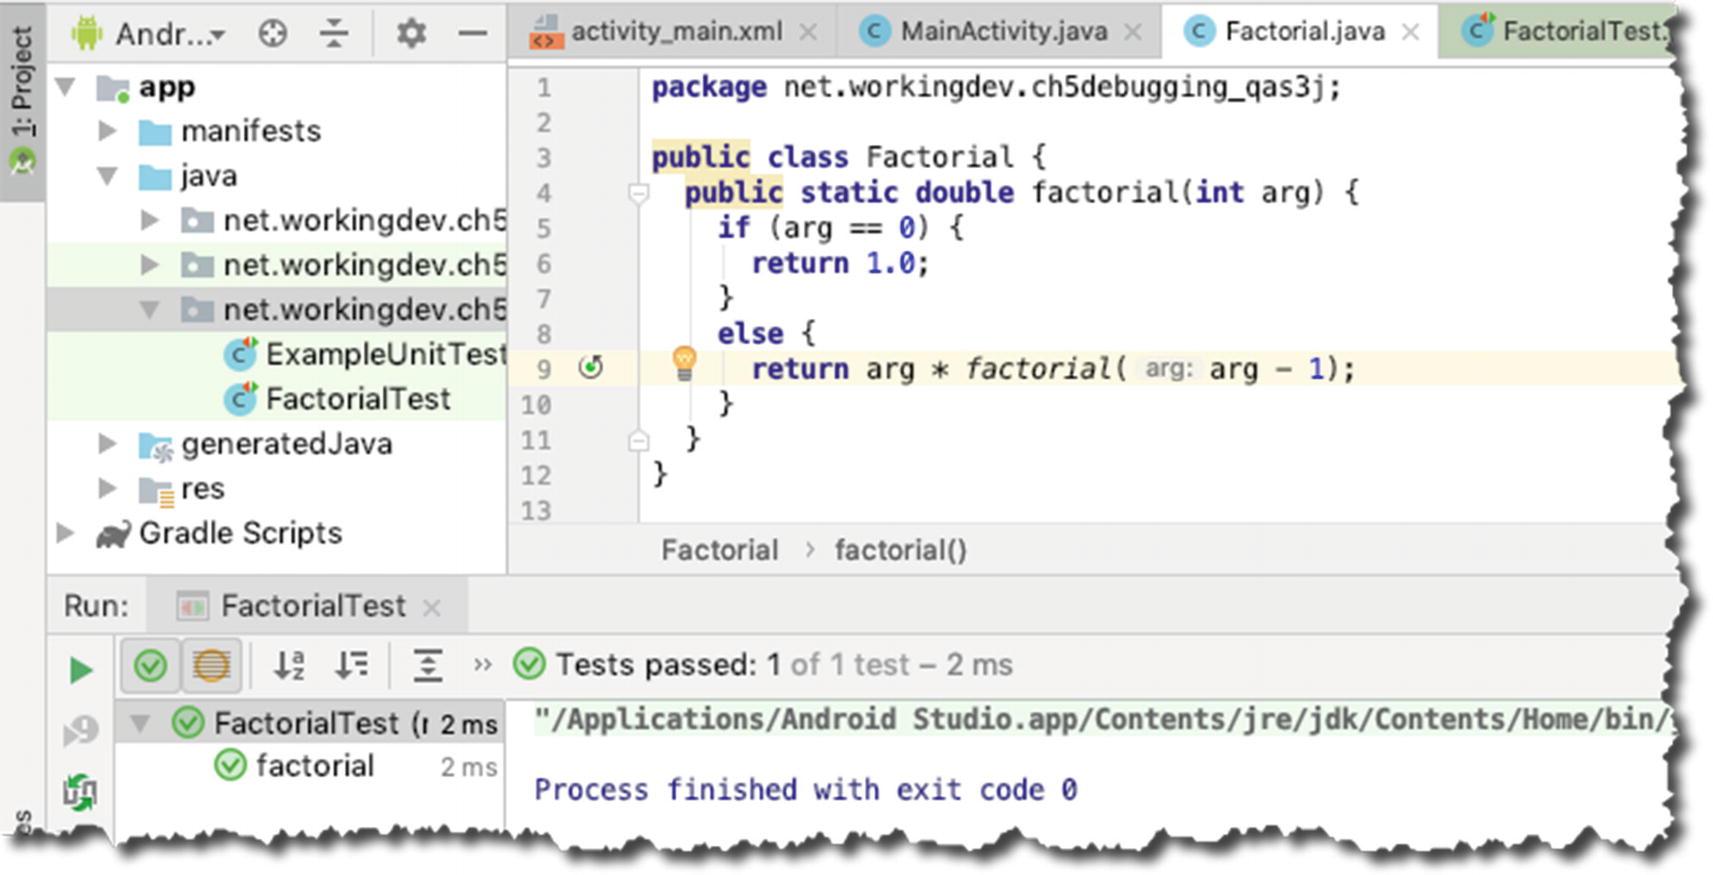
Successful test
Instead of yellow exclamation marks, we now see green checkmarks. Instead of seeing “Test failed,” we now see “Test passed.” Now we know that our code works as expected.
Instrumented Testing
Unit testing that interacts with the Android platform is known as instrumented testing; we will use the Espresso framework to do this.
Espresso is a testing framework for Android to make it easy to write reliable and concise user interface tests. Google released the Espresso framework in 2013. Since its 2.0 release, Espresso became part of the Android Support Repository.
Espresso automatically synchronizes your test actions with the user interface of your application. The framework also ensures that your activity is started before the tests run. It also lets the test wait until all observed background activities have finished.
Match—Use a matcher to target a specific component, for example, a button or textview. A ViewMatcher lets you find a View object in the hierarchy.
Act—Use a ViewAction object to perform an action, for example, a click, on a targeted View object.
Assert—Use an assertion on the state of a View.
sampleTest
❶ | Use a ViewMatcher to find a View object. We’re looking for a View with an id of button. Remember that when you’re using onView(), Espresso waits until all synchronization conditions are met before performing the corresponding UI action. |
❷ | When we find it, use a ViewAction to do something with it; in this case, we want to click it. |
❸ | Once again, we use a ViewMatcher to find a View object; this time, we’re trying to find a TextView with an id of textview. |
❹ | When we find it, we want to check if its text property matches “Hello World.” |
Setting Up a Simple Test
activity_main.xml
MainActivity
The onClick() method in MainActivity tries to get the Button’s id that got clicked and routes program logic according to that. If btnhello were clicked, we would set the text content of the TextView to “hello,” and if btnworld were clicked, we’d set the content to “world”—it’s simple enough. To verify this behavior, we can set up an instrumented test.
MainActivityTest
❶ | You’d want to import the Espresso matchers, actions statically, and asserts so you won’t have to qualify them later in the code fully. |
❷ | This just intercepts our test method calls and makes sure that the Activity is launched before we perform any test. |
❸ | You need to annotate each test method with @Test. |
❹ | Find the btnhello object using the withId() method. |
❺ | Then we simulate a click using a ViewAction.click(). |
❻ | Then we find the TextView, using a withId() method again. |
❼ | Finally, we assert if the TextView contains the text “hello.” |
Click the arrows in the IDE gutter.
Right-click the test and use the context-sensitive menu, then choose “Run MainActivityTest.” or
Go to the main menu bar, choose Run ➤ Run, then select MainActivityTest.
Recording Espresso Tests

Record Espresso Test
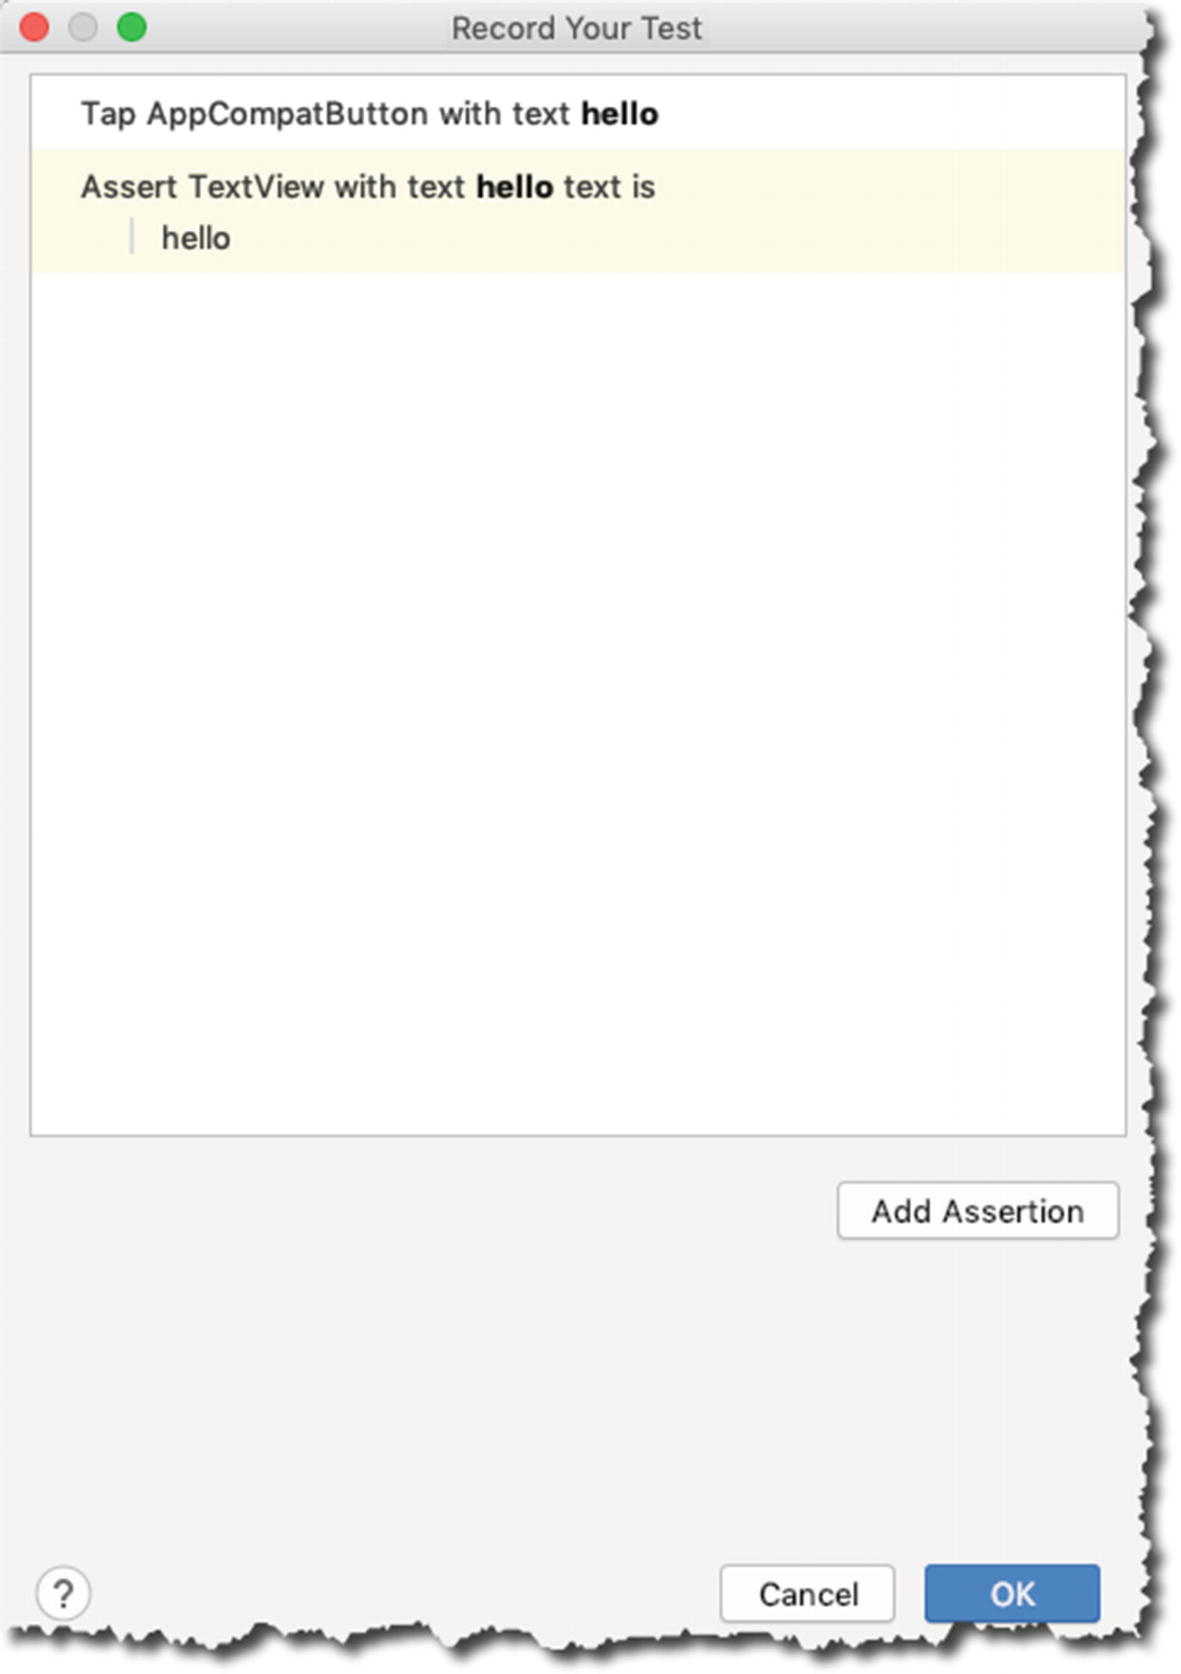
❶ | This section shows you each interaction you had with the app. At this point, I clicked the app once only; I clicked the “HELLO” button. |
❷ | This section is the ViewMatcher but done visually. If you click the TextView, like what I did here, it goes over as an item to the “Edit Assertion” section. |
❸ | The TextView is selected here because I clicked it in the ViewMatcher section (item 2). |
❹ | This is where you choose the assertion. In this case, we’re merely using the “text is.” |
❺ | This shows the actual value of the TextView we’d like to assert. |

Espresso recorder
Espresso recorder, assertion saved
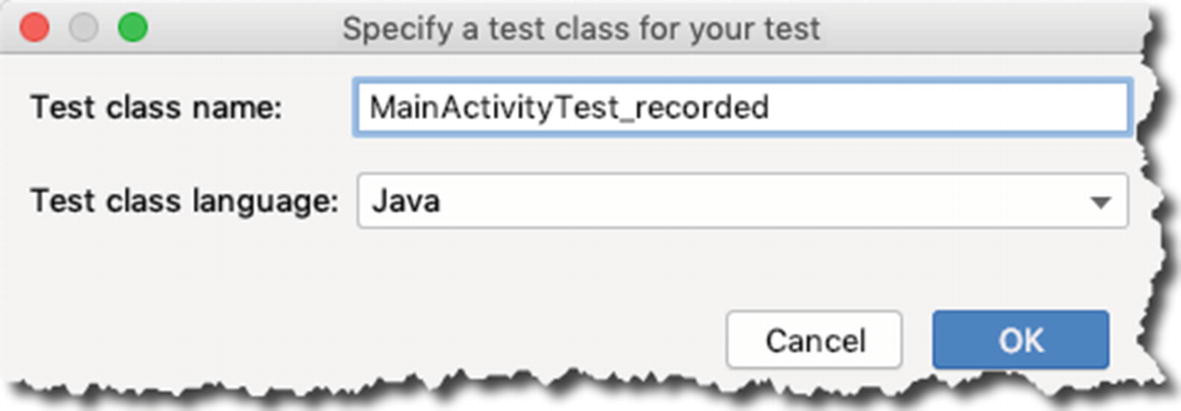
Espresso test, test saved
When you go to the src/androidTest folder, you’ll find the newly generated test class from your recording. You can now run the generated test, the same way you ran MainActivityTest earlier.
Two factoids about Espresso: (1) The Espresso recorder is one of the most used tools when using Espresso, according to Android Studio analytics; (2) Espresso recorder was originally named “cassette.”
More on Espresso Matchers
CursorMatchers—You can use this for Android Adapter Views that are backed by Cursors to match specific data rows.
LayoutMatchers—To match and detect typical layout issues, for example, TextViews that have ellipsis or multiline texts.
RootMatchers—To match Root objects that are dialogs or Roots that can receive touch events.
PreferenceMatchers—To match Android Preferences and let us find View components based on their key, summary text, and so on.
BoundedMatchers—To create your custom matcher for a given type.
Its value—You can use the withText() method to find a View that matches a certain String expression.
The number of its child—Using the hasChildCount() method, you can match a View with a particular child count.
Its class name—Using the withClassName() method
Enabled—By using the isEnabled() method
Focusable—By using the isFocusable() method
Displayed—isDisplayed()
Checked—isChecked()
Selected—isSelected()
There are plenty more methods you can use in the ViewMatchers class, so make sure to check them out at https://developer.android.com/reference/android/support/test/espresso/matcher/ViewMatchers.
Espresso Actions
clearText()
closeSoftKeyboard()
doubleClick()
longClick()
openLink()
pressBack()—Presses the back button
replaceText(String arg)
swipeDown()
swipeRight()
swipeUp()
typeText(String arg)
There are more actions available, so make sure you visit the API documentation for the ViewAction object.
Before we close the chapter, make sure you visit the official documentation for Espresso on the Android Developers website: https://bit.ly/androidstudioespresso; we’ve only scratched the surface of Espresso here.
Summary
We’ve talked about various kinds of testing you can do for your apps; you don’t have to do them all, but make sure you do the test that applies to your app.
Dev testing (unit testing) should be a core development task; try to get into the habit of writing your test cases and your actual codes.
Put JVM tests in src/test and put instrumented tests in src/androidTest.
You can use Espresso to create instrumented tests; the two things you’ll need in Espresso are the ViewMatchers and ViewActions.
The general steps for writing Espresso tests are as follows: (1) find the View object using ViewMatchers, (2) perform an action on the View with ViewActions, and (3) do your assertions.
An easy way to create Espresso tests is to use the Espresso recorder.