
Introduction to file I/O of Android
Internal vs. external storage
How to use internal storage
When you need to work with video, audio, json, or just plain text files, you can use the Java file I/O for local files. You’ll use the same File, InputStream, and OutputWriter, and other I/O classes in Java—if you’ve worked with them before. What will be different in Android is where you save them. In a Java desktop application, you can put your files practically anywhere you want. That’s not the case in Android. Just like in a Java web application, Android apps are not free to create and read files just about anywhere. There are certain places where your app has read and write access.
Internal and External Storage
Android differentiates between internal and external storage. The internal storage refers to that part of a flash drive that’s shared among all installed applications. The external storage refers to a storage space that can be mounted by the user—it’s typically an sdcard, but it doesn’t have to be. As long as the user can mount it, it could be anything; it could even be a portion of the internal flash drive.
Each option has pros and cons, so you need to consider your app’s needs and each option’s limitation. The following list shows some of these pros and cons.
The memory is always available to your app. There is no danger of a user unmounting the sdcard or whatever device. It’s guaranteed to be there always.
The storage space will be smaller in size than external storage because your app will be allocated only a portion of the flash storage shared by all the other apps. This was a concern in earlier versions of Android, but it’s less of a concern now. According to the Android Compatibility Definition, as of Android 6.0, an Android phone or tablet must have at least 1.5GB of nonvolatile space reserved for user space (the /data partition). This space should be plenty for most apps. You can read the compatibility definition here: https://bit.ly/android6compatibilitydefinition.
When your app creates files in this space, only your app can access them; except when the phone is rooted, but most users don’t root their phones, so generally it isn’t much of a concern.
When you uninstall your app, all the files it created will be deleted.
It typically has more space than internal storage.
It may not always be available, for example, when the user removes the sdcard or mounted as a USB drive.
All files here are visible to all applications and the user. Anybody and any app can create and save files here. They can also delete files.
When an app creates a file in this space, it can outlive the app; when you uninstall the app, the files it created won’t be removed.
Cache Directory
Whether you choose internal or external storage, you may still have to make one more decision on a file location. You can put your files on a cache directory or somewhere more permanent. The Android OS or third-party apps may reclaim files in a cache directory if space is needed. All files that are not in the cache directory are pretty safe unless you delete them manually. In this chapter, we won’t work with cache directories or external storage. We will use only the internal storage, and we’ll put the files in the standard location.
How to Work with Internal Storage
As said earlier, working with file storage in Android is like working with the usual classes in Java I/O. There are few options to use like openFileInput() and openFileOutput() or other ways to use InputStreams and OutputStreams. You just need to remember that these calls will not let you specify the file paths. You can only provide the filename; if you’re not concerned with that, go ahead and use them—it’s what we will use in this chapter. If, on the other hand, you need more flexibility, you can use the getFilesDir() or getCacheDir() to get a File object that points to the root of your file locations—use getCacheDir() if you want to work with the cache directories of the internal storage. When you have a File object, you can create your directory and file structure from there.
That’s the general lay of the territory when it comes to Android file storage. Again, in this chapter, we’ll only work with internal storage in the standard location (not cache).
- 1.
Decide on a filename
- 2.
Get a FileOutputStream object
- 3.
Convert your content to a ByteArray
- 4.
Write the ByteArray using the FileOutputStream
- 5.
Don’t forget to close the file
Saving String data to a file
❶ | Choose a filename. |
❷ | This is the String we want to save to a file. In a real app, you may be getting this from the contents of an EditText component. |
❸ | openFileOutput() returns a FileOutputStream; we need this object so we can write to a file. The first parameter of the call is the name of the file you want to create. The second parameter is a Context mode. We’re using MODE_PRIVATE because we want the file to be private to the app. We’re using the try-with-resources block here; this way, we don’t have to bother closing the file. When the block exits, it will close the file object for us automatically. |
❸ | The write method expects a ByteArray. So, we need to convert the String to a byte array. The getBytes() method should do that just fine. |
- 1.
Get a FileInputStream.
- 2.
Read from the stream, one byte at a time.
- 3.
Keep on reading until there’s nothing more to read. You’ll know when you’re at the end of the file if the value of the last byte you’ve read is -1. It’s time to stop by then.
- 4.
As you work your way to the end of the file, you need to store the bytes you’re taking from the stream into a temporary container. A StringBuilder or a StringBuffer should do the trick. Building a String object using the plus operator is wasteful and inefficient because Strings are immutable. Each time you use the plus operator, it creates a new String object; if your file has 2000 characters, you would have created 2000 String objects. This will be the case if you’re reading a text file. If you’re reading something else like an audio or video file, you’ll use a different data structure.
- 5.
When you reach the end of the file, stop reading. Do what you need to do with what you’ve read, and don’t forget to close it.
Reading from a file
❶ | We won’t be able to read the entire file in one fell swoop. We’ll read it by chunks. As we get some chunks, we’ll store them inside the StringBuilder object. |
❷ | openFileInput() returns a FileInputStream; this is the object we need to read from a file. The only parameter it takes is the name of the file to read. Using the try-with-resources here spares us from writing the boilerplate codes for closing files. |
❸ | The read() method reads a byte of data from the input stream and returns it as an integer. We need to keep reading from the stream one byte at a time until we reach the end of file (EOF) marker. When there are no more bytes to read from the stream, the EOF is marked as -1. We will use this as the condition for the while loop. Until the read() method doesn’t return -1, we keep on reading. |
❹ | The read() method returns an int; it’s the ASCII value of each letter in the file, returned as an integer. We have to cast it to a char before we can put it in the StringBuilder. |
❺ | When we run out of bytes to read, we’ll get out of the loop and get the String out of the StringBuilder. Now, you can work with the contents of the file as a String. |
EditText—This will allow us to input some text.
TextView—When we read data from a file, we will display the contents using this component.
Button—This will trigger a user action to save the contents of the EditText to a file.
app/res/layout/activity_main.xml
MainActivity
❶ | Declare the Button, EditText, TextView, the filename variable, and the TAG variable as class members; we will refer to them later. |
❷ | Initialize the TextView and EditText variables inside the onCreate() callback. |
❸ | Bind the Button to a listener object. When the Button is clicked, we will call a method that will contain the codes for saving the contents of txtinput to a file. |
saveData()
loadData()
onResume()
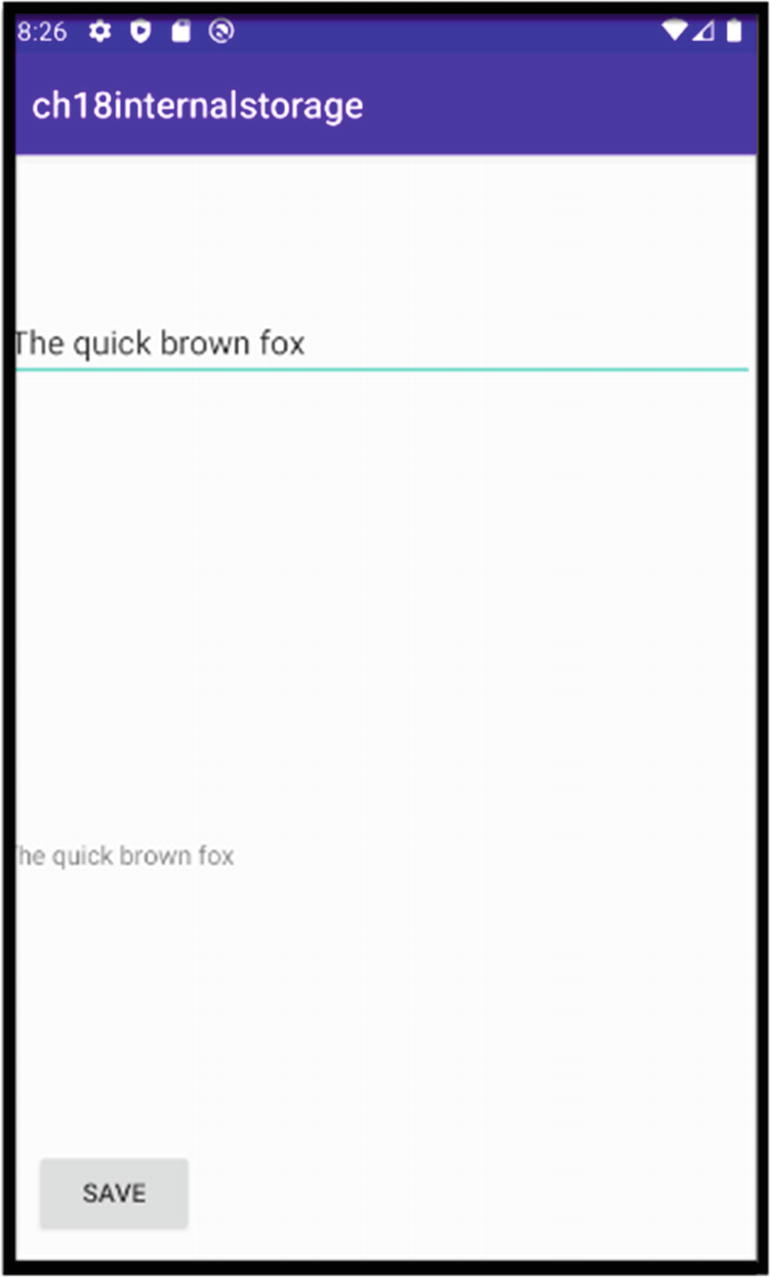
Our finished app
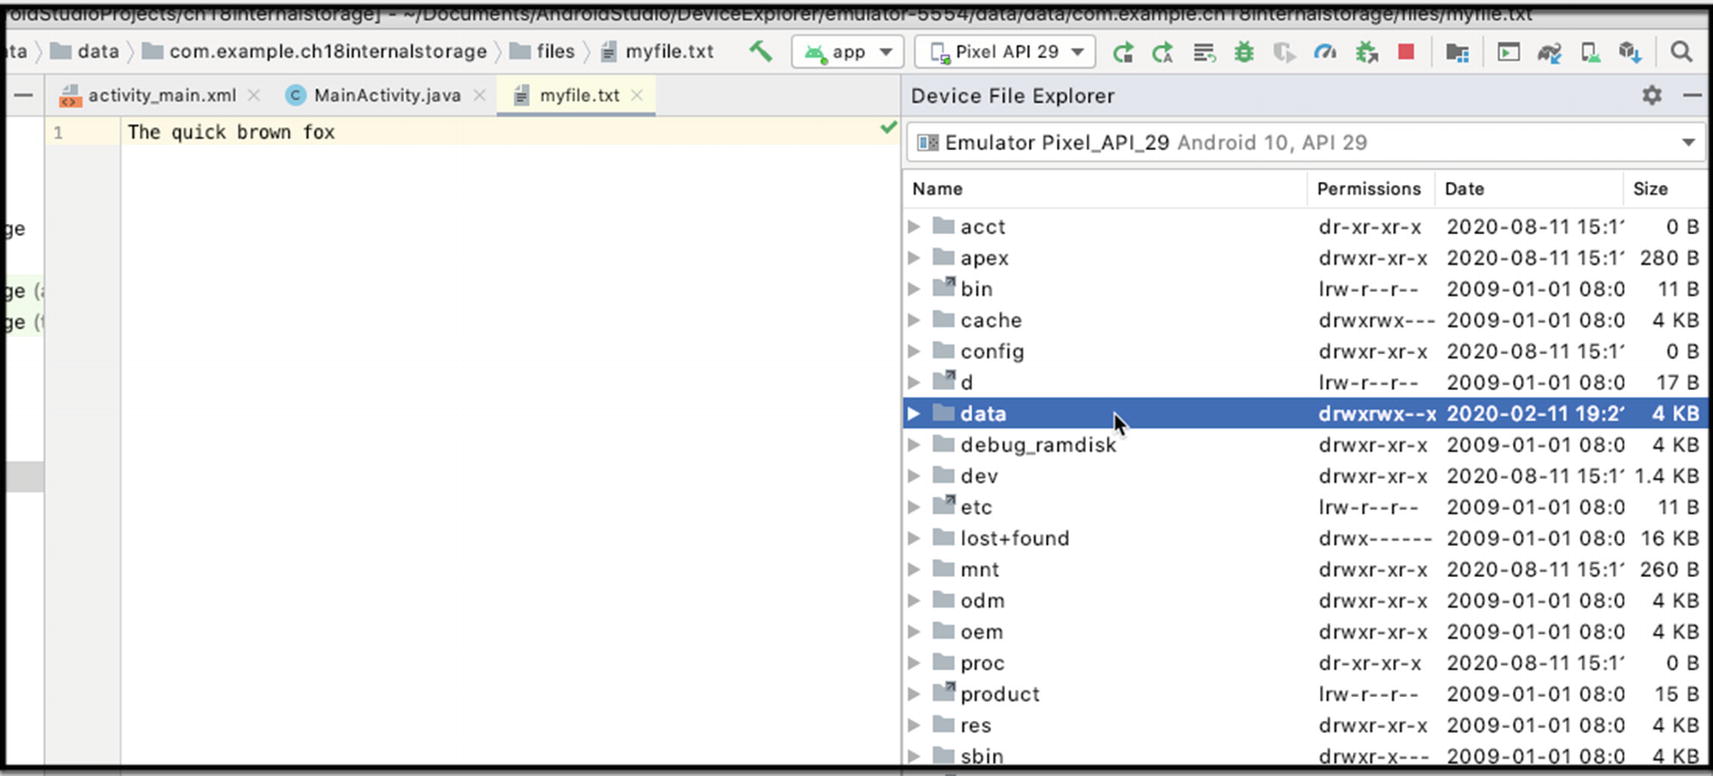
Device Explorer
Drill down to data ➤ data ➤ (package name of the app) ➤ files. You can view the file contents by double-clicking it; Android Studio will display the contents.
Summary
You can store your file either in the always-available-but-limited internal storage or in the larger-but-may-be-dismounted external storage.
Java I/O calls throw Exceptions; handle them appropriately.