
Lifecycle aware components
ViewModel
LiveData
Room
We saw a bit of the Architecture components in Chapter 10. In this chapter, we’ll look at some other libraries in the Architecture components, namely, Room; it’s a persistence library that sits on top of SQLite. If you’ve used an ORM before (Object Relational Mapper), you can think of Room as something similar to that.
In this chapter, we’ll also explore some more libraries in the Architecture components that go hand in hand with the Room libraries. We’ll look at lifecycle aware components, LiveData, and ViewModel; these, together with Room, are some of the libraries you’ll need to build a fluid and fluent database application.
Lifecycle Aware Components
Lifecycle aware components perform actions in response to a change in the lifecycle status of another component. If you’re familiar with the observable-observer design pattern, lifecycle aware components operate like that.
Lifecycle owner —A component that has a lifecycle like an Activity or a Fragment; it can enter various states in its lifecycle, for example, CREATED, RESUMED, PAUSED, DESTROYED, and so on. A lifecycle observer can tap into a lifecycle owner and be notified when the lifecycle status changes, for example, when the Activity enters the CREATED state—after it enters onCreate(), for example; I sometimes refer to the lifecycle owner as an observable.
Lifecycle observer —An object that listens to the changes in the lifecycle status of a lifecycle owner. It’s a class that implements the LifecycleObserver interface.
With the lifecycle aware components, we can observe a component like Activity and perform actions as it enters any of its lifecycle statuses.
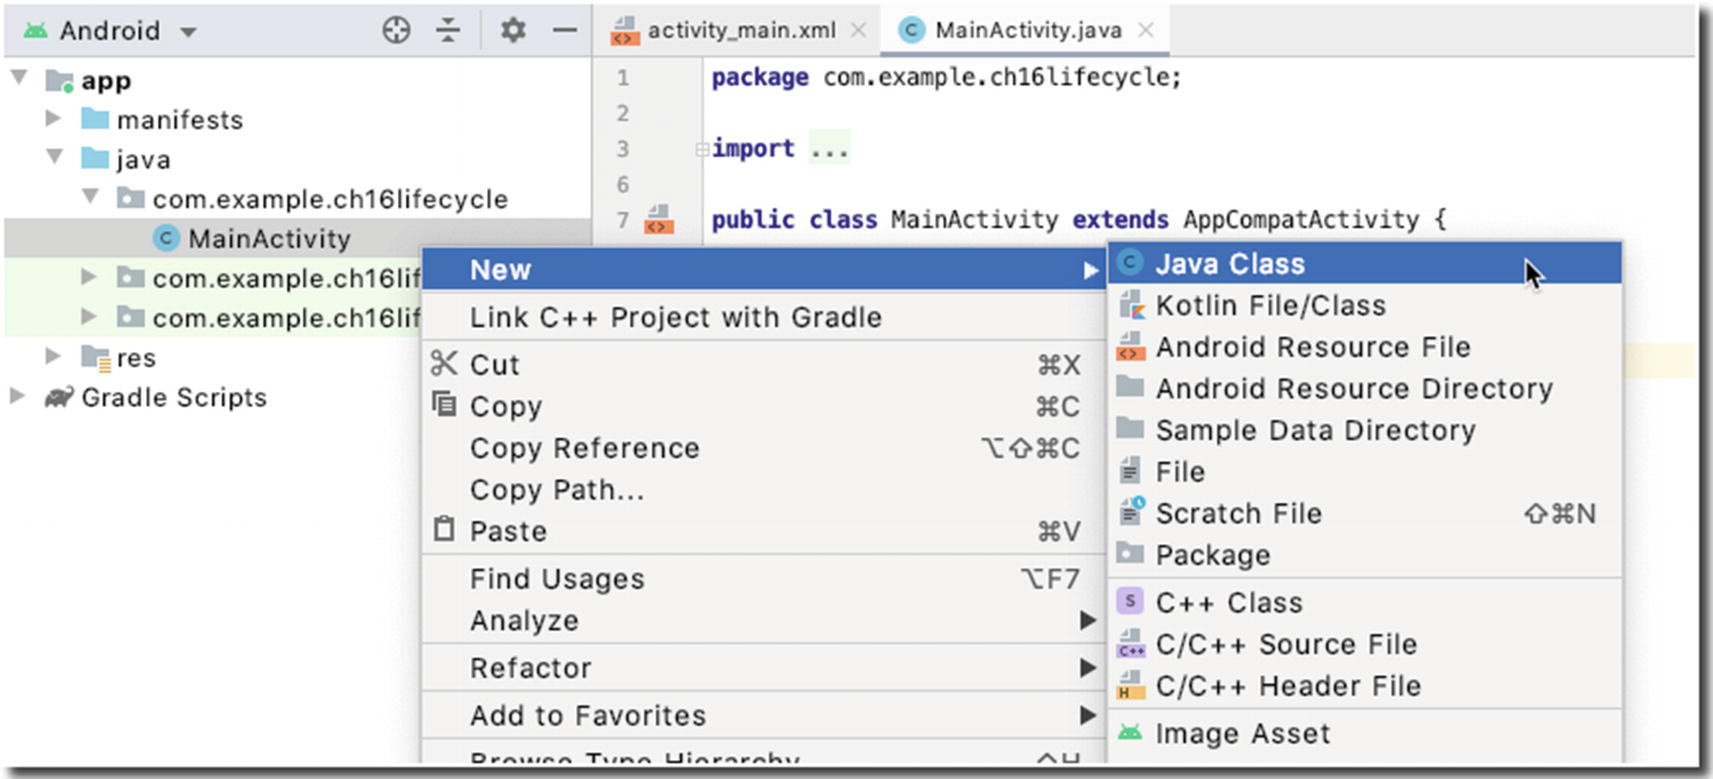
Add a Java class to the project
Name the new class “MainActivityObserver.”
build.gradle file, module level
The lifecycle_version at the time of writing is “2.2.0”; this will be different for you since you’ll be reading this at a later time. You can visit https://bit.ly/lifecyclerelnotes to find out the current version of the lifecycle libraries.
Your project needs to refresh after editing the Gradle file.
MainActivity —This is a simple Activity, pretty much like any other Activity that the IDE generates when you create a project with an empty Activity. The code sample is shown in Listing 16-2.
MainActivityObserver —A Java class that will implement the LifecycleObserver interface; this will be our listener object. The code is listed and annotated in Listing 16-1.
MainActivityObserver class
❶ | If you want to observe other components’ lifecycle changes, you need to implement the LifecycleObserver interface. This line makes this class an observer. |
❷ | Use the OnLifecycleEvent annotation to tell the Android Runtime that the decorated method is supposed to be called when the lifecycle event happens; in this case, we’re listening to the ON_CREATE event of the observed object. The parameter to the decorator indicates which lifecycle event we’re listening to. |
❸ | This is the decorated method. It gets called when the object it is observing enters the ON_CREATE lifecycle status. You can name this method anything you want; I just named it onCreateEvent() because it’s descriptive. Otherwise, you’re free to name it to your liking; the method’s name doesn’t matter because you already decorated it, and the annotation is sufficient. |
❹ | This is where you do something interesting in response to a lifecycle status change. |
MainActivity class
❶ | From the point of view of the MainActivity (it’s the one being observed), the only thing we need to do here is to add an observer object using the addObserver() method of the LifeCycleOwner interface—yes, the AppCompatActivity implements LifeCycleOwner; that’s the reason we can call the getLifecycle() method within our Activity. You simply need to pass an instance of an observer class (in our case, it’s the MainActivityObserver) to set up lifecycle awareness between an Activity and a regular class. |
The application doesn’t do much. It merely logs messages to the Logcat window every time there is a change in the lifecycle state of MainActivity. Still, it demonstrates how we can add an observer to the lifecycle of any Activity.
ViewModel
The Android framework manages the lifecycle of UI controllers like Activities and Fragments; it may decide to destroy or re-create an Activity (or Fragment) in response to some user actions, for example, clicking the back button, or device events, for example, rotating the screen. These configuration changes are out of your control.
If the runtime decides to destroy the UI controller, any transient UI-related data that you’re currently storing in them will be lost.
It’s best to create another project (with an empty Activity) to follow the discussion in this section; then add a Java class to the project and name it “RandomNumber.” Listings 16-4, 16-5, and 16-6 show a simple app that displays a random number every time the Activity is created.
RandomNumber class
MainActivity class
activity_main.xml
When you run this code for the first time, you’ll see a random number displayed on the TextView, no surprises there. You’ll also see the Log entries for createNumber() and getNumber() in the Logcat window; no surprises there either. Now, while the app is running on the emulator, try to change the device’s orientation—you’ll notice that every time the screen orientation changes, the displayed number on the TextView changes as well. You’ll also see that additional logs for the createNumber() and getNumber() methods show up in Logcat. This is because the runtime destroys and re-creates the MainActivity every time the screen orientation changes. Our RandomNumber object also gets destroyed and re-created along with the MainActivity—our UI data cannot survive across orientation changes.
- 1.
Add the lifecycle extensions to our project’s dependencies, like what we did earlier. Go back to Listing 16-1 for instructions.
- 2.
To make the RandomGenerator class a ViewModel, we will extend the ViewModel class from the AndroidX lifecycle libraries.
- 3.
From the MainActivity, we’ll get an instance of the RandomNumber class using the factory method of the ViewModelProviders class, instead of merely creating an instance of the RandomNumber class.
RandomNumber extends ViewModel
The class remains mostly the same as its previous version shown in Listing 16-4; the only difference is that now it extends ViewModel.
MainActivity and ViewModelProviders
❶ | This is the only change we need to do in MainActivity. Instead of directly managing the ViewModel object (the RandomNumber class) by creating an instance of it inside the onCreate() method, we’ll let the ViewModelProviders class manage the scope of our ViewModel object. |
LiveData

Data flow for the RandomNumber example

RandomNumber sample with LiveData
❶ | The user clicks the FETCH button, which calls the getNumber() function; actually, we’re going to call the createNumber() first, then call the getNumber(). This way, we’re fetching a new random number. There are ways to do this more elegantly, but this is the quickest way to do it, so bear with me. |
❷ | Our ViewModel object gets a new random number. This isn’t a simple String anymore; we’re going to change it to a MutableLiveData to become observable. |
❸ | From the MainActivity, we’ll get an instance of the LiveData coming from our ViewModel object and write some codes to observe it; next, we simply react to changes on the LiveData. |
ViewModel with LiveData
❶ | The value of mrandomnumber is what we return to the MainActivity. We want this to be an observable object. To do this, we change its type from int to MutableLiveData. |
❷ | We have to make that type change here too since mrandomnumber is now MutableLiveData; this function has to return MutableLiveData. |
❸ | To set the value of the MutableLiveData, use the setValue() method. |
MainActivity
❶ | Let’s fetch the random number from the ViewModel. The random number isn’t of String type anymore; it’s MutableLiveData. |
❷ | This is the boilerplate code for a button click. We need this trigger to fetch a random number from the ViewModel. |
❸ | To observe a LiveData, we call the observe() method; the method takes two arguments. The first argument is the lifecycle owner (MainActivity, so we pass this); the second argument is an Observer object. We used an anonymous class here to create the Observer object. |
❹ | This onChanged() method is called every time the value of the random number (mrandomnumber) in the ViewModel changes; so, when it changes, we set the value of the TextView accordingly. |
You’re sure the UI always matches the data state. You’ve already seen this from the example. LiveData follows the Observer pattern; it notifies the observer when its value changes.
There are no memory leaks. Observers are bound to lifecycle objects. If, for example, our MainActivity enters the paused state (for whatever reason, maybe another Activity is on the foreground), the LiveData won’t be observed; if the MainActivity is destroyed, the LiveData again won’t be observed, and it will clean up after itself—which also means we won’t need to handle the lifecycles of MainActivity and the ViewModel manually.
Room
If you want to include database functionalities to your app, you might want to look at Room. Before Room, the two popular ways to build database apps were either using Realm or just using good ole SQLite. Dealing with SQLite was considered to be a bit low level; it felt too close to the metal and, as such, was a bit cumbersome to use. Realm was quite popular among developers, but it wasn’t a first-party solution, no matter the popularity. Thankfully, we now have Room.
You don’t have to deal with raw queries for basic database operations.
It verifies the SQL queries at compile time, so you don’t need to worry about SQL injection—remember those?
There is no impedance mismatch between your database objects and Java objects. Room takes care of it; you only need to deal with Java objects.
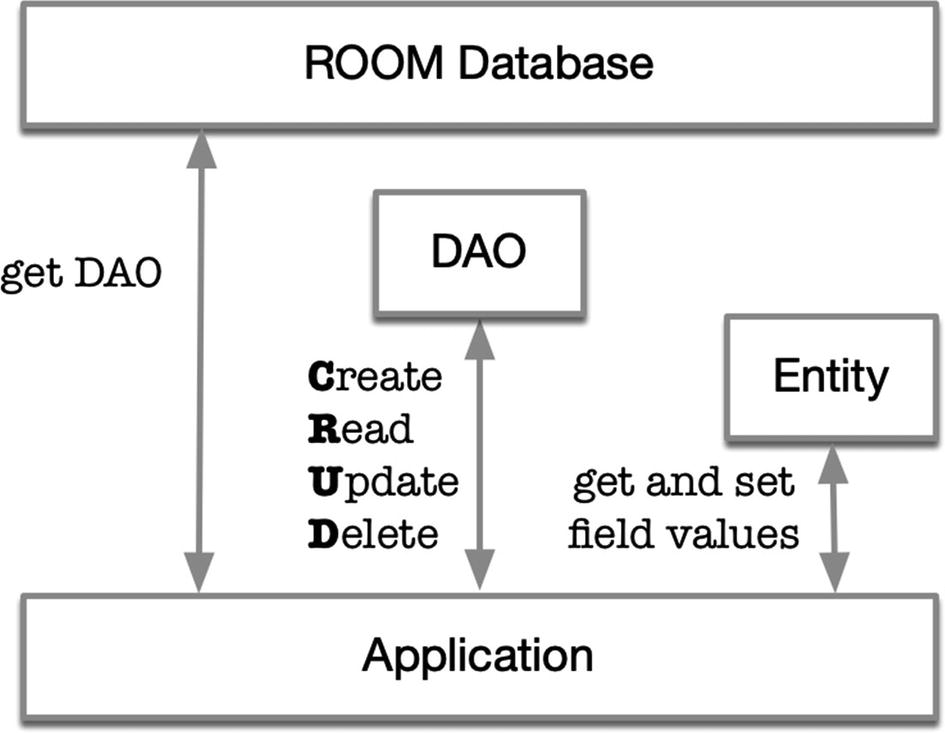
Room components
Entity—An Entity is used to represent a database table. You code it as a class that’s decorated by the @Entity annotation.
Dao or Data Access Object is a class that contains methods to access the tables in the database. This is where you code your CRUD (create, read, update, and delete). This is an interface that’s decorated by the @Dao annotation.
Database—This component holds a reference to the database. It’s an abstract class that is annotated by the @Database annotation.
Room dependencies
Person class, the Entity
❶ | The @Entity annotation makes this an Entity. If you don’t pass the tableName argument, the table’s name will default to the name of the decorated class. You will only need to pass this argument if you want the table’s name to be different from the decorated class. So, what I wrote here is unnecessary and redundant because I set the value of tableName to “person,” which is the same as the decorated class name. |
❷ | We’re making the uid member variable the primary key; we’re also saying it can’t be null. |
❸ | The member variables of the class will automatically become the fields on the table. The column names on the table will take after the member variables’ names unless you use the @ColumnInfo annotation. If you want the name of the table field (column) to be different from the name of the member variable, use the @ColumnInfo decoration, as shown here, and set the name to your preferred column name. |
PersonDAO, the Data Access Object
❶ | A DAO needs to be annotated by the @Dao decorator. |
❷ | Daos have to be written as interfaces. |
❸ | Use the @Insert decorator to indicate that the decorated method will be used for inserting records to the table. Similarly, you will decorate methods for update, query, and delete with @Update, @Query, and @Delete, respectively. |
❹ | Use the @Query to write SQL select statements. Each @Query is verified at compile time; if there is a problem with the query, a compilation error occurs instead of a runtime error. That should put your mind at ease. |
AppDatabase, the database holder
❶ | Use the @Database to signify that this class is the database holder. Use the entities argument to specify the Entities that are in the database. If you have more than one Entity, use commas to separate the list. The second argument is the version; this is an integer value that specifies the version of your DB. |
❷ | A Database class is abstract and extends the RoomDatabase. |
❸ | You need to provide an abstract class that will return an instance of the DAO object. |
❹ | You need to provide a static method to get an instance of the Database. It doesn’t have to be a singleton, like what we did here, but I imagine you don’t want more than one instance of the Database class. |
❺ | Use the databaseBuilder() method to create an instance of the RoomDatabase. There are three arguments to the builder method: (1) an application context; (2) the abstract class, which is annotated by @Database; and (3) the name of the database file. This will be the filename of SQLite dB. |
MainActivity
❶ | To begin using the RoomDatabase, get an instance of using the factory method we coded in the AppDatabase earlier. |
❷ | Let’s collect the data from the TextViews. |
❸ | Room follows best practices, so it won’t allow you to run any database query on the main UI thread. You need to create a background thread and run all your Room commands in there. Here, I used a quick and dirty Thread and Runnable objects, but you’re free to use any other means of background execution, for example, AsyncTask. |
❹ | Create a Person object using the inputs from the TextViews. |
❺ | Let’s get an instance of the DAO. |
❻ | Do an insert using the insertPerson() method we coded in the DAO earlier. |
❼ | Let’s do a SELECT. |
❽ | And list all entries in our person table. |
In a real app, you probably wouldn’t access the database from a UI controller like an Activity; you might want to put in a ViewModel class. That way, the UI controller’s responsibility is strictly to present data and not to act as a model.
If you use Room with ViewModel and LiveData, it can provide a more responsive UI experience. I didn’t cover it here, but it’s a great exercise to pursue after this chapter.
Summary
AppCompatActivity objects are now lifecycle owners. You can write another class and listen to the lifecycle changes of a lifecycle owner, then react accordingly; Fragments too are lifecycle owners—don’t forget to use AndroidX artifacts on your project when working with lifecycle aware components.
ViewModel makes your UI data resilient to the destruction and re-creation of UI controllers (like Activities and Fragments).
LiveData makes the relationship between your UI object and model data bidirectional. A change in one is automatically reflected in the other.
Room is an ORM for SQLite. It’s a first-party solution and it’s part of the Architecture components—there’s little reason we shouldn’t use it.