© Ted Hagos 2020
T. HagosLearn Android Studio 4https://doi.org/10.1007/978-1-4842-5937-5_7

7. Event Handling

Ted Hagos1 
(1)
Manila, National Capital Region, Philippines
 
What we’ll cover:
  • Listener objects

  • Anonymous inner classes

In the previous chapter, we already did some event handling. The part of the exercise where we incremented the TextView’s value for each button click was an exercise on declarative event handling . To bind a method name to a click event, we simply set a View’s android:onClick attribute to the name of a method in the associated Activity class. This is a low-ceremony and straightforward way to handle events but is limited to the “click” event. When you need to handle events like long clicks or gestures, you need to use event listeners—this is the topic of this chapter.

Intro to Event Handling

The user interacts with your app by touching, clicking, swiping, or typing something. The Android framework captures, stores, processes, and sends these actions to your app as event objects. We respond to these events by writing methods that are specifically designed to handle them. Methods that handle events are written inside listener objects —and there’s quite a few of them. Figure 7-1 shows a simplified model of how the Android framework and your app handle user actions.
../images/457413_2_En_7_Chapter/457413_2_En_7_Fig1_HTML.jpg
Figure 7-1

Simplified event handling model

When a user does something with your app, like clicking a button, the Android framework catches that action and turns it into an event object. An event object contains data about the user’s action, for example, which button was clicked, the location of the button when it was clicked, and so on. Android sends this event object to the application, and it calls a specific method that corresponds with the user’s action. If the user clicked the button, Android would call the onClick() method on the Button object; if the user clicks the same button but holds it a bit longer, then the onLongClick() method will be called. View objects, like the Button, can respond to a range of events like clicks, keypresses, touch or swipes, and so on. Table 7-1 lists some of the common events and their corresponding event handlers.
Table 7-1

Common listener objects

Interface

Method

Description

View.OnClickListener

onClick()

This gets called when the user either touches and holds the control (when in touch mode) or focuses upon the item with the navigation keys and then presses the ENTER key

View.OnLongClickListener

onLongClick()

Almost the same as a click, but only longer

View.OnFocusChangeListener

onFocusChange()

When the user navigates onto or away from the control

View.OnTouchListener

onTouch()

Almost the same as the click action, but this handler lets you find out if the user swiped up or down. You can use this to respond to gestures

View.OnCreateContextMenuListener

onCreateContextMenu()

Android calls this when a ContextMenu is being built, as a result of a long sustained click

To set up a listener, the View object can set or—more appropriately—register a listener object . Registering a listener means you tell the Android framework which method to call when the user interacts with the View object. Figure 7-2 shows an annotated code for registering a listener object.
../images/457413_2_En_7_Chapter/457413_2_En_7_Fig2_HTML.jpg
Figure 7-2

Annotated event registration and handling

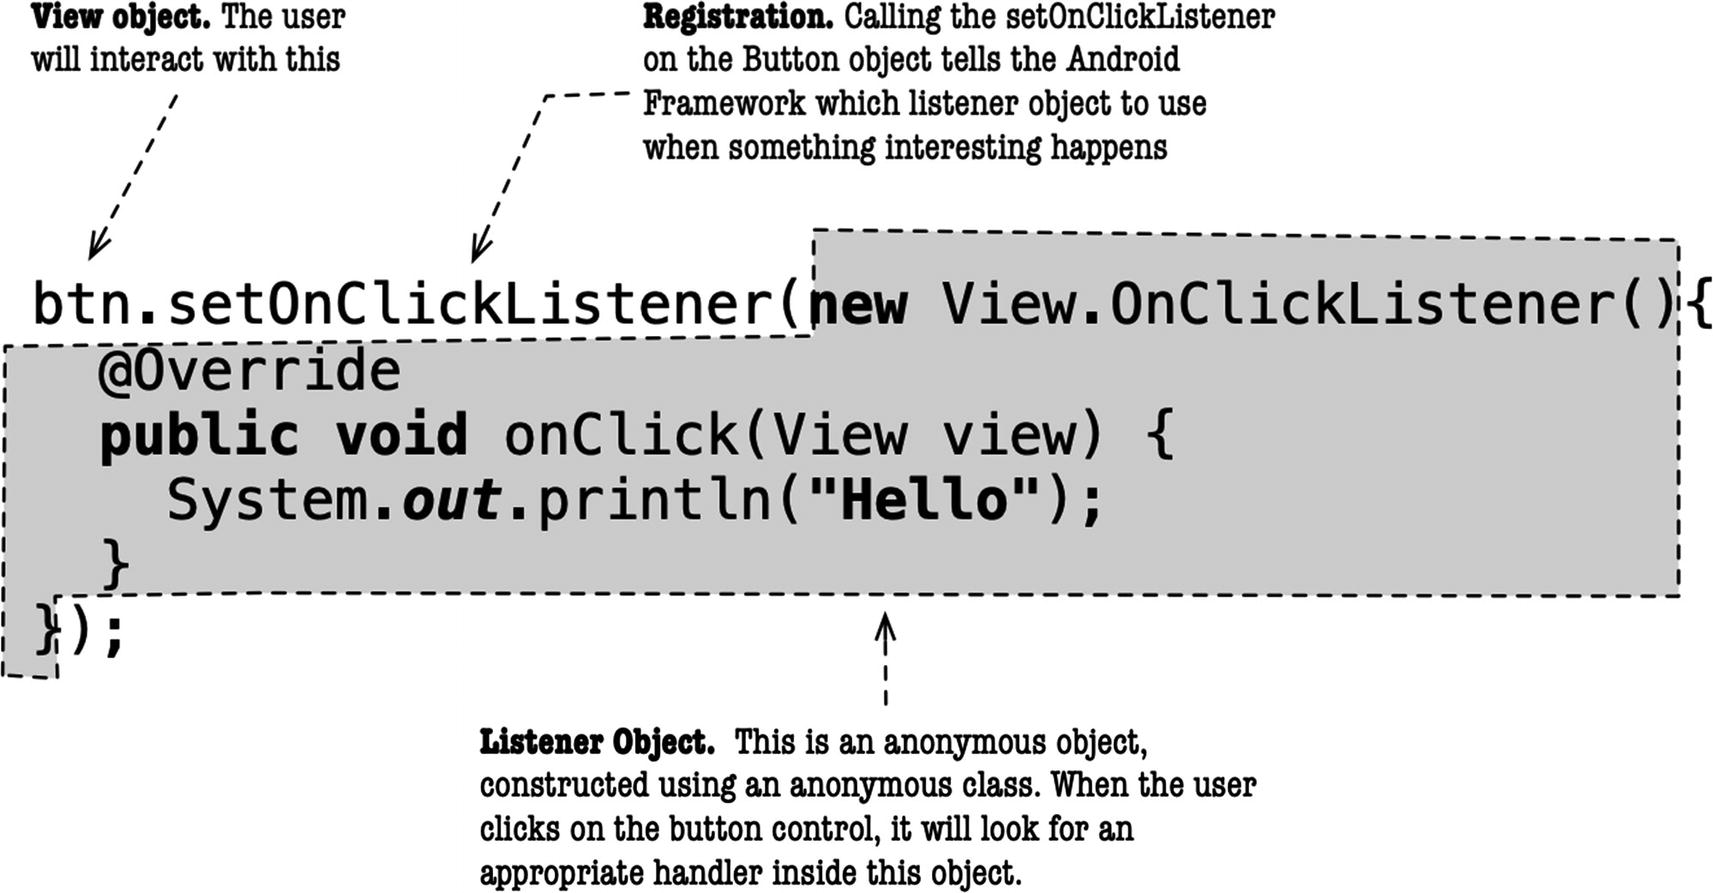
The setOnClickListener is a member method of the android.view.View class, which means every child class of View has it. The method expects an OnClickListener object as an argument—this becomes the listener for the button control. When the button is clicked, the codes inside the onClick method will run.

We created the listener object by creating an instance of an anonymous class that inherits from View.OnClickListener; this type is declared as a nested interface in the View class.

Now that we know some bits about events, let’s put them into practice. Let’s create a new project; Table 7-2 shows the details of the project.
Table 7-2

Project details

Project detail

Value

Application name

EventHandling

Company domain

Use your website name

Language

Java

Form factor

Phone and tablet only

Minimum SDK

API 29 (Q) Android 10

Type of activity

Empty

Activity name

MainActivity

Layout name

activity_main

The project will contain only two controls, the TextView, which came with the project when we used the wizard, and a Button view, which we are yet to add. The Button will intercept the events click and long click using an anonymous inner object.

Open the activity_main.xml file in the main editor if it’s not opened yet. You can find it in the Project Explorer window under the appreslayout folder.

Add a Button object to the design surface and put some constraints on it. You can add a Button to the layout by dragging it from the palette and onto the design surface, just like you did in the previous chapter. Figure 7-3 shows our project with an added Button object.
../images/457413_2_En_7_Chapter/457413_2_En_7_Fig3_HTML.jpg
Figure 7-3

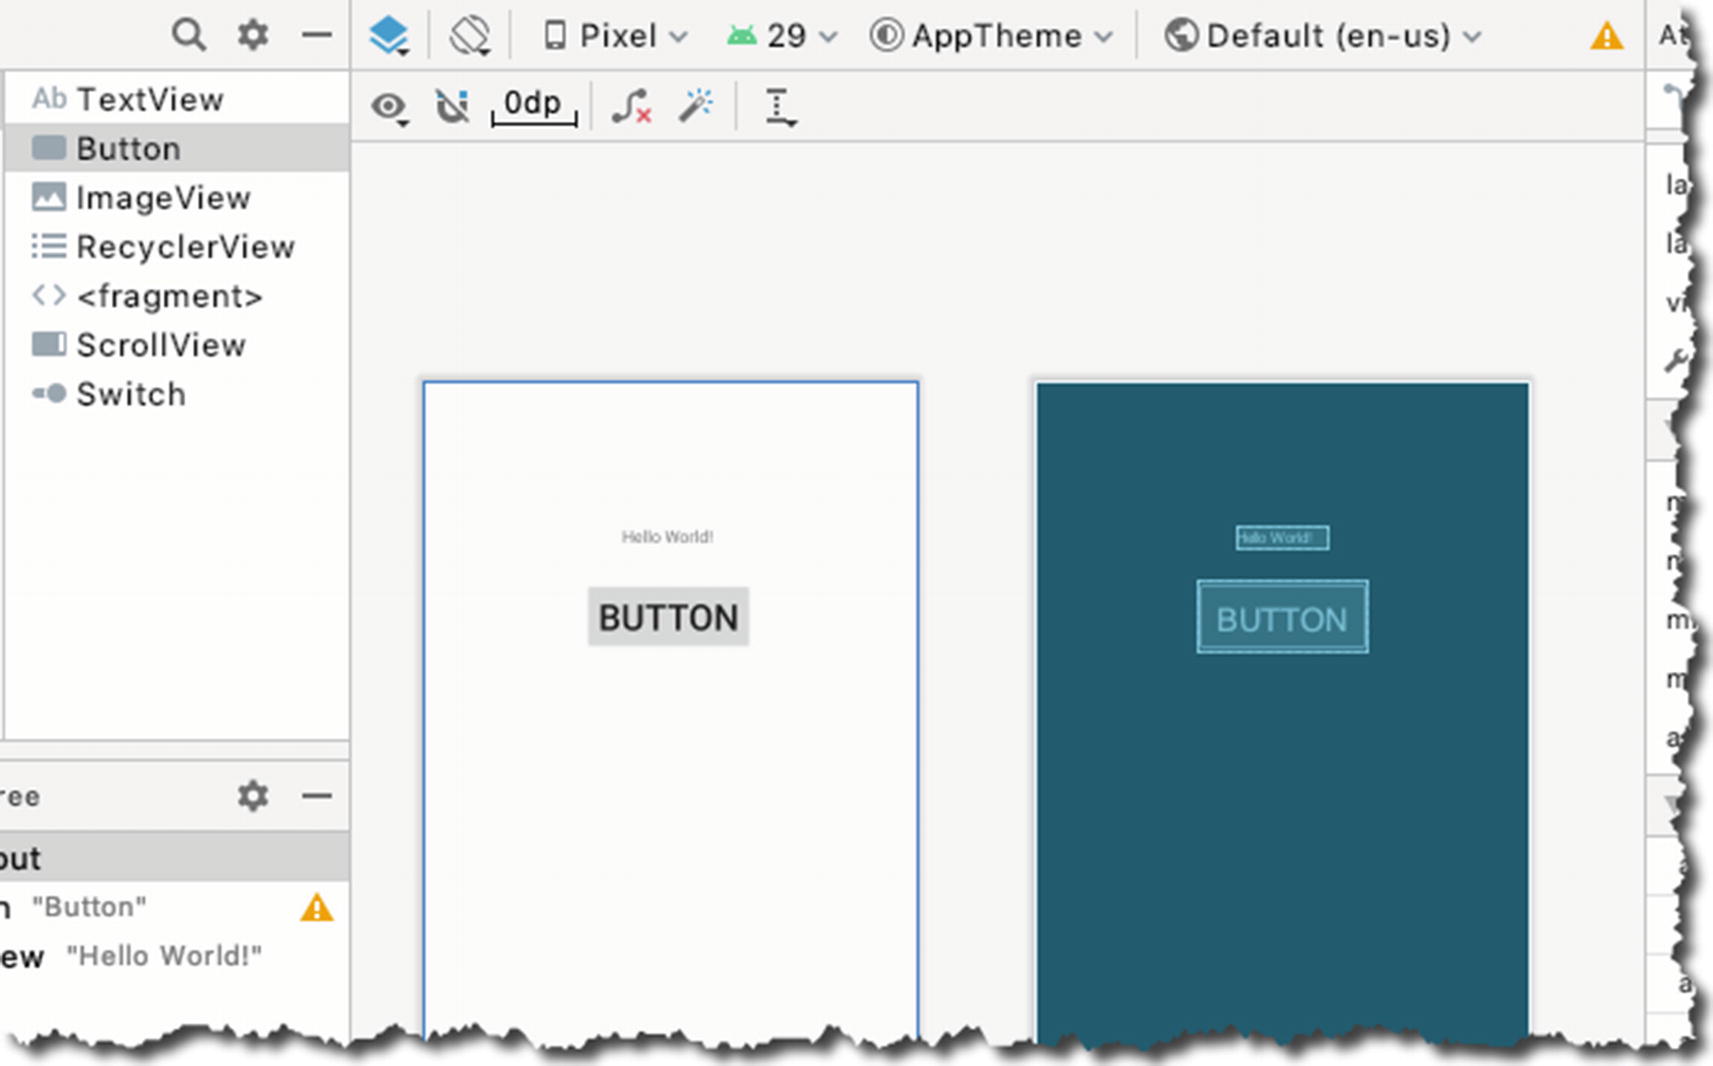
Add a Button View to the project

We want the Button to respond to the click event, so we’ll set up an OnClickListener object to do precisely this. Open the MainActivity.java in the main editor and add the event handling code, as shown in Listing 7-1.
import androidx.appcompat.app.AppCompatActivity;
import android.os.Bundle;
import android.view.View;
import android.widget.Button;
import android.widget.Toast;
public class MainActivity extends AppCompatActivity {
  @Override
  protected void onCreate(Bundle savedInstanceState) {
    super.onCreate(savedInstanceState);
    setContentView(R.layout.activity_main);
    Button btn = (Button) findViewById(R.id.button);
    btn.setOnClickListener(new View.OnClickListener(){
      @Override
      public void onClick(View view) {
        Context ctx =  MainActivity.this;
        Toast.makeText(ctx, "Hello", Toast.LENGTH_LONG).show();
      }
    });
  }
}
Listing 7-1

MainActivity.java

❶   We get a reference to the Button View; findViewById() should do that job just fine.

❷   In this case, we set up a listener object, an OnClickListener object, because we want to listen to click events.

❸   We override the onClick() method of the OnClickListener; this is where we put the codes we want to run when the Button is clicked.

❹   We display a Toast message. A Toast is a small pop-up message that disappears after a couple of seconds. You can use it to send small feedback to the user. Showing a Toast message is a two-step process. The first step is to create a Toast message using the makeText() function. It takes three parameters: (1) the context of the application, which in our case is the instance of MainActivity, (2) the message to show, and (3) how long to display it. The second step is to make it visible by calling the .show() method.
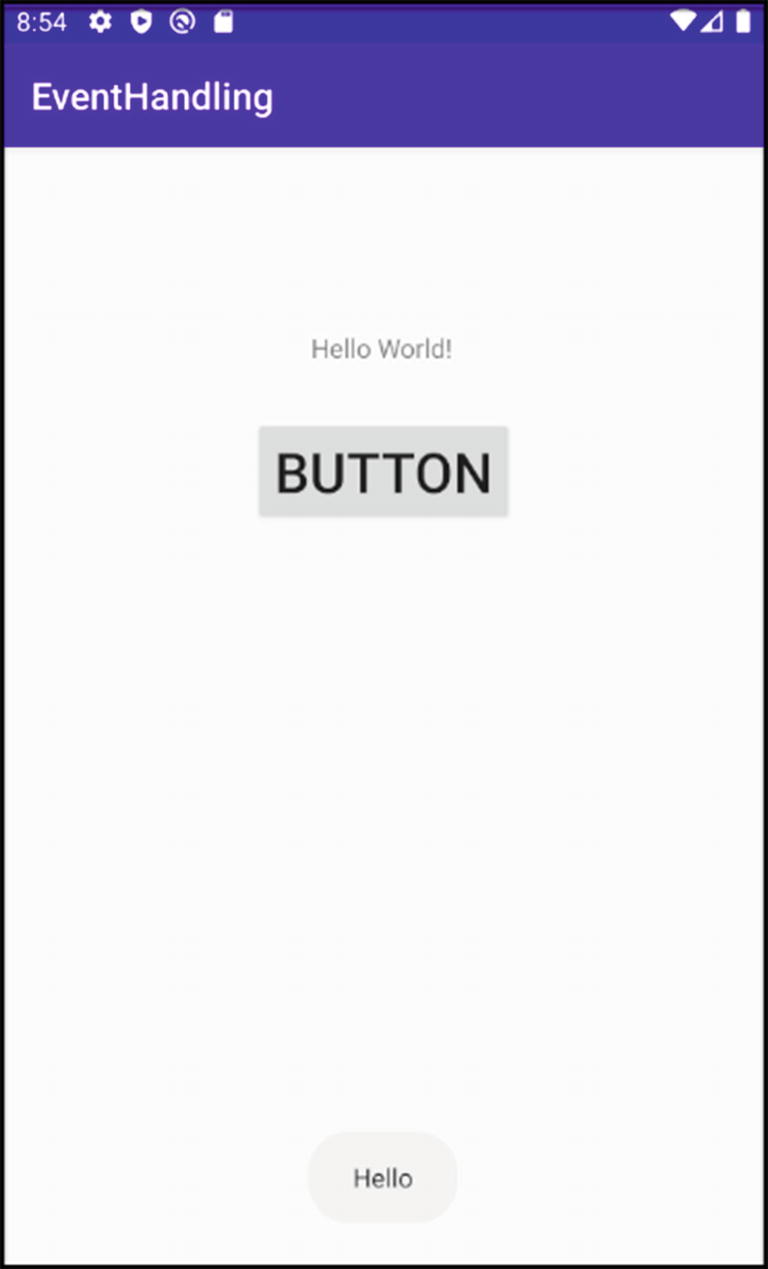
Figure 7-4 shows the app when the Button is clicked.
../images/457413_2_En_7_Chapter/457413_2_En_7_Fig4_HTML.jpg
Figure 7-4

Toast message

Handling Long Clicks

View objects can handle more than one kind of event. We can make our Button respond to both clicks (which we just did) and long clicks (which we’re about to do).

We will set up another listener object for the Button object, this time, a listener for long-click events. Like the click listener, we will set up the long-click listener inside the onCreate method of the Activity class, since the Activity doesn’t have to be visible before we set up the listeners. If you feel that the onCreate method is getting crowded already, feel free to refactor the method and relocate all the event handling codes somewhere else. For our example, I’ll keep the event handling codes inside the onCreate method. The code for the long-click listener is shown in Listing 7-2.
btn.setOnLongClickListener(new View.OnLongClickListener() {
  @Override
  public boolean onLongClick(View view) {
    return true;
  }
});
Listing 7-2

Long-click listener

It is very similar to the click handler in construction; we call the setXXXListener method and pass an instance of an anonymous listener class to it as an argument. We override the method (onLongClick, in this case) of the same listener object and put our codes in it—and that’s about it.

We could do another Toast message here, but I thought it might be instructive to use a different feedback mechanism, like Snackbar. Snackbar is like Toast, but instead of floating the text message, Snackbar’s message is anchored at the bottom of the screen. You can make it disappear after some timeout (just like Toast) or make the user swipe it away. Snackbar is more capable than Toast because you can include some actions in the message, like a small dialog box.

Before we can proceed, we need to make two changes to the project. We need to
  1. 1.

    Change the value of the layout container’s id property. By default, the layout container doesn’t have an id, and it’s usually okay because we didn’t have to refer to it from our Java code. Now, we will have to. The Snackbar’s construction requires that we refer to the layout container.

     
  2. 2.

    Add a dependency in our Gradle file. The Snackbar isn’t readily available for use; you will have to include it in the project’s dependency file.


Let’s deal with the layout file first. Open the activity_main layout file, then change the value of the main layout file’s id property. By default, the layout container doesn’t have a value on its id property; we need to give it one right now because we need to reference it in code later.

When activity_main is open in the main editor, switch to design mode; click somewhere in the body of the layout container, as shown in Figure 7-5. In the Attributes panel, edit the id property and set the value to root_layout.
../images/457413_2_En_7_Chapter/457413_2_En_7_Fig5_HTML.jpg
Figure 7-5

Change the id property of the layout container

Next, open the build.gradle file. There are two gradle files: one is at the project’s root folder, and the other is inside the app folder. It’s the latter that we need to update. Open the module-level gradle file by double-clicking the build.gradle (Module: App), as shown in Figure 7-6.
../images/457413_2_En_7_Chapter/457413_2_En_7_Fig6_HTML.jpg
Figure 7-6

build.gradle file

Then, add the implementation 'com.google.android.material:material:1.0.0' line in the dependencies section, as shown in Listing 7-3. This will make the Snackbar object available for use.
dependencies {
  implementation fileTree(dir: "libs", include: ["*.jar"])
  implementation 'androidx.appcompat:appcompat:1.1.0'
  implementation 'androidx.constraintlayout:constraintlayout:1.1.3'
  testImplementation 'junit:junit:4.12'
  androidTestImplementation 'androidx.test.ext:junit:1.1.1'
  androidTestImplementation 'androidx.test.espresso:espresso-core:3.2.0'
  implementation 'com.google.android.material:material:1.0.0'
}
Listing 7-3

The dependencies section of build.gradle

Now that we fixed the Gradle file and the layout container id, we can write the Snackbar code; Listing 7-4 shows the code to display a Snackbar.
btn.setOnLongClickListener(new View.OnLongClickListener() {
  @Override
  public boolean onLongClick(View view) {
    View vtemp = findViewById(R.id.root_layout);
    Snackbar.make(vtemp,"Long click", Snackbar.LENGTH_LONG).show();
    return true;
  }
});
Listing 7-4

Codes for displaying Snackbar

The onLongClick method returns a boolean value. We returned true from the method to tell the Android Runtime that we have already consumed it; there’s no need for other handlers (like onClick) to consume it again. Had we returned false, the onClick handler would have kicked right in after the onLongClick method returns.

Listing 7-5 shows the full code of MainActivity.java for your reference.
import androidx.appcompat.app.AppCompatActivity;
import android.content.Context;
import android.os.Bundle;
import android.view.View;
import android.widget.Button;
import android.widget.Toast;
import com.google.android.material.snackbar.Snackbar;
public class MainActivity extends AppCompatActivity {
  @Override
  protected void onCreate(Bundle savedInstanceState) {
    super.onCreate(savedInstanceState);
    setContentView(R.layout.activity_main);
    Button btn = (Button) findViewById(R.id.button);
    btn.setOnClickListener(new View.OnClickListener(){
      @Override
      public void onClick(View view) {
        Context ctx =  MainActivity.this;
        Toast.makeText(ctx, "Hello", Toast.LENGTH_LONG).show();
      }
    });
    btn.setOnLongClickListener(new View.OnLongClickListener() {
      @Override
      public boolean onLongClick(View view) {
        View vtemp = findViewById(R.id.root_layout);
        Snackbar.make(vtemp,"Long click", Snackbar.LENGTH_LONG).show();
        return true ;
      }
    });
  }
}
Listing 7-5

Complete code for MainActivity.java

Figure 7-7 shows the app on the emulator after a long click to the Button.
../images/457413_2_En_7_Chapter/457413_2_En_7_Fig7_HTML.jpg
Figure 7-7

App showing the Snackbar message

Summary

  • You can set the android:onClick attribute to a name of a function if you want to handle simple click events.

  • Listener objects must be registered to the Android Runtime if you’re going to intercept certain events.

  • There are many kinds of listener objects, and they are listed as nested interfaces in the View class.

  • You can associate multiple listeners to the same View object.

  • Make sure to return false on an onLongClick method, if you don’t want other event handlers to handle it.

..................Content has been hidden....................

You can't read the all page of ebook, please click here login for view all page.
Reset
18.119.253.93