
So far in this book, we have drawn exclusively with primitive shapes and text. In this section, we will see how we can use the Canvas class to draw Bitmap graphics- after all Bob is so much more than just a block or a line. We will also code Bob and implement his teleportation feature, shield and collision detection. To finish the game off, we will add a HUD, measure the time, and code a solution to remember the longest (best) time.
In this chapter we will:
- Learn how to use bitmap graphics in Android
- Implement our teleporting superhero, Bob
- Finish all the other features of the game including the HUD and timing
Let's wrap this game up.
This is the final class for this project. As a reminder, we need to make Bob teleport every time the player touches the screen and he should teleport to the location of the touch. I predict that a teleport method is quite likely. As we code this class, we will also see how to use a .png file to represent Bob instead of just using boring rectangles like we have done so far.
The first thing we will do is add the graphics (bob.png) file to the project.
Right-click and select Copy to copy the bob.png graphics file from the download bundle in the Chapter 13/drawable folder.
In Android Studio locate the app/res/drawable folder in the project explorer window. The following screenshot makes it clear where this folder can be located
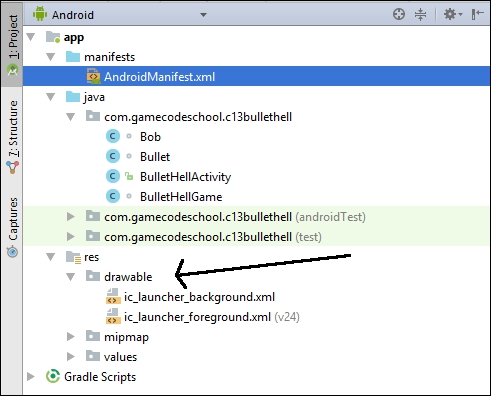
Right-click on the drawable folder and select Paste to add the bob.png file to the project. Click OK twice to confirm the default options for importing the file into the project.
In order to draw the bitmap in the correct place as well as keep the BulletHellGame class informed about where Bob is, we will need a few member variables. As we will see later in this chapter, the Canvas class has a drawBitmap method which takes a RectF as one of its arguments. This means that even though we have a graphics file to represent the game object we still need a RectF to indicate where to draw it.
In addition, we will be scaling Bob based on the resolution of the screen and we will need to calculate and retain the height and width. We will also need a boolean variable to keep track of whether Bob is currently teleporting.
The final thing that needs to be a member to make it in scope throughout the entire class is an object of type Bitmap. You can probably guess what this is used for.
Add the member variables and import them into the Bob class that matches the discussion we have just had.
import android.content.Context;
import android.graphics.Bitmap;
import android.graphics.BitmapFactory;
import android.graphics.RectF;

class Bob {

    RectF mRect;
    float mBobHeight;
    float mBobWidth;
    boolean mTeleporting = false;

    Bitmap mBitmap;
}
Now we can start initializing these member variables. Add the following code for the constructor shown next.
public Bob(Context context, float screenX, float screenY){
        mBobHeight = screenY / 10;
        mBobWidth = mBobHeight / 2;

        mRect = new RectF(screenX / 2,
                screenY / 2,
                (screenX / 2) + mBobWidth,
                (screenY / 2) + mBobHeight);

        // Prepare the bitmap
        // Load Bob from his .png file
        // Bob practices responsible encapsulation
        // looking after his own resources
        mBitmap = BitmapFactory.decodeResource
                       (context.getResources(), R.drawable.bob);
}
In the constructor, mBobHeight is initialized to 1/10th the height of the screen and then mBobWidth is initialized to half of mBobHeight. Bob should be a nicely formed (not stretched or squashed) character with this arrangement. Note the screen resolution was passed in as parameters from BulletHellGame. Also, you will see a third parameter, named context. This is used during the Bitmap initialization later in the method.
Next we initialize the RectF with this code:
mRect = new RectF(screenX / 2,
    screenY / 2,
   (screenX / 2) + mBobWidth,
   (screenY / 2) + mBobHeight);
The first two parameters put the top-left corner of Bob in the center of the screen and the second two parameters put the bottom right exactly the right distance away by adding mBobWidth and mBobHeight to the top and left calculation.
Finally, for the constructor, we initialize the bitmap with this line of code.
mBitmap = BitmapFactory.decodeResource
               (context.getResources(), R.drawable.bob);
The static decodeResource method of the BitmapFactory class is used to initialize mBitmap. It takes two parameters. The first is a call to getResources which is a made available by context. This method as the name suggests gives access to the project resources and the second parameter, R.drawable.bob points to the bob.png file in the drawable folder. The Bitmap (mBitmap) is now ready to be drawn by the Canvas class. We just need a way to supply mBitmap to the BulletHellGame class when needed
Next up we have the teleport method. Add the teleport method and as you do note that the parameters passed in are two floats which are the location to move to. Later in this chapter we will code calling this method from the onTouchEvent method of BulletHellGame.
boolean teleport(float newX, float newY){

   // Did Bob manage to teleport?
   boolean success = false;

   // Move Bob to the new position
   // If not already teleporting
   if(!mTeleporting){

      // Make him roughly central to the touch
      mRect.left = newX - mBobWidth / 2;
      mRect.top = newY - mBobHeight / 2;
      mRect.bottom = mRect.top + mBobHeight;
      mRect.right = mRect.left + mBobWidth;

      mTeleporting = true;

      // Notify BulletHellGame that teleport
      // attempt was successful
      success = true;
   }

   return success;
}
Inside the teleport method, a few things happen. First, a local variable success is declared and initialized to false. Right after this, there is an if block which holds all the logic for this method. The condition is if(!mTeleporting). This means that if mTeleporting is true, then the code will not execute. Immediately after the if block the value of success is returned to the calling code. Therefore, if the if block was not executed the value false is returned and the calling code will know that the teleportation attempt failed.
If, however, mTeleporting was false, the if block does execute, and Bob's location is updated using the passed in parameters. Look closely at the code in the if block and you will see a little adjustment going on. If we simply moved Bob to the location passed in, then he would teleport so that his top-left pixel was at the touched position. By offsetting the top-left position by half mBobWidth and half mBobHeight a more satisfying teleport is achieved, and Bob will reappear directly under the player's finger.
As we have successfully moved Bob we now set mTeleporting to true so that teleporting again will be temporarily prevented.
The final line of code in the if block sets success to true meaning that when the method returns it will inform the calling code that the teleport was successful.
There are three quick final methods for the Bob class that provide access to some of Bob's private members.
void setTelePortAvailable(){
   mTeleporting = false;
}

// Return a reference to mRect
RectF getRect(){
   return mRect;
}

// Return a reference to bitmap
Bitmap getBitmap(){

   return mBitmap;
}
The setTeleportAvailable method sets mTeleporting to false which means the method we have just been discussing (teleport) will return true when called. We will see when and where we use this very soon.
Finally, getRect and getBitmap return the RectF and the Bitmap in order that they can be used by BulletHellGame for things like collision detection and drawing.
We can now add a Bob instance to the game.
Let's put Bob into the fray. Add some more member variables before the BulletHellGame constructor.
private Bob mBob;
private boolean mHit = false;
private int mNumHits;
private int mShield = 10;

// Let's time the game
private long mStartGameTime;
private long mBestGameTime;
private long mTotalGameTime;
The first new member variable is our instance of Bob called mBob. Next, there is a boolean to keep track of whether Bob has been hit in the current frame.
The mNumHits and mShield track the number of times Bob has been hit by a bullet and the remaining shield before the game is over.
Finally, for the new member variables, there are three more of type long that will be used to track and record time. We will see them in action soon.
Initialize Bob just before the call to startGame in the constructor by adding the following highlighted code.
for(int i = 0; i < mBullets.length; i++){
   mBullets[i] = new Bullet(mScreenX);
}

mBob = new Bob(context, mScreenX, mScreenY);

startGame();
This code calls the Bob constructor passing in the required parameters of a Context object (used by the Bob class to initialize the Bitmap object) and the height and width of the screen in pixels.
Add the following code into the detectCollisions method just before the final closing curly brace of the method. Be careful not to get this code mixed up among the existing code in detectCollisions that we added in the previous chapter.
…
…
// Has a bullet hit Bob?
// Check each bullet for an intersection with Bob's RectF
for (int i = 0; i < mNumBullets; i++) {

   if (RectF.intersects(mBullets[i].getRect(), mBob.getRect())) {
          // Bob has been hit
          mSP.play(mBeepID, 1, 1, 0, 0, 1);

          // This flags that a hit occurred
          // so that the draw
          // method "knows" as well
          mHit = true;

          // Rebound the bullet that collided
          mBullets[i].reverseXVelocity();
          mBullets[i].reverseYVelocity();

          // keep track of the number of hits
          mNumHits++;

         if(mNumHits == mShield) {
               mPaused = true;
               mTotalGameTime = System.currentTimeMillis()
                     - mStartGameTime;

               startGame();
         }
    }

}
The new code is basically one big for loop that loops from zero to mNumBullets.
for (int i = 0; i < mNumBullets; i++) {
   …
The first line of code inside the for loop is an if statement that tests whether the current bullet being tested (as determined by the for loop) has collided with Bob. As we did in the Pong game the intersects method takes the RectF from a bullet and from Bob and sees whether they have collided.
if (RectF.intersects(mBullets[i].getRect(), mBob.getRect())) {
…
If there was not a collision, then the for loop continues and the next bullet is tested for a collision. If there was a collision and the if block is executed, then many things happen. Let's run through them.
First, we play a sound effect.
// Bob has been hit
mSP.play(mBeepID, 1, 1, 0, 0, 1);
Now we set mHit to true so that we know a collision has occurred. Note that mHit is a member so the code in all the methods can detect that a hit has occurred later this frame.
// This flags that a hit occurred
// so that the draw
// method "knows" as well
mHit = true;
Next the code reverses the bullet (horizontally and vertically) and increments mNumHits to keep track of the total number of hits.
// Rebound the bullet that collided
mBullets[i].reverseXVelocity();
mBullets[i].reverseYVelocity();

// keep track of the number of hits
mNumHits++;
This next if statement is nested inside the if statement we are currently discussing. It checks to see if the number of hits the player has taken is equal to the strength of the shield. If it is:
- The game is paused
mTotalGameTimeis initialized by subtractingmStartGametimefrom the current timestartGameis called to reset all the necessary variables and wait for a screen tap to restart from the beginning
if(mNumHits == mShield) {
   mPaused = true;
   mTotalGameTime = System.currentTimeMillis()
         - mStartGameTime;

   startGame();
}
Now we can draw Bob to the screen.
Add to the draw method as highlighted to draw Bob and the HUD
private void draw(){
   if (mOurHolder.getSurface().isValid()) {
         mCanvas = mOurHolder.lockCanvas();
         mCanvas.drawColor(Color.argb(255, 243, 111, 36));
         mPaint.setColor(Color.argb(255, 255, 255, 255));

         for(int i = 0; i < mNumBullets; i++){
               mCanvas.drawRect(mBullets[i].getRect(), mPaint);
         }

         mCanvas.drawBitmap(mBob.getBitmap(),
               mBob.getRect().left, mBob.getRect().top, mPaint);


         mPaint.setTextSize(mFontSize);
         mCanvas.drawText("Bullets: " + mNumBullets +
                      "  Shield: " + (mShield - mNumHits) +
                      "  Best Time: " + mBestGameTime /
                         MILLIS_IN_SECOND,
                  mFontMargin, mFontSize, mPaint);


       // Don't draw the current time when paused
       if(!mPaused) {
              mCanvas.drawText("Seconds Survived: " +
                     ((System.currentTimeMillis() -
                      mStartGameTime) / MILLIS_IN_SECOND),
                      mFontMargin, mFontMargin * 30, mPaint);
       }

      if(mDebugging) {
            printDebuggingText();
      }

      mOurHolder.unlockCanvasAndPost(mCanvas);
   }
}
We have seen how to draw text many times before and in the previous code we draw the number of bullets, the shield, best time, and current time to the screen.
However, this is the first time we have drawn a Bitmap. Our handy mCanvas object does all the work when we call its drawBitmap method and pass in Bob's Bitmap object and his RectF. Both objects are retrieved from the Bob instance using the getter methods we coded earlier in the chapter.
Notice that we have now used the sound (in the update method) that we set up when we started the project so let's add the sound files to the project so that when we run the game we can hear the effects playing.
Copy the assets folder and all its contents from the Chapter 13 folder of the download bundle. Use your operating system's file explorer to navigate to the BulletHell/app/src/main folder of your project and paste the assets folder.
Obviously, feel free to replace all the sound effects in the assets folder with your own. If you decide to replace all the sound effects, make sure you name them exactly the same or that you make appropriate edits in the code.
Next, we can code the onTouchEvent method. Here is the entire completed code. Make your method the same and then we will discuss how it works.
@Override
public boolean onTouchEvent(MotionEvent motionEvent) {

   switch (motionEvent.getAction() &
               MotionEvent.ACTION_MASK) {

          case MotionEvent.ACTION_DOWN:

               if(mPaused){
                     mStartGameTime = System.currentTimeMillis();
                     mPaused = false;
               }

               if(mBob.teleport(motionEvent.getX(),
               motionEvent. getY())){
                  mSP.play(mTeleportID, 1, 1, 0, 0, 1);
               }
               break;

          case MotionEvent.ACTION_UP:

             mBob.setTelePortAvailable();
             spawnBullet();
             break;
   }
   return true;
}
In this touch handling solution using, as usual, the onTouchEvent method, as before we have two case statements in the switch block. The first case, ACTION_DOWN, checks if mPaused is currently true and if it is sets it to false as well as initializing mStartTime with the current time. mStartTime is now ready to use to calculate the game's duration when the game ends.
Also within the ACTION_DOWN case a call is made to mBob.teleport. Remember that the teleport method requires the coordinates of the screen touch and this is achieved by using motionEvent.getX() and motionEvent.getY() as the arguments passed in.
As this method call is wrapped in an if statement the return value is used to decide whether the code in the if block is executed. If teleport returns true, then a sound effect for teleportation is played.
In the second case statement, ACTION_UP the code calls the setTeleportAvailable method. The result of this combination of events is that the teleport method will never return true more than once per press. Also in this case the spawnBullet method is called to unleash more danger on Bob.
Add the new highlighted code to printDebuggingText.
private void printDebuggingText(){
   int debugSize = 35;
   int debugStart = 150;
   mPaint.setTextSize(debugSize);

   mCanvas.drawText("FPS: " + mFPS , 10,
         debugStart + debugSize, mPaint);
   mCanvas.drawText("Bob left: " + mBob.getRect().left ,
         10    debugStart + debugSize *2, mPaint);
   mCanvas.drawText("Bob top: " + mBob.getRect().top ,
         10,   debugStart + debugSize *3, mPaint);
   mCanvas.drawText("Bob right: " + mBob.getRect().right ,
         10,   debugStart + debugSize *4, mPaint);
   mCanvas.drawText("Bob bottom: " + mBob.getRect().bottom ,
         10,   debugStart + debugSize *5, mPaint);
   mCanvas.drawText("Bob centerX: " + mBob.getRect().centerX() ,
         10,   debugStart + debugSize *6, mPaint);
   mCanvas.drawText("Bob centerY: " + mBob.getRect().centerY() ,
         10,   debugStart + debugSize *7, mPaint);

}
In the printDebugging text, we print out all the values that might be useful to observe. We format and space-out the lines of text using the debugStart and debugSize that were initialized back in the constructor during the previous chapter.
Add the new highlighted code to the spawnBullet method to make the bullets spawn more intelligently, away from Bob and delete the temporary code we added in the previous chapter. As you type or paste the code, you will notice that some of the code at the start and some at the end doesn't need to be deleted. The new code is highlighted, and the old code is shown in a regular font.
// Spawns ANOTHER bullet
private void spawnBullet(){
   // Add one to the number of bullets
   mNumBullets++;

   // Where to spawn the next bullet
   // And in which direction should it travel
   int spawnX;
   int spawnY;
   int velocityX;
   int velocityY;

   // This code will change in chapter 13
   // Don't spawn to close to Bob
   if (mBob.getRect().centerX()
          < mScreenX / 2) {

          // Bob is on the left
          // Spawn bullet on the right
          spawnX = mRandomX.nextInt
                       (mScreenX / 2) + mScreenX / 2;
          // Head right
          velocityX = 1;
   } else {

          // Bob is on the right
          // Spawn bullet on the left
          spawnX = mRandomX.nextInt
                (mScreenX / 2);
          // Head left
          velocityX = -1;
   }

   // Don't spawn to close to Bob
   if (mBob.getRect().centerY()
      < mScreenY / 2) {

         // Bob is on the top
         // Spawn bullet on the bottom
         spawnY = mRandomY.nextInt
                      (mScreenY / 2) + mScreenY / 2;
         // Head down
         velocityY = 1;
   } else {

          // Bob is on the bottom
          // Spawn bullet on the top
          spawnY = mRandomY.nextInt
                (mScreenY / 2);
          // head up
          velocityY = -1;
   }

   // Spawn the bullet
   mBullets[mNumBullets - 1]
               .spawn(spawnX, spawnY,
               velocityX, velocityY);
}
To understand the new code, let's examine part of it more closely. Basically, there are two if-else blocks. Here is the first if-else again:
// Don't spawn to close to Bob
if (mBob.getRect().centerX()
      < mScreenX / 2) {

   // Bob is on the left
   // Spawn bullet on the right
   spawnX = mRandomX.nextInt
         (mScreenX / 2) + mScreenX / 2;

   // Head right
   velocityX = 1;} else {

   // Bob is on the right
   // Spawn bullet on the left
   spawnX = mRandomX.nextInt
         (mScreenX / 2);
   // Head left
   velocityX = -1;
}
The first if-else gets the position of the center horizontal pixel of Bob and if it is less than the center of the screen horizontally the first if block executes. The spawnX variable is initialized with a random number between the center of the screen and the far right. Next velocityX is initialized to 1. When the spawn method is called this will have the effect of starting the bullet on the right and making it head to the right, away from Bob.
Of course, it then follows that the else block will execute when Bob is on the right-hand side of the screen and spawnX will then target the left and velocityX will head left.
The second if-else block uses the same techniques to make sure that the bullet is spawned at vertically opposite sides and heading vertically away from Bob.
We are nearly done.
Code the startGame method to reset the number of times the player was hit, the number of bullets spawned and the mHit variable too.
public void startGame(){
   mNumHits = 0;
   mNumBullets = 0;
   mHit = false;


   // Did the player survive longer than previously
   if(mTotalGameTime > mBestGameTime){
         mBestGameTime = mTotalGameTime;
   }

}
The final line of code checks to see if the time survived this game is longer than the previous best and if it is reinitializes mBestGameTime to show the new best time to the player.
We are done with the Bullet Hell game. Let's play.