
Add the single import statement and the member variables. Be sure to study the code it will give some insight and understanding to the rest of the Snake class.
import java.util.ArrayList;

class Snake {

    // The location in the grid of all the segments
    private ArrayList<Point> segmentLocations;

    // How big is each segment of the snake?
    private int mSegmentSize;

    // How big is the entire grid
    private Point mMoveRange;

    // Where is the center of the screen
    // horizontally in pixels?
    private int halfWayPoint;

    // For tracking movement Heading
    private enum Heading {
        UP, RIGHT, DOWN, LEFT
    }

    // Start by heading to the right
    private Heading heading = Heading.RIGHT;

    // A bitmap for each direction the head can face
    private Bitmap mBitmapHeadRight;
    private Bitmap mBitmapHeadLeft;
    private Bitmap mBitmapHeadUp;
    private Bitmap mBitmapHeadDown;

    // A bitmap for the body
    private Bitmap mBitmapBody;
}
The first line of code declares our first ArrayList. It is called segmentLocations and holds Point instances. The Point object is perfect for holding grid locations, so you can probably guess that this ArrayList will hold the horizontal and vertical positions of all the segments that get added to the snake when the player eats an apple.
The mSegmentSize variable is of type int and will keep a copy of the size of an individual segment of the snake. They are all the same size so just the one variable is required.
The single Point mMoveRange will hold the furthest points horizontally and vertically that the snakehead can be at. Anything more than this will mean instant death. We don't need a similar variable for the lowest positions because that is simple, zero, zero.
The halfwayPoint variable is explained in the comments. It is the physical pixel position, horizontally, of the center of the screen. We will see that despite using grid locations for most of these games calculations, this will be a useful variable.
Next up in the previous code we have our first enumeration. The values are UP, RIGHT, DOWN and LEFT. These will be perfect for clearly identifying and manipulating the way in which the snake is currently heading.
Right after the declaration of the Heading type, we declare an instance called heading and initialize it to Heading.RIGHT. When we code the rest of this class you will see how this will set our snake off heading to the right.
The final declarations are five Bitmap objects. For each direction that the snakehead can face and one for the body which was designed as a directionless circle shape for simplicity.
Now add the constructor method for the Snake class. There are heaps going on here so read all the comments and try to work it all out for yourself. Most of it will be straightforward after our discussion about the Matrix class along with your experience from the previous projects. We will go into some details afterward.
Snake(Context context, Point mr, int ss) {

        // Initialize our ArrayList
        segmentLocations = new ArrayList<>();

        // Initialize the segment size and movement
        // range from the passed in parameters
        mSegmentSize = ss;
        mMoveRange = mr;

        // Create and scale the bitmaps
        mBitmapHeadRight = BitmapFactory
                .decodeResource(context.getResources(),
                        R.drawable.head);

        // Create 3 more versions of the
        // head for different headings
        mBitmapHeadLeft = BitmapFactory
                .decodeResource(context.getResources(),
                        R.drawable.head);

        mBitmapHeadUp = BitmapFactory
                .decodeResource(context.getResources(),
                        R.drawable.head);

        mBitmapHeadDown = BitmapFactory
                .decodeResource(context.getResources(),
                        R.drawable.head);

        // Modify the bitmaps to face the snake head
        // in the correct direction
        mBitmapHeadRight = Bitmap
                .createScaledBitmap(mBitmapHeadRight,
                        ss, ss, false);

        // A matrix for scaling
        Matrix matrix = new Matrix();
        matrix.preScale(-1, 1);

        mBitmapHeadLeft = Bitmap
                .createBitmap(mBitmapHeadRight,
                        0, 0, ss, ss, matrix, true);

        // A matrix for rotating
        matrix.preRotate(-90);
        mBitmapHeadUp = Bitmap
                .createBitmap(mBitmapHeadRight,
                        0, 0, ss, ss, matrix, true);

        // Matrix operations are cumulative
        // so rotate by 180 to face down
        matrix.preRotate(180);
        mBitmapHeadDown = Bitmap
                .createBitmap(mBitmapHeadRight,
                        0, 0, ss, ss, matrix, true);

        // Create and scale the body
        mBitmapBody = BitmapFactory
                .decodeResource(context.getResources(),
                        R.drawable.body);

        mBitmapBody = Bitmap
                .createScaledBitmap(mBitmapBody,
                        ss, ss, false);

        // The halfway point across the screen in pixels
        // Used to detect which side of screen was pressed
        halfWayPoint = mr.x * ss / 2;
    }
First of all, the segmentLocations variable is initialized with new ArrayList<>(). Then, mSegmentSize and mMoveRange are then initialized by the values passed in as parameters (mr and ss). We will see how we calculate the values of those parameters when we create our Snake instance in SnakeEngine later in this chapter.
Next, we create and scale the four bitmaps for the head of the Snake. Initially however we create them all the same. Now we can use some of the matrix math magic we learnt about in the section Rotating bitmaps.
To do so, we first create a new instance of Matrix called matrix. We initialize matrix by using the prescale method and pass in the values -1 and 1. This has the effect of leaving all the vertical values the same while making all the horizontal values their inverse. This creates a horizontally 'flipped' image (head facing left). We can then use the matrix with the createBitmap method to change the mBitmapHeadLeft bitmap to look like it is heading left.
Now we use the Matrix class's prerotate method twice, once with the value of -90 and once with the value of 180 and again pass matrix as a parameter into createScaledBitmap to get the mBitmapHeadUp and mBitmapHeadDown ready to go.
Note
It would be perfectly possible to have just a single Bitmap for the head and rotate it based on the way the snake is heading as and when the snake changes direction during the game. With just 10 frames per second, the game would run fine. However, it is good practice to do relatively intensive calculations like this outside of the main game loop, so we did so just for good form.
Next, the Bitmap for the body is created and then scaled. No rotating or flipping is required.
The last line of code for the constructor calculates the midpoint horizontal pixel by multiplying mr.x with ss and dividing the answer by 2.
We will call this method to shrink the snake back to nothing at the start of each game. Add the code for the reset method.
// Get the snake ready for a new game
void reset(int w, int h) {

   // Reset the heading
   heading = Heading.RIGHT;

   // Delete the old contents of the ArrayList
   segmentLocations.clear();

   // Start with a single snake segment
   segmentLocations.add(new Point(w / 2, h / 2));
}
The reset method starts by setting the snakes heading variable back to the right (Heading.RIGHT).
Next, it clears all body segments from the ArrayList using the clear method.
Finally, it adds back into the ArrayList a new Point that will represent the snakes head when the next game starts.
The move method has two main sections. First, the body is moved and lastly the head. Code the move method and then we will examine it in detail.
void move() {
   // Move the body
   // Start at the back and move it
   // to the position of the segment in front of it
   for (int i = segmentLocations.size() - 1;
            i > 0; i--) {

            // Make it the same value as the next segment
            // going forwards towards the head
            segmentLocations.get(i).x =
                  segmentLocations.get(i - 1).x;

            segmentLocations.get(i).y =
                  segmentLocations.get(i - 1).y;
   }

   // Move the head in the appropriate heading
   // Get the existing head position
   Point p = segmentLocations.get(0);

   // Move it appropriately
   switch (heading) {
      case UP:
            p.y--;
            break;

      case RIGHT:
            p.x++;
            break;

      case DOWN:
            p.y++;
            break;

      case LEFT:
            p.x--;
            break;
   }

   // Insert the adjusted point back into position 0
   segmentLocations.set(0, p);

}
The first part of the move method is a for loop which loops through all the body parts in the ArrayList.
for (int i = segmentLocations.size() - 1;
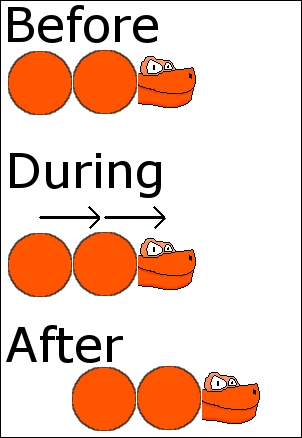
i > 0; i--) {The reason we move the body parts first is that we need to move the entire snake starting at the back. This is why the second parameter of the for loop condition is segmentLocations.size() and the third i--. The way it works is that we start at the last body segment and put it into the location of the second to last. Next, we take the second to last and move it into the position of the third to last. This continues until we get to the leading body position and we move it into the position currently occupied by the head. This is the code in the for loop that achieves this.
// Make it the same value as the next segment
// going forwards towards the head
segmentLocations.get(i).x =
   segmentLocations.get(i - 1).x;

segmentLocations.get(i).y =
   segmentLocations.get(i - 1).y;
This diagram should help visualize the process.
The technique works regardless of which direction the snake is moving but it doesn't explain how the head itself is moved. The head is moved outside the for loop.
Outside the for loop, we create a new Point called p and initialize it with segmentLocations.get(0) which is the location of the head- before the move. We move the head by switching on the direction the snake is heading and moving the head accordingly.
If the snake is heading up, we move the vertical grid position up one place (p.y--) and if it is heading right we move the horizontal coordinate right one place (p.x++). Examine the rest of the switch block to make sure you understand it.
Remember that p is a reference to segmentLocations.get(0) so we are done with moving the head.
This method checks to see if the snake has just died either by bumping into a wall or by attempting to eat himself.
boolean detectDeath() {
   // Has the snake died?
   boolean dead = false;

   // Hit any of the screen edges
   if (segmentLocations.get(0).x == -1 ||
            segmentLocations.get(0).x > mMoveRange.x ||
            segmentLocations.get(0).y == -1 ||
            segmentLocations.get(0).y > mMoveRange.y) {

      dead = true;
   }

   // Eaten itself?
   for (int i = segmentLocations.size() - 1; i > 0; i--) {
         // Have any of the sections collided with the head
         if (segmentLocations.get(0).x ==
                segmentLocations.get(i).x &&
                segmentLocations.get(0).y ==
                segmentLocations.get(i).y) {

                dead = true;
         }
   }
   return dead;
}
First, we declare a new boolean called dead and initialize it to false. Then we use a large if statement that checks if any one of four possible conditions is true by separating each of the four conditions with the logical OR || operator. The four conditions represent going off of the screen to the left, right, top and bottom (in that order).
Next, we loop through the segmentLocations excluding the first position which has the position of the head. We check whether any of the positions are in the same position as the head. If any of them are then the snake has just attempted to eat himself and is now dead.
The last line of code returns the value of dead to the SnakeGame class which will take the appropriate action depending upon whether the snake lives to face another update call or whether the game should be ended.
This method checks to see if the snakehead has collided with the apple. Look closely at the parameters and code the method and then we will discuss it.
boolean checkDinner(Point l) {
   if (segmentLocations.get(0).x == l.x &&
               segmentLocations.get(0).y == l.y) {

        // Add a new Point to the list
        // located off-screen.
        // This is OK because on the next call to
        // move it will take the position of
        // the segment in front of it
        segmentLocations.add(new Point(-10, -10));
        return true;
   }
   return false;
}
The checkDinner method receives a Point as a parameter. All we need to do is check if the Point parameter has the same coordinates as the snakehead. If it does, then an apple has been eaten. We simply return true when an apple has been eaten and false when it has not. SnakeGame will handle what happens when an apple is eaten, and no action is required when an apple has not been eaten.
The draw method is reasonably long and complex. Nothing we can't handle but it does demonstrate that if all this code were back in the SnakeGame class then the SnakeGame class would not only get quite cluttered but would also need access to quite a few of the member variables of this Snake class. Now imagine if you had multiple complex-to-draw objects and it is easy to imagine that SnakeGame would become something of a nightmare.
Note
In the two remaining projects, we will further separate and divide our code out into more classes making them more encapsulated. This makes the structure and interactions between classes more complicated but all the classes individually much simpler. This technique allows for multiple programmers with different skills and expertise to work on different parts of the game simultaneously.
To begin the draw method add a signature and if statement as shown next.
void draw(Canvas canvas, Paint paint) {
   // Don't run this code if ArrayList has nothing in it
   if (!segmentLocations.isEmpty()) {
         // All the code from this method goes here
   }
}
The if statement just makes sure the ArrayList isn't empty. All the rest of the code will go inside the if statement.
Add this code inside the if statement, inside draw method.
// Draw the head
switch (heading) {
   case RIGHT:
         canvas.drawBitmap(mBitmapHeadRight,
                     segmentLocations.get(0).x
                     * mSegmentSize,
                     segmentLocations.get(0).y
                     * mSegmentSize, paint);
         break;

   case LEFT:
         canvas.drawBitmap(mBitmapHeadLeft,
                     segmentLocations.get(0).x
                     * mSegmentSize,
                     segmentLocations.get(0).y
                     * mSegmentSize, paint);
         break;

   case UP:
         canvas.drawBitmap(mBitmapHeadUp,
                     segmentLocations.get(0).x
                     * mSegmentSize,
                     segmentLocations.get(0).y
                     * mSegmentSize, paint);
         break;

   case DOWN:
         canvas.drawBitmap(mBitmapHeadDown,
                     segmentLocations.get(0).x
                     * mSegmentSize,
                     segmentLocations.get(0).y
                     * mSegmentSize, paint);
         break;
}
The switch block uses the Heading enumeration to check which way the snake is facing/heading and the case statements handle the four possibilities by drawing the correct Bitmap based on which way the snakehead needs to be drawn. Now we can draw the body segments.
Add this code in the draw method inside the if statement right after the code we just added.
// Draw the snake body one block at a time
for (int i = 1; i < segmentLocations.size(); i++) {
   canvas.drawBitmap(mBitmapBody,
               segmentLocations.get(i).x
               * mSegmentSize,
               segmentLocations.get(i).y
               * mSegmentSize, paint);
}
The for loop goes through all the segments in the segmentLocations array excluding the head (because we have already drawn that). For each body part, it draws the mBitmapBody graphic at the location contained in the current Point object.
The switchHeading method gets called from the onTouchEvent method and prompts the snake to change direction. Add the switchHeading method.
// Handle changing direction
void switchHeading(MotionEvent motionEvent) {

   // Is the tap on the right hand side?
   if (motionEvent.getX() >= halfWayPoint) {
         switch (heading) {
               // Rotate right
               case UP:
                     heading = Heading.RIGHT;
                     break;
               case RIGHT:
                     heading = Heading.DOWN;
                     break;
               case DOWN:
                     heading = Heading.LEFT;
                     break;
               case LEFT:
                     heading = Heading.UP;
                     break;

         }
   } else {
         // Rotate left
      switch (heading) {
            case UP:
                  heading = Heading.LEFT;
                  break;
            case LEFT:
                  heading = Heading.DOWN;
                  break;
            case DOWN:
                  heading = Heading.RIGHT;
                  break;
            case RIGHT:
                  heading = Heading.UP;
                  break;
      }
   }
}
The switchHeading method receives a single parameter which is a MotionEvent instance. The method detects whether the touch occurred on the left or right of the screen by comparing the x coordinate of the touch (obtained by motionEvent.getX()) to our member variable halfwayPoint.
Depending upon the side of the screen that was touched one of two switch blocks is entered. The case statements in each of the switch blocks handle each of the four possible current headings. The case statements then change heading either clockwise or counterclockwise by 90 degrees to the next appropriate value for heading.
The Snake class is done, and we can, at last, bring it to life.
We have already declared an instance of Snake so initialize the snake just after we initialized the apple in the SnakeGame constructor as shown next by the highlighted code. Look at the variables we pass into the constructor so the constructor can set the snake up ready to slither.
// Call the constructors of our two game objects
mApple = new Apple(context,
         new Point(NUM_BLOCKS_WIDE,
         mNumBlocksHigh),
         blockSize);
mSnake = new Snake(context,
         new Point(NUM_BLOCKS_WIDE,
         mNumBlocksHigh),
         blockSize);
Reset the snake in the newGame method by adding the highlighted code that calls the Snake class's reset method every time a new game is started.
// Called to start a new game
public void newGame() {

   // reset the snake
   mSnake.reset(NUM_BLOCKS_WIDE, mNumBlocksHigh);

   // Get the apple ready for dinner
   mApple.spawn();

   // Reset the mScore
   mScore = 0;

   // Setup mNextFrameTime so an update can triggered
   mNextFrameTime = System.currentTimeMillis();
}
Code the update method to first move the snake to its next position and then checking for death each time the update method is executed. In addition call the checkDinner method, passing in the position of the apple.
// Update all the game objects
public void update() {

   // Move the snake
   mSnake.move();

   // Did the head of the snake eat the apple?
   if(mSnake.checkDinner(mApple.getLocation())){
         // This reminds me of Edge of Tomorrow.
         // One day the apple will be ready!
         mApple.spawn();

         // Add to  mScore
         mScore = mScore + 1;

         // Play a sound
         mSP.play(mEat_ID, 1, 1, 0, 0, 1);
   }

   // Did the snake die?
   if (mSnake.detectDeath()) {
          // Pause the game ready to start again
        mSP.play(mCrashID, 1, 1, 0, 0, 1);

        mPaused =true;
    }

}
If checkDinner returns true then we spawn another apple, add one to the score and play the eat sound. If the detectDeath method returns true then the code plays the crash sound and pauses the game (which the player can start again by tapping the screen).
We can draw the snake simply by calling its draw method which handles everything itself. Add the highlighted code to the SnakeGame draw method.
// Draw the apple and the snake
mApple.draw(mCanvas, mPaint);
mSnake.draw(mCanvas, mPaint);

// Draw some text while paused
if(mPaused){
Add this single line of highlighted code to the onTouchEvent method to have the Snake class respond to screen taps.
@Override
public boolean onTouchEvent(MotionEvent motionEvent) {
   switch (motionEvent.getAction() & MotionEvent.ACTION_MASK) {

          case MotionEvent.ACTION_UP:
                if (mPaused) {
                      mPaused = false;
                      newGame();

                      // Don't want to process snake
                      // direction for this tap
                      return true;
                }

                // Let the Snake class handle the input
                mSnake.switchHeading(motionEvent);
                break;

        default:
              break;

   }
   return true;
}
That's it. The snake can now update itself, check for dinner and death, draw itself and respond to the player's touches.