
Many things about this project will use things we learned during the Scrolling Shooter project and many things will be completely new. By going through a few things in advance albeit not in great detail will give a clearer picture of how the project will eventually turn into the fully-fledged game by the end of chapter 25.
In all the previous projects we spawned objects like bats, balls, snakes, apples, aliens, bullets and lasers based on logic in our code. With this game we need a way to sit back a little and design each level. There are a few different ways we could have done this. We could draw the levels in a graphics application like Paint or Photoshop and then write code to turn a level design image into the game. Another option is to write an entire app that allows the user to select different game objects and then drag and drop them around the screen. The application could then save the design and use it in the game. Both these approaches, unfortunately, would mean a significant increase in the size of the book which is already getting quite chunky. The method I opted for was to lay out the level designs in text, in Android Studio. In the designs, different, alpha-numeric characters would represent different game objects. This is visual and allows the game-designer to create, test and tweak quite easily and is also quite simple to implement.
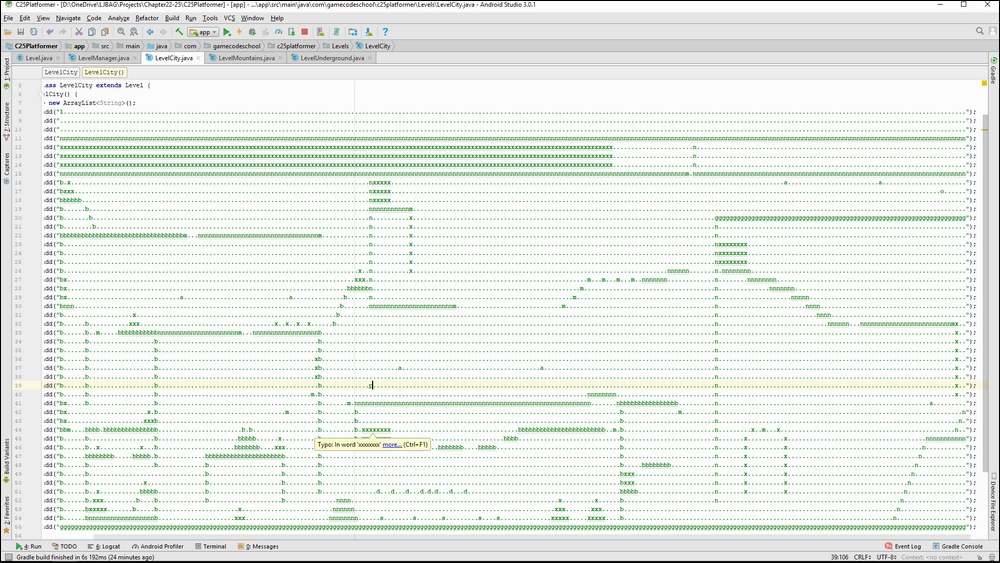
Take a look at this image of one of the level design files. Also open the Chapter 23/Levels folder in the download bundle. Open the files and you can examine them more closely than the image allows.
I don't provide the level files in the book because they are completely impractical to try and present them on the page. Remember that the download bundle is free and quick to get hold of on the book's page on the Packt website- in case you haven't got it already.
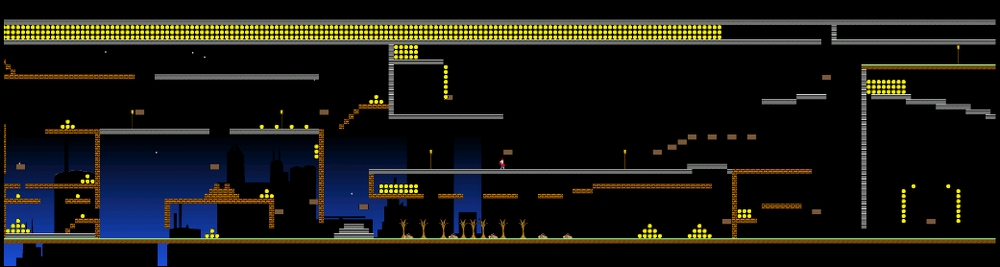
This next image is a zoomed-out view of the game that the game engine translated the previous text file into.
We will look at the level designs and which letters/numbers to use in greater detail in the next chapter.
Here is all the graphics provided for this project.
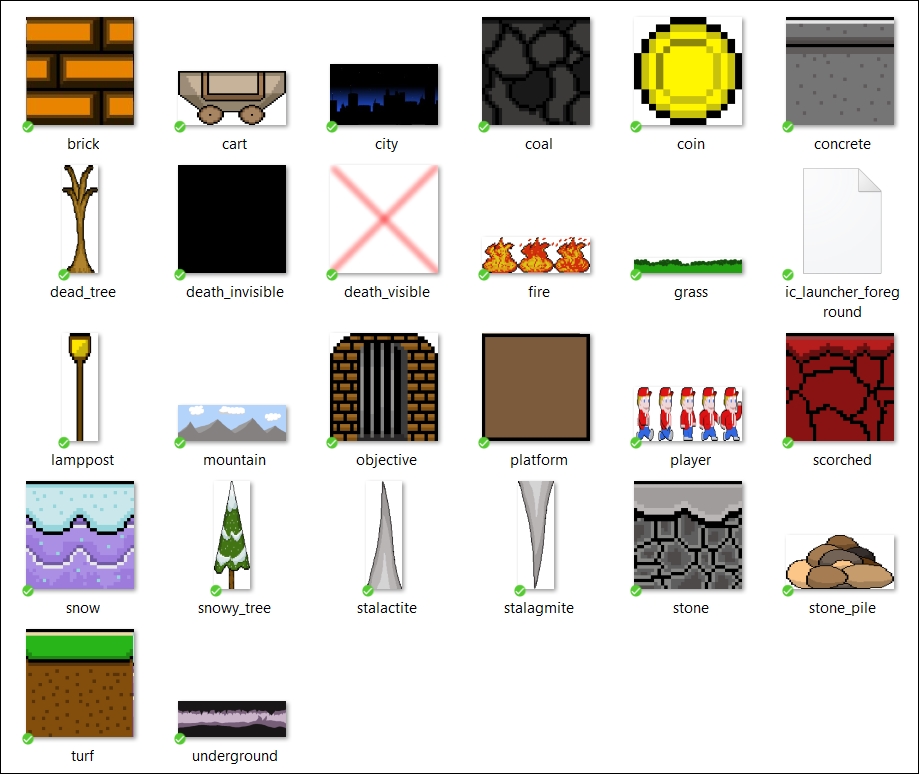
Notice the graphics we will use as tiles for the player to walk on (coal, concrete, scorched, snow, stone, turf). And look at the graphics that will be purely decorative (no collisions or interactions), dead_tree, lamppost, snowy_tree, stalactite, stalagmite and the three backgrounds, city, mountain and underground. There are also two obstacle graphics. Obstacles are things that don't do anything but will need to be jumped over. These are cart and stone_pile. Notice the coin graphic which is the time-saving collectible. The graphic named platform is the moving platform mentioned earlier.
There are two graphics not mentioned so far. Look at a close up of player graphic.
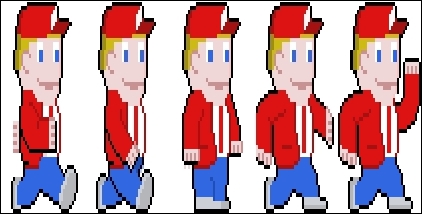
The player graphic is a sprite-sheet. It is a series of frames of animation. Only one of the representations of Bob is shown on screen at any given frame of the game. But our code will loop through them one at a time to create an animated walking effect. This will be controlled by a class called Animator.
Now have a look at the fire graphic which is also a sprite-sheet and will create a flickering fire animation.

We have seen the graphics, we know how we will decide their layout although we haven't seen any code yet but how will we decide which part of the game world should be on the player's screen at any given frame?
The answer to the question is a special class that can be thought of as the camera which is recording the gameplay. Look at the next image.
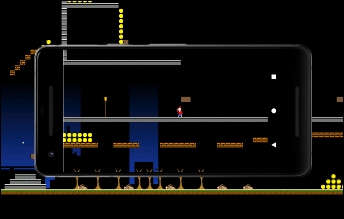
The image is a mock-up made in a simple graphics package that attempts to illustrate the camera in action. We can think of most of the game world existing off-screen and unseen and just the relevant portion being shown on-screen.
In the previous project the player's ship sat in the middle of the screen and the way we made it look like the ship was moving was a bit of a bodged job. The scrolling background did most of the work but the various …AlienMovementComponent based classes helped too. They took account of the direction the player was facing/flying and moderated (sped up or slowed down) their movement towards or away from the player accordingly. There is a better way.
In this project, all the game objects will have world coordinates. The coordinates held by each of the objects will have no connection to pixels on the screen. It could be simpler if you think about these coordinates as virtual metres. In fact, Bob is 2 units tall which is about the height of a not untypical human. Each and every piece of platform, scenery, collectable, Bob and even the background will have a position in the game world as well as a width and height (also in virtual metres) and not know anything about the screen resolution.
Whenever we move an object we will do so in virtual metres. Whenever we do collision detection we will do so in virtual metres. The virtual metre coordinates can still be held in a RectF and the width and height (in virtual metres) can still be held in a PointF. However, when the objects are drawn to the screen the Camera class will calculate whereabouts- if at all they get drawn. The camera will follow the player so as Bob moves around, and his virtual metres-based coordinates change the camera will reposition on-screen the objects drawn around him creating the illusion of moving through the game world.
We get to see the code for this in the next chapter and it is surprisingly straight forward.
In the previous project, because of the lack of a camera we had slightly ambiguous values for width, height and speed. We used relative values that would cause them to scale to the screen size on the device it was running on. In this project, because we have the Camera we can use our new virtual metres. This will make the ObjectSpec class (which all the specification classes drive from) much clearer. We will see this class and code all the specification classes for the entire project, later this chapter.
Also, in this project we will write better code for the Transform of the game objects. We crammed way too much into the Transform class of the Scrolling Shooter project. It was bad design, but it served the purpose of getting the project done without getting any bigger.
For the Platformer project we will have a base/parent Transform class which has much less data in it and suits just the simple game objects like platforms and decorations and we will extend this class to create a BackgroundTransform and PlayerTransform with much more specific methods and data but also still allowing access to the base class's data and methods.
We will code the Transform class in the next chapter and the two extended classes across the rest of the project.
The Entity-Component pattern will be used for every game object in this project just as it was in the previous one. We will not need any spawn-related component classes, however, because starting positions will be determined by the level layout files and none of the objects need to respawn (as the aliens and lasers did).
We will still need a component class which handles what happens during the update phase of the game loop but as many of the objects don't move we will have an UpdateComponent interface instead of a MovementComponent interface. Same job with a new name.
We will still have a GraphicsComponent interface as we did in Scrolling Shooter. We will code these interfaces after we have coded the specification classes later this chapter.
We will still need to communicate from the GameState class to the GameEngine and will again have a EngineController interface to achieve this. Furthermore, we will use the Observer pattern in the exact same way as before to handle communicating the user's input with the classes that need to know about it.
We will also still be using a GameEngineFactory class to construct GameObject instances using component classes based on the various specification classes. This time the class will need to be a bit smarter to make sure each GameObject instance gets the correct type of Transform. Otherwise, this class will be very familiar. As already stated we will code all the specifications in a minute but the components themselves will take shape over the rest of the project.
In this project, some of the levels will have hundreds of game objects. In all the previous projects the game object classes held a copy of the required bitmap. In the Snake game we drew lots of body segments and this was OK because the Snake class reused the body graphic over and over. The platforms, however will only know about themselves, not all the other platforms. This implies that if there is a platform that is 100 tiles long we will need 100 game objects with 100 copies of the graphic. That is not only a waste of memory and processing power but might even cause older Android devices to crash because they have run out of memory. In the next chapter we will code a BitmapStore class who's only job is to store and share bitmaps. Therefore, if there is a length of platform in the game that is 1000 blocks wide, if they are all the same object, perhaps turf, then there will only be one copy of the bitmap.
In the previous project we had the Level class. It defined which object types and how many of them were in the game. It used the GameObjectFactory class to construct the objects we wanted in the game. If we had wanted more divers and less chasers we would have made changes to Level. If we had invented a new type of alien or a smart-bomb for the player, we would have added it in the Level class. Most games have more than one level and this platformer is no exception.
To handle this, we will create a Level class and then extend it to create specific levels called LevelCave, LevelMountain and LevelCity. These Level-based classes will hold all the details of the specific level of the game. We will then create a LevelManager class that will understand how to use the GameObjectFactory class to load the required level when prompted to do so by the GameState class which will work in a similar way to the previous project.