
We know lots about variables, types and how to manipulate them but we haven't considered what variables and types the Sub' Hunter game will need. It will help to first consider all the different values and types we need to keep track of and manipulate, then we can come up with a list of names and types before actually adding the declaration code to the project. After that, we will initialize the variables.
Let's have a think about what our game needs to keep track of. This will dictate the variables, types, and names that we will declare.
- We need to know how many pixels wide and high the screen is comprised of. We will call these variables
numberHorizontalPixelsandnumberVerticalPixels. They will be of typeint. - Once we have calculated the size (in pixels) of one block on the game grid we will want to remember it. We will use an
intvariable calledblockSize. - If we have the size of each block we will also need to know the number of blocks both horizontal and vertical that fit on a given screen/grid. We will use variables named
gridWidthandgridHeightwhich will also be of typeint. - When the player touches the screen, we will need to remember and use the coordinates that were touched. These values will be precise floating-point coordinates and we will name them
horizontalTouchedandverticalTouched. - It will also be necessary to choose and remember which grid position (horizontally and vertically) the sub' is randomly spawned in. Let's call them
subHorizontalPositionandsubVerticalPosition. These will also be of typeint. - Each time that the player takes a shot we will need to know whether the sub was hit- or not. This implies a
booleanvariable and we will call ithit. - The
shotsTakenvariable will be of typeintand as the name implies will be used to count the number of shots the player has had so far. - The
distanceFromSubwill be used to store the calculated distance of the player's most recent shot from the sub'. It will be aninttype variable. - Finally, before we fire up Android Studio, we will need to know whether we want to output all the debugging text or just show the actual game. A
booleannameddebuggingwill do nicely.
Now we know the names and types of all the variables that will be in our game we can declare them, so they are ready for use as we need them.
In Android Studio add the following highlighted variable declarations.
Notice they are declared inside the SubHunter class declaration and before the onCreate method declaration.
public class SubHunter extends Activity {

   // These variables can be "seen"
   // throughout the SubHunter class
   int numberHorizontalPixels;
   int numberVerticalPixels;
   int blockSize;
   int gridWidth = 40;
   int gridHeight;
   float horizontalTouched = -100;
   float verticalTouched = -100;
   int subHorizontalPosition;
   int subVerticalPosition;
   boolean hit = false;
   int shotsTaken;
   int distanceFromSub;
   boolean debugging = true;

/*
   Android runs this code just before
   the app is seen by the player.
   This makes it a good place to add
   the code that is needed for
   the one-time setup.
*/
Notice in the previous code that we declare the variables as we have learned to do earlier in the chapter and that we also initialize a few of them too.
Most of the variables will be initialized later in the code but you can see that gridWidth has been initialized with the value 40. This is a fairly arbitrary number and once Sub' Hunter is complete you can play around with this value. However, giving gridWidth a value works as a kind of starting point when working out the grid size and, of course, the gridHeight value. We will see exactly how we do these calculations soon.
We also initialized the horizontalTouched and verticalTouched variables to -100. This again is arbitrary; the point is that the screen has not been touched yet so having far out values like this makes it plain.
Android is a vast ecosystem of devices and before we can initialize our variables any further we need to know details about the device the game will be running on.
We will write some code to detect the resolution of the screen. The aim of the code when we are done is to store the horizontal and vertical resolutions in our previously declared variables, numberHorizontalPixels, and numberVerticalPixels. Also, once we have the resolution information we will also be able to do calculations for initializing gridHeight and blockSize.
First, let's get the screen resolution by using some classes and methods of the Android API. Add the highlighted code in the onCreate method as highlighted next.
/*
   Android runs this code just before
   the player sees the app.
   This makes it a good place to add
   the code that is needed for
   the one-time setup.
 */

@Override
protected void onCreate(Bundle savedInstanceState) {
   super.onCreate(savedInstanceState);

   // Get the current device's screen resolution
   Display display = getWindowManager().getDefaultDisplay();
   Point size = new Point();
   display.getSize(size);

   Log.d("Debugging", "In onCreate");
   newGame();
   draw()'
}
Tip
What is happening here will become clearer once we have discussed classes further in Chapter 8, Object-Oriented Programming. For now, what follows is a slightly simplistic explanation of the three new lines of code.
The code gets the number of pixels (wide and high) for the device in the following way. Look again at the first new line of code.
Display display = getWindowManager().getDefaultDisplay();
How exactly this works will be explained in more detail in Chapter 11, Collisions, Sound Effects and Supporting Different Android Versions when we discuss chaining. Simply explained, we create an object of type Display called display and initialized with the result of calling both getWindowManager then getDefaultDisplay methods in turn which are part of the Activity class.
Then we create a new object called size of the Point type. We send size as an argument to the display.getSize method. The Point type has an x and y variable already declared, and therefore, so does the size object, which after the third line of code now holds the width and height (in pixels) of the display.
These values, as we will see next will be used to initialize numberHorizontalPixels and numberVerticalPixels.
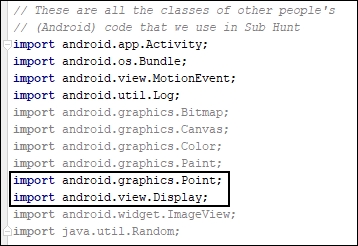
Also, notice that if you look back to the import statements at the top of the code the statements relating to the Point and Display classes are no longer greyed out because we are now using them.
The explanation just given is necessarily incomplete. Your understanding will improve as we proceed.
Now we have declared all the variables and have stored the screen resolution in the apparently elusive x and y variables hidden away in the size object, we can initialize some more variables and reveal exactly how we get our hands on the variables hidden in size.
Add these next four (six including comments) lines of code. Study them carefully and then we can talk about them.
@Override
protected void onCreate(Bundle savedInstanceState) {
   super.onCreate(savedInstanceState);

   // Get the current device's screen resolution
   Display display = getWindowManager().getDefaultDisplay();
   Point size = new Point();
   display.getSize(size);

   // Initialize our size based variables
   // based on the screen resolution
   numberHorizontalPixels = size.x;
   numberVerticalPixels = size.y;
   blockSize = numberHorizontalPixels / gridWidth;
   gridHeight = numberVerticalPixels / blockSize;

   Log.d("Debugging", "In onCreate");
   newGame();
   draw();
}
Let's look at the first line of code because it gives us a glimpse into the later chapters of the book.
numberHorizontalPixels = size.x;What is happening in the highlighted portion of the previous line of code is that we are accessing the x variable contained inside the size object using the dot operator . .
Remember that the width of the screen in pixels has previously been assigned to x. Therefore, the other part of the previous line numberHorizontalPixels = initializes numberHorizontalPixels with whatever value is in x.
The next line of code does the same thing with numberVerticalPixels and size.y. Here it is again for convenience.
numberVerticalPixels = size.y;
We now have the screen resolution neatly stored in the appropriate variables ready for use throughout our game.
The final two lines does some simple math to initialize blockSize and gridHeight. The blockSize variable is assigned the value of numberHorizontalPixels divided by gridWidth.
blockSize = numberHorizontalPixels / gridWidth;
Remember that gridWidth was previously initialized with the value 40. So, assuming the screen once it is made full screen and landscape (as ours has) are 1776 x 1080 pixels (as the Google Pixel emulator is) then gridWidth will be as follows.
1776 / 40 = 44.4
You have probably noticed that the result contains a fraction and an int holds whole numbers. We will discuss this further soon.
Note that it doesn't matter how high or low the resolution of the screen is blockSize will be about right compared to the number of horizontal grid positions and when they are drawn they will fairly neatly take up the entire width of the screen.
The final line in the previous code uses blockSize to match up how many blocks can be fitted into the height.
gridHeight = numberVerticalPixels / blockSize;
Using the resolution of the Google Pixel emulator as an example reveals the first imperfection of our code. Look at the math the previous line performs. Note that we had a similar imperfection when calculating gridWidth.
1080 / 44 = 24.54545…
We have a floating-point (fraction) answer. First, if you remember back to our discussion of types, the .54545.. is lost leaving 24. If you look at the grid we will eventually draw you will notice the last row is a slightly different size.
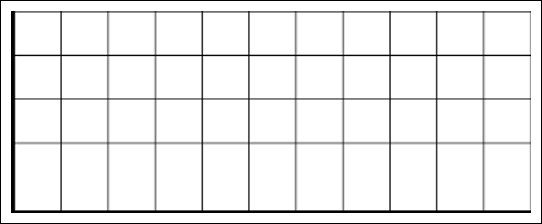
This could be more or less pronounced depending upon the resolution of your chosen device/emulator.
Tip
A common mistake in understanding the float to int conversion is to think like we might have been taught at high school and to round the answer up or down. When a decimal fraction is placed in an int the fractional part of the value is lost not rounded. So, it is always the lower whole number. As an extreme example, 1.999999 would become 1, not 2. When you need more accuracy or high-school rounding is required then you can do things slightly differently. We will be doing more advanced and accurate math than this as we progress through the book.
Another important point to consider for the future although it is not worth getting hung-up on now is that different devices have different ratios of width to height. It is perfectly possible, even likely that some devices will end up with a different number of grid positions than others. In the context of this project it is irrelevant but as our game projects improve throughout the book we will address these issues. In the final project, we will solve them all with a virtual camera
As the code is becoming more expansive it is more likely you will get some errors. Before we add the final code for this chapter let's discuss the most likely errors and warnings, so you know how to solve them when they arise.