
All the game objects are reliant upon or react to the player. For example, the aliens will spawn, chase and shoot relative to the player's position. Even the background will take its que for which way to scroll based on what the player is doing. Therefore, as mentioned previously it makes sense to get the player working first.
However, remember that using the Entity-Component pattern will mean that some of the components we code for the player will also be used when we implement some other game objects.
As we code all the player and background components I will make it clear what is new code and what we coded back in the Coding the player's and the background's empty component classes section.
Remember that despite the heading of this section some of these components comprise non-player related game objects too. We are just coding these first because it makes sense to get the player working right away.
We have two empty methods at the moment, initialize and draw. Let's add the code into the bodies starting with initialize. The new code (everything in the bodies of the methods) is highlighted.
Add the new code to the initialize method.
@Override
public void initialize(
   Context context,
   ObjectSpec spec,
   PointF objectSize){

   // Make a resource id out of the string of the file name
   int resID = context.getResources()
                .getIdentifier(spec.getBitmapName(),
                "drawable",
                context.getPackageName());

   // Load the bitmap using the id
   mBitmap = BitmapFactory.decodeResource(
                context.getResources(), resID);

   // Resize the bitmap
   mBitmap = Bitmap
                .createScaledBitmap(mBitmap,
                             (int)objectSize.x,
                             (int)objectSize.y,
                             false);

   // Create a mirror image of the bitmap if needed
   Matrix matrix = new Matrix();
   matrix.setScale(-1, 1);
   mBitmapReversed = Bitmap.createBitmap(mBitmap,
               0, 0,
               mBitmap.getWidth(),
               mBitmap.getHeight(),
               matrix, true);
}
All the code we have seen several times before. As a reminder this is what is happening. The getResources.getIdentifier methods use the name of the bitmap to identify a graphics file from the drawable folder.
The identifier is then used by the decodeResource method to load the graphics into a Bitmap object.
Next, createScaledBitmap is used to scale the Bitmap to the correct size for the game object.
Finally, a reversed version of the Bitmap is created with another Bitmap. Now we can show any GameObject with a StdGraphicsComponent facing left or right.
Now add the highlighted code into the draw method of the StdGraphicsComponent class.
@Override
public void draw(Canvas canvas,
                      Paint paint,
                      Transform t) {

   if(t.getFacingRight())
        canvas.drawBitmap(mBitmap,
                     t.getLocation().x,
                     t.getLocation().y,
                     paint);

   else
         canvas.drawBitmap(mBitmapReversed,
                      t.getLocation().x,
                      t.getLocation().y,
                      paint);
}
The code in the draw method uses the Transform class's getFacingRight method to determine whether to draw the Bitmap that is facing right or left.
This class is part of the solution that will bring the player's spaceship to life. The code in the move method uses the Transform to determine which way(s) the ship is heading and to move it accordingly. In a few pages time we will also code the PlayerInputComponent that will manipulate the Transform according to the player's screen touches. This is the class that responds to those manipulations.
Add the new highlighted code to the move method of the PlayerMovementComponent class.
@Override
public boolean move(long fps, Transform t,
                            Transform playerTransform){

   // How high is the screen?
   float screenHeight = t.getmScreenSize().y;
   // Where is the player?
   PointF location = t.getLocation();
   // How fast is it going
   float speed = t.getSpeed();
   // How tall is the ship
   float height = t.getObjectHeight();

   // Move the ship up or down if needed
   if(t.headingDown()){
           location.y += speed / fps;
   }
   else if(t.headingUp()){
           location.y -= speed / fps;
   }

   // Make sure the ship can't go off the screen
   if(location.y > screenHeight - height){
           location.y = screenHeight - height;
   }
   else if(location.y < 0){
           location.y = 0;
   }

   // Update the collider
   t.updateCollider();

   return true;
}
The first thing that happens in the move method is that some local variables are initialized from the Transform instance using the getter methods. As the variables are used more than once the code will be neater and fractionally faster than repeatedly calling the Transform class's getters again. At this point we have a variable to represent the screen height, the location of the object, speed of the object and the height of the object represented by the local variables, screenHeight, location, speed and height, respectively.
Next in the move method we use an if statement combined with an else if to determine if the ship is heading either up or down. Here it is again.
// Move the ship up or down if needed
if(t.headingDown()){
   location.y += speed / fps;
}
else if(t.headingUp()){
   location.y -= speed / fps;
}
If it is then the ship is moved either up or down by speed / fps. The next if and else if pair checks whether the ship has gone off the top or bottom of the screen.
// Make sure the ship can't go off the screen
if(location.y > screenHeight - height){
         location.y = screenHeight - height;
}
else if(location.y < 0){
        location.y = 0;
}
If it has location.y is changed to reflect either the lowest (screenHeight-height) or highest (0) point on the screen that the ship should be allowed at.
The final line of code calls the updateCollider method so that the collider is updated based on the new position of the ship.
This is a very simple component. This code executes whenever the GameObject's spawn method is called. Add the highlighted code.
@Override
public void spawn(Transform playerTransform, Transform t) {

   // Spawn in the centre of the screen
   t.setLocation(
                t.getmScreenSize().x/2,
                t.getmScreenSize().y/2);

}
All that we need to do is put the ship in the middle of the screen with the setLocation method. The middle is calculated by dividing the height and width by two.
This class is fairly long but not too complicated when taken a bit at a time. First add the following code to the PlayerInputComponent and setTransform methods.
PlayerInputComponent(GameEngine ger) {
   ger.addObserver(this);
   mPLS = ger;
}

@Override
public void setTransform(Transform transform) {
   mTransform = transform;
}
The constructor receives a reference to the GameEngine which it uses to register as an Observer using the addObserver method. Now this class will receive touch details every time the player touches the screen.
In the setTransform method mTransform is a made a reference to the Transform of the GameObject. Remember that the GameObject class was passed a InputController reference by the factory (soon to code GameObjectFactory) class and uses that reference to call this method.
Now that mTransform is a reference to the actual Transform that is part of the GameObject that is the player's ship the handleInput method can use it to manipulate it. Remember we manipulate the Transform in handleInput and the PlayerMovementComponent responds to those manipulations. As another reminder it is the onTouchEvent method in GameEngine which calls handleInput because PlayerInputComponent is registered as an Observer.
Add the highlighted code in the handleInput method and then we will discuss it. Be sure to look at the parameters that are passed in because they are key to the discussion on how the method does its job.
// Required method of InputObserver
// and is called from the onTouchEvent method
@Override
public void handleInput(MotionEvent event,
                        GameState gameState,
                        ArrayList<Rect> buttons) {
   int i = event.getActionIndex();
   int x = (int) event.getX(i);
   int y = (int) event.getY(i);

   switch (event.getAction() & MotionEvent.ACTION_MASK) {

           case MotionEvent.ACTION_UP:
                if (buttons.get(HUD.UP).contains(x,y)
                || buttons.get(HUD.DOWN).contains(x,y)) {

            // Player has released either up or down
            mTransform.stopVertical();
           }
           break;

      case MotionEvent.ACTION_DOWN:
           if (buttons.get(HUD.UP).contains(x,y)) {
                  // Player has pressed up
                  mTransform.headUp();
           } else if (buttons.get(HUD.DOWN).contains(x,y)) {
                  // Player has pressed down
                  mTransform.headDown();
           } else if (buttons.get(HUD.FLIP).contains(x,y)) {
                  // Player has released the flip button
                  mTransform.flip();
           } else if (buttons.get(HUD.SHOOT).contains(x,y)) {
                  mPLS.spawnPlayerLaser(mTransform);
           }
           break;

      case MotionEvent.ACTION_POINTER_UP:
           if (buttons.get(HUD.UP).contains(x, y)
           ||
           buttons.get(HUD.DOWN).contains(x, y)) {

           // Player has released either up or down
           mTransform.stopVertical();
           }
           break;

      case MotionEvent.ACTION_POINTER_DOWN:
             if (buttons.get(HUD.UP).contains(x, y)) {
                   // Player has pressed up
                   mTransform.headUp();
             } else if (buttons.get(HUD.DOWN).contains(x, y)) {
                   // Player has pressed down
                   mTransform.headDown();
            } else if (buttons.get(HUD.FLIP).contains(x, y)) {
                         // Player has released the flip button
                         mTransform.flip();
            } else if (buttons.get(HUD.SHOOT).contains(x, y)) {
                       mPLS.spawnPlayerLaser(mTransform);
            }
            break;
   }
}
Let's break the internals of handleInput down into manageable chunks. First, we use the getActionIndex, getX and getY methods to determine the coordinates of the touch which triggered this method to be called. These values are now stored in the x and y variables.
int i = event.getActionIndex();
int x = (int) event.getX(i);
int y = (int) event.getY(i);
Now we enter a switch block which decides the action type. There are four case statements that we handle. This is new. Previously we have only handled two cases ACTION_UP and ACTION_DOWN. The difference is that it is possible that multiple fingers could be interacting at one time. Let's see how we can handle this and what the four case statements are.
switch (event.getAction() & MotionEvent.ACTION_MASK) {

}
The first is nothing new. ACTION_UP is handled and we are only interested in the up and down buttons being released. If the up or down button is released, then the stopVertical method is called and the next time the move method of the PlayerMovementComponent is called the ship will not be moved up or down.
case MotionEvent.ACTION_UP:
   if (buttons.get(HUD.UP).contains(x,y)
   || buttons.get(HUD.DOWN).contains(x,y)) {

         // Player has released either up or down
         mTransform.stopVertical();
   }
   break;
Next, we handle ACTION_DOWN and this case is slightly more extensive. We need to handle all the ship controls. Each of the if – else blocks handle what happens when x and y are calculated to be inside a specific button. Take a close look next.
case MotionEvent.ACTION_DOWN:
   if (buttons.get(HUD.UP).contains(x,y)) {
         // Player has pressed up
         mTransform.headUp();
   } else if (buttons.get(HUD.DOWN).contains(x,y)) {
         // Player has pressed down
         mTransform.headDown();
   } else if (buttons.get(HUD.FLIP).contains(x,y)) {
         // Player has released the flip button
         mTransform.flip();
   } else if (buttons.get(HUD.SHOOT).contains(x,y)) {
         mPLS.spawnPlayerLaser(mTransform);
   }
   break;
When up is pressed the headUp method is called. When down is pressed the headDown method is called. When flip is pressed the flip method is called and when shoot is pressed mPLS is used to call the spawnPlayerLaser method on the GameEngine class.
If you look at the next two case statements, presented again next together they will look familiar. In fact, apart from the first line of code for each case - the case statement itself the code is identical to the earlier two case statements.
You will notice that instead of ACTION_UP and ACTION_DOWN we are now responding to the ACTION_POINTER_UP and ACTION_POINTER_DOWN. The explanation is simple. If the first finger to make contact with the screen causes an action to be triggered it is held by the MotionEvent object as an ACTION_UP or ACTION_DOWN. If it is the 2nd, 3rd, fourth, etc. then it is held as an ACTION_POINTER_UP or ACTION_POINTER_DOWN. This hasn't mattered in any of the earlier games and we have been able to avoid the extra code.
case MotionEvent.ACTION_POINTER_UP:
   if (buttons.get(HUD.UP).contains(x, y)
         ||
         buttons.get(HUD.DOWN).contains(x, y)) {

         // Player has released either up or down
         mTransform.stopVertical();
   }
   break;

case MotionEvent.ACTION_POINTER_DOWN:
   if (buttons.get(HUD.UP).contains(x, y)) {
         // Player has pressed up
         mTransform.headUp();
   } else if (buttons.get(HUD.DOWN).contains(x, y)) {
         // Player has pressed down
         mTransform.headDown();
   } else if (buttons.get(HUD.FLIP).contains(x, y)) {
         // Player has released the flip button
         mTransform.flip();
   } else if (buttons.get(HUD.SHOOT).contains(x, y)) {
         mPLS.spawnPlayerLaser(mTransform);
   }
   break;
It won't matter in our game whether it is a POINTER or not providing we respond to all the presses and releases. The player could be using crossed arms to play the game it doesn't make any difference to the Scrolling Shooter.
Let's turn our attention to the lasers.
We have already coded the PlayerLaserSpawner interface, implemented it through the GameEngine class, coded the PlayerInputComponent to receive an PlayerLaserSpawner instance as well as call the spawnPlayerLaser method (on GameEngine) when the player presses the on-screen shoot button. In addition, we have also coded a helper method in the Transform class (getFiringLocation) which calculates an aesthetically pleasing location to spawn a laser based upon the position and orientation of the player's ship.
For all of this to work we need to code the component classes of the laser itself. Add the following highlighted code to the move method of the LaserMovementComponent class.
@Override
public boolean move(long fps,
                    Transform t,
                    Transform playerTransform) {

   // Laser can only travel two screen widths
   float range = t.getmScreenSize().x * 2;

   // Where is the laser
   PointF location = t.getLocation();

   // How fast is it going
   float speed = t.getSpeed();

   if(t.headingRight()){
           location.x += speed / fps;
   }
   else if(t.headingLeft()){
           location.x -= speed / fps;
   }

   // Has the laser gone out of range
   if(location.x < - range || location.x > range){
          // disable the laser
          return false;
   }

   t.updateCollider();

   return true;
}
The new code in the move method initializes three local variables, range, location and speed. They are initialized using the laser's Transform reference. Their names are quite self-explanatory except perhaps range. The range variable is initialized by the width of the screen (t.getmScreensize.x) multiplied by two. We will use this value to monitor when it is time to deactivate the laser.
Next in the move method we see some code very similar to the PlayerMovementComponent. There is an if and an else-if block which detects which way the laser is heading (t.headingRight or t.headingLeft). Inside the if and else-if blocks the laser is moved horizontally in the appropriate direction using speed / fps.
The next if block checks if it is time to deactivate the laser using the formula repeated next:
if(location.x < - range || location.x > range){The if statement detects whether double the width of the screen has been exceeded in either the left or right-hand directions. If it has then the move method returns false. Think back to when we called the move method in the GameObject class's update method- when the move method returned false the mIsActive member of GameObject is set to false. The move method will no longer be called on this GameObject.
The final line of code in the move method updates the laser's collider to its new position using the updateCollider method.
The last bit of code for the laser is the spawn method of the LaserSpawnComponent. If you are wondering how the laser will draw itself refer to the PlayerLaserSpec class and you will see it uses a StdGraphicsComponent that we have already coded.
Add the new highlighted code into the spawn method as shown next.
@Override
public void spawn(Transform playerTransform,
                            Transform t) {

   PointF startPosition =
               playerTransform.getFiringLocation(t.getSize().x);

   t.setLocation((int)startPosition.x, (int)startPosition.y);

   if(playerTransform.getFacingRight()){
      t.headRight();
   }
   else{
          t.headLeft();
   }
}
The first thing the new code does is initialize a PointF called startPosition by calling the getFiringLocation method on the player's Transform reference. Notice also that the size of the laser is passed to getFiringLocation as is required for the method to do its calculations.
Next the setLocation method is called on the laser's Transform reference and the horizontal and vertical values now held by startPosition are used as arguments.
Finally, the player's heading is used in an if-else statement to decide which way to set the laser's heading. If the player was facing right it makes sense that the laser will also head right (or vice versa).
At this point the laser is ready to be drawn and moved.
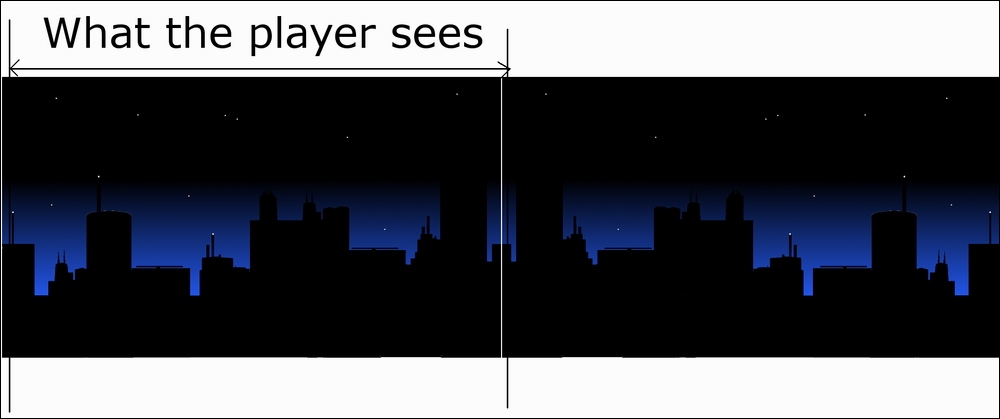
The first frame of the game shows the background image like this. This is unmanipulated in any way.

The way the next frame is shown is to move the image off-screen to the left. So, what do we show on the last pixel-wide vertical column on the right-hand side of the screen? We will make a reversed copy of the same image and show it to the right of the original(unreversed) image. The next image shows a gap between the two images to make it plain that there is a join and where the two images are, but in reality, we will put the images right next to each other so the join is invisible.
As the original image and the reversed image are steadily scrolled to the left, eventually, half of each image will be shown and so on.
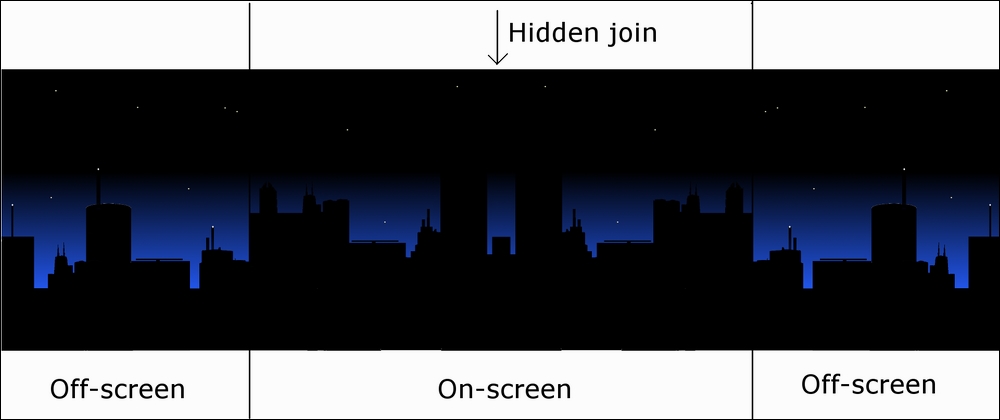
Eventually, we will be reaching the end of the original image and the last pixel on the right-hand-side of the reversed image will eventually be on-screen.
At the point when the reversed image is shown in full on the screen, just like the original image was at the start, we will move the original image over to the right-hand side. The two backgrounds will continuously scroll and as the right-hand image (either original or reversed) becomes the entire view that the player sees, the left-hand image (either original or reversed) will be moved to the right-hand-side ready to be scrolled into view.
Now we know what we need to achieve to scroll the background we can code the three background related component classes.
Let's start with the BackgroundGraphicsComponent. The first method we must code is the initialize method. Add the highlighted code to the initialize method.
@Override
public void initialize(Context c,
                       ObjectSpec s,
                       PointF objectSize) {

   // Make a resource id out of the string of the file name
   int resID = c.getResources()
          .getIdentifier(s.getBitmapName(),
          "drawable", c.getPackageName());

   // Load the bitmap using the id
   mBitmap = BitmapFactory
         .decodeResource(c.getResources(), resID);

   // Resize the bitmap
   mBitmap = Bitmap
         .createScaledBitmap(mBitmap,
                (int)objectSize.x,
                (int)objectSize.y,
                false);

   // Create a mirror image of the bitmap
   Matrix matrix = new Matrix();
   matrix.setScale(-1, 1);
   mBitmapReversed = Bitmap
                .createBitmap(mBitmap,
                0, 0,
                mBitmap.getWidth(),
                mBitmap.getHeight(),
                matrix, true);
}
The code is nothing we haven't seen before. The resource is selected using the name of the bitmap, it is loaded using decodeResource, it is scaled using createScaledBitmap then the Matrix class is used in conjunction with createBitmap to create the reversed version of the image. We now have two Bitmap objects (mBitmap and mBitmapReversed) ready to do our drawing.
Now we can code the draw method that will be called each frame of the game to draw the background. Add the new highlighted code to the draw method and then we can discuss it.
@Override
public void draw(Canvas canvas,
            Paint paint,
            Transform t) {

   int xClip = t.getXClip();
   int width = mBitmap.getWidth();
   int height = mBitmap.getHeight();
   int startY = 0;
   int endY = (int)t.getmScreenSize().y +20;

   // For the regular bitmap
   Rect fromRect1 = new Rect(0, 0, width - xClip, height);
   Rect toRect1 = new Rect(xClip, startY, width, endY);

   // For the reversed background
   Rect fromRect2 = new Rect(width - xClip, 0, width, height);
   Rect toRect2 = new Rect(0, startY, xClip, endY);

   //draw the two background bitmaps
   if (!t.getReversedFirst()) {
      canvas.drawBitmap(mBitmap,
                        fromRect1, toRect1, paint);

      canvas.drawBitmap(mBitmapReversed,
                        fromRect2, toRect2, paint);

   } else {
      canvas.drawBitmap(mBitmap, fromRect2,
                        toRect2, paint);

      canvas.drawBitmap(mBitmapReversed,
                        fromRect1, toRect1, paint);
   }
}
The first thing we need to do is declare some local variables to help us draw the two images in the correct place.
- The
xClipvariable is initialized by callinggetXclipusing theTransformreference. The value ofxClipis the key to deciding where the join in the image is. TheTransformholds this value and it is manipulated in theBackgroundMovementComponentthat we will code next. - The
widthvariable is initialized from the width that theBitmapwas scaled to. - The
heightvariable is initialized from the height that theBitmapwas scaled to. - The
startYvariable is the vertical point where we want to start drawing the images. This is simple- the top of the screen- zero. It is initialized accordingly. - The
endYvariable is the bottom of the screen and is initialized to the height of the screen + twenty pixels to make sure there are no glitches.
Next, we initialize four Rect objects. When we draw the bitmaps to the screen we will need two Rect objects for each Bitmap. One to determine the portion of the Bitmap to be drawn from. And one to determine the area of the screen to draw to. Therefore, we have named the Rect objects fromRect1, toRect1, fromRect2 and toRect2. Look at these four lines of code again.
// For the regular bitmap
Rect fromRect1 = new Rect(0, 0, width - xClip, height);
Rect toRect1 = new Rect(xClip, startY, width, endY);

// For the reversed background
Rect fromRect2 = new Rect(width - xClip, 0, width, height);
Rect toRect2 = new Rect(0, startY, xClip, endY);
First of all, note that for the purpose of explanation we can ignore all the vertical values of the four Rect objects. The vertical values are the second and fourth arguments and they are always startY and endY.
You can see that fromRect1 always starts at zero horizontally. And extends to the full width less whatever the value of xClip is.
Jumping to fromRect2 we see it always starts from the full width less xClip and extends to the full width.
Try and picture in your mind that as xClip increases in value the first image will shrink horizontally and the second image will grow. As xClip decreases in value the opposite happens.
Now turn your attention to toRect1. We can see that the image is drawn to the screen from xClip to whatever width is. Now look at toRect2 and see that it is drawn from the width less xClip to whatever width is. These values have the effect of positioning the images exactly side by side based on whatever their current width is as well as making sure that these widths cover exactly the whole width of the screen.
Tip
The author considered different ways of explaining how these Rect values are calculated and suggests that for absolute clarity of how this works the reader should use pencil and paper to calculate and draw the rectangles for different values of xClip. This exercise will be most useful once you have finished coding the background related components to see how xClip is manipulated.
The final part of the code uses the Transform reference to determine which image should be drawn on the left (first) and then draws the two images using drawBitimap and the four previously calculated Rect objects.
Next, we will get the background moving. This is achieved mainly by incrementing and decrementing mXClip in the Transform class but also by switching the order in which the images are drawn. Add the highlighted code to the move method of the BackgroundMovementComponent class.
@Override
public boolean move(long fps,
   Transform t,
   Transform playerTransform) {

   int currentXClip = t.getXClip();

   if(playerTransform.getFacingRight()) {
          currentXClip -= t.getSpeed() / fps;
          t.setXClip(currentXClip);
   }
   else {
          currentXClip += t.getSpeed() / fps;
          t.setXClip(currentXClip);
   }

   if (currentXClip >= t.getSize().x) {
          t.setXClip(0);
          t.flipReversedFirst();
   }
   else if (currentXClip <= 0) {
          t.setXClip((int)t.getSize().x);
          t.flipReversedFirst();
   }

   return true;
}
The first thing the code does is get the current value of the clipping/joining position from the Transform reference and store it in the currentXClip local variable.
The first if-else block tests whether the player is facing left or right. If the player is facing right currentXclip is reduced by the background's speed divided by the current frame rate. If the player is facing left currentXClip is increased by the background's speed divided by the current frame rate. In both cases the setXClip method is used to update mXClip in the Transform.
Next in the code there is an if-else-if block. These test whether currentXClip is either greater than the width of the background or less than zero. If currentXClip is greater than the width of the background setXclip is used to set it back to zero and the order of the images is flipped with flipReversedFirst. If currentXClip is less than or equal to zero setXClip is used to set it to the width of the background and the order of the images is flipped with flipReversedFirst.
The method always returns true because we never want to deactivate the background.
We just need to spawn the background and then we can start work on the factory that will compose and construct all these components into GameObject instances.
Add the highlighted code to the spawn method of the BackgroundSpawnComponent.
@Override
public void spawn(Transform playerLTransform, Transform t) {
   // Place the background in the top left corner
   t.setLocation(0f,0f);
}
A single line of code sets the backgrounds position to the top left corner of the screen.
But hang on a minute! We haven't instantiated a single game object. For that we need two more classes to complete our game object production line. The first is the factory itself and the next is the Level class which you can edit to determine what the game looks like (how many and which type of enemy), you can even extend it to make a game with multiple different levels.
Note
We will see how to create a game with multiple different levels for the final project of the book starting in Chapter 22, Exploring More Patterns and Planning the Platformer Project.
Once these two classes are complete it will be very easy to add lots of different aliens to the game. It would also be trivial to design and add your own …Spec classes, code their component classes and add them to the game.