Integrating Outlook Features with SharePoint
There are several excellent integration points with Outlook in this new version SharePoint. Probably the most useful integration is the ability to take tasks, lists, and documents offline and to synchronize changes seamlessly between Outlook and SharePoint. This offline integration will eliminate the need to purchase third-party products that provided this capability in the 2003 edition. Since this functionality is similar to the synchronization provided by Groove, organizations that already have the 2007 Office system should consider which products to purchase and roll out based on other factors such as full offline collaborative functionality.
The improved calendar functionality and integration make it much easier to coordinate individual and group events and activities. This section will describe and show examples that help to illustrate these new integration points.
Outlook integration with SharePoint tasks and contacts
Chapter 4 explored the various lists and libraries that are available in SharePoint. Lists are a very powerful feature of SharePoint that allow the tracking of sales, projects, small business inventory, and many other useful activities. In the 2007 release of Outlook, it is now possible to synchronize task and project tasks lists with Outlook, making the offline access and maintenance of tasks as easy as working with e-mail.
Exploring Tasks list synchronization
To explore how this functionality works, create a few sample Tasks list entries, link the list to Outlook, and then make changes on both the server and the client.
1. | Open your Outlook client. |
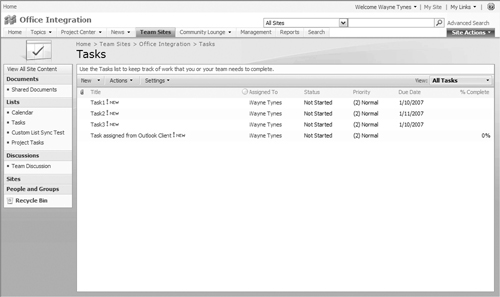
2. | Access a MOSS or WSS team site. Create either a project Tasks list or use the default Tasks list that comes with most of the site templates for this walkthrough. Go to your list and create a few sample tasks as in Figure 13.16. |
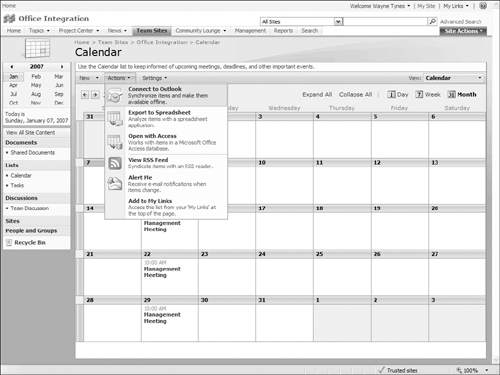
3. | Click Actions and then Connect to Outlook. |
4. | Click Advanced to see the additional configuration options. You will see the SharePoint List Options dialog box. This dialog box allows you to change the folder name that appears on the Outlook client as well as create a description of the list. Additionally, you can set this list to show up only on the computer you are currently using and adjust the Update Limit, which can change the update frequency of list synchronization. Leave the defaults and click OK. |
5. | Answer Yes to the Connect this SharePoint Task List to Outlook? dialog box. Your Outlook client will show a view of the list. Click New in the Outlook client to create a new task entry. |
6. | Fill in the Assigned To field and give your task a subject like “Task assigned from Outlook client” to make it easy to see where it originated. Click Save & Close and go back to your team site Tasks list. Your Tasks list should show the new entry as in Figure 13.17. |
7. | Go back to your site and refresh. You will see your new task entry. |

This powerful functionality allows users to take important Tasks lists with them when traveling, even in locations that don’t provide network access. This capability also helps to increase productivity by putting task information in the Outlook client where many users spend most of their day.
Removing the Tasks list from Outlook
To remove the Tasks list, just go to Tasks in Outlook and look for your list under Other Tasks. Right-click the tasks and select Delete.
Add SharePoint contacts to your Outlook client
You can connect SharePoint contacts to Outlook, update them, and have those changes synchronized back to the SharePoint site.
1. | In your browser, open a SharePoint contacts list. |
2. | Click Actions
|
3. | When prompted to connect the contacts, click OK. |
The contacts are added under Other Contacts in Contacts in the left navigation. To remove the contact list, just right-click the name of this list and select Delete (name of list).
Access to SharePoint document libraries and discussions
In addition to Tasks list synchronization, SharePoint and Outlook are also integrated to provide offline access to SharePoint document libraries and discussions. Outlook can provide instant search capability by keeping an index of all Outlook data updated as new content and mail items are stored, which extends this capability to offline document libraries and discussions.
After you have connected a SharePoint library to Office Outlook 2007, your library will show up in a folder called SharePoint Lists. Once the file is in this folder, you can treat is as you would other Outlook files and mail messages, including the use of flags and categories. If you have folder structures in your SharePoint document library, those folder structures will also show up in Outlook. The files are stored in a PST file on your local disk, not on the e-mail server inbox.
While editing your documents, Outlook will prompt you for a location on the local drive to save the document for editing. This keeps you from having to save your file to the server over a slow link while working. When you are finished editing the document, you can simply update the server copy of the file.
Note
Documents that are synchronized to Outlook are not automatically checked out. To be sure that the document is locked for editing, it is important to go to the document on the site and select Check Out from the document pull-down menu.
To explore document library synchronization, follow these steps:
1. | Go back to your team site and go to a document library. For this example, use the Shared Document library that is a default part of most templates. |
2. | If you don’t have any documents in your document library, import two or three documents using the Upload control. |
3. | Click Actions and then Connect to Outlook. Again, you can use the advanced options to change the name and description as well as other options. Click Yes. Note If you would like to have all of the folders and files in your SharePoint document library copied down to Outlook, make sure that you have your browser pointed at the top level of your folders prior to selecting Connect to Outlook. |
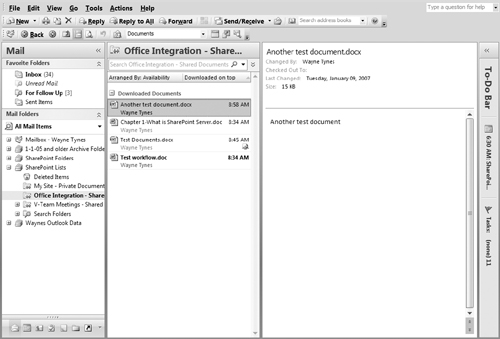
4. | Outlook then changes focus to the new (Team Site Name) Shared Documents under SharePoint Lists in your Outlook folders view, as in Figure 13.18. Note If you add additional documents to your SharePoint Document library and they don’t show up in your Outlook client immediately, simply click Send/Receive to force synchronization with the server and the document should appear. |
5. | Double-click one of the documents in your Outlook list to test out the server update. |
6. | You may see an Opening File dialog box. Click Open. |
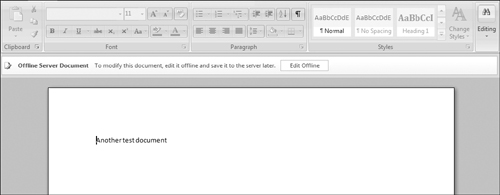
7. | The document opens in Word 2007 and you will notice an Offline Server Document message in the Ribbon, as in Figure 13.19, that says, “To modify this document, edit it offline and save it to the server later.” Click the Edit Offline button. |
8. | The Edit Offline dialog box appears. At this point you can change the Draft storage location on your hard drive as well as access the Word options settings by clicking Offline Editing Options. For this example, just click OK to put the document into offline editing mode. |
9. | Notice that the Ribbon message goes away. Make an edit to the document and then click Save. |
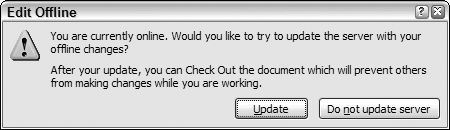
10. | Close the document. You will receive the message shown in Figure 13.20. Click Update to update the server copy. If you would like to keep working on the document and make sure that no one else edits the document, you can check it out on the server. Figure 13.20. The Update Server Copy dialog box
|
Note
If a file you are working on was not checked out, and that file is also edited from the server, a server conflict message will appear. Follow the instructions to complete the save.
Working with discussions offline is almost identical to working with documents. Simply create a new discussion and then click Actions
![]() Connect to Outlook and your discussion is copied to a folder under SharePoint Lists in the Outlook left navigation.
Connect to Outlook and your discussion is copied to a folder under SharePoint Lists in the Outlook left navigation.
Calendaring integration
Calendars have been enhanced with richer calendar views, expanded support for recurring events, and all-day events.
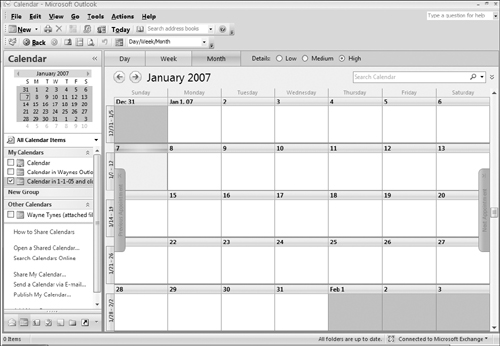
To explore the calendaring integration, a good first step is to open your Outlook 2007 calendar and a SharePoint team site calendar up to a monthly view. As you can see in Figures 13.21 and 13.22, the two calendars look very similar.

With both calendars still open, click to access the daily and weekly views on both calendars. Not bad, but what about the “integration,” you may ask? In the 2003 release of SharePoint, it was possible to view a team site calendar side by side with your Outlook calendar. In the 2007 releases, it is now possible to both view and update both calendars. To explore this functionality, you must first connect a SharePoint calendar to your Outlook client.
Connect a SharePoint calendar to the Outlook client
To connect a SharePoint calendar to the Outlook client, follow these steps:
1. | Go to your team site calendar in the browser. |
2. | |
3. | A Microsoft Office Outlook dialog box prompts you to connect only to sources you can trust. Click Yes. |
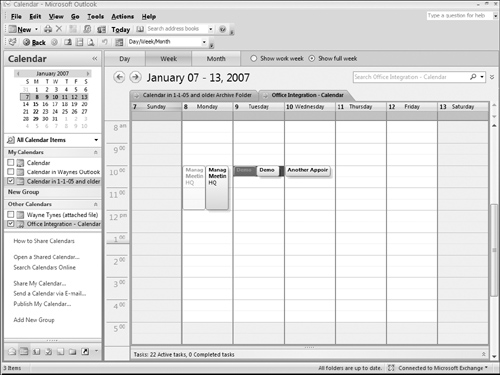
4. | Open Outlook to your calendar view and you will notice a new calendar under Other Calendars in the left side task pane. Also, notice the calendars show up side by side. |
You can now do useful activities like copy calendar items from one calendar to another. For example, in my SharePoint calendar I have a recurring management meeting every Monday from 10 am to 12 pm. By simply clicking on the appointment and dragging it to the same day on my Outlook calendar, the appointment with its recurrence properties is copied over.
Note
Although the recurrence property of weekly, every 1 week from 10 to 12, copied over correctly, the end date that was set on the server did not transfer over. Be sure to check your copied items to be sure all properties are set the way you want.
This copy capability works both ways: you can move appointments from your personal calendar to the shared calendar, too.
Overlaying the SharePoint calendar with your Outlook calendar
Overlaying the calendars allows you to see all of your events at one time, helping to avoid conflicts. Let’s walk through how to do this with the two calendars you are working with now.
1. | Click the Arrow in the Calendar tab of the SharePoint calendar. Now your overlay should look like Figure 13.24. Notice the entries match the colors of the calendar tabs to make it easy to see where each entry originated. |
2. | To reverse/turn off the overlay, simply click either of the arrows on the tab. |
RSS subscription
Outlook integration with SharePoint via Really Simple Syndication (RSS) was designed to help you keep track of changing information in Tasks lists and to know when new documents have been added to a SharePoint library.
Similar to the Alerts capability in SharePoint, RSS enables you to subscribe to updates. This technology allows content publishers to distribute information in a standard format to RSS readers. Outlook is an RSS reader and can receive feeds of content from multiple sources.
The following steps show how to add a SharePoint list RSS subscription to Outlook:
1. | Go to a SharePoint site or list in your browser and open your Outlook client. |
2. | In Outlook, open your RSS Feeds folder. |
3. | Go back to your SharePoint list and click Actions
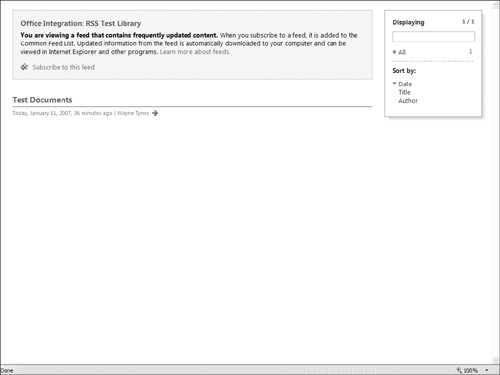
The Internet Explorer Subscribe to this Feed dialog box appears. Here you can change the name of your feed and select the folder you would like to create the feed in or create a new folder. |
4. | Click the Subscribe button. |
5. | The RSS Feeds page now shows any items that are in the list/library, and from this page you can View feed properties or sort and filter items. If you click View feed properties, you can change your feed schedule to be as short as 60 minutes or as long as 1 week. You can also set it to Never if you would like to turn off a feed but keep it available to activate later. |
6. | Go to your Outlook client and notice the new folder under your RSS Feeds folder. Add items to your list and come back after the time you specified in the Feed Properties dialog box to see the new updates. |