26
Drum triggering
A short story. A band goes into a studio to record a song. The producer and the engineer spend some time miking up the drum kit. They try different microphones in different positions and mic each drum with two microphones. They experiment with different snares of different sizes and woods, go through the process of tuning the toms as they wish, build the famous kick tunnel, and dampen all the drums. After perhaps seven hours of preparation, they cut the first drum take. Two weeks later, the track reaches the mixing engineer, who, in his own studio, at night, replaces all the drum recordings with samples— perhaps 20 minutes of work. None of the original drum tracks are left in the mix. He also filters some ambiance from the overheads and reconstructs it from the drum samples. Three days later, the clients come around to hear the mix. The drums sound amazing. The band is happy, the producer is happy, the record company is happy, and four months later the listeners are happy—everyone is happy. Many tracks have similar stories; one of them is Nirvana’s “Smells Like Teen Spirit.”
The practice of using samples to add to or replace real drums started somewhere around the early 1980s. It was used in pop and soon became an extremely common practice in the more energetic metal genres (where it is still prevalent). Throughout the 1990s, engineers started using it more and more in virtually any genre that involved recorded drums. This technique has always had its critics, who dismissed it as being disloyal to the true essence of performance and recording. Nonetheless, drum triggering is an extremely popular practice nowadays, and many recorded productions involve some degree of drum replacement.
One approach to generating the samples is programming a drum sequence that matches the recorded performance, then using a sampler to trigger the drums. Before audio sequencers existed, this meant syncing a tape machine to a hardware sequencer. Unless the recorded drums were tight to a metronome, this involved (and still does) the generation of tempo maps. Altogether, this method can be rather tedious. Today, the most common approach to drum triggering involves feeding a drum track, say the snare, to a machine or a plugin that triggers the samples in real time. The samples can be those of a drum module, taken from a sample library, or just clean individual hits that were recorded during the session. The samples either replace or are layered over the original recording. Although most commonly used with drums, we sometimes use samples to reinforce cymbals.
There are various benefits of drum replacement. First, we have total freedom over the sample we use, so if we do not like the sound of, say, the toms, we replace them with tom samples we do like. When layered, samples might be used to add missing timbre components. Second, the resultant samples track is spill-free, which makes gating, compression, and the addition of reverb both easier and more consistent. Third, most often as part of the process of drum triggering, we have ultimate control over the level of the hits, which can make the performance more consistent (and therefore possibly more powerful).
Drum replacement is ideal for budget drum recordings carried out in problematic rooms. The good news is that you can get away with horrendous close-mic recordings. The bad news is that you still need good overheads recording, which, out of all drum recordings, is the hardest to achieve in problematic rooms—the small dimensions of the room can cause comb filtering, profound room modes can alter the captured frequency content, and, above all, the reverb in such rooms is often not the greatest. Still, drum replacement is a blessing in situations where the drum recordings are flawed. Similar to guitar re-amping, it allows us to select the sound of our drums during mixdown.
![]()
The drums in the following demonstration are from the “Hero” production.
Track 26.1: Kick Original
A blend between the recorded kick in and out microphones.
Track 26.2: Kick Trigger
The original audio kick track is converted to MIDI using Logic’s “Audio to Score” function, then Toontrack EZdrummer is used to trigger this kick sample. Note the consistent velocity, unlike in the previous track.
Track 26.3: Snare Original
A blend between the recorded snare top and bottom microphones, and a snare reverb.
Track 26.4: Snare Trigger
The snare trigger, which is a product of Trillium Lane Labs’ Drum Rehab. This trigger is not intended to replace the original snare, just to blend in with it.
Track 26.5: Snare Original and Trigger
A blend between the original snare and its trigger. Compare this track to Track 26.3.
Track 26.6: Drums Without Triggers
The recorded drum kit without triggers.
Track 26.7: Drums With Triggers
In this track, the original kick is replaced with the kick trigger, while the snare trigger is only layered with the original snare.
Plugin: Trillium Lane Labs Drum Rehab
Kick: Toontrack EZdrummer
Methods of drum triggering
Delay units with sample and hold
One early method of triggering drum samples was using a delay unit that offered a sample and hold facility. A single drum hit was sampled and then could be triggered by feeding the unit with the performance itself. The main disadvantages of this method were that it required sampling a drum hit first (rather than choosing between different prerecorded samples) and that the triggered sample was always the same, including its level.
Drum module triggers
Another early method, still used today, involves the drum modules used with electronic drum kits. These modules have trigger inputs that are fed from the drum pads via a standard audio connection. Instead of feeding these inputs with the pads, we can feed a line-level signal from the multitrack or perhaps a gated version from the desk. Drum modules let us choose different samples via their interface. Most modules are velocity-sensitive, meaning that the triggered sample level corresponds to the level of the input hit. Some modules also provide dynamic control, where we can set the ratio between input and output velocities. For example, we might configure the unit, so wild variations in the level of input hits will only result in small (or no) level variations of the output samples.
Footswitch on a synchronizer
Some synchronizers have an input footswitch. The synchronizer can generate a specific MIDI note every time a signal exists at the footswitch input. By routing a drum track into the footswitch input, the synchronizer generates a MIDI note with every hit. We can connect the MIDI output of the synchronizer to a drum module or a sampler.
Drum replacement plugins
Early drum replacement plugins, such as Digidesign’s Sound Replacer, worked offline. Recent products such as TL Drum Rehab (Figure 26.1) and Drumagog perform drum replacement in real time. Essentially, these plugins are loaded as an insert on a drum track, various detection parameters are configured and we get to choose from various drum samples on our hard drive. We can also set the mix between the original track and the triggered samples. Most replacement plugins let us set the ratio between input and output velocities. Also, triggering might be based on velocity layers, where different input velocities trigger different samples, each of the same drum played at different velocities. This gives more realistic results.
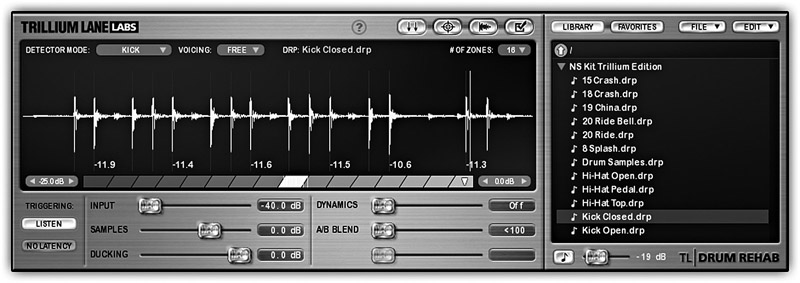
Figure 26.1 The Trillium Lane Labs Drum Rehab.
Audio to MIDI
Some applications let us convert audio into MIDI data. In Logic, the single audio track is first analyzed offline, and after configuring various settings a new MIDI region is created with notes representing each drum hit (Figure 26.2). The advantage of audio-to-MIDI conversion is that we can then more easily alter the various hits, whether in level or in timing. Digital Performer offers a very similar conversion that takes place in real time via a plugin called Trigger (Figure 26.3).
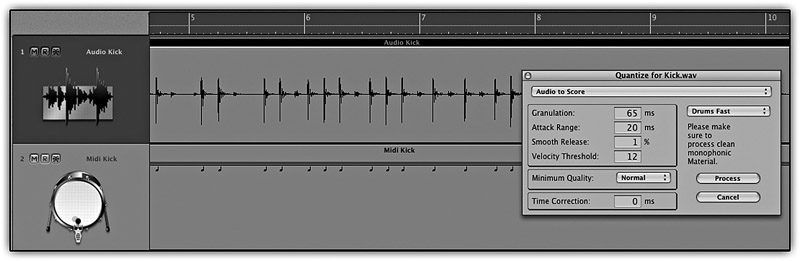
Figure 26.2 Logic’s “Audio to Score” conversion. The top track shows the original kick track, the floating window shows the “Audio to Score” dialog with its various configuration options, and the bottom track shows the resultant MIDI track after all notes have been transformed to Cl.
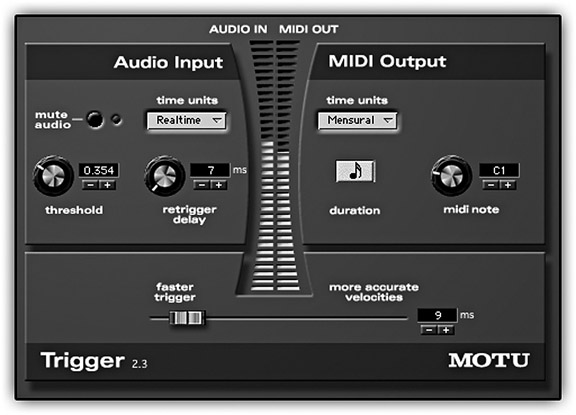
Figure 26.3 The MOTU Trigger plugin.
After the audio is converted into MIDI, the track can feed either a sampler or a software instrument. Various software instruments are designed specifically for drums and can be extremely handy for the purpose of drum triggering. One of them is the Toontrack EZdrummer shown in Figure 26.4.
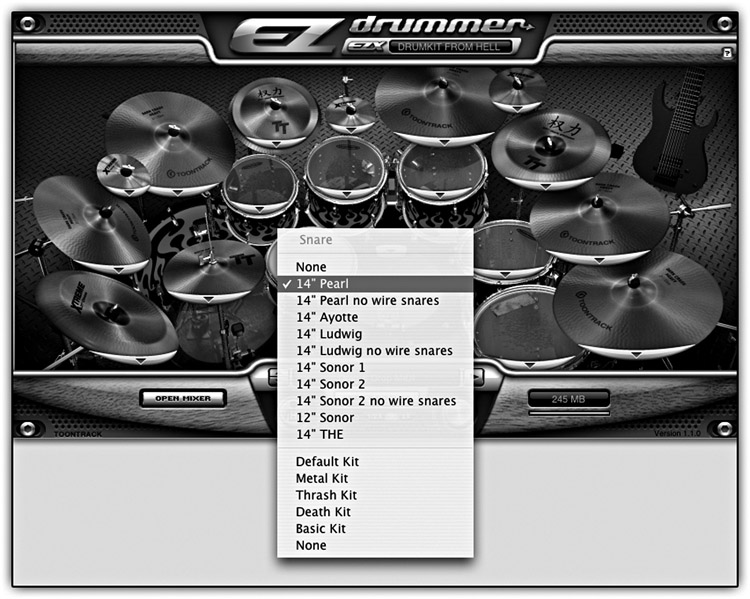
Figure 26.4 The Toontrack EZdrummer. This multilayer drum sampler has various drum sets; within each, different drums can be selected. This type of products is very useful during drum triggering.
Manually pasting samples onto a track
Although not exactly triggering, on an audio sequencer we can copy a specific drum sample, then go from hit to hit and paste the sample to replace the original drum hits. This is achievable with toms or crashes, where there are not many hits to replace. However, it can be very tedious with snares and kicks, of which there might be more than 100 hits. Locating the beginning of each hit can also be a difficult task. Features such as Pro Tools’ tab-to-transient and beat-detective can be of real help in these situations as they enable you to precisely locate each hit. Then keyboard macros like those offered by applications such as Quick Keys can automate the process so that hits can be replaced in a matter of seconds.