
10
Configuring Technical Features
Moodle supports a wide range of tools and features that require administrative attention – some only once, others regularly. Due to the volume of configuration areas, we have divided this topic into educational and technical configurations, each represented by a dedicated chapter:
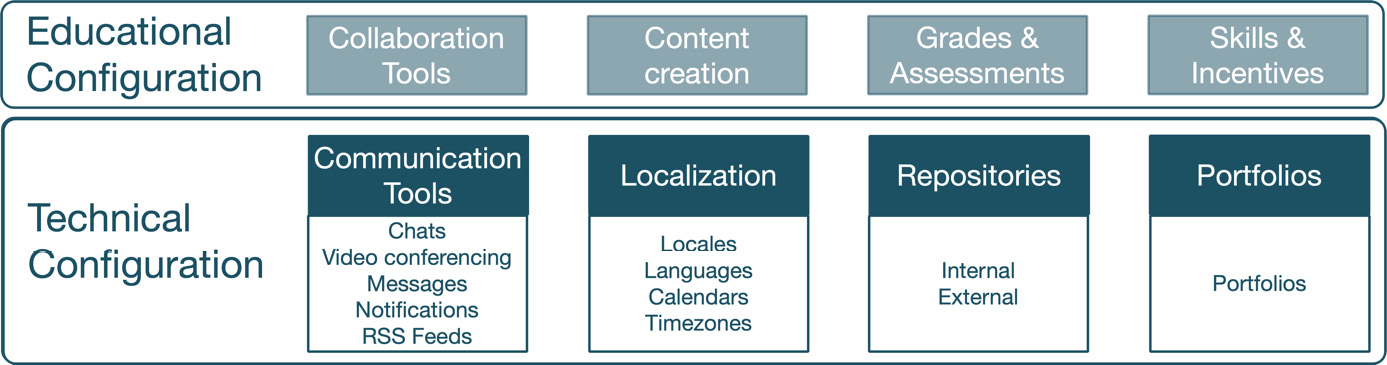
Figure 10.1 – Technical configuration topics
This chapter deals with configuring technical settings.
First, we will configure synchronous and asynchronous communication tools while covering chats, video conferencing (BigBlueButton), messaging (messages and notifications), and RSS feeds.
Next, we will learn how to configure localization features while dealing with different locales represented as language packs, multi-languages, calendars, and time zones.
We will then configure internal and external repositories, enabling users to add files to courses and other locations via the file picker.
Finally, we will configure portfolios, allowing data to be exported to external (portfolio) systems.
In this chapter, we will cover the following topics:
- Configuring communication tools
- Managing localization
- Managing repositories
- Managing portfolios
Configuring technical settings usually requires input from other techies, such as mail, system, or network administrators. It has proven beneficial to liaise with these experts to ensure the optimal setup of your Moodle system.
By the end of this chapter, you should be in a good position to approach your colleagues, gather the technical information needed, and implement these accordingly.
Configuring communication tools
Communication is a key feature in Moodle as it enhances the learning experience of all users involved. Moodle supports synchronous and asynchronous communication, which has to be configured by the administrator and is the topic of this section. We have also added a small section on contacting support since it is perceived as a relevant communication topic in the Moodle administration context. Let’s start with synchronous communication.
Synchronous communication
We will cover two types of synchronous communication in Moodle: instant messaging and web conferencing, both of which will be discussed in the following subsections.
Configuring instant messaging (Chat)
Moodle’s inbuilt facility for instant messaging is the Chat activity, which is used in courses or on the home page. The configuration of the module is presented – I couldn’t resist – as a Moodle chat:
Figure 10.2 – Chat configuration
The Chat activity can significantly impact server performance when used heavily. We have presented some chat optimization strategies in the Optimizing Moodle activities section in Chapter 15, Optimizing Moodle Performance.
The Chat activity is sufficient for basic group exchanges; however, a web conferencing tool is needed for more advanced collaborative activities, which we will cover in the following subsection.
Setting up web conferencing (BigBlueButton)
Since the COVID-19 pandemic has made the home office become the new normal, web conferencing has become a must in every working and learning environment. Typical requirements are meeting rooms for sessions such as live online classes, virtual office hours, or group collaboration with remote learners.
BigBlueButton (BBB) is an open source web conferencing system for online learning. According to its website, www.bigbluebutton.org, its key features are “real-time sharing of audio, video, presentation, and screen – along with collaboration tools such as chat (public and private), whiteboard, shared notes, polling, and breakout rooms. BigBlueButton can record your sessions for later playback.”
BBB has been integrated into Moodle and offers a free service provided by Blindside Networks with the following restrictions:
- The maximum length for each session is 60 minutes
- The maximum number of concurrent users per session is 25
- Recordings expire after 7 days and are not downloadable
- Student webcams are only visible to the moderator
BBB is a Moodle activity that’s set up and configured by teachers within a course. You, as an administrator, should ensure that the site-wide configuration is in line with the typical usage of the web conferencing tool. BBB comes with a significant number of configuration options, which is reflected by the number of menu items at Site administration | Plugins | Activity modules | BigBlueButton:

Figure 10.3 – BigBlueButton configuration
The configuration options in each sub-menu are well described and commented on. Instead of repetition, we will briefly describe the purpose of each of these settings areas:
- General settings: The BBB server details are specified in addition to default welcome messages. If the offered free service is too restrictive for your organization, you can either install a local BBB instance, engage with a Moodle Partner, or use a commercial BBB hosting provider for a more advanced setup and update the server settings accordingly.
- Recording: Various recording-related settings and default values.
- Import recordings: Enable these settings so that recordings can be imported from other courses.
- Show recordings: Specify how recorded sessions should be presented to learners – for instance, with or without preview.
- Wait for moderator: Define the behavior of the BBB activity before the moderator joins the session.
- Voice bridge: How a voice bridge is handled as part of the BBB setup.
- Pre-upload presentation: BBB lets moderators pre-upload presentations in various formats. Here, you can configure this feature.
- User limit: Specifies the number of users allowed in a session.
- Participants: The rule to be used by default when a new room is added.
- Mute on start: Sets whether microphones are muted when joining a session.
- Configuration for locking settings: Enables and disables various BBB features such as webcams, microphones, chats (private and public), or shared notes.
- Extended capabilities: Specifies whether a notification should be sent out once the recording link is available.
- Experimental features: At the time of writing, the only beta feature available was to automatically support activity completion for BBB.
For more information on BBB, refer to docs.moodle.org/en/BigBlueButton.
If your organization already uses an alternative web or video conferencing system such as Zoom or WebEx, a third-party plugin should be available at moodle.org/plugins; its installation was covered in Chapter 8, Understanding Moodle Plugins.
This completes this section on synchronous communication. Next up is its counterpart, asynchronous communication.
Asynchronous communication
There are two types of asynchronous communication options in Moodle – messaging and RSS feeds. We will cover both tools to equip you with the information needed to configure asynchronous communication.
Messaging configuration
Moodle comes with a flexible messaging facility that can be seen as a basic multichannel communication system that supports messages and notifications.
Important note
Messaging system = Messages + Notifications
Messages contain information and are sent from a sender to a receiver. Notifications let users know that a message has been sent or an event has been triggered.
A learner might send a message to the teacher, who receives a notification (user to user). An activity or Moodle itself might also send messages: you, as an administrator, might be notified when updates are available, and a learner might get notified when an assignment is due. Not only this, but users can also reply to forum posts via email or send attachments to their private files. The different messaging channels are summarized in the following table:
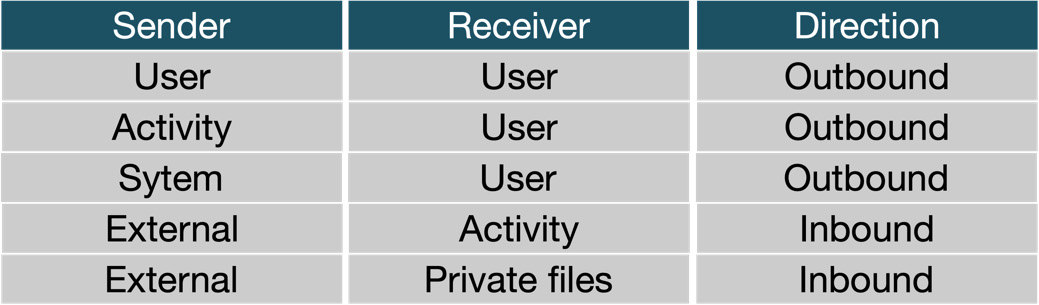
Figure 10.4 – Messaging communication channels
We can distinguish between inbound and outbound messaging, as seen from the perspective of Moodle: a message sent from one (Moodle) user to another (Moodle) user is seen as outbound, as the sending takes place within Moodle. A file sent via email by a learner to their private files is seen as inbound, as Moodle receives the attachment. We will be dealing with both direction types, starting with outbound messaging.
Outbound messaging
Before configuring outbound messaging, ensure the Enable messaging system checkbox is ticked in Site administration | General | Advanced features. For each notification type (such as subscribed forums, posts, or feedback reminders), the following message outputs are available:

Figure 10.5 – Message outputs
Let’s look at these in more detail:
- Web: This uses the built-in notifications mechanism and does not require any customization. The default theme displays notification indicators in the toolbar.
- Email: Messages will be forwarded to an email address. Moodle’s email works without any configuration using its internal PHP-based method. To improve its performance and make use of your existing email infrastructure, go to Site administration | Server | Email | Outgoing mail configuration, where you will find all the relevant mail-related settings. The page is divided into the following six categories:
- SMTP: Settings for sending emails
- No-reply and domain: No-reply address and allowed email domains
- Email diverting: For use in development environments
- DKIM: Email signing
- Test outgoing mail configuration
- Email display settings: You can find well-documented instructions at docs.moodle.org/en/Mail_configuration
- Mobile: Messages will be sent to the mobile Moodle app. The setup is described in more detail in the Configuring mobile notifications subsection of Chapter 11, Enabling Mobile Learning.
- Other: A separate column is shown for each installed third-party message output. At moodle.org/plugins/?q=type:message, you will find additional notification plugins, including those for Jabber, Telegram, Slack, and SMS.
Users can (via Notification preferences in the User account section of their Preferences) configure how to receive notifications, depending on whether they are online or offline. The defaults for each notification type and channel can be configured by going to Site administration | General | Messaging | Notification settings. You can also lock the settings for each notification type; in the following screenshot, we have locked Assignment notifications for the Web and Email channels to make sure nobody can claim they didn’t know about that upcoming deadline:

Figure 10.6 – Notification preferences
System notifications only apply to you, the administrator; all others apply to all users, including the three notification types in Inbound message configuration, which is the topic of the following subsection.
Inbound messaging
Moodle allows users to reply to forum posts via email and send attachments to their private files. Incoming messages are processed by message handlers, as illustrated in the following diagram:
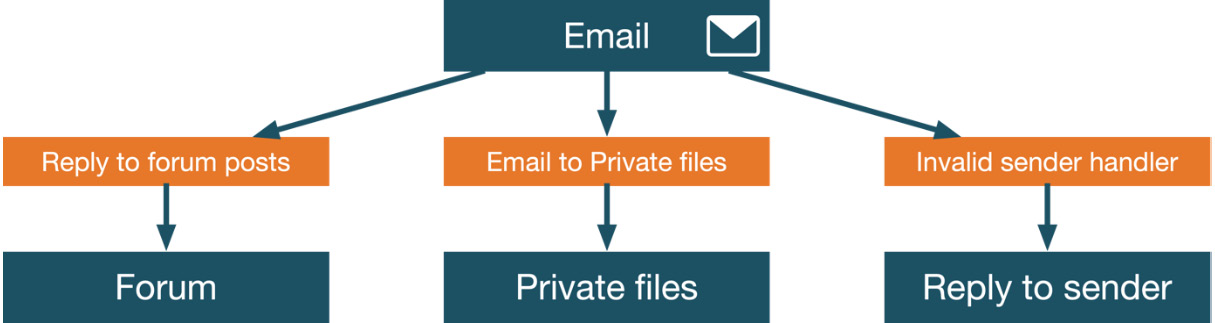
Figure 10.7 – Inbound messaging
To support incoming messages, the following settings have to be configured:
- Make sure Enable incoming mail processing is turned on in Site administration | Server | Email | Incoming mail configuration.
- Mailbox configuration: Specify the Mailbox name and Email domain on the same screen details. For [email protected], the former would be packt and the latter openumlaut.com.
Important note
It is highly recommended that you use a dedicated address for inbound messaging and not your day-to-day email.
- Incoming mail server settings: On the same page, configure your IMAP server – check with your mail administrator for details.
- Configure message handlers: To specify which types of emails will be processed by Moodle, go to Site administration | Server | Incoming mail configuration | Message handlers. Here, you need to configure the message handlers, which have been implemented as plugins:
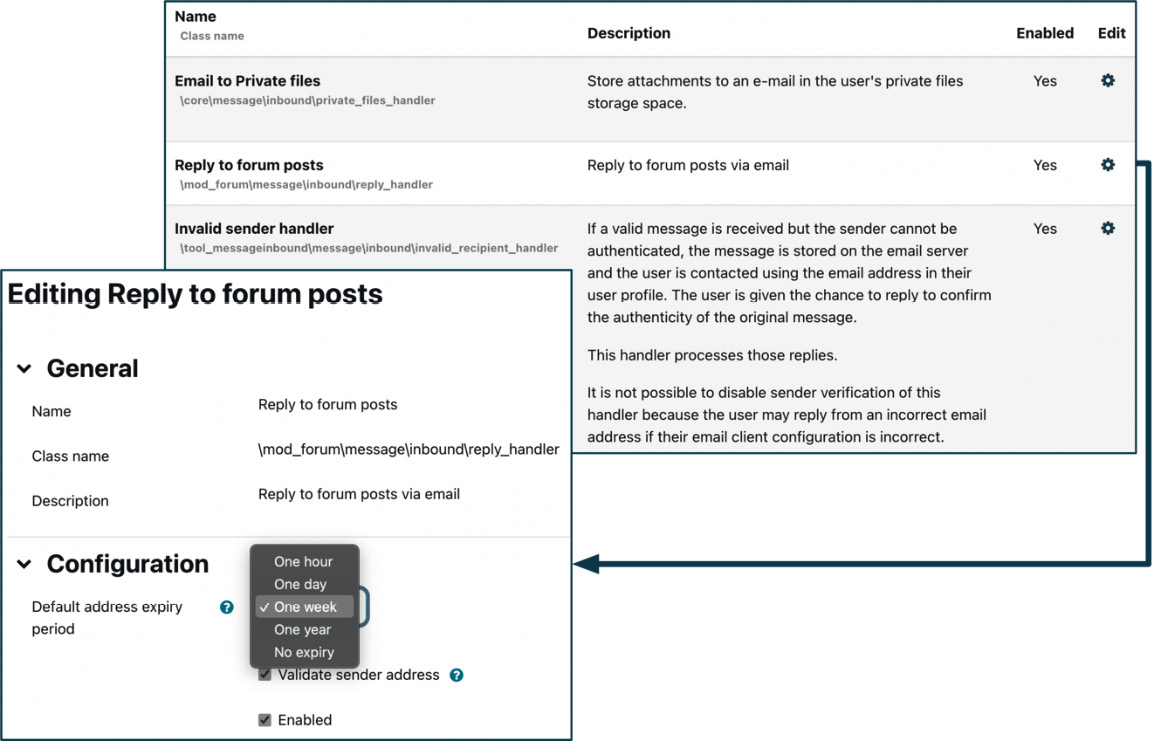
Figure 10.8 – Message handlers
Three message handlers come with Moodle: Email to Private files, Reply to forum posts, and Invalid recipient handler. The first two have already been mentioned and should be self-explanatory. The invalid recipient handler deals with messages from senders that do not match the user’s email address and cannot be disabled.
Select the Configuration icon in the Edit column and tick the Enabled setting to enable any of the other two handlers. It is recommended that you leave the expiry setting as-is. You can find a good explanation of incoming email configuration with hints for other email servers at docs.moodle.org/en/Mail_configuration.
Messaging in Moodle provides versatile inbound and outbound communication among users, but also between system entities. As an administrator, you must guarantee that all supported channels work correctly and in line with your organization’s guidelines. You will likely have to liaise with the mail admin to ensure proper configuration.
The second type of asynchronous communication supported by Moodle is RSS feeds, which will be covered in the following subsection.
Configuration RSS feeds
Really Simple Syndication (RSS) is an XML-based format for distributing and aggregating web content, such as news headlines. Moodle supports the consumption as well as the production of RSS feeds, as illustrated in the following diagram:

10.9 – Moodle RSS feeds
RSS feeds must be switched on via the Enable RSS feeds setting at Site administration | General | Advanced features.
External RSS feeds are consumed via the Remote RSS Feeds block in Moodle courses or the dashboard. The block is configured and pre-populated at Site administration | Plugins | Blocks | Remote RSS feeds. The parameters available are Entries per feed (the number of loaded and displayed atoms) and Timeout (the amount of time before the feed expires in the cache).
Three Moodle activities – Forum, Database, and Glossary – can be set up as RSS producers; their feeds can be used in other courses. Each module has an Enable RSS feeds option in its respective plugin setting. For security and privacy, each RSS feed URL contains an automatically created token for the user. If there is a suspicion that this has been compromised, users can reset this via the Security keys link in the User account section of their Preferences.
RSS feeds are valuable for consuming external feeds and providing certain course data as internal feeds. To conclude this section on communication, we will cover how users can contact your support channels.
Contacting support
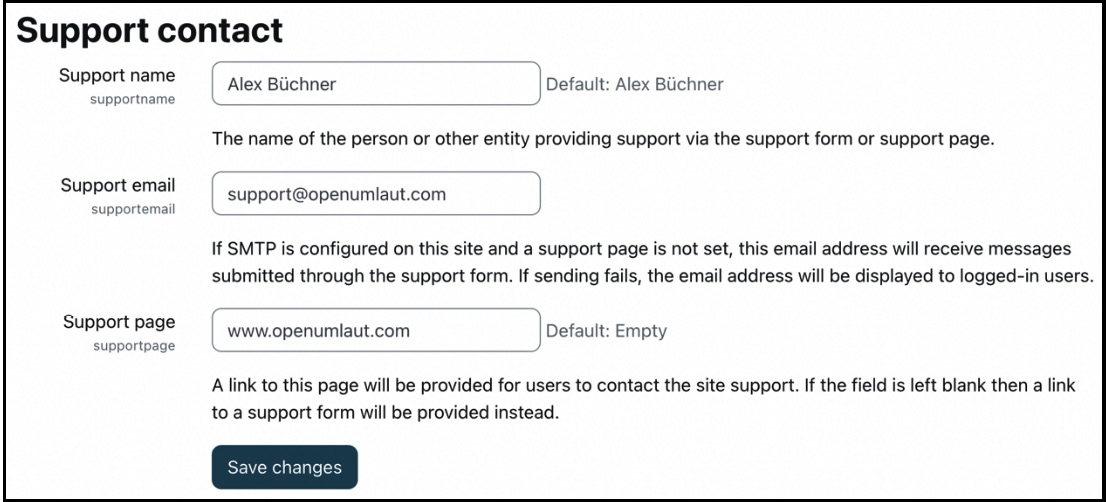
A topic remotely related to communication is users of your Moodle system seeking assistance. When you go to Site administration | Server | Support contact, Moodle lets you specify a Support name, a Support email address, and a Support page:
10.10 – Support contact
Your contact details are displayed at various places throughout Moodle – for instance, during self-registration. There is no support block you can put on the front page, but you can easily mimic this using a Text block.
This concludes this section on communication tools, where we dealt with synchronous tools (chat and web conferencing), asynchronous tools (messaging and RSS), and setting up communication channels for Moodle support. In the following section, we will cover Moodle localization to facilitate the usage of your LMS across locales.
Managing localization
Localization is concerned with adapting software to be used in different locales. A locale is linked to a region where certain cultural aspects apply, such as language, formatting of dates and times, calendric representation, and so on.
As Moodle is used worldwide and given that many educational establishments span continents and cultures, localization must be fully supported.
Important note
If the main language of your Moodle system is anything other than (UK or US) English, make sure you select this during installation. This way, locale settings, as well as role names and descriptions, will be adequately localized.
The key areas that can be configured in Moodle are language-related settings and calendric information. Languages and calendars are the topics of the following two subsections.
Languages, idiomas, 语言, and تاغللا
Moodle supports over 80 languages, including Latin and Esperanto! The Unicode standard has been adopted to represent the character sets of multiple languages as it covers most modern scripts that are used throughout the world. Moodle supports left-to-right writing systems, as used in this book, and right-to-left writing systems too, such as Arabic:
Figure 10.11 – Support for right-to-left writing
Language packs are utilized to support different locales.
Understanding language packs
In Moodle, a language pack contains information about the locale and all translations. Technically, the term “language pack” is a bit of a misnomer – they should be called “locale packs.”
Important note
Every locale is represented as a language pack.
The following diagram illustrates the fundamental concepts of language packs:

Figure 10.12 – Language packs
Each language pack contains two essential parts:
- Language configuration: This contains localization information about the locale – for instance, the character set to be used, the writing direction, various date and time formats, and separators for different data types
- Language strings: These are grouped by Moodle components (for example, core, module, third-party), and translations are provided for each language string
Standardized two-letter region codes characterize locales. For example, pt represents Portuguese, as spoken in Portugal, whereas pt_br represents Brazilian Portuguese. Internally, pt is the parent language, whereas pt_br is the child language, which only contains strings that are different from the parent language pack. This approach reduces the size of child language packs significantly.
Some packs of non-standardized languages have made their way into Moodle, which partly explains why there are over 200 (!) language packs to choose from. For these specialized packs, new codes have been made up by their creators, including de_kids, en_us_k12, and es_mx_kids (for young learners), da_rum (courses have been renamed rooms), and, most importantly, en_ar (pirate language – ahoy!). You may also come across language packs with a wp suffix; they represent strings from Moodle Workplace.
To support a locale, you have to install its language pack, which Moodle will download automatically from download.moodle.org. Go to Site administration | General | Language | Language packs to include new packs via Moodle’s language import utility:

Figure 10.13 – Language import utility
Six language packs, consisting of Arabic, English (en and en_us), French, German, and simplified Chinese, have been installed in the preceding screenshot. Select one or many locales on the right-hand side and click the Install selected language pack(s) button to add more language packs. To reverse this operation, select a single or multiple language packs in the list on the left-hand side and click on the Uninstall selected language pack(s) button.
Tip
If your firewall doesn’t allow connections to Moodle’s download server, you need to download the required language packs from download.moodle.org/langpack, copy them to $CFG->wwwroot/lang, and unzip the file(s) manually.
The English (en) language pack cannot be uninstalled. It is used as a reference language in cases where strings in other languages are not translated. Some language packs are incomplete, and sometimes, only non-admin features have been translated.
Once installed, the user can choose a language (if configured) from the language menu located in the profile menu. Bear in mind that only terms and phrases that are part of Moodle will change. Any content that’s created will not be translated unless it is configured to make use of the multilingual feature (refer to the Customizing languages subsection of this chapter):
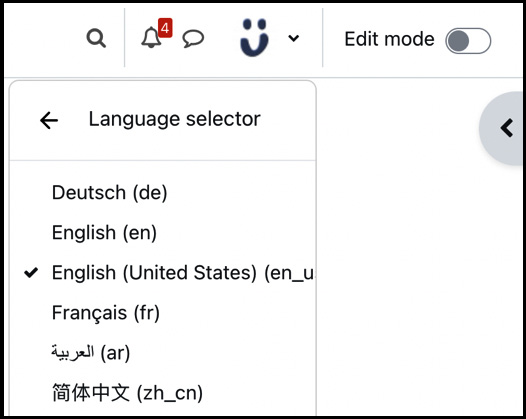
Figure 10.14 – Language selector
Language packs are kept and maintained at download.moodle.org/langpack/4.x (where x is the current release version number). Some packs are updated more frequently than others, and Moodle automatically updates language packs daily. If you’re impatient like me, clicking on the Update all installed language packs button performs this task immediately.
Once you have installed all the required language packs, you should configure the language-related settings.
Configuring language settings
Moodle offers several language-related parameters that you can find at Site administration | General | Language | Language settings:
- Language auto detect: By default, Moodle detects the language from the used web browser locale. If you wish to override this and use the default site language instead, untick this checkbox.
- Default language: This allows you to select the language used throughout the site unless individual users override it via the language menu or from their profile. Only those languages for which a language pack has been installed appear and are shown in the language menu.
- On account creation set user’s browser language as their preferred language: If enabled, it does what it says on the tin; otherwise, the configured default language is used. The default language will also be set if the user’s browser language is not installed.
- Display language menu: If enabled, the language menu will be displayed in the profile menu. Users will always be able to change the language in their profile, no matter the setting. Bear in mind that some themes do not support this feature.
- Languages on language menu: If left empty, all the installed languages will appear in the language menu. To narrow down the number of available languages, specify a comma-separated list of locale codes.
- Cache language menu and Cache all language strings: Unless you add or remove language packs, it is recommended that you leave both settings enabled, as they cache language menu items and strings, respectively, rather than loading them dynamically.
- Site wide locale: The localization operations are internally driven by system locales based on the chosen language pack. If you wish to change this (which is hardly ever required), select the site-wide locale in its operating system format, such as en_US.UTF-8. The corresponding file has to be installed at the system level.
- Excel encoding: Moodle uses the Unicode format when downloading data in Microsoft Excel (such as in gradebook reports or log files). Leave this setting unchanged unless your teachers or learners use a dinosaur version of Excel.
- Task status: This entry is for information purposes only and cannot be modified. It informs you of whether installed language packs are updated regularly via scheduled tasks (more on tasks in Chapter 15, Optimizing Moodle Performance).
Three additional language-related settings are placed elsewhere:
- The Full name format option in Site administration | Users | Permissions | User policies defines how names are displayed when the full name is shown. If the language placeholder is entered, the format of the full name is decided by the current language pack. This way, you can cater to local sensitivities concerning first names.
- The Alternative fullname format option, in Site administration | Users | Permissions | User policies, is the same as Full name format but defines how names are shown to users with the moodle/site:viewfullnames capability.
- The Allow extended characters in usernames parameter, which you can see by going to Site administration | General | Security | Site security settings, removes the limitation of only using alphanumeric characters in usernames – for instance, alex.büchner.
So far, we have worked with language packs provided by Moodle and its community-based translators. Next, let’s deal with customizing language strings and phrases.
Customizing languages
Every phrase, term, and string used in Moodle is represented in language files, tied to specific Moodle modules (located in the lang directory). There are over 30,000 (!) language strings, demonstrating the system’s scale. You can change any word or phrase; for example, you may want to change Grades to Marks, Outcomes to Work indicators, Teacher to Instructor, and so on.
To customize a language file, go to Site administration | General | Language | Language customization, where you first have to choose a language to be customized. Clicking on the Open language pack for editing button will lead to the checkout step; this might take a few seconds. Once this has been done, you can click on the Continue button.
Important note
Moodle creates a local directory inside $CFG->dataroot, where it stores your edited phrases. Ensure you have write access to the lang directory to avoid error messages.
Moodle keeps a separate language file for each module. This separation is beneficial as it frees the underlying code (developed by programmers) from the localization (worked on by translators). However, the disadvantage is that you need to know where (that is, in which PHP module) the respective strings are located. However, Moodle offers a good filtering mechanism to simplify the search for strings that are to be modified.
Let’s say you wish to change the term Guest to Visitor. As it is likely that the term Guest appears in several modules, it is safe to select all the items in the Show strings of these components list.
The filter criteria you can choose from includes Customised only for strings that have been changed in previous sessions, Help only for balloon help tooltips, and Modified in this session only for phrases that have been changed in the current session. The Only strings containing parameter requires the word or phrase you are looking for (in our case, Guest). Internally, Moodle uses string identifiers, which can also be used to search for content. Just enter the string ID in the String identifier textbox to do this. Once the search has been successful, the following information is shown for each string that matches the filter:
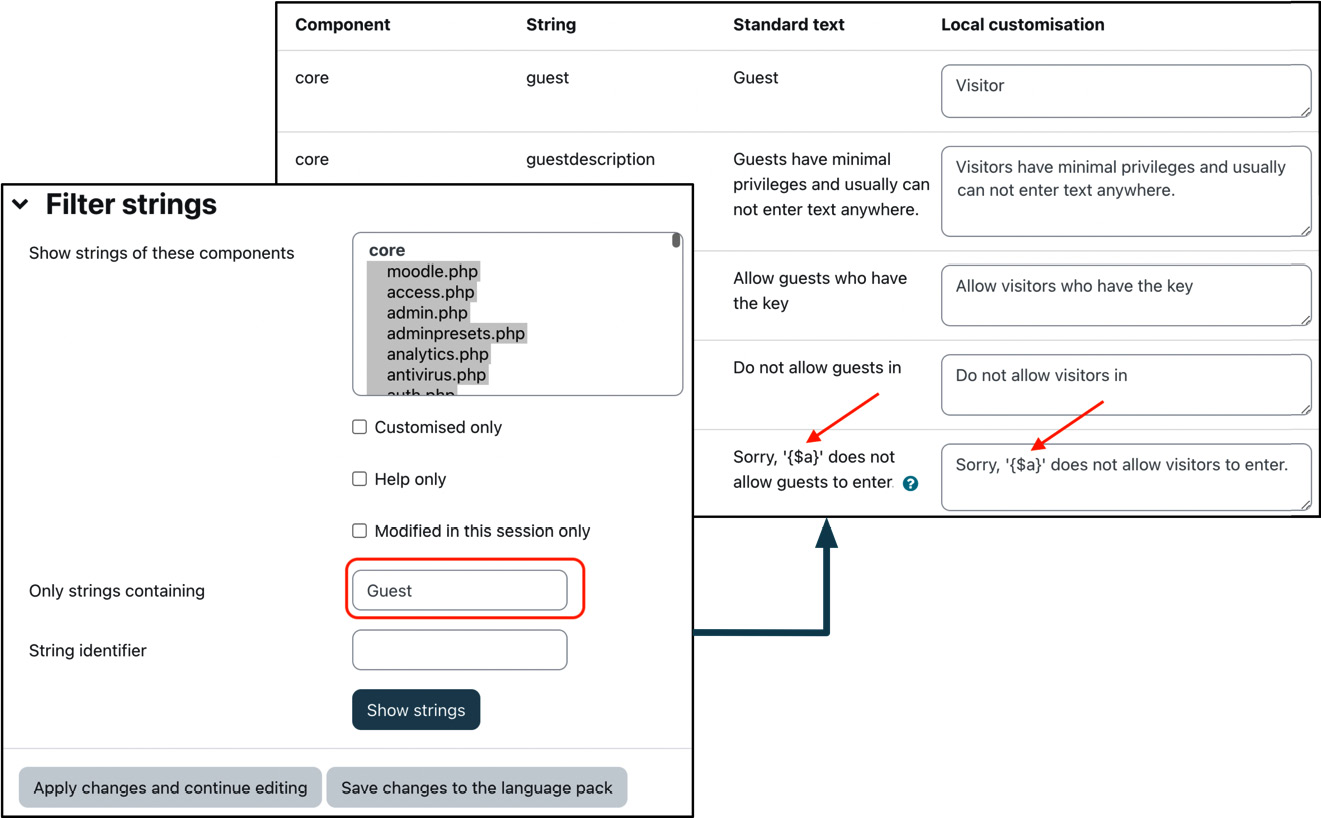
Figure 10.15 – Language customization
You might have spotted the $a parameter in the fifth phrase from the top. This is a placeholder, which is substituted on the fly; in this instance, it is substituted with the name of a course. These codes must be included in the local customization – you must keep them to avoid any problems. Some placeholders will contain a parameter, such as $a->id or $a->query.
Ensure you click the Save changes to the language pack button to reflect the changes on your Moodle site. These modifications will be maintained when you update your site.
You can grant users access to the Language customization menu for translators via the report/customlang:edit and report/customlang:view role capabilities.
There is a helpful setting called Show origin of languages strings, which you can see by going to Site administration | Development | Debugging, which is useful when you customize a language pack. If this setting is enabled, it shows the file and string identifier besides each string as the output on the screen if ?strings=1 or &strings=1 is appended to the page URL, as demonstrated in the following sample:

Figure 10.16 – Displaying the language string components and identifiers
If you wish to contribute translated strings to a language pack, go to the Moodle languages portal at lang.moodle.org. You will find information on utilizing the AMOS translation tool and the AMOS Moodle block (for details, check out docs.moodle.org/dev/AMOS_manual).
Now that we have localized some textual elements of the user interface, let’s deal with multilingual content.
Supporting multilingual content
If some of your users deal with multilingual content, turning on the Multi-Language Content filter is recommended by going to Site administration | Plugins | Filters | Manage filters. The Multi-Language Content filter supports the <span lang="xx"class="multilang"> tag, which lets your course designers and content creators support multiple languages in all text areas entered via the Atto editor.
The multilang HTML syntax changed a while ago and is not supported anymore. If any of your users still use the old format, you will need to run the Multilang upgrade admin tool (admin/tool/multilangupgrade) once. You will find more details on admin tools in Chapter 17, Working with Moodle Admin Tools.
An additional plugin, which was mentioned in the previous chapter when we dealt with availability restrictions, is Restriction by language (moodle.org/plugins/availability_language). Once the add-on has been installed, users can restrict individual activities and resources based on the selected language. In addition to the available standard restrictions, such as activity completion, course authors can also specify a language as the criteria.
This concludes this section on language-related topics in Moodle. The second part of localization is calendric information, which will be covered in the following subsection.
Calendric information
Different cultures represent calendric information – dates, times, and time zones – in different formats. The following high-level diagram illustrates the main components of a Moodle calendar:
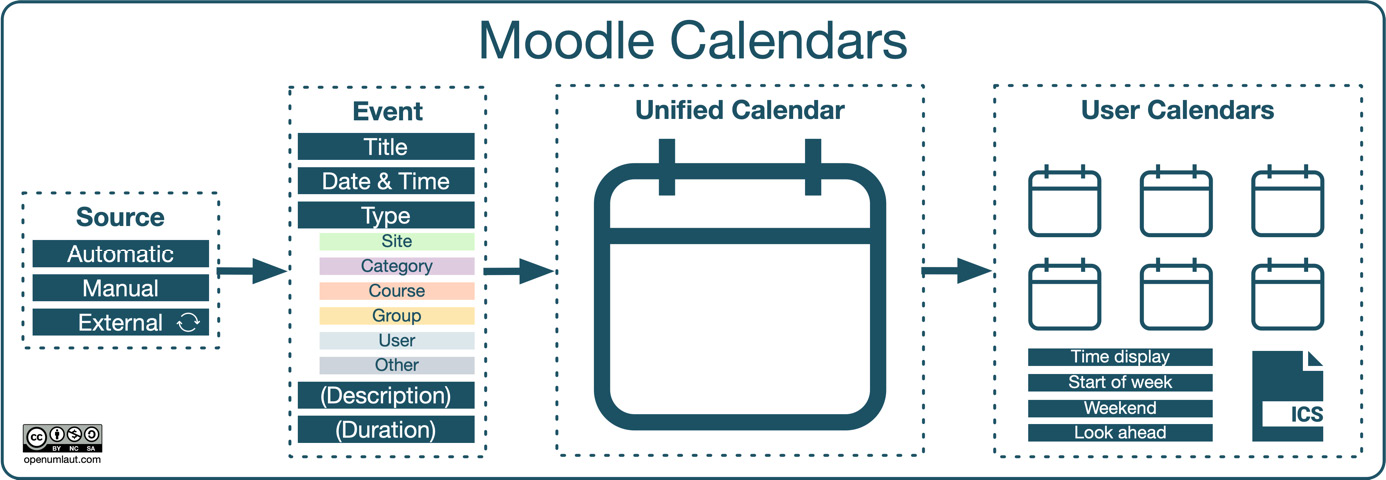
Figure 10.17 – Moodle calendars
The built-in calendar is fed by multiple sources, which can be Automatic (for example, assignment deadlines or grading cut-off dates), Manual (for instance, a fire drill announcement), or an External calendar feed that’s updated frequently.
Each calendar entry is represented as an Event, which comprises several fields: title, date, time, description, duration, and type. Additional fields might make up the event, depending on the calendar type (site, category, course, group, user, or other).
The centralized Unified Calendar aggregates all the events in the system and acts as the source for user calendars. User Calendars display events in the format specified in the selected locale (language pack) and the parameters specified in the calendar settings.
Important note
Locales have to be installed for non-English calendars to work correctly. On Unix systems, you can check this with the locale -a command. Otherwise, your days in the calendar will be displayed in English.
We will configure calendars first before we deal with time zones in Moodle.
Configuring calendars
By default, Moodle formats dates and times according to the set locale for Gregorian calendars. Other calendars are supported, but they must be installed as a plugin. To do so, follow the instructions in Chapter 8, Understanding Moodle Plugins, and browse the Calendars section in the public plugins database at moodle.org.
Calendar settings can be changed by going to Site administration | Appearance | Calendar:
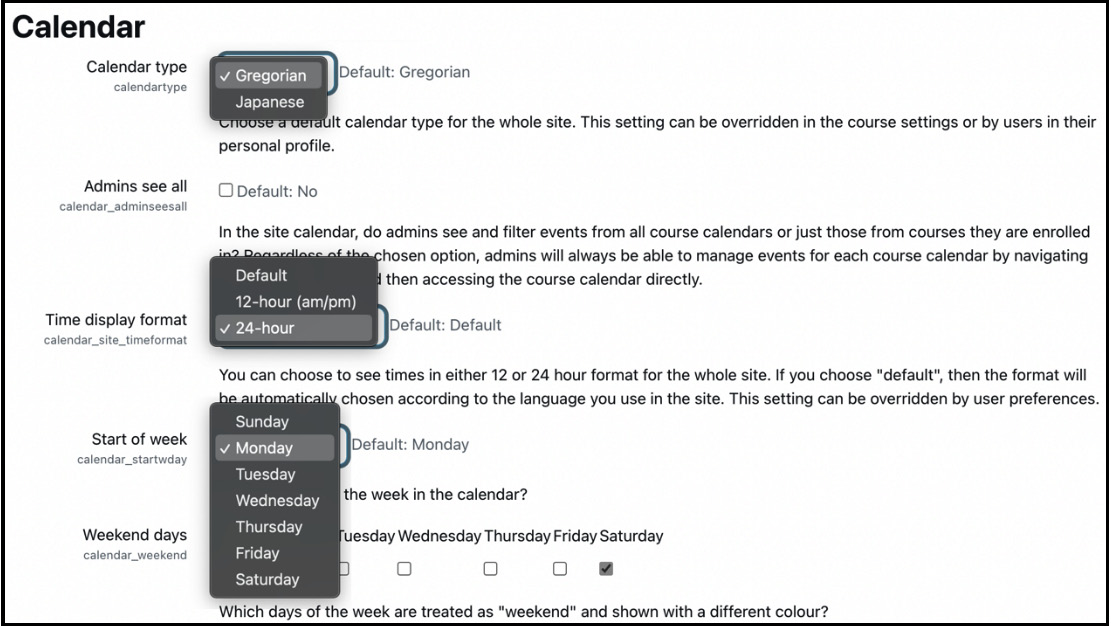
Figure 10.18 – Calendar configuration
The fields that are most relevant to calendar localization are shown in the preceding screenshot (I have installed the Japanese calendar plugin):
- Calendar type is the default setting for the site and its users, which can be overridden in the user’s Preference section via the Preferred calendar option.
- If you need to see all the calendar events, turn on Admins see all; otherwise, you will only see your events.
- Times are displayed according to the selected locale; Time display format can be overridden by a 12-hour or a 24-hour clock.
- Different countries have different starting days for the week – for instance, in North America, the week starts on Sunday, whereas in Europe, it starts on Monday (Start of week).
- Not all countries use the default values of Saturday and Sunday as the weekend days. For example, in Islamic countries, the weekend is on Friday and Saturday, whereas Sunday is a normal working day. This can be specified via the Weekend days option.
A few more settings on this page mainly deal with look-ahead values and calendar export options. These settings are rather well explained on screen.
Configuring time zones
Moodle supports systems that span across time zones, which happens in three scenarios:
- In countries that cover more than a single time zone
- On sites that have learners from multiple countries/time zones
- In a situation where the server is hosted outside the time zone of the organization – for example, with an internet service provider
To modify the default time zone parameters, go to Site administration | General | Location | Location settings:
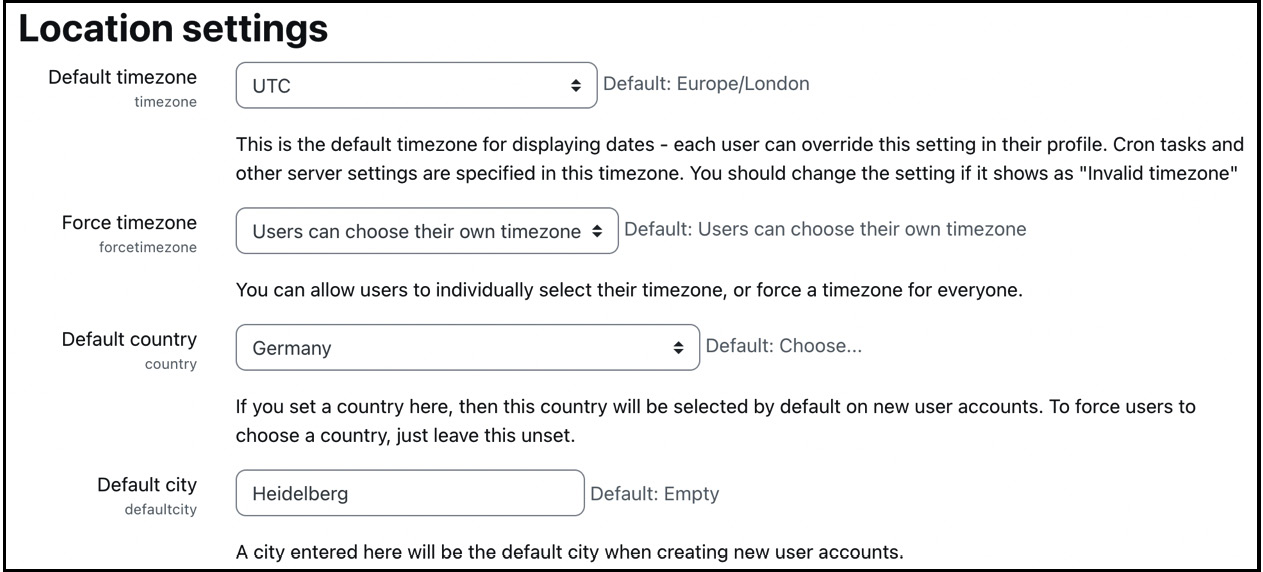
Figure 10.19 – Time zone configuration
The value selected in the Default timezone parameter is used throughout the system. The default value is set during installation, but this might not reflect your local time. Each learner can change this setting in their user profile unless Force timezone has been set. Displayed times, such as for assignment deadlines, are adjusted to the selected time zone. Default country and Default city are used for new user accounts if specified.
Every so often, rules in certain time zones (there are almost 2,300 separate ones!) change – for instance, the adjustment of daylight savings time. In this case, you should update your system as new versions of Moodle always contain the latest version of the time zone rules.
This completes this section on localization. Next, we will look at repositories and the management thereof.
Managing repositories
The file picker is central to most file operations in Moodle. Files can be selected from a wide range of sources, known in Moodle as repositories.
Important note
Repositories enable users to add files to courses and other locations in Moodle.
The following diagram shows which repositories are available in Moodle core and a high-level view of how they work in conjunction with the file picker:
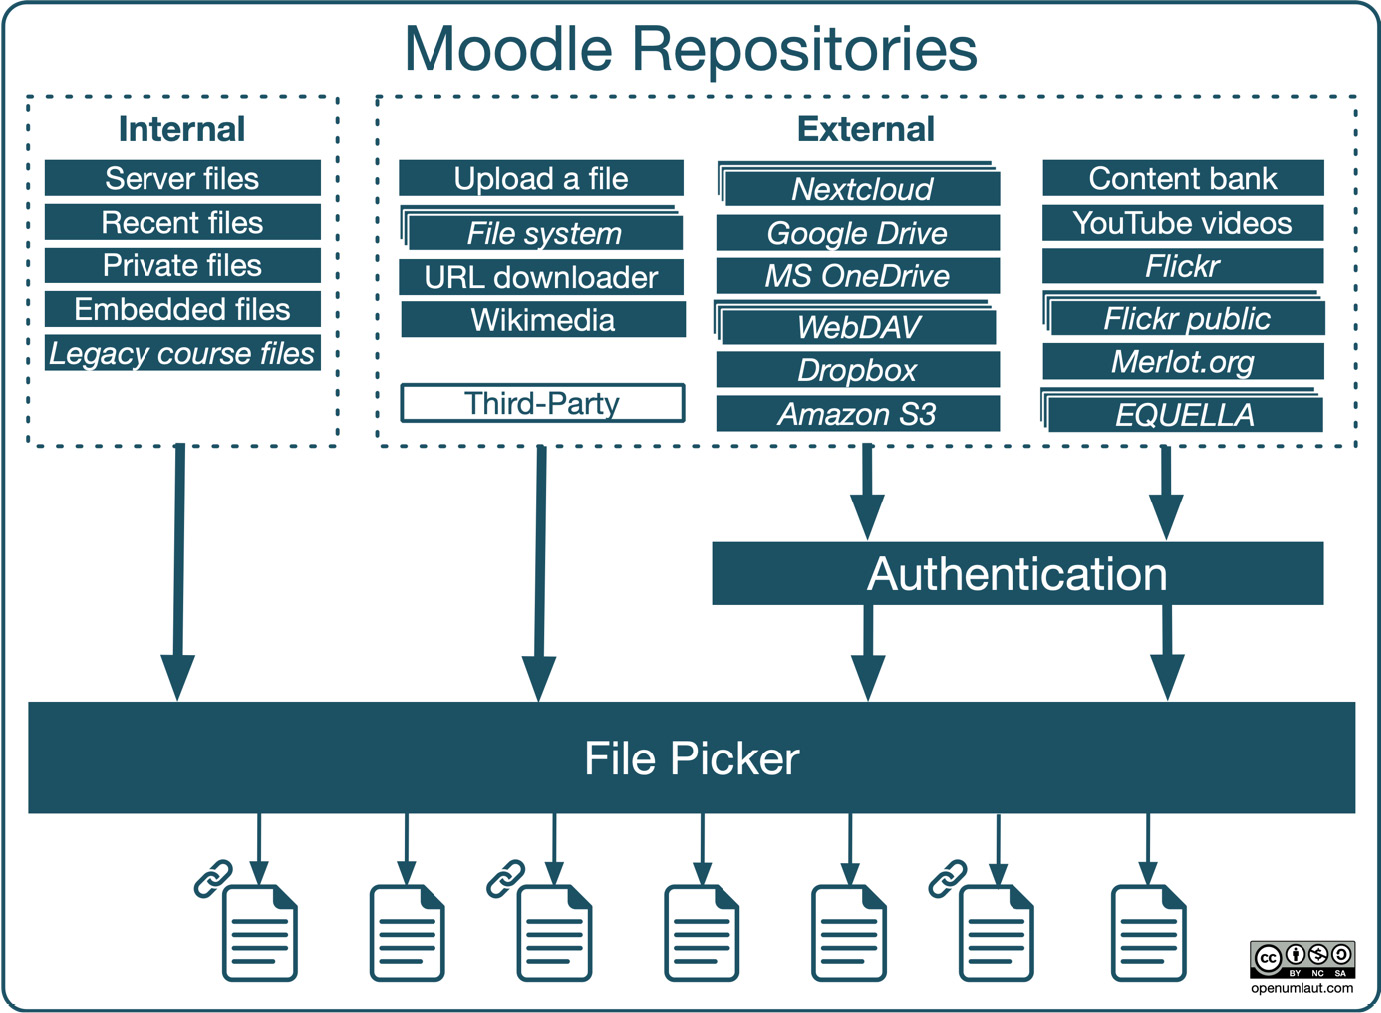
Figure 10.20 – Moodle repositories
For the sake of simplicity, we will distinguish between internal and external repositories. An internal repository accesses internal Moodle files. An external repository is located outside Moodle, on some local or remote media, in another application’s data storage, or the cloud. All repositories are accessed via the file picker – some directly, others with an added layer of authentication. Files can be copied or linked, although not all repository types support linking.
You can configure Moodle repositories by going to Site administration | Plugins | Repositories | Manage repositories (the order of the repos on your system might differ from this view):
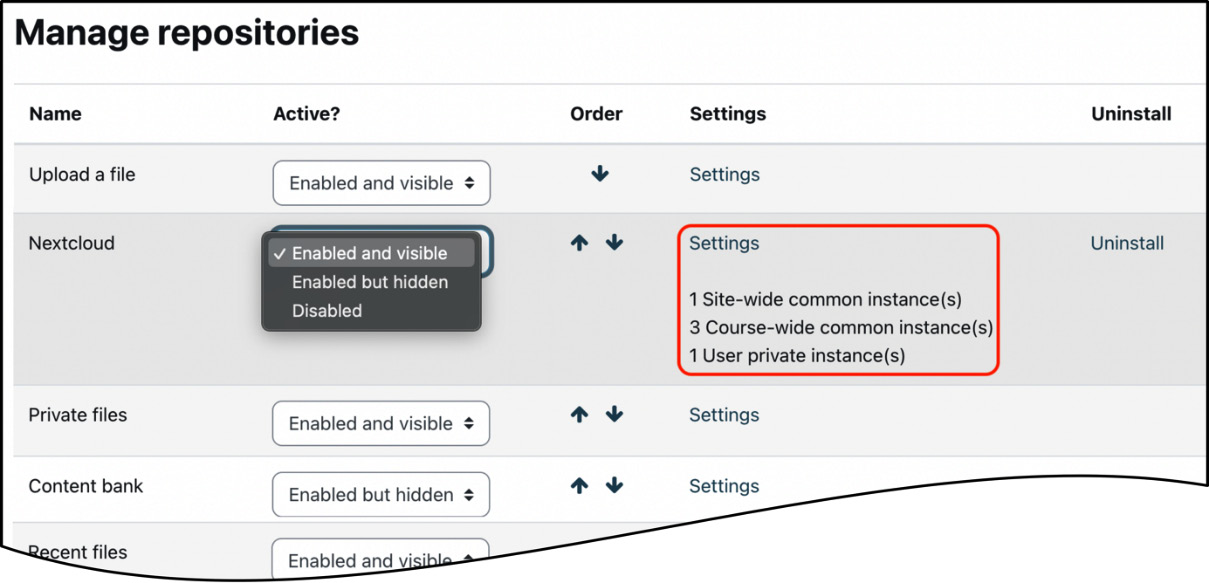
Figure 10.21 – Managing Moodle repositories
Each repository plugin has one of the following three states:
- Enabled and visible: The repository plugin is always available via the file picker
- Enabled but hidden: The repository plugin is unavailable via the file picker, but already created instances are kept
- Disabled: The repository is unavailable in your Moodle system, and all instances will be deleted
Important note
When you disable a repository plugin, its settings and all of its instances will be removed. You have the option to download any content or references to Moodle.
The order in which the repositories are listed reflects the order in which they appear in the file picker. This arrangement can be changed using the up and down arrows. A Settings link will be displayed for almost all repository types as soon as a repository has been enabled. Every repository has a repository plugin name parameter that lets you override its default name. Some repositories also have additional plugin-specific settings, which will be discussed in due course.
All repository types support copying files, but only some also support linking of files. If you wish to enable linking, make sure Allow external links is checked at Site administration | Plugins | Repositories | Common repository settings. Some institutions don’t allow linking for data integrity and security reasons.
In the following subsections, we will cover the different types of internal and external repositories in more detail.
Internal repository plugins
There are several internal repository plugins to choose from:
- Server files: These are files on your Moodle system to which a user has access. Files are arranged in a hierarchy reflecting Moodle contexts (refer to Chapter 2, Exploring the Moodle System).
- Recent files: These are recently used and uploaded files. You can specify Number of recent files (the default is 50) and a Time limit in the settings.
- Private files: These are the personal files of a user and can be accessed throughout Moodle. You can specify the user quota via the Private file space parameter by going to Site administration | General | Security | Site security settings.
- Embedded files: This allows users to reuse the files embedded in the current text area.
- Legacy course files: This gives access to files after they’ve been migrated from (ancient) Moodle 1.9. You can find details about this repository type at docs.moodle.org/en/Legacy_course_files. Legacy course files are intended to be a temporary measure, and the objective is to discontinue their use once all the files have been migrated. You can find two self-explanatory settings related to legacy files at Site administration | Plugins | Repositories | Common repository settings: Legacy course files in new courses and Allow adding to legacy course files.
Internal repository plugins are handled by Moodle and usually don’t require any configuration or management. This is not the case for their external counterparts, which we will cover next.
External repository plugins
External repository plugins will let your users add (copy, stream, or link) new files or data to your Moodle system. Content may be uploaded from your local computer, a USB pen drive, network drive, cloud storage, or external applications, including streaming services. As always, additional repository types can be installed via the plugins database at moodle.org/plugins/?q=type:repository.
The following table lists all the external repository plugins that are part of Moodle’s core:
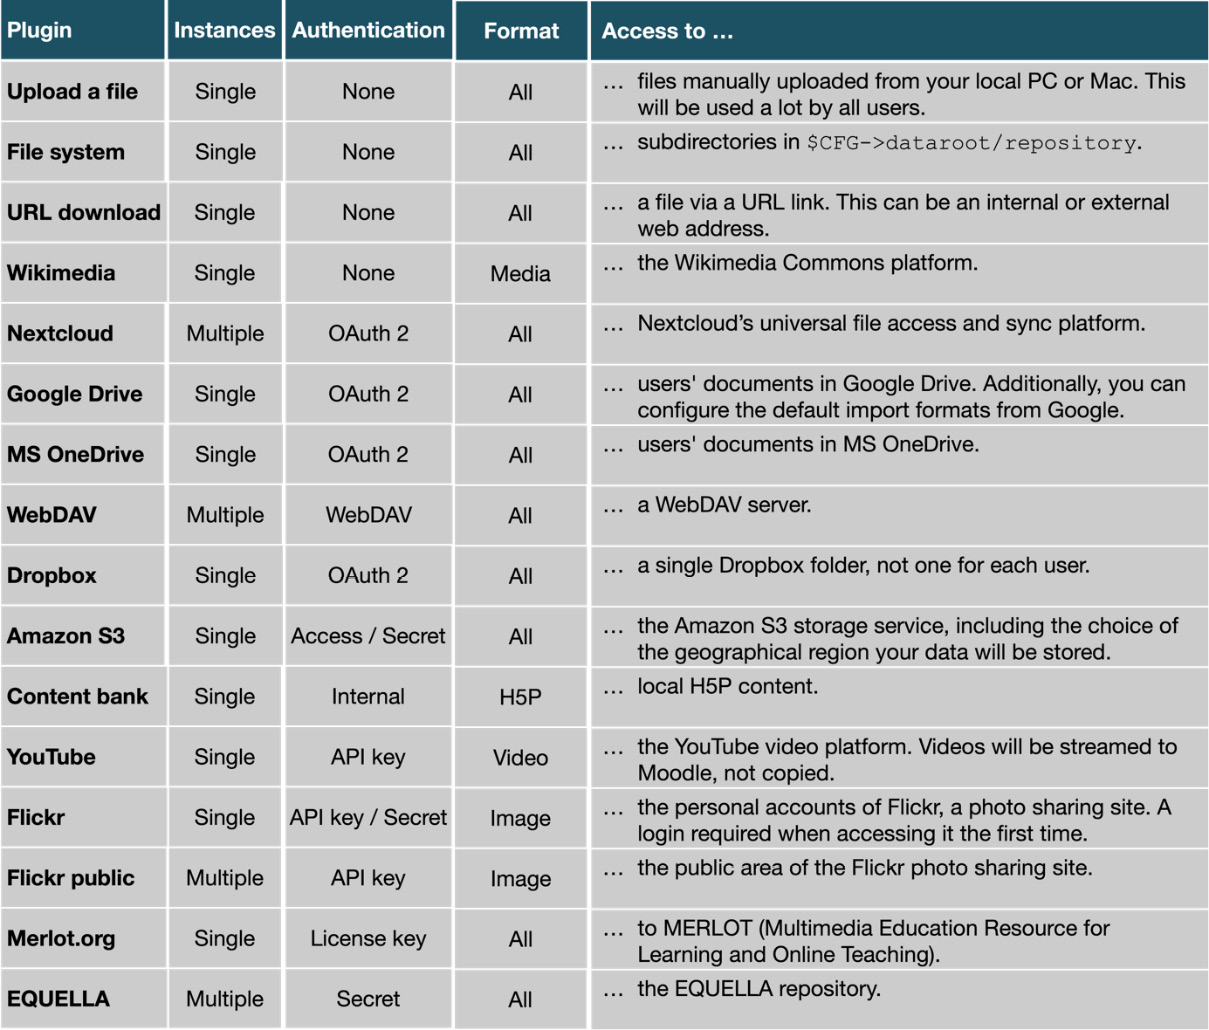
Figure 10.22 – External repository types
Some external repository types support multiple instances. The number of existing site-wide, course-wide, and private user instances are displayed under the plugins’ Settings link. These can then be configured in the relevant context:
- Site-wide instance: You, as the administrator, can create global instances that all users in the system can then access. Site-wide instances are created as part of Settings when managing a plugin – for example, the Nextcloud repository:
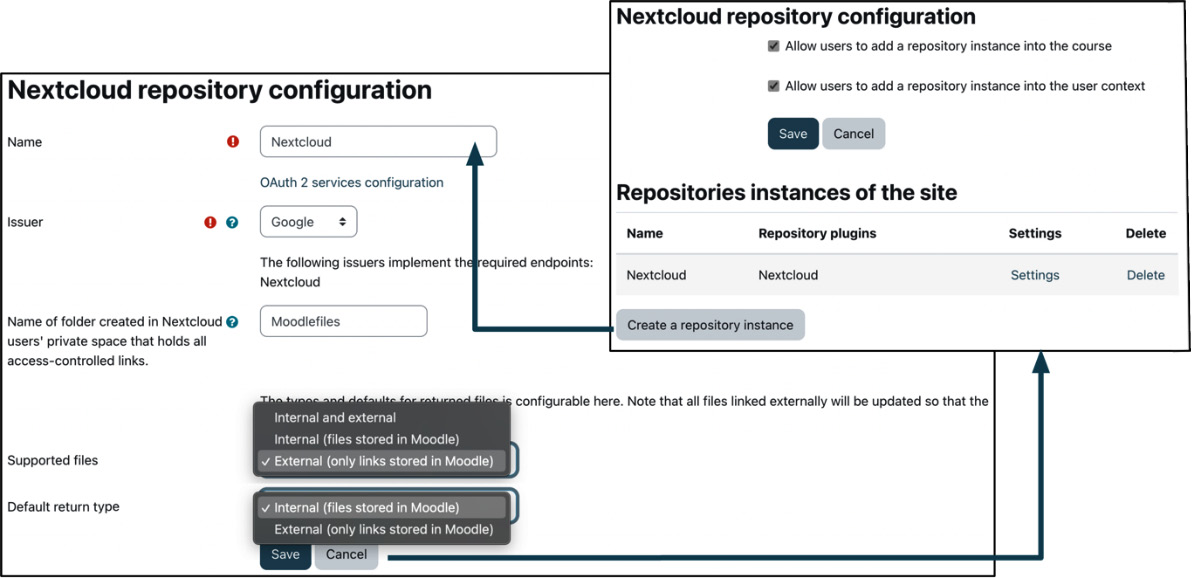
Figure 10.23 – Creating site-wide instances
- Course-wide instance: You can add instances via the Repositories link in the More menu if the Allow admins to add <repository plugin> instance to a course option is selected. Everybody enrolled in the course who has the repository/filesystem:view capability can access the instance in their file picker.
A popular example is the File system repository type, where a readable directory must be selected for each instance. A typical use case is to create a dedicated directory for file upload, which can then be accessed in a particular course. How to set up the course repository is shown in the following annotated screenshot:
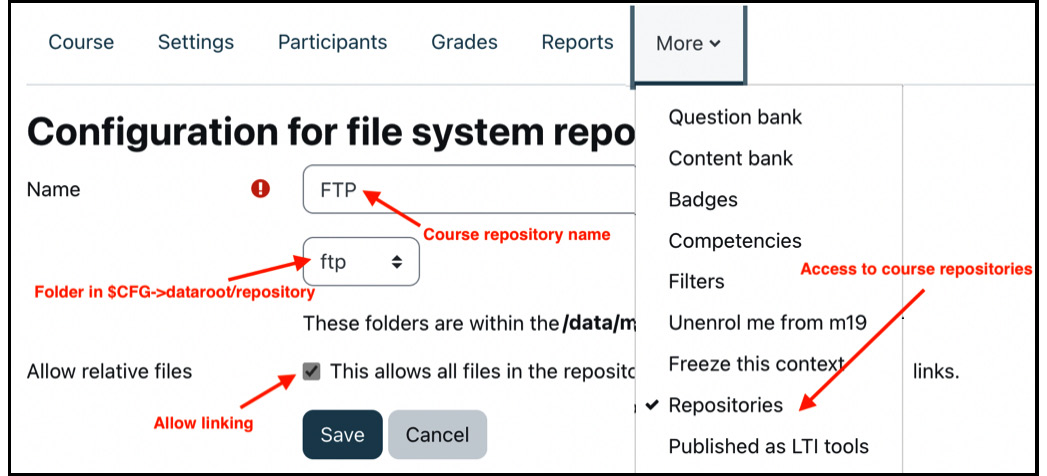
Figure 10.24 – Configuring the course repository
- User private instance: You can create a personal instance via the Manage instances link in the Repositories pane in Preferences if the Allow admins to add <repository plugin> instance for personal use option is selected.
You can find the following three types of authentication when configuring external repository plugins:
- No authentication: Files or content can be accessed directly without any credentials.
- OAuth 2 services: Access to the repository requires authentication via OAuth 2. How to configure its services was covered in the Service provider-based authentication section in Chapter 5, Managing Users, Cohorts, and Authentication. The Nextcloud screenshot (Figure 10.23) shows a typical setup for a repository plugin that’s been done via OAuth 2.
- Plugin-dependent: Repository types that do not (yet) support OAuth 2 have implemented their own authentication mechanism. This might be an access/secret key pair, an API key, or simply a license.
While most external repository types support all file formats, some only host particular ones; for example, YouTube only provides video streams, and the content bank (currently) only stores H5P files. Streaming content repositories (for instance, YouTube and the third-party plugin for Vimeo) only appear in the file picker when initiated from Atto’s audio/video icon.
Additional information on all the mentioned Moodle repositories can be found at docs.moodle.org/en/Repositories.
Hint
Once the repository setup has been completed, it is best to test the access from several contexts (users, sites, and courses) and ensure that no users have access to sources they shouldn’t have and vice versa.
To wrap up this section, let’s have a look at a fully populated file picker that supports a significant number of repository types:
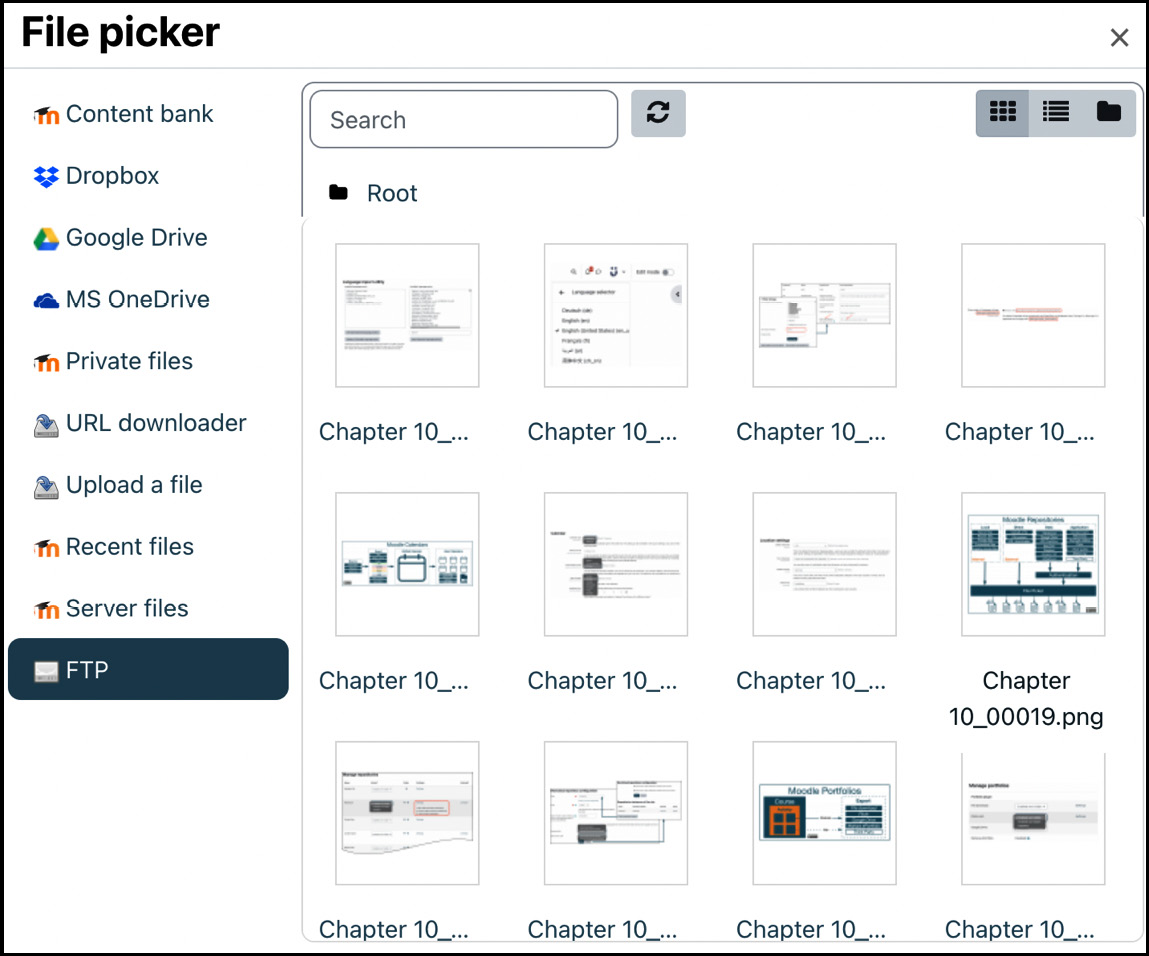
Figure 10.25 – File picker with various repositories
Repositories are concerned with getting internal and external content into Moodle. To achieve the opposite – pushing content out of Moodle – you can use portfolios, which is the topic of the final section of this chapter.
Managing portfolios
According to Moodle Docs, Moodle portfolios enable data, such as forum posts or assignment submissions, to be exported to external systems. The following diagram illustrates the high-level workflow for this:
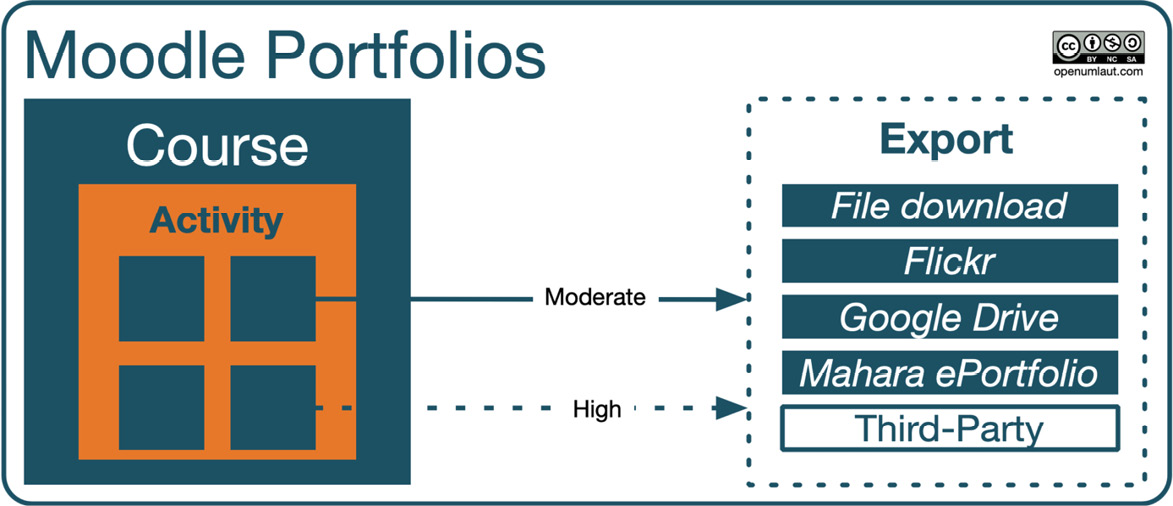
Figure 10.26 – Moodle portfolios
The data that users can export is very granular – for instance, a chat session, one glossary entry, or an individual forum post. Depending on the size of the file to be exported, the portfolio export is executed straight away (moderate file size) or queued (high transfer file size).
Important note
Supported export formats are HTML, LEAP2A, images, text, and files.
Moodle portfolios must be enabled by selecting the Enable portfolios parameter by going to Site administration | General | Advanced features. Once done, you have access to all the available portfolio plugins at Site administration | Plugins | Portfolios | Manage portfolios:
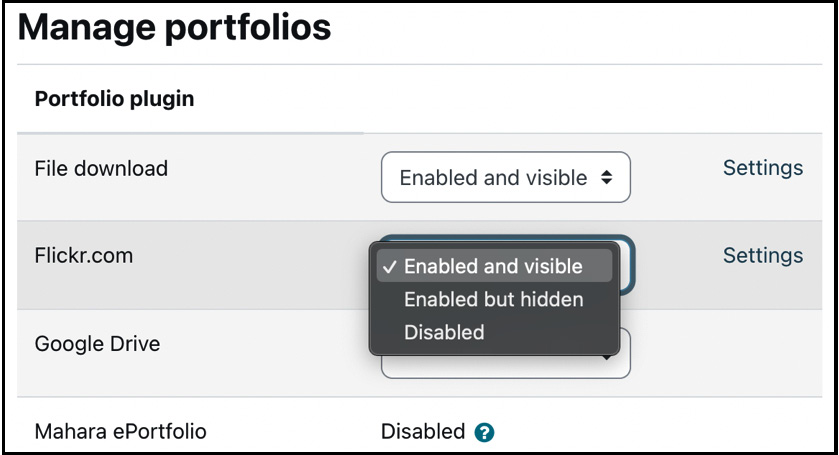
Figure 10.27 – Managing portfolios
Each portfolio has one of the following three states:
- Enabled and visible: The portfolio will be available throughout the system
- Enabled but hidden: Portfolios have to be activated to be used
- Disabled: The portfolio is unavailable in your Moodle system
Like repositories, each portfolio plugin has a Name setting, where the default plugin label can be changed. Unlike repositories, multiple instances do not exist, nor is it possible to change the order of the plugins.
The following core portfolio plugins can be activated and configured:
- File download: Supported export formats are HTML and LEAP2A (a specification for e-portfolio portability).
- Flickr.com: Follow the on screen instructions to obtain an API key and a Secret string. Authorization is required at first use.
- Google Drive: Follow the on screen instructions to register your site with Google using OAuth 2.0 to obtain the Client ID and Secret details. Permission has to be granted at first use. An HTML file will be created automatically in the users’ Documents area.
- Mahara ePortfolio: This repository type is only available if a valid network connection to the open source e-portfolio system Mahara has been established and the MNet authentication plugin has been enabled. In Chapter 19, Setting Up Moodle Networking, we will briefly cover MNet.
- Third-party: Additional plugins can be found at moodle.org/plugins/?q=type:portfolio – for example, Box.
Once at least one portfolio type has been set up, users will see an Export to portfolio option at various places inside activities in their courses. When selecting this option, they must choose one of the existing destinations from the Available export formats drop-down menu. Depending on the chosen portfolio type, additional actions might have to be taken – for example, logging into the site, confirming the file type, or granting access to the external application.
Users can select which available portfolios are presented in their Export to portfolio list. Once they navigate to the Configure option in the Portfolios pane in Preferences, they have the option to hide any configured portfolio plugins.
Furthermore, when they navigate to Transfer logs in the Portfolios pane, they will be shown a list of any Currently queued transfers and Previous successful transfers. The former lists all the pending exports, which can either be continued (using the play button) or canceled (via the stop button). The latter displays details about all the recent transfers that have been made.
The three mentioned user actions – manage portfolios, export portfolios, and view transfer logs – are shown in the following screenshot arrangement:
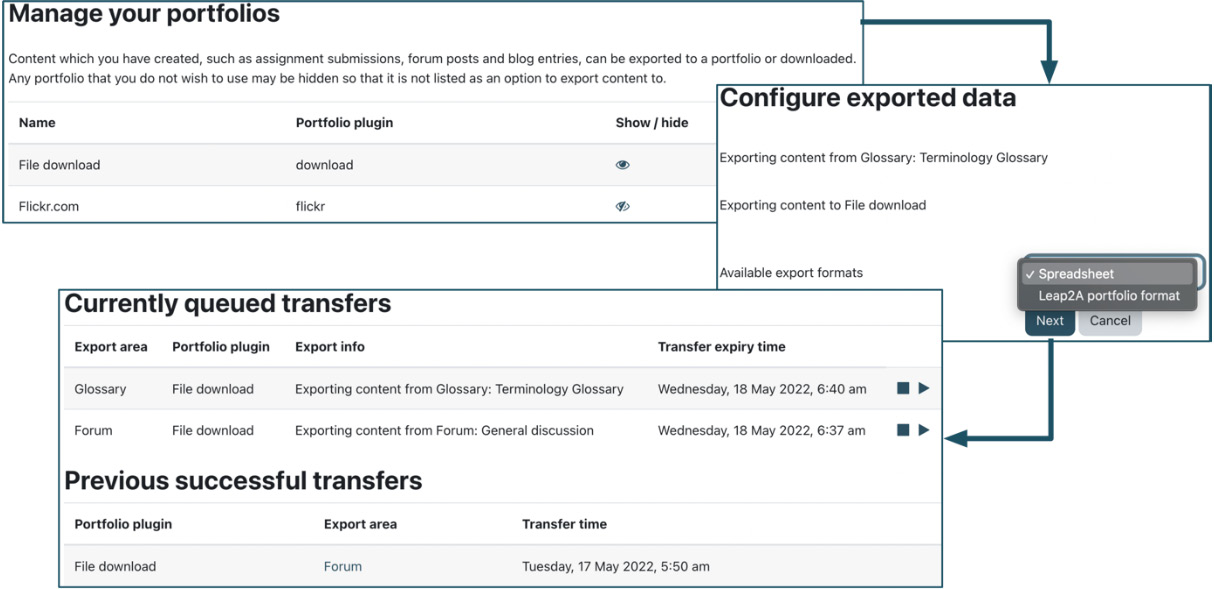
Figure 10.28 – Portfolio user actions
Some settings apply to all portfolios and they can be accessed at Site administration | Plugins | Portfolios | Common portfolio settings. They include two thresholds for file sizes (Moderate transfer filesize and High transfer filesize) and two for the number of database records (Moderate transfer dbsize and High transfer dbsize). If the actual values exceed the threshold values, users will be warned that the export might take some time.
Hint
Additional information on all the mentioned Moodle portfolios can be found at docs.moodle.org/en/Portfolios.
Portfolios are the last of the four building blocks that make up this technical configuration chapter. While not used heavily, they are a valuable feature for learners to export their data to external (portfolio) systems.
Summary
This chapter taught you how to administer any Moodle tools and features that are classified as technical.
First, we configured synchronous and asynchronous communication tools by covering chats, video conferencing (BigBlueButton), messaging (messages and notifications), and RSS feeds. Next, we dealt with various localization creation features, locales, multi-languages, calendars, and time zones. We then configured internal and external repositories to enable your users to add files to courses and other locations via the file picker. Finally, we configured portfolios to let your learners export data to external (portfolio) systems.
You should now be in a good position to approach all stakeholders in your organization and gather any relevant input to ensure that all technical components have been set up appropriately.
Now, let’s move on to another exciting chapter, where we will cover mobile learning and the Moodle app.