
C H A P T E R 10
Using jQuery Effects
For the most part, jQuery UI contains the user-interface functionality associated with jQuery, but some basic effects and animationsare included in the core library, and these are the topic of this chapter. Although I describe them as basic, they can be used to achieve some pretty sophisticated effects. The main focus is on animating the visibility of elements, but you can use these features to animate a range of CSS properties in a number of ways. Table 10-1 provides the summary for this chapter.

Using the Basic Effects
The most basic effects are simply to show or hide elements. The methods that you can use for this are described in Table 10-2.
Listing 10-1shows the simplest of these effects, which is to use the show and hide methods without any arguments.
Listing 10-1. Using the Show and Hide Methods Without Argument
<!DOCTYPE html>

<html>

<head>

    <title>Example</title>

    <script src="jquery-1.7.js" type="text/javascript"></script>

    <link rel="stylesheet" type="text/css" href="styles.css"/>

    <script type="text/javascript">

        $(document).ready(function() {

            $("<button>Hide</button><button>Show</button>").appendTo("#buttonDiv")

                .click(function(e) {

                   if ($(e.target).text() == "Hide") {

                        $('#row1 div.dcell').hide();

                   } else {

                        $('#row1 div.dcell').show();

                   }

                   e.preventDefault();

                });

        });

    </script>

</head>

<body>

    <h1>Jacqui's Flower Shop</h1>

    <form method="post">

        <div id="oblock">

            <div class="dtable">

                <div id="row1" class="drow">

                    <div class="dcell">

                        <img src="astor.png"/><label for="astor">Astor:</label>

                        <input name="astor" value="0" required />

                    </div>

                    <div class="dcell">

                        <img src="daffodil.png"/><label for="daffodil">Daffodil:</label>

                        <input name="daffodil" value="0" required />

                    </div>

                    <div class="dcell">

                        <img src="rose.png"/><label for="rose">Rose:</label>

                        <input name="rose" value="0" required />

                    </div>

                </div>

                <div id="row2"class="drow">

                    <div class="dcell">

                        <img src="peony.png"/><label for="peony">Peony:</label>

                        <input name="peony" value="0" required />

                    </div>

                    <div class="dcell">

                        <img src="primula.png"/><label for="primula">Primula:</label>
                        <input name="primula" value="0" required />

                    </div>

                    <div class="dcell">

                        <img src="snowdrop.png"/><label for="snowdrop">Snowdrop:</label>

                        <input name="snowdrop" value="0" required />

                    </div>

                </div>

            </div>

        </div>

        <div id="buttonDiv"><button type="submit">Place Order</button></div>

    </form>

</body>

</html>
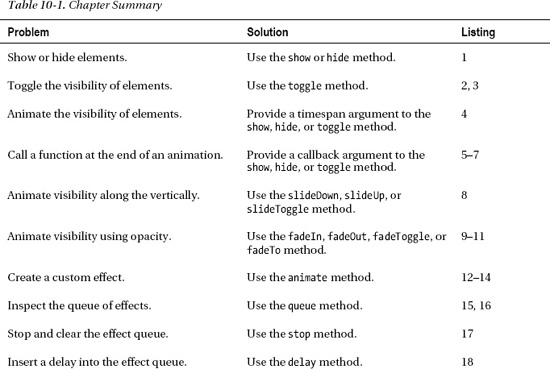
In the script in this example, I manipulate the DOM to add two button elements and provide a function to be called when either of them is clicked. This function uses the text method to figure out which button has been used and calls either the hide or show method. In both cases, I call this method on a jQuery object with the selector #row1 div.dcell, meaning that those div elements in the dcell class that are descendants of the element with the row1 id will be made invisible or visible. Figure 10-1 illustrates what happens when I click the Hide button.
Figure 10-1. Hiding elements with the hide element
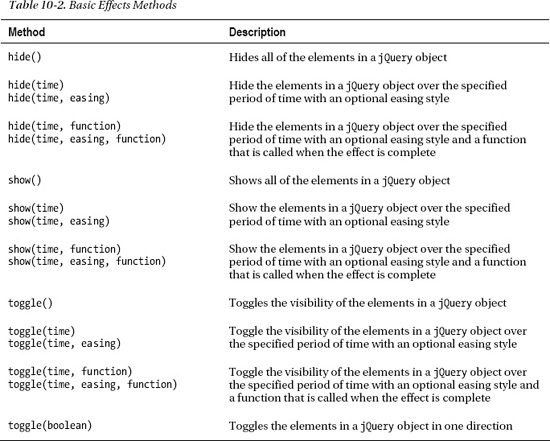
Clicking the Show button calls the show method, restoring the hidden elements, as Figure 10-2 shows.
Figure 10-2. Showing elements with the show method
It is hard to show transitions using figures, but there are a few of points to note. The first is that the transition is immediate. There is no delay or effect, and the elements just appear and disappear. Second, calling hide on elements that are already hidden has no effect and nor does calling show on elements that are visible. Finally, when you hide or show an element, you also show or hide all of its descendants.
![]() Tip You can select elements using the
Tip You can select elements using the :visible and :hidden selectors. See Chapter 5 for details of the jQuery extension CSS selectors.
Toggling Elements
You can flip elements from being visible or hidden and back using the toggle method. Listing 10-2 gives an example.
Listing 10-2. Using the toggle Method to Switch Element Visibility
...

<script type="text/javascript">

    $(document).ready(function() {

        $("<button>Toggle</button>").appendTo("#buttonDiv")

            .click(function(e) {

                $('div.dcell:first-child').toggle();

                e.preventDefault();

            });

    });

</script>

...
In this example I add a single button to the document, and when it is clicked, I use the toggle element to change the visibility of the div.dcell elements that are the first children of their parents. You can see the effect in Figure 10-3.
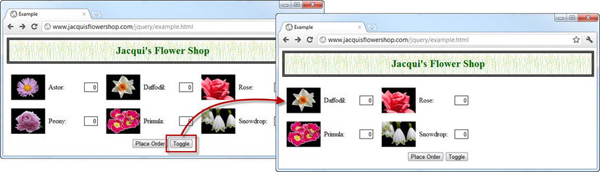
Figure 10-3. Toggling the visibility of elements
![]() Tip Notice that the structure of the document collapses around the hidden elements. If you want to hide the elements and leave space on the screen, then you can set the CSS
Tip Notice that the structure of the document collapses around the hidden elements. If you want to hide the elements and leave space on the screen, then you can set the CSS visibility property to hidden.
Toggling in One Direction
You can pass a boolean argument to the toggle method to restrict the way that visibility is toggled. If you pass true as the argument, then only hidden elements will be shown (visible elements will not be hidden). If you pass false as the argument, then you get the opposite effect. Visible elements will be hidden, but hidden elements will not be made visible. Listing 10-3 shows the use of this flavor of the toggle method. I must confess that I have never found this feature useful, but I include it for completeness.
Listing 10-3. Using the toggle Method in One Direction
...

<script type="text/javascript">

    $(document).ready(function() {

        $("<button>Toggle</button>").appendTo("#buttonDiv")

            .click(function(e) {

                $('div.dcell:first-child').toggle(false);

                e.preventDefault();

            });

    });

</script>

...
Animating the Visibility of Elements
You can animate the process of showing and hiding elements by passing a time span to the show, hide, or toggle methods. The process of showing and hiding elements is then performed gradually, over the specified period. Table 10-3 shows the different time span arguments you can use.
Listing 10-4 shows how you can animate showing and hiding elements.
Listing 10-4. Animating the Visibility of Elements
...

<script type="text/javascript">

    $(document).ready(function() {


        $("<button>Toggle</button>").appendTo("#buttonDiv")

            .click(function(e) {

                $('img').toggle("fast", "linear");

                e.preventDefault();

            });


    });

</script>

...
In this example, I have used the fast value to specify that toggling the visibility of the img elements in the document should be done over a period of 600 milliseconds.
![]() Tip When specifying a duration in milliseconds, be sure that the value is not quoted. That is, use
Tip When specifying a duration in milliseconds, be sure that the value is not quoted. That is, use $('img').toggle(500) and not $('img').toggle("500"). If you do use quotes, then the value will be ignored, and the default internal will be used.
I have also provided an additional argument, which specifies the style of the animation, known as the easing style or easing function. Two easing styles are available, swing and linear. When animating with the swing style, the animation starts slowly, speeds up, and then slows down again as the animation reaches conclusion. The linear style maintains a constant pace throughout the animation. If you omit the argument, swing is used.
You can see the effect of the animation as it hides elements in Figure 10-4. It is difficult to show animation in this way, but you'll get a sense of what happens.
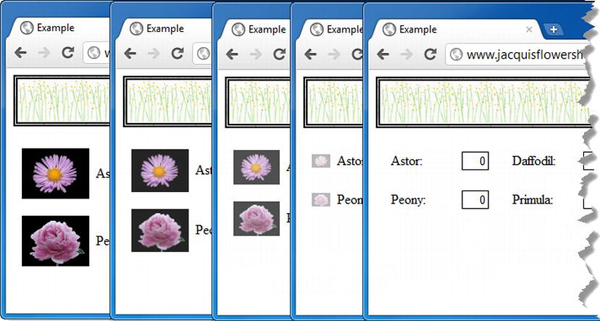
Figure 10-4. Animating hiding elements
As you can see, the animation effect reduces the size of the image in both dimensions and decreases the opacity. At the end of the animation, the img elements are invisible. The images disappear smoothly and elegantly, but this doesn't always happen. Figure 10-5 shows what happens if you click the Toggle button again to make the img elements visible.

Figure 10-5. Animating showing elements
The img elements grow only vertically until right at the end of the sequence when they snap back horizontally. This is an unfortunate interaction between the way that jQuery animates visibility and the CSS table-style layout that I am using in the document. This isn't a critical issue. You can use one of the other animation styles that animates in one dimension only, but it does make the point that animations need to be tested carefully.
Using Effect Callbacks
You can supply a function as an argument to the show, hide, and toggle methods, and the function will be called when these methods finish performing their effect. This can be useful for updating other elements to reflect the change in status, as shown in Listing 10-5.
![]() Tip If you want to perform multiple sequential effects on a single element, then you can use regular jQuery method chaining. See the “Creating and Managing the Effect Queue” section later in this chapter for details.
Tip If you want to perform multiple sequential effects on a single element, then you can use regular jQuery method chaining. See the “Creating and Managing the Effect Queue” section later in this chapter for details.
Listing 10-5. Using an Event Callback
...

<script type="text/javascript">

    $(document).ready(function() {


        var hiddenRow = "#row2";

        var visibleRow = "#row1";


        $(hiddenRow).hide();


        $("<button>Switch</button>").insertAfter("#buttonDiv button")

            .click(function(e) {

                hideVisibleElement();

                e.preventDefault();

            });


        function hideVisibleElement() {

            $(visibleRow).hide("fast", showHiddenElement);

        }


        function showHiddenElement() {

            $(hiddenRow).show("fast", switchRowVariables);

        }


        function switchRowVariables() {

            var temp = hiddenRow;

            hiddenRow = visibleRow;

            visibleRow = temp;

        }

    });

</script>

...
To make this example clearer, I have broken down the effect activities into separate functions. To get set up, I hide one of the div elements that acts as a row in my CSS table layout and define two variables that I use to track which row is visible and which row is not. I add a button element to the document, and when this is clicked, I call the hideVisibleElement function, which uses the hide method to animate hiding the visible row:
$(visibleRow).hide("fast", showHiddenElement);
I specify the name of the function I want performed when the effect has completed, in this case showHiddenElement.
![]() Tip The callback function is not passed any arguments, but the
Tip The callback function is not passed any arguments, but the this variable is set to the DOM element being animated. If multiple elements are being animated, then the callback function will be called once for each of them.
This function uses the show method to animate revealing the element, as follows:
$(hiddenRow).show("fast", switchRowVariables);
Once again, I specify a function to perform at the end of the effect. In this case, it is the switchRowVariables function, which shuffles the variables that track visibility so that you perform the effects on the right elements the next time the button is clicked. The result is that when the button is clicked, the current row is replaced by the hidden row, with a quick animation to make the transition less jarring to the user. Figure 10-6 shows the effect (although, once again, the true effect becomes apparent only when you load the example in the browser).
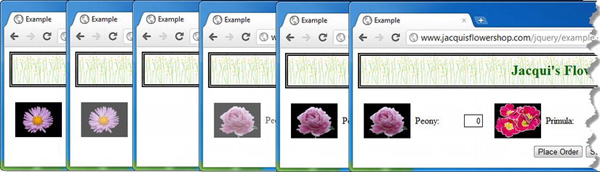
Figure 10-6. Using callback functions to chain effects
The transition between the rows is smooth, and there is no interaction with the CSS table layout because you are dealing with the rows and not the cells of the table. You wouldn't usually need to break out the individual functions as I did, so Listing 10-6 shows the same example rewritten using a more terse set of inline functions.
Listing 10-6. Using Inline Callback Functions
...

<script type="text/javascript">
    $(document).ready(function() {


        var hiddenRow = "#row2";

        var visibleRow = "#row1";


        $(hiddenRow).hide();


        $("<button>Switch</button>").insertAfter("#buttonDiv button")

            .click(function(e) {

                $(visibleRow).hide("fast", function() {

                    $(hiddenRow).show("fast", function() {

                        var temp = hiddenRow;

                        hiddenRow = visibleRow;

                        visibleRow = temp;

                    });

                });


                e.preventDefault();

            });

    });

</script>

...
Creating Looping Effects
You can use the callback functions to produce effects that are performed in a loop. Listing 10-7 provides a demonstration.
Listing 10-7. Using Callback Functions to Create a Looping Effect
...

<script type="text/javascript">

    $(document).ready(function() {


        $("<button>Toggle</button>").insertAfter("#buttonDiv button")

            .click(function(e) {

                performEffect();

                e.preventDefault();

            });


        function performEffect() {

            $('h1').toggle("slow", performEffect)

        }

    });

</script>

...
In this example, clicking the button leads to the performEffect function being executed. This function uses the toggle method to change the visibility of the h1 element in the document and passes itself as the callback argument. The result is that the h1 element loops between being visible and hidden.
![]() Tip Some caution is required when using the current function as the callback function. Eventually you will exhaust the JavaScript call stack, and your script will stop working. The easiest way to solve this problem is with the
Tip Some caution is required when using the current function as the callback function. Eventually you will exhaust the JavaScript call stack, and your script will stop working. The easiest way to solve this problem is with the setTimeout function, which will schedule a callback to your target function without nesting the function calls, like this: $('h1').toggle("slow", setTimeout( performEffect, 1)). It is actually pretty hard to exhaust the call stack, and it usually means leaving a page with animations running for a very long time, but it is worth taking this into account.
USING EFFECTS RESPONSIBLY
Using the Slide Effects
jQuery has a set of effects that slide elements on and off the screen. The methods for this are described in Table 10-4.
These methods animate an element in the vertical axis. The arguments to these methods are as for the basic effect. You can elect to provide a time span, an easing style, and a callback function. Listing 10-8 shows the slide effects in use.
Listing 10-8. Using the Slide Effects
...

<script type="text/javascript">

    $(document).ready(function() {

        $("<button>Toggle</button>").insertAfter("#buttonDiv button")

            .click(function(e) {

                $('h1').slideToggle("fast");

                e.preventDefault();

            });

    });

</script>

...
In this script, I use the slideToggle method to toggle the visibility of the h1 element. You can see the effect in Figure 10-7.
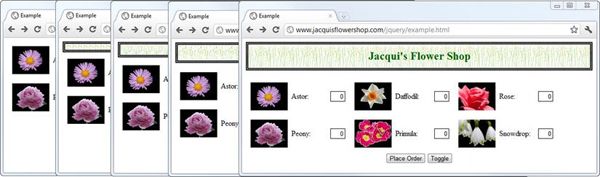
Figure 10-7 Using the slide effect to reveal an element
The figure shows the h1 element being made visible. The elements are clipped, rather than scaled, because jQuery creates the effect by manipulating the height of the element. You can see what I mean by this in Figure 10-8.

Figure 10-8. jQuery creating an effect by manipulating the height of the elements
This figure shows a close-up of the h1 element as it is made visible. You can see that the size of the text doesn't change, only the amount of it that is shown. However, this isn't true for images, because the browser scales them automatically. If you look really closely, you can see that the entire background image is always shown, but it is scaled down to fit the height.
Using the Fade Effects
The fade effect methods show and hide elements by reducing their opacity (or, if you prefer, increasing their transparency). The fade effect methods are described in Table 10-5.

The fadeOut, fadeIn, and fadeToggle methods are consistent with the other effect methods. You can provide a time span, an easing style, and a callback function, just as in the previous examples. Listing 10-9 demonstrates how to use fading.
Listing 10-9. Showing and Hiding Elements by Fading
...

<script type="text/javascript">

    $(document).ready(function() {

        $("<button>Toggle</button>").insertAfter("#buttonDiv button")

            .click(function(e) {

                $('img').fadeToggle();

                e.preventDefault();

            });

    });

</script>

...
I have applied the fadeToggle method to the img elements in the document, in part to demonstrate one of the limitations of this effect. Figure 10-9 shows what happens when you hide the elements.
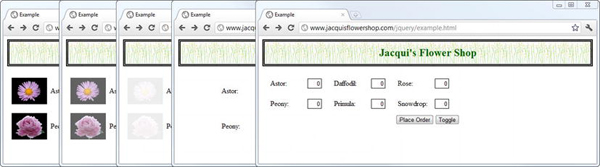
Figure 10-9. Using the fade effect
The fade effect operates only on opacity, unlike the other effects that change the size of the selected elements as well. This means you get a nice smooth fade effect until the elements are completely transparent, at which point jQuery hides them and the page snaps into a new layout. This last stage can be somewhat jarring if not used carefully.
Fading to a Specific Opacity
You can use the fadeTo method to fade elements to a particular opacity. The range of opacity values is a number within the range of 0 (completely transparent) to 1 (completely opaque). The visibility of the elements isn't changed, so you avoid the snap of the page layout I mentioned. Listing 10-10 shows the use of the fadeTo method.
Listing 10-10. Fading to a Specific Opacity
...

<script type="text/javascript">

    $(document).ready(function() {

        $("<button>Fade</button>").insertAfter("#buttonDiv button")

            .click(function(e) {

                $('img').fadeTo("fast", 0);

                e.preventDefault();

            });

    });

</script>

...
In this example, I have specified that the img elements should be faded until they are completely transparent. This has the same effect as the fadeOut method but doesn't hide the elements at the end of the transition. Figure 10-10 shows the effect.
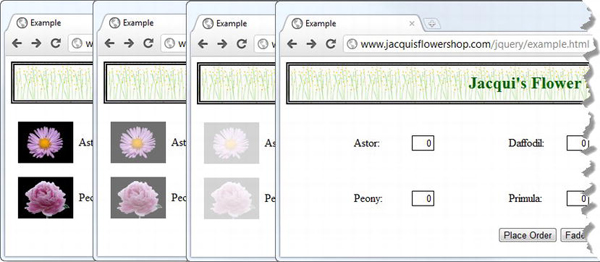
Figure 10-10. Fading out an element with the fadeTo method
You don't have to fade elements to the extremes of the opacity range. You can specify intermediate values as well, as Listing 10-11 demonstrates.
Listing 10-11. Fading to a Specific Opacity
...

<script type="text/javascript">

    $(document).ready(function() {

        $("<button>Fade</button>").insertAfter("#buttonDiv button")

            .click(function(e) {

                $('img').fadeTo("fast", 0.4);

                e.preventDefault();

            });

    });

</script>

...
You can see the effect in Figure 10-11.
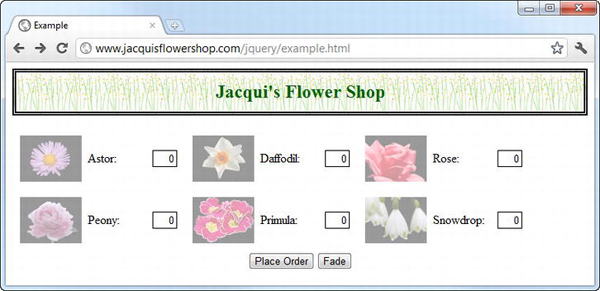
Figure 10-11. Fading to a specific opacity
Creating Custom Effects
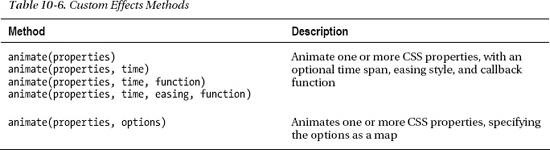
jQuery doesn't limit you to the basic slide and fade effects. You can create your own as well. Table 10-6 shows the methods that you use for this.
jQuery can animate any property that accepts a simple numeric value, for example, the height property.
![]() Note Being able to animate numeric CSS properties means you can't animate colors. There are a few ways to address this. The first (and to my mind best) solution is to use jQuery UI, which I describe in Part IV of this book. If you don't want to use jQuery UI, then you might like to consider using the native browser support for CSS animations. The performance of these is pretty good, but the support is patchy currently and nonexistent in older browser versions. For details of CSS animation, see my book The Definitive Guide to HTML5, which is also published by Apress. The approach that I like least is using a jQuery plugin. Animating colors is difficult to get right, and I have yet to find a plugin that I am entirely satisfied with, but the most reliable I have found is available from
Note Being able to animate numeric CSS properties means you can't animate colors. There are a few ways to address this. The first (and to my mind best) solution is to use jQuery UI, which I describe in Part IV of this book. If you don't want to use jQuery UI, then you might like to consider using the native browser support for CSS animations. The performance of these is pretty good, but the support is patchy currently and nonexistent in older browser versions. For details of CSS animation, see my book The Definitive Guide to HTML5, which is also published by Apress. The approach that I like least is using a jQuery plugin. Animating colors is difficult to get right, and I have yet to find a plugin that I am entirely satisfied with, but the most reliable I have found is available from https://github.com/jquery/jquery-color.
You supply a set of properties that you want to animate as a map object, and, if you want, you can do the same for the options you want to set. Listing 10-12 shows a custom animation.
Listing 10-12. Using a Custom Animation
...

<script type="text/javascript">

    $(document).ready(function() {


        $('form').css({"position": "fixed", "top": "70px", "z-index": "2"});

        $('h1').css({"position": "fixed", "z-index": "1", "min-width": "0"});


        $("<button>Animate</button>").insertAfter("#buttonDiv button")

            .click(function(e) {


                $('h1').animate({

                    height: $('h1').height() + $('form').height() + 10,

                    width: ($('form').width())

                });


                e.preventDefault();

            });

    });

</script>

...
In this example, I want to animate dimensions of the h1 element so that its background image extends behind the form element. Before I can do this, I need to make some changes to the CSS for the affected elements. I could do this using the style sheet I defined in Chapter 3, but since this is a book on jQuery, I have chosen to use JavaScript. To make the animation easier to manage, I have positioned both the form and h1 elements using the fixed mode and have used the z-index property to ensure that the h1 element is displayed below the form.
I have added a button to the document that calls the animate method when clicked. I have chosen to animate the height and width properties, using information obtained via other jQuery methods. You can see the effect of the animation in Figure 10-12.
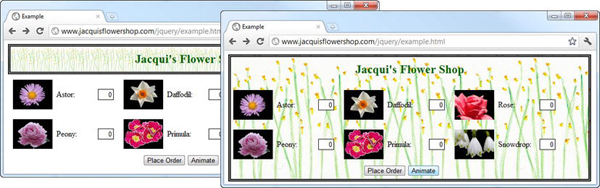
Figure 10-12. Performing a custom animation
I have shown only the start and end states in the figure, but jQuery provides a smooth transition just like with the other effects, and you can exert control other the transition by specifying a time span and an easing style.
Using Absolute Target Property Values
Notice that you specify only the final values for the animation. The start point for jQuery custom animations is the current values of the properties being animated. I used values I derived from other jQuery methods, but you have some other choices. First, and most obvious, is that you can use absolute values, as shown in Listing 10-13.
Listing 10-13. Performing a Custom Animation Using Absolute Values
...

<script type="text/javascript">

    $(document).ready(function() {


        $('form').css({"position": "fixed", "top": "70px", "z-index": "2"});

        $('h1').css({"position": "fixed", "z-index": "1", "min-width": "0"});


        $("<button>Animate</button>").insertAfter("#buttonDiv button")

            .click(function(e) {

                $('h1').animate({

                    left: 50,

                    height: $('h1').height() + $('form').height() + 10,

                    width: ($('form').width())

                });


                e.preventDefault();

            });

    });

</script>

...
In this example, I have added the left property to the animation, specifying an absolute value of 50 (which will be taken as 50 pixels). This shifts the h1 element to the right. Figure 10-13 shows the outcome of the animation.
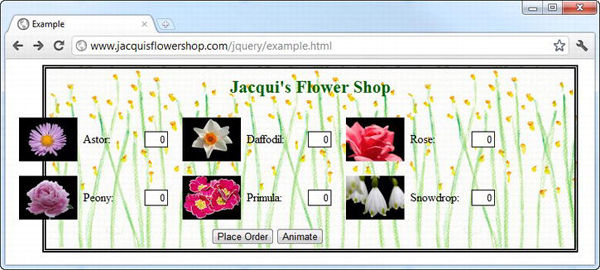
Figure 10-13. Creating a custom animation with a fixed final property value
Using Relative Target Property Values
You can also specify your animation targets using relative values. You specify an increase by prefixing a value with += and a decrease with -=. Listing 10-14 shows the use of relative values.
Listing 10-14. Using Relative Values in a Custom Animation Effect
...

<script type="text/javascript">

    $(document).ready(function() {


        $('form').css({"position": "fixed", "top": "70px", "z-index": "2"});

        $('h1').css({"position": "fixed", "z-index": "1", "min-width": "0"});


        $("<button>Animate</button>").insertAfter("#buttonDiv button")

            .click(function(e) {

                $('h1').animate({

                    height: +=100,

                    width: -=700

                });


                e.preventDefault();

            });

    });

...
Creating and Managing the Effect Queue
When you use effects, jQuery creates a queue of the animations that it has to perform and works its way through them. There are a set of methods you can use to get information about the queue or take control of it. These methods are described in Table 10-7.
You create a queue of effects by chaining together calls to effect-related methods, as shown in Listing 10-15.
Listing 10-15. Creating an Effect Queue
...

<script type="text/javascript">

    $(document).ready(function() {


        $('form').css({"position": "fixed", "top": "70px", "z-index": "2"});

        $('h1').css({"position": "fixed", "z-index": "1", "min-width": "0"});


        var timespan = "slow";


        cycleEffects();


        function cycleEffects() {

                $('h1')

                .animate({left: "+=100"}, timespan)

                .animate({left: "-=100"}, timespan)

                .animate({height: 223,width: 700}, timespan)

                .animate({height: 30,width: 500}, timespan)

                .slideUp(timespan)

                .slideDown(timespan, cycleEffects);

        }

    });

</script>

...
This script in this example uses regular jQuery method chaining to string together a series of effects on the h1 element. The last effect uses the cycleEffects function as the callback, which starts the process over again. This is a pretty annoying sequence. It is hypnotic for a moment and then a little irritating, and then it tips right over into the kind of effect that brings on a headache. But it does create a queue of effects, which is what I need to demonstrate the queue features.
![]() Note I could have used the callback functions to achieve the same effect, but that doesn't create the effect queue, because the function that starts the next animation isn't executed until the previous animation has completed. When you use regular method chaining, as in this example, all of the methods are evaluated, and the animation effects are placed in the queue. The limitation of using method chaining is that you are limited to working with the current selection. When using callbacks, you can string together sequences that involve entirely unrelated elements.
Note I could have used the callback functions to achieve the same effect, but that doesn't create the effect queue, because the function that starts the next animation isn't executed until the previous animation has completed. When you use regular method chaining, as in this example, all of the methods are evaluated, and the animation effects are placed in the queue. The limitation of using method chaining is that you are limited to working with the current selection. When using callbacks, you can string together sequences that involve entirely unrelated elements.
Displaying the Items in the Effect Queue
You can use the queue method to inspect the contents of the effects queue. This is not entirely helpful because the queue contains one of two types of data object. If an effect is being executed, then the corresponding item in the queue is the string value inprogress. If the effect is not being executed, the item in the queue is the function that will be invoked. The jQuery effects are all performed by the doAnimation function, and you can't inspect that to find out what is going to be animated. That said, inspecting the content is a good place to start with the queue, and Listing 10-16 shows how it can be done.
Listing 10-16. Inspecting the Contents of the Effect Queue
...

<script type="text/javascript">

    $(document).ready(function() {


        $('h1').css({"position": "fixed", "z-index": "1", "min-width": "0"});

        $('form').remove();

        $('<table border=1></table>')

            .appendTo('body').css({

                position: "fixed", "z-index": "2",

                "border-collapse": "collapse", top: 100

            });


        var timespan = "slow";


        cycleEffects();

        printQueue();


        function cycleEffects() {

                $('h1')

                .animate({left: "+=100"}, timespan)

                .animate({left: "-=100"}, timespan)

                .animate({height: 223,width: 700}, timespan)

                .animate({height: 30,width: 500}, timespan)

                .slideUp(timespan)

                .slideDown(timespan, cycleEffects);

        }


        function printQueue() {

            var q = $('h1').queue();

            var qtable = $('table'),

            qtable.html("<tr><th>Queue Length:</th><td>" + q.length + "</td></tr>");

            for (var i = 0; i < q.length; i++) {

                var baseString = "<tr><th>" + i + ":</th><td>";

                if (q[i] == "inprogress") {

                    $('table').append(baseString + "In Progress</td></tr>");

                } else if (q[i].name == "") {

                    $('table').append(baseString + q[i] + "</td></tr>");

                } else {

                    $('table').append(baseString + q[i].name + "</td></tr>");

                }

            }

            setTimeout(printQueue, 500);

        }

    });

</script>

...
You don't need the form element in this example, so I have removed it from the DOM and replaced it with a simple table that I'll use to display the contents of the effect queue. I have added a repeating function called printQueue that calls the queue method and displays the number of items and a little detail about each of them in the table. As I say, the items in the queue are not especially useful in their own right, but they do give you an overall picture of what is going on. Figure 10-14 shows how jQuery progresses through the effects queue.
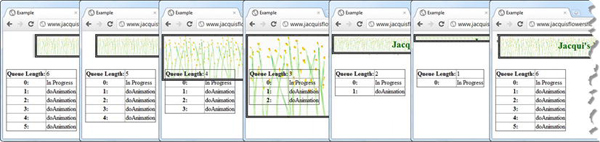
Figure 10-14. Inspecting the contents of the queue
This is an example that is hard to portray in static images. I recommend you load the document into a browser to see for yourself. When the cycleEffects function is first called, there are six items in the effects queue, the first of which is shown as being in progress. The others are instances of the doAnimation function. After each effect is completed, jQuery removes the item from the queue. At the end of the last effect, the cycleEffects function is called again, which puts back in the position of having six items in the queue.
Stopping Effects and Clearing the Queue
You can use the stop method to interrupt the effect that jQuery is currently performing. You can provide two optional arguments to this method, both of which are boolean values. If you pass true as the first argument, then all of the other effects are removed from the queue and will not be performed. If you pass true as the second argument, then the CSS properties that are being animated will be set to their target values.
The default value for both arguments is false, which means that only the current effect is removed from the queue and that the properties that were being animated are left at the values they were set to at the moment the effect was interrupted. If you don't clear the queue, jQuery will move on to the next effect and begin executing it as normal. Listing 10-17 provides an example of using the stop method.
![]() Tip When you call the
Tip When you call the stop method, any callback associated with the current effect will not be executed. When you use the stop method to clear the queue, no callback associated with any of the effects in the queue will be executed.
Listing 10-17. Using the stop Method
...

<script type="text/javascript">

    $(document).ready(function() {


        $('h1').css({"position": "fixed", "z-index": "1", "min-width": "0"});

        $('form').remove();

        $('<table border=1></table>')

            .appendTo('body')

            .css({

                position: "fixed", "z-index": "2",

                "border-collapse": "collapse", top: 100

            });


        $('<button>Stop</button><button>Start</button>')

          .appendTo($('<div/>').appendTo("body")

            .css({position: "fixed", "z-index": "2",

                "border-collapse": "collapse", top: 100, left:200

            })).click(function(e) {

                $(this).text() == "Stop" ? $('h1').stop(true, true) : cycleEffects();

            });


        var timespan = "slow";


        cycleEffects();

        printQueue();


        function cycleEffects() {

                $('h1')

                .animate({left: "+=100"}, timespan)

                .animate({left: "-=100"}, timespan)

                .animate({height: 223,width: 700}, timespan)

                .animate({height: 30,width: 500}, timespan)

                .slideUp(timespan)

                .slideDown(timespan, cycleEffects);

        }


        function printQueue() {

            var q = $('h1').queue();

            var qtable = $('table'),

            qtable.html("<tr><th>Queue Length:</th><td>" + q.length + "</td></tr>");

            for (var i = 0; i < q.length; i++) {

                var baseString = "<tr><th>" + i + ":</th><td>";

                if (q[i] == "inprogress") {

                    $('table').append(baseString + "In Progress</td></tr>");

                } else if (q[i].name == "") {

                    $('table').append(baseString + q[i] + "</td></tr>");

                } else {

                    $('table').append(baseString + q[i].name + "</td></tr>");

                }

            }
            setTimeout(printQueue, 500);

        }

    });

</script>

...
To demonstrate the stop method, I have added two buttons to the document. When the Stop button is clicked, I call the stop method, passing in two true arguments. This has the effect of clearing the rest of the effect queue and snapping the element to the target values for the property that was being animated. Since callback functions are not invoked when the stop method is used, the loop of cycleEffects method calls is broken, and animation is brought to a halt. When the Start button is clicked, the cycleEffects method is called and the animation resumes.
![]() Tip Clicking the Start button when the animations are running doesn't confuse jQuery. It just adds the effects used by the
Tip Clicking the Start button when the animations are running doesn't confuse jQuery. It just adds the effects used by the cycleEffects method to the effects queue. The use of callbacks means that the size of the queue will jump around a little, but in terms of the animations, everything continues as normal.
Inserting a Delay into the Queue
You can use the delay method to introduce a pause between two effects in the queue. The argument to this method is the number of milliseconds that the delay should last for. Listing 10-18 shows the use of this method.
Listing 10-18. Using the delay Method
...

<script type="text/javascript">

    $(document).ready(function() {


        $('h1').css({"position": "fixed", "z-index": "1", "min-width": "0"});

        $('form').remove();

        $('<table border=1></table>')

            .appendTo('body')

            .css({

                position: "fixed", "z-index": "2",

                "border-collapse": "collapse", top: 100

            });


        $('<button>Stop</button><button>Start</button>')

          .appendTo($('<div/>').appendTo("body")

            .css({position: "fixed", "z-index": "2",

                "border-collapse": "collapse", top: 100, left:200

            })).click(function(e) {

                $(this).text() == "Stop" ? $('h1').stop(true, true) : cycleEffects();

            });
        var timespan = "slow";


        cycleEffects();

        printQueue();


        function cycleEffects() {

                $('h1')

                .animate({left: "+=100"}, timespan)

                .animate({left: "-=100"}, timespan)

                .delay(1000)

                .animate({height: 223,width: 700}, timespan)

                .animate({height: 30,width: 500}, timespan)

                .delay(1000)

                .slideUp(timespan)

                .slideDown(timespan, cycleEffects);

        }


        function printQueue() {

            var q = $('h1').queue();

            var qtable = $('table'),

            qtable.html("<tr><th>Queue Length:</th><td>" + q.length + "</td></tr>");

            for (var i = 0; i < q.length; i++) {

                var baseString = "<tr><th>" + i + ":</th><td>";

                if (q[i] == "inprogress") {

                    $('table').append(baseString + "In Progress</td></tr>");

                } else if (q[i].name == "") {

                    $('table').append(baseString + q[i] + "</td></tr>");

                } else {

                    $('table').append(baseString + q[i].name + "</td></tr>");

                }

            }

            setTimeout(printQueue, 500);

        }

    });

</script>

...
This script introduces two one-second delays in the sequence of animation effects. The delay method uses an anonymous function to handle the delay, so you'll see the following code in the queue inspection table in the document:
function (next, runner) {

    var timeout = setTimeout(next, time);

    runner.stop = function () {

        clearTimeout(timeout);

    };

}
I have formatted the code to make it easier to read, but you don't have to understand how it functions. Just know what it means when you find it in the queue.
Inserting Functions into the Queue
You can add your own functions into the queue using the queue method, and they will be executed just as the standard effect methods are. You can use this feature to start other animations, gracefully exit a chain of animations based on an external variable, or, well, do anything that you need. Listing 10-19 contains an example.
Listing 10-19. Inserting a Custom Function into the Queue
...

<script type="text/javascript">

    $(document).ready(function() {


        $('form').css({"position": "fixed", "top": "70px", "z-index": "2"});

        $('h1').css({"position": "fixed", "z-index": "1", "min-width": "0"});


        var timespan = "slow";


        cycleEffects();


        function cycleEffects() {

                $('h1')

                .animate({left: "+=100"}, timespan)

                .animate({left: "-=100"}, timespan)

                .queue(function() {

                    $('img').fadeTo(timespan, 0).fadeTo(timespan, 1);

                    $(this).dequeue();

                })

                .animate({height: 223,width: 700}, timespan)

                .animate({height: 30,width: 500}, timespan)

                .slideUp(timespan)

                .slideDown(timespan, cycleEffects);

        }

    });

</script>

...
The this variable is set to the jQuery object that the method was called on. This is useful because you must make sure to call the dequeue method at some point in your function in order to move the queue onto the next effect or function. In this example, I used the queue method to add a function that fades the img elements to fully transparent and back.
![]() Tip The effects I added in the custom function are added to the effect queues for the
Tip The effects I added in the custom function are added to the effect queues for the img elements. Each element has its own queue, and you can manage them independently of one another. If you want to animate multiple properties on the same elements whose queue you are operating on, then you just use the animate method. Otherwise, your effects will just be added to the queue in sequence.
Alternatively, you can accept a single argument to the function, which is the next function in the queue. In this situation, you must invoke the function to move the queue to the next effect, as shown in Listing 10-20.
Listing 10-20. Using the Argument Passed to the Custom Function
...

<script type="text/javascript">

    $(document).ready(function() {


        $('form').css({"position": "fixed", "top": "70px", "z-index": "2"});

        $('h1').css({"position": "fixed", "z-index": "1", "min-width": "0"});


        var timespan = "slow";


        cycleEffects();


        function cycleEffects() {

                $('h1')

                .animate({left: "+=100"}, timespan)

                .animate({left: "-=100"}, timespan)

                .queue(function(nextFunction) {

                    $('img').fadeTo(timespan, 0).fadeTo(timespan, 1);

                    nextFunction();

                })

                .animate({height: 223,width: 700}, timespan)

                .animate({height: 30,width: 500}, timespan)

                .slideUp(timespan)

                .slideDown(timespan, cycleEffects);

        }

    });

</script>

...
![]() Tip If you don't invoke the next function or call the
Tip If you don't invoke the next function or call the dequeue method, then the effect sequence will stall.
Enabling and Disabling Effect Animations
You can disable the animation of effects by setting the value of the $.fx.off property to true, as shown in Listing 10-21.
Listing 10-21. Disabling Animations
<script type="text/javascript">

    $(document).ready(function() {


        $.fx.off = true;


        $('form').css({"position": "fixed", "top": "70px", "z-index": "2"});

        $('h1').css({"position": "fixed", "z-index": "1", "min-width": "0"});


        var timespan = "slow";


        cycleEffects();


        function cycleEffects() {

                $('h1').animate({left: "+=100"}, timespan)

                .delay(500)

                .animate({left: "-=100"}, timespan)

                .delay(500)

                .queue(function(nextFunction) {

                    $('img').fadeTo(timespan, 0).fadeTo(timespan, 1);

                    nextFunction();

                })

                .delay(500)

                .animate({height: 223,width: 700}, timespan)

                .delay(500)

                .animate({height: 30,width: 500}, timespan)

                .delay(500)

                .slideUp(timespan)

                .delay(500)

                .slideDown(timespan, setTimeout(cycleEffects, 1));

        }

    });

</script>
When animations are disabled, calls to effect methods cause the elements to snap to their target property values immediately. Time spans are ignored, and there are no intermediate animations. On a modern computer, the browser can snap between these states so quickly that they are invisible. It is for this reason that I have added all the calls to the delay method in the example. Without these calls, no changes are discernible. The other point to note is that looping sets of effects will quickly hit the call stack limit when animations are disabled. To avoid this, I have used the setTimeout method, as described earlier in this chapter.
Summary
In this chapter, I showed you how to use the jQuery effect features. The built-in effect methods are mostly for making elements visible and invisible in different ways, but you can go beyond this and animate any numeric CSS property. You can also dig into the effect queue and take more control over the sequence of effects that are applied to elements.