
C H A P T E R 13
Working with Forms
In this chapter, I will show you the support that jQuery provides for working with HTML forms. In part, I will recap the form-related events and the jQuery methods you can use to manage them, but most of this chapter is dedicated to a plugin that provides a great mechanism for validating the values that users enter into a form before it is submitted to a server. If you have written any kind of form-based web application, you will have realized that users will enter all sorts of data into a form, so validation is an important process.
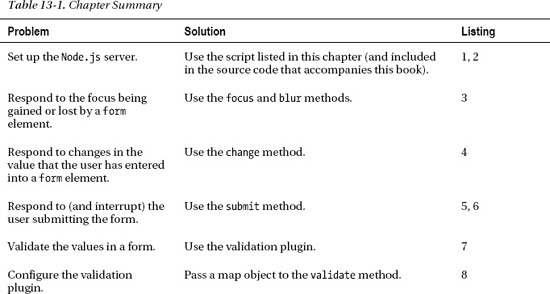
I begin this chapter by introducing the Node.js server script that you will use in this part of the book. For this chapter, the script doesn't do a great deal other than show you the data values that were entered into the form, but in later chapters you'll start to rely on Node.js a little more. Table 13-1 provides the summary for this chapter.

Preparing the Node.js Server
In this chapter, you will be using Node.js to receive and process form data from the browser. I don't want to get drawn into the details of how Node.js functions, but one of the reasons that I selected it for this book was because Node.js is built around JavaScript, which means you can use the same skills for server-side programming as you do for client-side programming.
![]() Tip If you want to re-create the example in this chapter, then you should see Chapter 1 for details of how to obtain
Tip If you want to re-create the example in this chapter, then you should see Chapter 1 for details of how to obtain Node.js and the additional module that I rely on. You can download the server-side script along with all of the HTML documents from Apress.com.
Listing 13-1 shows the server-side script that you will use in this chapter. I present this as a black box and explain only the inputs and output.
Listing 13-1. The formserver.js Node.js Script
var http = require('http'),

var querystring = require('querystring'),


http.createServer(function (req, res) {

    console.log("[200 OK] " + req.method + " to " + req.url);


    if (req.method == 'POST') {

        var dataObj = new Object();

        var contentType = req.headers["content-type"];

        var fullBody = '';


        if (contentType) {

            if (contentType.indexOf("application/x-www-form-urlencoded") > -1) {

                req.on('data', function(chunk) { fullBody += chunk.toString();});

                req.on('end', function() {

                    res.writeHead(200, "OK", {'Content-Type': 'text/html'});

                    res.write('<html><head><title>Post data</title></head><body>'),

                    res.write('<style>th, td {text-align:left; padding:5px; color:black}
'),

                    res.write('th {background-color:grey; color:white; min-width:10em}
'),

                    res.write('td {background-color:lightgrey}
'),

                    res.write('caption {font-weight:bold}</style>'),

                    res.write('<table border="1"><caption>Form Data</caption>'),

                    res.write('<tr><th>Name</th><th>Value</th>'),

                    var dBody = querystring.parse(fullBody);

                    for (var prop in dBody) {

                    res.write("<tr><td>" + prop + "</td><td>" + dBody[prop] + "</td></tr>");

                    }

                    res.write('</table></body></html>'),

                    res.end();

                });

            }

        }

    }

}).listen(80);

console.log("Ready on port 80");
To run this script, I enter the following at the command line:
node.exe formserver.js
The command will be different if you are using another operating system. See the Node.js documentation for details. To demonstrate the Node.js functionality you'll use in this chapter, you need to turn to your example document, which is shown in Listing 13-2.
Listing 13-2. The Example Document for This Chapter
<!DOCTYPE html>

<html>
<head>

    <title>Example</title>

    <script src="jquery-1.7.js" type="text/javascript"></script>

    <script src="jquery.tmpl.js" type="text/javascript"></script>

    <link rel="stylesheet" type="text/css" href="styles.css"/>

    <script type="text/javascript">

        $(document).ready(function() {


            var data = [

               { name: "Astor", product: "astor", stocklevel: "10", price: "2.99"},

               { name: "Daffodil", product: "daffodil", stocklevel: "12", price: "1.99"},

               { name: "Rose", product: "rose", stocklevel: "2", price: "4.99"},

               { name: "Peony", product: "peony", stocklevel: "0", price: "1.50"},

               { name: "Primula", product: "primula", stocklevel: "1", price: "3.12"},

               { name: "Snowdrop", product: "snowdrop", stocklevel: "15", price: "0.99"},

            ];


            var templResult = $('#flowerTmpl').tmpl(data);

            templResult.slice(0, 3).appendTo('#row1'),

            templResult.slice(3).appendTo("#row2");


        });

    </script>

    <script id="flowerTmpl" type="text/x-jquery-tmpl">

        <div class="dcell">

            <img src="${product}.png"/>

            <label for="${product}">${name}: </label>

            <input name="${product}" value="0" required />

        </div>

    </script>

</head>

<body>

    <h1>Jacqui's Flower Shop</h1>

    <form method="post" action="http://node.jacquisflowershop.com/order">

        <div id="oblock">

            <div class="dtable">

                <div id="row1" class="drow">

                </div>

                <div id="row2"class="drow">

                </div>

            </div>

        </div>

        <div id="buttonDiv"><button type="submit">Place Order</button></div>

    </form>

</body>

</html>
The individual product elements are generated using data templates (as described in Chapter 12). I have specified a value for the action attribute of the form element, which means it will post to the following URL:
http://node.jacquisflowershop.com/order
I am using two different servers. The first server (www.jacquisflowershop.com) is the one you have been using throughout this book. It delivers the static content such as HTML documents, scripts files, and images. For me, this is Microsoft's IIS 7.5, but you can use any server that appeals to you (I use IIS because a lot of my books are about Microsoft web programming technologies, and I already have a server set up and ready to go).
The second server (node.jacquisflowershop.com) runs Node.js (using the script shown previously), and when you submit the form in the example document, this is where the data will be sent. In this chapter, you don't care a great deal about what the server does with the data it receives. You are focused on the form itself. In Figure 13-1, you can see that I have entered some values into the input elements in the document.
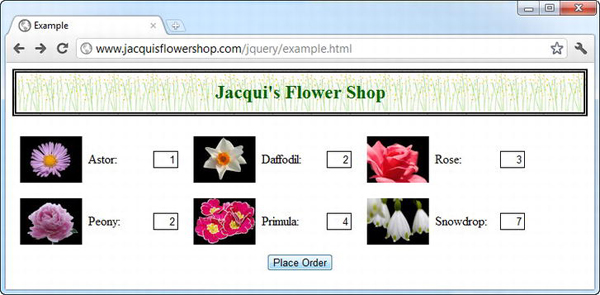
Figure 13-1. Entering data into the input elements
When I click the Place Order button, the form is submitted to the Node.js server, and a simple response is sent back to the browser, as shown in Figure 13-2.
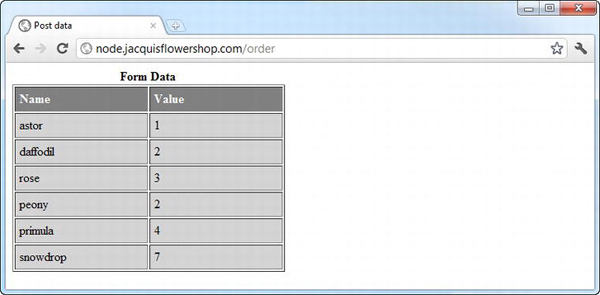
Figure 13-2. The response from the Node.js server
I know this is not a very interesting response, but you just need somewhere to send the data for now, and I don't want to get drawn off-track into the world of server development.
Recapping the Form Event Methods
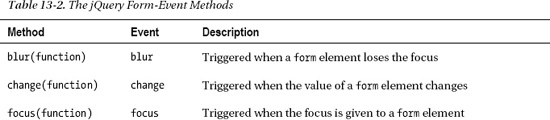
As I mentioned in Chapter 9, there are a set of jQuery methods that deal with form-related events. It is worth recapping these now that you are specifically looking at forms. Table 13-2 describes the methods and the events to which they correspond.
![]() Tip Don't forget that jQuery defines a set of extension selectors that match form elements. See Chapter 5 for details.
Tip Don't forget that jQuery defines a set of extension selectors that match form elements. See Chapter 5 for details.

Dealing with Form Focus
The blur and focus methods allow you to respond to changes in the focus. A common use for these features is to help the user by emphasizing which element has the focus (and thus which element will receive input from the keyboard). Listing 13-3 provides a demonstration.
Listing 13-3. Managing Form Element Focus
...

<script type="text/javascript">

$(document).ready(function() {

    var data = [

       { name: "Astor", product: "astor", stocklevel: "10", price: "2.99"},

       { name: "Daffodil", product: "daffodil", stocklevel: "12", price: "1.99"},

       { name: "Rose", product: "rose", stocklevel: "2", price: "4.99"},

       { name: "Peony", product: "peony", stocklevel: "0", price: "1.50"},

       { name: "Primula", product: "primula", stocklevel: "1", price: "3.12"},

       { name: "Snowdrop", product: "snowdrop", stocklevel: "15", price: "0.99"},

    ];


    var templResult = $('#flowerTmpl').tmpl(data);

    templResult.slice(0, 3).appendTo('#row1'),

    templResult.slice(3).appendTo("#row2");


    $('input').focus(handleFormFocus).blur(handleFormFocus);


    function handleFormFocus(e) {

        var borderVal = e.type == "focus" ? "medium solid green" : "";

        $(this).css("border", borderVal);

    }


});

</script>...
In this example, I select all of the input elements and register the handleFormFocus function as the handler for both the focus and blur events. The function applies a green border when an element gains the focus and removes it when the focus is lost. You can see the effect in Figure 13-3.
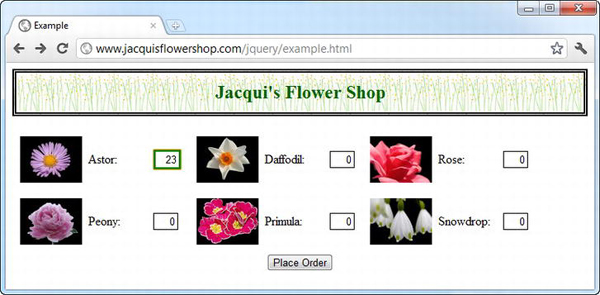
Figure 13-3. Emphasizing the focused element
Notice that I used the input selector. In other words, I selected the elements by tag. jQuery provides the extension selector :input (I described the extension selectors in Chapter 5). This extension selector matches elements more broadly in some browsers, and in particular, it will match button elements that are capable of submitting the form, which means if you use the extension selector, your border will be applied to the button as well as the actual input elements. You can see the difference when the button is focused in Figure 13-4.
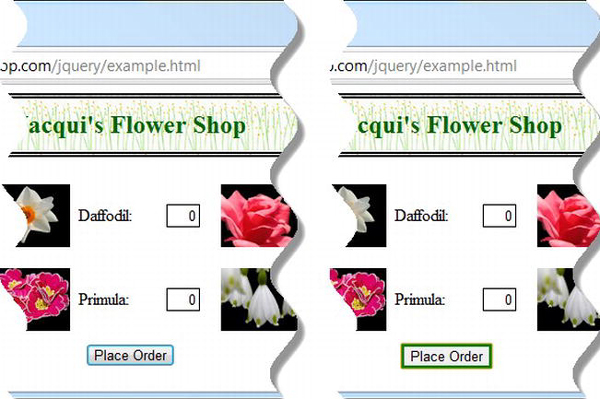
Figure 13-4. The difference between the input and :input selectors
Which selector you use is a matter for personal preference, but it is useful to be aware of the difference.
Dealing with Value Changes
The change event is triggered when the user changes the value in a formelement. This is a particularly useful event if you are providing cumulative information based on the values in the form. Listing 13-4 shows how you can use this event to track the total number of items selected in the flower shop document. This is the same approach I took when I refactored the example at the end of Part II of this book.
Listing 13-4. Responding to the Change Event
...

<script type="text/javascript">

$(document).ready(function() {

    var data = [

       { name: "Astor", product: "astor", stocklevel: "10", price: "2.99"},

       { name: "Daffodil", product: "daffodil", stocklevel: "12", price: "1.99"},

       { name: "Rose", product: "rose", stocklevel: "2", price: "4.99"},

       { name: "Peony", product: "peony", stocklevel: "0", price: "1.50"},

       { name: "Primula", product: "primula", stocklevel: "1", price: "3.12"},

       { name: "Snowdrop", product: "snowdrop", stocklevel: "15", price: "0.99"},

    ];


    var templResult = $('#flowerTmpl').tmpl(data);

    templResult.slice(0, 3).appendTo('#row1'),

    templResult.slice(3).appendTo("#row2");


    $('input').focus(handleFormFocus).blur(handleFormFocus);


    function handleFormFocus(e) {

        var borderVal = e.type == "focus" ? "medium solid green" : "";

        $(this).css("border", borderVal);

    }


    var total = $('#buttonDiv')

        .prepend("<div>Total Items: <span id=total>0</span></div>")

        .css({clear: "both", padding: "5px"});

    $('<div id=bbox />').appendTo("body").append(total).css("clear: left");


    $('input').change(function(e) {

        var total = 0;

        $('input').each(function(index, elem) {

            total += Number($(elem).val());

        });

        $('#total').text(total);

    });

});

</script>

...
In this example, I respond to the change event by totaling the values in all of the input elements and displaying the result in the span element that I had previously added to the document.
Dealing with Form Submission
A lot of the more advanced activities you can perform with forms arise from the way you can prevent the browser's default form mechanism from working. Listing 13-5 provides a simple demonstration.
Listing 13-5. Intercepting the Form Submission
...

<script type="text/javascript">

$(document).ready(function() {

    var data = [

       { name: "Astor", product: "astor", stocklevel: "10", price: "2.99"},

       { name: "Daffodil", product: "daffodil", stocklevel: "12", price: "1.99"},

       { name: "Rose", product: "rose", stocklevel: "2", price: "4.99"},

       { name: "Peony", product: "peony", stocklevel: "0", price: "1.50"},

       { name: "Primula", product: "primula", stocklevel: "1", price: "3.12"},

       { name: "Snowdrop", product: "snowdrop", stocklevel: "15", price: "0.99"},

    ];


    var templResult = $('#flowerTmpl').tmpl(data);

    templResult.slice(0, 3).appendTo('#row1'),

    templResult.slice(3).appendTo("#row2");


    $('form').submit(function (e) {

        if ($('input').val() == 0) {

            e.preventDefault();

        }

    });

});

</script>...
In this script, I register an inline function for the submit event. This event will be triggered when the user clicks the Place Order button. If the value of the first input element is 0, I call the preventDefault method to interrupt the default action of the form, which is to submit the data to the server. For any other value, the form is submitted.
![]() Tip As an alternative, you can return
Tip As an alternative, you can return false from the function to achieve the same effect.
There are ways in which the form can be programmatically submitted. You can use the jQuery submit method without any arguments, and you can use the submit method, which is defined for form elements by the HTML5 specification. Listing 13-6 shows both approaches in use.
Listing 13-6. Explicitly Submitting a Form
...

<script type="text/javascript">

$(document).ready(function() {

    var data = [

       { name: "Astor", product: "astor", stocklevel: "10", price: "2.99"},

       { name: "Daffodil", product: "daffodil", stocklevel: "12", price: "1.99"},

       { name: "Rose", product: "rose", stocklevel: "2", price: "4.99"},

       { name: "Peony", product: "peony", stocklevel: "0", price: "1.50"},

       { name: "Primula", product: "primula", stocklevel: "1", price: "3.12"},

       { name: "Snowdrop", product: "snowdrop", stocklevel: "15", price: "0.99"},

    ];


    var templResult = $('#flowerTmpl').tmpl(data);

    templResult.slice(0, 3).appendTo('#row1'),

    templResult.slice(3).appendTo("#row2");


    $('form').submit(function (e) {

        if ($('input').val() == 0) {

            e.preventDefault();

        }

    });


    $('<button>DOM API</button>').appendTo('#buttonDiv').click(function (e) {

        document.getElementsByTagName("form")[0].submit();

        e.preventDefault();

    });


    $('<button>jQuery Method</button>').appendTo('#buttonDiv').click(function (e) {

        $('form').submit();

        e.preventDefault();

    });

});

</script>...
I have added two buttons to the document. The one that uses the jQuery submit method ends up calling your handler function, and if the value of the first input element is zero, the form won't be submitted. However, the button that uses the DOM API and calls the submit method defined by the form element bypasses your event handler, and the form will always be submitted.
![]() Tip My advice is to stick to the jQuery methods, of course, but if you do use the DOM method, at least you will understand the results you get.
Tip My advice is to stick to the jQuery methods, of course, but if you do use the DOM method, at least you will understand the results you get.
Validating Form Values
The main reason for interrupting and preventing the browser from submitting data to the server is that you want to validate the values that a user has entered into the form. At some point, every web programmer realizes that users will type any old crap into an input element. There are an infinite number of different values you might have to process, but in my experience there are only a few reasons why the user gives you something unexpected in a form.
The first reason is that the user doesn't understand what data you are after. You might have asked for the name on the credit card, but the user might have entered their card number, for example.
The second reason is that the user doesn't want to give you the information you have requested and is just trying to get through the form as quickly as possible. They'll enter anything that will move them to the next stage in the process. If you have a lot of new users whose e-mail address is [email protected], then you know that this is the problem.
The third reason is that you are asking for information the user doesn't have, such as asking a UK resident which state they live in. (We don't have states here. I am looking at you, NPR. No donation for you.)
The final reason is that the user has made a genuine mistake, typically a typo. For example, I am a quick but inaccurate typist, and I often type my surname as Freman instead of Freeman, missing out an e.
There is nothing you can do about typos, but the way that you deal with the other three reasons can make the difference between creating a smooth and seamless application and something that annoys and angers users.
I don't want to get into a long rant about the design of web forms, but I do want to say that the best way of approaching this issue is to focus on what the user is trying to achieve. And when things go wrong, try to see the problem (and the required resolution) the way the user sees it. Your users don't know about how you have built your systems, and they don't know about your business processes; they just want to get something done. Everyone can be happy if you keep the focus on the task the user is trying to complete and don't needlessly punish them when they don't give you the data you want.
jQuery provides you with all the tools you need to create your own system to validate data values, but I recommend a different approach. One of the most popular jQuery plugins is called Validation, and as you guess from the name, it handles form validation.
![]() Caution What I am discussing in this chapter is client-side validation. This is a complement to rather than a replacement for server-side validation, where you check the data as it is received by the server. Client-side validation is for the benefit of the user: to stop them from having to make repeated submissions to the server to discover and correct data errors. Server-side validation is for the benefit of the application and ensures that bad data doesn't cause problems. You must use both: it is trivial to bypass client-side validation, and it does not provide reliable protection for your application.
Caution What I am discussing in this chapter is client-side validation. This is a complement to rather than a replacement for server-side validation, where you check the data as it is received by the server. Client-side validation is for the benefit of the user: to stop them from having to make repeated submissions to the server to discover and correct data errors. Server-side validation is for the benefit of the application and ensures that bad data doesn't cause problems. You must use both: it is trivial to bypass client-side validation, and it does not provide reliable protection for your application.
You can download the Validation plugin from http://bassistance.de/jquery-plugins/jquery-plugin-validation or use the version that I included in the source code download for this book (available at Apress.com). Listing 13-7 shows the use of this plugin.
![]() Tip There are a lot of different configuration options for the validation plugin. In this chapter, I have focused on those that are most frequently used and that cover the broadest range of situations. If they don't suit you, I suggest exploring some of the other options, which are described in the documentation available in the plugin download.
Tip There are a lot of different configuration options for the validation plugin. In this chapter, I have focused on those that are most frequently used and that cover the broadest range of situations. If they don't suit you, I suggest exploring some of the other options, which are described in the documentation available in the plugin download.
Listing 13-7. Using the Form Validation Plugin
<!DOCTYPE html>

<html>

<head>

    <title>Example</title>

    <script src="jquery-1.7.js" type="text/javascript"></script>

    <script src="jquery.tmpl.js" type="text/javascript"></script>

    <script src="jquery.validate.js" type="text/javascript"></script>

    <link rel="stylesheet" type="text/css" href="styles.css"/>

    <style type="text/css">

        div.errorMsg {color: red}

        .invalidElem {border: medium solid red}

    </style>

    <script type="text/javascript">

    $(document).ready(function() {


            var data = [

               { name: "Astor", product: "astor", stocklevel: "10", price: "2.99"},

               { name: "Daffodil", product: "daffodil", stocklevel: "12", price: "1.99"},

               { name: "Rose", product: "rose", stocklevel: "2", price: "4.99"},

               { name: "Peony", product: "peony", stocklevel: "0", price: "1.50"},

               { name: "Primula", product: "primula", stocklevel: "1", price: "3.12"},

               { name: "Snowdrop", product: "snowdrop", stocklevel: "15", price: "0.99"},

            ];


            var templResult = $('#flowerTmpl').tmpl(data);

            templResult.slice(0, 3).appendTo('#row1'),

            templResult.slice(3).appendTo("#row2");


            $('form').validate({

                highlight: function(element, errorClass) {

                    $(element).add($(element).parent()).addClass("invalidElem");

                },

                unhighlight: function(element, errorClass) {

                    $(element).add($(element).parent()).removeClass("invalidElem");

                },

                errorElement: "div",

                errorClass: "errorMsg"

            });


            $.validator.addClassRules({

                flowerValidation: {
                    min: 0

                }

            })


            $('input').addClass("flowerValidation").change(function(e) {

                $('form').validate().element($(e.target));

            });


    });

    </script>

    <script id="flowerTmpl" type="text/x-jquery-tmpl">

        <div class="dcell">

            <img src="${product}.png"/>

            <label for="${product}">${name}: </label>

            <input name="${product}" value="0" required />

        </div>

    </script>

</head>

<body>

    <h1>Jacqui's Flower Shop</h1>

    <form method="post" action="http://node.jacquisflowershop.com/order">

        <div id="oblock">

            <div class="dtable">

                <div id="row1" class="drow">

                </div>

                <div id="row2"class="drow">

                </div>

            </div>

        </div>

        <div id="buttonDiv"><button type="submit">Place Order</button></div>

    </form>

</body>

</html>
![]() Note HTML5 includes support for some basic form validation. It is a good start, but it is pretty basic, and there are still some significant differences in the way that browsers interpret the specification. Until the scope, richness, and consistency of the HTML5 features improves, I recommend sticking with jQuery for form validation.
Note HTML5 includes support for some basic form validation. It is a good start, but it is pretty basic, and there are still some significant differences in the way that browsers interpret the specification. Until the scope, richness, and consistency of the HTML5 features improves, I recommend sticking with jQuery for form validation.
Importing the JavaScript File
The first thing you have to do is bring the template plugin into the document, as follows:
...

<script src="jquery.validate.js" type="text/javascript"></script>

...
I have used the debug version of the file, but there is a minimized version available as well, and some, but not all, of the CDN services host this file because it is so popular.
Configuring the Validation
The next step is to configure the validation of the form element, which you do by calling the validate method on the form elements on which you want to perform validation. The argument to the validate method is a map object that contains configuration settings, as shown in Listing 13-8.
Listing 13-8. Configuring the Validation
...

$('form').validate({

    highlight: function(element, errorClass) {

        $(element).add($(element).parent()).addClass("invalidElem");

    },

    unhighlight: function(element, errorClass) {

        $(element).add($(element).parent()).removeClass("invalidElem");

    },

    errorElement: "div",

    errorClass: "errorMsg"

});

...
I have specified values for four options (highlight, unhighlight, errorElement, and errorClass); I'll come back to these later in the chapter and explain their meaning.
Defining the Validation Rules
A lot of the flexibility of the validation plugin comes from the way that you can quickly and easily define rules to test for valid input. There are various ways of associating rules with elements. The one I tend to use works through classes. You define a set of rules and associate them with a class, and when the form is validated, the rules are applied to any form element that is a member of the specified class. I created only a single rule in the example, as shown in Listing 13-9.
Listing 13-9. Defining a Validation Rule
...

$.validator.addClassRules({

    flowerValidation: {

        min: 0

    }

})

...
In this case, I have created a new rule that will be applied to form elements that are members of the flowerValidation class. The rule is that the value should be equal to or greater than 0. I have expressed the condition in the rule using min. This is just one of a number of convenient predefined checks that the validation plugin provides, and I'll describe all of them later in the chapter.
Applying the Validation Rules
You associate the validation rules with the elements in the form by adding the element to the class you specified in the previous step. This gives you the ability to tailor the validation for different kinds of element in a form. For this example, all of the elements are to be treated the same, so I use jQuery to select all of the input elements and add them to the flowerValidation class, as shown in Listing 13-10.
Listing 13-10. Adding the Input Elements to the Class Associated with Validation
...

$('input').addClass("flowerValidation").change(function(e) {

    $('form').validate().element($(e.target));

});

...
I have also used a function bound to the change event to explicitly validate the element whose value has changed. This makes sure the user gets immediate feedback if they correct an error. You can see the effect of the validation plugin in Figure 13-5. To create this figure, I entered -1 in the input field and clicked the Place Order button.
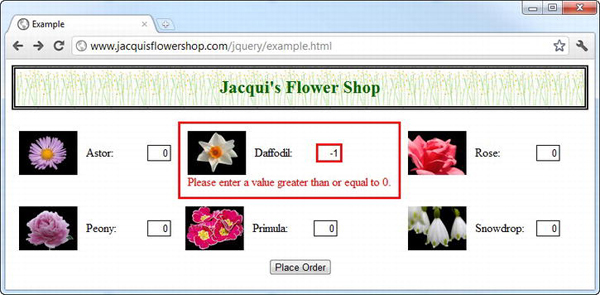
Figure 13-5. Using the validation plugin
![]() Tip The text of the message shown to the user is generated by the validation plugin. I show you how to customize these messages later in the chapter.
Tip The text of the message shown to the user is generated by the validation plugin. I show you how to customize these messages later in the chapter.
Much like the homegrown validation I showed you earlier, the user can't submit the form until the problem has been resolved, but this time, the user can see which value or values are problematic and is given guidance as to how the problems can be resolved. (I accept that the message is a bit generic, but I'll show you how to change that later in the chapter.)
Using the Validation Checks
The Validation plugin supports a wide range of checks that you can use to validate form values. You saw the min check in the previous example. This ensures that the value is greater to or equal to a specified numeric value. Table 13-3 describes the set of checks you can perform.
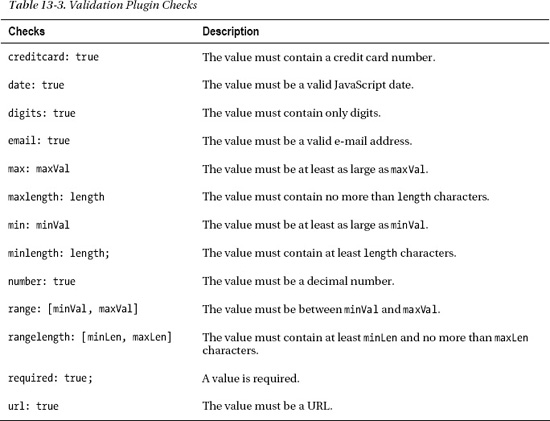
You can associate multiple rules together in a single rule. This allows you to perform complex validations in a compact and expressive way.
![]() Tip Included in the validation plugin distribution is a file called
Tip Included in the validation plugin distribution is a file called additional-methods.js. This file defines some additional checks, including U.S. and U.K. phone numbers, IPv4 and IPv6 addresses, and some additional date, e-mail, and URL formats.
You can apply these checks to your elements in several ways. I describe each in the sections that follow.
![]() Note The Validation plugin also supports remote validation, where the data the user has entered into a field is checked using a remote server. This is useful when you need to check with data that cannot be distributed to the client, because it would be either insecure or impractical (such as checking that a username hasn't already been used). I demonstrate remote validation in Chapter 16, after I introduce the features it relies on in Chapter 14 and 15.
Note The Validation plugin also supports remote validation, where the data the user has entered into a field is checked using a remote server. This is useful when you need to check with data that cannot be distributed to the client, because it would be either insecure or impractical (such as checking that a username hasn't already been used). I demonstrate remote validation in Chapter 16, after I introduce the features it relies on in Chapter 14 and 15.
Applying Validation Rules via Classes
The technique I find myself using most frequently is applying checks through classes. This is the approach I took in the example. You are not limited to a single check, though. You can apply multiple checks together to validate different aspects of the value that the user provides, as demonstrated in Listing 13-11.
Listing 13-11. Combining Multiple Checks in a Single Rule
...

<script type="text/javascript">

$(document).ready(function() {


        var data = [

            { name: "Astor", product: "astor", stocklevel: "10", price: "2.99"},

            { name: "Daffodil", product: "daffodil", stocklevel: "12", price: "1.99"},

            { name: "Rose", product: "rose", stocklevel: "2", price: "4.99"},

            { name: "Peony", product: "peony", stocklevel: "0", price: "1.50"},

            { name: "Primula", product: "primula", stocklevel: "1", price: "3.12"},

            { name: "Snowdrop", product: "snowdrop", stocklevel: "15", price: "0.99"},

        ];


        var templResult = $('#flowerTmpl').tmpl(data);

        templResult.slice(0, 3).appendTo('#row1'),

        templResult.slice(3).appendTo("#row2");


    $('form').validate({
        highlight: function(element, errorClass) {

            $(element).add($(element).parent()).addClass("invalidElem");

        },

        unhighlight: function(element, errorClass) {

            $(element).add($(element).parent()).removeClass("invalidElem");

        },

        errorElement: "div",

        errorClass: "errorMsg"

    });


    $.validator.addClassRules({

        flowerValidation: {

            required: true,

            digits: true,

            min: 0,

            max: 100

        }

    })


    $('input').addClass("flowerValidation").change(function(e) {

        $('form').validate().element($(e.target));

    });


});

</script>

...
In this example, I have combined the required, digits, min, and max checks to ensure that the user provides a value that comprises only digits and that falls within the range of 0 to 100.
Notice that I associate the rule with the class using the addClassRules method. The argument to this method is one or more sets of checks and the class name they are to be applied to. As shown, you call the addClassRules method on the validator property of the main jQuery $ function.
Each validated form element is assessed individually, which means the user can be presented with different error messages for different problems, as shown in Figure 13-6.
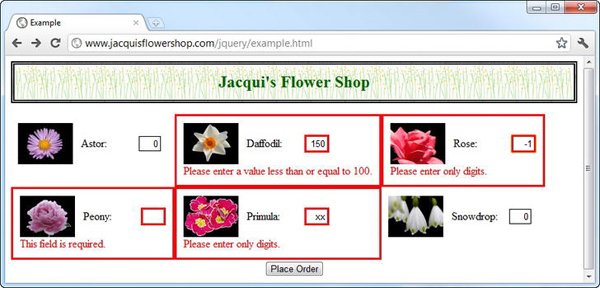
Figure 13-6. Applying multiple validation checks to form elements
I have entered several values that will fail one of the checks. It is important to note that the checks are performed in the order you defined them in the rule. If you look at the error message for the Rose product, you will see that it has failed the digits check. If you rearrange the order of the checks, you can get a different error. Listing 13-12 shows the revised order.
Listing 13-12. Changing the Order in Which Checks Are Applied
...

$.validator.addClassRules({

    flowerValidation: {

        required: true,

        min: 0,

        max: 100,

        digits: true

    }

})

...
In this example, I have moved the digits check to the end of the rule. If I enter -1 into a form field now, it is the min check that will fail, as demonstrated by Figure 13-7.
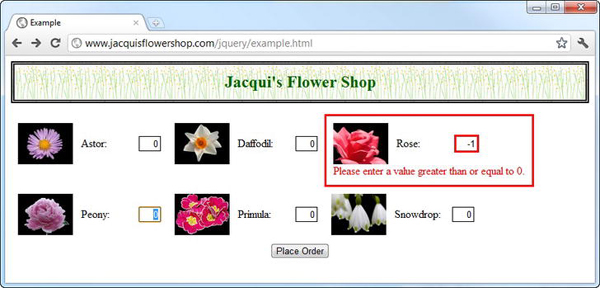
Figure 13-7. Changing the order in which the checks are applied during validation
Applying Validation Rules Directly to Elements
The next technique allows you to apply rules to a single element, as shown in Listing 13-13.
Listing 13-13. Applying Validation Rules to the Elements in a Selection
...

<script type="text/javascript">

$(document).ready(function() {


        var data = [

            { name: "Astor", product: "astor", stocklevel: "10", price: "2.99"},

            { name: "Daffodil", product: "daffodil", stocklevel: "12", price: "1.99"},

            { name: "Rose", product: "rose", stocklevel: "2", price: "4.99"},

            { name: "Peony", product: "peony", stocklevel: "0", price: "1.50"},

            { name: "Primula", product: "primula", stocklevel: "1", price: "3.12"},

            { name: "Snowdrop", product: "snowdrop", stocklevel: "15", price: "0.99"},

        ];


        var templResult = $('#flowerTmpl').tmpl(data);

        templResult.slice(0, 3).appendTo('#row1'),

        templResult.slice(3).appendTo("#row2");


    $('form').validate({

        highlight: function(element, errorClass) {

            $(element).add($(element).parent()).addClass("invalidElem");

        },

        unhighlight: function(element, errorClass) {
            $(element).add($(element).parent()).removeClass("invalidElem");

        },

        errorElement: "div",

        errorClass: "errorMsg"

    });


    $.validator.addClassRules({

        flowerValidation: {

            required: true,

            min: 0,

            max: 100,

            digits: true,

        }

    })


    $('#row1 input').each(function(index, elem) {

        $(elem).rules("add", {

            min: 10,

            max: 20

        })

    });


    $('input').addClass("flowerValidation").change(function(e) {

        $('form').validate().element($(e.target));

    });


});

</script>

...
Notice that you call the rules method on a jQuery object, passing in the string add and a map object with the checks you want to perform and their arguments. The rules method operates on only the first element in the selection, so you have to use the each method if you want to apply the rules more broadly. In this case, I selected all of the input elements that are descendants of the row1 element and applied a set of checks.
![]() Tip You can remove rules from elements by replacing
Tip You can remove rules from elements by replacing add with remove when you call the rules method.
Rules that are applied to elements using the rules methods are evaluated before those applied using a class. For my example, this means the input elements on the top row will be checked using a min value of 10 and a max value of 20, while the other input elements will use values of 0 and 100, respectively. You can see the effect of this in Figure 13-8.
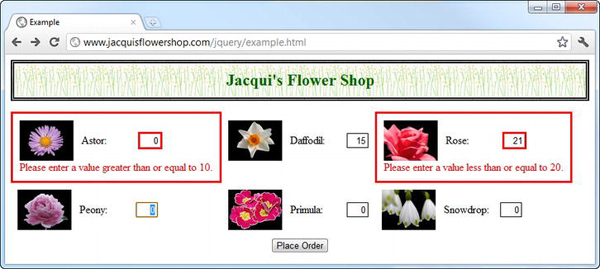
Figure 13-8. Applying rules directly to elements
Because you are dealing with each element individually, you can tailor the checks. Listing 13-14 gives an example.
Listing 13-14. Tailoring Checks for Elements
...

<script type="text/javascript">

$(document).ready(function() {


    var data = [

        { name: "Astor", product: "astor", stocklevel: "10", price: "2.99"},

        { name: "Daffodil", product: "daffodil", stocklevel: "12", price: "1.99"},

        { name: "Rose", product: "rose", stocklevel: "2", price: "4.99"},

        { name: "Peony", product: "peony", stocklevel: "0", price: "1.50"},

        { name: "Primula", product: "primula", stocklevel: "1", price: "3.12"},

        { name: "Snowdrop", product: "snowdrop", stocklevel: "15", price: "0.99"},

    ];


    var templResult = $('#flowerTmpl').tmpl(data);

    templResult.slice(0, 3).appendTo('#row1'),

    templResult.slice(3).appendTo("#row2");


    $('form').validate({

        highlight: function(element, errorClass) {

            $(element).add($(element).parent()).addClass("invalidElem");

        },

        unhighlight: function(element, errorClass) {

            $(element).add($(element).parent()).removeClass("invalidElem");

        },
        errorElement: "div",

        errorClass: "errorMsg"

    });


    $('input').each(function(index, elem) {

        var rules = {

            required: true,

            min: 0,

            max: data[index].stocklevel,

            digits: true

        }

        if (Number(data[index].price) > 3.00) {

            rules.max--;

        }

        $(elem).rules("add", rules);

    });


    $('input').change(function(e) {

        $('form').validate().element($(e.target));

    });


});

</script>

...
In this example, I tailor the value of the max check using the data object that I added to the document to generate elements using the template. The value for the max check is set based on the stocklevel property and adjusted down if the price is greater than $3. When you have data like this, you are able to perform much more useful validation. You can see the effect of this change in Figure 13-9.
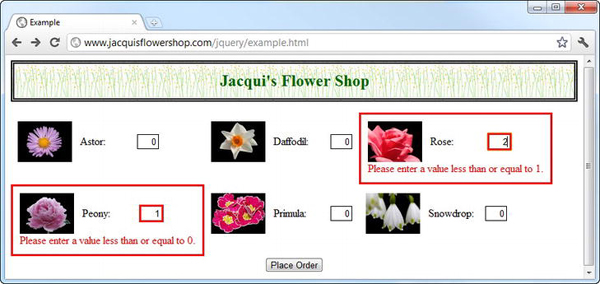
Figure 13-9. Setting different values for validation checks based on data
Applying Validation Rules via the Element Name Attribute
You can apply validation rules to elements based on the value of the name attribute. Nothing in the HTML specification requires the name attribute value to be unique, and a single value is often used to categorize a group of form elements. In my flower shop example document, each name is different and corresponds to a specific product. Either way, you can create rules that correspond to a name attribute value and rules that apply to all elements assigned that value. Listing 13-15 gives a demonstration.
Listing 13-15. Assigning Validation Rules Based on Element Name
...


<script type="text/javascript">

$(document).ready(function() {


    var data = [

        { name: "Astor", product: "astor", stocklevel: "10", price: "2.99"},

        { name: "Daffodil", product: "daffodil", stocklevel: "12", price: "1.99"},

        { name: "Rose", product: "rose", stocklevel: "2", price: "4.99"},

        { name: "Peony", product: "peony", stocklevel: "0", price: "1.50"},

        { name: "Primula", product: "primula", stocklevel: "1", price: "3.12"},

        { name: "Snowdrop", product: "snowdrop", stocklevel: "15", price: "0.99"},

    ];


    var templResult = $('#flowerTmpl').tmpl(data);

    templResult.slice(0, 3).appendTo('#row1'),

    templResult.slice(3).appendTo("#row2");


    var rulesList = new Object();

    for (var i = 0; i < data.length; i++) {

        rulesList[data[i].product] = {

            min: 0,

            max: data[i].stocklevel,

        }

    }


    $('form').validate({

        highlight: function(element, errorClass) {

            $(element).add($(element).parent()).addClass("invalidElem");

        },

        unhighlight: function(element, errorClass) {

            $(element).add($(element).parent()).removeClass("invalidElem");

        },

        errorElement: "div",

        errorClass: "errorMsg",

        rules: rulesList

    });


    $('input').change(function(e) {

        $('form').validate().element($(e.target));

    });
});

</script>

...
You add rules that rely on element names using the rules property of the configuration object you pass to the validate method when you set up form validation. Notice that I have used just the data object to create the set of rules (and also notice that the product property in the data object is used to generate the name attribute on the input elements). I tend not to use this approach, since I would rather work directly with the elements in the document, but this technique can be handy if you have a data object and want to set up validation before the form elements have been added to the document.
Applying Validation Rules Using Element Attributes
The final way you can apply checks to attributes is to use elements. The validation plugin checks form elements to see whether they define attributes that correspond to the name of the built-in checks, so an element that defines a required attribute is assumed to need the required check. Listing 13-16 provides a demonstration.
Listing 13-16. Performing Validation Using Element Attributes
...

<script type="text/javascript">

$(document).ready(function() {


    var data = [

        { name: "Astor", product: "astor", stocklevel: "10", price: "2.99"},

        { name: "Daffodil", product: "daffodil", stocklevel: "12", price: "1.99"},

        { name: "Rose", product: "rose", stocklevel: "2", price: "4.99"},

        { name: "Peony", product: "peony", stocklevel: "0", price: "1.50"},

        { name: "Primula", product: "primula", stocklevel: "1", price: "3.12"},

        { name: "Snowdrop", product: "snowdrop", stocklevel: "15", price: "0.99"},

    ];


    var templResult = $('#flowerTmpl').tmpl(data);

    templResult.slice(0, 3).appendTo('#row1'),

    templResult.slice(3).appendTo("#row2");


    $('form').validate({

        highlight: function(element, errorClass) {

            $(element).add($(element).parent()).addClass("invalidElem");

        },

        unhighlight: function(element, errorClass) {

            $(element).add($(element).parent()).removeClass("invalidElem");

        },

        errorElement: "div",

        errorClass: "errorMsg",

    });


    $('input').change(function(e) {
        $('form').validate().element($(e.target));

    });


});

</script>

<script id="flowerTmpl" type="text/x-jquery-tmpl">

    <div class="dcell">

        <img src="${product}.png"/>

        <label for="${product}">${name}: </label>

        <input name="${product}" value="0" required min="0" max="${stocklevel}"/>

    </div>

</script>

...
I like this technique when it is used in conjunction with a data template, but I find it clutters up a document when applied to statically defined elements, because the same attributes are applied to elements over and over again.
Specifying Validation Messages
The validation plugin defines a default error message for all of the built-in checks, but these are generic and not always useful to the user. As a simple example, if you set a max check with a value of 10 and the user enters 20 in the field, then the error message will be as follows:
Please enter a value less than or equal to 12
This message describes the constraint you have applied on a form element, but it doesn't provide any guidance to the user as to why there is a limit. Fortunately, you can change these messages to provide some additional context and tailor the message to your needs. The method you use to change the messages depends on how you created the validation rule in the first place. You can't change the messages when you apply rules using a class, but in the following sections I describe how to define messages for the other techniques.
Specifying Messages for Attribute and Name Validation
When you rely on the name attribute or on check attributes to associate rules with elements, you can change the messages by adding a messages property to the options object that you pass to the validate method when you set up validation. Listing 13-17 provides a demonstration.
Listing 13-17. Using the messages Property on the options Object
...

<script type="text/javascript">

$(document).ready(function() {


    var data = [

        { name: "Astor", product: "astor", stocklevel: "10", price: "2.99"},

        { name: "Daffodil", product: "daffodil", stocklevel: "12", price: "1.99"},

        { name: "Rose", product: "rose", stocklevel: "2", price: "4.99"},

        { name: "Peony", product: "peony", stocklevel: "0", price: "1.50"},
        { name: "Primula", product: "primula", stocklevel: "1", price: "3.12"},

        { name: "Snowdrop", product: "snowdrop", stocklevel: "15", price: "0.99"},

    ];


    var templResult = $('#flowerTmpl').tmpl(data);

    templResult.slice(0, 3).appendTo('#row1'),

    templResult.slice(3).appendTo("#row2");


    $('form').validate({

        highlight: function(element, errorClass) {

            $(element).add($(element).parent()).addClass("invalidElem");

        },

        unhighlight: function(element, errorClass) {

            $(element).add($(element).parent()).removeClass("invalidElem");

        },

        errorElement: "div",

        errorClass: "errorMsg",

        messages: {

            rose: {

                max: "We don't have that many roses in stock!"

            },

            peony: {

                max: "We don't have that many peonies in stock!"

            }

        }

    });


    $('input').change(function(e) {

        $('form').validate().element($(e.target));

    });


});

</script>

...
You can see the structure of the object that you provide as the value for the messages property. You define a property using the name of the element you are interested in and set the value of this property to be a map between the check and the new message you want to use. In this example, I have changed the message for the max check on the elements with the names of rose and peony. You can see the effect in Figure 13-10. Both of these elements are shown with a tailored validation message.
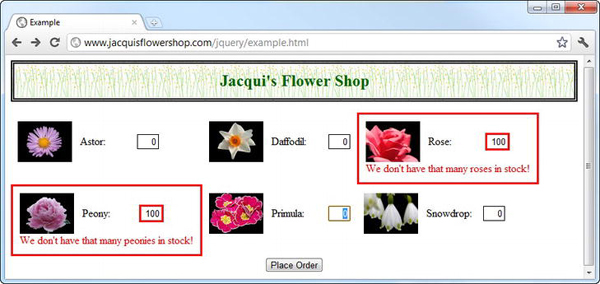
Figure 13-10. Changes messages via the options object
The syntax for setting up these validation messages can be highly duplicative, so I tend to create an object with the messages I want programmatically, as shown in Listing 13-18.
Listing 13-18. Defining Custom Messages Programmatically
...

<script type="text/javascript">

$(document).ready(function() {


    var data = [

        { name: "Astor", product: "astor", stocklevel: "10", price: "2.99"},

        { name: "Daffodil", product: "daffodil", stocklevel: "12", price: "1.99"},

        { name: "Rose", product: "rose", stocklevel: "2", price: "4.99"},

        { name: "Peony", product: "peony", stocklevel: "0", price: "1.50"},

        { name: "Primula", product: "primula", stocklevel: "1", price: "3.12"},

        { name: "Snowdrop", product: "snowdrop", stocklevel: "15", price: "0.99"},

    ];


    var templResult = $('#flowerTmpl').tmpl(data);

    templResult.slice(0, 3).appendTo('#row1'),

    templResult.slice(3).appendTo("#row2");


    var customMessages = new Object();

    for (var i = 0; i < data.length; i++) {

        customMessages[data[i].product] = {

            max: "We only have " + data[i].stocklevel + " in stock"

        }

    }
    $('form').validate({

        highlight: function(element, errorClass) {

            $(element).add($(element).parent()).addClass("invalidElem");

        },

        unhighlight: function(element, errorClass) {

            $(element).add($(element).parent()).removeClass("invalidElem");

        },

        errorElement: "div",

        errorClass: "errorMsg",

        messages: customMessages

    });


    $('input').change(function(e) {

        $('form').validate().element($(e.target));

    });


});

</script>

...
In this example, I incorporate the stocklevel property from the data objects to give a more meaningful message to the user.
Specifying Messages for Per-Element Validation
When you apply rules to individual elements, you can pass in a messages object that defines the messages you want for your checks. Listing 13-19 shows how this is done.
Listing 13-19. Specifying Messages for Rules Applied on a Per-Element Basis
...

<script type="text/javascript">

$(document).ready(function() {


    var data = [

        { name: "Astor", product: "astor", stocklevel: "10", price: "2.99"},

        { name: "Daffodil", product: "daffodil", stocklevel: "12", price: "1.99"},

        { name: "Rose", product: "rose", stocklevel: "2", price: "4.99"},

        { name: "Peony", product: "peony", stocklevel: "0", price: "1.50"},

        { name: "Primula", product: "primula", stocklevel: "1", price: "3.12"},

        { name: "Snowdrop", product: "snowdrop", stocklevel: "15", price: "0.99"},

    ];


    var templResult = $('#flowerTmpl').tmpl(data);

    templResult.slice(0, 3).appendTo('#row1'),

    templResult.slice(3).appendTo("#row2");


    $('form').validate({

        highlight: function(element, errorClass) {

            $(element).add($(element).parent()).addClass("invalidElem");
        },

        unhighlight: function(element, errorClass) {

            $(element).add($(element).parent()).removeClass("invalidElem");

        },

        errorElement: "div",

        errorClass: "errorMsg",

    });


    $('input').each(function(index, elem) {

        $(elem).rules("add", {

            min: 10,

            max: 20,

            messages: {

                max: "You only have " + data[index].stocklevel + " in stock"

            }

        })

    }).change(function(e) {

        $('form').validate().element($(e.target));

    });


});

</script>

...
Once again, I have used the stockvalue property to define the message. For simplicity, I have assumed that the input elements are ordered in the same way that the data items are ordered. You can see the effect of these messages in Figure 13-11.
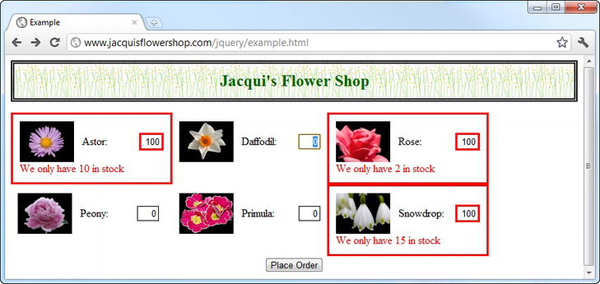
Figure 13-11. Specifying messages that are derived from the data object
Creating a Custom Check
You can create a custom validation check if the built-in ones don't suit your needs. This is a relatively simple process that means you can closely relate validation to the structure and nature of your web application. Listing 13-20 provides a demonstration.
Listing 13-20. Creating a Custom Validation Check
...

<script type="text/javascript">

$(document).ready(function() {


    var data = [

        { name: "Astor", product: "astor", stocklevel: "10", price: "2.99"},

        { name: "Daffodil", product: "daffodil", stocklevel: "12", price: "1.99"},

        { name: "Rose", product: "rose", stocklevel: "2", price: "4.99"},

        { name: "Peony", product: "peony", stocklevel: "0", price: "1.50"},

        { name: "Primula", product: "primula", stocklevel: "1", price: "3.12"},

        { name: "Snowdrop", product: "snowdrop", stocklevel: "15", price: "0.99"},

    ];


    var templResult = $('#flowerTmpl').tmpl(data);

    templResult.slice(0, 3).appendTo('#row1'),

    templResult.slice(3).appendTo("#row2");


    $('form').validate({

        highlight: function(element, errorClass) {

            $(element).add($(element).parent()).addClass("invalidElem");

        },

        unhighlight: function(element, errorClass) {

            $(element).add($(element).parent()).removeClass("invalidElem");

        },

        errorElement: "div",

        errorClass: "errorMsg",

    });


    $.validator.addMethod("stock", function(value, elem, args) {

        return Number(value) < Number(args);

    }, "We don't have that many in stock");


    $('input').each(function(index, elem) {

        $(elem).rules("add", {

            min: 0,

            stock: data[index].stocklevel

        })

    }).change(function(e) {

        $('form').validate().element($(e.target));

    });


});

</script>
...
You define a custom check using the addMethod method, which is called on the validator property of the $ function. The arguments to this method are the name you want to assign the check, a function that is used to perform validation, and a message to show if validation fails. In this example, I have defined a check called stock.
Defining the Validation Function
The arguments to the custom validation function are the value entered by the user, the HTMLElement object representing the form element, and any arguments that were specified when the check is applied to an element for validation, like this:
...

$(elem).rules("add", {

    min: 0,

    stock: data[index].stocklevel

})

...
When I applied the rule, I specified the value of a stocklevel property as the argument to the check. This is passed as is to the custom validation function:
function(value, elem, args) {

    return Number(value) <= Number(args);

}
You signal if the value is valid through the result you return from the function. If the value is valid, you return true. If not, you return false. The value and the arguments are presented as strings, which means I have to use the Number type to ensure that JavaScript compares the values as numbers. For my function, a value is valid if it is smaller than or equal to the argument.
Defining the Validation Message
You can specify the message that is displayed in two ways. The first is as a string, which is what I used in the earlier example. The other way to specify a message is with a function, allowing you to create messages with a lot more context. Listing 13-21 provides a demonstration.
Listing 13-21. Creating a Message for a Custom Check Using a Function
...

<script type="text/javascript">

$(document).ready(function() {


    var data = [

        { name: "Astor", product: "astor", stocklevel: "10", price: "2.99"},

        { name: "Daffodil", product: "daffodil", stocklevel: "12", price: "1.99"},

        { name: "Rose", product: "rose", stocklevel: "2", price: "4.99"},

        { name: "Peony", product: "peony", stocklevel: "0", price: "1.50"},

        { name: "Primula", product: "primula", stocklevel: "1", price: "3.12"},

        { name: "Snowdrop", product: "snowdrop", stocklevel: "15", price: "0.99"},
    ];


    var templResult = $('#flowerTmpl').tmpl(data);

    templResult.slice(0, 3).appendTo('#row1'),

    templResult.slice(3).appendTo("#row2");


    $('form').validate({

        highlight: function(element, errorClass) {

            $(element).add($(element).parent()).addClass("invalidElem");

        },

        unhighlight: function(element, errorClass) {

            $(element).add($(element).parent()).removeClass("invalidElem");

        },

        errorElement: "div",

        errorClass: "errorMsg",

    });


    $.validator.addMethod("stock", function(value, elem, args) {

        return Number(value) <= Number(args);

    }, function(args) {

        return "We only have " + args + " in stock"

    });


    $('input').each(function(index, elem) {

        $(elem).rules("add", {

            min: 0,

            stock: data[index].stocklevel

        })

    }).change(function(e) {

        $('form').validate().element($(e.target));

    });


});

</script>

...
The argument to the function is the argument you provide when applying the rule. This is the value of the stocklevel property in this example. You can see the effect in Figure 13-12.

Figure 13-12. Defining error messages for custom checks using a function
Formatting the Validation Error Display
To my mind, one of the best features of the validation plugin is the wide range of ways that you can configure how validation error messages are displayed to the user. In the examples so far in this chapter, I have relied on the configuration options highlighted in Listing 13-22.
Listing 13-22. The Configuration Options for Formatting the Validation Errors
...

$(document).ready(function() {


    var data = [

        { name: "Astor", product: "astor", stocklevel: "10", price: "2.99"},

        { name: "Daffodil", product: "daffodil", stocklevel: "12", price: "1.99"},

        { name: "Rose", product: "rose", stocklevel: "2", price: "4.99"},

        { name: "Peony", product: "peony", stocklevel: "0", price: "1.50"},

        { name: "Primula", product: "primula", stocklevel: "1", price: "3.12"},

        { name: "Snowdrop", product: "snowdrop", stocklevel: "15", price: "0.99"},

    ];


    var templResult = $('#flowerTmpl').tmpl(data);

    templResult.slice(0, 3).appendTo('#row1'),

    templResult.slice(3).appendTo("#row2");


    $('form').validate({

        highlight: function(element, errorClass) {

            $(element).add($(element).parent()).addClass("invalidElem");

        },
        unhighlight: function(element, errorClass) {

            $(element).add($(element).parent()).removeClass("invalidElem");

        },

        errorElement: "div",

        errorClass: "errorMsg",

    });


    $.validator.addMethod("stock", function(value, elem, args) {

        return Number(value) <= Number(args);

    }, function(args) {

        return "We only have " + args + " in stock"

    });


    $('input').each(function(index, elem) {

        $(elem).rules("add", {

            min: 0,

            stock: data[index].stocklevel

        })

    }).change(function(e) {

        $('form').validate().element($(e.target));

    });


});

</script>

...
I have relied on four different configuration options, but they are tightly coupled together. I explain the significance of each in the following sections.
Setting the Class for Invalid Elements
The errorClass option allows you to set a class that will be associated with invalid values. This class is applied to error messages when they are added to the document. In my examples, I specify a class called errorMsg, for which there is a corresponding selector in the style element, as shown in Listing 13-23.
Listing 13-23. The style Element for the Example Document
...

<style type="text/css">

    div.errorMsg {color: red}

    .invalidElem {border: medium solid red}

</style>

...
I have simply set the color property so that the validation text is shown in red.
Setting the Error Message Element
Error messages are inserted into the document as the immediate next sibling of the form element that contains the invalid value. By default, the error message text is contained within a label element. This didn't suit me in the examples, because the external style sheet contains a selector that matches all label elements within the cell-level div elements in the CSS table layout and applied a style that prevented the text from displaying properly. To address this, I used the errorElement option to specify that a div element be used instead, as shown in Listing 13-24.
Listing 13-24. Specifying the Element That Will Be Used for the Error Message
...

$('form').validate({

    highlight: function(element, errorClass) {

        $(element).add($(element).parent()).addClass("invalidElem");

    },

    unhighlight: function(element, errorClass) {

        $(element).add($(element).parent()).removeClass("invalidElem");

    },

    errorElement: "div",

    errorClass: "errorMsg",


});

...
Setting the Highlighting for Invalid Elements
The highlight and unhighlight options let you specify functions to use to highlight elements that contain invalid values. The arguments to the functions are the HTMLElement object representing the invalid element and whatever class you specified using the errorClass option. As you can see in the highlighted statements in Listing 13-25, I ignore the second attribute but use the HTMLElement object to create a jQuery selection, navigate to the parent element, and add it to the invalidElem class.
Listing 13-25. Controlling the Element Highlight
...

$('form').validate({

    highlight: function(element, errorClass) {

        $(element).add($(element).parent()).addClass("invalidElem");

    },

    unhighlight: function(element, errorClass) {

        $(element).add($(element).parent()).removeClass("invalidElem");

    },

    errorElement: "div",

    errorClass: "errorMsg",


});

...
The function specified by the unhighlight option is called when the user has corrected the problem and the element contains a valid value. I use this opportunity to remove the class I added in the other function. The invalidElem class corresponds to a selector in the style element contained in the document, as shown in Listing 13-26.
Listing 13-26. The Style Used for Highlighting Element
...

<style type="text/css">

    div.errorMsg {color: red}

    .invalidElem {border: medium solid red}

</style>

...
You can select and manipulate elements in these functions in any way you like. I have applied a border to the parent element to demonstrate the freedom you have in the DOM, but I could have operated directly on the element itself or on another part of the document entirely had I preferred.
Using a Validation Summary
You can present the user with a single list of all the validation errors, rather than add individual messages next to each element. This can be useful if the structure or layout of your document can't easily flex to accommodate additional elements. Listing 13-27 shows how you can create a validation summary.
Listing 13-27. Using a Validation Summary
...

<script type="text/javascript">

$(document).ready(function() {


    var data = [

        { name: "Astor", product: "astor", stocklevel: "10", price: "2.99"},

        { name: "Daffodil", product: "daffodil", stocklevel: "12", price: "1.99"},

        { name: "Rose", product: "rose", stocklevel: "2", price: "4.99"},

        { name: "Peony", product: "peony", stocklevel: "0", price: "1.50"},

        { name: "Primula", product: "primula", stocklevel: "1", price: "3.12"},

        { name: "Snowdrop", product: "snowdrop", stocklevel: "15", price: "0.99"},

    ];


    var plurals = {

        astor: "Astors",

        daffodil: "Daffodils",

        rose: "Roses",

        peony: "Peonies",

        primula: "Primulas",

        snowdrop: "Snowdrops"

    }


    var templResult = $('#flowerTmpl').tmpl(data);

    templResult.slice(0, 3).appendTo('#row1'),

    templResult.slice(3).appendTo("#row2");


    $('<div id=errorSummary>Please correct the following errors:</div>')

        .append('<ul id="errorsList"></ul>').hide().insertAfter('h1'),
    $('form').validate({

        highlight: function(element, errorClass) {

            $(element).addClass("invalidElem");

        },

        unhighlight: function(element, errorClass) {

            $(element).removeClass("invalidElem");

        },

        errorContainer: '#errorSummary',

        errorLabelContainer: '#errorsList',

        wrapper: 'li',

        errorElement: "div"

    });


    $.validator.addMethod("stock", function(value, elem, args) {

        return Number(value) <= Number(args.data.stocklevel);

    }, function(args) {

        return "You requested " + $(args.element).val() + " "

            + plurals[args.data.product] + " but you only have "

            + args.data.stocklevel + " in stock";

    });


    $('input').each(function(index, elem) {

        $(elem).rules("add", {

            min: 0,

            stock: {

                index: index,

                data: data[index],

                element: elem

            }

        })

    }).change(function(e) {

        $('form').validate().element($(e.target));

    });


});

</script>

...
For this example, I am going to work backward and show you the result before explaining how I get there. Figure 13-13 shows the validation summary being displayed.
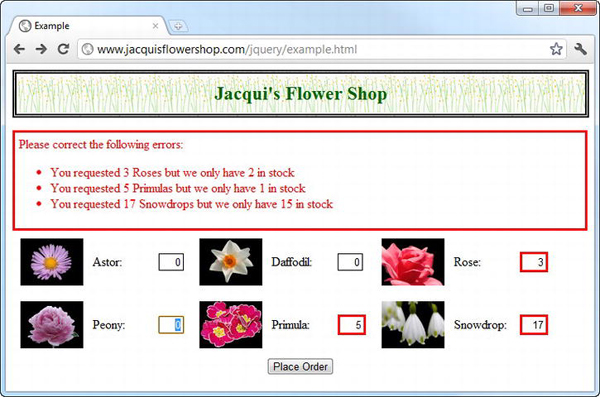
Figure 13-13. Using a validation summary
Preparing the Validation Messages
The first issue to solve when using a validation summary is that the context that is implied by placing an error message next to a form element is lost; you have to put some additional work into the error messages so that they make sense. To start with, I defined an object that contained the plurals of the flower names:
var plurals = {

    astor: "Astors",

    daffodil: "Daffodils",

    rose: "Roses",

    peony: "Peonies",

    primula: "Primulas",

    snowdrop: "Snowdrops"

}
I use these values to generate a specific error message using the function feature of the custom check, like this:
$.validator.addMethod("stock", function(value, elem, args) {

    return Number(value) <= Number(args.data.stocklevel);

}, function(args) {

    return "You requested " + $(args.element).val() + " "
        + plurals[args.data.product] + " but you only have "

        + args.data.stocklevel + " in stock";

});
The link between these two stages is the argument object that I specify when applying the custom check to the form elements. The built-in checks have simple arguments, but you can create complex objects and pass whatever data suits you:
$('input').each(function(index, elem) {

    $(elem).rules("add", {

        min: 0,

        stock: {

            index: index,

            data: data[index],

            element: elem

        }

    })

}).change(function(e) {

    $('form').validate().element($(e.target));

});
I don't have access to all of the objects I would like in the message-generating functions, so I pass them via the argument. In this case, I have passed the index, the data array, and the element itself, all of which I use to piece together the message to display to the user.
Creating the Validation Summary
You are responsible for adding the element that will contain the validation summary and adding it to the document. I have added a div element that contains an ul element. My goal is to create an unnumbered list showing each error:
$('<div id=errorSummary>Please correct the following errors:</div>')

    .append('<ul id="errorsList"></ul>').hide().insertAfter('h1'),
I have included some text in the div element. This will be displayed above the list of errors. I have emphasized the call to the hide method. You are responsible for making sure the element isn't visible. This isn't compulsory. The element can be visible all of the time, but I think it is good practice only to show a validation summary when there are errors for the user to resolve.
Now that you have all the pieces in place, you can turn to the options that you use to configure the validation summary:
$('form').validate({

    highlight: function(element, errorClass) {

        $(element).addClass("invalidElem");

    },

    unhighlight: function(element, errorClass) {

        $(element).removeClass("invalidElem");

    },

    errorContainer: '#errorSummary',

    errorLabelContainer: '#errorsList',

    wrapper: 'li',

    errorElement: "div"
});
I have tightened the focus of the hightlight and unhighlight functions so that only the input element is highlighted, but the important options are highlighted.
The errorContainer option specifies a selector that will be made visible when there are validation errors to display. In my case, this is the element with the errorSummary ID (the div element).
The errorLabelContainer option specifies the element into which the individual error messages will be inserted. For my example, this is the ul element, since I want my messages displayed as a list.
The wrapper option specifies an element into which the validation message will be inserted. This is really useful only if you want a list display. Finally, the errorElement specifies the element that will contain the error text. This is the label element by default, but I have switched to div elements to make the formatting easier. The result of these options is the validation summary that is shown in Figure 13-13.
The validation plugin removes messages when the user resolves an issue, and when there are no issues at all, the user can submit the form. Figure 13-14 shows the validation summary after two of the three errors from the last figure have been resolved.
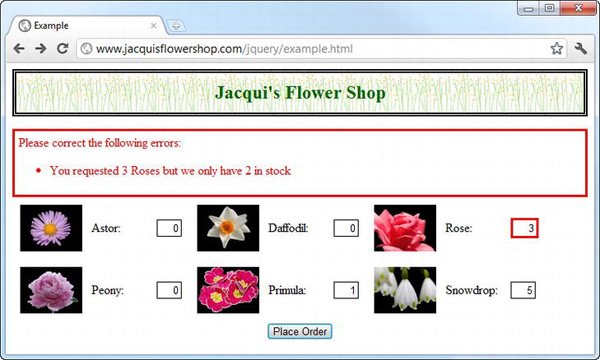
Figure 13-14. A validation summary showing fewer error messages
The choice between inline messages and validation summaries is a personal one and is usually driven by the structure of the document. The good news is that the validation plugin is very flexible, and it usually doesn't take much work to define and apply validation that is closely tailored to your needs.
Summary
In this chapter, I showed you the support that jQuery provides for forms. I began by recapping the form-related event methods and explained the roles that the most important ones play in the life of an HTML form. Most of the chapter was spent covering the Validation plugin, which provides flexible and extensible support for validating the values that users enter into a form and providing the means for resolving any problems before the data is submitted to the server.