
C H A P T E R 4
JavaScript Primer
jQuery is a JavaScript library that you add to your HTML documents. On its own, the jQuery library doesn't do anything. You take advantage of the jQuery functionality from your own scripts that you add alongside the jQuery library. In this chapter, I provide a primer for the JavaScript language, focusing on the features that are most pertinent when working with jQuery.
JavaScript has had a difficult life and was rushed through standardization before it had a chance to mature properly. This has resulted in a language that can be very pleasant to work with but that has some odd behavioral and syntactical quirks.
![]() Tip To get the best from this book, you will need some experience of programming and an understanding of concepts such as variables, functions, and objects. If you are new to programming, a good starting point is a series of articles posted on the popular Lifehacker.com. No programming knowledge is assumed, and all of the examples are conveniently in JavaScript. The guide is available here:
Tip To get the best from this book, you will need some experience of programming and an understanding of concepts such as variables, functions, and objects. If you are new to programming, a good starting point is a series of articles posted on the popular Lifehacker.com. No programming knowledge is assumed, and all of the examples are conveniently in JavaScript. The guide is available here: http://lifehacker.com/5744113/learn-to-code-the-full-beginners-guide.
Getting Ready to Use JavaScript
You can define scripts in an HTML document in a couple of different ways. You can define an inline script, where the content of the script is part of the HTML document. You can also define an external script, where the JavaScript is contained in a separate file and referenced via a URL (which is how you access the jQuery library, as you'll see in Chapter 5). Both of these approaches rely on the script element. In this chapter, I will be using inline scripts. You can see a simple example in Listing 4-1.
Listing 4-1. A Simple Inline Script
<!DOCTYPE HTML>

<html>

<head>

    <title>Example</title>

    <script type="text/javascript">

        console.log("Hello");
</script>
</head>
<body>
This is a simple example
</body>
</html>
This is a trivially simple script that writes a message to the console. The console is a basic (but useful) tool that the browser provides that lets you display debugging information as your script is executed. Each browser has a different way of showing the console. For Google Chrome, you must select the “JavaScript console” item from the Tools menu. You can see how the console is displayed in Chrome in Figure 4-1; the other browsers have very similar features.
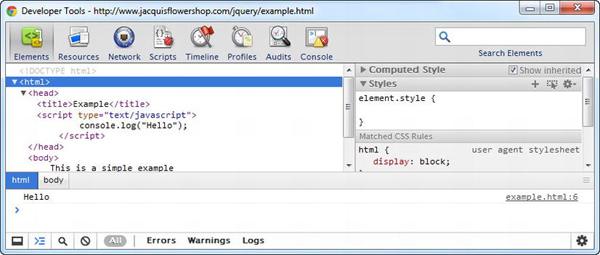
Figure 4-1 The Google Chrome JavaScript console
You can see that the output from calling the console.log method is displayed in the console window, along with the details of where the message originated (in this case on line 7 of the example.html file). In this chapter, I won't show screenshots; I'll show just the results from some of the examples. So, for example, for Listing 4-1, the output is as follows:
Hello
I have formatted some of the results to make them easier to read. In the sections that follow, I'll show you the core features of the JavaScript language. If you have had any experience programming in any other modern language, you will find the JavaScript syntax and style familiar.
Using Statements
The basic JavaScript building block is the statement. Each statement represents a single command, and statements are usually terminated by a semicolon (;). In fact, the semicolon is optional, but using them makes your code easier to read and allows for multiple statements on a single line. Listing 4-2 shows a couple of statements in a script, which is defined in the document using a script element.
Listing 4-2. Using JavaScript Statements
<!DOCTYPE HTML>
<html>
<head>
<title>Example</title>
</head>
<body>
<script type="text/javascript">
console.log("This is a statement");
console.log("This is also a statement");
</script>
</body>
</html>
The browser executes each statement in turn. In this example, I simply write out a pair of messages to the console. The results are as follows:
this is a statement
this is also a statement
Defining and Using Functions
If you define statements directly in the script element, as I did in Listing 4-2, then the browser will execute those statements as soon as it reaches them as the document is loaded. As an alternative, you can package multiple statements into a function, which won't be executed until the browser encounters a statement that invokes the function, as shown in Listing 4-3.
Listing 4-3. Defining a JavaScript Function
<!DOCTYPE HTML>
<html>
<head>
<title>Example</title>
<script type="text/javascript">
function myFunc() {
console.log("This is a statement");
};
myFunc();
</script>
</head>
<body>
This is a simple example</body>
</html>
The statements contained by a function are encompassed by braces ({ and }) and are referred to as the code block. This listing defines a function called myFunc, which contains a single statement in the code block. JavaScript is a case-sensitive language, which means that the keyword function must be lowercase. The statement in the function won't be executed until the browser reaches another statement that calls the myFunc function, like this:
myFunc();
This example isn't especially useful because the function is invoked immediately after it has been defined. You will see some examples where functions are much more useful when you look at events in Chapter 9.
Defining Functions with Parameters
In common with most programming languages, JavaScript allows you to define parameters for functions, as shown in Listing 4-4.
Listing 4-4. Defining Functions with Parameters
<!DOCTYPE HTML>
<html>
<head>
<title>Example</title>
<script type="text/javascript">
function myFunc(name, weather) {
console.log("Hello " + name + ".");
console.log("It is " + weather + " today");
};
myFunc("Adam", "sunny");
    </script>

</head>

<body>

    This is a simple example

</body>

</html>
In this listing, I have added two parameters to the myFunc function. They are called name and weather. JavaScript is a loosely typed language, which means you don't have to declare the data type of the parameters when you define the function. I'll come back to loose typing later in the chapter when I cover JavaScript variables. To invoke a function with parameters, you provide values as argument when you invoke the function, like this:
myFunc("Adam", "sunny");
The results from this listing are as follows:
Hello Adam
The number of arguments when you invoke a function doesn't need to match the number of parameters in the function. If you call the function with fewer arguments than it has parameters, then the value of any parameters you have not supplied values for is undefined. If you call the function with more arguments than there are parameters, then the additional arguments are simply ignored.
The consequence of this is that you can't create two functions with the same name and different parameters and expect JavaScript to differentiate between them based on the arguments you provide when invoking the function. This is called polymorphism, and although it is supported in languages such as Java and C#, it isn't available in JavaScript. Instead, if you define two functions with the same name, then the second definition replaces the first.
Defining Functions That Return Results
You can return results from functions using the return keyword. Listing 4-5 shows a function that returns a result.
Listing 4-5. Returning from a Function
<!DOCTYPE HTML>
<html>
<head>
<title>Example</title>
<script type="text/javascript">
function myFunc(name) {
return ("Hello " + name + ".");
};
console.log(myFunc("Adam"));
</script>
</head>
<body>
This is a simple example
</body>

</html>
This function defines one parameter and uses it to generate a simple result. I invoke the function and pass the result as the argument to the console.log function, like this:
console.log(myFunc("Adam"));
Notice that you don't have to declare that the function will return a result or denote the data type of the result. The result from this listing is as follows:
Hello Adam
Using Variables and Types
You define variables using the var keyword and can optionally assign a value to the variable in a single statement. Variables that are defined in a function are local variables and are available for use only within that function. Variables that are defined directly in the script element are global variables and can be accessed anywhere, including other scripts. Listing 4-6 demonstrates the use of local and global variables.
Listing 4-6. Using Local and Global Variables
<!DOCTYPE HTML>

<html>

    <head>

        <title>Example</title>

    </head>

    <body>

        <script type="text/javascript">

            var myGlobalVar = "apples";


            function myFunc(name) {

                var myLocalVar = "sunny";

                return ("Hello " + name + ". Today is " + myLocalVar + ".");

            };

            document.writeln(myFunc("Adam"));

        </script>

        <script type="text/javascript">

            document.writeln("I like " + myGlobalVar);

        </script>

    </body>

</html>
Again, JavaScript is a loosely typed language. This doesn't mean JavaScript doesn't have types. It just means you don't have to explicitly declare the type of a variable and that you can assign different types to the same variable without any difficulty. JavaScript will determine the type based on the value you assign to a variable and will freely convert between types based on the context in which they are used. The result from Listing 4-6 is as follows:
Hello Adam. Today IS sunny


I like apples
Using the Primitive Types
JavaScript defines a small set of primitive types. These are string, number, and boolean. This may seem like a short list, but JavaScript manages to fit a lot of flexibility into these three types.
Working with Strings
You define string values using either the double quote or single quote characters, as shown in Listing 4-7.
Listing 4-7. Defining String Variables
<!DOCTYPE HTML>

<html>

<head>

    <title>Example</title>

    <script type="text/javascript">

        var firstString = "This is a string";

        var secondString = 'And so is this';

    </script>

</head>

<body>

    This is a simple example

</body>

</html>
The quote characters that you use must match. You can't start a string with a single quote and finish with a double quote, for example.
Working with Booleans
The boolean type has two values: true and false. Listing 4-8 shows both values being used, but this type is most useful when used in conditional statements, such as an if statement.
Listing 4-8. Defining String Variables
<!DOCTYPE HTML>

<html>

<head>

       <title>Example</title>

       <script type="text/javascript">

             var firstBool = true;

             var secondBool = false;

       </script>

</head>

<body>

       This is a simple example

</body>

</html>
Working with Numbers
The number type is used to represent both integer and Floating-point numbers (also known as real numbers). Listing 4-9 provides a demonstration.
Listing 4-9. Defining String Variables
<!DOCTYPE HTML>

<html>

<head>

    <title>Example</title>

    <script type="text/javascript">

        var daysInWeek = 7;

        var pi = 3.14;

        var hexValue = 0xFFFF;

    </script>

</head>

<body>

    This is a simple example

</body>

</html>
You don't have to specify which kind of number you are using. You just express the value you require, and JavaScript will act accordingly. In the listing, I have defined an integer value, defined a floating-point value, and prefixed a value with 0x to denote a hexadecimal value.
Creating Objects
JavaScript supports the notion of objects, and there are different ways in which you can create them. Listing 4-10 gives a simple example.
Listing 4-10. Defining String Variables
<!DOCTYPE HTML>

<html>

<head>

    <title>Example</title>

    <script type="text/javascript">

        var myData = new Object();

        myData.name = "Adam";

        myData.weather = "sunny";


        console.log("Hello " + myData.name + ". ");

        console.log("Today is " + myData.weather + ".");

    </script>

</head>

<body>

    This is a simple example

</body>

</html>
I create an object by calling new Object(), and I assign the result (the newly created object) to a variable called myData. Once the object is created, I can define properties on the object just by assigning values, like this:
myData.name = "Adam";
Prior to this statement, my object doesn't have a property called name. After the statement has executed, the property does exist, and it has been assigned the value Adam. You can read the value of a property by combining the variable name and the property name with a period, like this:
console.log("Hello " + myData.name + ". ");
Using Object Literals
You can define an object and its properties in one step using the object literal format. Listing 4-11 shows how this is done.
Listing 4-11. Defining String Variables
<!DOCTYPE HTML>

<html>

<head>

    <title>Example</title>

    <script type="text/javascript">

        var myData = {

            name: "Adam",

            weather: "sunny"

        };


        console.log("Hello " + myData.name + ". ");

        console.log("Today is " + myData.weather + ".");

    </script>

</head>

<body>

    This is a simple example

</body>

</html>
Each property that you want to define is separated from its value using a colon (:), and properties are separated using a comma (,).
Using Functions as Methods
One of the features that I like most about JavaScript is the way that you can add functions to your objects. A function defined on an object is called a method. I don't know why, but I find this elegant and endlessly pleasing. Listing 4-12 shows how you can add methods in this manner.
Listing 4-12. Defining String Variables
<!DOCTYPE HTML>

<html>

<head>

    <title>Example</title>

    <script type="text/javascript">

        var myData = {

            name: "Adam",
weather: "sunny",
printMessages: function() {
console.log("Hello " + this.name + ". ");
console.log("Today is " + this.weather + ".");
}
};
myData.printMessages();
</script>
</head>
<body>
This is a simple example
</body>
</html>
In this example, I have used a function to create a method called printMessages. Notice that to refer to the properties defined by the object, I have to use the this keyword. When a function is used as a method, the function is implicitly passed the object on which the method has been called as an argument through the special variable this. The output from the listing is as follows:
Hello adam


today is sunny
Working with Objects
Once you have created objects, you can do a number of things with them. In the following sections, I'll describe the activities that will be useful later in this book.
Read and Modify the Property Values
The most obvious thing to do with an object is to read or modify the values assigned to the properties that the object defines. There are two different syntax styles you can use, both of which are shown in Listing 4-13.
Listing 4-13. Reading and Modifying Object Properties
<!DOCTYPE HTML>

<html>

<head>

    <title>Example</title>

    <script type="text/javascript">

        var myData = {

            name: "Adam",

            weather: "sunny",

        };


        myData.name = "Joe";

        myData["weather"] = "raining";
console.log("Hello " + myData.name + ".");
console.log("It is " + myData["weather"]);
</script>
</head>
<body>
This is a simple example
</body>
</html>
The first style is the one that most programmers with be familiar with and that I used in earlier examples. You concatenate the object name and the property name together with a period, like this:
myData.name = "Joe";
You can assign a new value to the property by using the equals sign (=) or read the current value by omitting it. The second style is an array-style index, like this:
myData["weather"] = "raining";
In this style, you specify the name of the property you want between square braces ([ and ]). This can be a very convenient way to access a property because you can pass the property you are interested in using a variable, like this:
var myData = {

    name: "Adam",

    weather: "sunny",

};


var propName = "weather";

myData[propName] = "raining";
This is the basis for how you enumerate the properties of an object, which I describe next.
Enumerating an Object's Properties
You enumerate the properties that an object has using the for...in statement. Listing 4-14 shows how you can use this statement.
Listing 4-14. Enumerating an Object's Properties
<!DOCTYPE HTML>

<html>

<head>

    <title>Example</title>

    <script type="text/javascript">

        var myData = {

            name: "Adam",

            weather: "sunny",

            printMessages: function() {

                console.log("Hello " + this.name + ". ");

                console.log("Today is " + this.weather + ".");

            }
};
for (var prop in myData) {
console.log("Name: " + prop + " Value: " + myData[prop]);
}
</script>
</head>
<body>
This is a simple example
</body>
</html>
The for...in loop performs the statement in the code block for each property in the myData object. The prop variable is assigned the name of the property being processed in each iteration. I use the array-index style to retrieve the value of the property from the object. The output from this listing is as follows (I have formatted the results to make them easier to read):
NAme:name value:Adam

Name:weather value:sunny

Name: printMessages Value: function () {

    console.log("Hello " + this.name + ". ");

    console.log("Today is " + this.weather + ".");

}
From the result, you can see that the function I defined as a method is also enumerated. This is as a result of the flexible way that JavaScript handles functions.
Adding and Deleting Properties and Methods
You are still able to define new properties for an object, even when you have used the object literal style. Listing 4-15 gives a demonstration.
Listing 4-15. Adding a New Property to an Object
<!DOCTYPE HTML>

<html>

<head>

    <title>Example</title>

    <script type="text/javascript">

        var myData = {

            name: "Adam",

            weather: "sunny",

        };


        myData.dayOfWeek = "Monday";

    </script>

</head>

<body>
This is a simple example
</body>
</html>
In this listing, I have added a new property to the object called dayOfWeek. I have used the dot notation (concatenating the object and property names with a period), but I could as readily used the index-style notation.
As you might expect by now, you can also add new methods to an object by setting the value of a property to be a function, as shown in Listing 4-16.
Listing 4-16. Adding a New Method to an Object
<!DOCTYPE HTML>
<html>
<head>
<title>Example</title>
<script type="text/javascript">
var myData = {
name: "Adam",
weather: "sunny",
};
myData.SayHello = function() {
console.write("Hello");
};
</script>
</head>
<body>
    This is a simple example

</body>

</html>
You can delete a property or method from an object using the delete keyword, as shown in Listing 4-17.
Listing 4-17. Deleting a Property from an Object
<!DOCTYPE HTML>

<html>

<head>

    <title>Example</title>

    <script type="text/javascript">

        var myData = {

            name: "Adam",

            weather: "sunny",

        };


        delete myData.name;

        delete myData["weather"];

        delete myData.SayHello;

    </script>

</head>
<body>
This is a simple example
</body>
</html>
Determine Whether an Object Has a Property
You can check to see whether an object has a property using the in expression, as shown in Listing 4-18.
Listing 4-18. Checking to See Whether an Object Has a Property
<!DOCTYPE HTML>
<html>
<head>
<title>Example</title>
<script type="text/javascript">
var myData = {
name: "Adam",
weather: "sunny",
};
var hasName = "name" in myData;
var hasDate = "date" in myData;
console.log("HasName: " + hasName);
console.log("HasDate: " + hasDate);
</script>
</head>
<body>

    This is a simple example

</body>

</html>
In this example, I test for a property that exists and one that doesn't. The value of the hasName variable will be true, and the value of the hasDate property will be false.
Using JavaScript Operators
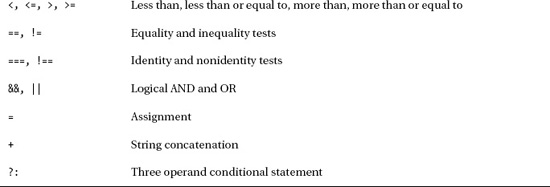
JavaScript defines a largely standard set of operators. I've summarized the most useful in Table 4-1.

Using Conditional Statements
Many of the JavaScript operators are used in conjunction with conditional statements. In this book, I tend to use the if/else and switch statements. Listing 4-19 shows the use of both (which will be familiar if you have worked with pretty much any programming language).
Listing 4-19. Using the if/else and switch Conditional Statements
<!DOCTYPE HTML>

<html>

<head>

    <title>Example</title>

    <script type="text/javascript">


        var name = "Adam";


        if (name == "Adam") {

            console.log("Name is Adam");

        } else if (name == "Jacqui") {

            console.log("Name is Jacqui");

        } else {

            console.log("Name is neither Adam or Jacqui");

        }


        switch (name) {

            case "Adam":

                console.log("Name is Adam");

                break;

            case "Jacqui":

                console.log("Name is Jacqui");

                break;

            default:

                console.log("Name is neither Adam or Jacqui");
break;
}
</script>
</head>
<body>
This is a simple example
</body>
</html>
The Equality Operator vs. the Identity Operator
The equality and identity operators are of particular note. The equality operator will attempt to coerce operands to the same type in order to assess equality. This is a handy feature, as long as you are aware it is happening. Listing 4-20 shows the equality operator in action.
Listing 4-20. Using the Equality Operator
<!DOCTYPE HTML>

<html>

<head>

    <title>Example</title>

    <script type="text/javascript">


       var firstVal = 5;

       var secondVal = "5";


        if (firstVal == secondVal) {

            console.log("They are the same");

        } else {

            console.log("They are NOT the same");

        }

    </script>

</head>

<body>

    This is a simple example

</body>

</html>
The output from this script is as follows:
They are the same
JavaScript is converting the two operands into the same type and comparing them. In essence, the equality operator tests that values are the same irrespective of their type. If you want to test to ensure that the values and the types are the same, then you need to use the identity operator (===, three equals signs, rather than the two of the equality operator), as shown in Listing 4-21.
Listing 4-21. Using the Identity Operator
<!DOCTYPE HTML>

<html>

<head>

    <title>Example</title>

    <script type="text/javascript">


       var firstVal = 5;

       var secondVal = "5";


        if (firstVal === secondVal) {

            console.log("They are the same");

        } else {

            console.log("They are NOT the same");

        }

    </script>

</head>

<body>

    This is a simple example

</body>

</html>
In this example, the identity operator will consider the two variables to be different. This operator doesn't coerce types. The result from this script is as follows:
They are NOT the same
JavaScript primitives are compared by value, but JavaScript objects are compared by reference. Listing 4-22 shows how JavaScript handles equality and identity tests for objects.
Listing 4-22. Performing Equality and Identity Tests on Objects
<!DOCTYPE HTML>

<html>

<head>

    <title>Example</title>

    <script type="text/javascript">


        var myData1 = {

            name: "Adam",

            weather: "sunny",

        };


        var myData2 = {

            name: "Adam",

            weather: "sunny",

        };
var myData3 = myData2;
var test1 = myData1 == myData2;
var test2 = myData2 == myData3;
var test3 = myData1 === myData2;
var test4 = myData2 === myData3;
console.log("Test 1: " + test1 + " Test 2: " + test2);
console.log("Test 3: " + test3 + " Test 4: " + test4);
</script>
</head>
<body>
This is a simple example
</body>
</html>
The results from this script are as follows:
Test 1: false Test 2: true
Test 3: false Test 4: true
Listing 4-23 shows the same tests performed on primitives.
Listing 4-23. Performing Equality and Identity Tests on Objects
<!DOCTYPE HTML>
<html>
<head>
<title>Example</title>
<script type="text/javascript">
var myData1 = 5;
var myData2 = "5";
        var myData3 = myData2;


        var test1 = myData1 == myData2;

        var test2 = myData2 == myData3;

        var test3 = myData1 === myData2;

        var test4 = myData2 === myData3;


        console.log("Test 1: " + test1 + " Test 2: " + test2);

        console.log("Test 3: " + test3 + " Test 4: " + test4);

    </script>


</head>

<body>

    This is a simple example

</body>

</html>
The results from this script are as follows:
Test 1: true Test 2: true

Test 3: false Test 4: true
Explicitly Converting Types
The string concatenation operator (+) has a higher precedence than the addition operator (also +), which means that when it can, JavaScript will concatenate variables in preference to adding them. This can cause confusion because JavaScript will also convert types freely to produce a result and isn't always the result that is expected, as shown in Listing 4-24.
Listing 4-24. String Concatentation Operator Precedence
<!DOCTYPE HTML>

<html>

<head>

    <title>Example</title>

    <script type="text/javascript">


        var myData1 = 5 + 5;

        var myData2 = 5 + "5";


        console.log("Result 1: " + myData1);

        console.log("Result 2: " + myData2);


    </script>

</head>

<body>

    This is a simple example

</body>

</html>
The result from this script is as follows:
Result 1: 10

Result 2: 55
The second result is the kind that causes confusion. What might be intended to be an addition operation is interpreted as string concatenation through a combination of operator precedence and over-eager type conversion. To avoid this, you can explicitly convert the types of values to ensure you perform the right kind of operation.
Converting Numbers to Strings
If you are working with multiple number variables and want to concatenate them as strings, then you can convert the numbers to strings with the toString method, as shown in Listing 4-25.
Listing 4-25. Using the number.toString Method
<!DOCTYPE HTML>

<html>

<head>

    <title>Example</title>

    <script type="text/javascript">

        var myData1 = (5).toString() + String(5);

        console.log("Result: " + myData1);

    </script>

</head>

<body>

    This is a simple example

</body>

</html>
Notice that I have placed the numeric value in parentheses, and then I called the toString method. This is because you have to allow JavaScript to convert the literal value into a number before you can call the methods that the number type defines. I have also shown an alternative approach to achieve the same effect, which is to call the String function and pass in the numeric value as an argument. Both of these techniques have the same effect, which is to convert a number to a string, meaning that the + operator is used for string concatenation and not addition. The output from this script is as follows:
Result:55
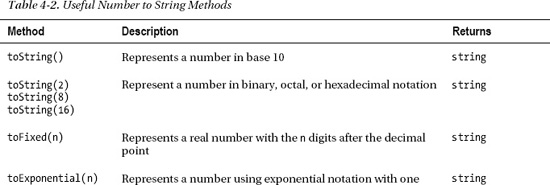
There are some other methods that allow you to exert more control over how a number is represented as a string. I have briefly described these in Table 4-2. All of the methods shown in the table are defined by the number type.

Converting Strings to Numbers
The opposite problem is to convert strings to numbers so that you can perform addition rather than concatenation. You can do this with the Number function, as shown in Listing 4-26.
Listing 4-26. Converting Strings to Numbers
<!DOCTYPE HTML>

<html>

<head>

    <title>Example</title>

    <script type="text/javascript">


        var firstVal = "5";

        var secondVal = "5";


        var result = Number(firstVal) + Number(secondVal);


        console.log("Result: " + result);

    </script>

</head>

<body>

    This is a simple example

</body>

</html>
The output from this script is as follows:
Result: 10
The Number method is quite strict in the way that is parses string values, but there are two other functions you can use that are more flexible and will ignore trailing non-number characters. These functions are parseInt and parseFloat. I have described all three methods in Table 4-3.

Working with Arrays
JavaScript arrays work pretty much like arrays in most other programming languages. Listing 4-27 shows how you can create and populate an array.
Listing 4-27. Creating and Populating an Array
<!DOCTYPE HTML>

<html>

<head>

    <title>Example</title>

    <script type="text/javascript">


        var myArray = new Array();

        myArray[0] = 100;

        myArray[1] = "Adam";

        myArray[2] = true;


    </script>

</head>

<body>

    This is a simple example

</body>

</html>
I have created a new array by calling new Array(). This creates an empty array, which I assign to the variable myArray. In the subsequent statements, I assign values to various index positions in the array.
There are a couple of things to note in this example. First, I didn't need to declare the number of items in the array when I created it. JavaScript arrays will resize themselves to hold any number of items. The second point of note is that I didn't have to declare the data types that the array will hold. Any JavaScript array can hold any mix of data types. In the example, I have assigned three items to the array: a number, a string, and a boolean.
Using an Array Literal
The array literal style lets you create and populate an array in a single statement, as shown in Listing 4-28.
Listing 4-28. Using the Array Literal Style
<!DOCTYPE HTML>

<html>

<head>

    <title>Example</title>

    <script type="text/javascript">
var myArray = [100, "Adam", true];
</script>
</head>
<body>
This is a simple example
</body>
</html>
In this example, I specified that the myArray variable should be assigned a new array by specifying the items I wanted in the array between square brackets ([ and ]).
Reading and Modifying the Contents of an Array
You read the value at a given index using square braces ([ and ]), placing the index you require between the braces, as shown in Listing 4-29.
Listing 4-29. Reading the Data from an Array Index
<!DOCTYPE HTML>

<html>

<head>

    <title>Example</title>

    <script type="text/javascript">

        var myArray = [100, "Adam", true];

        console.log("Index 0: " + myArray[0]);

    </script>

</head>

<body>

    This is a simple example

</body>

</html>
You can modify the data held in any position in a JavaScript array simply by assigning a new value to the index. Just as with regular variables, you can switch the data type at an index without any problems. Listing 4-30 demonstrates modifying the contents of an array.
Listing 4-30. Modifying the Contents of an Array
<!DOCTYPE HTML>

<html>

<head>

    <title>Example</title>

    <script type="text/javascript">

        var myArray = [100, "Adam", true];

        myArray[0] = "Tuesday";

        console.log("Index 0: " + myArray[0]);

    </script>

</head>

<body>

    This is a simple example
</body>
</html>
In this example, I have assigned a string to position 0 in the array, a position that was previously held by a number.
Enumerating the Contents of an Array
You enumerate the content of an array using a for loop. Listing 4-31 shows how to apply the loop to display the contents of a simple array.
Listing 4-31. Enumerating the Contents of an Array
<!DOCTYPE HTML>
<html>
<head>
<title>Example</title>
<script type="text/javascript">
var myArray = [100, "Adam", true];
for (var i = 0; i < myArray.length; i++) {
console.log("Index " + i + ": " + myArray[i]);
}
</script>
</head>
<body>
This is a simple example
</body>

</html>
The JavaScript loop works just the same way as loops in many other languages. You determine how many elements there are in the array by using the length property. The output from the listing is as follows:
Index 0: 100 Index 1: Adam Index 2: true
Using the Built-in Array Methods
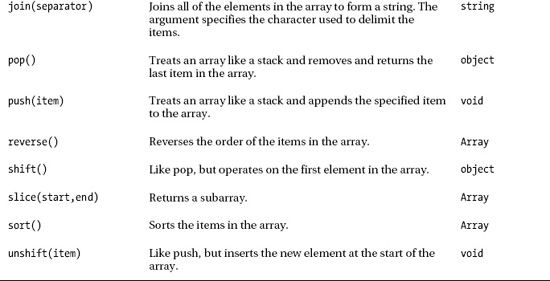
The JavaScript Array object defines a number of methods that you can use to work with arrays. Table 4-4 describes the most useful of these methods.

Handling Errors
JavaScript uses the try...catch statement to deal with errors. For the most part, you won't be worrying about errors in this book because my focus is on explaining the features of jQuery and not general programming technique. Listing 4-32 shows how to use this kind of statement.
Listing 4-32. Handling an Exception
<!DOCTYPE HTML>

<html>

<head>

    <title>Example</title>

    <script type="text/javascript">

        try {

            var myArray;

            for (var i = 0; i < myArray.length; i++) {

                console.log("Index " + i + ": " + myArray[i]);

            }

        } catch (e) {

            console.log("Error: " + e);

        }

    </script>

</head>

<body>

    This is a simple example

</body>
</html>
The problem in this script is a common one. I am trying to use a variable that has not been initialized properly. I have wrapped the code that I suspect will cause an error in the try clause of the statement. If no problems arise, then the statements execute normally, and the catch clause is ignored.
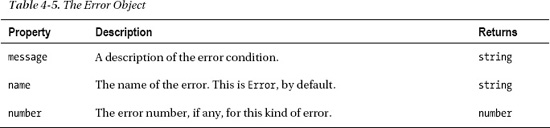
However, if there is an error, then execution of the statements in the try clause stops immediately, and control passes to the catch clause. The error that you have encountered is described by an Error object, which is passed to the catch clause. Table 4-5 shows the properties defined by the Error object.
The catch clause is your opportunity to recover from or clear up after the error. If there are statements that need to be executed whether or not there has been an error, you can place them in the optional finally clause, as shown in Listing 4-33.
Listing 4-33. Using a finally Clause
<!DOCTYPE HTML>

<html>

<head>

    <title>Example</title>

    <script type="text/javascript">

        try {

            var myArray;

            for (var i = 0; i < myArray.length; i++) {

                console.log("Index " + i + ": " + myArray[i]);

            }

        } catch (e) {

            Console.log("Error: " + e);

        } finally {

            console.log("Statements here are always executed");

        }

    </script>

</head>

<body>

    This is a simple example

</body>

</html>
Comparing undefined and null Values
JavaScript defines a couple of special values that you need to be careful with when you compare them: undefined and null. The undefined value is returned when you read a variable that hasn't had a value assigned to it or try to read an object property that doesn't exist. Listing 4-34 shows how undefined is used in JavaScript.
Listing 4-34. The undefined Special Value
<!DOCTYPE HTML>

<html>

<head>

    <title>Example</title>

    <script type="text/javascript">

        var myData = {

            name: "Adam",

            weather: "sunny",

        };

        console.log("Prop: " + myData.doesntexist);

    </script>

</head>

<body>

    This is a simple example

</body>

</html>
The output from this listing is as follows:
Prop: undefined
JavaScript is odd in that is also defined null, another special value. The null value is slightly different from undefined. The undefined value is returned when no value is defined, and null is used when you want to indicate that you have assigned a value but that value is not a valid object, string, number, or boolean; that is, you have defined a value of no value. To help clarify this, Listing 4-35 shows the transition from undefined to null.
Listing 4-35. Using undefined and null
<!DOCTYPE HTML>

<html>

<head>

    <title>Example</title>

    <script type="text/javascript">


        var myData = {

            name: "Adam",

        };


        console.log("Var: " + myData.weather);
console.log("Prop: " + ("weather" in myData));
myData.weather = "sunny";
console.log("Var: " + myData.weather);

console.log("Prop: " + ("weather" in myData));
myData.weather = null;
console.log("Var: " + myData.weather);
console.log("Prop: " + ("weather" in myData));
</script>
</head>
<body>
This is a simple example
</body>
</html>
I create an object and then try to read the value of the weather property, which is not defined:
console.log("Var: " + myData.weather);
console.log("Prop: " + ("weather" in myData));
There is no weather property, so the value returned by calling myData.weather is undefined, and using the in keyword to determine whether the object contains the property returns false. The output from these two statements is as follows:
Var: undefined


Prop: false
I then assign a value to the weather property, which has the effect of adding the property to the object:
myData.weather = "sunny";

console.log("Var: " + myData.weather);

console.log("Prop: " + ("weather" in myData));
I read the value of the property and check to see whether the property exists in the object again. As you might expect, you learn that the object does define the property and that its value is sunny:
Var: sunny

Prop: true
Now I set the value of the property to null, like this:
myData.weather = null;
This has a very specific effect. The property is still defined by the object, but I have indicated it doesn't contain a value. When I perform my checks again, I get the following results:
This distinction is important when it comes to comparing undefined and null values because null is an object and undefined is a type in its own right.
Checking to See Whether a Variable or Property Is null or undefined
If you want to check to see whether a property is null or undefined (and you don't care which), then you can simply use an if statement and the negation operator (!), as shown in Listing 4-36.
Listing 4-36. Checking to See Whether a Property is null or undefined
<!DOCTYPE HTML>

<html>

<head>

    <title>Example</title>

    <script type="text/javascript">


        var myData = {

            name: "Adam",

            city: null

        };


        if (!myData.name) {

            console.log("name IS null or undefined");

        } else {

            console.log("name is NOT null or undefined");

        }


        if (!myData.city) {

            console.log("city IS null or undefined");

        } else {

            console.log("city is NOT null or undefined");

        }


    </script>

</head>

<body>

    This is a simple example

</body>

</html>
This technique relies on the type coercion that JavaScript performs such that the values you are checking are treated as boolean values. If a variable or property is null or undefined, then the coerced boolean value is false.
Differentiating Between null and undefined
If you want to compare two values, then you have a choice. If you want to treat an undefined value as being the same as a null value, then you can use the equality operator (==) and rely on JavaScript to convert the types. An undefined variable will be regarded as being equal to a null variable, for example. If you want to differentiate between null and undefined, then you need to use the identity operator (===). Listing 4-37 shows both comparisons.
Listing 4-37. Equality and Identity Comparisons for null and undefined Values
<!DOCTYPE HTML>

<html>

<head>

    <title>Example</title>

    <script type="text/javascript">


        var firstVal = null;

        var secondVal;


        var equality = firstVal == secondVal;

        var identity = firstVal === secondVal;


        console.log("Equality: " + equality);

        console.log("Identity: " + identity);


    </script>

</head>

<body>

    This is a simple example

</body>

</html>
The output from this script is as follows:
Equality: true

Identity: false
Summary
In this chapter, I showed you the core JavaScript features that you will use throughout this book. Understanding basic JavaScript is essential to using jQuery, as you'll see in the chapters ahead.