
C H A P T E R 5
jQuery Basics
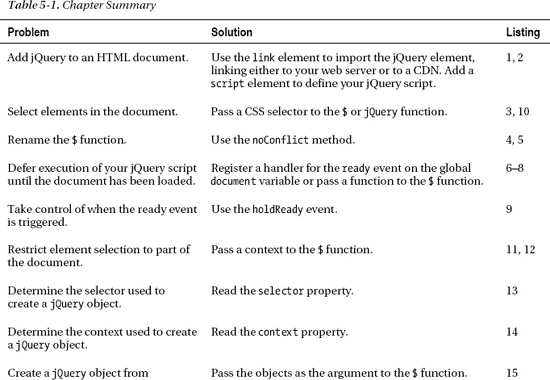
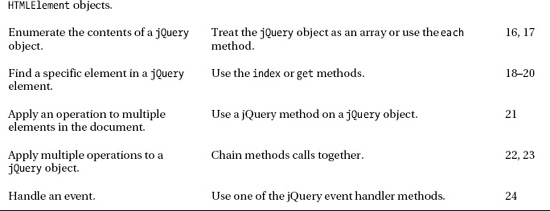
In this chapter, I will introduce you to your first jQuery script. The script is simple, but it demonstrates many of the most important characteristics of jQuery, including how you select elements in the document, how such selections are presented to you, and the nature of the relationship between jQuery and the built-in DOM API that is part of the HTML specification. Table 5-1 provides the summary for this chapter.
Setting Up jQuery
The very first thing you need to do with jQuery is add it to the document you want to work with. Listing 5-1 shows the flower shop example document you first saw in Chapter 2.
Listing 5-1. The Flower Shop Example Document
<!DOCTYPE html>

<html>

<head>

    <title>Example</title>

    <script src="jquery-1.7.js" type="text/javascript"></script>

    <link rel="stylesheet" type="text/css" href="styles.css"/>

</head>

<body>

    <h1>Jacqui's Flower Shop</h1>

    <form method="post">

        <div id="oblock">

            <div class="dtable">

                <div id="row1" class="drow">

                    <div class="dcell">

                        <img src="astor.png"/><label for="astor">Astor:</label>

                        <input name="astor" value="0" required>

                    </div>

                    <div class="dcell">

                        <img src="daffodil.png"/><label for="daffodil">Daffodil:</label>

                        <input name="daffodil" value="0" required >

                    </div>

                    <div class="dcell">

                        <img src="rose.png"/><label for="rose">Rose:</label>

                        <input name="rose" value="0" required>

                    </div>

                </div>

                <div id="row2" class="drow">

                    <div class="dcell">

                        <img src="peony.png"/><label for="peony">Peony:</label>

                        <input name="peony" value="0" required>

                    </div>

                    <div class="dcell">

                        <img src="primula.png"/><label for="primula">Primula:</label>

                        <input name="primula" value="0" required>

                    </div>

                    <div class="dcell">

                        <img src="snowdrop.png"/><label for="snowdrop">Snowdrop:</label>

                        <input name="snowdrop" value="0" required>

                    </div>

                </div>

            </div>

        </div>

        <div id="buttonDiv"><button type="submit">Place Order</button></div>

    </form>

</body>

</html>
To help maintain focus on the content, I have moved the CSS styles to a separate style sheet called styles.css, as demonstrated in Chapter 3. You can see how I have added the jQuery library to the document, as follows:
<script src="jquery-1.7.js" type="text/javascript"></script>
Two files are available for download from the jquery.com web site. The first is jQuery-1.7.js, which is the version that is generally used during the development of a web site or application. This file is around 230KB and contains the uncompressed JavaScript code. You can simply open and read the file to learn about how jQuery implements its features and easily unwind a stack trace if you encounter problems in your code.
![]() Tip As I write this book, the latest version of jQuery is 1.7. jQuery is very actively developed, so by the time you read this, a later version will almost certainly have been released, although the techniques I show you in this book should still all work.
Tip As I write this book, the latest version of jQuery is 1.7. jQuery is very actively developed, so by the time you read this, a later version will almost certainly have been released, although the techniques I show you in this book should still all work.
The other file is jquery.1.7.min.js and is intended for use when you deploy your site or web application to users. It contains the same JavaScript code but has been minimized, meaning that all of the whitespace characters have been removed, and the meaningful variable names have been replaced with single-character names to save space. The minimized script is almost impossible to read for the purposes of debugging, but it is much smaller. The minimized file is only 31KB. If you are serving up a lot of pages that rely on jQuery, then this difference can save you significant amounts of bandwidth (and therefore money).
USING A CDN FOR JQUERY
A First jQuery Script
Now that you have added the jQuery library to the document, you can write a script that uses jQuery functionality. Listing 5-2 contains a simple script that shows off some of the basic jQuery features.
Listing 5-2. A First jQuery Script
<!DOCTYPE html>

<html>

<head>

    <title>Example</title>

    <script src="jquery-1.7.js" type="text/javascript"></script>

    <link rel="stylesheet" type="text/css" href="styles.css"/>

    <script type="text/javascript">

        $(document).ready(function () {

            $("img:odd").mouseenter(function(e) {

               $(this).css("opacity", 0.5);

            }).mouseout(function(e) {

               $(this).css("opacity", 1.0);

            });

        });

    </script>

</head>

<body>

    <h1>Jacqui's Flower Shop</h1>

    <form method="post">

        <div id="oblock">

            <div class="dtable">

                <div id="row1" class="drow">

                    <div class="dcell">

                        <img src="astor.png"/><label for="astor">Astor:</label>

                        <input name="astor" value="0" required>

                    </div>

                    <div class="dcell">

                        <img src="daffodil.png"/><label for="daffodil">Daffodil:</label>

                        <input name="daffodil" value="0" required >

                    </div>

                    <div class="dcell">

                        <img src="rose.png"/><label for="rose">Rose:</label>

                        <input name="rose" value="0" required>

                    </div>

                </div>

                <div id="row2" class="drow">

                    <div class="dcell">

                        <img src="peony.png"/><label for="peony">Peony:</label>

                        <input name="peony" value="0" required>

                    </div>

                    <div class="dcell">

                        <img src="primula.png"/><label for="primula">Primula:</label>

                        <input name="primula" value="0" required>

                    </div>

                    <div class="dcell">

                        <img src="snowdrop.png"/><label for="snowdrop">Snowdrop:</label>

                        <input name="snowdrop" value="0" required>

                    </div>

                </div>

            </div>

        </div>

        <div id="buttonDiv"><button type="submit">Place Order</button></div>

    </form>

</body>

</html>
This is a short script, but it demonstrates some of the most important features and characteristics of jQuery. I’ll break down the script line by line in this chapter, but it will take you the rest of the part of this book to fully understand all of the functional areas that this script touches upon. To start with, Figure 5-1 shows the effect that this script creates.
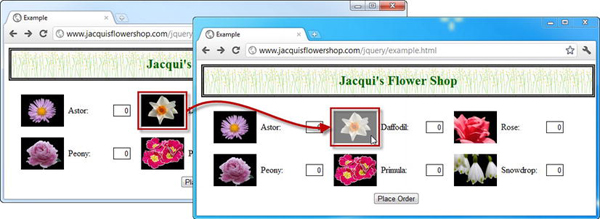
Figure 5-1. Increasing image opacity
The script changes the opacity of the daffodil, peony, and snowdrop images when the mouse is moved over them. This has the effect of making the image look a little brighter and washed out. When the mouse is moved away from the image, the opacity returns to its previous value. The images for the aster, rose, and primula are unaffected.
Understanding the jQuery $ Function
You access jQuery by using the $(...) function, which I will refer to as the $ function for simplicity. The $ function is the entry point to the wonderful world of jQuery and is a shorthand for the jQuery function. You can rewrite the script to use the full function name if you prefer, as shown in Listing 5-3.
Listing 5-3. Using the jQuery Function in Place of the Shorthand
...

<script type="text/javascript">

    jQuery(document).ready(function () {

        jQuery("img:odd").mouseenter(function(e) {

           jQuery(this).css("opacity", 0.5);

        }).mouseout(function(e) {

           jQuery(this).css("opacity", 1.0);

        });

    });

</script>

...
This script provides the same functionality as the previous example. It requires slightly more typing but has the advantage of making the use of jQuery explicit.
jQuery is not the only JavaScript library that uses the $ notation, which can cause problems if you are trying to use multiple libraries in the same document. You can make jQuery relinquish control of the $ by calling the jQuery.noConflict method, as shown in Listing 5-4.
Listing 5-4. Releasing jQuery’s Control of $
<script type="text/javascript">

    jQuery.noConflict();

    jQuery(document).ready(function () {

        jQuery("img:odd").mouseenter(function(e) {

           jQuery(this).css("opacity", 0.5);

        }).mouseout(function(e) {

           jQuery(this).css("opacity", 1.0);

        });

    });

</script>
You can also define your own shorthand notation. You do this by assigning the result of the noConflict method to a variable, as shown in Listing 5-5.
Listing 5-5. Using an Alternative Shorthand
<script type="text/javascript">

    var jq = jQuery.noConflict();

    jq(document).ready(function () {

        jq("img:odd").mouseenter(function(e) {

           jq(this).css("opacity", 0.5);

        }).mouseout(function(e) {

           jq(this).css("opacity", 1.0);

        });

    });

</script>
In this example, I created my own shorthand, jq, and then used this shorthand throughout the rest of my script.
![]() Tip I will be using the
Tip I will be using the $ notation throughout this book, since it is the normal convention for jQuery (and because I won’t be using any other library that wants control of $).
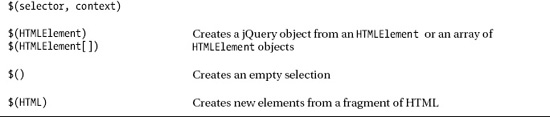
Irrespective of how you refer to the main jQuery function, you can pass the same set of arguments. These are described in Table 5-2. All of these types of argument are described later in this chapter except the last one, which is described in Chapter 7.

Waiting for the Document Object Model
In Chapter 2, I placed the script element at the end of the document so that the browser would create all of the objects in the DOM before executing my JavaScript code. You can neatly avoid this issue by using jQuery. Listing 5-6 shows the relevant code.
Listing 5-6. Waiting for the DOM
<script type="text/javascript">

    $(document).ready(function () {

        // ...code to execute...

    });

</script>
You pass the document variable (which I introduced in Chapter 1) to the $ function and call the ready method, passing in a function that you want executing when the DOM is loaded and ready to be used. You can then place the script element wherever you prefer in the document, safe in the knowledge that jQuery will prevent the function from being executed prematurely.
![]() Note Passing a
Note Passing a function to the ready method creates a handler for the jQuery ready event. I cover jQuery events fully in Chapter 9. For the moment, please just accept that the function you pass to the ready method will be invoked when the document is loaded and the DOM is ready for use.
Forgetting the Function
A common error is to omit the function part of this incantation and just pass a series of JavaScript statements to the ready method. This doesn’t work. The statements are executed by the browser immediately and not when the DOM is ready. Listing 5-7 provides a demonstration.
Listing 5-7. Omitting the Function from the ready Event Handler
...

<script type="text/javascript">


    function countImgElements() {

        return $('img').length;

    }


    $(document).ready(function() {

      console.log("Ready function invoked. IMG count: " + countImgElements());

    });


    $(document).ready(

      console.log("Ready statement invoked. IMG count: " + countImgElements())

    );

</script>

...
In this example, I call the ready method twice, once with a function and once just passing in a regular JavaScript statement. In both cases, I call the countImgElements function, which returns the number of img elements that are present in the DOM. (Don’t worry about how this method works for the moment. I explain the call to the length property later in this chapter.) When I load the document, the script is executed, and the following output is written to the console:
Ready statement invoked. IMG count: 0

Ready function invoked. IMG count: 6
As you can see, the statement without the function is executed as the document is loaded and before the browser has discovered the img elements in the document and created the corresponding DOM objects.
Using the Alternative Notation
You can pass your function as the parameter to the jQuery $ function if you prefer. This has the same effect as using the $(document).ready approach. Listing 5-8 provides a demonstration.
Listing 5-8. Deferring Execution of a Function Until the DOM Is Ready
...

<script type="text/javascript">

    $(function() {

        $("img:odd").mouseenter(function(e) {

           $(this).css("opacity", 0.5);

        }).mouseout(function(e) {

           $(this).css("opacity", 1.0);

        })

    });

</script>

...
Deferring the ready Event
You can control when the ready event is triggered by using the holdReady method. This can be useful if you need to load external resources dynamically (an unusual and advanced technique). The holdReady method must be called before the ready event is triggered and can then be called again when you are ready. Listing 5-9 gives an example of using this method.
Listing 5-9. Using the holdReady Method
...

<script type="text/javascript">


    $.holdReady(true);


    $(document).ready(function() {

        console.log("Ready event triggered");

        $("img:odd").mouseenter(function(e) {

           $(this).css("opacity", 0.5);

        }).mouseout(function(e) {

           $(this).css("opacity", 1.0);

        })

    });


    setTimeout(function() {

        console.log("Releasing hold");

        $.holdReady(false);

    }, 5000);


</script>

...
In this example, I call the holdReady method at the start of the script element. I have passed a value of true as the argument, indicating that I want the ready event to be held. I then define the function I want to be called when the ready event is fired (this is the same set of statements that I opened the chapter with, which alter the opacity of some of the images).
Finally, I use the setTimeout method to invoke a function after 5,000 milliseconds. This function calls the holdReady method with an argument of false, which tells jQuery to trigger the ready event. The net effect is that I delay the ready event for five seconds. I have added some debug messages that write the following output to the console when the document is loaded into the browser:
Releasing hold

Ready event triggered
![]() Tip You can call the
Tip You can call the holdReady method multiple times, but the number of calls to the holdReady method with the true argument must be balanced by the same number of calls with the false argument before the ready event will be triggered.
Selecting Elements
One of the most important areas of jQuery functionality is how you select elements from the DOM. In the example script, I located all of the odd img elements, as shown in Listing 5-10.
Listing 5-10. Selecting Elements from the DOM
...

<script type="text/javascript">

    $(document).ready(function() {

        $("img:odd").mouseenter(function(e) {

           $(this).css("opacity", 0.5);

        }).mouseout(function(e) {

           $(this).css("opacity", 1.0);

        })

    });

</script>

...
To select elements, you simply pass a selector to the $ function. jQuery supports all of the CSS selectors I described in Chapter 3, plus some additional ones that give you some very handy fine-grained control. In the example I used the :odd pseudo-selector, which selects the odd-numbered elements matched by the main part of the selector (img in this case, which selects all of the img elements, as described in Chapter 2). The :odd selector is zero-based, meaning that the first element is considered to be even. This can be a little confusing at first. Table 5-3 lists the most useful jQuery selectors.
![]() Tip You can create an empty selection by calling the
Tip You can create an empty selection by calling the $ function without any arguments ($()). I mention this for completeness, but it is not a feature that I have ever had cause to use.

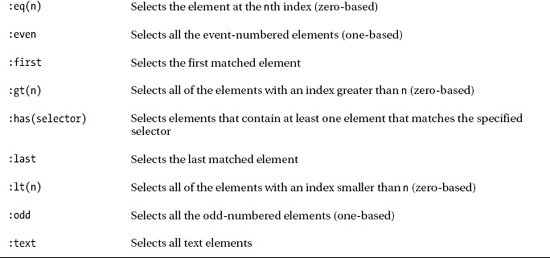
I have called these the most useful because they define functionality that would be difficult to re-create using CSS selectors. These selectors are used just like the CSS pseudo-selectors. They can be used on their own, in which case they are applied to all of the elements in the DOM, like this:
$(':even')
or combined with other selectors to restrict their effect, like this:
$('img:even')
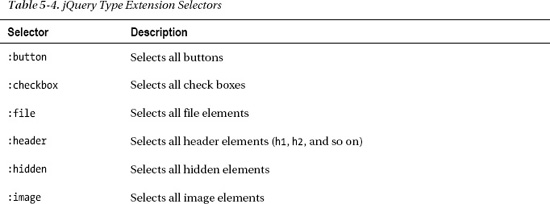
In addition, jQuery defines some selectors that select elements based on type, as described in Table 5-4.

Narrowing the Selection with a Context
By default, jQuery searches the entire DOM for elements. You can narrow the scope of a search by providing an additional argument to the $ function. This gives the search a context, which is used as the starting point for matching elements. Listing 5-11 provides a demonstration.
Listing 5-11. Narrowing a Search with a Context
<script type="text/javascript">

    $(document).ready(function() {


        $("img:odd", $('.drow')).mouseenter(function(e) {

           $(this).css("opacity", 0.5);

        }).mouseout(function(e) {

           $(this).css("opacity", 1.0);

        })

    });

</script>
In this example, I use one jQuery selection as the context for another. The context is evaluated first, and it matches all of the elements that are members of the drow class. This set of elements is then used as the context for the img:odd selector.
When you supply a context that contains multiple elements, then each element is used as a starting point in the search. There is an interesting subtlety in this approach. The elements that match the context are gathered together, and then the main selection is performed. In the example, this means the img:odd selector is applied to the results of the drow selector, which means that the odd-numbered elements are not the same as when you search the entire document. The net result is that the opacity effect is applied to the odd-numbered img elements in each div element in the drow class. This is the daffodil and primula images. When you omitted the context, the effect was applied to the daffodil, peony, and snowdrop images.
If you just want to match elements starting at a given point in the document, then you can use an HTMLElement object as the context. Listing 5-12 contains an example. I show you how to easily switch between the jQuery world and HTMLElement objects in the next section.
Listing 5-12. Using an HTMLElement as the Context
<script type="text/javascript">

    $(document).ready(function() {

        var elem = document.getElementById("oblock");


        $("img:odd", elem).mouseenter(function(e) {

           $(this).css("opacity", 0.5);

        }).mouseout(function(e) {

           $(this).css("opacity", 1.0);

        })

    });

</script>
The script in this example searches for odd-numbered img elements, limiting the search to those elements that are descended from the element whose id is oblock. Of course, you could achieve the same effect using the descendant CSS selector. The benefit of this approach arises when you want to narrow a search programmatically, without having to construct a selector string. A good example of such a situation is when handling an event. You can learn more about events (and see how HTMLElement objects arise in this situation) in Chapter 9.
Understanding the Selection Result
When you use jQuery to select elements from the DOM, the result from the $ function is a confusingly named jQuery object, which represents zero or more DOM elements. In fact, when you perform a jQuery operation that modifies one or more elements, the result is likely to be a jQuery object, which is an important characteristic that I’ll return to shortly.
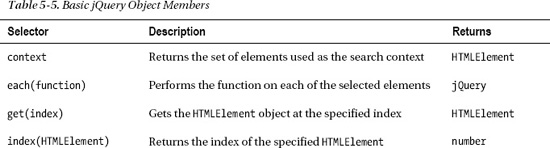
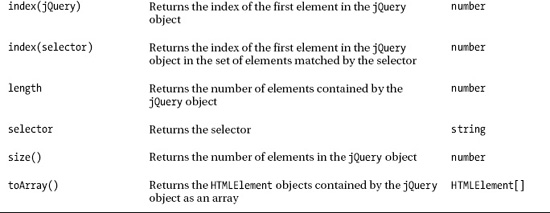
The methods and properties that are defined by the jQuery object are essentially the contents for the rest of the book, but there are some basic members that I can cover in this chapter, as described in Table 5-5.
Determining the Selector
The selector property returns a selector that describes the elements in the jQuery object. When you narrow or widen the selection (which I describe in Chapter 6), the selector property returns a selector that describes the combined set of operations. Listing 5-13 shows the selector property in use.
Listing 5-13. Using the selector Property
<script type="text/javascript">

    $(document).ready(function() {

        var selector =  $("img:odd").selector

        console.log("Selector: " + selector);

    });

</script>
This script produces the following output to the console:
Selector: img:odd
Determining the Context
The context property provides you with details of the context used when the jQuery was created. If a single HTMLElement object was used as the context, then the context property will return that HTMLElement. If no context was used or if multiple elements were used (as in the example I used earlier in the chapter), then the context property returns undefined instead. Listing 5-14 shows this property in use.
Listing 5-14. Determining the Context for a jQuery Object
...

<script type="text/javascript">

    $(document).ready(function() {

        var jq1 = $("img:odd");

        console.log("No context: " + jq1.context.tagName);


        var jq2 = $("img:odd", $('.drow'));

        console.log("Multiple context elements: " + jq2.context.tagName);


        var jq3 = $("img:odd", document.getElementById("oblock"));

        console.log("Single context element: " + jq3.context.tagName);

    });

</script>

...
This script selects elements using no context, multiple context objects, and a single context object. The output is as follows:
No context: undefined

Multiple context elements: undefined

Single context element: DIV
Dealing with DOM Objects
jQuery doesn’t replace the DOM; it just makes it a lot easier to work with. The HTMLElement objects (which I introduced in Chapter 2) are still used, and the jQuery library makes it easy to switch between jQuery objects and DOM objects. To my mind, the ease with which you can move from the traditional DOM to jQuery and back is part of the elegance of jQuery and helps you maintain compatibility with non-jQuery scripts and libraries.
Creating jQuery Objects from DOM Objects
You can create jQuery objects by passing an HTMLElement object or an array of HTMLElement objects as the argument to the $ function. This can be useful when dealing with JavaScript code that isn’t written in jQuery or in situations where jQuery exposes the underlying DOM objects, such as event processing. Listing 5-15 contains an example.
Listing 5-15. Creating jQuery Objects from DOM Objects
...

<script type="text/javascript">

    $(document).ready(function() {


        var elems = document.getElementsByTagName("img");


        $(elems).mouseenter(function(e) {

           $(this).css("opacity", 0.5);

        }).mouseout(function(e) {

           $(this).css("opacity", 1.0);

        })

    });

</script>

...
In this example, I select the img elements in the document using the document.getElementsByTagName method, rather than using jQuery directly with a selector. I pass the results of this method (which is a collection of HTMLElement objects) to the $ function, which returns a regular jQuery object that I can use just as in the previous examples.
This script also demonstrates how you can create a jQuery object from a single HTMLElement object:
$(this).css("opacity", 1.0);
When you are handling events, jQuery sets the value of the this variable to the HTMLElement that is processing the event. I describe the jQuery event support in Chapter 9, so I don’t want to get into the subject in this chapter (although I do mention the functions that contain these statements again a little later in this chapter).
Treating a jQuery Object As An Array
You can treat the jQuery object as an array of HTMLElement objects. This means you get to use the advanced features that jQuery provides but still get to the DOM directly. You can use the length property or the size method to determine how many elements are collected in the jQuery object and access individual DOM objects by using an array-style index (using the [ and ] brackets).
![]() Tip You can use the
Tip You can use the toArray method to extract the HTMLElement objects from the jQuery object as an array. I like to use the jQuery object itself, but sometimes it is useful to work with the DOM objects, such as when dealing with legacy code that wasn’t written using jQuery.
Listing 5-16 shows how you can enumerate the contents of a jQuery object to access the HTMLElement objects contained within.
Listing 5-16. Treating a jQuery Object As an Array
...

<script type="text/javascript">

    $(document).ready(function() {

        var elems = $('img:odd'),

        for (var i = 0; i < elems.length; i++) {

            console.log("Element: " + elems[i].tagName + " " + elems[i].src);

        }

    });

</script>

...
In the listing, I use the $ function to select the odd-numbered img elements and enumerate the selected elements to print out the value of the tagName and src properties to the console. The results are as follows:
Element: IMG http://www.jacquisflowershop.com/jquery/daffodil.png

Element: IMG http://www.jacquisflowershop.com/jquery/peony.png

Element: IMG http://www.jacquisflowershop.com/jquery/snowdrop.png
Iterate a Function Over DOM Objects
The each method lets you define a function that is performed for each DOM object in the jQuery object. Listing 5-17 gives a demonstration.
Listing 5-17. Using the each Method
...

<script type="text/javascript">

    $(document).ready(function() {

        $('img:odd').each(function(index, elem) {

            console.log("Element: " + elem.tagName + " " + elem.src);

        });

    });

</script>

...
jQuery passes two arguments to the specified function. The first is the index of the element in the collection, and the second is the element object itself. In this example, I write the tag name and the value of the src property to the console, producing the same results as the previous script.
Finding Indices and Specific Elements
The index method lets you find the index of an HTMLElement in a jQuery object. You can pass the index that you want using either an HTMLElement or jQuery object as the argument. When you use a jQuery object, the first matched element is the one whose index is returned. Listing 5-18 gives a demonstration.
Listing 5-18. Locating the Index of an HTMLElement
...

<script type="text/javascript">

    $(document).ready(function() {


        var elems = $('body *'),


        // find an index using the basic DOM API

        var index = elems.index(document.getElementById("oblock"));

        console.log("Index using DOM element is: " + index);


        // find an index using another jQuery object

        index = elems.index($('#oblock'));

        console.log("Index using jQuery object is: " + index);

    });

</script>

...
In this example, I locate a method using the DOM API’s getElementById method to find a div element by the id attribute value. This returns an HTMLElement object. I then use the index method on a jQuery object to find the index of the object that represents the div element. I repeat the process using a jQuery object, which I obtain through the $ function. I write the results from both approaches to the console, which produces the following results:
Index using DOM element is: 2

Index using jQuery object is: 2
You can also pass a string to the index method. When you do this, the string is interpreted as a selector. However, this approach causes the index method to behave in a different way than the previous example. Listing 5-19 provides a demonstration.
Listing 5-19. Using the Selector Version of the index Method
<script type="text/javascript">

    $(document).ready(function() {


        var imgElems = $('img:odd'),

        // find an index using a selector

        index = imgElems.index("body *");

        console.log("Index using selector is: " + index);


        // perform the same task using a jQuery object

        index = $("body *").index(imgElems);

        console.log("Index using jQuery object is: " + index);


    });

</script>
When you pass a string to the index method, the order in which the collection of elements is used changes. jQuery matches elements using the selector and then returns the index in the matched elements of the first element in the jQuery object on which you called the index method. This means that this statement:
index = imgElems.index("body *");
is equivalent to this statement:
index = $("body *").index(imgElems);
In essence, passing a string argument reverses the way in which the two sets of elements are considered.
![]() Tip We can use the
Tip We can use the index method without an argument to get the position of an element relative to its siblings. This can be useful when using jQuery to explore the DOM, which is the topic of Chapter 7.
The get method is the complement to the index method, such that you specify an index and receive the HTMLElement object at that position in the jQuery object. This has the same effect as using the array-style index I described earlier in this chapter. Listing 5-20 provides a demonstration.
Listing 5-20. Getting the HTMLElement Object at a Given Index
...

<script type="text/javascript">

    $(document).ready(function() {

        var elem = $('img:odd').get(1);

        console.log("Element: " + elem.tagName + " " + elem.src);

    });

</script>

...
In this script, I select the odd-numbered img elements, use the get method to retrieve the HTMLElement object at index 1, and write the value of the tagName and src properties to the console. The output from this script is as follows:
Element: IMG http://www.jacquisflowershop.com/jquery/peony.png
Modifying Multiple Elements and Chaining Method Calls
One of the features that make jQuery so concise and expressive is that calling a method on a jQuery object usually modifies all of the elements that the object contains. I say usually, because some methods perform operations that just don’t make sense for multiple elements, and you’ll see examples of this in later chapters. Listing 5-21 shows how jQuery makes life a lot easier than the basic DOM API.
Listing 5-21. Operating on Multiple Elements
...

<script type="text/javascript">

    $(document).ready(function() {


        $('label').css("color", "blue");


        var labelElems = document.getElementsByTagName("label");

        for (var i = 0; i < labelElems.length; i++) {

            labelElems[i].style.color = "blue";

        }

    });

</script>

...
In this example, I select all of the label elements in the document and change the value of the CSS color property to blue. I do this in a single statement in jQuery, but it takes a bit more effort using the basic DOM API—not a lot more effort, I must admit, but it mounts up in a complex web application. I also find the meaning of the jQuery statement is immediately apparent, but that’s just a personal thing.
One of the other nice features of the jQuery object is that it implements a fluent API. This means that whenever you call a method that modifies the contents of the object, the result of the method is another jQuery object. This may seem simple, but it allows you to perform method chaining, as shown in Listing 5-22.
Listing 5-22. Method Chaining Method Calls on a jQuery Object
...

<script type="text/javascript">

    $(document).ready(function() {


        $('label').css("color", "blue").css("font-size", ".75em");


        var labelElems = document.getElementsByTagName("label");

        for (var i = 0; i < labelElems.length; i++) {

            labelElems[i].style.color = "blue";

            labelElems[i].style.fontSize = ".75em";

        }

    });

</script>

...
In this example, I create a jQuery object using the $ function, call the css method to set a value for the color property, and then call the css method again, this time to set the font-size property. I have also shown the equivalent addition using the basic DOM API. You can see that it doesn’t require much work to achieve the same effect, because you already have a for loop that is enumerating the selected elements.
You start to get some real benefits when you start chaining methods that make more substantial changes to the set of elements contained in the jQuery object. Listing 5-23 provides a demonstration.
Listing 5-23. A More Sophisticated Chaining Example
<script type="text/javascript">

    $(document).ready(function() {


        $('label').css("color", "blue").add("input[name!='rose']")

                    .filter("[for!='snowdrop']").css("font-size", ".75em");


        var elems = document.getElementsByTagName("label");

        for (var i = 0; i < elems.length; i++) {

            elems[i].style.color = "blue";

            if (elems[i].getAttribute("for") != "snowdrop") {

                elems[i].style.fontSize= ".75em";

            }

        }

        elems = document.getElementsByTagName("input");

        for (var i = 0; i < elems.length; i++) {

            if (elems[i].getAttribute("name") != "rose") {

                elems[i].style.fontSize= ".75em";

            }

        }

    });

</script>
This is a slightly over-the-top example, but it nicely demonstrates the flexibility that jQuery offers. Let’s break down the chained methods to make sense of what is happening. You start with this:
$('label').css("color", "blue")
This is a nice and simple start. I have selected all of the label elements in the document and set the value of the CSS color property to be blue for all of them. The next step is as follows:
$('label').css("color", "blue").add("input[name!='rose']")
The add method adds the elements that match the specified selector to the jQuery object. In this case, I have selected all input elements that don’t have a name attribute whose value is rose. These are combined with the previously matched elements to give me a mix of label and input elements. You’ll see more of the add method in Chapter 6. Here is the next addition:
$('label').css("color", "blue").add("input[name!='rose']").filter("[for!='snowdrop']")
The filter method removes all of the elements in a jQuery object that don’t meet a specified condition. I explain this method in more depth in Chapter 6, but for the moment it is enough to know that this allows me to remove any element from the jQuery object that has a for attribute whose value is snowdrop.
$('label').css("color", "blue").add("input[name!='rose']")

    .filter("[for!='snowdrop']").css("font-size", ".75em");
The final step is to call the css method again, this time setting the font-size property to .75em. The net result of this is as follows:
- All
labelelements are assigned the valuebluefor thecolorCSS property. - All label elements except the one that has the
forattribute value ofsnowdropare assigned the value.75emfor the CSSfont-sizeproperty. - All
inputelements that don’t have anameattribute value ofroseare assigned the value of.75emfor the CSSfont-sizeproperty.
Achieving the same effect using the basic DOM API is a lot more complex, and I ran into some difficulties while writing this script. For example, I thought I could use the document.querySelectorAll method, described in Chapter 2, to select input elements using the selector input[name!='rose'], but it turns out that this kind of attribute filter doesn’t work with that method. I then tried to avoid duplicating the call to set the font-size value by concatenating the results of two getElementsByTagName calls together, but that turns out to be a painful experience in its own right. I don’t want to belabor the point, especially since you must already have a certain commitment to jQuery to be reading this book, but jQuery provides a level of fluidity and expressiveness that is impossible to achieve using the basic DOM API.
Handling Events
Returning to the script you started the chapter with, you can see that I chained together two method calls, as highlighted in Listing 5-24.
Listing 5-24. Chained Method Calls in the Example Script
...

<script type="text/javascript">

    $(document).ready(function() {

        $("img:odd").mouseenter(function(e) {

           $(this).css("opacity", 0.5);

        }).mouseout(function(e) {

           $(this).css("opacity", 1.0);

        })

    });

</script>

...
The methods I chained were mouseenter and mouseout. These methods let me define handler functions for the mouseenter and mouseout events that I described in Chapter 2. I cover the jQuery support for events in Chapter 9, but I just wanted to show how you can use the behavior of the jQuery object to specify a single handler method for all of the elements that you have selected.
Summary
In this chapter, I introduced you to your first jQuery script and used it to demonstrate some of the key characteristics of the jQuery library: the $ function, the ready event, the jQuery result object, and how jQuery complements, rather than replaces, the built-in DOM API that is part of the HTML specification.