
C H A P T E R 14
Using Ajax: Part I
Ajax stands for Asynchronous JavaScript and XML but is generally a word in its own right these days. Ajax allows you to make requests to the server asynchronously, meaning, in short, that your request happens in the background and doesn’t prevent the user from interacting with the content in your HTML document. The most common use for Ajax is to submit data from a form element. The advantage of doing this is that the browser doesn’t have to load a new document to display the server’s response, and you can use the standard jQuery functions to display the data within the document seamlessly.
The Ajax support that I’ll be using in this chapter is built into the core jQuery library, although I do briefly describe a useful plugin at the end of the chapter. jQuery doesn’t reinvent Ajax but rather makes the existing browser Ajax API easier to use.
In this chapter, I am going to describe the shorthand and convenience Ajax methods. These are simpler methods that make using Ajax relatively quick and easy. In Chapter 15, I describe the low-level jQuery Ajax API on which these methods are based. However, as you’ll see, the low-level API isn’t that low-level, and the main reason for its use is when the shorthand and convenience methods don’t do quite what you want. Table 14-1 provides the summary for this chapter.
Using the Ajax Shorthand Methods
Although Ajax is usually associated with posting form data, it can actually be used a lot more widely. I am going to start introducing Ajax by performing some simpler tasks, starting with some different ways that you can obtain data from the server without using forms at all.
jQuery defines a set of Ajax shorthand methods, which are convenient wrappers around the core Ajax functions and which allow you to quickly and simply perform common Ajax tasks. In the sections that follow, I introduce you to the shorthand methods for retrieving data from the server using HTTP GET requests.
(BRIEFLY) UNDERSTANDING ASYNCHRONOUS TASKS
Performing an Ajax GET Request
To begin, you are going to use Ajax to perform an HTTP GET request to load a fragment of HTML that you can add to your document. Listing 14-1 shows the example document that you will be working with.
Listing 14-1. The Example Document
<!DOCTYPE html>

<html>

<head>

    <title>Example</title>

    <script src="jquery-1.7.js" type="text/javascript"></script>

    <script src="jquery.tmpl.js" type="text/javascript"></script>

    <script src="jquery.validate.js" type="text/javascript"></script>

    <link rel="stylesheet" type="text/css" href="styles.css"/>

    <script type="text/javascript">

        $(document).ready(function() {

            // script will go here

        });

    </script>

</head>

<body>

    <h1>Jacqui's Flower Shop</h1>

    <form method="post" action="http://node.jacquisflowershop.com/order">

        <div id="oblock">

            <div class="dtable">

                <div id="row1" class="drow">

                </div>

                <div id="row2"class="drow">

                </div>

            </div>

        </div>

        <div id="buttonDiv"><button type="submit">Place Order</button></div>

    </form>

</body>

</html>
This is similar to the examples you have seen previously, but there are no elements to describe the products and no data item or templates to generate them. Instead, I have created a separate file called flowers.html, which I have placed next to the example document (which is called example.html in the source code download for this book). Listing 14-2 shows the content of flowers.html.
Listing 14-2. The flowers.html File
...

<div>

    <img src="astor.png"/><label for="astor">Astor:</label>

    <input name="astor" value="0" required />

</div>

<div>

    <img src="daffodil.png"/><label for="daffodil">Daffodil:</label>

    <input name="daffodil" value="0" required />

</div>

<div>

    <img src="rose.png"/><label for="rose">Rose:</label>

    <input name="rose" value="0" required />

</div>

<div>

    <img src="peony.png"/><label for="peony">Peony:</label>

    <input name="peony" value="0" required />

</div>

<div>

    <img src="primula.png"/><label for="primula">Primula:</label>

    <input name="primula" value="0" required />

</div>

<div>

    <img src="snowdrop.png"/><label for="snowdrop">Snowdrop:</label>

    <input name="snowdrop" value="0" required />

</div>

...
These are the same elements you have been using in previous chapters, except that they are not assigned to rows and I have removed the class attribute from the div elements. I have made these changes only so that I can show you how to work with the elements once you load them. There is no technical reason for doing this. Notice that this isn’t a complete HTML document, just a fragment.
You can now use the jQuery support for Ajax to bring the HTML fragment into the main HTML document. This might seem like an odd thing to do, but you are simulating a common situation where different pieces of content are produced by different systems and need to be stitched together to create a complex document or web application. I am using only one server in this example for simplicity, but it is easy to imagine that the information about the products is coming from elsewhere. In fact, in later examples, I will introduce Node.js in order to show you how to deal with multiple servers. That is all to come. For the moment, let’s look at the basic jQuery Ajax support and use it to deal with the flowers.html file. Listing 14-3 shows how you can do this.
Listing 14-3. Using jQuery Ajax Support with an HTML Fragment
...

<script type="text/javascript">

$(document).ready(function() {

    $.get("flowers.html",

        function(data) {

            var elems = $(data).filter('div').addClass("dcell");

            elems.slice(0, 3).appendTo('#row1'),

            elems.slice(3).appendTo("#row2");

    });

});

</script>

...
I used the get method and provided two arguments. The first argument is the URL that you want to load. In this case, I have specified flowers.html, which will be interpreted as being a URL that is relative to the URL from which the main document was loaded.
The second argument is a function that will be invoked if the request is successful. As I mentioned in the sidebar, Ajax relies heavily on callback functions because the requests are performed asynchronously. jQuery passes the data from the server response as the argument to the function.
When you load a document that contains this script, the flowers.html file is loaded from the server, the HTML fragment it contains is parsed into element, and then they are added to the document. Figure 14-1 shows the result.

Figure 14-1. The effect of using Ajax
OK, so I admit that you ended up with the same result you saw when the elements or data was inline, but how the path you took to get there is worth exploring. Let’s dig into the detail.
![]() Tip Although I have used the
Tip Although I have used the get method to load HTML, it can be used to obtain any kind of data from the server.
Processing the Response Data
The argument passed to the success function is the data that the server has sent back an in answer to our request. In this example, you get back the content of the flowers.html file, which is an HTML fragment. To make this into something I can use with jQuery, I passed the data into the jQuery $ function so that it would be parsed and a hierarchy of HTMLElement objects generated, as shown in Listing 14-4.
Listing 14-4. Processing the Data Obtained from the Server
...

<script type="text/javascript">

$(document).ready(function() {

    $.get("flowers.html",

        function(data) {

            var elems = $(data).filter('div').addClass("dcell");

            elems.slice(0, 3).appendTo('#row1'),

            elems.slice(3).appendTo("#row2");

    });

});

</script>

...
As I mentioned previously, I left out the class attributes from the div elements. You can see that I add them back in using the standard jQuery addClass method. Once the data has been passed to the $ function, then you can use the jQuery object that is returned as you would any other. I go on to add the elements to the document using the slice and appendTo methods, as I have in previous chapters.
![]() Tip Notice that I have used the
Tip Notice that I have used the filter method to select only the div elements generated from the data. When parsing the data, jQuery assumes that the carriage-return characters that I added between the div elements in the flowers.html file for structure are text content and creates text elements for them. To avoid this, you can either ensure that there are no carriage returns in the documents you request or use the filter method to remove then.
Making the Effect Easier to See
The statements that trigger the Ajax request are executed in response to the ready event (which I described in Chapter 9). This makes it hard to visualize how using Ajax is any different from using inline data. To make it more obvious, I have added a button to the document, and the Ajax request will be performed only when this button is clicked. You can see the changes in Listing 14-5.
Listing 14-5. Making an Ajax Request in Response to a Button Press
...

<script type="text/javascript">

$(document).ready(function() {

    $('<button>Ajax</button>').appendTo('#buttonDiv').click(function(e) {

        $.get("flowers.html",

            function(data) {

                var elems = $(data).filter("div").addClass("dcell");

                elems.slice(0, 3).appendTo('#row1'),

                elems.slice(3).appendTo("#row2");

        });

        e.preventDefault();

    });

});

</script>

...
Now the flowers.html document isn’t loaded until the button is clicked, and each time that it is clicked, additional elements are added to the document, as shown in Figure 14-2. Notice that I have called the preventDefault method on the Event object that is passed to my event handler function. Since the button element is contained with a form element, the default action is to submit the form to the server.
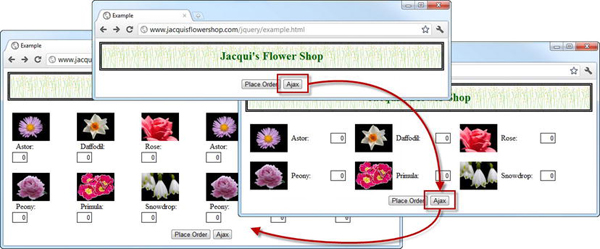
Figure 14-2. Using Ajax in response to a button press
Getting Other Kinds of Data
You are not limited to using the get method just for HTML. You can obtain any kind of data from the server. Of particular interest is JSON, because of the way that jQuery helpfully processes the data for you. Back when Ajax started to be widely adopted, XML was seen as the data format of choice, so much so that the X in Ajax stands for XML. I am not going to go into the details XML, but it tends to be verbose, hard to read, and relatively time- and resource-consuming to generate and process.
In recent years, XML has been largely replaced by the JavaScript Object Notation (JSON), which is a simpler data format and is exceptionally easy to work with in JavaScript code (as the name suggests). For this example, I have created a file called mydata.json and saved it alongside the example.html file on the web server. Listing 14-6 shows the contents of mydata.json.
Listing 14-6. The Contents of mydata.json
[{"name":"Astor","product":"astor","stocklevel":"10","price":"2.99"},

 {"name":"Daffodil","product":"daffodil","stocklevel":"12","price":"1.99"},

 {"name":"Rose","product":"rose","stocklevel":"2","price":"4.99"},

 {"name":"Peony","product":"peony","stocklevel":"0","price":"1.50"},

 {"name":"Primula","product":"primula","stocklevel":"1","price":"3.12"},

 {"name":"Snowdrop","product":"snowdrop","stocklevel":"15","price":"0.99"}]
The file contains the data for the flower shop products, and as you can see, JSON data is identical to the way you represent data inline in JavaScript code. This is one of the reasons that JSON has replaced XML for web applications. To load and process this data using Ajax, you can use the get method, as shown in Listing 14-7.
Listing 14-7. Using the get Method to Obtain JSON Data
...

<script type="text/javascript">

$(document).ready(function() {

    $('<button>Ajax</button>').appendTo('#buttonDiv').click(function(e) {

        $.get("mydata.json", function(data) {

            var template = $('#flowerTmpl'),

            template.tmpl(data.slice(0, 3)).appendTo("#row1");

            template.tmpl(data.slice(3)).appendTo("#row2");

        });

        e.preventDefault();

    });

});

</script>

<script id="flowerTmpl" type="text/x-jquery-tmpl">

    <div class="dcell">

        <img src="${product}.png"/>

        <label for="${product}">${name}:</label>

        <input name="${product}" data-price="${price}" data-stock="${stocklevel}"

            value="0" required />

    </div>

</script>

...
In this example, I request the JSON data file in response to the button click. The data retrieved from the server is passed to a function, just as with the HTML fragment. I have used the data template plugin (described in Chapter 12) to process the data and generate HTML elements from it and then the slice and appendTo method to insert the elements into the document. Notice that I didn’t have to do anything to convert the JSON string to a JavaScript object. jQuery does this for me automatically.
![]() Tip Some web servers (and this includes Microsoft IIS 7.5, which I have used for this book) will not return content to browsers if they don’t recognize the file extension or data format. To make this example work with IIS, I have to add a new mapping between the file extension (
Tip Some web servers (and this includes Microsoft IIS 7.5, which I have used for this book) will not return content to browsers if they don’t recognize the file extension or data format. To make this example work with IIS, I have to add a new mapping between the file extension (.json) and the MIME type for JSON data (application/json). Until I did this, IIS would return 404 – Not Found errors when mydata.json was requested.
Providing Data to GET Requests
You can send data to the server as part of your GET requests, which are the kind of requests made by the get, load, getScript, and getJSON methods. You do this by passing a data object to the shorthand method you are using. Listing 14-8 provides an example.
Listing 14-8. Sending Data as Part of a GET Request
...

<script type="text/javascript">

$(document).ready(function() {


    var requestData = {

        country: "US",

        state: "New York"

    }


    $.get("flowers.html", requestData,

        function(responseData) {

            var elems = $(responseData).filter('div').addClass("dcell");

            elems.slice(0, 3).appendTo('#row1'),

            elems.slice(3).appendTo("#row2");

    });


});

</script>

...
The data you provide is appended to the specified URL as a query string. For this example, this means you request the following:
http://www.jacquisflowershop.com/jquery/flowers.html?country=US&state=New+York
The server can use the data you provide to tailor the content that is returned. You might have different flower sections for different states, for example.
GET AND POST: PICK THE RIGHT ONE
Performing an Ajax POST Request
Now that you have seen how to get data from the server, you can turn your attention to how you send it, that is to say, how you post form data to the server. Once again, there is a shorthand method: post, which makes posting a form very simple. Before you look at that method, you need to set up your server, which means turning once again to Node.js and understanding how to work within a security feature that browsers apply to Ajax POST requests.
Preparing Node.js to Receive Form Data
For this part of the chapter, you need a server script that will receive data sent from the browser using the HTTP POST method, perform some simple operation on the data that has been sent, and generate a response. Listing 14-9 shows the Node.js script this section.
Listing 14-9. The Node.js Script for Posting Data
var http = require('http'),

var url = require('url'),

var querystring = require('querystring'),


http.createServer(function (req, res) {

    console.log("[200 OK] " + req.method + " to " + req.url);


    if (req.method == 'OPTIONS') {

        res.writeHead(200, "OK", {

            "Access-Control-Allow-Headers": "Content-Type",

            "Access-Control-Allow-Methods": "*",

            "Access-Control-Allow-Origin": "*"

            });

        res.end();


    } else if (req.method == 'POST') {

        var dataObj = new Object();

        var contentType = req.headers["content-type"];

        var fullBody = '';


        if (contentType) {

            if (contentType.indexOf("application/x-www-form-urlencoded") > -1) {

                req.on('data', function(chunk) { fullBody += chunk.toString();});

                req.on('end', function() {

                    var dBody = querystring.parse(fullBody);

                    writeResponse(req, res, dBody,

                        url.parse(req.url, true).query["callback"])

                });

            } else {

                req.on('data', function(chunk) { fullBody += chunk.toString();});

                req.on('end', function() {

                    dataObj = JSON.parse(fullBody);

                    var dprops = new Object();

                    for (var i = 0; i < dataObj.length; i++) {

                        dprops[dataObj[i].name] = dataObj[i].value;

                    }

                    writeResponse(req, res, dprops);

                });

            }

        }

    } else if (req.method == "GET") {

        var data = url.parse(req.url, true).query;

        writeResponse(req, res, data, data["callback"])

    }

    console.log("Ready on port 80");

}).listen(80);


function writeResponse(req, res, data, jsonp) {

    var total = 0;

    for (item in data) {

        if(item != "_" && data[item] > 0) {

            total += Number(data[item]);

        } else {

            delete data[item];

        }

    }

    data.total = total;

    jsonData = JSON.stringify(data);

    if (jsonp) {

        jsonData = jsonp + "(" + jsonData + ")";

    }


    res.writeHead(200, "OK", {

        "Content-Type": "application/json",

        "Access-Control-Allow-Origin": "*"});

    res.write(jsonData);

    res.end();

}
I saved this script to a file called formserver.js. The easiest way to get this script is to download the source code that accompanies this book and that is freely available from Apress.com. I run the script by entering the following at the command prompt:
node.exe formserver.js
This script processes the data sent by the browser and creates a JSON response. I could have returned HTML from this script, but JSON is more compact and often simpler to work with. The JSON object I return is very simple: an object that contains the total number of products that the user has selected and the number of each of them for which a value was specified. So, for example, if I selected one astor, two daffodils, and three roses, the JSON response sent back by the Node.js script would be as follows:
{"astor":"1","daffodil":"2","rose":"2","total":5}
The previous JSON I showed you represented an array of objects, but this server script returns just a single object whose properties correspond to the selected flowers. The total property contains the sum of the individual selections. I appreciate that this is hardly the most valuable activity a server can perform, but I want to keep our focus on using Ajax rather than server-side development.
Understanding Cross-Origin Ajax Requests
If you look at the Node.js script, you will see that when I write the response to the browser, I set an HTTP header, like this:
Access-Control-Allow-Origin: http://www.jacquisflowershop.com
By default, browsers limit scripts to making make Ajax requests within the same origin as the document that contains them. An origin is the combination of the protocol, hostname, and port components of a URL. If two URLs have the same protocol, hostname, and port, then they are within the same origin. If any of the three components is different, then they are in different origins.
![]() Tip This policy is intended to reduce the risks of a cross-site scripting (CSS) attack, where the browser (or user) is tricked into executing a malicious script. CSS attacks are outside the scope of this book, but there is a nice Wikipedia article at
Tip This policy is intended to reduce the risks of a cross-site scripting (CSS) attack, where the browser (or user) is tricked into executing a malicious script. CSS attacks are outside the scope of this book, but there is a nice Wikipedia article at http://en.wikipedia.org/wiki/Cross-site_scripting that provides a good introduction to the topic.
Table 14-2 shows how a number of URLs compare to the URL of the main example document, which is www.jacquisflowershop.com/jquery/example.html.
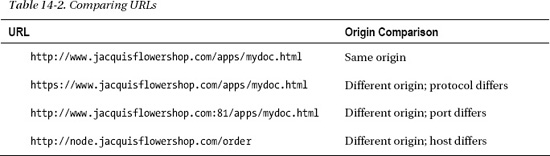
In my configuration, I have two servers. www.jacquisflowershop.com handles the static content, and node.jacquisflowershop.com runs Node.js. As you can see from the table, a document from the first server has a different origin to the second. When you want to make a request from one origin to another, it is known as a cross-origin request.
The problem with this policy is that it is a blanket ban; there are no cross-origin requests. This has led to the use of some very ugly tricks to trick the browser into making requests that contravene the policy. Fortunately, there is now a legitimate means of making cross-origin requests, defined in the Cross-Origin Resource Sharing (CORS) specification. I am only going to describe CORS briefly. For complete details, see the full CORS standard at www.w3.org/TR/cors.
![]() Tip The CORS specification is reasonably recent. It is supported by the current generation of browsers, but older browsers will simply ignore cross-origin requests. A more established approach is to use JSONP, which I describe in the “Working with JSONP” section.
Tip The CORS specification is reasonably recent. It is supported by the current generation of browsers, but older browsers will simply ignore cross-origin requests. A more established approach is to use JSONP, which I describe in the “Working with JSONP” section.
The way that CORS works is that the browser contacts the second server (the Node.js server for us) and includes an Origin header in the request. The value of this header is the origin of the document that has led to the request being made.
If the server recognizes the origin and wants to allow the browser to make a cross-origin request, then it adds the Access-Control-Allow-Origin header, setting the value to match the Origin header from the request. If the response doesn’t contain this header, then the browser discards the response.
![]() Tip Supporting CORS means that the browser has to apply the cross-origin security policy after it has contacted the server and has obtained the response header, meaning that the request is made even if the response is discarded because the required header is missing or specified a different domain. This is a very different approach from browsers that don’t implement CORS and that simply block the request, never contacting the server.
Tip Supporting CORS means that the browser has to apply the cross-origin security policy after it has contacted the server and has obtained the response header, meaning that the request is made even if the response is discarded because the required header is missing or specified a different domain. This is a very different approach from browsers that don’t implement CORS and that simply block the request, never contacting the server.
In the Node.js script, I manually set the Access-Control-Allow-Origin header to my trusted origin www.jacquisflowershop.com, but you could easily use the value of the Origin header in the request to follow a more sophisticated decision process. You can also set the Access-Control-Allow-Origin header to an asterisk (*), which means that cross-origin requests from any origin will be permitted. This is fine for the purposes of testing, but you should think carefully about the security implications before using this setting in a production application.
Using the post Method to Submit Form Data
So, now that you have prepared the server and understood CORS, you are in a position to use the post method to send form data to the server, as shown by Listing 14-10.
Listing 14-10. Sending Data with the post Method
...

<script type="text/javascript">

$(document).ready(function() {


    $('button').get(0).disabled = true;


    $.getJSON("mydata.json", function(data) {

        var template = $('#flowerTmpl'),

        template.tmpl(data.slice(0, 3)).appendTo("#row1");

        template.tmpl(data.slice(3)).appendTo("#row2");

        $('button').get(0).disabled = false;

    });


    $('button').click(function(e) {

        var formData = $('form').serialize();


        $.post("http://node.jacquisflowershop.com/order", formData,

            function(data) {

                processServerResponse(data);

            })


        e.preventDefault();

    })


    function processServerResponse(data) {

        var inputElems = $('div.dcell').hide();


        for (var prop in data) {

            var filtered = inputElems.has('input[name=' + prop + ']')

                .appendTo("#row1").show();

        }


        $('#buttonDiv, #totalDiv').remove();

        $('#totalTmpl').tmpl(data).appendTo('body'),

    }

});

</script>

<script id="totalTmpl" type="text/x-jquery-tmpl">

    <div id="totalDiv" style="clear: both; padding: 5px">

        <div style="text-align: center">Total Items: <span id=total>${total}</span></div>

        <div id="buttonDiv"><button type="submit">Place Order</button></div>

    </div>

</script>

<script id="flowerTmpl" type="text/x-jquery-tmpl">

    <div class="dcell">

        <img src="${product}.png"/>

        <label for="${product}">${name}:</label>

        <input name="${product}" data-price="${price}" data-stock="${stocklevel}"

            value="0" required />

    </div>

</script>

...
This example looks more complicated than it really is. I start by using the getJSON method to obtain the mydata.json file that contains details of the flower products and then use a data template to generate elements and add them to the document. This gives you the starting point that you have come to know and love, as shown in Figure 14-3.
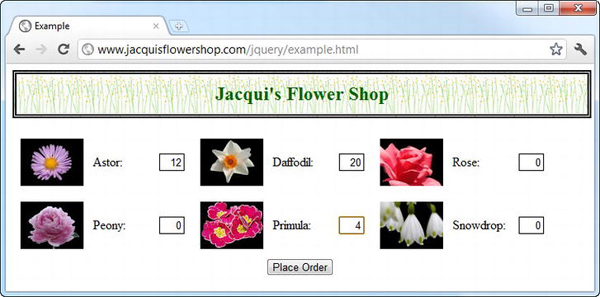
Figure 14-3. The starting point for sending data to the server
You can see that I have entered some values into the input elements: 12 astors, 20 daffodils, and 4 primulas. I use the click method to register a function that will be called when the button element is clicked, like this:
$('button').click(function(e) {

    var formData = $('form').serialize();


    $.post("http://node.jacquisflowershop.com/order", formData,

        function(data) {

            processServerResponse(data);

        })


    e.preventDefault();

})
The first thing that I do is to call the serialize method on the form element. This is a very helpful method that works its way through all of the form elements and creates a URL-encoded string that you can send to the server.
![]() Tip Notice that I call the
Tip Notice that I call the preventDefault method on the Event object that is passed to my handler function for the click event. I need to do this to stop the browser posting the form in the regular way, that is, by sending the data and loading the response as a new document.
For the values I entered, the serialize method generates a string like this:
astor=12&daffodil=20&rose=0&peony=0&primula=4&snowdrop=0
I use the serialize method because the post method sends data in the URL-encoded format (although this can be changed by using the ajaxSetup global event handler method, which I describe in Chapter 15). Once I have the data from the input elements, I call the post method to initiate the Ajax request.
The arguments to the post method are the URL that I want to send the data to (which need not be the same as the URL specified by the action attribute of the form element), the data I want to send, and a function to call if the request is successful. In this example, I take the response from the server and pass it to the processServerResponse function, which is defined as follows:
function processServerResponse(data) {

    var inputElems = $('div.dcell').hide();


    for (var prop in data) {

        var filtered = inputElems.has('input[name=' + prop + ']')

            .appendTo("#row1").show();

    }


    $('#buttonDiv, #totalDiv').remove();

    $('#totalTmpl').tmpl(data).appendTo('body'),

}
I hide all of the cell-level div elements in the CSS layout (which are members of the dcell class) and then display those that correspond to the properties in the JSON object from the server. I also use a data template to generate a display for the total number of selected items. These are both activities you could have performed on the client, but the point here is that you obtained the data through an Ajax POST request. You can see the result in Figure 14-4.
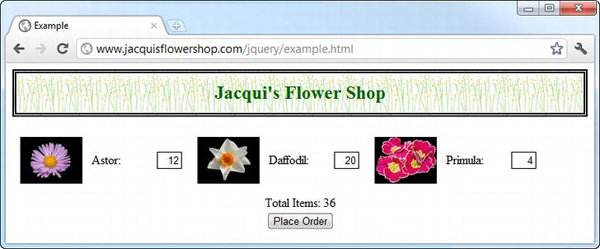
Figure 14-4. The effect of processing the data returned from the Ajax POST request
You can see how easy it is to submit form data to the server (and, of course, how easy it is to process the response, especially if it is JSON).
![]() Tip If you don’t get the response shown in the figure, then the likely cause is that your
Tip If you don’t get the response shown in the figure, then the likely cause is that your CORS header isn’t being set to the correct domain in the Node.js script.
Sending Other Data Using the post Method
Although the post method is usually used to submit form data, you can actually send any data you like. You just need to create an object that contains your data, call the serialize method to format the data properly, and then pass it to the post method. This can be a useful technique if you are collecting data from the user without using a form or if you want to be selective about the form elements that you include in the POST request. Listing 14-11 shows how you can use the post method in this way.
Listing 14-11. Using the post Method to Send Nonform Data to the Server
...

<script type="text/javascript">

$(document).ready(function() {


    $('button').click(function(e) {

        var requestData = {

            apples: 2,

            oranges: 10

        };


        $.post("http://node.jacquisflowershop.com/order", requestData,

            function(responseData) {

                alert(JSON.stringify(responseData));

            })

        e.preventDefault();

    })

});

</script>

...
In this script, I create an object and define properties explicitly. I pass this object to the post method and use the alert method to display the response from the server. (The server doesn’t really care what kind of data it gets from the browser; it will just try to add up the values and generate a total.) You can see the dialog box that is shown in Figure 14-5.
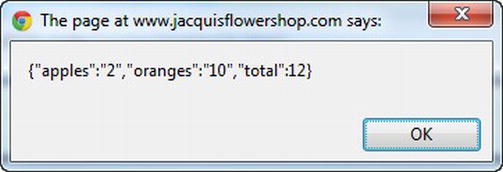
Figure 14-5. The response from the server for some nonform data
![]() Tip The JSON response from the server is automatically transformed into a JavaScript object by jQuery. I used the
Tip The JSON response from the server is automatically transformed into a JavaScript object by jQuery. I used the JSON.stringify method (which is supported by most browsers) to turn it back into a string so that I could display it in the dialog box.
Specifying the Expected Data Type
When you use the get and post methods, jQuery has to figure out what kind of data the server is sending back in response to your request. It can be anything from HTML to a JavaScript file. To do this, jQuery relies on the information that the server provides in the response, particularly the Content-Type header. For the most part, this works very well, but on occasion jQuery needs a little help. This is usually because the server is specifying the wrong MIME type for the data in the response.
You can override the information that the server provides and can tell jQuery what data you are expecting by passing an additional argument to the get or post methods. This argument can be one of the following values:
Listing 14-12 shows how you can specify the expected data type for the get method.
Listing 14-12. Specifying the Expected Data Type
...

<script type="text/javascript">

$(document).ready(function() {


    $.get("mydata.json",

        function(responseData) {

            console.log(JSON.stringify(responseData));

    }, "json");


});

</script>

...
You specify the data type as the last argument to the shorthand methods. In this example, I have told jQuery that I am expecting JSON data. It doesn’t matter what the server says the content type is. jQuery will not treat the response as JSON. In this example, I write the response to the console, which produces the following output:
[{"name":"Astor","product":"astor","stocklevel":"10","price":"2.99"},

 {"name":"Daffodil","product":"daffodil","stocklevel":"12","price":"1.99"},

 {"name":"Rose","product":"rose","stocklevel":"2","price":"4.99"},

 {"name":"Peony","product":"peony","stocklevel":"0","price":"1.50"},

 {"name":"Primula","product":"primula","stocklevel":"1","price":"3.12"},

 {"name":"Snowdrop","product":"snowdrop","stocklevel":"15","price":"0.99"}]
This is the same content that I put into the mydata.json file, which is, of course, what you hoped would happen. The problem with specifying the data type is that you have to be right. If the data is actually of a different type, then you can have some problems, as demonstrated in Listing 14-13.
Listing 14-13. Specifying the Wrong Kind of Data
...

<script type="text/javascript">

$(document).ready(function() {

    $.get("flowers.html",

        function(responseData) {

            console.log(JSON.stringify(responseData));

    }, "json");


});

</script>

...
In this example, I have requested a file that contains HTML but told jQuery that it should treat it as JSON. The problem here is that when dealing with JSON, jQuery automatically creates a JavaScript object from the data, which it can’t do with HTML. The Ajax request ends in the following error:
SyntaxError: Unexpected token <
![]() Tip I’ll show you how to detect Ajax errors in Chapter 15.
Tip I’ll show you how to detect Ajax errors in Chapter 15.
Avoiding the Most Common Ajax Pitfall
Before you go any further, I want to show you the most common problem that web programmer makes with Ajax, which is to treat the asynchronous request as though it were synchronous. Listing 14-14 gives an example of the problem.
Listing 14-14. A Common Ajax Mistake
...

<script type="text/javascript">

$(document).ready(function() {

    $('<button>Ajax</button>').appendTo('#buttonDiv').click(function(e) {

        e.preventDefault();


        var elems;


        $.get("flowers.html", function(data) {

            elems = $(data).filter("div").addClass("dcell");

        });


        elems.slice(0, 3).appendTo('#row1'),

        elems.slice(3).appendTo("#row2");


    });

});

</script>

...
In this example, I have defined a variable called elems, which is then used by the Ajax callback function to assign the result of the server request. I then use the slice and appendTo methods to add the elements that I have obtained from the server to the document. If you run this example, you will see that no elements are added to the document, and depending on your browser, you will see an error message displayed on the console. Here is the message shown by Google Chrome:
Uncaught TypeError: Cannot call method 'slice' of undefined
The issue here is that the statements in the script element are not executed in the order in which they are written. The problem is that I have assumed that the following sequence will occur:
- Define the
elemsvariable. - Get the data from the server and assign it to the
elemsvariable. - Slice the elements in the
elemsvariable and add them to the document.
What really happens is this:
- Define the
elemsvariable. - Start the asynchronous request to the server.
- Slice the elements in the
elemsvariable and add them to the document.
And, at some point in the near future, this happens:
- Receive the request from the server.
- Process the data and assign it to the
elemsvariable
In short, you get the error message because you called the slice methods on a variable that doesn’t contain any elements. The worst thing about this mistake is that sometimes the code actually works. This is because the Ajax response completes so quickly that the variable contains the data you expect before you come to process it (this is typically the case when the data is cached by the browser or you perform some complex operations between starting the Ajax request and trying to operate on the data). You now know what to look for whether you see this kind of behavior from your code.
Using the Type-Specific Convenience Methods
jQuery provides three convenience methods that make dealing with particular types of data a little more convenient. These methods are described and demonstrated in the sections that follow.
Getting an HTML Fragment
The load method will only obtain HTML data, which allows you to request an HTML fragment, process the response to create a set of elements, and insert those elements in the document in a single step. Listing 14-15 shows how you can use the load method.
Listing 14-15. Using the Load Shorthand Method
...

<script type="text/javascript">

$(document).ready(function() {

    $('<button>Ajax</button>').appendTo('#buttonDiv').click(function(e) {

        $('#row1').load("flowers.html");

        e.preventDefault();

    });

});

</script>

...
You call the load method on the element in the document that you want to insert the new elements into and pass the URL as a method argument. If the request is successful and the response from the server contains valid HTML, then the elements will be inserted at the specified location, as shown in Figure 14-6.
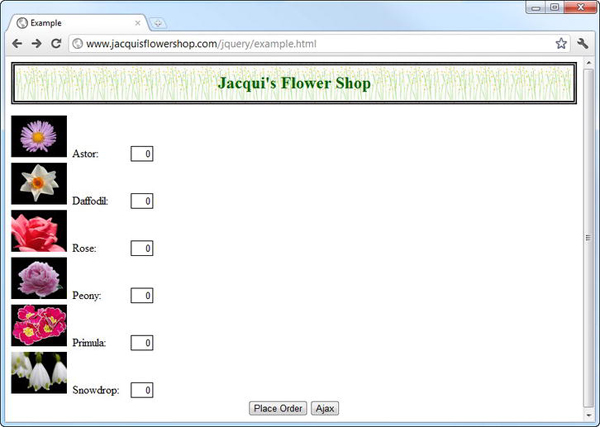
Figure 14-6. Adding elements to the document using the load method
You can see that the elements from the flower.html file have all been added to the document, but because they lack the class attribute, they are not properly added to the CSS table layout that the main document uses. For this reason, the load method is most useful when all of the elements are to be inserted in a single location, and you don’t need to modify them before they are added.
Getting and Executing Scripts
The getScript method loads a JavaScript file and then executes the statements it contains. To demonstrate this method, I have created a file called myscript.js and saved it alongside example.html on my web server. Listing 14-16 shows the contents of this file.
Listing 14-16. The Contents of the myscript.js File
var flowers = [

    ["Astor", "Daffodil", "Rose"],

    ["Peony", "Primula", "Snowdrop"],

    ["Carnation", "Lily", "Orchid"]

]


$('<div id=row3 class=drow/>').appendTo('div.dtable'),


var fTemplate = $('<div class=dcell><img/><label/><input/></div>'),


for (var row = 0; row < flowers.length; row++) {

    var fNames = flowers[row];


    for (var i = 0; i < fNames.length; i++) {

        fTemplate.clone().appendTo("#row" + (row + 1)).children()

            .filter('img').attr('src', fNames[i] + ".png").end()

            .filter('label').attr('for', fNames[i]).text(fNames[i]).end()

            .filter('input').attr({name: fNames[i], value: 0})

    }

}
These statements generate three rows of elements that describe the flowers. I have generated these elements using loops so I don’t have to get involved defining templates (although, in general, I would much rather use data templates as described in Chapter 12).
The most important thing to realize when dealing with scripts like this is that the state of the document may change between you initiating the Ajax request and the script statements being executed. Listing 14-17 contains a script from the main document that uses the getScript method but that also modifies the DOM before the Ajax request can complete.
Listing 14-17. Requesting and Executing Scripts with the getScript Method
...

<script type="text/javascript">

$(document).ready(function() {

    $('<button>Ajax</button>').appendTo('#buttonDiv').click(function(e) {

        $.getScript("myscript.js");

        $('#row2').remove();


        e.preventDefault();

    });

});

</script>

...
You call the getScript method on the main $ function and just pass the URL of the JavaScript file you want to use as the argument. If the server can provide the file and if it contains valid JavaScript statements, then the code will be executed.
![]() Tip The
Tip The getScript method can be used for any script file, but I find it especially useful for loading and executing scripts that are not central to a web application’s functionality, like tracker or geolocation scripts. The user doesn’t care if I am able to accurately locate their location for my site statistics, but they do care when loading and executing the script makes them wait. By using the getScript method, I can get the information I require without making it annoying. To be very clear, I am not suggesting that you do anything that is hidden from the user, only that you defer loading and executing legitimate functionality that the user is unlikely to value more than their time.
In this example, after I start the Ajax request with the getScript method, I use the remove method to remove the row2 element from the document. This element is used by the myscript.js file to insert some of the new elements. These elements are quietly discarded because the selector for the row2 ID doesn’t match anything in the document. You can see the effect in Figure 14-7. Depending on the circumstances, you can view this as a robust design that does its best in the face of document changes or an annoyance that quietly disposes of elements. Either way, it pays not to make too many assumptions about the state of the document in your external JavaScript files.
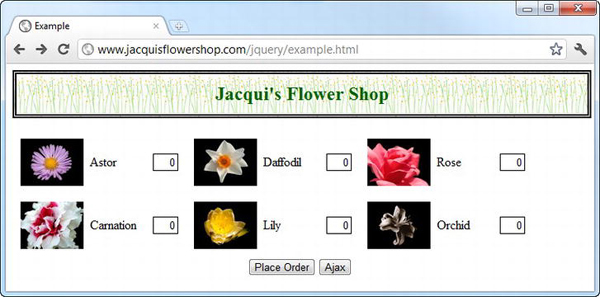
Figure 14-7. The effect of a document change during an Ajax request
Getting JSON Data
The getJSON method obtains a JSON object from the server. This is perhaps the least useful of the three convenience methods because it doesn’t do anything more with the data than the basic get method. Listing 14-18 shows the use of the getJSON method.
Listing 14-18. Using the getJSON Method
...

<script type="text/javascript">

$(document).ready(function() {

    $('<button>Ajax</button>').appendTo('#buttonDiv').click(function(e) {

        $.getJSON("mydata.json", function(data) {

            var template = $('#flowerTmpl'),

            template.tmpl(data.slice(0, 3)).appendTo("#row1");

            template.tmpl(data.slice(3)).appendTo("#row2");

        });

        e.preventDefault();

    });

});

</script>

<script id="flowerTmpl" type="text/x-jquery-tmpl">

    <div class="dcell">

        <img src="${product}.png"/>

        <label for="${product}">${name}:</label>

        <input name="${product}" data-price="${price}" data-stock="${stocklevel}"

            value="0" required />

    </div>

</script>

...
In this example, I request the JSON data file in response to the button click. The data retrieved from the server is passed to a function, much as with the get method that I showed you earlier in the chapter. I have used the data template plugin (described in Chapter 12) to process the data and generate HTML elements from it and then the slice and appendTo method to insert the elements into the document. Notice that you are passed a JavaScript object as the argument to the function. You don’t have to do anything to convert from the JSON format into an object because jQuery takes care of this for you.
. Working with JSONP
JSONP is an alternative to CORS and works around the same-origin restriction on Ajax requests. It relies on the fact that the browser will allow you to load JavaScript code from any server, which is how the script element works when you specify a src attribute. To begin with, define a function in the document that will process the data, like this:
...

function processJSONP(data) {

    //...do something with the data...

}

...
You then make a request to the server where the query string includes your form data and a callback property, set to the name of the function you just defined, like this:
http://node.jacquisflowershop.com/order?callback=processJSONP&astor=1

    &daffodil=2&rose=2&peony=0&primula=0&snowdrop=0
The server, which needs to understand how JSONP works, generates the JSON data as normal and then creates a JavaScript statement that calls the function you created and passes in the data as an argument, like this:
processJSONP({"astor":"1","daffodil":"2","rose":"2","total":5})
The server also sets the content type of the response to be text/javascript, which tells the browser that it has received some JavaScript statements and should execute them. This has the effect of invoking the method you defined earlier, passing in the data sent by the server. In this way, you neatly sidestep the same-domain issues without using CORS.
![]() Caution Cross-origin requests are restricted for good reason. Don’t use JSONP casually. It can create some serious security problems.
Caution Cross-origin requests are restricted for good reason. Don’t use JSONP casually. It can create some serious security problems.
jQuery has very convenient support for JSONP. All you have to do is use the getJSON method and specify a URL that contains callback=? in the query string. jQuery creates a function with a random name and uses this when communicating to the server, meaning you don’t have to modify your code at all. Listing 14-19 demonstrates how to make a JSONP request.
Listing 14-19. Making a JSONP Request Using the getJSON Method
...

<script type="text/javascript">

    $(document).ready(function() {


        $('button').get(0).disabled = true;


        $.getJSON("mydata.json", function(data) {

            var template = $('#flowerTmpl'),

            template.tmpl(data.slice(0, 3)).appendTo("#row1");

            template.tmpl(data.slice(3)).appendTo("#row2");

            $('button').get(0).disabled = false;

        });


        $('button').click(function(e) {

            var formData = $('form').serialize();


            $.getJSON("http://node.jacquisflowershop.com/order?callback=?",

                   formData, processServerResponse)


            e.preventDefault();

        })


        function processServerResponse(data) {

            var inputElems = $('div.dcell').hide();

            for (var prop in data) {

                var filtered = inputElems.has('input[name=' + prop + ']')

                    .appendTo("#row1").show();

            }

            $('#buttonDiv, #totalDiv').remove();

            $('#totalTmpl').tmpl(data).appendTo('body'),

        }

    });

</script>

...
Using the Ajax Forms Plugin
So far, I have been using the built-in jQuery support for Ajax. As I mentioned previously, one of the strengths of jQuery is the ease with which it can be extended to add new functionality and the vibrant world of plugins that this leads to. To finish this chapter, I am going to briefly describe a useful form-related plugin.
If you are interested in using Ajax solely to post form data to a server, then you might like the Ajax Forms plugin, which you can get from www.malsup.com/jquery/form. This is a plugin that makes using Ajax on forms extremely simple, as Listing 14-20 demonstrates.
Listing 14-20. Using the Ajax Forms Plugin
<!DOCTYPE html>

<html>

<head>

    <title>Example</title>

    <script src="jquery-1.7.js" type="text/javascript"></script>

    <script src="jquery.tmpl.js" type="text/javascript"></script>

    <script src="jquery.validate.js" type="text/javascript"></script>

    <script src="jquery.form.js" type="text/javascript"></script>

    <link rel="stylesheet" type="text/css" href="styles.css"/>

    <script type="text/javascript">

        $(document).ready(function() {


            $.getScript("myscript.js");


            $('form').ajaxForm(function(data) {

                console.log(JSON.stringify(data))

            });

        });

    </script>

</head>

<body>

    <h1>Jacqui's Flower Shop</h1>

    <form method="post" action="http://node.jacquisflowershop.com/order">

        <div id="oblock">

            <div class="dtable">

                <div id="row1" class="drow">

                </div>

                <div id="row2"class="drow">

                </div>

            </div>

        </div>

        <div id="buttonDiv"><button type="submit">Place Order</button></div>

    </form>

</body>

</html>
In this example, I have added the jquery.form.js script file to the document (this is included in the download for the plugin) and, in the script element, called the ajaxForm method on the form element. The argument to the ajaxForm method is a callback function, and this provides me with access to the response from the server. This is a neat and simple approach to basic Ajax forms, right down to the fact that the URL to post the form to is taken from the form element itself.
This plugin does a lot more, and it even includes some support for basic form validation, but if you get to the point where you want to start taking control of your Ajax requests, then I suggest using the low-level Ajax features that I describe in Chapter 15. But for quick and simple situations, this plugin is convenient and well-designed.
Summary
In this chapter, I introduced you to the shorthand and convenience methods that jQuery provides for Ajax. I have shown you how to use the get and post methods to make asynchronous HTTP GET and POST requests, how to work with JSON data, and how to use the convenience methods that deal with specific data types. Along the way, I have shown you the most common Ajax pitfall, explained cross-origin requests, and showed how to deal with them and briefly introduced a jQuery plugin, which makes it even easier to use Ajax with forms that the shorthand methods. In the next chapter, I’ll show you the low-level API, although you’ll see that it isn’t really that low-level and is actually quite pleasant to use.