
C H A P T E R 12
Using Data Templates
You will see your first jQuery plugin in this chapter; it is called the jQuery Templates plugin and it provides a way for you to use templates to easily generate HTML elements from JavaScript data objects.
I want to be very clear that this plugin is not actively developed or supported and has been deprecated by the jQuery team. That doesn't mean you shouldn't use it, but you should be aware of this fact before you incorporate this plugin into your projects. I'd recommend a more actively development alternative if I could find one that was anywhere as powerful and expressive as the jQuery Templates plugin, but even in an abandoned state this plugin is the best around.
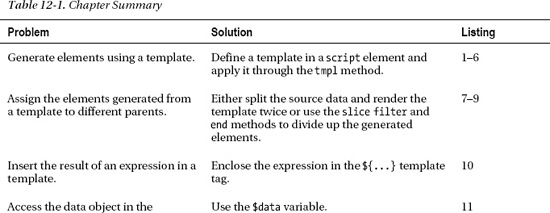
This history of this plugin is rather odd. Microsoft and the jQuery team announced that three plugins developed by Microsoft had been accepted as “official” plugins, a status that had not been accorded to any other plugin. A while later, the jQuery team announced that the plugins were deprecated, that the official status was removed, and that there were plans to replace them with other functionality. A replacement for the template plugin would be created as part of jQuery UI (which I describe in Part IV of this book). Sadly, nothing has yet appeared, and the abandoned plugins are still available and widely used (especially in the case of the template plugin). Obviously, the decision about using abandoned code is a personal one, but I like the functionality that the template plugin provides, and I use it often. My thinking is that I can always dig into the source code and fix any serious problems and that the occasional need to work around minor problems is justified by the utility value of the template feature. Table 12-1 provides the summary for this chapter.
Understanding the Problem That Templates Solve
Data templates solve a very specific problem: they allow you to programmatically generate elements from the properties and values of JavaScript objects. This is something you can do in other ways. In fact, I did something very similar in Chapter 11 when I created some elements to represent additional flowers in the example document. Listing 12-1 shows the relevant statements from that chapter.
Listing 12-1. Creating Elements Programmatically
...

<script type="text/javascript">

    $(document).ready(function() {


        var fNames = ["Carnation", "Lily", "Orchid"];

        var fRow = $('<adiv id=row3 class=drow/>').appendTo('div.dtable'),

        var fTemplate = $('<div class=dcell><img/><label/><input/></div>'),

        for (var i = 0; i < fNames.length; i++) {

            fTemplate.clone().appendTo(fRow).children()

                .filter('img').attr('src', fNames[i] + ".png").end()

                .filter('label').attr('for', fNames[i]).text(fNames[i]).end()

                .filter('input').attr({name: fNames[i], value: 0, required: "required"})

        }
    });

</script>

...
The problem with this approach is that it doesn't scale very well. As it is, the statements in the listing are already quite hard to read, and the complexity increases sharply for more complex elements. To my mind, the underlying issue of intelligibility arises because you are using JavaScript to solve a problem that is really about HTML elements. Handily, as I'll explain, the jQuery data templates library puts the emphasis back on HTML and, unless you want something very specialized, minimizes the amount of code you need to use to generate elements from data.
Taking a broader view, the need to integrate data into the document is a common issue to resolve. In my projects, it arises through two situations. The first is because I am working with some preexisting system that contains the data that drives my web application. I could obtain the data and integrate it into the document at the server—and there are some great technologies available to do this—but it means that my server farm spends a lot of time doing work that I could get the browser to do for me. If you have ever built and operated a high-volume web application, you know that the costs are substantial, and any opportunity to reduce the amount of processing required is taken seriously.
The second reason I need to integrate data into a document is that my web application is sourcing the data via Ajax in response to a user action. I will explain the jQuery support for Ajax fully in Chapters 14 and 15, but the short version is that you can obtain and display data from a server without reloading the entire page in the browser. It is a powerful technique that is very widely used, and the data template library works nicely with it.
Setting Up the jQuery Templates Library
Before you can use the jQuery template, you have to obtain the library and link to it in your document. You can download the library from https://github.com/jquery/jquery-tmpl. Decompress the archive file and copy either the jquery.templ.js file (for development) or the jquery.teml.min.js file (for deployment) to your web server, ideally to the same location as your main jQuery JavaScript file.
The next step is to add a script element to your example document that imports the template library, as shown in Listing 12-2.
Listing 12-2. Adding the Template Library to the Example Document
<!DOCTYPE html>

<html>

<head>

    <title>Example</title>

    <script src="jquery-1.7.js" type="text/javascript"></script>

    <script src="jquery.tmpl.js" type="text/javascript"></script>

    <link rel="stylesheet" type="text/css" href="styles.css"/>

    <script type="text/javascript">

        $(document).ready(function() {


            // example will go here


        });

    </script>

</head>

<body>
    <h1>Jacqui's Flower Shop</h1>

    <form method="post">

        <div id="oblock">

            <div class="dtable">

                <div id="row1" class="drow"></div>

                <div id="row2"class="drow"></div>

            </div>

        </div>

        <div id="buttonDiv"><button type="submit">Place Order</button></div>

    </form>

</body>

</html>
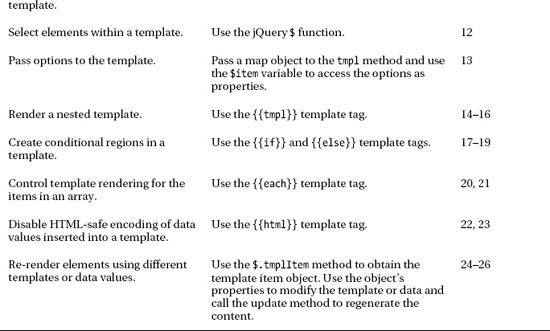
I'll use this listing as the example document for this chapter. Aside from the addition of the template library, you will notice that I have removed the individual flowers. You'll be using the template library to explore some different techniques for adding them back in. As a starting point, you can see how this document appears in Figure 12-1.
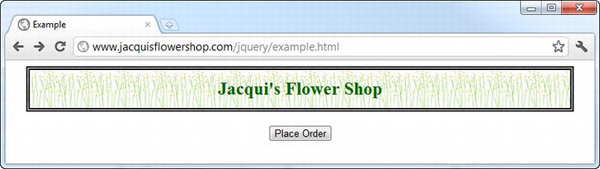
Figure 12-1. The starting example document
![]() Caution Previously, I showed you how you could use jQuery to enhance and remodel a document while still leaving it functional for non-JavaScript users. In general, this is a very sensible approach, but one with which the techniques in this chapter are largely incompatible. The idea of using JavaScript to create elements from data using a template makes it hard to create a non-JavaScript equivalent. After all, if the document already contained the elements that result from the data, you wouldn't need to use the templates. I am a big fan of providing a fallback for non-JavaScript browsers, and I recommend you think carefully about the experience you offer to such users, even as I commend these template features to you for their convenience and utility.
Caution Previously, I showed you how you could use jQuery to enhance and remodel a document while still leaving it functional for non-JavaScript users. In general, this is a very sensible approach, but one with which the techniques in this chapter are largely incompatible. The idea of using JavaScript to create elements from data using a template makes it hard to create a non-JavaScript equivalent. After all, if the document already contained the elements that result from the data, you wouldn't need to use the templates. I am a big fan of providing a fallback for non-JavaScript browsers, and I recommend you think carefully about the experience you offer to such users, even as I commend these template features to you for their convenience and utility.
A First Data Templates Example
The best way to start learning about data templates is to jump right in. Listing 12-3 demonstrates the basic template features. I have included the full HTML document in this listing because of the way you express templates using a script element, but I'll just show the relevant elements in future examples.
Listing 12-3. A First Data Templates Example
<!DOCTYPE html>

<html>

<head>

    <title>Example</title>

    <script src="jquery-1.7.js" type="text/javascript"></script>

    <script src="jquery.tmpl.js" type="text/javascript"></script>

    <link rel="stylesheet" type="text/css" href="styles.css"/>

    <script type="text/javascript">

        $(document).ready(function() {


            var data = [

                { name: "Astor", product: "astor", stocklevel: "10", price: 2.99},

                { name: "Daffodil", product: "daffodil", stocklevel: "12", price: 1.99},

                { name: "Rose", product: "rose", stocklevel: "2", price: 4.99},

                { name: "Peony", product: "peony", stocklevel: "0", price: 1.50},

                { name: "Primula", product: "primula", stocklevel: "1", price: 3.12},

                { name: "Snowdrop", product: "snowdrop", stocklevel: "15", price: 0.99},

            ];


            $('#flowerTmpl').tmpl(data).appendTo('#row1'),


        });

    </script>

    <script id="flowerTmpl" type="text/x-jquery-tmpl">

        <div class="dcell">

            <img src="${product}.png"/>

            <label for="${product}">${name}:</label>

            <input name="${product}" data-price="${price}" data-stock="${stocklevel}"

                value="0" required />

        </div>

    </script>

</head>

<body>

    <h1>Jacqui's Flower Shop</h1>

    <form method="post">

        <div id="oblock">

            <div class="dtable">

                <div id="row1" class="drow"></div>

                <div id="row2"class="drow"></div>

            </div>

        </div>

        <div id="buttonDiv"><button type="submit">Place Order</button></div>

    </form>

</body>

</html>
In the sections that follow, I'll break down the example and explain each part. When the data is part of the document, it is known as inline data. The alternative is remote data, which is where you get the data from a server separately from the document. I'll demonstrate remote data later in the chapter, but it touches upon the jQuery support for Ajax, which is the topic of Chapters 14 and 15.
Defining the Data
The starting point for the example is the data, which in this case is an array of objects, each of which describes a single flower product. Listing 12-4 shows the relevant statements from the document.
Listing 12-4. Defining the Flower Data
...

var data = [

    { name: "Astor", product: "astor", stocklevel: "10", price: 2.99},

    { name: "Daffodil", product: "daffodil", stocklevel: "12", price: 1.99},

    { name: "Rose", product: "rose", stocklevel: "2", price: 4.99},

    { name: "Peony", product: "peony", stocklevel: "0", price: 1.50},

    { name: "Primula", product: "primula", stocklevel: "1", price: 3.12},

    { name: "Snowdrop", product: "snowdrop", stocklevel: "15", price: 0.99},

];

...
You express your data as one or more JavaScript objects. The jQuery template library is very flexible about the kind of objects that can be used as data, but the format shown in the template is the most commonly used because it corresponds to the JSON data format, which I explain in Chapter 14.
![]() Tip JSON is important is because it is often used with Ajax, which I explain in Chapters 14 and 15.
Tip JSON is important is because it is often used with Ajax, which I explain in Chapters 14 and 15.
For this example, the array contains six objects, each of which has a set of properties that describe a flower shop product: the display name, the product name, the stock level, and the price.
Defining the Template
As you might imagine, at the heart of the data template library is the data template. This is a set of HTML elements containing placeholders that correspond to aspects of the data objects. Listing 12-5 shows the template for this example.
Listing 12-5. Defining the Data Template
...

<script id="flowerTmpl" type="text/x-jquery-tmpl">

    <div class="dcell">

        <img src="${product}.png"/>

        <label for="${product}">${name}:</label>

        <input name="${product}" data-price="${price}" data-stock="${stocklevel}"

            value="0" required />

    </div>

</script>

...
The first thing to note about the template is that it is contained within a script element with a type attribute value of text/x-jquery-tmpl. The reason you do this is to stop the browser from interpreting the contents of the template as regular HTML. It is not essential, but it is very good practice and avoids a lot of potential problems.
The second thing to note is that when you define a template in a script element, you assign a name to the template using the id attribute. In this case, the template is called flowerTmpl. You need to know the name of the template when you apply it to your data.
The contents of the template will be applied to the objects in the data array in order to produce a set of HTML elements for each and every object. You can see that the structure of the template corresponds to the set of elements that I have used for the flower products in previous chapters. The key difference, of course, is the sections I have emphasized in the listings. These are the data placeholders.
When the template library processes the template, it replaces any data placeholders with the value of the property from the object being dealt with. So, for example, for the first object in the array, the template library will encounter the ${product} placeholder and replace it with the value of the product property, which is astor. So, this part of the template:
<img src="${product}.png"/>
is transformed into this:
<img src="astor.png"/>
Inserting data values is only one of the things you can do with a template. I'll explain the others later in the chapter.
Applying the Template
We bring the template together using the tmpl method. This allows you to specify the data you want to use and the template that should be applied to it. Listing 12-6 shows the use of this method in the listing.
Listing 12-6. Applying the Data Template
...

$('#flowerTmpl').tmpl(data).appendTo('#row1'),

...
You use the jQuery $ function to select the element that contains the template and then call the tmpl method on the result, passing in the data that you want to be processed as the method argument.
The tmpl method returns a standard jQuery object that contains the elements produced from the template. In this case, I end up with a set of div elements, each of which contains an img, label, and input element that has been tailored for one of the objects in my data array. I use the appendTo method to insert the complete set as children to the row1 element. You can see the result in Figure 12-2.
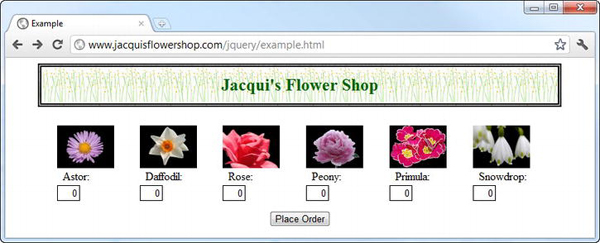
Figure 12-2. Using data templates
Tweaking the Result
You don't quite get the desired result because all of the products are in a single line. But, since you are dealing with a jQuery object, you can slice and dice the elements as you usually would. Listing 12-7 shows how you can do this by operating on the tmpl method result.
Listing 12-7. Processing the Results from a Template
...

<script type="text/javascript">

    $(document).ready(function() {


    var data = [

        { name: "Astor", product: "astor", stocklevel: "10", price: 2.99},

        { name: "Daffodil", product: "daffodil", stocklevel: "12", price: 1.99},

        { name: "Rose", product: "rose", stocklevel: "2", price: 4.99},

        { name: "Peony", product: "peony", stocklevel: "0", price: 1.50},

        { name: "Primula", product: "primula", stocklevel: "1", price: 3.12},

        { name: "Snowdrop", product: "snowdrop", stocklevel: "15", price: 0.99},

    ];


    $('#flowerTmpl').tmpl(data)

        .slice(0, 3).appendTo('#row1').end().end().slice(3).appendTo("#row2");


    });

</script>

<script id="flowerTmpl" type="text/x-jquery-tmpl">

    <div class="dcell">

        <img src="${product}.png"/>

        <label for="${product}">${name}:</label>

        <input name="${product}" data-price="${price}" data-stock="${stocklevel}"
            value="0" required />

    </div>

</script>

...
In this example, I use the slice and end methods to narrow and broaden the selection and the appendTo method to add subsets of the elements generated from the template to different rows.
Notice that I have to call the end method twice in succession to unwind the narrowing caused by the slide and appendTo methods. This is perfectly functional, and I generally like using the end method to create single-statement operations, but I find the end().end() sequence dislikable. Instead, I would usually break down the steps into separate operations, as shown in Listing 12-8.
Listing 12-8. Splitting the Elements Using Multiple Statements
...

var templResult = $('#flowerTmpl').tmpl(data);

templResult.slice(0, 3).appendTo('#row1'),

templResult.slice(3).appendTo("#row2"); ;

...
Either way, you get the same result, which is that the products are broken into two rows, each containing three flowers, as shown in Figure 12-3.
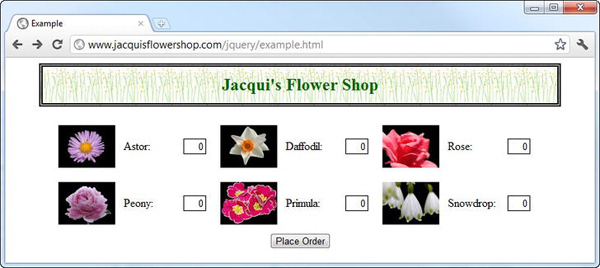
Figure 12-3. Tweaking the result to suit the layout
Tweaking the Input
The other approach you can take is to adjust the data that you pass to the tmpl method. Listing 12-9 shows how this can be done.
Listing 12-9. Using the Data to Adjust the Output from the Template
...

<script type="text/javascript">

    $(document).ready(function() {


        var data = [

            { name: "Astor", product: "astor", stocklevel: "10", price: 2.99},

            { name: "Daffodil", product: "daffodil", stocklevel: "12", price: 1.99},

            { name: "Rose", product: "rose", stocklevel: "2", price: 4.99},

            { name: "Peony", product: "peony", stocklevel: "0", price: 1.50},

            { name: "Primula", product: "primula", stocklevel: "1", price: 3.12},

            { name: "Snowdrop", product: "snowdrop", stocklevel: "15", price: 0.99},

        ];


        var template = $('#flowerTmpl'),

        template.tmpl(data.slice(0, 3)).appendTo("#row1");

        template.tmpl(data.slice(3)).appendTo("#row2");


    });

</script>

<script id="flowerTmpl" type="text/x-jquery-tmpl">

    <div class="dcell">

        <img src="${product}.png"/>

        <label for="${product}">${name}:</label>

        <input name="${product}" data-price="${price}" data-stock="${stocklevel}"

            value="0" required />

    </div>

</script>

...
In this script, I solved the problem of allocating flowers to rows by using the template twice—once for each row. I used the split method so that I could feed a range of data objects to the template each time. The technique is different, but the result is the same, as shown in Figure 12-2.
Evaluating Expressions
You are not limited to just the property values from the data objects. You can place JavaScript expressions between the brace characters, and the template engine will evaluate them and insert the results into the HTML produced by the template. Listing 12-10 contains an example.
Listing 12-10. Evaluating an Expression in a Template
...

<script id="flowerTmpl" type="text/x-jquery-tmpl">


    <div class="dcell">

        <img src="${product}.png"/>

        <label for="${product}">${name}:</label>

        <input name="${product}" data-price="${price}" data-stock="${stocklevel}"
            value="${stocklevel > 0 ? 1: 0}" required />

    </div>

</script>

...
In this template, I use the JavaScript ternary operator to set the value attribute of the inputelement based on the stocklevel property. I place this expression between the brace characters, just as I did when I included a property value directly. If the stocklevel property is greater than zero, then the value attribute will be set to 1; otherwise, it will be zero. You can see the effect in Figure 12-4. All of the flowers except the peony have a stocklevel value greater than zero.
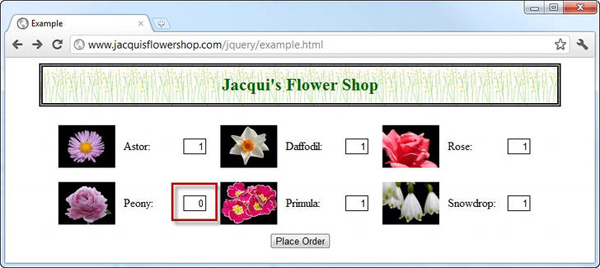
Figure 12-4. Evaluating an expression in a template
This example demonstrates the core template functionality in a nutshell: you combine data with a template to product DOM objects, which you then add to the document using core jQuery. You can use the values from the data directly or indirectly in expressions to generate content.
Using the Template Variables
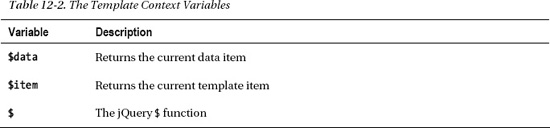
Templates are not JavaScript scripts. Any content you add to the script is assumed to be part of the template and will be added to the output when the template is used. To help make templates more flexible, you are provided with a small number of context variables that you can use within the placeholder tags. These are described in Table 12-2 and explained in the following sections.
Using the Data Variable
The $data variable returns the data item to which the template is being applied. For the example in this chapter, $data will be set to each flower object in turn. In the previous listing, I used the ternary operator in a template. This is a perfectly acceptable technique, but I find that it is easy to end up with an unreadable template, which is part of the problem you want to avoid.
I like to keep the amount of code in a template to a bare minimum, and to do this, I like to combine the $data variable with the ability to call JavaScript functions from within the template. Listing 12-11 gives a demonstration.
Listing 12-11. Using the $data Variable in a Template
...

<script type="text/javascript">

    $(document).ready(function() {


        var data = [

            { name: "Astor", product: "astor", stocklevel: "10", price: 2.99},

            { name: "Daffodil", product: "daffodil", stocklevel: "12", price: 1.99},

            { name: "Rose", product: "rose", stocklevel: "2", price: 4.99},

            { name: "Peony", product: "peony", stocklevel: "0", price: 1.50},

            { name: "Primula", product: "primula", stocklevel: "1", price: 3.12},

            { name: "Snowdrop", product: "snowdrop", stocklevel: "15", price: 0.99},

        ];


        var template = $('#flowerTmpl'),

        template.tmpl(data.slice(0, 3)).appendTo("#row1");

        template.tmpl(data.slice(3)).appendTo("#row2");


    });


    function stockDisplay(product) {

        return product.stocklevel > 0 ? 1 : 0;

    }


</script>

<script id="flowerTmpl" type="text/x-jquery-tmpl">

    <div class="dcell">

        <img src="${product}.png"/>

        <label for="${product}">${name}:</label>

        <input name="${product}" data-price="${price}" data-stock="${stocklevel}"

            value="${stockDisplay($data)}" required />

    </div>

</script>

...
In this example, I have defined a function called stockDisplay that produces the value that should be shown in the input element. The argument to the function is a data object, which I obtain within the template using the $data variable. For a simple ternary expression, the difference in legibility is minor, but you can imagine the difference for more complex expressions or where an expression is used several times in the same template.
![]() Caution You must be careful where you define functions that will be called from a template. More specifically, the function must have been defined before the
Caution You must be careful where you define functions that will be called from a template. More specifically, the function must have been defined before the tmpl method is called. I tend to place these functions at the end of my script element, but if you want them inside your handler for the ready event, then make sure that the function is defined early. Equally, a common mistake is to define the function inside the template.
Using the jQuery $ Function in a Template
You can use the jQuery $ function in a template placeholder, but it is important to bear in mind that the elements that you are generating through the template are not yet attached to the document, so your jQuery selections won't reflect them. I rarely use this feature because my interest usually lies with the elements I am generating and the data behind them, but Listing 12-12 contains a simple demonstration.
Listing 12-12. Using the jQuery $ Function in a Template
...

<script type="text/javascript">

    $(document).ready(function() {


        $("<h2>Today's special offer: <span id=offer data-discount='0.50'>"

            + "50 cents off</span></h2>")

            .insertAfter('h1')

            .css({ color: "red", fontSize: "14pt", textAlign: "center" });


        var data = [

            { name: "Astor", product: "astor", stocklevel: "10", price: 2.99},

            { name: "Daffodil", product: "daffodil", stocklevel: "12", price: 1.99},

            { name: "Rose", product: "rose", stocklevel: "2", price: 4.99},

            { name: "Peony", product: "peony", stocklevel: "0", price: 1.50},

            { name: "Primula", product: "primula", stocklevel: "1", price: 3.12},

            { name: "Snowdrop", product: "snowdrop", stocklevel: "15", price: 0.99},

        ];


        var template = $('#flowerTmpl'),

        template.tmpl(data.slice(0, 3)).appendTo("#row1");

        template.tmpl(data.slice(3)).appendTo("#row2");


    });


    function stockDisplay(product) {

        return product.stocklevel > 0 ? 1 : 0;

    }

</script>

<script id="flowerTmpl" type="text/x-jquery-tmpl">

    <div class="dcell">

        <img src="${product}.png"/>

        <label for="${product}">${name}:</label>
        <input name="${product}" data-price="${price - $('#offer').data('discount')}"

            data-stock="${stocklevel}" value="${stockDisplay($data)}" required />

    </div>

</script>

...
In this example, I have added an h2 element to the document that contains a span element, and the data-discount attribute on this element defines the discount that should be applied to the product prices. In the template, I use the jQuery $ function to locate the span element and the data method to read the value of the attribute (the data method is explained in Chapter 8). When the template is used to generate elements, the price specified in each data object is reduced by the discount amount.
I have included this example for completeness, but there is a lot about it that I don't like. First, using the $ function this way means I am searching the document for the span element for every data object that I process, which is a needless overhead. Second, I am back to including code in my template, which I'd much rather avoid. Third, handling this in a function would allow me to abstract the way in which the price is determined from the template. Still, all that said, you do have access to the $ function from within templates, and that may suit your coding style more than it does mine.
Using the Template Variable
The object returned by the $item variable performs several functions, which I'll explain as you go through the chapter. The first function is to provide you with a means of passing additional data between your jQuery script and the template. Listing 12-13 provides a demonstration. For details of other uses of this object, see the “Manipulating Templates from Event Handler Functions” section later in the chapter.
Listing 12-13. Passing Options to the Template via the $item Variable
...

<script type="text/javascript">

    $(document).ready(function() {


        $("<h2>Today's special offer: <span id=offer data-discount='0.50'>"

            + "50 cents off</span></h2>")

            .insertAfter('h1')

            .css({ color: "red", fontSize: "14pt", textAlign: "center" });


        var data = [

            { name: "Astor", product: "astor", stocklevel: "10", price: 2.99},

            { name: "Daffodil", product: "daffodil", stocklevel: "12", price: 1.99},

            { name: "Rose", product: "rose", stocklevel: "2", price: 4.99},

            { name: "Peony", product: "peony", stocklevel: "0", price: 1.50},

            { name: "Primula", product: "primula", stocklevel: "1", price: 3.12},

            { name: "Snowdrop", product: "snowdrop", stocklevel: "15", price: 0.99},

        ];


        var options = {

            discount: $('#offer').data('discount'),

            stockDisplay: function(product) {

                return product.stocklevel > 0 ? 1 : 0;
            }

        };

        var template = $('#flowerTmpl'),

        template.tmpl(data.slice(0, 3), options).appendTo("#row1");

        template.tmpl(data.slice(3), options).appendTo("#row2");


    });


</script>

<script id="flowerTmpl" type="text/x-jquery-tmpl">

    <div class="dcell">

        <img src="${product}.png"/>

        <label for="${product}">${name}:</label>

        <input name="${product}" data-price="${price - $item.discount}"

            data-stock="${stocklevel}" value="${$item.stockDisplay($data)}" required />

    </div>

</script>

...
In this example, I create an object called options and define a property (discount) and a method (stockDisplay). I then pass this object as the second argument to the tmpl method. The properties and methods of the object are available through the $item variable in the template. So, when I want to read the value of the discount property, I do the following:
${price - $item.discount}
and when I want to call the stockDisplay function, I do this:
${$item.stockDisplay($data)}
You can see how I have used the discount property in the options object to tidy up the discount level that I previously obtained through the jQuery $ function. Not only do I like this code style better, but I search the document only once for the span element.
![]() Tip Once again, notice how I refer to the template variables with the
Tip Once again, notice how I refer to the template variables with the $ prefix: $item and $data. Also notice how the whole thing is wrapped in the ${…} sequence that you started the chapter with. A common mistake is to omit one or other of the dollar signs.
Using Nested Templates
When building complex applications, it can be helpful to break down the overall template into smaller sections and compose them at runtime. As you'll see in later sections of this chapter, by composing templates in this way, you can get some finely tuned output. To start with the basics, Listing 12-14 shows how you can refer to one template from another.
Listing 12-14. Nesting Templates
...

<script type="text/javascript">

    $(document).ready(function() {


        $("<h2>Today's special offer: <span id=offer data-discount='0.50'>"

            + "50 cents off</span></h2>")

            .insertAfter('h1')

            .css({ color: "red", fontSize: "14pt", textAlign: "center" });


        var data = [

            { name: "Astor", product: "astor", stocklevel: "10", price: 2.99},

            { name: "Daffodil", product: "daffodil", stocklevel: "12", price: 1.99},

            { name: "Rose", product: "rose", stocklevel: "2", price: 4.99},

            { name: "Peony", product: "peony", stocklevel: "0", price: 1.50},

            { name: "Primula", product: "primula", stocklevel: "1", price: 3.12},

            { name: "Snowdrop", product: "snowdrop", stocklevel: "15", price: 0.99},

        ];


        var options = {

            discount: $('#offer').data('discount'),

            stockDisplay: function(product) {

                return product.stocklevel > 0 ? 1 : 0;

            }

        }

        var template = $('#flowerTmpl'),

        template.tmpl(data.slice(0, 3), options).appendTo("#row1");

        template.tmpl(data.slice(3), options).appendTo("#row2");

    });


</script>

<script id="flowerTmpl" type="text/x-jquery-tmpl">

    <div class="dcell">

        <img src="${product}.png"/>

        <label for="${product}">${name}:</label>

        {{tmpl($data, $item) "#inputTmpl"}}

    </div>

</script>

<script id="inputTmpl" type="text/x-jquery-tmpl">

   <input name="${product}" data-price="${price - $item.discount}"

            data-stock="${stocklevel}" value="${$item.stockDisplay($data)}" required />

</script>

...
I have split the template into two in this example. The first template, flowerTmpl, is called for each item in the data array. This template calls the inputTmpl template in order to create the input element. You call another template using the {{tmpl}} tag, like this:
{{tmpl($data, $item) "#inputTmpl"}}
There are three arguments when using the {{tmpl}} tag. The first two are the data item to process and the options object, and these are placed in parentheses, as shown. The third argument is the template to use. This can be expressed as a selector (as I have done) or accessed via a variable or a function defined in a script.
Using Nested Templates on Arrays
If you pass a single value or object to a nested template, then the specified template is used just once, as in the previous example. However, if you pass an array of objects, then the template is used to generate elements for each item in the array, as shown in Listing 12-15.
Listing 12-15. Using a Nested Template on an Arrays
...

<script type="text/javascript">

    $(document).ready(function() {


        var data = [

            {

            rowid: "row1",

            flowers:

                [{ name: "Astor", product: "astor", stocklevel: "10", price: 2.99},

                { name: "Daffodil", product: "daffodil", stocklevel: "12", price: 1.99},

                { name: "Rose", product: "rose", stocklevel: "2", price: 4.99}]

            },

            {

            rowid: "row2",

            flowers:

                [{ name: "Peony", product: "peony", stocklevel: "0", price: 1.50},

                { name: "Primula", product: "primula", stocklevel: "1", price: 3.12},

                { name: "Snowdrop", product: "snowdrop", stocklevel: "15", price: 0.99}]

            }

        ];


        $('div.drow').remove();

        $('#rowTmpl').tmpl(data).appendTo('div.dtable'),

    });


</script>

<script id="flowerTmpl" type="text/x-jquery-tmpl">

    <div class="dcell">

        <img src="${product}.png"/>

        <label for="${product}">${name}:</label>

        <input name="${product}" data-price="${price}"

            data-stock="${stocklevel}" value="${stocklevel}" required />

    </div>

</script>

<script id="rowTmpl" type="text/x-jquery-tmpl">

    <div id="${rowid}" class="drow">

        {{tmpl($data.flowers) '#flowerTmpl'}}
    </div>

</script>

...
To demonstrate this feature, I have refactored the data object so that it is an array that contains two objects. Each of these objects defines an rowid to be used as a row identifier and an array of three object representing flower products.
I remove the row-level div elements from the document and then use the rowTmpl template to process the data. This template generates a replacement row-level div for my CSS table-style layout and then uses the {{tmpl}} tag to process the array of flower objects, as follows:
<script id="rowTmpl" type="text/x-jquery-tmpl">

    <div id="${rowid}" class="drow">

        {{tmpl($data.flowers) '#flowerTmpl'}}

    </div>

</script>
Even though I have invoked the template only once, the template engine uses it to generate elements for every item in the array, which means that I end up with a cell-level element for each flower.
You might reasonably object to structuring the data to match the intended layout, so Listing 12-16 shows how you can slice and dice the original data format to get the same effect (because it is rare that data comes in a perfect format for immediate display).
Listing 12-16. Refactoring the Inline Data to Use Nested Templates
...

<script type="text/javascript">

    $(document).ready(function() {


        var originalData = [

            { name: "Astor", product: "astor", stocklevel: "10", price: 2.99},

            { name: "Daffodil", product: "daffodil", stocklevel: "12", price: 1.99},

            { name: "Rose", product: "rose", stocklevel: "2", price: 4.99},

            { name: "Peony", product: "peony", stocklevel: "0", price: 1.50},

            { name: "Primula", product: "primula", stocklevel: "1", price: 3.12},

            { name: "Snowdrop", product: "snowdrop", stocklevel: "15", price: 0.99},

        ];


        var itemsPerRow = 4;

        var slicedData = [];


        for (var i = 0, j = 0; i < originalData.length; i+= itemsPerRow, j++) {

            slicedData.push({

                rowid: "row" + j,

                flowers: originalData.slice(i, i + itemsPerRow)

            });

        }


        $('div.drow').remove();

        $('#rowTmpl').tmpl(slicedData).appendTo('div.dtable'),

    });
</script>

<script id="flowerTmpl" type="text/x-jquery-tmpl">

    <div class="dcell">

        <img src="${product}.png"/>

        <label for="${product}">${name}:</label>

        <input name="${product}" data-price="${price}"

            data-stock="${stocklevel}" value="${stocklevel}" required />

    </div>

</script>

<script id="rowTmpl" type="text/x-jquery-tmpl">

    <div id="${rowid}" class="drow">

        {{tmpl($data.flowers) '#flowerTmpl'}}

    </div>

</script>

...
In this example, I allocate the elements to rows using a for loop and then pass the formatted data object to the tmpl method. The number of items per row is determined by the value of the itemsPerRow variable, which I have set to 4 in this example. You can see the result in Figure 12-5.
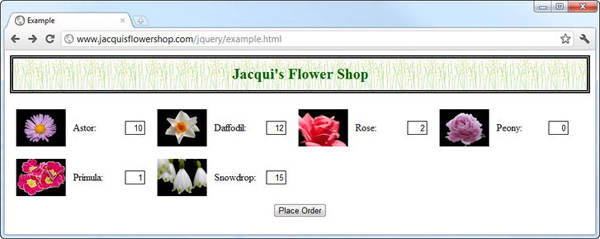
Figure 12-5. Formatting data to suit the templates
To an extent, I am simply pushing the complexity around the document. I either format the data or accept a more complex template. To my mind, this is unavoidable because the template engine can do only so much to help us. The correct balance between code complexity and template complexity will depend on the data format you are working with. My advice is to play around and try different approaches until you arrive at something that you can live with, that other people can understand, and that you are confident you can maintain in the future.
Using Conditional Templates
The template engine allows you to determine which portions of the template are used dynamically, based on a condition. You do this using the {{if}} and {{/if}} tags, as shown in Listing 12-17.
Listing 12-17. Selecting Parts of the Template Based on a Condition
...

<script type="text/javascript">

    $(document).ready(function() {


        var originalData = [

            { name: "Astor", product: "astor", stocklevel: "10", price: 2.99},

            { name: "Daffodil", product: "daffodil", stocklevel: "12", price: 1.99},

            { name: "Rose", product: "rose", stocklevel: "2", price: 4.99},

            { name: "Peony", product: "peony", stocklevel: "0", price: 1.50},

            { name: "Primula", product: "primula", stocklevel: "1", price: 3.12},

            { name: "Snowdrop", product: "snowdrop", stocklevel: "15", price: 0.99},

        ];


        var itemsPerRow = 3;

        var slicedData = [];


        for (var i = 0, j = 0; i < originalData.length; i+= itemsPerRow, j++) {

            slicedData.push({

                rowid: "row" + j,

                flowers: originalData.slice(i, i + itemsPerRow)

            });

        }


        $('div.drow').remove();

        $('#rowTmpl').tmpl(slicedData).appendTo('div.dtable'),

    });


</script>

<script id="flowerTmpl" type="text/x-jquery-tmpl">

    {{if stocklevel > 0}}

        <div class="dcell">

            <img src="${product}.png"/>

            <label for="${product}">${name}:</label>

            <input name="${product}" data-price="${price}"

                data-stock="${stocklevel}" value="${stocklevel}" required />

        </div>

    {{/if}}

</script>

<script id="rowTmpl" type="text/x-jquery-tmpl">

    <div id="${rowid}" class="drow">

        {{tmpl($data.flowers) '#flowerTmpl'}}

    </div>

</script>

...
You specify a condition in the {{if}} tag, and if the condition evaluates to true, then the portion of the template until the {{/if}} tag is used. If the condition is false, then that part of the template is skipped. In this example, I check the value of the stocklevel property and skip the entire flowerTmpl template if the value is zero. This means the flower shop displays only those products that are in stock, as shown in Figure 12-6.
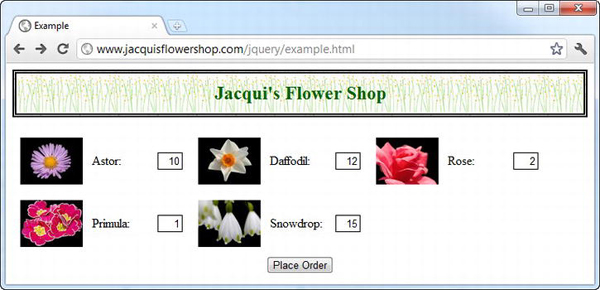
Figure 12-6. Rendering the template for in-stock items only
You can create more complex conditions by adding the {{else}} tag, which lets you define a region of the template that will be used if the condition specified by the {{if}} tag evaluates as false. Listing 12-18 gives an example.
Listing 12-18. Using the {{else}} Tag
...

<script type="text/javascript">

    $(document).ready(function() {


        var originalData = [

            { name: "Astor", product: "astor", stocklevel: "10", price: 2.99},

            { name: "Daffodil", product: "daffodil", stocklevel: "12", price: 1.99},

            { name: "Rose", product: "rose", stocklevel: "2", price: 4.99},

            { name: "Peony", product: "peony", stocklevel: "0", price: 1.50},

            { name: "Primula", product: "primula", stocklevel: "1", price: 3.12},

            { name: "Snowdrop", product: "snowdrop", stocklevel: "15", price: 0.99},

        ];


        var itemsPerRow = 3;

        var slicedData = [];


        for (var i = 0, j = 0; i < originalData.length; i+= itemsPerRow, j++) {

            slicedData.push({

                rowid: "row" + j,

                flowers: originalData.slice(i, i + itemsPerRow)

            });

        }


        $('div.drow').remove();

        $('#rowTmpl').tmpl(slicedData).appendTo('div.dtable'),
    });


</script>

<script id="flowerTmpl" type="text/x-jquery-tmpl">

    {{if stocklevel > 0}}

        <div class="dcell">

            <img src="${product}.png"/>

            <label for="${product}">${name}:</label>

            <input name="${product}" data-price="${price}"

                data-stock="${stocklevel}" value="${stocklevel}" required />

        </div>

    {{else}}

         <div class="dcell">

            <img src="${product}.png" style="opacity:0.5"/>

            <span style="color: grey">${name} (No stock)</span>

        </div>

    {{/if}}

</script>

<script id="rowTmpl" type="text/x-jquery-tmpl">

    <div id="${rowid}" class="drow">

        {{tmpl($data.flowers) '#flowerTmpl'}}

    </div>

</script>

...
In this example, I display one set of elements for products that are in stock and another set of elements for those that are out of stock. You can go further and put a condition in the {{else}} tag to create the equivalent of an else…if condition, as shown in Listing 12-19.
Listing 12-19. Applying a Condition to an {{else}} Tag
...

<script id="flowerTmpl" type="text/x-jquery-tmpl">

    {{if stocklevel > 5}}

        <div class="dcell">

            <img src="${product}.png"/>

            <label for="${product}">${name}:</label>

            <input name="${product}" data-price="${price}"

                data-stock="${stocklevel}" value="${stocklevel}" required />

        </div>

    {{else stocklevel > 0}}

        <div class="dcell">

            <img src="${product}.png"/>

            <label style="color:red" for="${product}">${name}: (Low Stock)</label>

            <input name="${product}" data-price="${price}"

                data-stock="${stocklevel}" value="${stocklevel}" required />

        </div>

    {{else}}

         <div class="dcell">

            <img src="${product}.png" style="opacity:0.5"/>

            <span style="color: grey">${name} (No stock)</span>

        </div>
    {{/if}}

</script>

...
In this script, I display different sets of elements for the products for which you have more than five items in stock—those products with less stock and those with none at all. I have only slightly differentiated the elements generated for each condition, but you can use this feature to produce completely different content. And, of course, you can make a call to other templates as required. You can see the effect of this script in Figure 12-7.

Figure 12-7. Using conditional statements in templates
Controlling Iteration Over Arrays
The {{each}} template tag lets you exert control over how arrays of data items are processed in a template. This is an alternative approach to using calls to nested templates, which I showed you earlier in the chapter. Listing 12-20 shows how the {{each}} tag is used.
Listing 12-20. Using the {{each}} Template Tag
...

<script type="text/javascript">

    $(document).ready(function() {


        var originalData = [

            { name: "Astor", product: "astor", stocklevel: "10", price: 2.99},

            { name: "Daffodil", product: "daffodil", stocklevel: "12", price: 1.99},

            { name: "Rose", product: "rose", stocklevel: "2", price: 4.99},

            { name: "Peony", product: "peony", stocklevel: "0", price: 1.50},

            { name: "Primula", product: "primula", stocklevel: "1", price: 3.12},

            { name: "Snowdrop", product: "snowdrop", stocklevel: "15", price: 0.99},
        ];


        var itemsPerRow = 3;

        var slicedData = [];


        for (var i = 0, j = 0; i < originalData.length; i+= itemsPerRow, j++) {

            slicedData.push({

                rowid: "row" + j,

                flowers: originalData.slice(i, i + itemsPerRow)

            });

        }


        $('div.drow').remove();

        $('#flowerTmpl').tmpl(slicedData).appendTo('div.dtable'),

    });


    function stockDisplay(product) {

        return product.stocklevel > 0 ? 1 : 0;

    }


</script>

<script id="flowerTmpl" type="text/x-jquery-tmpl">

    <div id="${rowid}" class="drow">

        {{each flowers}}

            <div class="dcell">

                <img src="${product}.png"/>

                <label for="${product}">${$index} ${name}: </label>

                <input name="${product}" value="${stockDisplay($value)}" required />

            </div>

        {{/each}}

    </div>

</script>

...
The content between the {{each}} and {{/each}} tags is rendered once for each item in the specified array. Within the {{each}} and {{/each}} tags, you can refer to individual properties as you would normally. You can refer to the current item in the array using the $value variable and the index of the current item using the $index variable.
![]() Tip You can specify different names for
Tip You can specify different names for $index and $value by providing arguments to the {{each}} tag. For example, if you wanted $i instead of $index and $v instead of $value, you would write {{each($i, $v) flowers}}.
Iterating Over the Result of an Expression
If you provide an expression to the {{each}} tag, then the content up until {{/each}} will be rendered once for each item in the expression result. Listing 12-21 shows this technique, where I filter the set of data items to remove those that are low or out of stock.
Listing 12-21. Using an Expression with the {{each tag}}
...

<script type="text/javascript">

    $(document).ready(function() {


        var originalData = [

            { name: "Astor", product: "astor", stocklevel: "10", price: 2.99},

            { name: "Daffodil", product: "daffodil", stocklevel: "12", price: 1.99},

            { name: "Rose", product: "rose", stocklevel: "2", price: 4.99},

            { name: "Peony", product: "peony", stocklevel: "0", price: 1.50},

            { name: "Primula", product: "primula", stocklevel: "1", price: 3.12},

            { name: "Snowdrop", product: "snowdrop", stocklevel: "15", price: 0.99},

        ];


        var itemsPerRow = 3;

        var slicedData = [];


        for (var i = 0, j = 0; i < originalData.length; i+= itemsPerRow, j++) {

            slicedData.push({

                rowid: "row" + j,

                flowers: originalData.slice(i, i + itemsPerRow)

            });

        }


        $('div.drow').remove();

        $('#flowerTmpl').tmpl(slicedData).appendTo('div.dtable'),

    });


    function stockDisplay(product) {

        return product.stocklevel > 0 ? 1 : 0;

    }


    function filterLowStock(flowers) {

        var result = [];

        for (var i = 0; i < flowers.length; i++) {

            if (flowers[i].stocklevel > 2) { result.push(flowers[i]) }

        }

        return result;

    }

</script>

<script id="flowerTmpl" type="text/x-jquery-tmpl">

    <div id="${rowid}" class="drow">

        {{each filterLowStock(flowers)}}

            <div class="dcell">
                <img src="${product}.png"/>

                <label for="${product}">${name}: </label>

                <input name="${product}" value="${stockDisplay($value)}" required />

            </div>

        {{/each}}

    </div>

</script>

...
I call the filterLowStock function from the {{each}} tag, which limits the number of items that are iterated over. You can see the result in Figure 12-8.
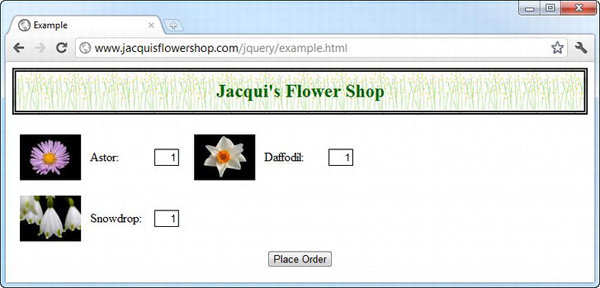
Figure 12-8. Using an expression with an {{each}} tag
Disabling HTML Encoding
By default, the template engine encodes the values that you insert into a template to make them safe to display in a web page. This means characters such as < and > are replaced or encoded so that they are not interpreted as denoting an HTML element. This is usually useful, but if you are dealing with data that contains HTML markup, then it causes a problem. Listing 12-22 provides a demonstration.
Listing 12-22. Working with Data That Contains HTML Markup
...

<script type="text/javascript">

    $(document).ready(function() {


        var data = [

            { name: "Astor", product: "astor", elem: "<img src=astor.png/>"},

            { name: "Daffodil", product: "daffodil", elem: "<img src=daffodil.png/>"},

            { name: "Rose", product: "rose", elem: "<img src=rose.png/>"},
            { name: "Peony", product: "peony", elem: "<img src=peony.png/>" },

            { name: "Primula", product: "primula", elem: "<img src=primula.png/>" },

            { name: "Snowdrop", product: "snowdrop", elem: "<img src=snowdrop.png/>" },

        ];


        var templResult = $('#flowerTmpl').tmpl(data);

        templResult.slice(0, 3).appendTo('#row1'),

        templResult.slice(3).appendTo("#row2"); ;

    });

</script>

<script id="flowerTmpl" type="text/x-jquery-tmpl">

    <div class="dcell">

        ${elem}

        <label for="${product}">${name}: </label>

        <input name="${product}" value="0" required />

    </div>

</script>

...
In this example, each data item contains a property whose value is the HTML element that displays an image for the product. In the template, I display the content of this property by referring to the property name, ${elem}. You can see the issue in Figure 12-9.
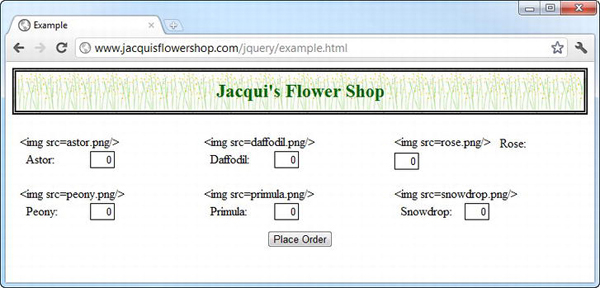
Figure 12-9. The effect of encoding HTML content from a data object
You can avoid this problem by using the {{html}} tag, which tells the template engine that the content you are working with should be displayed as is. Listing 12-23 shows the application of this tag.
![]() Caution Use this tag carefully and never trust content that has been submitted by users. It is very easy for malicious content to be injected into your page, including scripts that can override the event handlers of your own code.
Caution Use this tag carefully and never trust content that has been submitted by users. It is very easy for malicious content to be injected into your page, including scripts that can override the event handlers of your own code.
Listing 12-23. Using the {{html}} Tag
...

<script id="flowerTmpl" type="text/x-jquery-tmpl">

    <div class="dcell">

        {{html elem}}

        <label for="${product}">${name}: </label>

        <input name="${product}" value="0" required />

    </div>

</script>

...
You use the {{html}} tag with the value that you want to insert into the template, and the encoding sequence is skipped.
![]() Caution I'm not kidding. Be careful about the data that you insert into the template using this tag. It can be incredibly dangerous if you cannot guarantee that the data is absolutely benign. Don't forget that your own colleagues might be capable of malicious modifications, especially that weird guy in the operations team. He's never liked you. He's probably plotting to get at your data even now. Trust no one.
Caution I'm not kidding. Be careful about the data that you insert into the template using this tag. It can be incredibly dangerous if you cannot guarantee that the data is absolutely benign. Don't forget that your own colleagues might be capable of malicious modifications, especially that weird guy in the operations team. He's never liked you. He's probably plotting to get at your data even now. Trust no one.
Manipulating Templates from Event Handler Functions
You can go back to the template that was used to create an element and make changes. You can change the template, change the data or options that were used to generate the template, or even modify the elements that were generated by the template the first time around. The most common reason for doing this is to change part of the document in response to a user action, which means you are usually performing these tasks from within an event handler function, as demonstrated by Listing 12-24.
Listing 12-24. Changing the Template Used to Render a Data Item
...

<style type="text/css">

    .bigview {

        border: medium solid black;

        position: relative;

        top: -10px;

        left: -10px;

        background-color: white;
    }

    .bigview > img {

        width: 160px;

        height: 120px;

    }

</style>

<script type="text/javascript">

    $(document).ready(function() {


        var data = [

            { name: "Astor", product: "astor", stocklevel: "10", price: "2.99"},

            { name: "Daffodil", product: "daffodil", stocklevel: "12", price: "1.99"},

            { name: "Rose", product: "rose", stocklevel: "2", price: "4.99"},

            { name: "Peony", product: "peony", stocklevel: "0", price: "1.50"},

            { name: "Primula", product: "primula", stocklevel: "1", price: "3.12"},

            { name: "Snowdrop", product: "snowdrop", stocklevel: "15", price: "0.99"},

        ];


        var templResult = $('#flowerTmpl').tmpl(data);

        templResult.slice(0, 3).appendTo('#row1'),

        templResult.slice(3).appendTo("#row2"); ;


        $('div.dcell').mouseenter(handleMouse);


        function handleMouse(e) {

            var tmplItem = $.tmplItem(this);

            var template = e.type == "mouseenter" ? "#flowerTmplSel" : "#flowerTmpl";

            tmplItem.tmpl = $(template).template();

            tmplItem.update();

            $('div.dcell').unbind()

                .bind(e.type == "mouseenter" ? "mouseleave" : "mouseenter", handleMouse);

        }

    });

</script>

<script id="flowerTmpl" type="text/x-jquery-tmpl">

    <div class="dcell">

        <img src="${product}.png"/>

        <label for="${product}">${name}: </label>

        <input name="${product}" value="0" required />

    </div>

</script>

<script id="flowerTmplSel" type="text/x-jquery-tmpl">

    <div class="dcell bigview">

        <img src="${product}.png"/>

        {{if $data.stocklevel > 0}}

            Stock: ${stocklevel} Price: $${price}

        {{else}}

            (Out of stock)

        {{/if}}

    </div>

</script>

...
This example required a detailed explanation. There is a surprising amount going on and some potential problems for the unwary. The baseline of this example is pretty simple. You have an inline data object that is rendered using the flowerTmpl template.
After rendering the content, I use the mouseenter method to register the handleMouse function as a handler for the elements that match the div.dcell elements. These are the top-level elements that the template has rendered.
When the mouse enters one of these div elements, the handleMouse function is executed. The first thing I do in this function is obtain the template item associated with the element that triggered the event:
var tmplItem = $.tmplItem(this);
This is the same kind of object that you can obtain using the $item variable inside the template (as described earlier in the chapter), but the object is a lot more useful here. Table 12-3 shows the properties of the template item object.
Returning to the example, I select the template I want to use to display the selected element based on the event type. If the mouse has entered the element, then I select the flowerTmplSel template:
var template = e.type == "mouseenter" ? "#flowerTmplSel" : "#flowerTmpl";
I then use the tmpl property of the template item to associate the template with the data item:
tmplItem.tmpl = $(template).template();
In thinking about what is happening here, it helps to understand that the template engine remembers how it generated the content that you are now trying to change. It keeps a record of the data object and the template you used. This is a neat trick, and it works even when you use condition and nested templates. By using the tmpl property, I am telling the template engine that I want to use a different template to generate content for the data item that was originally used to generate the element that triggered the event you are now processing (you might need to read this sentence a couple of times to parse it properly).
When you have finished making changes, you call the update method on the template item to re-render the content using the new values (in this case, the new template):
tmplItem.update();
You can see how this new template is applied in Figure 12-10.
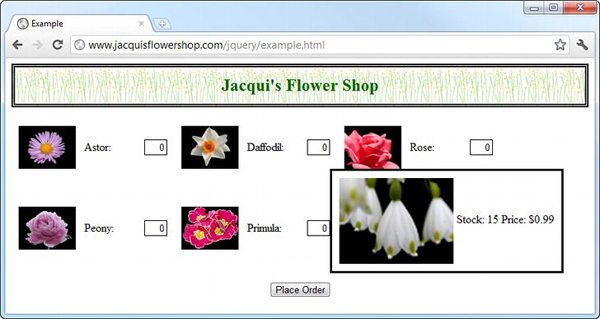
Figure 12-10. Using a different template when the mouse is over an element
The last statement in the handleMouse function is as follows:
$('div.dcell').unbind().bind(e.type == "mouseenter" ? "mouseleave" : "mouseenter",

    handleMouse);
When you change the template, the elements that were previous generated are removed from the document and replaced by those generated by the new template. This means that any event handlers are removed as well. There is an unfortunate interaction between the template library and the core jQuery library, which means that the live method (described in Chapter 9) doesn't work properly and so you must take care to add back the handlers you require.
Changing the Data Used by a Template
You can modify the data used by a template and have the template engine regenerate the elements using the new values.Listing 12-25 provides an example.
Listing 12-25. Modifying the Data Used by a Template
...

<script type="text/javascript">

    $(document).ready(function() {


        var data = [

            { name: "Astor", product: "astor", stocklevel: "10", price: "2.99"},

            { name: "Daffodil", product: "daffodil", stocklevel: "12", price: "1.99"},

            { name: "Rose", product: "rose", stocklevel: "2", price: "4.99"},

            { name: "Peony", product: "peony", stocklevel: "0", price: "1.50"},

            { name: "Primula", product: "primula", stocklevel: "1", price: "3.12"},

            { name: "Snowdrop", product: "snowdrop", stocklevel: "15", price: "0.99"},

        ];


        var templResult = $('#flowerTmpl').tmpl(data);

        templResult.slice(0, 3).appendTo('#row1'),

        templResult.slice(3).appendTo("#row2"); ;


        $('<button>Modify Data</button>').prependTo("#buttonDiv").click(function(e) {

            var item = $.tmplItem($('div.dcell').first());

            item.data.product = "orchid";

            item.data.name = "Orchid";

            item.update();

            e.preventDefault();

        });

    });

</script>

<script id="flowerTmpl" type="text/x-jquery-tmpl">

    <div class="dcell">

        <img src="${product}.png"/>

        <label for="${product}">${name}: </label>

        <input name="${product}" value="0" required />

    </div>

</script>

...
In this example, I add a button to the document. When the button is clicked, I obtain the template item for the first element that matches the div.dcell selector and then use the data property to make changes to the data objects:
var item = $.tmplItem($('div.dcell').first());

item.data.product = "orchid";

item.data.name = "Orchid";
I then call the update method to regenerate the content using the new values. You can see the effect in Figure 12-11.
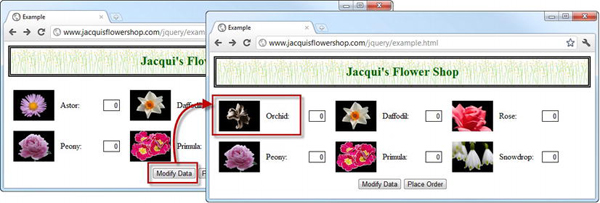
Figure 12-11. Changing the data associated with a template
If you still have a reference to the original data object, you can achieve the same effect by applying changed directly, as shown in Listing 12-26.
Listing 12-26. Changing the Values of the Data Object Directly
...

<script type="text/javascript">

    $(document).ready(function() {


        var data = [

            { name: "Astor", product: "astor", stocklevel: "10", price: "2.99"},

            { name: "Daffodil", product: "daffodil", stocklevel: "12", price: "1.99"},

            { name: "Rose", product: "rose", stocklevel: "2", price: "4.99"},

            { name: "Peony", product: "peony", stocklevel: "0", price: "1.50"},

            { name: "Primula", product: "primula", stocklevel: "1", price: "3.12"},

            { name: "Snowdrop", product: "snowdrop", stocklevel: "15", price: "0.99"},

        ];


        var templResult = $('#flowerTmpl').tmpl(data);

        templResult.slice(0, 3).appendTo('#row1'),

        templResult.slice(3).appendTo("#row2"); ;


        data[0].name = "Orchid";

        data[0].product = "orchid";


        $('<button>Modify Data</button>').prependTo("#buttonDiv").click(function(e) {

            var item = $.tmplItem($('div.dcell').first()).update();

            e.preventDefault();

        });

    });

</script>

...
Summary
In this chapter, I introduced the jQuery template library, which gives you a nice set of features for translating JavaScript data into HTML elements without getting bogged down in a mass of nasty code. Even though the status of this plugin is uncertain, it is still extremely useful and widely used, and although it is not perfect, I recommend its use because it is so very convenient and powerful.