
C H A P T E R 15
Using Ajax: Part II
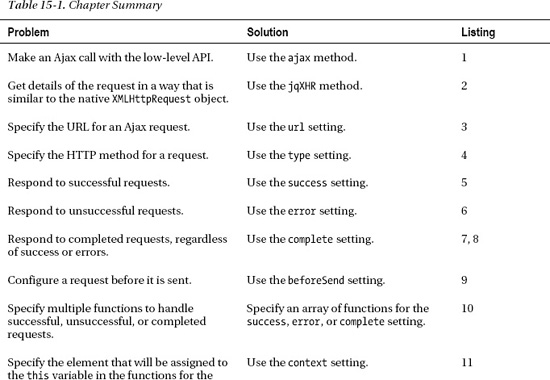
In this chapter, I show you how to use the low-level jQuery Ajax API. The term low-level implies that you are rooting around in the guts of the request, but that really isn't the case. The methods I describe in this chapter are not as convenient as those in Chapter 14, but with just a little more effort you can configure the request so that it meets your needs when the configuration used by the shorthand and convenience methods doesn't quite do the job. Table 15-1 provides the summary for this chapter.
Making a Simple Ajax Request with the Low-Level API
Making a request with the low-level API isn't much more complicated than using the shorthand and convenience methods I showed you in Chapter 14. The difference is that you can configure many different aspects of the request and get a lot more information about the request that is being performed. The method that is at the heart of the low-level API is ajax, and Listing 15-1 provides a simple demonstration of its use.
Listing 15-1. Using the ajax Method
<!DOCTYPE html>

<html>

<head>

    <title>Example</title>
    <script src="jquery-1.7.js" type="text/javascript"></script>

    <script src="jquery.tmpl.js" type="text/javascript"></script>

    <script src="jquery.validate.js" type="text/javascript"></script>

    <link rel="stylesheet" type="text/css" href="styles.css"/>

    <script type="text/javascript">

        $(document).ready(function() {

        $.ajax("mydata.json",{

                success: function(data) {

                    var template = $('#flowerTmpl'),

                    template.tmpl(data.slice(0, 3)).appendTo("#row1");

                    template.tmpl(data.slice(3)).appendTo("#row2");

                }

            });

        });

    </script>

    <script id="flowerTmpl" type="text/x-jquery-tmpl">

        <div class="dcell">

            <img src="${product}.png"/>

            <label for="${product}">${name}:</label>

            <input name="${product}" data-price="${price}" data-stock="${stocklevel}"

                value="0" required />

        </div>

    </script>

</head>

<body>

    <h1>Jacqui's Flower Shop</h1>

    <form method="post" action="http://node.jacquisflowershop.com/order">

        <div id="oblock">

            <div class="dtable">

                <div id="row1" class="drow">

                </div>

                <div id="row2"class="drow">

                </div>

            </div>

        </div>

        <div id="buttonDiv"><button type="submit">Place Order</button></div>

    </form>

</body>

</html>
You use the ajax method by passing the URL that you want to request and a map object whose properties define a set of key/value pairs, each of which configures a setting for the request.
![]() Note This chapter relies on the same
Note This chapter relies on the same Node.js script used in Chapter 14.
In this example, my object has one setting: the success setting specifies the function to call if the request is successful. In this example, I request the mydata.json file from the server and use it with a data template to create and insert elements into the document, just as I did in the previous chapter with the shorthand methods. By default, the ajax method makes an HTTP get request, which means that the example is equivalent to using the get or getJSON method, which I showed you in Chapter 14. I'll show you how to configure POST requests later in this chapter.
Lots of settings are available, and I explain them throughout the rest of the chapters, in addition to some useful methods that jQuery provides to make using Ajax easier.
Understanding the jqXHR Object
The result of the ajax method is a jqXHR object, which you can use to get details about the request and interact with it. The jqXHR is a superset of the XMLHttpRequest object that underpins browser support for Ajax and has been adapted to work with the jQuery deferred object features that I describe in Chapter 35.
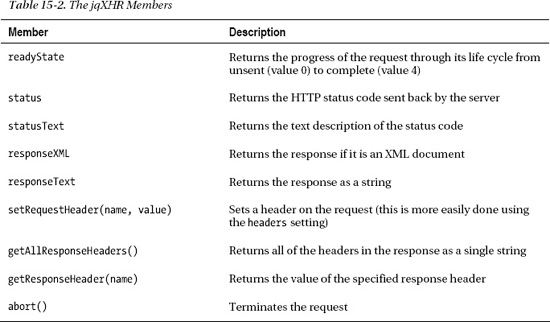
For most Ajax operations, you can simply ignore the jqXHR object, which is exactly what I suggest you do. The jqXHR object is useful when you need more information about the response from the server than would otherwise be available. You can also use the jqXHR object to configure the Ajax request, but this is more easily done using the settings for the ajax method. Table 15-2 describes the members of the jqXHR object.
You see the jqXHR object in a few places. The first is as the result from the ajax method, as demonstrated by Listing 15-2.
Listing 15-2. Using the jqXHR Object
...

<script type="text/javascript">

    $(document).ready(function() {


        var jqxhr = $.ajax("mydata.json",{

            success: function(data) {

                var template = $('#flowerTmpl'),

                template.tmpl(data.slice(0, 3)).appendTo("#row1");

                template.tmpl(data.slice(3)).appendTo("#row2");

            }

        });


        var timerID = setInterval(function() {

            console.log("Status: " + jqxhr.status + " " + jqxhr.statusText);

            if (jqxhr.readyState == 4) {

                console.log("Request completed: " + jqxhr.responseText);

                clearInterval(timerID);

            }

        }, 100);

    });

</script>

...
In this example, I assign the result from the ajax method and then use the setInterval method to write information about the request to the console every 100 milliseconds. Using the result of the ajax method doesn't change the fact that the request is performed asynchronously, so caution is required when working with the jqXHR object. I use the readyState property to check the status of the request (the value of 4 indicates the request has completed) and write the response from the server to the console. This script produces the following output (although you might see something slightly different based on your browser configuration):
Status: 200 OK


Request completed: [{"name":"Astor","product":"astor","stocklevel":"10","price":"2.99"},

{"name":"Daffodil","product":"daffodil","stocklevel":"12","price":"1.99"},

{"name":"Rose","product":"rose","stocklevel":"2","price":"4.99"},

{"name":"Peony","product":"peony","stocklevel":"0","price":"1.50"},

{"name":"Primula","product":"primula","stocklevel":"1","price":"3.12"},

{"name":"Snowdrop","product":"snowdrop","stocklevel":"15","price":"0.99"}]
I rarely use the jqXHR object at all and never when it is the result of the ajax method. jQuery starts the Ajax request automatically when the ajax method is called, so I don't find the ability to configure the request useful. If I want to work with the jqXHR object (typically to get additional information about the response from a server), then I usually do so through the event handler settings that I describe in the “Handling Ajax Events” section later in the chapter. They give me a context regarding the status of the request and mean that I don't have to poll for request status.
Setting the Request URL
The url setting is one of the most important available, allowing you to specify the URL for the request. You can use this setting as an alternative to passing the URL as an argument to the ajax method, as shown in Listing 15-3.
Listing 15-3. Using the url Setting
...

<script type="text/javascript">

    $(document).ready(function() {

        $.ajax({

            url: "mydata.json",

            success: function(data) {

                var template = $('#flowerTmpl'),

                template.tmpl(data.slice(0, 3)).appendTo("#row1");

                template.tmpl(data.slice(3)).appendTo("#row2");

            }

        });

    });

</script>

...
Making a POST Request
You set the type of HTTP request you want to make using the type setting. The default is to make GET requests, as in the previous example. Listing 15-4 shows using the ajax method to create a POST request and submit form data to the server.
Listing 15-4. Creating a POST Request with the ajax Method
...

<script type="text/javascript">

    $(document).ready(function() {


        $.ajax({

            url: "mydata.json",

            success: function(data) {

                var template = $('#flowerTmpl'),

                template.tmpl(data.slice(0, 3)).appendTo("#row1");

                template.tmpl(data.slice(3)).appendTo("#row2");

            }

        });


        $('button').click(function(e) {

            $.ajax({

                url: $('form').attr("action"),

                data: $('form').serialize(),

                type: 'post',
                success: processServerResponse

            })

            e.preventDefault();

        })


        function processServerResponse(data) {

            var inputElems = $('div.dcell').hide();

                for (var prop in data) {

                var filtered = inputElems.has('input[name=' + prop + ']')

                    .appendTo("#row1").show();

            }

            $('#buttonDiv, #totalDiv').remove();

            $('#totalTmpl').tmpl(data).appendTo('body'),

        }

    });

</script>

<script id="totalTmpl" type="text/x-jquery-tmpl">

    <div id="totalDiv" style="clear: both; padding: 5px">

        <div style="text-align: center">Total Items: <span id=total>${total}</span></div>

        <div id="buttonDiv"><button type="submit">Place Order</button></div>

    </div>

</script>

...
I have used several settings in addition to type. To specify the target for the POST request, I used the url setting, which I described earlier. In this example, I take the url from the target of the form element in the document. I specify the data to send using the data setting that I set by using the serialize method, which I described in Chapter 33.
GOING BEYOND GET AND POST
Handling Ajax Events
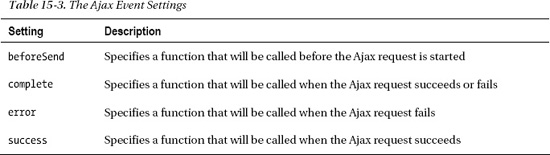
Several settings let you specify handler functions for events that are triggered through the life of an Ajax request. These are the means by which you specify the callback functions that are so central to Ajax requests. You already saw one of these in the success setting in the previous example. Table 15-3 lists the event-related settings and describes each of them.
![]() Tip The settings described in Table 15-3 are related to local events, meaning that they deal with individual Ajax requests. You can also use a series of global events, which I describe in the “Using the Global Ajax Events” section later in this chapter.
Tip The settings described in Table 15-3 are related to local events, meaning that they deal with individual Ajax requests. You can also use a series of global events, which I describe in the “Using the Global Ajax Events” section later in this chapter.
Dealing with Successful Requests
When I demonstrated the use of the success property, I omitted a couple of arguments from the function. They are a status message describing the result of the request and a jqXHR object. Listing 15-5 shows the use of a function that accepts these arguments.
Listing 15-5. Receiving All of the Arguments to a Success Function
...

<script type="text/javascript">

    $(document).ready(function() {


        $.ajax("mydata.json",{

            success: function(data, status, jqxhr) {


                console.log("Status: " + status);


                console.log("jqXHR Status: " + jqxhr.status + " " + jqxhr.statusText);

                console.log(jqxhr.getAllResponseHeaders());


                var template = $('#flowerTmpl'),

                template.tmpl(data.slice(0, 3)).appendTo("#row1");

                template.tmpl(data.slice(3)).appendTo("#row2");

            }

        });
    });

</script>

...
The status argument is a string that describes the outcome of the request. The function that we specify using the success setting is executed only for successful results, and so this argument generally has the value success. The exception is when you use the ifModified setting, which I describe in the “Ignoring Unmodified Data” section later in the chapter.
The callback functions for Ajax events follow the same pattern, and this argument is more useful some of the other events.
The final argument is a jqXHR object. You don't have to poll the status of the request before working with the jqXHR object since you know the function is executed only when the request has successfully completed. In this example, I have used the jqXHR object to get the status information and the headers that the server has included in the response and write them to the console. This example produces the following result (although you will see a different set of headers depending on the web server you are using):
Status: success

jqXHR Status: 200 OK


Date: Sat, 22 Oct 2011 09:19:03 GMT

X-Powered-By: ASP.NET

Content-Length: 437

Last-Modified: Wed, 19 Oct 2011 12:49:28 GMT

Server: Microsoft-IIS/7.5

ETag: "c2d4ec895d8ecc1:0"

Content-Type: application/json

Cache-Control: no-cache

Accept-Ranges: bytes
Dealing with Errors
You use the error setting to specify a function to be called when a request fails. Listing 15-6 provides a demonstration.
Listing 15-6. Using the error Setting
...

<style type="text/css">

    .error {color: red; border: medium solid red; padding: 4px;

            margin: auto; width: 200px; text-align: center}

</style>

<script type="text/javascript">

    $(document).ready(function() {


        $.ajax("NoSuchFile.json",{

            success: function(data, status, jqxhr) {

                var template = $('#flowerTmpl'),

                template.tmpl(data.slice(0, 3)).appendTo("#row1");
                template.tmpl(data.slice(3)).appendTo("#row2");

            },

            error: function(jqxhr, status, errorMsg) {

                $('<div class=error/>')

                    .text("Status: " + status + " Error: " + errorMsg)

                    .insertAfter('h1'),

            }

        });

    });

</script>

...
In this example, I have requested a file called NoSuchFile.json, which doesn't exist on the web server, thus guaranteeing that the request will fail and the function I have specified with the error setting will be invoked. The arguments to the function are a jqXHR object, a status message, and the error message from the server response. In the error function I add a div element to the document showing the value of the status and errorMsg arguments, as shown in Figure 15-1.
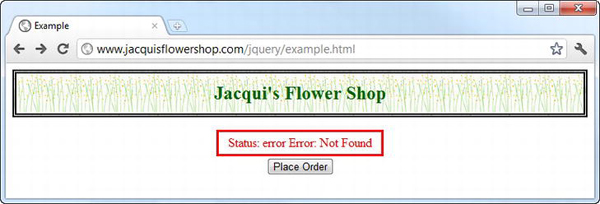
Figure 15-1 Displaying an error message
The status argument can be one of the values shown in Table 15-4.
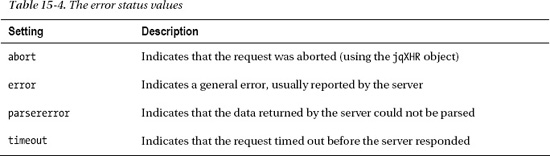
The errorMsg argument varies based on the status. When the status is error, then errorMsg will be set to the text portion of the response from the server. So, in this example, the response from the server was 404 Not Found, and so errorMsg is set to Not Found.
When the status is timeout, the value of errorMsg will also be timeout. You can specify the period before a request times out using the timeout setting, which I describe in the “Setting Timeouts and Headers” section later in this chapter.
When the status is parsererror, then errorMsg will contain details of the problem. This error occurs when data is badly formed or the server returns the wrong MIME type for the data. You can override the data type using the dataType setting. Finally, when the request is abort, both the status and the errorMsg values will be abort.
![]() Tip Although I have displayed the
Tip Although I have displayed the status and errorMsg values in the document, this is generally unhelpful to the user, since the messages require some understanding of what's happening inside the web application and they contain no instructions about how the problem might be resolved.
Dealing with Completed Requests
You can use the complete setting to specify a function that will be called when the Ajax request completes, irrespective of whether it succeeds or fails. Listing 15-7 provides a demonstration.
Listing 15-7. Using the Complete Setting
...

<script type="text/javascript">

    $(document).ready(function() {


        $.ajax("mydata.json",{

            success: function(data, status, jqxhr) {

                var template = $('#flowerTmpl'),

                template.tmpl(data.slice(0, 3)).appendTo("#row1");

                template.tmpl(data.slice(3)).appendTo("#row2");

            },

            error: function(jqxhr, status, errorMsg) {

                $('<div class=error/>')

                    .text("Status: " + status + " Error: " + errorMsg)

                    .insertAfter('h1'),

            },

            complete: function(jXHR, status) {

                console.log("Completed: " + status);

            }

        });

    });

</script>

...
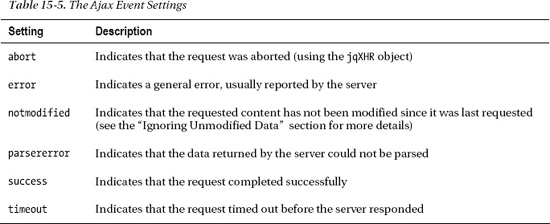
The function specified by the complete setting is called after the functions specified by the success and error settings. You get a lot less prepackaged information from jQuery in this function, although you do get a wider range of values for the status argument, as shown in Table 15-5.
You might be tempted to use the complete setting to specify a single function that can handle all outcomes of a request, but doing so means you don't benefit from the way that jQuery processes data and errors. A better approach is to use the success and error settings and carefully organize the arguments on the common function, as shown in Listing 15-8.
Listing 15-8. Using a Single Function to Handle All Request Outcomes
...

<script type="text/javascript">

    $(document).ready(function() {


        $.ajax("mydata.json",{

            success: function(data, status, jqxhr) {

                handleResponse(status, data, null, jqxhr);

            },

            error: function(jqxhr, status, errorMsg) {

                handleResponse(status, null, errorMsg, jqxhr);

            }

        });


        function handleResponse(status, data, errorMsg, jqxhr) {

            if (status == "success") {

                var template = $('#flowerTmpl'),

                template.tmpl(data.slice(0, 3)).appendTo("#row1");

                template.tmpl(data.slice(3)).appendTo("#row2");

            } else {

                $('<div class=error/>')

                    .text("Status: " + status + " Error: " + errorMsg)
                    .insertAfter('h1'),

            }

        }


    });

</script>

...
Configuring Requests Before They Are Sent
The beforeSend setting lets you specify a function that will be called before the request is started. This gives you an opportunity to do any last-minute configuration, supplementing or overriding the settings you passed to the ajax method (which can be useful if you are using the same settings object for multiple requests). Listing 15-9 demonstrates the use of this setting.
Listing 15-9. Using the beforeSend Setting
...

<script type="text/javascript">

    $(document).ready(function() {


        $.ajax({

            success: function(data, status, jqxhr) {

                handleResponse(status, data, null, jqxhr);

            },

            error: function(jqxhr, status, errorMsg) {

                handleResponse(status, null, errorMsg, jqxhr);

            },

            beforeSend: function(jqxhr, settings) {

                settings.url = "mydata.json";

            }

        });


        function handleResponse(status, data, errorMsg, jqxhr) {

            if (status == "success") {

                var template = $('#flowerTmpl'),

                template.tmpl(data.slice(0, 3)).appendTo("#row1");

                template.tmpl(data.slice(3)).appendTo("#row2");

            } else {

                $('<div class=error/>')

                    .text("Status: " + status + " Error: " + errorMsg)

                    .insertAfter('h1'),

            }

        }


    });

</script>

...
The arguments to the function are the jqXHR object (which can be helpful for setting the request headers or for aborting the request before it is started) and the settings object that you passed to the ajax method. In this example, I used the url setting to specify the URL for the Ajax request.
Specifying Multiple Event Handler Functions
I have shown using just one function to respond to the Ajax request events, but you set the success, error, complete, and beforeStart settings to an array of functions, each of which will be executed when the corresponding event is triggered. Listing 15-10 provides a simple demonstration.
Listing 15-10. Specifying Multiple Event Handling Functions
...

<script type="text/javascript">

    $(document).ready(function() {


        $.ajax("mydata.json", {

            success: [processData, reportStatus]

        });


        function processData(data, status, jqxhr) {

            var template = $('#flowerTmpl'),

            template.tmpl(data.slice(0, 3)).appendTo("#row1");

            template.tmpl(data.slice(3)).appendTo("#row2");

        }


        function reportStatus(data, status, jqxhr) {

            console.log("Status: " + status + " Result code: " + jqxhr.status);

        }

    });

</script>

...
In this example, I have set the success setting to an array of two functions, one of which uses the data to add elements to the document and the other of which prints information to the console.
![]() Tip You can also use the
Tip You can also use the jqXHR object to register event listeners as part of the general jQuery for deferred objects, which I describe in Chapter 35.
Setting the Context for Events
The context setting lets you specify an element that will be assigned to the this variable when an event function is enabled. This can be useful for easily targeting elements in the document without having to select them in the handler function. Listing 15-11 gives a demonstration.
Listing 15-11. Using the context Setting
...

<script type="text/javascript">

    $(document).ready(function() {


        $.ajax("mydata.json", {

            context: $('h1'),

            success: function(data, status, jqxhr) {

                var template = $('#flowerTmpl'),

                template.tmpl(data.slice(0, 3)).appendTo("#row1");

                template.tmpl(data.slice(3)).appendTo("#row2");

            },

            complete: function(jqxhr, status) {

                var color = status == "success" ? "green" : "red";

                this.css("border", "thick solid " + color);

            }

        });

    });

</script>

...
In this example, I set the context setting to the jQuery object containing the h1 elements in the document. In the complete function, I use the css method on the jQuery object (which I refer to as this) to set the border for the selected elements (or element, since there is only one in the document), varying the color based on the status of the request.
![]() Tip You can assign any object using the
Tip You can assign any object using the context setting, and so you are responsible for ensuring that you do appropriate things with it. For example, if you set the context to be an HTMLElement object, then you must be sure to pass the object to the $ function before calling any jQuery methods on it.
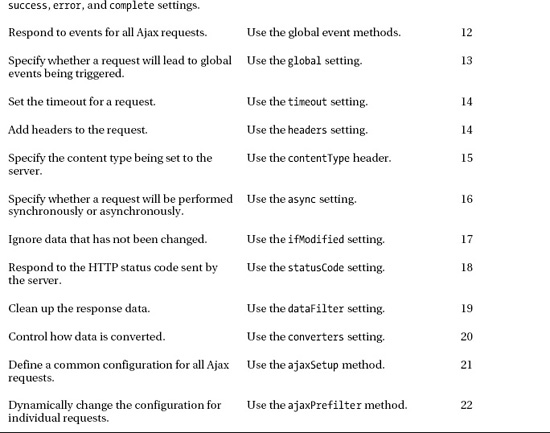
Using the Global Ajax Events
In addition to the per-request events that I described in the previous chapter, jQuery also defines a set of global events, which you can use to monitor all Ajax queries that are made by your application. Table 15-6 shows the methods available for global events.
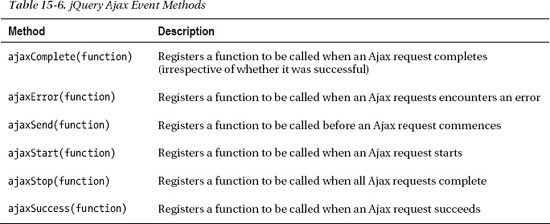
You use these methods on any element in the document, just as you do with the regular event methods I described in Chapter 9. You pass the function that you want to be executed when the corresponding event occurs. The ajaxStart and ajaxStop methods do not pass any arguments to their functions. The other methods provide the following arguments:
- An
Eventobject describing the event - A
jqXHRobject describing the request - The settings object that contains the configuration for the request
The ajaxError method passes an additional argument to the function, which is the description of the error that has occurred.
![]() Tip The jQuery documentation states that the functions passed to the
Tip The jQuery documentation states that the functions passed to the ajaxComplete and ajaxSuccess methods are provided with an XMLHttpRequest object rather a jqXHR object. This is not true; all of the functions that take arguments are given a jqXHR.
There are two important things to remember about these methods. The first is that the functions will be triggered for events from all Ajax requests, which means you have to be careful to ensure that you are not making assumptions that are true only for a specific request. The second thing to remember is that you need to call these methods before you start making Ajax requests to ensure that the functions are properly triggered. If you call the global methods after calling the ajax method, you run the risk that the Ajax request will have finished before jQuery can properly register your event handler functions. Listing 15-12 provides a demonstration of using the global Ajax event methods.
Listing 15-12. Using the Global Ajax Event Methods
...

<style type="text/css">

    .ajaxinfo {color: blue; border: medium solid blue; padding: 4px;

            margin: auto; margin-bottom:2px; width: 200px; text-align: center}

</style>

<script type="text/javascript">

    $(document).ready(function() {


        $('<div class=ajaxinfo ><label for="globalevents">Events:<input type="checkbox"'

         + 'id="globalevents" name="globalevents" checked></label></div>')

            .insertAfter('h1'),

        $('<div id="info" class=ajaxinfo/>').text("Ready").insertAfter('h1'),


        $(document)

            .ajaxStart(function() {

                displayMessage("Ajax Start")

            })

            .ajaxSend(function(event, jqxhr, settings) {

                displayMessage("Ajax Send: " + settings.url)

            })

            .ajaxSuccess(function(event, jqxhr, settings) {

                displayMessage("Ajax Success: " + settings.url)

            })

            .ajaxError(function(event, jqxhr, settings, errorMsg) {

                displayMessage("Ajax Error: " + settings.url)

            })

            .ajaxComplete(function(event, jqxhr, settings) {

                displayMessage("Ajax Complete: " + settings.url)

            })

            .ajaxStop(function() {

                displayMessage("Ajax Stop")

            })


        function displayMessage(msg) {

           $('#info').queue(function() {

                $(this).fadeTo("slow", 0).queue(function() {

                        $(this).text(msg).dequeue()

                    }).fadeTo("slow", 1).dequeue();

           })

        }


        $('button').click(function(e) {

            $('#row1, #row2').children().remove();

            $.ajax("mydata.json", {

                global: $('#globalevents:checked').length > 0,

                success: function(data, status, jqxhr) {

                    var template = $('#flowerTmpl'),

                    template.tmpl(data.slice(0, 3)).appendTo("#row1");
                    template.tmpl(data.slice(3)).appendTo("#row2");

                }

            });

            e.preventDefault();

        })

    });

</script>

...
In this example, I have registered functions for all of the global Ajax events. These functions call the displayMessage function and show which event has been triggered. Because Ajax requests can complete very quickly, I have used the effects queue to slow down the transition from one message to another so you can see the sequence clearly (this doesn't slow down the Ajax request, just the display of the event messages). Finally, so that you can control the start of the sequence, I have added a handle for the button element's click event, which begins the Ajax request. You can see the status display in Figure 15-2.
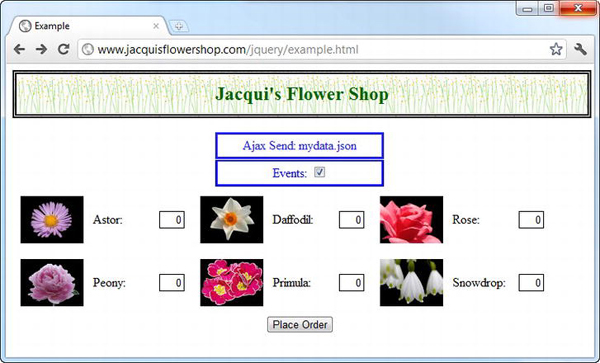
Figure 15-2 Displaying the global Ajax events
Controlling Global Events
You will notice that I have added a check box to the document. In the call to the ajax function, I use the check box to set the value of the global setting, as shown in Listing 15-13.
Listing 15-13. Using the global Setting
$.ajax("mydata.json", {

    global: $('#globalevents:checked').length > 0,

    success: function(data, status, jqxhr) {

        var template = $('#flowerTmpl'),

        template.tmpl(data.slice(0, 3)).appendTo("#row1");

        template.tmpl(data.slice(3)).appendTo("#row2");

    }

});
When the global setting is false, the Ajax request doesn't generate the global Ajax events. You can try this yourself using the example. Uncheck the box and click the button, and you will see that the Ajax request is performed without any status information being shown.
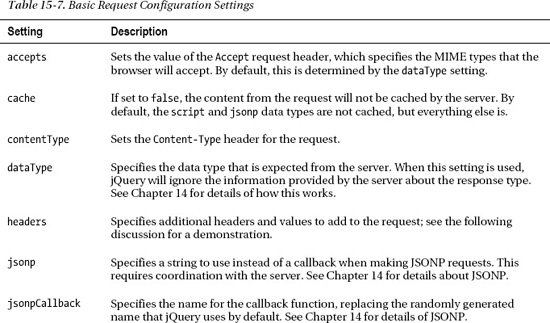
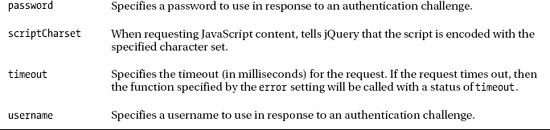
Configuring the Basic Settings for an Ajax Request
There are a group of settings that allow you to perform some basic configuration of the Ajax request. These are the least interesting of the settings available, and they are largely self-evident. Table 15-7 shows the settings I am referring to, and I demonstrate a small number of these settings in the sections that follow.
Setting Timeouts and Headers
Users are often not aware of Ajax requests happening, so setting a timeout period is a good way of avoiding leaving the user hanging around waiting for a process they don't even know is happening to complete. Listing 15-14 shows how you can set a timeout on a request.
Listing 15-14. Setting Timeouts
...

<script type="text/javascript">

    $(document).ready(function() {


        $.ajax("mydata.json", {

            timeout: 5000,

            headers: {

                "X-HTTP-Method-Override": "PUT"

            },

            success: function(data, status, jqxhr) {

                var template = $('#flowerTmpl'),

                template.tmpl(data.slice(0, 3)).appendTo("#row1");

                template.tmpl(data.slice(3)).appendTo("#row2");

            },

            error: function(jqxhr, status, errorMsg) {

                console.log("Error: " + status);

            }

       });

    });

</script>

...
In this example, I have used the timeout setting to specify a maximum duration for the request of five seconds. If the request hasn't completed in that time, then the function specified by the error setting will be executed, with a status value of error.
![]() Caution The timer starts as soon as the request is passed to the browser, and most browsers put limits on the number of concurrent requests. This means you run the risk of timing out requests before they even start. To avoid this, you must have some awareness of the limits of the browser and the volume and expected duration of any other Ajax requests that are in progress.
Caution The timer starts as soon as the request is passed to the browser, and most browsers put limits on the number of concurrent requests. This means you run the risk of timing out requests before they even start. To avoid this, you must have some awareness of the limits of the browser and the volume and expected duration of any other Ajax requests that are in progress.
In this listing, I also used the headers setting to add a header to the request, like this:
...

headers: {

    "X-HTTP-Method-Override": "PUT"

},

...
You specify additional headers using a map object. The header in the example is the one I mentioned in the “Making a POST Request” section earlier in the chapter. This header can be useful for creating a RESTful web application, as long as it is properly understood by the server.
Sending JSON Data to the Server
It can be useful to send JSON to the server; it is a compact and expressive data format and easy to generate from JavaScript objects. You use the contentType setting to specify the Content-Type header in the request, which tells the server what kind of data is being sent. You can see an example of sending JSON data in Listing 15-15.
Listing 15-15. Sending JSON to the Server
...

<script type="text/javascript">

    $(document).ready(function() {


        $.ajax("mydata.json", {

            success: function(data, status, jqxhr) {

                var template = $('#flowerTmpl'),

                template.tmpl(data.slice(0, 3)).appendTo("#row1");

                template.tmpl(data.slice(3)).appendTo("#row2");

            }

       });


        $('button').click(function(e) {

            $.ajax({

                url: $('form').attr("action"),

                contentType: "application/json",

                data: JSON.stringify($('form').serializeArray()),

                type: 'post',

                success: processServerResponse

            })

            e.preventDefault();
        })


        function processServerResponse(data) {

            var inputElems = $('div.dcell').hide();

                for (var prop in data) {

                var filtered = inputElems.has('input[name=' + prop + ']')

                    .appendTo("#row1").show();

            }

            $('#buttonDiv, #totalDiv').remove();

            $('#totalTmpl').tmpl(data).appendTo('body'),

        }

    });

</script>

...
I have used the contentType setting to specify a value of application/json, which is the MIME type for JSON. I could have sent any object to the server, but I wanted to demonstrate how you can express form data as JSON, which is like this:
...

data: JSON.stringify($('form').serializeArray()),

...
I select the form element and call the serializeArray method; this creates an array of objects, each of which has a name property and a value property representing one of the input elements in the form. I then use the JSON.stringify method to convert this into a string like this:
[{"name":"astor","value":"1"}, {"name":"daffodil","value":"1"},

 {"name":"rose","value":"1"}, {"name":"peony","value":"1"},

 {"name":"primula","value":"1"},{"name":"snowdrop","value":"1"}]
And you have a convenient array of JSON objects that you can send to the server. The Node.js script that I am using for this chapter is able to parse and process this object.
Using More Advanced Configuration Settings
In the sections that follow, I describe the most interesting and useful of the advanced settings that you can apply to an Ajax request. I find that I don't use these often, but they are invaluable when I need them. They provide some fined-grained control over how jQuery deals with Ajax.
Making the Request Synchronously
The async setting specifies whether the request will be performed asynchronously. A value of true, which is the default, means that it will; a value of false means that the request will be performed synchronously.
When the request is performed synchronously, the ajax method behaves like a normal function, and the browser will wait for the request to complete before moving on to execute other statements in the script. Listing 15-16 gives an example.
Listing 15-16. Making a Synchronous Request
...

<script type="text/javascript">

    $(document).ready(function() {

        var elems;


        $.ajax("flowers.html", {

            async: false,

            success: function(data, status, jqxhr) {

                elems = $(data).filter("div").addClass("dcell");

            }

        });


        elems.slice(0, 3).appendTo('#row1'),

        elems.slice(3).appendTo("#row2");

    });

</script>

...
This is the same request that I showed you in Chapter 14 to demonstrate the most common pitfall when using Ajax, updated to use the low-level API. The difference in this case is that the async setting is false, and so the browser won't get to the statements that call the slice and appendTo methods until the request has been completed and the results are assigned to the elems variable (assuming that the request completed successfully). Making synchronous calls using the Ajax method is an odd thing to do, and I recommend you consider why your web application needs to do this.
![]() Tip Do not use synchronous calls because you find making asynchronous calls arduous; I appreciate that using callbacks and making sure you don't make assumptions about the outcome of requests can be tiresome, but it really is worth the time to get your head around this approach to web programming.
Tip Do not use synchronous calls because you find making asynchronous calls arduous; I appreciate that using callbacks and making sure you don't make assumptions about the outcome of requests can be tiresome, but it really is worth the time to get your head around this approach to web programming.
Ignoring Unmodified Data
You can use the ifModified setting to receive data only if the response has changed since the last time you queried it; this is determined by the Last-Modified header in the response. If you need to request the same data repeatedly in response to a user action, you often end up processing the server response and modifying the document just to present the user with whatever was already there. The default value for this setting is false, which tells jQuery to ignore the header and always give you the data.
Listing 15-17 provides a demonstration of using this setting.
Listing 15-17. Using the ifModified Setting
...

<script type="text/javascript">

    $(document).ready(function() {
        $('button').click(function(e) {

            $.ajax("mydata.json", {

                ifModified: true,

                success: function(data, status) {

                    if (status == "success") {

                        $('#row1, #row2').children().remove();

                        var template = $('#flowerTmpl'),

                        template.tmpl(data.slice(0, 3)).appendTo("#row1");

                        template.tmpl(data.slice(3)).appendTo("#row2");

                    } else if (status == "notmodified") {

                        $('img').css("border", "thick solid green");

                    }

                }

            });

            e.preventDefault();

        })

    });

</script>

...
In this example, the value of the ifModified setting is true. The success function is always called, but if the content has not been modified since I last requested it, then the data argument will be undefined and the status argument will be notmodified. In this example, I perform different actions based on the status argument. If the argument is success, then I use the data argument to add elements to the document. If the argument is notmodified, then I use the css method to add a border to the img elements already in the document.
I make the call to the ajax method in response to the click event from the button element. This allows me to make the same request repeatedly to demonstrate the effect of the ifModified setting, which you can see in Figure 15-3.
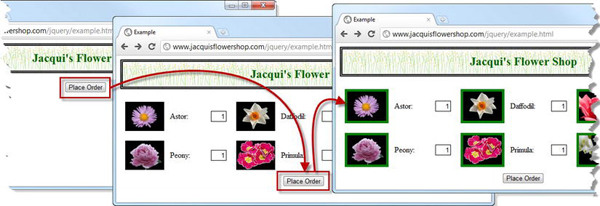
Figure 15-3 Using the ifModified setting
This can be a very useful setting, but I recommend being careful with its use. If you are making a request as a consequence of a user action (say, a button press), there is possibility that the user is pressing the button because the previous request didn't perform the way it was supposed to perform. Imagine that you request the data but the success method contains a bug that doesn't properly update the document with the content; the user is pressing the button to try to get the document to display properly. By using the ifModified setting unwisely, you can end up ignoring the user action, forcing the user to take more serious steps to resolve the problem.
Dealing with the Response Status Code
The statusCode setting allows you to respond to the different status codes that are returned in HTTP responses. You can use this feature as an alternative to the success and error settings or as a complement. Listing 15-18 shows how you can use the statusCode setting on its own.
Listing 15-18. Using the statusCode Setting
...

<style type="text/css">

    .error {color: red; border: medium solid red; padding: 4px;

            margin: auto; width: 200px; text-align: center}

</style>

<script type="text/javascript">

    $(document).ready(function() {


        $.ajax({

            url: "mydata.json",

            statusCode: {

                200: handleSuccessfulRequest,

                404: handleFailedRequest,

                302: handleRedirect

            }

        });


        function handleSuccessfulRequest(data, status, jqxhr) {

            $('#row1, #row2').children().remove();

            var template = $('#flowerTmpl'),

            template.tmpl(data.slice(0, 3)).appendTo("#row1");

            template.tmpl(data.slice(3)).appendTo("#row2");

        }


        function handleRedirect() {

            // this function will neber be called

        }


        function handleFailedRequest(jqxhr, status, errorMsg) {

            $('<div class=error>Code: ' + jqxhr.status + ' Message: '

                + errorMsg + '</div>').insertAfter('h1'),

        }

    });

</script>

...
You use the statusCode setting with an object that maps between HTTP status codes and the functions you want executed when they are returned to the server. In this example, I have defined three functions and associated them with the status codes 200, 404, and 302.
The arguments passed to the functions depend on whether the status code reflects a successful request or an error. If the code represents a success (such as 200), then the arguments are the same as for the success-setting function. Otherwise (such as the 404 code, which indicates the requested file can't be found), the arguments are the same as for the error-setting function.
Notice that I have also added a map for the 302 code. This is sent back to the browser when the server wants to redirect you to another URL. jQuery automatically follows redirections until it receives some content or encounters an error. This means that my function for the 302 code won't ever be called.
![]() Tip The
Tip The 304 code, indicating that content has not been modified since it was last requested, is generated only if the ifModified setting has been used. Otherwise, jQuery sends a 200 code instead. See the previous section for information about the ifModified setting.
As you can see, this feature doesn't quite expose all of the status codes directly. I find this feature useful when I am debugging interactions between the browser and the server, typically to find out why jQuery isn't behaving quite the way I would like. When I do this, I use the statusCode setting to complement the success and error settings and print out information to the console. When using these settings together, the success or error function will be executed before those specified by the statusCode setting.
Cleaning Up the Response Data
The dataFilter setting allows you to specify a function that will be called to process the data returned by the server. This is a very useful feature when the server sends you data that isn't quite what you need, either because the formatting isn't perfect or because it contains data that you don't want processed. I find this setting useful when working with Microsoft ASP.NET servers that can append extra data into JSON data. The dataFilter settings lets me remove this data with very little effort. Listing 15-19 shows the use of the dataFilter setting.
Listing 15-19. Using the dataFilter Setting
...

<script type="text/javascript">

    $(document).ready(function() {


            $.ajax({

                url: "mydata.json",

                success: function(data, status, jqxhr) {

                    $('#row1, #row2').children().remove();

                    var template = $('#flowerTmpl'),

                    template.tmpl(data.slice(0, 3)).appendTo("#row1");

                    template.tmpl(data.slice(3)).appendTo("#row2");

                },
                dataType: "json",

                dataFilter: function(data, dataType) {

                    if (dataType == "json") {

                        var filteredData = $.parseJSON(data);

                        filteredData.shift();

                        return JSON.stringify(filteredData.reverse());

                    } else {

                       return data;

                    }

                }

            });

    });

</script>

...
The function is passed the data received from the server and the value of the dataType setting. If the dataType setting has not been used, then the second function argument will be undefined. Your job in this function is to return the filtered data. In this example, I focus on the json data type, as follows:
...

var filteredData = $.parseJSON(data);

filteredData.shift();

return JSON.stringify(filteredData.reverse());

...
To keep this example simple, I am doing something that is slightly redundant. First, I convert the JSON data into a JavaScript array by using the jQuery parseJSON data (this is one of the jQuery utility methods I describe in Chapter 33). I then use the shift method to remove the first item in the array and use the reverse method to reverse the order of the remaining items.
The redundancy comes because you have to return a string from the function, so I call the JSON.stringify method, knowing that jQuery will convert the data into a JavaScript object before calling the success function. Still, that aside, you can see that I am able to remove an element in the array, and I could have performed any other kind of processing that I needed. You can see the effect of this function in Figure 15-4.
Figure 15-4 Removing an item and reversing the order of the data using the dataFilter setting
Managing Data Conversion
I have saved one of my favorite settings until last. You will have noticed that jQuery does some handy conversions when it receives certain data types. As an example, when jQuery receives some JSON data, it presents the success function with a JavaScript object, rather than the raw JSON string.
You can control these conversions using the converters setting. The value for this setting is an object that maps between data types and functions that are used to process them. Listing 15-20 shows how you can use this setting to automatically parse HTML data into a jQuery object.
Listing 15-20. Using the converters Setting
...

<script type="text/javascript">

    $(document).ready(function() {


        $.ajax({

            url: "flowers.html",

            success: function(data, status, jqxhr) {

                var elems = data.filter('div').addClass("dcell");

                elems.slice(0, 3).appendTo('#row1'),

                elems.slice(3).appendTo("#row2");

            },

            converters: {

                "text html": function(data) {

                    return $(data);

                }
            }

        });

    });

</script>

...
In this example, I have registered a function for the text html type. Notice that you use a space between the components of the MIME type (as opposed to text/html). The function is passed the data that has been received from the server and returns the converted data. In this case, I simply pass the HTML fragment that is contained in the flowers.html file to the jQuery $ function and return the result. This means I can call all the usual jQuery methods on the object passed as the data argument to the success function.
![]() Tip The data types don't always match the MIME types that are returned by the server. For example,
Tip The data types don't always match the MIME types that are returned by the server. For example, application/json is usually presented as "text json" to the converters method.
It is easy to get carried away with these converters. I always try to avoid the temptation to do more in these functions than I should. For example, I am sometimes tempted to take JSON data, apply a data template, and pass the resulting HTML elements back. And although this is a nice trick, it can catch you out if someone else tries to extend your coding or you need to unwind heavy processing to get at the raw data later.
Setting Up and Filtering Ajax Requests
Now that you have seen the ajax method and the settings that are available, you can turn your attention to a couple of additional methods that jQuery provides to make configuring requests simpler.
Defining Default Settings
The ajaxSetup method lets you specify the settings that will be used for every Ajax request, freeing you from having to define all of the settings you are interested in for each and every request. Listing 15-21 shows this method in use.
Listing 15-21. Using the ajaxSetup Method
...

<script type="text/javascript">

    $(document).ready(function() {


        $.ajaxSetup({

            timeout: 15000,

            global: false,

            error: function(jqxhr, status, errorMsg) {

                $('<div class=error/>')
                    .text("Status: " + status + " Error: " + errorMsg)

                    .insertAfter('h1'),

            },

            converters: {

                "text html": function(data) {

                    return $(data);

                }

            }

        });


        $.ajax({

            url: "flowers.html",

            success: function(data, status, jqxhr) {

                var elems = data.filter('div').addClass("dcell");

                elems.slice(0, 3).appendTo('#row1'),

                elems.slice(3).appendTo("#row2");

            },

        });

    });

</script>

...
You call the ajaxSetup method against the jQuery $ function, just as you do for the ajax method. The argument to the ajaxSetup is an object that contains the settings you want to use as the defaults for all your Ajax requests. In this example, I define defaults for the timeout, global, error, and converters settings. Once I have called the ajaxSetup method, I only have to define values for those settings for which I haven't provided a default value or whose value I want to change. This can be a useful time-saver if you are making a lot of Ajax requests that have similar configurations.
![]() Tip The settings specified by the
Tip The settings specified by the ajaxSetup method also affect requests made by the convenience and shorthand methods I showed you in Chapter 14. This can be a nice way of combining the detailed control that comes with the low-level API with the simplicity of the convenience methods.
Filtering Requests
The ajaxSetup method defines a baseline configuration that is applied to all Ajax requests. You can use the ajaxPrefilter method if you want to dynamically tailor the settings for requests individually. Listing 15-22 contains a demonstration of using this method.
Listing 15-22. Using the ajaxPrefilter Method
...

<script type="text/javascript">

    $(document).ready(function() {


        $.ajaxSetup({
            timeout: 15000,

            global: false,

            error: function(jqxhr, status, errorMsg) {

                $('<div class=error/>')

                    .text("Status: " + status + " Error: " + errorMsg)

                    .insertAfter('h1'),

            },

            converters: {

                "text html": function(data) {

                    return $(data);

                }

            }

        })


        $.ajaxPrefilter("json html", function(settings, originalSettings, jqxhr) {

            if (originalSettings.dataType == "html") {

                settings.timeout = 2000;

            } else {

                jqxhr.abort();

            }

        })


        $.ajax({

            url: "flowers.html",

            dataType: "html",

            success: function(data, status, jqxhr) {

                var elems = data.filter('div').addClass("dcell");

                elems.slice(0, 3).appendTo('#row1'),

                elems.slice(3).appendTo("#row2");

            },

        });

    });

</script>

...
The function that you specify will be executed for each new Ajax request. The arguments passed to the function are the settings for the request (which includes any defaults you have set using ajaxSetup); the original settings passed to the Ajax method (which excludes any default values) and to the jqXHR object for the request. You make changes to the object passed as the first argument, as shown in the example. In this script, if a dataType setting has been specified in the settings passed to the Ajax method, I set the timeout to be two seconds. For all other requests, I call the abort method on the jqXHR object to prevent the request from being sent.
Summary
In this chapter, I showed you the low-level jQuery Ajax interface that, as I hope you agree, isn't that much harder to work with than the convenience and shorthand methods I showed you in Chapter 14. For a modicum of additional effort, you can control many aspects of the way that the Ajax request is processed, giving you endless ways in which you can tweak the process to your needs and preferences.