
C H A P T E R 28
Dialogs, Themes, and Layouts
In this chapter, I describe three useful jQuery Mobile features that are helpful when creating mobile web applications. Each feature is pretty simple, but I will be using them in the chapters that follow, so I wanted you to understand them before I start using them in examples. These features allow you to create dialogs, apply themes to your pages and elements, and lay out elements in multicolumn grids. None of these items is especially exciting on its own, but this is the kind of important plumbing that makes life easier for the mobile web developer. Table 28-1 provides the summary for this chapter.
Creating Dialogs
One of the nice features of jQuery Mobile pages is that you can use them to easily create dialogs. You do this by applying the data-rel attribute to the a element that navigates to the page, specifying a value of dialog. Listing 28-1 contains an example.
Listing 28-1. Using a Page as a Dialog
<!DOCTYPE html>

<html>

<head>

    <title>Example</title>

    <meta name="viewport" content="width=device-width, initial-scale=1">

    <link rel="stylesheet" href="jquery.mobile-1.0.css" type="text/css" />

    <script type="text/javascript" src="jquery-1.6.4.js"></script>

    <script type="text/javascript" src="jquery.mobile-1.0.js"></script>

</head>

<body>

    <div id="page1" data-role="page">

        <div data-role="header">

           <h1>Jacqui's Shop</h1>

        </div>

        <div data-role="content">

            <a href="#page2" data-rel="dialog">Show the dialog</a>

        </div>

    </div>

    <div id="page2" data-role="page">

        <div data-role="header">

           <h1>You clicked the link!</h1>

        </div>

        <div data-role="content">

            This is the content area of the dialog

        </div>

    </div>

</body>

</html>
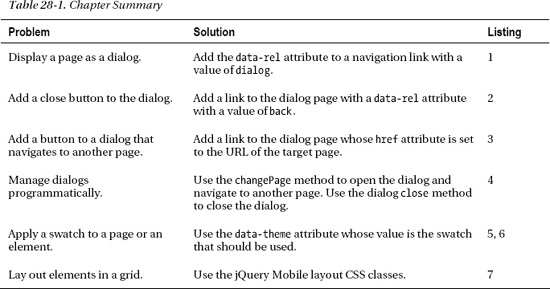
In this example, there are two regular jQuery Mobile pages. The link in the first page is just like the links I was using in the previous chapter, with the exception that I have applied the data-rel attribute and set the value to dialog. When the user clicks the link, jQuery Mobile takes the pages and presents it in the form of a dialog, as Figure 28-1 shows.
Figure 28-1 Displaying a page as a dialog
The interesting thing about this feature is that you don't have to make any changes to the page at all. Everything is set up in the navigation link, and all without having to write any JavaScript code.
Adding Buttons to the Dialog
In the basic dialog, the user has to click the icon in the top-left corner to close the dialog and return to the previous page. You can add a close button to the dialog by adding a button element and using another data attribute, as Listing 28-2 demonstrates.
Listing 28-2. Adding a Close Button to a Dialog
<!DOCTYPE html>

<html>

<head>

    <title>Example</title>

    <meta name="viewport" content="width=device-width, initial-scale=1">

    <link rel="stylesheet" href="jquery.mobile-1.0.css" type="text/css" />

    <script type="text/javascript" src="jquery-1.6.4.js"></script>

    <script type="text/javascript" src="jquery.mobile-1.0.js"></script>

</head>

<body>

    <div id="page1" data-role="page">

        <div data-role="header">

           <h1>Jacqui's Shop</h1>

        </div>

        <div data-role="content">

            <a href="#page2" data-rel="dialog">Show the dialog</a>

        </div>

    </div>

    <div id="page2" data-role="page">

        <div data-role="header">

           <h1>You clicked the link!</h1>
        </div>

        <div data-role="content">

            This is the content area of the dialog

            <a href="#" data-role="button" data-rel="back">Close</a>

        </div>

    </div>

</body>

</html>
I have added an a element and applied the data-rel attribute with a value of back. I don't have to specify the target for the link. I just set the href attribute to # and leave jQuery Mobile to figure out what to do. This is a useful because you may want to display a dialog from different pages, and you don't know which of them caused the dialog to be shown. Figure 28-2 shows the effect of adding this element to the dialog.
![]() Tip You will notice that I have set the
Tip You will notice that I have set the data-role attribute on this link to button. This causes jQuery Mobile to create a button widget from the element, which I explain fully in Chapter 29.

Figure 28-2 Adding a close button to a dialog
Adding Another Button to a Dialog
You have a choice when it comes to adding other buttons to a dialog. If you are offering the user a chance to navigate to another page, then you can simply add an a element and set the href attribute to the page that you want. This is what I have done in Listing 28-3, and I have used the same data-role value as in the previous example so that jQuery Mobile creates a button from the link.
Listing 28-3. Adding a Navigation Link to a Dialog
<!DOCTYPE html>

<html>

<head>

    <title>Example</title>

    <meta name="viewport" content="width=device-width, initial-scale=1">

    <link rel="stylesheet" href="jquery.mobile-1.0.css" type="text/css" />

    <script type="text/javascript" src="jquery-1.6.4.js"></script>

    <script type="text/javascript" src="jquery.mobile-1.0.js"></script>

</head>

<body>

    <div id="page1" data-role="page">

        <div data-role="header">

           <h1>Jacqui's Shop</h1>

        </div>

        <div data-role="content">

            <a href="#page2" data-rel="dialog">Show the dialog</a>

        </div>

    </div>

    <div id="page2" data-role="page">

        <div data-role="header">

           <h1>You clicked the link!</h1>

        </div>

        <div data-role="content">

            This is the content area of the dialog

            <a href="#page3" data-role="button">OK</a>

            <a href="#" data-role="button" data-rel="back">Close</a>

        </div>

    </div>

    <div id="page3" data-role="page">

        <div data-role="header">

           <h1>Jacqui's Shop</h1>

        </div>

        <div data-role="content">

            This is page 3. You came here via the dialog.

        </div>

    </div>

</body>

</html>
In this example, I have added an a element that takes the user to page3, which I have added to the document. Figure 28-3 shows the navigation from the dialog to the new page.
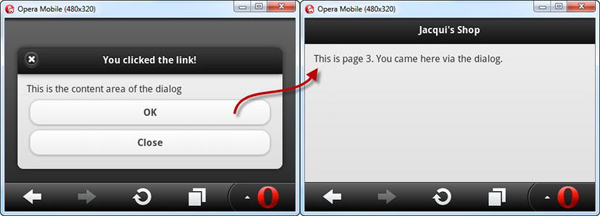
Figure 28-3 Adding a navigation link/button to a dialog
![]() Tip jQuery Mobile doesn't add the dialog to the browser's history, which means that if you navigate from a dialog to another page, hitting the back button returns to the page shown before the dialog.
Tip jQuery Mobile doesn't add the dialog to the browser's history, which means that if you navigate from a dialog to another page, hitting the back button returns to the page shown before the dialog.
Managing Dialogs Programmatically
Although jQuery Mobile tries to minimize the amount of code you have to write, there are times when you want to take more direct control of what is happening. Listing 28-4 shows how you can open and close dialogs programmatically.
Listing 28-4. Opening and Closing a Dialog Programmatically
<!DOCTYPE html>

<html>

<head>

    <title>Example</title>

    <meta name="viewport" content="width=device-width, initial-scale=1">

    <link rel="stylesheet" href="jquery.mobile-1.0.css" type="text/css" />

    <script type="text/javascript" src="jquery-1.6.4.js"></script>

    <script type="text/javascript">

        $(document).bind("pageinit", function() {


            $('#openDialog').bind("tap", function() {

                $.mobile.changePage("#page2", {

                    role: "dialog"

                })

            })


            $('#closeDialog').bind("tap", function() {
                $('#page2').dialog("close")

            })


            $('#okButton').bind("tap", function() {

                $.mobile.changePage("#page3")

            })


        });

    </script>

    <script type="text/javascript" src="jquery.mobile-1.0.js"></script>

</head>

<body>

    <div id="page1" data-role="page">

        <div data-role="header">

           <h1>Jacqui's Shop</h1>

        </div>

        <div data-role="content">

            <button id="openDialog">Show the dialog</button>

        </div>

    </div>

    <div id="page2" data-role="page">

        <div data-role="header">

           <h1>You clicked the link!</h1>

        </div>

        <div data-role="content">

            This is the content area of the dialog

            <button id="okButton">OK</button>

            <button id="closeDialog">Close</button>

        </div>

    </div>

    <div id="page3" data-role="page">

        <div data-role="header">

           <h1>Jacqui's Shop</h1>

        </div>

        <div data-role="content">

            This is page 3. You came here via the dialog.

        </div>

    </div>

</body>

</html>
I have replaced the links with button elements in this example because there is no default action for clicking a button outside of a form. I have also added a script element in which I have registered handler functions for the tap event for each button. (I have used separate calls to the bind method because it makes the example easier to explain, but there is no reason why these three functions cannot be combined into a single function, just as I have been doing in earlier parts of the book.)
To open the dialog, you just have to call the changePage method, specifying the URL of the page you want and using a settings object that has a value of dialog for the role property, like this:
$.mobile.changePage("#page2", {

    role: "dialog"

})
I explained the changePage method in Chapter 27. This is the same method you use when you want to navigate away from the dialog to another page:
$.mobile.changePage("#page3")
You can see the jQuery UI underpinnings of jQuery Mobile when you close a dialog programmatically:
$('#page2').dialog("close")
You can learn more about the jQuery UI dialog widget in Chapter 22, although this is the only occasion where the functionality of that widget leaks through into the jQuery Mobile world.
Applying Themes
jQuery Mobile provides support for themes. There is a default theme included in the jQuery Mobile files that you downloaded and installed in Chapter 26, and you can create custom themes using the jQuery Mobile ThemeRoller application, which is a variation on the application of the same name you used for jQuery UI.
![]() Note As I mentioned in Chapter 26, I won't be creating and using a custom theme in this part of the book. The jQuery Mobile ThemeRoller application is a relatively late addition to jQuery Mobile and, as I write this, has some problems. I expect that these will be resolved by the time that you read this.
Note As I mentioned in Chapter 26, I won't be creating and using a custom theme in this part of the book. The jQuery Mobile ThemeRoller application is a relatively late addition to jQuery Mobile and, as I write this, has some problems. I expect that these will be resolved by the time that you read this.
A jQuery Mobile theme consists of one or more swatches, which is a set of styles that are applied to different kinds of elements. Although I won't be creating a custom theme (see the previous note), you can use the ThemeRoller application to view the default theme. Swatches are identified by a single letter, starting with A. The default theme has five swatches, named A through E. To view the default theme in ThemeRoller, navigate to http://jquerymobile.com/themeroller, click the Import link, and paste the contents of the jquery.mobile-1.0.css file into the dialog (this is the CSS file that you downloaded and installed in Chapter 26). The ThemeRoller application will process the CSS and display the default swatches, as shown in Figure 28-4.
Figure 28-4 The swatches in the default theme
![]() Tip As I write this, ThemeRoller is unable to properly parse the CSS from the default theme. If you try to modify any of the styles in a swatch, badly formed CSS is generated, and none of the swatches is displayed properly.
Tip As I write this, ThemeRoller is unable to properly parse the CSS from the default theme. If you try to modify any of the styles in a swatch, badly formed CSS is generated, and none of the swatches is displayed properly.
You apply a theme to a jQuery Mobile page by using the data-theme attribute, setting the value to the name of the swatch you want. Listing 28-5 provides an example.
![]() Tip There is also a swatch called
Tip There is also a swatch called active, which is used to highlight selected buttons. This is applied automatically by jQuery Mobile, but you can use it directly as well. If you do, be sure that you are not confusing the user by creating conflicting active elements.
Listing 28-5. Using the Swatches in a Theme
<!DOCTYPE html>

<html>

<head>

    <title>Example</title>

    <meta name="viewport" content="width=device-width, initial-scale=1">

    <link rel="stylesheet" href="jquery.mobile-1.0.css" type="text/css" />

    <script type="text/javascript" src="jquery-1.6.4.js"></script>

    <script type="text/javascript" src="jquery.mobile-1.0.js"></script>

</head>

<body>
    <div id="page1" data-role="page" data-theme="a">

        <div data-role="header">

           <h1>Jacqui's Shop</h1>

        </div>

        <div data-role="content">

            This is Theme A

            <a href="#page2" data-role="button">Switch Theme</a>

        </div>

    </div>

    <div id="page2" data-role="page" data-theme="b">

        <div data-role="header">

           <h1>Jacqui's Shop</h1>

        </div>

        <div data-role="content">

            This is Theme B

            <a href="#page1" data-role="button">Switch Theme</a>

        </div>

    </div>

</body>

</html>
I have applied the data-theme attribute to the page element, which has the effect of applying the specified swatch to all of the child elements within the page. There are two pages in this example so that I can show how the same content is displayed by a pair of contrasting themes—and to make the point that there is no reliable way in jQuery Mobile to change the theme once a page has been through the automatic enhancement process. The data-theme attribute is transformed into a set of CSS classes that are applied to elements during page initialization, and so changing the value of the attribute doesn't do anything to change the classes. You can see the two-page example in Figure 28-5.
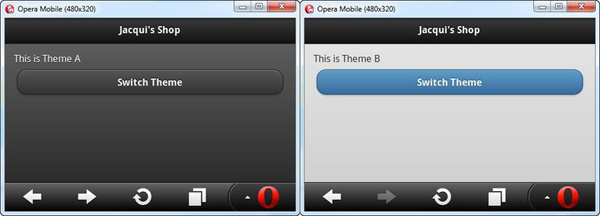
Figure 28-5 Two pages in the same application using different swatches
Applying Swatches to Individual Elements
The previous example shows how you can style entire pages, but you can also apply swatches on a per-element basis, mixing and matching to get a specific effect. Listing 28-6 provides a demonstration.
Listing 28-6. Applying Swatches to Individual Elements
<!DOCTYPE html>

<html>

<head>

    <title>Example</title>

    <meta name="viewport" content="width=device-width, initial-scale=1">

    <link rel="stylesheet" href="jquery.mobile-1.0.css" type="text/css" />

    <script type="text/javascript" src="jquery-1.6.4.js"></script>

    <script type="text/javascript" src="jquery.mobile-1.0.js"></script>

</head>

<body>
    <div id="page1" data-role="page" data-theme="a">

        <div data-role="header">

           <h1>Jacqui's Shop</h1>

        </div>

        <div data-role="content">

            <a href="document2.html" data-role="button" data-theme="b">Press Me</a>

            <a href="document2.html" data-role="button" data-theme="c">Press Me</a>

            <a href="document2.html" data-role="button" data-theme="e">Press Me</a>

        </div>

    </div>

</body>

</html>
In this example, I have applied the data-theme to the page and to the three button elements, each specifying a different swatch. You can see the effect in Figure 28-6.
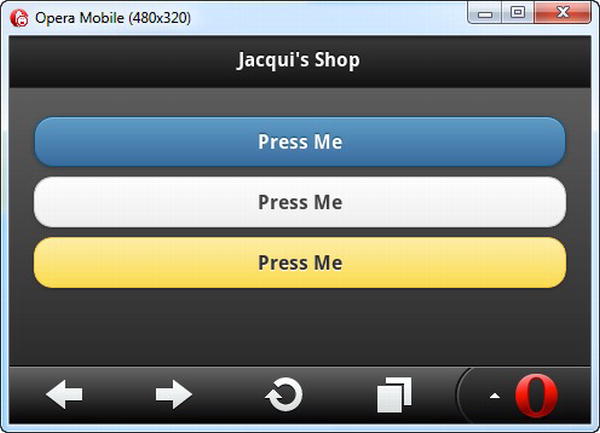
Figure 28-6 Applying different swatches to elements in the same page
The jQuery Mobile support for themes is simple and easy to work with. It would be nice if you were able to change the swatches used by elements on the fly, but even with this omission, you can use swatches to tailor the appearance of your mobile applications.
Creating Grid Layouts
jQuery Mobile defines some useful CSS classes that you can use to lay out the contents of your mobile pages in grid form. This is something you could do yourself, but having them built into the library is useful and reduces the amount of custom development is needed, especially for simple mobile applications.
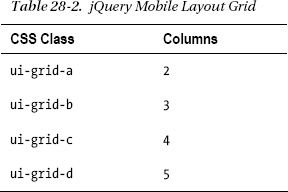
jQuery Mobile defines four grid classes, each of which contains a different number of columns, as summarized by Table 28-2.
You apply one of the grid classes to a container element and then apply classes to each of the content items within, starting with ui-block-a, ui-block-b, and so on, for each column. Listing 28-7 shows the use of these classes to create a simple grid.
Listing 28-7. Creating a Grid Using the jQuery Mobile Layout Classes
<!DOCTYPE html>

<html>

<head>

    <title>Example</title>

    <meta name="viewport" content="width=device-width, initial-scale=1">

    <link rel="stylesheet" href="jquery.mobile-1.0.css" type="text/css" />

    <script type="text/javascript" src="jquery-1.6.4.js"></script>

    <script type="text/javascript" src="jquery.mobile-1.0.js"></script>

</head>

<body>

    <div id="page1" data-role="page" data-theme="b">

        <div data-role="header">

           <h1>Jacqui's Shop</h1>

        </div>

        <div data-role="content">

            <div class="ui-grid-b">

                <div class="ui-block-a"><button>Press Me</button></div>
                <div class="ui-block-b"><button>Press Me</button></div>

                <div class="ui-block-c"><button>Press Me</button></div>

            </div>

            <div class="ui-grid-a">

                <div class="ui-block-a"><button>Press Me</button></div>

                <div class="ui-block-b"><button>Press Me</button></div>

            </div>

            <div><button>Press Me</button></div>

        </div>

    </div>

</body>

</html>
In this example, I have created two grids: one with three columns and one with two columns. Each column contains a button element, and I have added a button outside of the grid to emphasize the default behavior, which is for elements to span the screen. You can see the result in Figure 28-7.
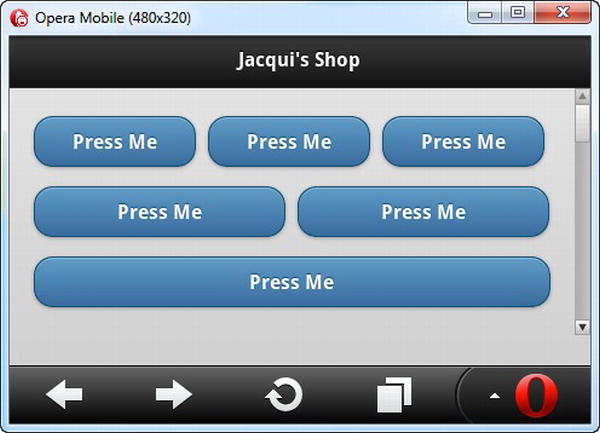
Figure 28-7 Laying out elements in a grid
Summary
In this chapter, I introduced three helpful features of jQuery Mobile: dialogs, swatches, and grid layouts. These are pretty minor features, but I wanted to describe them before I started using them in later chapters. These are simple features, but they help form the structure of most jQuery Mobile applications, so having a thorough understanding of them is important.