
C H A P T E R 9
Working with Events
In this chapter, I describe the jQuery support for events. If you are unfamiliar with events, then I provided a very brief overview of how they work and how they are propagated through the DOM in Chapter 2. jQuery provides some very nice event-related features, of which my favorite is the ability to automatically associate event handler functions with elements as they are added to the DOM. Table 9-1 provides the summary for this chapter.
Handling Events
jQuery provides a set of methods that let you register functions that are called when specified events are triggered on elements you are interested in. These methods are described in Table 9-2.
The various flavors of the bind method let you specify a function that will be invoked when an event is triggered, and since this is jQuery, the function is used for all of the elements in the jQuery object on which you use the bind method. Listing 9-1 shows a simple example.
Listing 9-1. Using the bind Method to Register an Event Handler Function
<!DOCTYPE html>

<html>

<head>

    <title>Example</title>

    <script src="jquery-1.7.js" type="text/javascript"></script>

    <link rel="stylesheet" type="text/css" href="styles.css"/>

    <script type="text/javascript">

        $(document).ready(function() {


            $('img').bind("mouseenter", handleMouseEnter)

                .bind("mouseout", handleMouseOut);


            function handleMouseEnter(e) {

                $(this).css({

                    "border": "thick solid red",

                    "opacity": "0.5"

                });

            };


            function handleMouseOut(e) {

                $(this).css({

                    "border": "",

                    "opacity": ""

                });

            }

        });

    </script>

</head>

<body>

    <h1>Jacqui's Flower Shop</h1>

    <form method="post">

        <div id="oblock">

            <div class="dtable">

                <div id="row1" class="drow">

                    <div class="dcell">

                        <img src="astor.png"/><label for="astor">Astor:</label>

                        <input name="astor" value="0" required />

                    </div>

                    <div class="dcell">

                        <img src="daffodil.png"/><label for="daffodil">Daffodil:</label>

                        <input name="daffodil" value="0" required />

                    </div>

                    <div class="dcell">

                        <img src="rose.png"/><label for="rose">Rose:</label>

                        <input name="rose" value="0" required />

                    </div>

                </div>

                <div id="row2"class="drow">

                    <div class="dcell">

                        <img src="peony.png"/><label for="peony">Peony:</label>

                        <input name="peony" value="0" required />

                    </div>

                    <div class="dcell">

                        <img src="primula.png"/><label for="primula">Primula:</label>

                        <input name="primula" value="0" required />

                    </div>

                    <div class="dcell">

                        <img src="snowdrop.png"/><label for="snowdrop">Snowdrop:</label>

                        <input name="snowdrop" value="0" required />

                    </div>

                </div>

            </div>

        </div>

        <div id="buttonDiv"><button type="submit">Place Order</button></div>

    </form>

</body>

</html>
In this example, I select all of the img elements in the document and use the bind method to register handler functions for the mouseenter and mouseout events. These handlers use the css method to set values for the border and opacity properties. When the user moves the mouse pointer over one of the img elements, the border is drawn, and the image is made more transparent, returning to its previous state when the pointer is moved away.
When jQuery calls the handler function, the this variable is set to the element to which the handler is attached. The object passed to the handler function is jQuery’s own Event object, which is different from the Event object defined by the DOM specification. Table 9-3 describes the properties and methods of the jQuery Event object.
The jQuery Event object also defines most of the properties from the standard DOM Event object. So, for almost all situations, you can treat the jQuery Event object as having a superset of the functionality defined by the DOM standard.
Registering a Function to Handle Multiple Event Types
A common technique is to use a single function to handle two or more kinds of event. These events are usually related in some way, such as the mouseenter and mouseout events. When using the bind method, you can specify multiple event types in the first argument, separated by a space. This is demonstrated in Listing 9-2.
Listing 9-2. Registering a Function to Handle Multiple Event Types
...

<script type="text/javascript">

    $(document).ready(function() {


        $('img').bind("mouseenter mouseout", handleMouse);


        function handleMouse(e) {

            var cssData = {

                "border": "thick solid red",

                "opacity": "0.5"

            }

            if (event.type == "mouseout") {

                cssData.border = "";

                cssData.opacity = "";

            }

            $(this).css(cssData);

        }

    });

</script>

...
In this script, I have used a single call to the bind method to specify that the mouseenter and mouseout events should be handled by the handleMouse function for all of the img elements in the document. Of course, you can also use a single function and chain the bind calls, like this:
$('img').bind("mouseenter", handleMouse).bind("mouseout", handleMouse);
You can also register handlers using a map object. The properties of the object are the names of the events, and their values are the functions that will be invoked when the events are triggered. Listing 9-3 shows the use of a map object with the bind method.
Listing 9-3. Using a Map Object to Register Event Handlers
...

<script type="text/javascript">

    $(document).ready(function() {


        $('img').bind({

            mouseenter: function() {

                $(this).css("border", "thick solid red");

            },

            mouseout: function() {

                $(this).css("border", "");

            }

        });


    });

</script>

...
In this example, I have defined the handler functions inline, as part of the map object. The bind method gets the details of the events I am interested in and my functions and creates the associations I have specified.
Providing Data to the Event Handler Function
You can pass an object to the bind method, which jQuery will then make available to the handler function through the Event.data property. This can be useful when using a single function to handle events from different sets of elements. The data value can help determine what kind of response is required. Listing 9-4 shows how to define and use the data value.
Listing 9-4. Passing Data to the Event Handler Function via the bind Method
...

<script type="text/javascript">

    $(document).ready(function() {


        $('img:odd').bind("mouseenter mouseout", "red", handleMouse);

        $('img:even').bind("mouseenter mouseout", "blue", handleMouse);


        function handleMouse(e) {

            var cssData = {

                "border": "thick solid " + e.data,

            }

            if (event.type == "mouseout") {

                cssData.border = "";

            }

            $(this).css(cssData);


        }

    });

</script>

...
In this script, I use the optional argument to the bind method to specify which color border should be displayed when the mouseenter event is triggered. For the odd-numbered img elements, the border will be red, and for the even-numbered it will be blue. In the event handler function I use the Event.data property to read the data and use it to create the value for the CSS border property. You can see the effect in Figure 9-1.
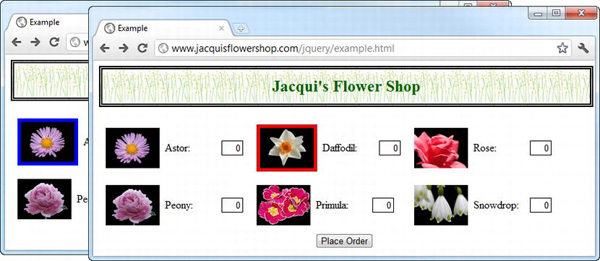
Figure 9-1. Passing data to the handler function via the bind method
Suppressing the Default Action
As I mentioned in Chapter 2, some events have a default action when they are triggered on certain elements. A good example occurs when the user clicks a button whose type attribute is submit. If the button is contained in a form element, the default action is for the browser to submit the form. To prevent the default action from being performed, you can call the preventDefault method on the Event object, as shown in Listing 9-5.
Listing 9-5. Preventing the Default Action on an Event
<script type="text/javascript">

    $(document).ready(function() {


        $('button:submit').bind("click", function(e) {

            e.preventDefault();

        });


    });

</script>
Now, usually you want to suppress the default action so you can perform some other activity instead. For example, you stop the browser from submitting the form because you want to do it with Ajax (which is the topic of Chapters 14 and 15). Instead of writing a one-line function, you can use the bind method, as shown in Listing 9-6.
Listing 9-6. Using the bind Method to Create a Handler That Prevents the Default Action
...

<script type="text/javascript">

    $(document).ready(function() {

        $('button:submit').bind("click", false);

    });

</script>

...
The first argument is the event or events whose default action you want to suppress, and the second argument allows you to specify whether the event should be prevented from bubbling up the DOM (I explain event bubbling in Chapter 2).
Removing Event Handler Functions
The unbind method removes a handler function from an element. You can unbind all of the handlers associated with all events for all elements in a jQuery object by calling the unbind method with no arguments, as shown in Listing 9-7.
Listing 9-7. Unbinding All Event Handlers
...

<script type="text/javascript">

    $(document).ready(function() {


        $('img').bind("mouseenter mouseout", handleMouse);


        $('img[src*=rose]').unbind();


        function handleMouse(e) {

            var cssData = {

                "border": "thick solid red",

                "opacity": "0.5"

            }

            if (event.type == "mouseout") {

                cssData.border = "";

                cssData.opacity = "";

            }

            $(this).css(cssData);

        }

    });

</script>

...
In this example, I bind a handler for the mouseenter and mouseout events for all of the img elements and then use the unbind method to remove all of the handlers for the img element whose src attribute contains rose. You can be more selective by passing the events you want to unbind as an argument to the unbind method, as shown in Listing 9-8.
Listing 9-8. Selectively Unbinding Events
...

<script type="text/javascript">

    $(document).ready(function() {


        $('img').bind("mouseenter mouseout", handleMouse);


        $('img[src*=rose]').unbind("mouseout");


        function handleMouse(e) {

            var cssData = {

                "border": "thick solid red",

                "opacity": "0.5"

            }

            if (event.type == "mouseout") {

                cssData.border = "";

                cssData.opacity = "";

            }

            $(this).css(cssData);

        }

    });

</script>

...
In this script I unbind only the mouseout event, leaving the handler for the mouseenter event untouched.
Unbinding from Within the Event Handler Function
The final option for unbinding is to do so from within the event handler function. This can be useful only if you want to handle an event a certain number of times, for example. Listing 9-9 contains a simple demonstration.
Listing 9-9. Unbinding from an Event Inside the Event Handler
...

<script type="text/javascript">

    $(document).ready(function() {


        $('img').bind("mouseenter", handleMouseEnter).bind("mouseout", handleMouseExit)


        var handledCount = 0;


        function handleMouseEnter(e) {

            $(this).css("border", "thick solid red");

        }

        function handleMouseExit(e) {

            $(this).css("border", "");

            handledCount ++;

            if (handledCount == 2) {

                $(this).unbind(e);

            }

        }

    });

</script>

...
In the handleMouseEvent function, I increment a counter each time that I handle the mouseout event. After I have handled the event twice, I pass the Event object to the unbind method to unregister the function as a handler. jQuery figures out the details it requires from the object itself.
Executing a Handler Once
The one method lets you register an event handler that will be executed only once for an element and then removed. Listing 9-10 provides an example.
Listing 9-10. Using the one Method to Register a Single-Shot Event Handler Function
...

<script type="text/javascript">

    $(document).ready(function() {


        $('img').one("mouseenter", handleMouseEnter).one("mouseout", handleMouseOut);


        function handleMouseEnter(e) {

            $(this).css("border", "thick solid red");

        };


        function handleMouseOut(e) {

            $(this).css("border", "");

        };

    });

</script>

...
I have used the one method to register handlers for the mouseenter and mouseout events. The handler functions will be called when the user moves the mouse in and out of one of the img elements, and then the function will be unbound (but just for that element; the others will still have the handlers until the mouse is moved over them).
Performing Live Event Binding
One limitation of the bind method is that your event handler functions are not associated with any new element that you add to the DOM. Listing 9-11 contains an example.
Listing 9-11. Adding Elements After Setting Up the Event Handlers
...

<script type="text/javascript">

    $(document).ready(function() {

        $('img').bind({

            mouseenter: function() {

                $(this).css("border", "thick solid red");

            },

            mouseout: function() {

                $(this).css("border", "");

            }

        });


        $('#row1').append($("<div class='dcell'/>")

            .append("<img src='lily.png'/>")

            .append("<label for='lily'>Lily:</label>")

            .append("<input name='lily' value='0' required />"));

    });

</script>

...
In this script, I use the bind method to set up handlers for the mouseenter and mouseout events for all of the img elements. I then use the append methods to insert some new elements in the document, including another img element. This new img element didn’t exist when I used the bind method, and my handler functions are not associated with it. The result of this is that I have six img elements that display a border when the mouse hovers over them and one that doesn’t.
In an example as simple as this, the easy answer is to call the bind method again, but it can be difficult to keep track of which handlers are required for different types of elements. Fortunately, jQuery makes this easy for you with a set of methods that automatically register event handlers when new elements that match a selector are added to the DOM. These methods are described in Table 9-4.


Listing 9-12 shows the previous example updated to use the live method. The change is minor, but the effect is significant. Any elements that I add to the DOM that match the selector img will have the specified event handler functions added automatically.
![]() Tip The
Tip The live method doesn’t actually need to add the handler functions directly to the element. In fact, it just creates an event handler on the document object and looks for events that were triggered by elements that match the selector. When it sees such an event, it triggers the event handler. However, for all practical purposes, it is just easier to imagine the live method diligently adding handles to new elements.
Listing 9-12. Using the live Method
...

<script type="text/javascript">

    $(document).ready(function() {


        $('img').live({

            mouseenter: function() {

                $(this).css("border", "thick solid red");

            },

            mouseout: function() {

                $(this).css("border", "");

            }

        });


        $('#row1').append($("<div class='dcell'/>")

            .append("<img src='lily.png'/>")

            .append("<label for='lily'>Lily:</label>")

            .append("<input name='lily' value='0' required />"));

    });


</script>

...
In this example, the newly added img element matches the selector of the jQuery object that I used with the live method and is associated with the handlers for the mouseenter and mouseout events.
The complement to the live method is die, which you can use to remove the handlers and prevent them from being assigned to any new elements that match the selector. Listing 9-13 shows the use of the die method.
Listing 9-13. Using the die Method
...

<script type="text/javascript">

    $(document).ready(function() {


        $('img').live({

            mouseenter: function() {

                $(this).css("border", "thick solid red");

            },

            mouseout: function() {

                $(this).css("border", "");

            }

        });


        $('img').die();

    });


</script>

...
![]() Caution It is important to use the same selector with the
Caution It is important to use the same selector with the live and die methods; otherwise, the die method won’t undo the effect of live.
Limiting DOM Traversal for Live Event Handlers
One problem with the live method is that the events have to propagate all the way up to the document element before your handler functions are executed. You can take a more direct approach by using the delegate method, which allows you to specify where the event listener will be located in the document. Listing 9-14 provides an example.
Listing 9-14. Using the delegate Method
...

<script type="text/javascript">

    $(document).ready(function() {


        $('#row1').delegate("img", {

            mouseenter: function() {

                $(this).css("border", "thick solid red");

            },

            mouseout: function() {

                $(this).css("border", "");

            }

        });


        $('#row1').append($("<div class='dcell'/>")

            .append("<img src='carnation.png'/>")

            .append("<label for='carnation'>Carnation:</label>")

            .append("<input name='carnation' value='0' required />"));


        $('#row2').append($("<div class='dcell'/>")

            .append("<img src='lily.png'/>")

            .append("<label for='lily'>Lily:</label>")

            .append("<input name='lily' value='0' required />"));

    });


</script>

...
In this example, I use the delegate method to add the listener to the element whose ID is #row1, and the selector I specified matches the img element. The effect of this is that my handler functions will be executed when a mouseenter or mouseout event that originated from an img element propagates to the row1 element. When I add another img element to row1, it is automatically covered by my call to the delegate method, which is not the case when I add elements to row2.
The main benefit of using the delegate method is speed, which can become an issue if you have a particularly large and complex document and a lot of event handlers. By pushing the point where the events are intercepted down into the documents, you reduce the distance that events have to travel in the DOM before they lead to the handler functions being invoked.
![]() Tip To remove handlers added with the
Tip To remove handlers added with the delegate method, you have to use undelegate. The die method works only with the live method.
Manually Invoking Event Handlers
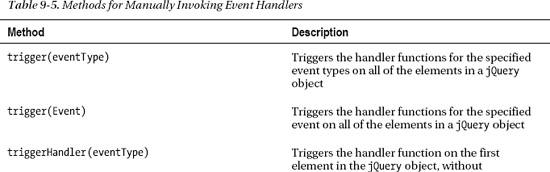
You can manually invoke the event handling functions on elements using the methods described in Table 9-5.
Listing 9-15 shows how you can trigger the event handlers manually.
Listing 9-15. Triggering Event Handlers Manually
...

<script type="text/javascript">

    $(document).ready(function() {


        $('img').bind({mouseenter: function() {

                $(this).css("border", "thick solid red");

            },

            mouseout: function() {

                $(this).css("border", "");

            }

        });


        $("<button>Trigger</button>").appendTo("#buttonDiv").bind("click", function (e) {

            $('#row1 img').trigger("mouseenter");

            e.preventDefault();

        });


    });


</script>

...
In this script, I use the bind method to set up a pair of event handler functions on the img elements in the document. I then use the appendTo method to insert a button element into the document method and the bind method to register a handler function for the click event.
When the button is pressed, the event handler function selects the img elements that are descendants of row1 and uses the trigger method to invoke their handlers for the mouseenter button. The effect, which is shown in Figure 9-2, is as though the mouse were simultaneously moved over all three img elements.

Figure 9-2. Manually triggering event handler functions
Using an Event Object
You can also use an Event object to trigger other elements’ event handlers. This can be a convenient technique to use inside a handler, as demonstrated in Listing 9-16.
Listing 9-16. Manually Triggering Event Handles with an Event Object
...

<script type="text/javascript">

    $(document).ready(function() {


        $('#row1 img').bind("mouseenter", function() {

            $(this).css("border", "thick solid red");

        });


        $('#row2 img').bind("mouseenter", function(e) {

            $(this).css("border", "thick solid blue");

            $('#row1 img').trigger(e);

        });


    });


</script>

...
In this example, I use the bind method to add a red border to the img descendants of the row1 element in response to the mouseenter event. I do the same with a blue border to the row2 img elements, but in the handler, I have added the following statement:
$('#row1 img').trigger(e);
The effect of this addition is that when the mouse enters one of the row2 img elements, the handler for the same event type is triggered on the row1 img elements as well. You can see the effect in Figure 9-3.

Figure 9-3. Triggering event handlers using an event
This approach is convenient when you want to trigger the handlers for the event type currently being processed, but you could as easily get the same effect by specifying the event type.
Using the triggerHandler Method
The triggerHandler method invokes the handler functions without performing the event’s default action or allowing the event to bubble up through the DOM. And, unlike the trigger method, triggerHandler invokes the handler function only on the first element in a jQuery object. Listing 9-17 shows the use of this method. Another difference is that the result from the triggerHandler method is the result returned by the handler function. This means you cannot chain the triggerHandler method.
Listing 9-17. Using the triggerHandler Method
...

<script type="text/javascript">

    $(document).ready(function() {

        $('#row1 img').bind("mouseenter", function() {

            $(this).css("border", "thick solid red");

        });


        $('#row2 img').bind("mouseenter", function(e) {

            $(this).css("border", "thick solid blue");

            $('#row1 img').triggerHandler("mouseenter");

        });

    });

</script>

...
You can see the effect of this script in Figure 9-4.
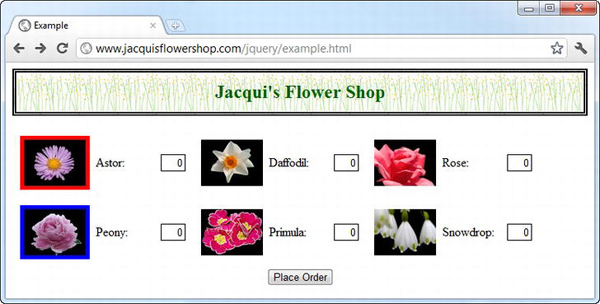
Figure 9-4. Using the triggerHandler method
Using the Event Shorthand Methods
jQuery defines some convenience methods that you can use as a shorthand to register an event handler for commonly used events. In the tables that follow, I have shown these shorthand methods with a function argument. This is the most common use and is equivalent to calling the bind method, but they require less typing and (at least to my mind) make it more obvious which events you are binding to. Listing 9-18 shows how you can use a shorthand method in this way.
Listing 9-18. Using an Event Shorthand Method to Bind a Handler Function
...

<script type="text/javascript">

    $(document).ready(function() {


        $('img').mouseenter(function() {

           $(this).css("border", "thick solid red");

        });


    });

</script>

...
This is equivalent to using the bind event for the mouseenter event, which I have shown in Listing 9-19.
Listing 9-19. Using the bind Method for the mouseenter Event
...

<script type="text/javascript">

    $(document).ready(function() {


        $('img').bind("mouseenter", function() {

           $(this).css("border", "thick solid red");

        });


    });

</script>

...
That’s all well and good, and by this point, you should be comfortable with how this example works. However, you can also use the shorthand methods as an analog to the trigger method. You do this by calling the method without arguments. Listing 9-20 shows how you can do this.
Listing 9-20. Using the Event Shorthand Methods to Trigger Event Handlers
...

<script type="text/javascript">

    $(document).ready(function() {


        $('img').bind("mouseenter", function() {

           $(this).css("border", "thick solid red");

        });


        $("<button>Trigger</button>").appendTo("#buttonDiv").click(function (e) {

            $('img').mouseenter();

            e.preventDefault();

        });

    });

</script>

...
I add a button to the document that, when clicked, selects the img elements and invokes their handlers for the mouseenter event. For completeness, Listing 9-21 shows the equivalent functionality written using the trigger method.
Listing 9-21. Using the trigger Method
...

<script type="text/javascript">

    $(document).ready(function() {


        $('img').bind("mouseenter", function() {

           $(this).css("border", "thick solid red");

        });


        $("<button>Trigger</button>").appendTo("#buttonDiv").click(function (e) {

            $('img').trigger("mouseenter");

            e.preventDefault();

        });

    });

</script>

...
In the sections that follow, I list the different categories of shorthand methods and the events they correspond to.
Using the Document Event Shorthand Methods
Table 9-6 describes the jQuery shorthand methods that apply to the document object.
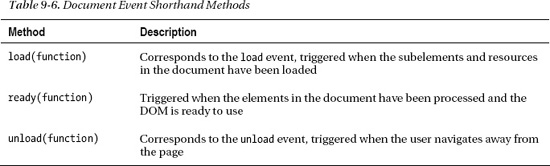
The ready method deserves special mention. It doesn’t correspond directly to a DOM event but is incredibly useful when using jQuery. You can see the different ways you can use the ready method in Chapter 5, when I explain how to defer execution of a script until the DOM is ready and how you can control the execution of the ready event.
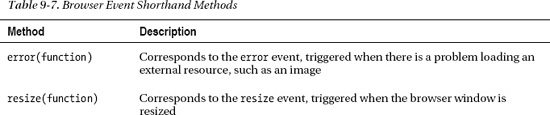
Using the Browser Event Shorthand Methods
Table 9-7 describes the browser events, which are usually targeted at the window object (although the error and scroll events are also used with elements as well).
Using the Mouse Event Shorthand Methods
Table 9-8 describes the set of shorthand methods that jQuery provides for dealing with mouse events.
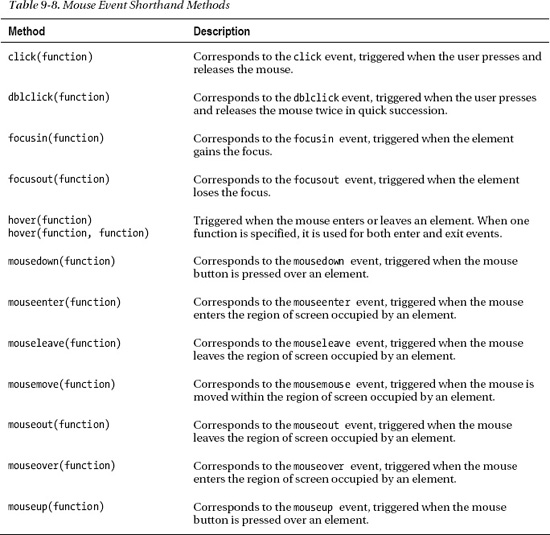
The hover method is a convenient way of binding a handler function to the mouseenter and mouseleave events. If you provide two functions as arguments, then the first is invoked in response to the mouseenter event and the second in response to mouseleave. If you specify only one function, it will be invoked for both events. Listing 9-22 shows the use of the hover method.
Listing 9-22. Using the hover Method
...

<script type="text/javascript">

    $(document).ready(function() {


        $('img').hover(handleMouseEnter, handleMouseLeave);


        function handleMouseEnter(e) {

            $(this).css("border", "thick solid red");

        };


        function handleMouseLeave(e) {

            $(this).css("border", "");

        }

    });

</script>

...
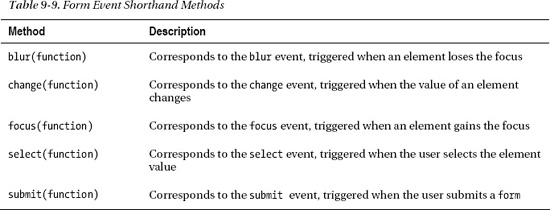
Using the Form Event Shorthand Methods
Table 9-9 describes the shorthand methods that jQuery provides for dealing with events that are usually associated with forms.
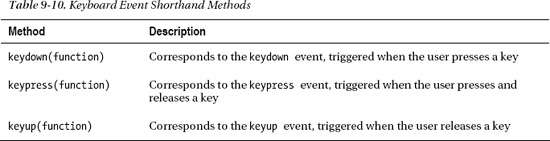
Using the Keyboard Event Shorthand Methods
Table 9-10 describes the shorthand methods that jQuery provides for dealing with keyboard events.
Summary
In this chapter, I showed you the jQuery support for events. As with much of jQuery, the benefit of the event functionality is simplicity and elegance. You can create and manage event handlers with little effort. I particularly like the support for creating live event handlers, such that elements that are added to the DOM that match a particular selector are automatically associated with event handlers. It significantly reduces the amount of time that I spend tracking down problems with event handling in my web applications.