A good starting point for Python is to gain an understanding of basic text handling and strings. A string is a block of characters stored together as a value. As you will learn, they can be viewed as a simple list of characters.
We will create a script to obtain the user's input, use string manipulation to switch around the letters, and print out a coded version of the message. We will then extend this example by demonstrating how encoded messages can be passed between parties without revealing the encoding methods, while also showing how to reuse sections of the code within other Python modules.
You can use most text editors to write Python code. They can be used directly on the Raspberry Pi or remotely through VNC or SSH.
The following are a few text editors that are available with the Raspberry Pi:
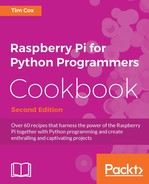
- nano: This text editor is available at the terminal and includes syntax highlighting and line numbers (with the
-coption). Refer to the following screenshot: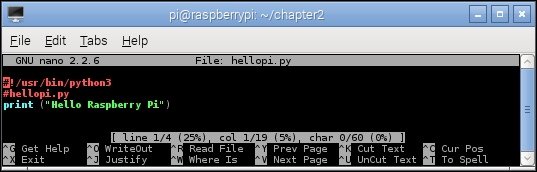
The nano command-line editor
- IDLE3: This Python editor includes the syntax highlighting feature, context help, and will run scripts directly from the editor (on pressing F5). This program requires X-Windows (the Debian desktop) or X11-forwarding to run remotely. We will be using Python 3 throughout the book, so ensure that you run IDLE3 (rather than IDLE), which will use Python 3 to run the scripts, as shown in the following screenshot:
The IDLE3 Python editor
- Geany: This text editor provides an Integrated Development Environment (IDE) that supports a range of programming languages, syntax highlighting, auto completion, and easy code navigation. This is a feature-rich editor, but can be difficult to use for beginners and may sometimes be slow when running on the Raspberry Pi. Again, you will need to run this editor with the Debian desktop or X11-forwarding. Refer to the following screenshot:

The Geany IDE
To install Geany, use the following command and then run Geany from the Programming menu item:
sudo apt-get install geanyTo ensure Geany uses Python 3 when you click on the Execute button (to run your scripts), you will need to change the build commands. Load
hellopi.pyand then click on the Build menu and select Set Build Commands. In the window that appears, as shown in the following screenshot, changepythontopython3in the Compile and Execute sections. Python is always compiled automatically when it is run (producing the temporary.pycfiles), so you don't need to use the Compile button, except maybe to check the syntax of the code:
The Geany Build command settings for Python 3
If you have the home directory of the Raspberry Pi shared across the network (refer to Sharing the home folder of the Raspberry Pi with SMB recipe in Chapter 1, Getting Started with a Raspberry Pi Computer), you can edit files on another computer. However, note that if you use Windows, you must use an editor that supports Linux line endings, such as Notepad++ (you should not use the standard Notepad program).
To create a space for your Python scripts, we will add a python_scripts folder to your home directory with the following command:
mkdir ~/python_scripts
Now you can open this folder and list the files whenever you need to, using the following commands:
cd ~/python_scripts
ls
Tip
You can use the Tab key to help complete commands in the terminal, for example, typing cd ~/pyt and then pressing the Tab key will finish the command for you. If there are multiple options that start with pyt, pressing the Tab key again will list them.
To repeat or edit older commands, use the up and down arrow keys to switch between older and newer commands as required.
Create the encryptdecrypt.py script as follows:
#!/usr/bin/python3
#encryptdecrypt.py

#Takes the input_text and encrypts it, returning the result
def encryptText(input_text,key):
  input_text=input_text.upper()
  result = ""
  for letter in input_text:
    #Ascii Uppercase 65-90  Lowercase 97-122 (Full range 32-126)
    ascii_value=ord(letter)
    #Exclude non-characters from encryption
    if (ord("A") > ascii_value) or (ascii_value > ord("Z")):
      result+=letter
    else:
      #Apply encryption key
      key_value = ascii_value+key
      #Ensure we just use A-Z regardless of key
      if not((ord("A")) < key_val < ord("Z")):
        key_val = ord("A")+(key_val-ord("A"))
                         %(ord("Z")-ord("A")+1)
      #Add the encoded letter to the result string
      result+=str(chr(key_value))
  return result

#Test function
def main():
  print ("Please enter text to scramble:")
  #Get user input
  try:
    user_input = input()
    scrambled_result = encryptText(user_input,10)
    print ("Result: " + scrambled_result)
    print ("To un-scramble, press enter again")
    input()
    unscrambled_result = encryptText(scrambled_result,-10)
    print ("Result: " + unscrambled_result)
  except UnicodeDecodeError:
    print ("Sorry: Only ASCII Characters are supported")

main()
#EndThe preceding script implements a very basic method to scramble the text using a simple form of character substitution called the Caesar cipher. Named after the Roman emperor Julius Caesar, who originally used this method to send secret orders to his armies.
The file defines two functions, encryptText() and main().
When the script is running, the main() function obtains the user's input using the input() command. The result is stored as a string in the user_input variable (the command will wait until the user has pressed the Enter key before continuing), as follows:
user_input = input()
We will call the encryptText() function with two arguments, the text to be encrypted, and the key. After the text has been encrypted, the result is printed:
scrambled_result = encryptText(user_input,10)
print ("Result: " + scrambled_result)Finally, we will use input() to wait for the user input again (in this case, a prompt to press Enter; any other input is ignored). Now, we will unscramble the text by reversing the encryption by calling encryptText() again, but with a negative version of the key, and displaying the result, which should be the original message.
The encryptText() function performs a simple form of encryption by taking the letters in the message and substituting each letter with another in the alphabet (determined by counting from the number of letters specified by the encryption key). In this way, the letter A will become C when the encryption key is 2.
To simplify the process, the function converts all characters to uppercase. This allows us to use the ASCII character set to translate each character into numbers easily; the letter A is represented by 65 and Z by 90. This is achieved with input_text=input_text.upper() and then by using ord(letter) to convert to an ASCII value, which gives us a number representation of the character. ASCII is a standard that maps the numbers 0 to 254 (an 8-bit value) and commonly used characters and symbols:
|
A |
B |
C |
D |
E |
F |
G |
H |
I |
J |
K |
L |
M |
|---|---|---|---|---|---|---|---|---|---|---|---|---|
|
65 |
66 |
67 |
68 |
69 |
70 |
71 |
72 |
73 |
74 |
75 |
76 |
77 |
|
N |
O |
P |
Q |
R |
S |
T |
U |
V |
W |
X |
Y |
Z |
|
78 |
79 |
80 |
81 |
82 |
83 |
84 |
85 |
86 |
87 |
88 |
89 |
90 |
ASCII table for upper case letters
Next, we will ensure that we have an empty string where we can build our result (result = "") and we will also set our encryption key to our key value.
The input_text variable contains our string, which is stored as a list (this is similar to an array) of letters. We can access each item in the list using input_text[0] for the first item and so on; however, Python also allows us to loop through a list using for…in, accessing each item in turn.
The for letter in input_text: line allows us to break up input_text by looping through it for each item inside (in this case, the letters in the string) and also setting the letter equal to that item. So if input_text equaled HELLO, it would run all the code that is indented under the command five times; each time, the letter variable would be set to H, E, L, L, and finally O. This allows us to read each letter separately, process it, and add the new encrypted letter to the result string.
The next part, if (ord("A") > ascii_value) or (ascii_value > ord("Z")):, checks to see if the character we are looking at is not between A and Z, which means it is probably a number or punctuation mark. In this case, we will exclude the character from the encryption (passing the character directly to the result string unchanged).
If the letter is between A and Z, we can add the value of our encryption key to the value of our letter to obtain our new encoded letter. That is, for an encryption key of 10, we end up with the following set of letters in the output:
Input Letter: A B C D E F G H I J K L M N O P Q R S T U V W X Y Z Output Letter: K L M N O P Q R S T U V W X Y Z A B C D E F G H I J
As we want the encrypted message to be easy to write out, we have limited the output to be between A and Z. So, if the letter starts as X, we want to it to wrap around and continue counting from A. We can achieve this by using the % (modulus) function, which gives us the remainder value if we divide a number by another. So, if X is 24 and we add 10, we get 34. The value of 34%26 (where 26 is the total number of letters) is 8. Counting 8 from A, we reach H.
However, in ASCII, the letter A is the number 65, so we will remove this offset from key_value and then add it back once we have the modulus value. The following code ensures that we limit the ASCII values to be between A and Z:
#Ensure we just use A-Z regardless of key
if not((ord("A")) < key_value < ord("Z")):
key_value = ord("A")+(key_value-ord("A"))
%(ord("Z")-ord("A")+1)Essentially, if the value is not between the values for A or Z, then we will allow the value to wrap around (by calculating the modulus using the total number of letters between A and Z, which is 26). This also works if the key is larger than 26 and if we are counting the opposite way too, for instance, if the encryption key was negative, and therefore, the decryption key positive.
Finally, we can convert key_value back into a letter by using the chr() and str() functions and adding it to the result string.
Note
Note that we use to split the code into another line, it doesn't affect the calculation. Python can be very fussy about splitting lines, in some cases you can find a natural break in the code and separate the line with a carriage return, however other times we have to force a line break using the symbol.
Of course, given very little time, such a simple encryption method could easily be broken. Remember that there are only 25 possible combinations to choose from before the result of the encryption is repeated (multiples of 26 will result in no encryption at all).
You can try this simple experiment. Currently, with this basic form of encryption, you will supply the method and key to anyone you wish to read your message. However, what happens if you want to send a secure transmission without sending the method and key?
The answer is to send the same message back and forth three times as demonstrated in the following diagram:

We do not need to exchange encryption keys with the other person
The first time, we will encrypt it and send it over to the other party. They will then encrypt it again with their own encryption and send it back. The message at this stage has two layers of encryption applied to it. We can now remove our encryption and return it. Finally, they will receive the message with just their encryption, which they can remove and read the message.
Just remember that there are only 25 useful encryption combinations with the Caesar cipher, so it is possible that they could decrypt the message by accident.
We can make use of our previous file as a module using the import command as follows:
import encryptdecrypt as ENC
This will allow access to any function inside the encryptdecrypt file using ENC as the reference. When such a file is imported, it will run any code that would normally be run; in this case, the main() function.
If the file is run directly, Python will set __name__ to the "__main__" global attribute. By using the following code, we can reuse the functions in this Python script in other scripts without running any other code:
if __name__=="__main__":
  main()
Create the keypassing.py script using the following code in the same directory as encryptdecrypt.py:
#!/usr/bin/python3
#keypassing.py
import encryptdecrypt as ENC

KEY1 = 20
KEY2 = 50

print ("Please enter text to scramble:")
#Get user input
user_input = input()
#Send message out
encodedKEY1 = ENC.encryptText(user_input,KEY1)
print ("USER1: Send message encrypted with KEY1 (KEY1): " + encodedKEY1)
#Receiver encrypts the message again
encodedKEY1KEY2 = ENC.encryptText(encodedKEY1,KEY2)
print ("USER2: Encrypt with KEY2 & returns it (KEY1+KEY2): " + encodedKEY1KEY2)
#Remove the original encoding
encodedKEY2 = ENC.encryptText(encodedKEY1KEY2,-KEY1)
print ("USER1: Removes KEY1 & returns with just KEY2 (KEY2): " + encodedKEY2)
#Receiver removes their encryption
message_result = ENC.encryptText(encodedKEY2,-KEY2)
print ("USER2: Removes KEY2 & Message received: " + message_result)
#End
On running the preceding script, we can see that the other person doesn't need to know the encryption key that we are using, and anyone who intercepts the message will not be able to see its contents. The script produces the following output:
Please enter text to scramble:
"A message to a friend."
USER1: Send message encrypted with KEY1 (KEY1): U GYMMUAY NI U ZLCYHX.
USER2: Encrypt with KEY2 & returns it (KEY1+KEY2): S EWKKSYW LG S XJAWFV.
USER1: Removes KEY1 & returns with just KEY2 (KEY2): Y KCQQYEC RM Y DPGCLB.
USER2: Removes KEY2 & Message received: A MESSAGE TO A FRIEND.
This method is known as the three-pass protocol, developed by Adi Shamir in 1980 (http://en.wikipedia.org/wiki/Three-pass_protocol). One particular disadvantage of this method is that it is possible for a third party to intercept the messages (the so-called man-in-the-middle attack) and characterize the encryption method by inserting known values and analyzing the responses.