
In this section, we shall make use of an online service called Xively; the service allows us to connect, transmit, and view data online. Xively makes use of a common protocol that is used for transferring information over HTTP called REpresentational State Transfer (REST). REST is used by many services, such as Facebook and Twitter, using various keys and access tokens to ensure data is transferred securely between authorized applications and verified sites.
You can perform most REST operations (methods such as POST, GET, SET, and so on) manually using a Python library called requests (http://docs.python-requests.org).
However, it is often easier to make use of specific libraries available for the service you intend to use. They will handle the authorization process; provide access functions; and, if the service changes, the library can be updated rather than your code.
We will use the xively-python library, which provides Python functions to allow us to easily interact with the site.
For details about the xively-python library, refer to http://xively.github.io/xively-python/.
The data collected by Xively is shown in the following screenshot:
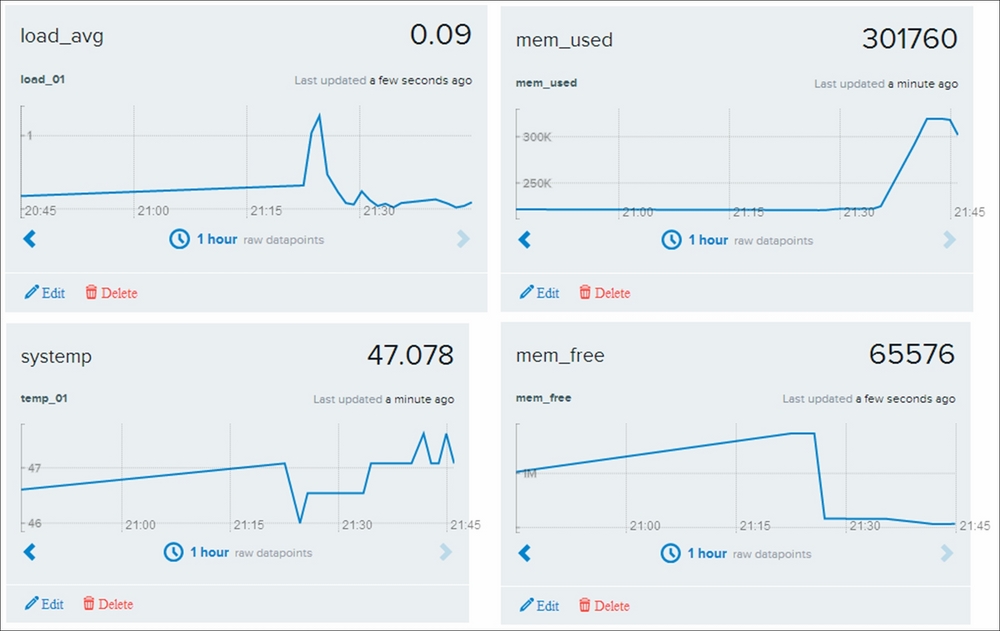
Xively collects and graphs data transferred using REST
You will need to create an account on www.xively.com, which we will use to receive our data. Go to the site and sign up for a free developer account (via the Developer section, https://personal.xively.com/signup).
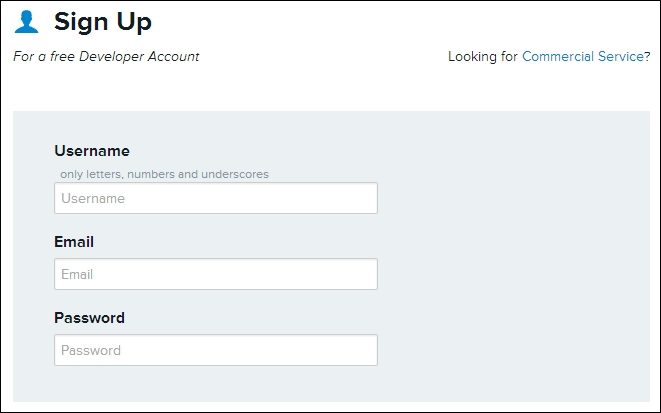
Sign up and create a Xively account
Once you have registered and verified your account, you can follow the instructions that will take you through a test drive example. This will demonstrate linking to data from your smartphone (gyroscopic data, location, and so on), which will give you a taste of what we can do with the Raspberry Pi.
When you log in, you will be taken to the Development Devices dashboard (located in the WebTools drop-down menu):
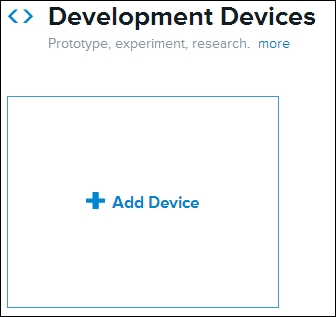
Adding a new device
Select +Add Device and fill in the details, giving your device a name and setting Device as Private.
You will now see the control page for your remote device, which contains all the information you need to connect and also where your data will be displayed.
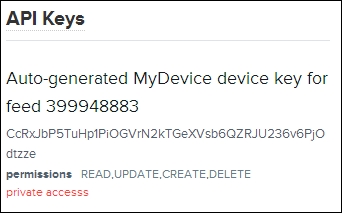
Example API Key and feed number (this will be unique for your device)
Although there is a lot of information on this page, you only need two parts of it:
Now that we have the details we need to connect with Xively, we can focus on the Raspberry Pi side of things.
We will use pip-3.2 to install Xively, as follows:
sudo pip-3.2 install xively-python
Ensure that the install reports the following:
Successfully installed xively-python requests
You are now ready to send some data from your Raspberry Pi.
Create the following script, xivelyLog.py. Ensure you set FEED_ID and API_KEY within the code to match the device you created:
#!/usr/bin/env python3
#xivelylog.py
import xively
import time
import datetime
import requests
from random import randint
import data_local as dataDevice

# Set the FEED_ID and API_KEY from your account
FEED_ID = 399948883
API_KEY = "CcRxJbP5TuHp1PiOGVrN2kTGeXVsb6QZRJU236v6PjOdtzze"
api = xively.XivelyAPIClient(API_KEY) # initialize api client
DEBUG=True

myData = dataDevice.device()
myDataNames=myData.getName()

def get_datastream(feed,name,tags):
  try:
    datastream = feed.datastreams.get(name)
    if DEBUG:print ("Found existing datastream")
    return datastream
  except:
    if DEBUG:print ("Creating new datastream")
    datastream = feed.datastreams.create(name, tags=tags)
    return datastream

def run():
  print ("Connecting to Xively")
  feed = api.feeds.get(FEED_ID)
  if DEBUG:print ("Got feed" + str(feed))
  datastreams=[]
  for dataName in myDataNames:
    dstream = get_datastream(feed,dataName,dataName)
    if DEBUG:print ("Got %s datastream:%s"%(dataName,dstream))
    datastreams.append(dstream)

  while True:
    data=myData.getNew()
    for idx,dataValue in enumerate(data):
      if DEBUG:
        print ("Updating %s: %s" % (dataName,dataValue))
      datastreams[idx].current_value = dataValue
      datastreams[idx].at = datetime.datetime.utcnow()
    try:
      for ds in datastreams:
        ds.update()
    except requests.HTTPError as e:
      print ("HTTPError({0}): {1}".format(e.errno, e.strerror))
    time.sleep(60)

run()
#EndFirst, we initialize the Xively API client, to which we supply API_KEY (this authorizes us to send data to the Xively device we created previously). Next, we use FEED_ID to link us to the specific feed we want to send the data to. Finally, we request the datastream to connect to (if it doesn't already exist in the feed, the get_datastream() function will create one for us).
For each datastream in the feed, we supply a name function and tags (these are keywords that help us identify the data; we can use our data names for this).
Once we have defined our datastreams, we enter the main loop; here, we gather our data values from dataDevice. We then set the current_value function and also the timestamp of the data for each data item and apply it to our datastream objects.
Finally, when all the data is ready, we update each of the datastreams and the data is sent to Xively, appearing within a few moments on the dashboard for the device.
We can log in to our Xively account and view data as it comes in, using a standard web browser. This provides the means to send data and remotely monitor it anywhere in the world (perhaps from several Raspberry Pis at once if required). The service even supports the creation of triggers that can send additional messages back if certain items go out of expected ranges, reach specific values, or match set criteria. The triggers can in turn be used to control other devices or raise alerts, and so on.
The AirPi Air Quality and Weather project (http://airpi.es) shows you how to add your own sensors or use their AirPi kit to create your own air quality and weather station (with data logging to your own Xively account). The site also allows you to share your Xively data feeds with others from around the world.