The previous recipe demonstrated using a dedicated servo controller to handle the control of the servos used by the PiBug. This has the advantage that any disturbances in the processing taking place on the Raspberry Pi does not cause interference with the delicate servo control (since the controller will continue to send the correct signals).
However, the Raspberry Pi is also capable of direct servo control. To achieve this we will make use of Richard Hurst's Servoblaster, which is a multiple servo driver.
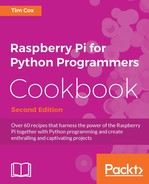
In this recipe, we will control four servos attached to the MeArm, a simple laser-cut robot arm; however, you can choose to fit servos to whatever device you like.
The MeArm is a simple robot arm powered by four miniature servos
Most common servos will have three wires and a three pin connector as follows:
|
Black/Brown |
Red |
Orange/White/Yellow/Blue |
|
Ground |
Positive Supply (Typically 5V for small servos) |
Signal |
While it is usually possible to power the servos directly from the Raspberry Pi 5V pins on the GPIO header, they can draw a significant amount of current when moving. Unless you have a very good power supply, this can cause the Raspberry Pi to reset unexpectedly, risking corrupting the SD card. Therefore it is recommended that you power them separately, for example, with an additional USB power supply and cable connected to the ground and positive supply.
By default the servos can be wired as follows:
|
Servo |
0 |
1 |
2 |
3 |
4 |
5 |
6 |
7 |
All GND |
All Power |
|
Raspberry Pi GPIO Pin | ||||||||||
|
7 |
11 |
12 |
13 |
15 |
16 |
19 |
22 |
6 |
No Connect | |
|
5V Power Supply |
GND |
+5V | ||||||||
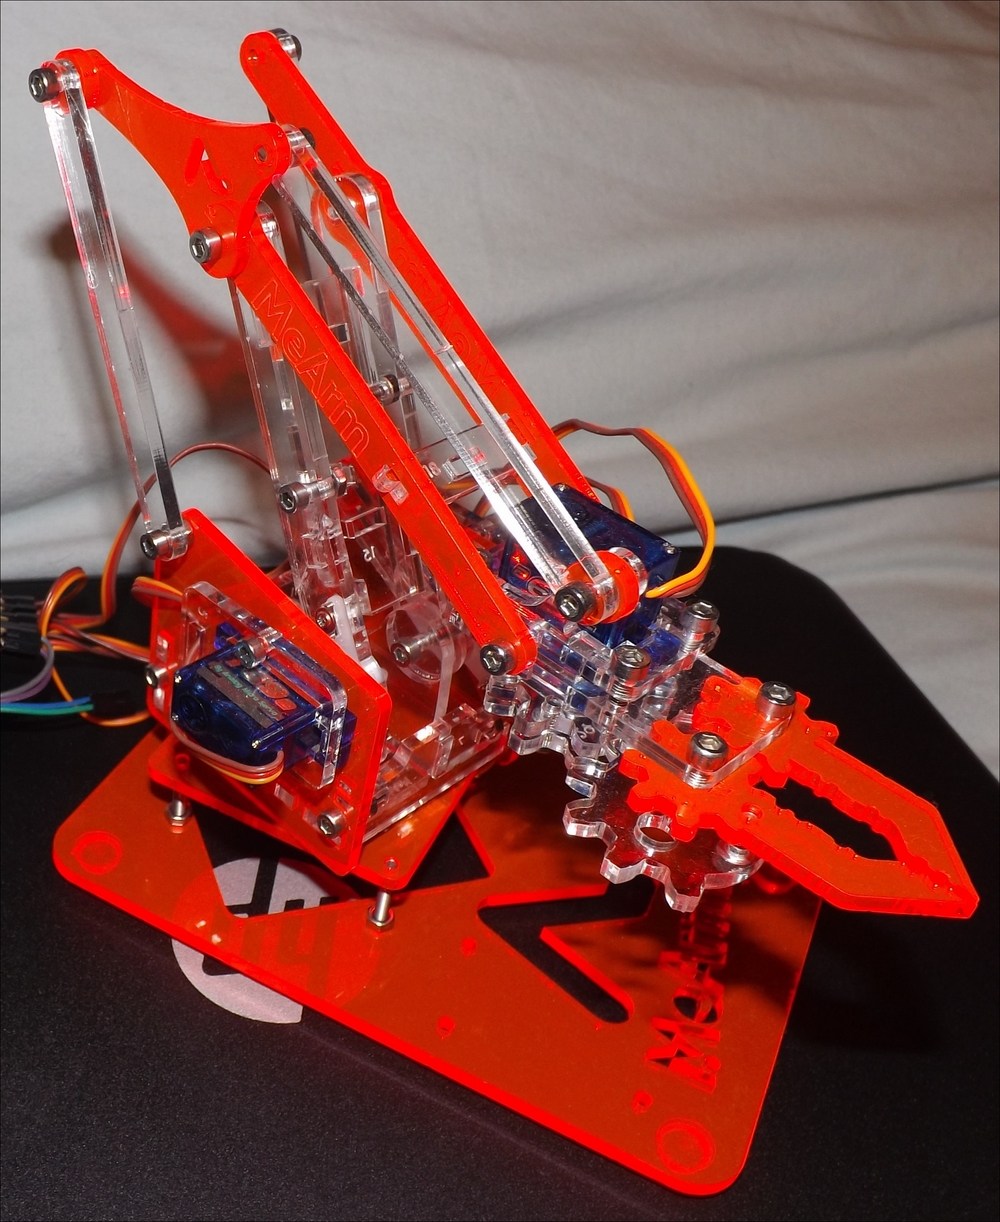
We will assume we are controlling four servos (0, 1, 2 and 3) that will be fitted later to the MeArm or similar device.

To install Servoblaster, start by downloading the source files from the Git repository:
cd ~
wget https://github.com/richardghirst/PiBits/archive/master.zip
Unzip and open the matplotlib-master folder, as follows:
unzip master.zip
rm master.zip
cd PiBits-master/ServoBlaster/user
We will use the user space daemon (which is located in the user directory) that is called servod. Before we can use it, we should compile it with this command:
make servod
There should be no errors, showing the following text:
gcc -Wall -g -O2 -o servod servod.c mailbox.c -lm
For usage information use the following command:
./servod --help
Now we can test a servo, first start the servod daemon (with a timeout of 2,000ms to switch off the servo off after it has moved):
sudo servod --idle-timeout=2000
You can move the servo's position to 0% of the servo's range:
echo 0=0% > /dev/servoblaster
Now update the servo to 50%, causing the servo to rotate to 90 degrees (servo mid-point):
echo 0=50% > /dev/servoblaster
As recommended by the MeArm build instructions, the servos should be connected and calibrated before building the arm, to ensure that each servo is able to move the arm in its correct range. This is done by ensuring each servo is powered up and commanded to its mid-point position (50%/90 degrees) and the servo-arm fitted at the expected orientation:
Each of the servos should be calibrated in the correct position before you fit them on the MeArm
You can now set each of the MeArm servos (0, 1, 2 and 3) to their mid-points (by commanding each in turn to 50%) before building and fitting them to completed arm.
The servos could be used to control a wide range of alternative devices other than the MeArm, but your servos will probably need to be calibrated in a similar manor.
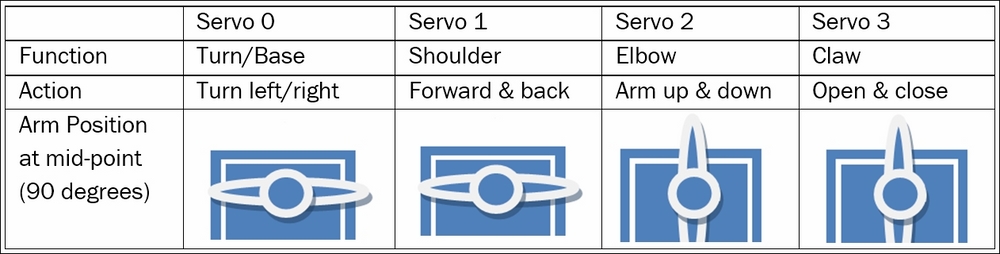
The precision control of servos means they can be used for a variety of applications. For example, controlling simulated hands
Create the following servo_control.py script:
#!/usr/bin/env python3
#servo_control.py
import curses
import os
#HARDWARE SETUP
# GPIO
# 2[=VX==2=======]26[=======]40
# 1[===013=======]25[=======]39
# V=5V X=Gnd
# Servo 0=Turn 1=Shoulder 2=Elbow 3=Claw
name=["Turn","Shoulder","Elbow","Claw"]
CAL=[90,90,90,90]
MIN=[0,60,40,60]; MAX=[180,165,180,180]
POS=list(CAL)
KEY_CMD=[ord('c'),ord('x')]
#Keys to rotate counter-clockwise
KEY_LESS={ord('d'):0,ord('s'):1,ord('j'):2,ord('k'):3}
#Keys to rotate clockwise
KEY_MORE={ord('a'):0,ord('w'):1,ord('l'):2,ord('i'):3}

STEP=5; LESS=-STEP; MORE=STEP #Define control steps
DEG2MS=1.5/180.0; OFFSET=1 #mseconds
IDLE=2000 #Timeout servo after command
SERVOD="/home/pi/PiBits-mater/ServoBlaster/user/servod" #Location of servod
DEBUG=True
text="Use a-d, w-s, j-l and i-k to control the MeArm. c=Cal x=eXit"

def initialize():
  cmd=("sudo %s --idle-timeout=%s"%(SERVOD, IDLE))
  os.system(cmd)

def limitServo(servo,value):
  global text
  if value > MAX[servo]:
    text=("Max %s position %s:%s"%(name[servo],servo,POS[servo]))
    return MAX[servo]
  elif value < MIN[servo]:
    text=("Min %s position %s:%s"%(name[servo],servo,POS[servo]))
    return MIN[servo]
  else:
    return value

def updateServo(servo,change):
  global text
  POS[servo]=limitServo(servo,POS[servo]+change)
  setServo(servo,POS[servo])
  text=str(POS)

def setServo(servo,position):
  ms=OFFSET+(position*DEG2MS)
  os.system("echo %d=%dus > /dev/servoblaster" %(servo, ms/1000))

def calibrate():
  global text
  text="Calibrate 90deg"
  for i,value in enumerate(CAL):
    POS[i]=value
    setServo(i,value)

def main(term):
  term.nodelay(1)
  term.addstr(text)
  term.refresh()
  while True:
    term.move(1,0)
    c = term.getch()
    if c != -1:
      if c in KEY_MORE:
        updateServo(KEY_MORE[c],MORE)
      elif c in KEY_LESS:
        updateServo(KEY_LESS[c],LESS)
      elif c in KEY_CMD:
        if c == ord('c'):
          calibrate()
        elif c == ord('x'):
          exit()
      if DEBUG:term.addstr(text+"   ")

if __name__=='__main__':
  initialize()
  curses.wrapper(main)
#Endpython3 servo_control.py
You can control the servos fitted to the MeArm (or whatever you are using) as prompted:
Use a-d, w-s, j-l and i-k to control the MeArm. c=Cal x=eXit
The script starts by importing the curses and os modules. A standard python input() command would require the Enter key to be pressed after each key press before we could act upon it. However, as we will see shortly, the curses module simply allows us to scan for keyboard presses and respond to them immediately. We use the os module to call the servoblaster commands, as we would via the terminal.
First, we define our setup, such as the servo mappings, calibration positions, min/max ranges, our control keys and the STEP size in degrees for each control command. We also define our parameters for our requested angle (in degrees) to target PWM signal up-time (in milliseconds) calculation.
Therefore, our required up-time (in milliseconds) can be calculated as OFFSET + (degrees*DEG2MS). Finally, we define the SERVOD command line and servo IDLE timeout to initialize the servoblaster user daemon. Within initialize () we use os.system() to start the servod daemon as we did before.
In order to detect keypresses, we call the main() function of the script from curses.wrapper(), allowing term to control the terminal input and output. We use term.nodelay(1) so when we do check for any keypresses (using term.getch()) execution will continue normally. We use term.addstr(text) to show the user the control keys and then update the display via term.refresh(). The remaining script checks the terminal for keypresses and the result assigned to c. If no key was pressed, then term.getch() returns -1, otherwise the ASCII equivalent value is returned and we can check for it in each of the dictionaries we defined for control keys. We will use KEY_MORE and KEY_LESS to change the servo positions and KEY_CMD (c or x) to allow us to set all the servos to their calibrated position or to exit cleanly. Finally, we display any useful debugging information (if DEBUG is set to True) using term.addstr() and ensure it is displayed at (1,0) in the terminal (one line down from the top).
For normal control, the position of the servos will be controlled using the updateServo() function, which adjusts the current position (stored in the POS array) by the required change (either +STEP or –STEP). We ensure the new position is within the MAX/MIN limits defined and report if we've hit them. The servo is then instructed to move to the required position using setServo() specifying the needed PWM up-time in micro seconds.
The last function, calibrate(), called when c is pressed, simply sets each of the servos to the angle defined in the CAL array (using setServo()) and ensures the current position is kept up to date.