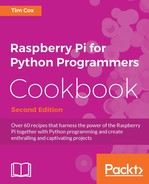
A classic bat and ball game can be created using the drawing tools of canvas and by detecting the collisions of the objects. The user will be able to control the green paddle using the left and right cursor keys to aim the ball at the bricks and hit them until they have all been destroyed.
Control the bat to aim the ball at the bricks
This example requires graphical output, so you must have a screen and keyboard attached to the Raspberry Pi or use X11 Forwarding and X server if connected remotely from another computer.
Create the following script, bouncingball.py.
- First, import the
tkinterandtimemodules, and define constants for the game graphics:#!/usr/bin/python3 # bouncingball.py import tkinter as TK import time VERT,HOREZ=0,1 xTOP,yTOP = 0,1 xBTM,yBTM = 2,3 MAX_WIDTH,MAX_HEIGHT = 640,480 xSTART,ySTART = 100,200 BALL_SIZE=20 RUNNING=True
- Next, create functions for closing the program, moving the paddle right and left, and for calculating the direction of the ball:
def close(): global RUNNING RUNNING=False root.destroy() def move_right(event): if canv.coords(paddle)[xBTM]<(MAX_WIDTH-7): canv.move(paddle, 7, 0) def move_left(event): if canv.coords(paddle)[xTOP]>7: canv.move(paddle, -7, 0) def determineDir(ball,obj): global delta_x,delta_y if (ball[xTOP] == obj[xBTM]) or (ball[xBTM] == obj[xTOP]): delta_x = -delta_x elif (ball[yTOP] == obj[yBTM]) or (ball[yBTM] == obj[yTOP]): delta_y = -delta_y - Set up the
tkinterwindow and define the canvas:root = TK.Tk() root.title("Bouncing Ball") root.geometry('%sx%s+%s+%s' %(MAX_WIDTH, MAX_HEIGHT, 100, 100)) root.bind('<Right>', move_right) root.bind('<Left>', move_left) root.protocol('WM_DELETE_WINDOW', close) canv = TK.Canvas(root, highlightthickness=0) canv.pack(fill='both', expand=True) - Add the borders,
ball, andpaddleobjects to the canvas:top = canv.create_line(0, 0, MAX_WIDTH, 0, fill='blue', tags=('top')) left = canv.create_line(0, 0, 0, MAX_HEIGHT, fill='blue', tags=('left')) right = canv.create_line(MAX_WIDTH, 0, MAX_WIDTH, MAX_HEIGHT, fill='blue', tags=('right')) bottom = canv.create_line(0, MAX_HEIGHT, MAX_WIDTH, MAX_HEIGHT, fill='blue', tags=('bottom')) ball = canv.create_rectangle(0, 0, BALL_SIZE, BALL_SIZE, outline='black', fill='black', tags=('ball')) paddle = canv.create_rectangle(100, MAX_HEIGHT - 30, 150, 470, outline='black', fill='green', tags=('rect')) - Draw all the bricks and set up the ball and paddle positions:
brick=list() for i in range(0,16): for row in range(0,4): brick.append(canv.create_rectangle(i*40, row*20, ((i+1)*40)-2, ((row+1)*20)-2, outline='black', fill='red', tags=('rect'))) delta_x = delta_y = 1 xold,yold = xSTART,ySTART canv.move(ball, xold, yold) - Create the main loop for the game to check for collisions and handle the movement of the paddle and ball:
while RUNNING:
  objects = canv.find_overlapping(canv.coords(ball)[0],
                                  canv.coords(ball)[1],
                                  canv.coords(ball)[2],
                                  canv.coords(ball)[3])

  #Only change the direction once (so will bounce off 1st
  # block even if 2 are hit)
  dir_changed=False
  for obj in objects:
    if (obj != ball):
      if dir_changed==False:
        determineDir(canv.coords(ball),canv.coords(obj))
        dir_changed=True
      if (obj >= brick[0]) and (obj <= brick[len(brick)-1]):
        canv.delete(obj)
      if (obj == bottom):
        text = canv.create_text(300,100,text="YOU HAVE MISSED!")
        canv.coords(ball, (xSTART,ySTART,
                    xSTART+BALL_SIZE,ySTART+BALL_SIZE))
        delta_x = delta_y = 1
        canv.update()
        time.sleep(3)
        canv.delete(text)
  new_x, new_y = delta_x, delta_y
  canv.move(ball, new_x, new_y)

  canv.update()
  time.sleep(0.005)
#End
We create a Tkinter application that is 640 x 480 pixels and bind the <Right> and <Left> cursor keys to the move_right() and move_left() functions. We use root.protocol('WM_DELETE_WINDOW', close) to detect when the window is closed so that we can cleanly exit the program (via close(), which sets RUNNING to False).
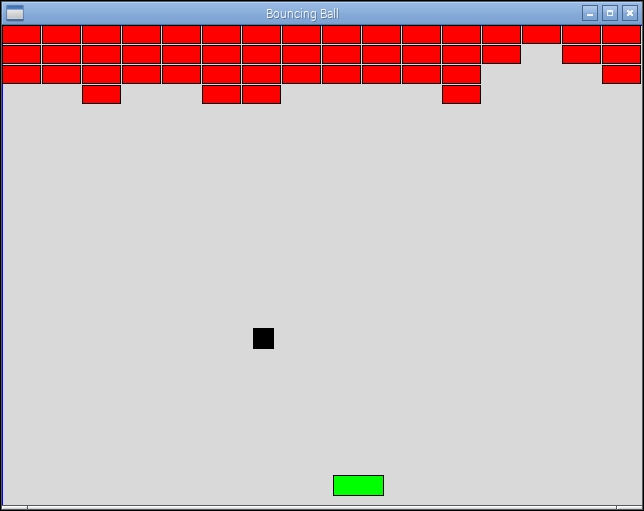
We then add a Canvas widget to the application that will hold all our objects. We create the following objects: top, left, right, and bottom. These make up our bounding sides for our game area. The canvas coordinates are 0,0 in the top-left corner and 640,480 in the bottom-right corner, so the start and end coordinates can be determined for each side (using canv.create_line(xStart, yStart, xEnd, yEnd)).
The coordinates of the Canvas widget
You can also add multiple tags to the objects; tags are often useful for defining specific actions or behaviors of objects. For instance, they allow for different types of event to occur when specific objects or bricks are hit. We see more uses of tags in the next example.
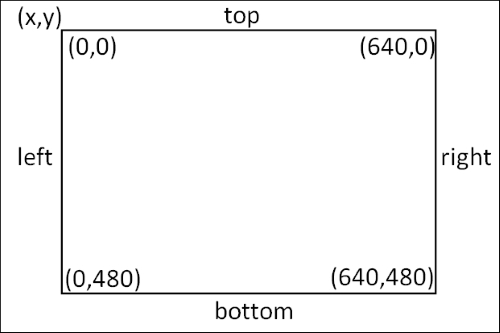
Next, we define the ball and paddle objects, which are added using canv.create_rectangle(). This requires two sets of coordinates that define the opposite corners of the Incorrect image, should be the following image with the 4x16 bricks on objects (in this case, the top-left and bottom-right corners).

A tkinter rectangle is defined by the coordinates of the two corners.
Finally, we can create the bricks!
We want our bricks to be 40 x 20 pixels wide so we can fit 16 bricks across our game area of 640 pixels (in four rows). We can create a list of brick objects with their positions defined automatically, as shown in the following code:
brick=list()
for i in range(0,16):
for row in range(0,4):
brick.append(canv.create_rectangle(i*40, row*20,
((i+1)*40)-2, ((row+1)*20)-2, outline='black',
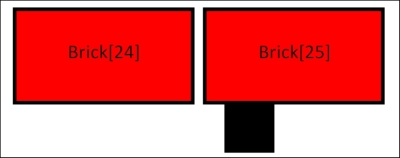
fill='red', tags=('rect')))A brick-like effect is provided by making the bricks slightly smaller (-2) to create a small gap.

Four rows of 16 bricks are generated at the top of Canvas
We now set the default settings before starting the main control loop. The movement of the ball will be governed by delta_x and delta_y, which are added to or subtracted from the ball's previous position in each cycle.
Next, we set the starting position of the ball and use the canv.move() function to move the ball by that amount. The move() function will add 100 to the x and y coordinates of the ball object, which was originally created at position 0,0.
Now that everything is set up, the main loop can run; this will check that the ball has not hit anything (using the canv.find_overlapping() function), make any adjustments to the delta_x or delta_y values, and then apply them to move the ball to the next location.
The sign of delta_x and delta_y determines the direction of the ball. Positive values will make the ball travel diagonally downwards and towards the right, while -delta_x will make it travel towards the left, either downwards or upwards depending on whether delta_y is positive or negative.
After the ball has been moved, we use canv.update() to redraw any changes made to the display, and time.sleep() allows a small delay before checking and moving the ball again.
Object collisions are detected using the canv.find_overlapping() function. This returns a list of canvas objects that are found to be overlapping the bounds of a rectangle defined by the supplied coordinates. For example, in the case of the square ball, are any of the coordinates of the canvas objects within the space the ball is occupying?
The objects are checked to detect if they overlap each other
If the ball is found to be overlapping another object, such as the walls, the paddle, or one or more of the bricks, we need to determine which direction the ball should next travel in. Since we are using the coordinates of the ball as the area within which to check, the ball will always be listed so that we ignore them when we check the list of objects.
We use the dir_changed flag to ensure that if we hit two bricks at the same time, we do not change direction twice before we move the ball. Otherwise, this would cause the ball to continue moving in the same direction even though it has collided with the bricks.
So if the ball is overlapping something else, we can call determineDir() with the coordinates of the ball and the object to work out what the new direction should be.
When the ball collides with something, we want the ball to bounce off it; fortunately, this is easy to simulate as we just need to change the sign of either delta_x or delta_y depending on whether we have hit something on the sides or the top/bottom. If the ball hits the bottom of another object, it means we were travelling upwards and should now travel downwards. However, we will continue to travel in the same direction on the x axis (be it left or right or just up). This can be seen from the following code:
if (ball[xTOP] == obj[xBTM]) or (ball[xBTM] == obj[xTOP]):
    delta_x = -delta_x
The determineDir() function looks at the coordinates of the ball and the object, and looks for a match between either the left and right x coordinates or the top and bottom y coordinates. This is enough to say whether the collision is on the sides or top/bottom, and we can set the delta_x or delta_y signs accordingly, as can be seen in the following code:
if (obj >= brick[0]) and (obj <= brick[-1]):
    canv.delete(obj)
Next, we can determine if we have hit a brick by checking whether the overlapping object ID is between the first and last ID bricks. If it was a brick, we can remove it using canv.delete().
We also check to see whether the object being overlapped is the bottom line (in which case, the player has missed the ball with the paddle), so a short message is displayed briefly. We reset the position of the ball and delta_x/delta_y values. The canv.update() function ensures that the display is refreshed with the message before it is deleted (3 seconds later).
Finally, the ball is moved by the delta_x/delta_y distance and the display is updated. A small delay is added here to reduce the rate of updates and the CPU time used. Otherwise, you will find that your Raspberry Pi will become unresponsive if it is spending 100 percent of its effort running the program.
When the user presses the cursor keys, the move_right() and move_left() functions are called. They check the position of the paddle object, and if the paddle is not at the edge, the paddle will be moved accordingly. If the ball hits the paddle, the collision detection will ensure that the ball bounces off, just as if it has hit one of the bricks.
You can extend this game further by adding a score for each block destroyed, allowing the player a finite number of lives that are lost when they miss the ball, and even writing some code to read in new brick layouts.