
Databases are a perfect way to store lots of structured data while maintaining the ability to access and search for specific data. Structured Query Language (SQL) is a standardized set of commands to update and query databases. For this example, we will use SQLite (a lightweight self-contained implementation of an SQL database system).
In this chapter, we will gather raw data from our ADC (or local data source) and build our own database. We can then use a Python library called sqlite3 to add data to a database and then query it.
   ##            Timestamp  0:Light  1:Temperature   2:External  3:Potentiometer
    0 2015-06-16 21:30:51      225            212          122              216
    1  2015-06-16 21:30:52      225            212          148              216
    2  2015-06-16 21:30:53      225            212          113              216
    3  2015-06-16 21:30:54      225            212          137              216
    4  2015-06-16 21:30:55      225            212          142              216
    5  2015-06-16 21:30:56      225            212          115              216
    6  2015-06-16 21:30:57      225            212          149              216
    7  2015-06-16 21:30:58      225            212          128              216
    8  2015-06-16 21:30:59      225            212          123              216
9 2015-06-16 21:31:02 225 212 147 216 To capture data in our database, we will install SQLite ready to use with Python's sqlite3 built-in module. Use the following command to install SQLite:
sudo apt-get install sqlite3
Next, we will perform some basic operations with SQLite to see how to use SQL queries.
Run SQLite directly, creating a new test.db database file with the following command:
sqlite3 test.db
SQLite version 3.7.13 2012-06-11 02:05:22
Enter ".help" for instructions
Enter SQL statements terminated with a ";"
sqlite>
This will open a SQLite console within which we enter SQL commands directly. For example, the following commands will create a new table, add some data, display the content, and then remove the table:
CREATE TABLE mytable (info TEXT, info2 TEXT,);
INSERT INTO mytable VALUES ("John","Smith");
INSERT INTO mytable VALUES ("Mary","Jane");
John|Smith
Mary|Jane
DROP TABLE mytable;
.exit
You will need the same hardware setup as the previous recipe, as detailed in the Getting ready section of the Using devices with the I2C bus recipe.
Create the following script, mysqlite_adc.py:
#!/usr/bin/python3
#mysql_adc.py
import sqlite3
import datetime
import data_adc as dataDevice
import time
import os


DEBUG=True
SHOWSQL=True
CLEARDATA=False
VAL0=0;VAL1=1;VAL2=2;VAL3=3 #Set data order
FORMATBODY="%5s %8s %14s %12s %16s"
FORMATLIST="%5s %12s %10s %16s %7s"
DATEBASE_DIR="/var/databases/datasite/"
DATEBASE=DATEBASE_DIR+"mydatabase.db"
TABLE="recordeddata"
DELAY=1 #approximate seconds between samples

def captureSamples(cursor):
    if(CLEARDATA):cursor.execute("DELETE FROM %s" %(TABLE))
    myData = dataDevice.device()
    myDataNames=myData.getName()

    if(DEBUG):print(FORMATBODY%("##",myDataNames[VAL0],
                                myDataNames[VAL1],myDataNames[VAL2],
                                myDataNames[VAL3]))
    for x in range(10):
        data=myData.getNew()
        for i,dataName in enumerate(myDataNames):
            sqlquery = "INSERT INTO %s (itm_name, itm_value) " %(TABLE) +
                       "VALUES('%s', %s)"
                        %(str(dataName),str(data[i]))
            if (SHOWSQL):print(sqlquery)
            cursor.execute(sqlquery)

        if(DEBUG):print(FORMATBODY%(x,
                                    data[VAL0],data[VAL1],
                                    data[VAL2],data[VAL3]))
        time.sleep(DELAY)
    cursor.commit()

def displayAll(connect):
    sqlquery="SELECT * FROM %s" %(TABLE)
    if (SHOWSQL):print(sqlquery)
    cursor = connect.execute (sqlquery)
    print(FORMATLIST%("","Date","Time","Name","Value"))

    for x,column in enumerate(cursor.fetchall()):
       print(FORMATLIST%(x,str(column[0]),str(column[1]),
                         str(column[2]),str(column[3])))

def createTable(cursor):
    print("Create a new table: %s" %(TABLE))
    sqlquery="CREATE TABLE %s (" %(TABLE) +
             "itm_date DEFAULT (date('now','localtime')), " +
             "itm_time DEFAULT (time('now','localtime')), " +
             "itm_name, itm_value)"
    if (SHOWSQL):print(sqlquery)
    cursor.execute(sqlquery)
    cursor.commit()

def openTable(cursor):
    try:
        displayAll(cursor)
    except sqlite3.OperationalError:
        print("Table does not exist in database")
        createTable(cursor)
    finally:
        captureSamples(cursor)
        displayAll(cursor)

try:
    if not os.path.exists(DATEBASE_DIR):
        os.makedirs(DATEBASE_DIR)
    connection = sqlite3.connect(DATEBASE)
    try:
        openTable(connection)
    finally:
        connection.close()
except sqlite3.OperationalError:
    print("Unable to open Database")
finally:
    print("Done")

#End
Note
If you do not have the ADC module hardware, you can capture local data by setting the dataDevice module as data_local. Ensure you have data_local.py (from the There's more… section in the Reading analog data using an analog-to-digital converter recipe) in the same directory as this script:
import data_local as dataDevice
This will capture the local data (RAM, CPU activity, temperature, and so on) to the SQLite database instead of ADC samples.
When the script is first run, it will create a new SQLite database file called mydatabase.db, which will add a table named recordeddata. The table is generated by createTable(), which runs the following SQLite command:
CREATE TABLE recordeddata
(
    itm_date DEFAULT (date('now','localtime')),
    itm_time DEFAULT (time('now','localtime')),
    itm_name,
    itm_value
)
The new table will contain the following data items:
|
Name |
Description |
|---|---|
|
|
Used to store the date of the data sample. When the data record is created the current date (using |
|
|
Used to store the time of the data sample. When the data record is created the current time (using |
|
|
Used to record the name of the sample. |
|
|
Used to keep the sampled value. |
We then use the same the method to capture ten data samples from the ADC as we did in the Logging and plotting data recipe previously (as shown in the function captureSamples()). However, this time we will then add the captured data into our new SQLite database table, using the following SQL command (applied using cursor.execute(sqlquery)):
INSERT INTO recordeddata
    (itm_name, itm_value) VALUES ('0:Light', 210)
The current date and time will be added by default to each record as it is created. We end up with a set of 40 records (four records for every cycle of ADC samples captured), which are now stored in the SQLite database.
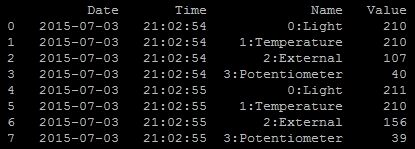
Eight ADC samples have been captured and stored in the SQLite database
After the records have been created we must remember to call cursor.commit(), which will save all the new records to the database.
The last part of the script calls displayAll(), which will use the following SQL command:
SELECT * FROM recordeddata
This will select all of the data records in the recordeddata table, and we use cursor.fetch() to provide the selected data as a list we can iterate through:
    for x,column in enumerate(cursor.fetchall()):
       print(FORMATLIST%(x,str(column[0]),str(column[1]),
                         str(column[2]),str(column[3])))
This allows us to print out the full contents of the database, displaying the captured data.
Note
Notice that here we use the try, except, and finally constructs in this script to attempt to handle the mostly likely scenario users will face when running the script.
First we ensure that if the database directory doesn't exist, we create it. Next we try opening the database file; this process will automatically create a new database file if one doesn't already exist. If either of these initial steps fail (due to not having read/write permissions, for example) we cannot continue so we report that we cannot open the database and simply exit the script.
Next, we try to open the required table within the database and display it; if the database file is brand new this operation will always fail as it will be empty. However, if this occurs we just catch the exception and create the table before continuing with the script to add our sampled data to the table and display it.
This allows the script to gracefully handle potential problems, take corrective action and then continue smoothly. The next time the script is run, the database and table will already exist, so we won't need to create them a second time and we can append the sample data to the table within the same database file.
There are many variants of SQL servers available (such as MySQL, Microsoft SQL Server, or PostgreSQL); however, they should at least have the following primary commands (or equivalent):
CREATE, INSERT, SELECT, WHERE, UPDATE, SET, DELETE, and DROP
You should find that even if you choose to use a different SQL server to the SQLite one used here, the SQL commands will be relatively similar.
The CREATE TABLE command is used to define a new table by specifying the column names (and also to set DEFAULT values if desired):
CREATE TABLE table_name (
    column_name1 TEXT,
    column_name2 INTEGER DEFAULT 0,
    column_name3 REAL )
The previous SQL command will create a new table called table_name, containing three data items. One column would contain text, another integers (for example, 1, 3, -9) and finally one column for real numbers (for example, 5.6, 3.1749, 1.0).
The INSERT command will add a particular entry to a table in the database:
INSERT INTO table_name (column_name1name1, column_name2name2, column_name3)name3)
    VALUES ('Terry'Terry Pratchett', 6666, 27.082015)082015)
This will enter the values provided into the corresponding columns in the table.
The SELECT command allows us to specify a particular column or columns from the database table, returning a list of records with the data:
SELECT column_name1, column_name2 FROM table_name
Or to select all items, use this command:
SELECT * FROM table_name
The WHERE command is used to specify specific entries to be selected, updated, or deleted:
SELECT * FROM table_name
    WHERE column_name1= 'Terry Pratchett'
This will SELECT any records where the column_name1 matches 'Terry Pratchett'.
The UPDATE command will allow us to change (SET) the values of data in each of the specified columns. We can also combine this with the WHERE command to limit the records the change is applied to:
UPDATE table_name
    SET column_name2=49name2=49,column_name3=30name3=30.111997
    WHERE column_name1name1= 'Douglas Adams'Adams';