
Stop frame (or stop motion) animation is the process of taking a series of still images of items, while making very small movements (typically of an easily moveable object such as a doll or plasticine model) in each frame. When the frames are assembled into a video, the small movements combine to produce an animation.

Multiple images can be combined into an animation
Traditionally, such animations were made by taking hundreds or even thousands of individual photos on a film camera (such as a Cine Super 8 movie camera) and then sending the film off to be developed and playing back the results some weeks later. Despite the inspiring creations by Nick Park at Aardman Animations, including Wallace and Gromit (which are full-length, stop frame animation films), this was a hobby that was a little out of reach for most.
In the modern digital age, we can take multiple images quickly and easily with the luxury of reviewing the results almost instantly. Now anyone can try their hand at their own animated masterpieces with very little cost or effort.
We will extend our original Camera GUI with some extra features that will allow us to create our own stop frame animations. It will allow us to take images and try them out in a sequence before generating a finished video for us.
The software setup for this example will be the same as the previous time-lapse example. Again, we will need mencoder to be installed and we need the cameraGUI.py file in the same directory.
You will also need something to animate, ideally something you can put in different poses, like the two dolls shown in the following image:
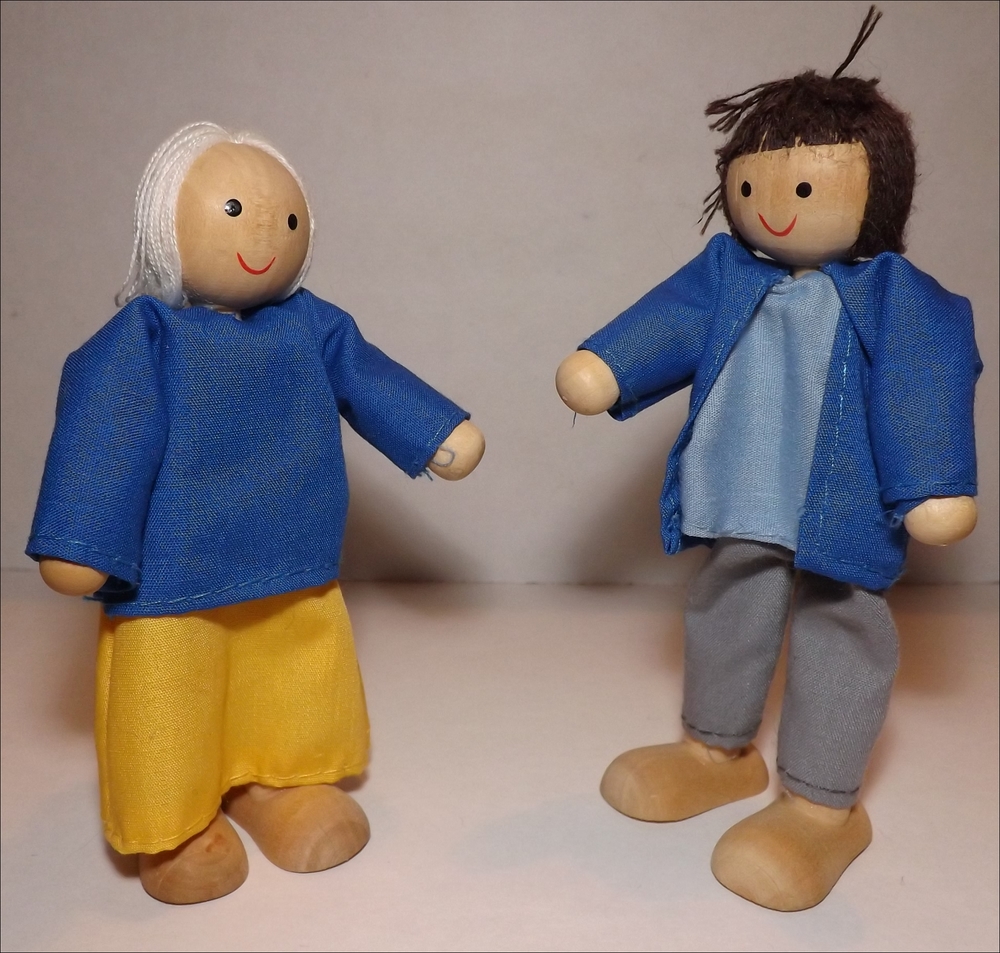
Two potential stars for our stop frame animation
Create animateGUI.py in the same directory as cameraGUI.py by performing the following steps:
- Start by importing the supporting modules (including
cameraGUI), as shown in the following code:#!/usr/bin/python3 #animateGUI.py import tkinter as TK from tkinter import messagebox import time import os import cameraGUI as camGUI
- Extend the
cameraGUI.SETclass with settings for the image size and encoding as follows:class SET(camGUI.SET): TL_SIZE=(1920,1080) ENC_PROG="mencoder -nosound -ovc lavc -lavcopts" ENC_PROG+=" vcodec=mpeg4:aspect=16/9:vbitrate=8000000" ENC_PROG+=" -vf scale=%d:%d"%(TL_SIZE[0],TL_SIZE[1]) ENC_PROG+=" -o %s -mf type=jpeg:fps=24 mf://@%s" LIST_FILE="image_list.txt"
- Extend the main
cameraGUIclass with the functions required for the animation as follows:class cameraGUI(camGUI.cameraGUI): def diff(a, b): b = set(b) return [aa for aa in a if aa not in b] def __init__(self,parent): super(cameraGUI,self).__init__(parent) self.parent=parent TK.Frame.__init__(self,self.parent, background="white") self.theList = TK.Variable() self.imageListbox=TK.Listbox(self.parent, listvariable=self.theList, selectmode=TK.EXTENDED) self.imageListbox.grid(row=0, column=4,columnspan=2, sticky=TK.N+TK.S+TK.E+TK.W) yscroll = TK.Scrollbar(command=self.imageListbox.yview, orient=TK.VERTICAL) yscroll.grid(row=0, column=6, sticky=TK.N+TK.S) self.imageListbox.configure(yscrollcommand=yscroll.set) self.trimBtn=TK.Button(self.parent,text="Trim", command=self.trim) self.trimBtn.grid(row=1,column=4) self.speed = TK.IntVar() self.speed.set(20) self.speedScale=TK.Scale(self.parent,from_=1,to=30, orient=TK.HORIZONTAL, variable=self.speed, label="Speed (fps)") self.speedScale.grid(row=2,column=4) self.genBtn=TK.Button(self.parent,text="Generate", command=self.generate) self.genBtn.grid(row=2,column=5) self.btnAniTxt=TK.StringVar() self.btnAniTxt.set("Animate") self.animateBtn=TK.Button(self.parent, textvariable=self.btnAniTxt, command=self.animate) self.animateBtn.grid(row=1,column=5) self.animating=False self.updateList() - Add functions to list the images that were taken and remove them from the list using the following code snippet:
def shutter(self): super(cameraGUI,self).shutter() self.updateList() def updateList(self): filelist=[] for files in os.listdir("."): if files.endswith(".jpg"): filelist.append(files) filelist.sort() self.theList.set(tuple(filelist)) self.canvas.update() def generate(self): self.msg("Generate video...") cameraGUI.run("ls *.jpg > "+SET.LIST_FILE) filename=cameraGUI.timestamp()+".avi" cameraGUI.run(SET.ENC_PROG%(filename,SET.LIST_FILE)) self.msg(filename) TK.messagebox.showinfo("Encode Complete", "Video: "+filename) def trim(self): print("Trim List") selected = map(int,self.imageListbox.curselection()) trim=cameraGUI.diff(range(self.imageListbox.size()), selected) for item in trim: filename=self.theList.get()[item] self.msg("Rename file %s"%filename) #We could delete os.remove() but os.rename() allows #us to change our minds (files are just renamed). os.rename(filename, filename.replace(".jpg",".jpg.bak")) self.imageListbox.selection_clear(0, last=self.imageListbox.size()) self.updateList() - Include functions to perform the test animation using the image list as follows:
def animate(self): print("Animate Toggle") if (self.animating==True): self.btnAniTxt.set("Animate") self.animating=False else: self.btnAniTxt.set("STOP") self.animating=True self.doAnimate() def doAnimate(self): imageList=[] selected = self.imageListbox.curselection() if len(selected)==0: selected=range(self.imageListbox.size()) print(selected) if len(selected)==0: TK.messagebox.showinfo("Error", "There are no images to display!") self.animate() elif len(selected)==1: filename=self.theList.get()[int(selected[0])] self.updateDisp(filename,SET.PV_SIZE) self.animate() else: for idx,item in enumerate(selected): self.msg("Generate Image: %d/%d"%(idx+1, len(selected))) filename=self.theList.get()[int(item)] aImage=cameraGUI.getTKImage(filename,SET.PV_SIZE) imageList.append(aImage) print("Apply Images") canvasList=[] for idx,aImage in enumerate(imageList): self.msg("Apply Image: %d/%d"%(idx+1, len(imageList))) canvasList.append(self.canvas.create_image(0, 0, anchor=TK.NW, image=imageList[idx], state=TK.HIDDEN)) self.cycleImages(canvasList) def cycleImages(self,canvasList): while (self.animating==True): print("Cycle Images") for idx,aImage in enumerate(canvasList): self.msg("Cycle Image: %d/%d"%(idx+1, len(canvasList))) self.canvas.itemconfigure(canvasList[idx], state=TK.NORMAL) if idx>=1: self.canvas.itemconfigure(canvasList[idx-1], state=TK.HIDDEN) elif len(canvasList)>1: self.canvas.itemconfigure( canvasList[len(canvasList)-1], state=TK.HIDDEN) self.canvas.update() time.sleep(1/self.speed.get()) #End - Next, create the following
cameraGUI3animate.pyfile to use the GUI:#!/usr/bin/python3 #cameraGUI3animate.py import tkinter as TK import animateGUI as GUI #Define Tkinter App root=TK.Tk() root.title("Camera GUI") cam=GUI.cameraGUI(root) TK.mainloop() #End - Run the example with the following command:
python3 cameraGUI3animate.py
Once again, we create a new class based on the original cameraGUI class. This time, we define the following GUI with six extra controls:
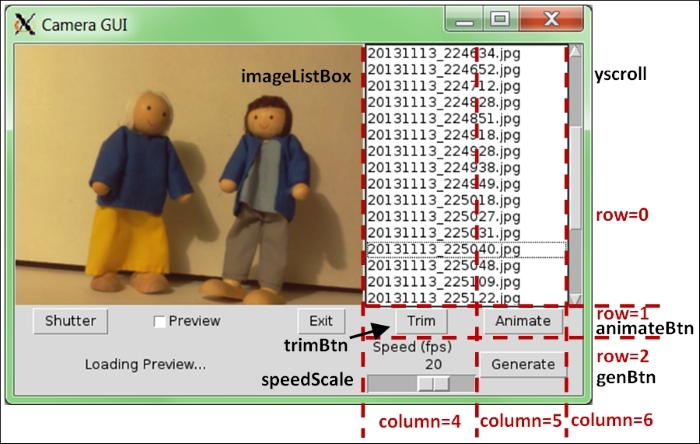
The animation GUI layout
We create a listbox control (imageListbox) that will contain a list of the .jpg images in the current directory (self.theList). This control has a vertical scroll bar (yscroll) linked to it to allow easy scrolling of the list, and selectmode=TK.EXTENDED is used to allow multiple selections using Shift and Ctrl (for block and group selections).
Next, we add a Trim button (timeBtn) that will call self.trim(). This will remove any items that have not been selected in the list. We use curselection() to get a list of the currently selected items from the imageListbox control. The curselection() function normally returns a list of indexes that are numerical strings, so we use map(int,...) to convert the result into a list of integers.
We use this list to get all the indexes that have not been selected using our utility diff(a,b) function. The function compares a full list of indexes against the selected ones and returns any that haven't been selected.
The self.trim() function uses os.rename() to change the filename extensions from .jpg to .jpg.bak for all the non-selected images. We could delete them using os.remove(), but we only really want to rename them to stop them from appearing in the list and final video. The list is repopulated using self.updateList(), which updates self.theList with a list of all the .jpg files available.
We add a scale control (speedScale) that is linked to self.speed and is used to control the playback speed of the animation test. As earlier, we add a Generate button (genBtn) that calls self.generate().
Finally, we add the Animate button (animateBtn). The text for the button is linked to self.btnAniTxt (making it easy to change within our program), and when pressed, the button calls self.animate().
Note
We override the original shutter() function from the original cameraGUI script by adding a call to self.updateList(). This ensures that after an image has been taken, the list of images is updated with the new image automatically. Again, we use super() to ensure that the original functionality is also performed.
The animate() function (called by clicking on the Animate button) allows us to test a selection of images to see whether they will make a good animation or not. When the button is clicked on, we change the text of the button to STOP, the self.animating flag to True (to indicate that the animation mode is running), and call doAnimate().
The doAnimate() function first gets a list of currently selected images in the imageListbox control, generates a list of TK.PhotoImage objects, and attaches them to the self.canvas object in the GUI. However, if only one image has been selected, we display it directly using self.updateDisp(). Alternatively, if no images have been selected, it will try to use them all (unless the list is empty, in which case it will inform the user that there are no images to animate). When we have more than one TK.PhotoImage object linked to the canvas, we can loop through them using the cycleImages() function.
The TK.PhotoImage objects are all created with their states set to TK.HIDDEN, which means they are not visible on the canvas. To produce the animation effect, the cycleImages() function will set each image to TK.NORMAL and then TK.HIDDEN again, allowing each frame to be displayed for 1 divided by self.speed (the fps value set by the Scale control) seconds before showing the next.
The cycleImages() function will perform the animation as long as self.animating is True, that is, until the animateBtn object is clicked on again.
Once the user is happy with their animation, they can generate the video using the Generate button (genBtn). The generate() function will call mencoder to generate the final video of all the images in the imageListbox control.
If you really want to get into producing animations, you should consider adding some extra features to help you, such as the ability to duplicate and reorder frames. You may want to add some manual adjustments for the camera to avoid white balance and lighting fluctuations caused by the automatic settings of the camera.
The camera module is ideal for close-up photography due to its small size and ability to be remotely controlled. By using small lenses or adding hardware controls, you could make a purpose-built animation machine.
The Raspberry Pi camera lens has been designed mainly for middle to long distance photography, and it therefore has trouble focusing on objects that are closer than 25 cm (10 inches). However, using some basic lenses, we can adjust the effective focal length and make it more suitable for macro photography. You can use add-on lenses that are available for mobile phones or credit card-style magnifier lenses to adjust the focus, as shown in the following images:

An add-on macro lens (right) and a credit card magnifier (left) can improve the focus of close-up items
Of course, while it is useful to have a display available to review the images taken, it is often useful to be able to simply press a physical button to take an image. Fortunately, this is just a matter of attaching a button (and resistor) to a GPIO pin, as we have done previously (see the Responding to a button recipe in Chapter 6, Using Python to Drive Hardware), and creating suitable GPIO control code to call our cameraGUI.camCapture() function. The code for this is as follows:
#!/usr/bin/python3
#shutterCam.py
import RPi.GPIO as GPIO
import cameraGUI as camGUI
import time


GPIO.setmode(GPIO.BOARD)
CAMERA_BTN=12 #GPIO Pin 12
GPIO.setup(CAMERA_BTN,GPIO.IN,pull_up_down=GPIO.PUD_UP)
count=1
try:
  while True:
    btn_val = GPIO.input(CAMERA_BTN)
    #Take photo when Pin 12 at 0V
    if btn_val==False:
      camGUI.cameraGUI.camCapture("Snap%03d.jpg"%count,
                                   camGUI.SET.NORM_SIZE)
      count+=1
    time.sleep(0.1)
finally:
  GPIO.cleanup()
#End
The previous code will take a picture when the button is pressed. The following diagram shows the connections and circuit diagram required to achieve this:

The button (and 1K ohm resistor) should be connected between pins 12 and 6 (GND)
You don't even have to stop here since you can add buttons and switches for any of the controls or settings for the camera if you want to. You can even use other hardware (such as infrared sensors and so on) to trigger the camera to take an image or video.