
We will create a small GUI to allow the user to enter information, and the program can then be used to encrypt and decrypt it.
You will need to ensure that you have completed the instructions in the There's more… section of the Working with text and strings recipe in Chapter 2, Starting with Python Strings, Files, and Menus, where we created the reusable encryptdecrypt.py module. You must ensure that this file is placed in the same directory as the following script.
Note
Since we are using Tkinter (one of many available add-ons of Python), we need to ensure that it is installed. It should be installed by default on the standard Raspbian image. We can confirm it is installed by importing it from the Python prompt, as follows:
python3
>>> import tkinter
If it is not installed, an ImportError exception will be raised, in which case you can install it using the following command (use Ctrl + Z to exit the Python prompt):
sudo apt-get install python3-tk
If the module did load, you can use the following command to read more about the module (use Q to quit when you are done reading):
>>>help(tkinter)
You can also get information about all the classes, functions, and methods within the module using the following command:
>>>help(tkinter.Button)
The following dir command will list any valid commands or variables that are in the scope of the module:
>>>dir(tkinter.Button)
You will see that our own modules will have the information about the functions marked by triple quotes; this will show up if we use the help command.
The command line will not be able to display the graphical displays created in this chapter, so you will have to start the Raspberry Pi desktop (using the command startx), or if you are using it remotely, ensure you have X11 Forwarding enabled and an X server running (see Chapter 1, Getting Started with a Raspberry Pi Computer).
We will use the tkinter module to produce a GUI for the encryptdecrypt.py script we wrote in the previous chapter.
To generate the GUI we will create the following tkencryptdecrypt.py script:
#!/usr/bin/python3
#tkencryptdecrypt.py
import encryptdecrypt as ENC
import tkinter as TK

def encryptButton():
    encryptvalue.set(ENC.encryptText(encryptvalue.get(),
                                     keyvalue.get()))

def decryptButton():
    encryptvalue.set(ENC.encryptText(encryptvalue.get(),
                                     -keyvalue.get()))
#Define Tkinter application
root=TK.Tk()
root.title("Encrypt/Decrypt GUI")
#Set control & test value
encryptvalue = TK.StringVar()
encryptvalue.set("My Message")
keyvalue = TK.IntVar()
keyvalue.set(20)
prompt="Enter message to encrypt:"
key="Key:"

label1=TK.Label(root,text=prompt,width=len(prompt),bg='green')
textEnter=TK.Entry(root,textvariable=encryptvalue,
                   width=len(prompt))
encryptButton=TK.Button(root,text="Encrypt",command=encryptButton)
decryptButton=TK.Button(root,text="Decrypt",command=decryptButton)
label2=TK.Label(root,text=key,width=len(key))
keyEnter=TK.Entry(root,textvariable=keyvalue,width=8)
#Set layout
label1.grid(row=0,columnspan=2,sticky=TK.E+TK.W)
textEnter.grid(row=1,columnspan=2,sticky=TK.E+TK.W)
encryptButton.grid(row=2,column=0,sticky=TK.E)
decryptButton.grid(row=2,column=1,sticky=TK.W)
label2.grid(row=3,column=0,sticky=TK.E)
keyEnter.grid(row=3,column=1,sticky=TK.W)

TK.mainloop()
#End
Run the script using the following command:
python3 tkencryptdecrypt
We start by importing two modules; the first is our own encryptdecrypt module and the second is the tkinter module. To make it easier to see which items have come from where, we use ENC/TK. If you want to avoid the extra reference, you can use from <module_name> import * to refer to the module items directly.
The encryptButton() and decryptButton() functions will be called when we click on the Encrypt and Decrypt buttons; they are explained in the following sections.
The main Tkinter window is created using the Tk() command, which returns the main window where all the widgets/controls can be placed.
We will define six controls as follows:
Label: This displays the prompt Enter message to encrypt:Entry: This provides a textbox to receive the user's message to be encryptedButton: This is an Encrypt button to trigger the message to be encryptedButton: This is a Decrypt button to reverse the encryptionLabel: This displays the Key: field to prompt the user for an encryption key valueEntry: This provides a second textbox to receive values for the encryption keys
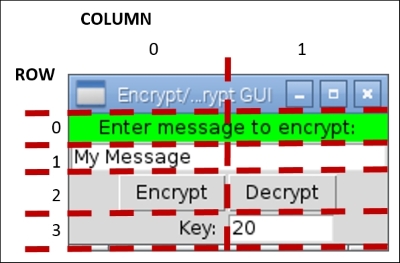
These controls will produce a GUI similar to the one shown in the following screenshot:

The GUI to encrypt/decrypt messages
Let's take a look at the first label1 definition:
label1=TK.Label(root,text=prompt,width=len(prompt),bg='green')
All controls must be linked to the application window; hence, we have to specify our Tkinter window root. The text used for the label is set by text; in this case, we have set it to a string named prompt, which has been defined previously with the text we require. We also set the width to match the number of characters of the message (while not essential, it provides a neater result if we add more text to our labels later), and finally, we set the background color using bg='green'.
Next, we define the text Entry box for our message:
textEnter=TK.Entry(root,textvariable=encryptvalue,
                   width=len(prompt))
We will define textvariable—a useful way to link a variable to the contents of the box—which is a special string variable. We could access the text directly using textEnter.get(), but we shall use a Tkinter StringVar() object instead to access it indirectly. If required, this will allow us to separate the data we are processing from the code that handles the GUI layout. The enycrptvalue variable automatically updates the Entry widget it is linked to whenever the .set() command is used (and the .get() command obtains the latest value from the Entry widget).
Next, we have our two Button widgets, Encrypt and Decrypt, as follows:
encryptButton=TK.Button(root,text="Encrypt",command=encryptButton)
decryptButton=TK.Button(root,text="Decrypt",command=decryptButton)
In this case, we can set a function to be called when the Button widget is clicked by setting the command attribute. We can define the two functions that will be called when each button is clicked. In the following code snippet, we have the encryptButton() function, which will set the encryptvalue StringVar that controls the contents of the first Entry box. This string is set to the result we get by calling ENC.encryptText() with the message we want to encrypt (the current value of encryptvalue) and the keyvalue variable. The decrypt() function is exactly the same, except we make the keyvalue variable negative to decrypt the message:
def encryptButton():
    encryptvalue.set(ENC.encryptText(encryptvalue.get(),
                                     keyvalue.get()))
We then set the final Label and Entry widgets in a similar way. Note that textvariable can also be an integer (numerical value) if required, but there is no built-in check to ensure that only numbers can be entered. You will get a ValueError exception when the .get() command is used.
After we have defined all the widgets to be used in the Tkinter window, we have to set the layout. There are three ways to define the layout in Tkinter: place, pack, and grid.
The place layout allows us to specify the positions and sizes using exact pixel positions. The pack layout places the items in the window in the order that they have been added in. The grid layout allows us to place the items in a specific layout. It is recommended that you avoid the place layout wherever possible since any small change to one item can have a knock-on effect on the positions and sizes of all the other items; the other layouts account for this by determining their positions relative to the other items in the window.
We will place the items as laid out in the following screenshot:
Grid layout for the Encrypt/Decrypt GUI
The positions of first two items in the GUI are set using the following code:
label1.grid(row=0,columnspan=2,sticky= TK.E+TK.W)
textEnter.grid(row=1,columnspan=2,sticky= TK.E+TK.W)
We can specify that the first Label and Entry box will span both columns (columnspan=2), and we can set the sticky values to ensure they span right to the edges. This is achieved by setting both the TK.E for the east and TK.W for the west sides. We'd use TK.N for the north and TK.S for the south sides if we needed to do the same vertically. If the column value is not specified, the grid function defaults to column=0. The other items are similarly defined.
The last step is to call TK.mainloop(), which allows Tkinter to run; this allows the buttons to be monitored for clicks and Tkinter to call the functions linked to them.