
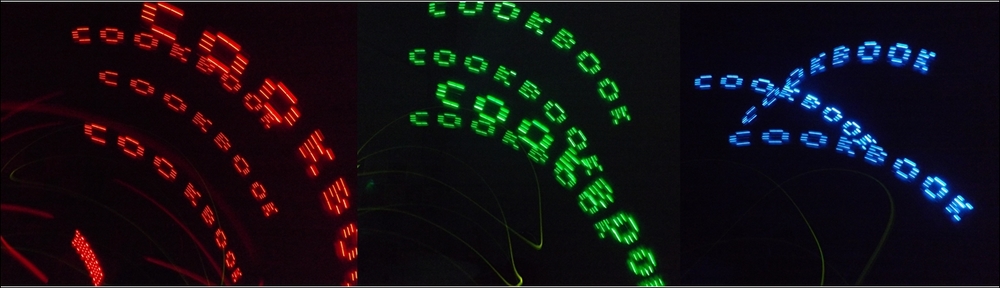
Persistence of Vision (POV) displays can produce an almost magical effect, displaying images in the air by moving a line of LEDs back and forth very quickly or around in circles. The effect works because your eyes are unable to adjust fast enough to separate out the individual flashes of light, and so you observe a merged image (the message or picture being displayed).
Persistence of vision using RGB LEDs
This recipe also uses the RGB LED kit used in the previous recipe; you will also need the following additional items:
- Breadboard (half-sized or larger)
- 2 x Dupont female to male patch wires
- Tilt switch (ball-bearing type is suitable)
- 1 x 470 ohm resistor (R_Protect)
- Breadboarding wire (solid core)
The tilt switch should be added to the RGB LED (as described in the Getting ready section of the Multiplexed color LEDs recipe). The tilt switch is wired as follows:
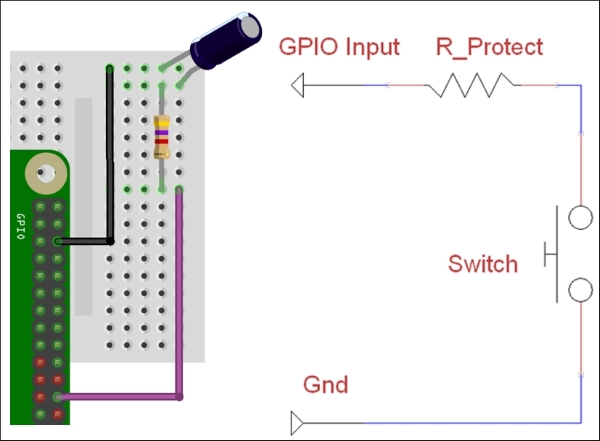
Tilt switch is connected to GPIO Input (GPIO pin 24) and Gnd (GPIO pin 6)
To reproduce the POV image, you will need to be able to quickly move the LEDs and tilt switch back and forth. Note how the tilt switch is mounted angled to the side, so the switch will open when moved to the left. It is recommended that the hardware is mounted onto a length of wood or similar. You can even use a portable USB battery pack along with a Wi-Fi dongle to power and control the Raspberry Pi through a remote connection (see Chapter 1, Getting Started with a Raspberry Pi – Connecting Remotely to the Raspberry Pi over the Network using SSH (and X11 Forwarding), for details):
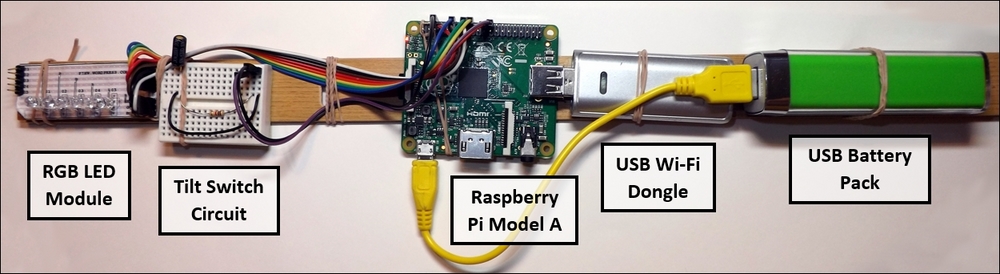
Persistence of Vision hardware setup
You will also need the completed rgbled.py file, which we will extend further in the How to do it… section.
Create a script called tilt.py to report the state of the tilt switch:
#!/usr/bin/python3
#tilt.py
import RPi.GPIO as GPIO
#HARDWARE SETUP
# GPIO
# 2[===========T=]26[=======]40
# 1[=============]25[=======]39
#Tilt Config
TILT_SW = 24

def tilt_setup():
  #Setup the wiring
  GPIO.setmode(GPIO.BOARD)
  #Setup Ports
  GPIO.setup(TILT_SW,GPIO.IN,pull_up_down=GPIO.PUD_UP)

def tilt_moving():
  #Report the state of the Tilt Switch
  return GPIO.input(TILT_SW)

def main():
  import time
  tilt_setup()
  while True:
    print("TILT %s"% (GPIO.input(TILT_SW)))
    time.sleep(0.1)

if __name__=='__main__':
  try:
    main()
  finally:
    GPIO.cleanup()
    print("Closed Everything. END")
#End
You can test the script by running it directly with the following command:
sudo python3 tilt.py
Add the following rgbled_pov() function to the rgbled.py script we created previously; this will allow us to display a single line of our image:
def rgbled_pov(led_pattern,color,ontime):
  '''Disable all the LEDs and re-enable the LED pattern in the required color'''
  led_deactivate(LED,RGB)
  for led_num,col_num in enumerate(led_pattern):
    if col_num >= 1:
      led_activate(LED[led_num],color)
  time.sleep(ontime)
We will now create the following file, called rgbledmessage.py, to perform the required actions to display our message. First we will import the modules used, the updated rgbled module, the new tilt module, and the python os module. Initially, we set DEBUG to True so the Python terminal will display additional information while the script is running:
#!/usr/bin/python3
# rgbledmessage.py
import rgbled as RGBLED
import tilt as TILT
import os

DEBUG = True
Add a readMessageFile() function to read the content of the letters.txt file and then add processFileContent() to generate a Python dictionary of the LED patterns for each letter:
def readMessageFile(filename):
  assert os.path.exists(filename), 'Cannot find the message file: %s' % (filename)
  try:
    with open(filename, 'r') as theFile:
    fileContent = theFile.readlines()
  except IOError:
    print("Unable to open %s" % (filename))
  if DEBUG:print ("File Content START:")
  if DEBUG:print (fileContent)
  if DEBUG:print ("File Content END")
  dictionary = processFileContent(fileContent)
  return dictionary

def processFileContent(content):
  letterIndex = [] #Will contain a list of letters stored in the file
  letterList = []  #Will contain a list of letter formats
  letterFormat = [] #Will contain the format of each letter
  firstLetter = True
  nextLetter = False
  LETTERDIC={}
  #Process each line that was in the file
  for line in content:
    # Ignore the # as comments
    if '#' in line:
      if DEBUG:print ("Comment: %s"%line)
    #Check for " in the line = index name
    elif '"' in line:
      nextLetter = True
      line = line.replace('"','') #Remove " characters
      LETTER=line.rstrip()
      if DEBUG:print ("Index: %s"%line)
    #Remaining lines are formatting codes
    else:
      #Skip firstLetter until complete
      if firstLetter:
        firstLetter = False
        nextLetter = False
        lastLetter = LETTER
      #Move to next letter if needed
      if nextLetter:
        nextLetter = False
        LETTERDIC[lastLetter]=letterFormat[:]
        letterFormat[:] = []
        lastLetter = LETTER
      #Save the format data
      values = line.rstrip().split(' ')
      row = []
      for val in values:
        row.append(int(val))
      letterFormat.append(row)
  LETTERDIC[lastLetter]=letterFormat[:]
  #Show letter patterns for debugging
  if DEBUG:print ("LETTERDIC: %s" %LETTERDIC)
  if DEBUG:print ("C: %s"%LETTERDIC['C'])
  if DEBUG:print ("O: %s"%LETTERDIC['O'])
  return LETTERDIC
Add a createBuffer() function, which will convert a message into a series of LED patterns for each letter (assuming the letter is defined by the letters.txt file):
def createBuffer(message,dictionary):
  buffer=[]
  for letter in message:
    try:
      letterPattern=dictionary[letter]
    except KeyError:
      if DEBUG:print("Unknown letter %s: use _"%letter)
      letterPattern=dictionary['_']
    buffer=addLetter(letterPattern,buffer)
  if DEBUG:print("Buffer: %s"%buffer)
  return buffer

def addLetter(letter,buffer):
  for row in letter:
    buffer.append(row)
  buffer.append([0,0,0,0,0])
  buffer.append([0,0,0,0,0])
  return buffer
Next, we define displayBuffer() to display the LED patterns using the rgbled_pov() function in the rgbled module:
def displayBuffer(buffer):
  position=0
  while(1):
    if(TILT.tilt_moving()==False):
      position=0
    elif (position+1)<len(buffer):
      position+=1
      if DEBUG:print("Pos:%s ROW:%s"%(position,buffer[position]))
    RGBLED.rgbled_pov(buffer[position],RGBLED.RGB_GREEN,0.001)
    RGBLED.rgbled_pov(buffer[position],RGBLED.RGB_BLUE,0.001)
Finally, we create a main() function to perform each of the required steps:
- Set up the hardware components (RGB LEDs and the tilt switch).
- Read the
letters.txtfile. - Define the dictionary of LED letter patterns.
- Generate a buffer to represent the required message.
- Display the buffer using the
rgbledmodule and control it with thetiltmodule:def main(): RGBLED.led_setup() TILT.tilt_setup() dict=readMessageFile('letters.txt') buffer=createBuffer('_COOKBOOK_',dict) displayBuffer(buffer) if __name__=='__main__': try: main() finally: RGBLED.led_cleanup() print("Closed Everything. END") #End
Create the following file, called letters.txt, to define the LED patterns needed to display the example '_COOKBOOK_' message. Note, this file only needs to define a pattern for each unique letter or symbol in the message:
#COOKBOOK
"C"
0 1 1 1 0
1 0 0 0 1
1 0 0 0 1
"O"
0 1 1 1 0
1 0 0 0 1
1 0 0 0 1
0 1 1 1 0
"K"
1 1 1 1 1
0 1 0 1 0
1 0 0 0 1
"B"
1 1 1 1 1
1 0 1 0 1
0 1 0 1 0
"_"
0 0 0 0 0
0 0 0 0 0
0 0 0 0 0
0 0 0 0 0
0 0 0 0 0
The first function, readMessageFile(), will open and read the contents of a given file (as we did previously in Chapter 2, Starting with Python Strings, Files, and Menus; see the Using files and handling errors recipe for more details). This will then use processFileContent() to return a Python dictionary containing corresponding patterns for the letters defined in the file provided. Each line in the file is processed, ignoring any line with a # character in and checking for " characters to indicate the name for the LED pattern that follows after. After the file has been processed, we end up with a Python dictionary that contains LED patterns for the '_', 'C', 'B', 'K' and 'O' characters:
'_': [[0, 0, 0, 0, 0], [0, 0, 0, 0, 0], [0, 0, 0, 0, 0], [0, 0, 0, 0, 0], [0, 0, 0, 0, 0]]
'C': [[0, 1, 1, 1, 0], [1, 0, 0, 0, 1], [1, 0, 0, 0, 1]]
'B': [[1, 1, 1, 1, 1], [1, 0, 1, 0, 1], [0, 1, 0, 1, 0]]
'K': [[1, 1, 1, 1, 1], [0, 1, 0, 1, 0], [1, 0, 0, 0, 1]]
'O': [[0, 1, 1, 1, 0], [1, 0, 0, 0, 1], [1, 0, 0, 0, 1], [0, 1, 1, 1, 0]]
Now that we have a selection of letters to choose from, we can create a sequence of LED patterns using the createBuffer() function. As the name suggests, the function will build up a buffer of LED patterns by looking up each letter in the message and adding the related pattern row by row. If a letter isn't found in the dictionary, then a space will be used instead.
Finally, we now have a list of LED patterns ready to display. To control when we start the sequence, we will use the TILT module and check the status of the tilt switch:

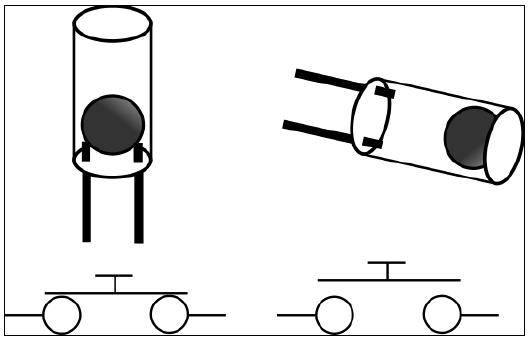
The tilt switch position when not moving (left) and moving (right)
The tilt switch consists of a small ball bearing enclosed in a hollow insulated cylinder; the connection between the two pins is closed when the ball is resting at the bottom of the cylinder. The tilt switch is open when the ball is moved to the other end of the cylinder, out of contact of the pins:
The tilt switch circuit, switch closed and switch open
The tilt switch circuit shown previously will allow GPIO pin 24 to be connected to the ground when the switch is closed, then if we read the pin it will return False when it is at rest. By setting the GPIO pin as an input and enabling the internal pull-up resistor, when the tilt switch is open it will report True.
If the tilt switch is open (reporting True) then we will assume the unit is being moved and begin displaying the LED sequences, incrementing the current position each time we display a row of the LED pattern. Just to make the pattern a little more colorful (just because we can!) we repeat each row in another color. As soon as the TILT.tilt_moving() function reports we have stopped moving or we are moving in the opposite direction, we will reset the current position, ready to start the whole pattern over again:
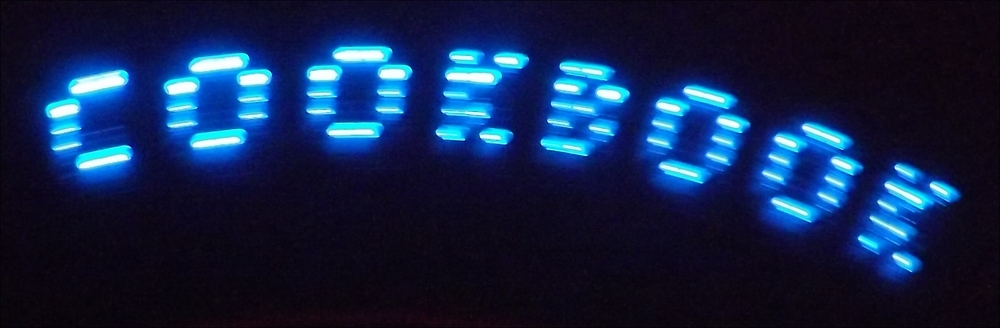
The message is displayed by the RGB LEDs – here using Green and Blue together
When the RGB LED module and tilt switch are moved back and forth, we should see the message displayed in the air!
Try experimenting with different color combinations, speeds, and arm waviness to see what effects you can produce. You could even create a similar setup mounted on a wheel to produce a continuous POV effect.