
We're still covering basic prerequisites to building a robot, such as safety and where to buy parts. In this chapter, you're going to learn about a vital piece of measurement equipment that every robot builder has by their side, the digital multimeter. Multimeter features are broken into groups: must-have, nice-to-have, and optional. The chapter concludes with an analysis of three multimeters.
A multimeter is a required tool for robot building. You will need a multimeter to perform the experiments and build the projects in the chapters that follow. (See Figure 4-1 for an example of a multimeter.)
With a multimeter, you can:
determine if an unexpected amount (too much or too little) of power is being used
determine if a part is damaged or worn out
determine what type of part something is
determine the value (electrical denomination) of a part
manually read sensors and chips to aid designing and debugging
The capabilities of digital multimeters (also called DMMs) have rocketed while prices have dropped. A perfectly acceptable digital multimeter can be had for under $20. A really great digital multimeter can be had for $150.
What follows are brief descriptions of the features available on multimeters. Don't worry too much about what the fancy symbols (μ,Ω) stand for, as they're written that way so that they'll match the catalogs and advertisements.
If this information seems overwhelming to you, just buy (or borrow) any cheap, digital multimeter until you've learned enough to make a more educated purchase.
Here are the features your multimeter must have:
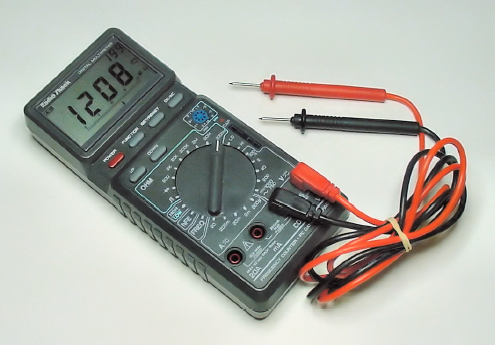
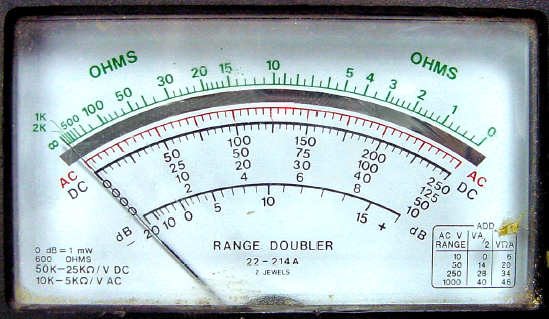
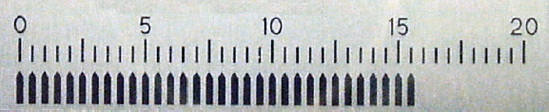
Digital meters display measured values on an LCD (liquid-crystal display) similar to a calculator (see Figure 4-2). No guessing or interpretation is needed. Analog meters have a needle that swings back and forth, with line markings underneath (see Figure 4-3). Because digital meters are so easy to read and so inexpensive, don't use analog.

3½ digits means that numbers up to 1999 can be displayed (with a floating decimal point). 3 ¾ digits means that numbers up to 4999 can be displayed. 4 digits means that numbers up to 9999 can be displayed. In practice, 3½ digits are all that's needed. Every digital multimeter meets this requirement.
Measured in volts, DC voltage indicates how much pressure or force the electricity has. A range of 0.2 V (200 mV) to 48 V is usually all that's needed for tabletop robots. Every basic multimeter meets this requirement.
Measured in amps, DC current indicates how many electrons are speeding by per second. A range of 0.0002 A (200 μA) to 2 A is usually all that's needed. Every basic multimeter meets this requirement.
Measured in ohms, resistance indicates how much something opposes electricity going through it. A range of 1 Ω to 2,000,000 Ω (2 MΩ) is usually all that's needed. Every basic multimeter meets this requirement.
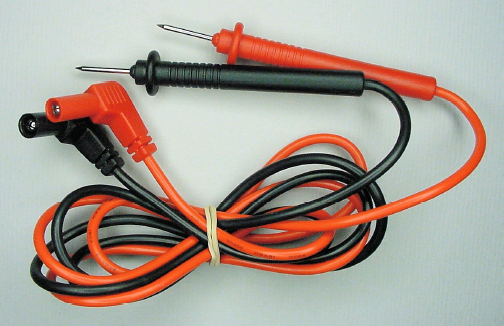
The meter should come with the cables (see Figure 4-4) needed to connect it to the parts to test. Every basic multimeter meets this requirement. Ironically, really expensive pieces of equipment, such as many oscilloscopes, require probes that are sold separately.
Almost every multimeter includes protection to prevent permanent damage to the device if too much voltage or current is applied to the probes. UL (Underwriters Laboratory) Listing mark or CE (Conformité Européenne) marking is a good sign (see Figure 4-5). However, be aware that despite protection on the probe inputs, many meters are still vulnerable to damage through their transistor, capacitor, or data ports.

Here are features that are worth paying extra for, if you can afford to do so:
Measured in farads, capacitance indicates the number of electrons the multimeter can store. A range of 0.000000000020 f (20 pF) to 0.01 F (10,000 μF) is desirable. Many multimeters have this feature, but the range is usually less broad.
Measured in volts or millivolts, diode test mode indicates how much electrical pressure is required to turn on a semiconductor. This is an important feature because it can help classify different diode types and test and identify transistors. It can even light up LEDs. Most multimeters have this feature.
Measured in ohms, continuity indicates whether an electrical connection exists between two points. Many multimeters have this feature, which usually includes an audible beep so that you don't need to look at the display to see when something is connected.
If an audible continuity feature doesn't exist on your multimeter, you can use the resistance setting instead, although you'll need to look at the display rather than listen for a beep.
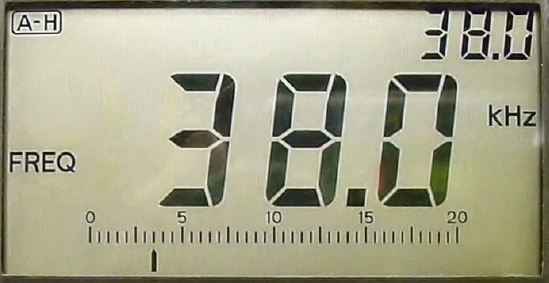
Measured in hertz, frequency indicates how many times something is occurring per second. A range of 0.1 Hz to 50,000,000 Hz (50 MHz) is desirable (see Figure 4-6). If the meter has a frequency function, get one that at least measures up to 45,000 Hz (45 kHz). Some multimeters have this feature, but the range is usually less broad.
Measured in percentages, duty cycle indicates how often a measurement is high as opposed to how often a measurement is low. This turns out to be an important measurement in robotics, as it is the key to PWM (pulse-width modulation). Only some multimeters have this feature, which often appears in frequency mode.
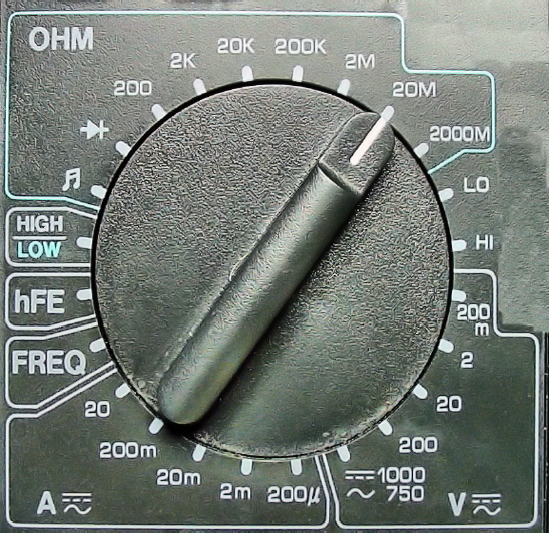
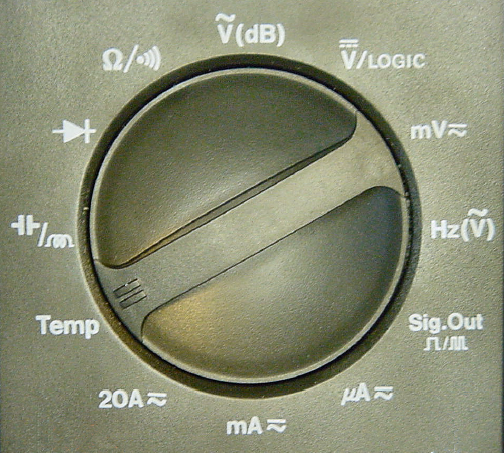
Normally a user must manually dial the meter to select the expected maximum value to be measured (see Figure 4-7). Autoranging automatically determines the range and subsequently bumps it up or down as necessary, which is nice. Autoranging can be annoying if the measurement is occurring on the border between two ranges, because the device will keep switching between the modes unless the multimeter also has some sort of range-hold button. Only the mid-range and high-end multimeters have the autoranging feature, which you can easily identify by uncluttered dials (see Figure 4-8).
It's common to forget to turn off the multimeter as your mind considers the task at hand. I'm often surprised to see the on switch still engaged when I'm putting my meter away. Luckily for the battery, my meter has auto power off. This feature can be annoying if it shuts off after too short of a delay, but most meters won't turn off if the measurement value changes enough.
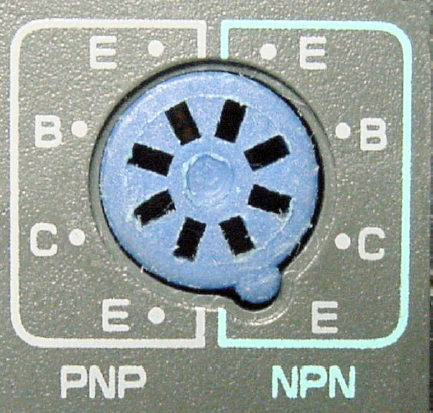
A transistor mode measures the hFE (or β), which indicates the amount of amplification or gain of a transistor. The bipolar type of npn or pnp is usually determined by the user inserting the transistor into different socket holes (see Figure 4-9). You can use the multimeter's diode feature to determine bipolar transistor types if the multimeter doesn't have this transistor-test feature. See Chapter 16 for detailed steps on testing with a transistor socket or diode feature.
A dual display includes a small, second set of digits in a corner of the display so that other measurements or calculations can be displayed at the same time as the ongoing value. This is almost a requirement for maximum, minimum, and the other calculated features, since the ongoing value is otherwise not displayed. Many meters have this feature.
A maximum mode displays the maximum value measured. This is actually a nice feature to test that a part isn't ever exceeding a specified range. While the meter continuously measures, you can exercise the various parts of a circuit, pausing every so often to view the maximum value read by the meter. This way you don't need to watch the display all the time. Many multimeters have this feature.
A minimum mode displays the minimum value measured. See the Maximum feature, previously described. Many multimeters have this feature.
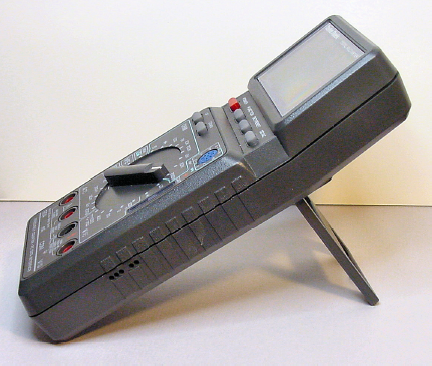
Most meters have a foldout piece to prop the meter up at an angle on the desktop (see Figure 4-10). This makes it easy to read the display while working on the robot.
Here are some bonus features that are available on some multimeters, but not absolutely necessary to have:
Measured in henries, inductance indicates the amount of opposition to changes in electrical flow. Very few multimeters have this feature; otherwise, it would have made the nice-to-have list.
A data interface (see Figure 4-11) communicates measurements to a personal computer or external device. This can be very useful for generating test logs. However, since the data from a multimeter is updated only a few times per second, this feature can't be used to make a multimeter into a true oscilloscope.

Figure 4.11. Connecting a multimeter to a personal computer with RS-232 DB9 (left) or optical USB (right)
Check to see if the computer software is included. If available separately, consider purchasing the software at the same time as the multimeter, just in case the software becomes unavailable when that multimeter model is discontinued.
Only some multimeters have the data interface feature.
A scope mode graphically plots measured values over a period of time. This can be an extremely useful feature for examining the quality and grouping of data pulses and timing signals. Unfortunately, the resolution and maximum speed limit of multimeter-based scopes is rather limited at this time. A true, high-speed oscilloscope with a generous display is a different beast. Few multimeters have a scope feature, and their price is greatly increased.
A backlight lights up the meter's display from behind. Useful at night or in dimly lit areas. When turned on, the meter's battery drains much faster and some units can emit a high-pitched whine detectable by people with sensitive ears. Mainly higher-end or graphic-intensive units have backlighting.
A stopwatch measures the time between events. It can be useful for checking circuit timing or servo commands. Few multimeters have this feature.
Measured in degrees Celsius or degrees Fahrenheit, a temperature mode indicates how hot or cold something is. It could be useful to answer the age-old question "Does this feel like it's getting hot to you?" Only some multimeters have this feature.
Measured in decibels, a sound mode indicates how loud or quiet something is. It could be useful for motor, speaker, or microphone volume testing. Few multimeters have this feature.
A counter measures the number of times something occurs, regardless of length of time. Many multimeters have this feature.
Digital meters don't react instantly to changes in measured values. Instead, they average their readings over a short period of time and update the display only a couple of times per second (analog-nostalgic supporters point to this weakness). So, some digital multimeters supplement their display with a bar graph, which is a rapidly updating single-axis line (see Figure 4-12).
Data hold prevents the screen from changing from the currently displayed value. Most meters continue to display the current measured value but place the held value somewhere else on the screen. Many multimeters have this feature.
A data-auto mode periodically moves the measured value to the smaller portion of the dual display. This makes it clear when the ongoing value is changing, since the small and large display won't have the same value for a few seconds.
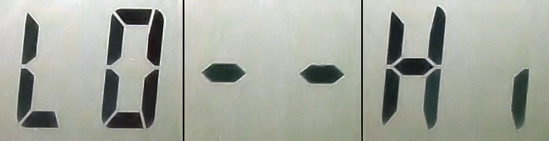
A logic mode interprets the DC voltage measurement as a logical signal, indicating low, high, or an improper value in between (see Figure 4-13). It's better to do this in your head using the meter's voltage mode. Depending on the parts you choose, the robot's chips may accept a certain voltage as "high" that the meter may consider "low." This is especially likely with the recent advent of low-voltage chips. Most multimeters have this logic mode feature.
Similar to the memory feature available on most calculators, memory mode on a multimeter can store one or more measured values. When only a single value is frozen and stored elsewhere on the display, this feature is simply another name for data hold. Some multimeters have a multi-memory feature, but it's not terribly useful except in graphic scopes.
A relative mode shows the difference between the last value measured and the current value. This shows the change in value, rather than the absolute value. Some multimeters have this feature.
An offset mode shows the difference between the value stored in memory and the current value being measured. Some multimeters have this feature.
A limit mode displays whether the measured value exceeds a specified maximum or minimum value stored in memory. Some multimeters have this feature.
A rubber boot (see Figure 4-14) protects the meter from scuffs and bumps that might otherwise damage or crack the meter's primary case. The meter is almost always operated with the boot installed, unless space is a serious issue.
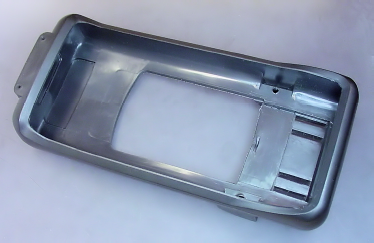
If a rubber boot is available but not included with the meter, it might be best to purchase the boot at the same time as the meter. The boot may no longer be available when the meter is discontinued.
Most multimeters have a boot available.
Unlike DC (Direct Current) that comes from a battery, AC (Alternating Current) comes from a standard household outlet. Because of the danger from the higher voltage and current capacity of household outlets, this book only involves DC.
Measured in volts, AC voltage indicates how much peak-to-peak pressure or force the electricity has. Every basic multimeter has this feature.
The standard test leads that come with most multimeters are appropriate for probing circuit boards and briefly touching wires or connectors.
Hook adaptors (see Figure 4-15) and alligator clips are available that slide over each probe and clip to the circuit being tested, resulting in hands-free connections to jumper wires and IC pins. The hook adaptor tends to be preferable for most low-voltage digital circuits.
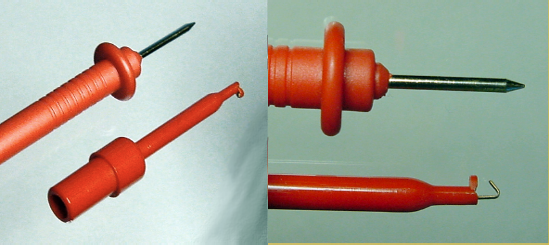
A pair of hooks can be more perilous in that the multimeter becomes physically attached to the circuit or test points. The hooks make it more difficult to suddenly withdraw the leads in the event of high voltage or other error.
On the other hand, a single hook connected to ground can actually be safer than no hooks at all. This allows the technician to hold only a single, hookless probe, making a pathway across the heart less inviting and allowing the technician to concentrate on a single point.
Because hook probes are referred to extensively throughout this book, it would be helpful for you to purchase a pair (see Table 4-1).
Described in this section are various advertised specifications for three digital multimeters. Don't expect to buy these exact models, because multimeter part numbers and branding are constantly changing. Instead, try to understand the specifications so that you can find an existing model that meets your needs.
I've deciphered the jargon and analyzed an inexpensive model, a moderately priced model, and a higher-end model. See if you can guess the prices for them.
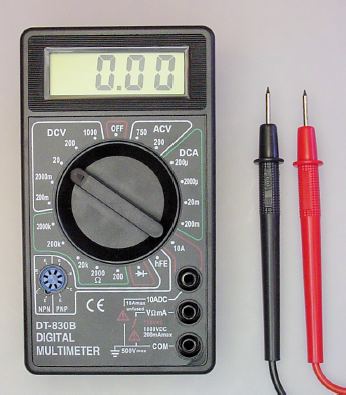
Figure 4-16 shows the absolutely cheapest meter I could find, the DT-830B. It appears to have several siblings with slightly rearranged cases and model numbers.
Display: 1999 | Means the same thing as 3½ digits. |
DC Volts: 200mV | Lowest DC voltage setting is 200 millivolts. That's just fine. That means the meter's going to be able to measure voltage levels lower than 0.2 volts, as the lowest setting on the dial measures up to 0.2 volts. |
±0.5% + 2 | Indicates the lower setting ranges can be measured accurately within half a percent, and the last digit may be off by ±2 decimals. For example, with a reading of 1.05, the actual value may be as low as 1.05 – (1.05*0.005) – 0.02 = 1.024 or as high as 1.05 + (1.05*0.005) + 0.02 = 1.075. That's fine for amateur robotic work. |
2/20/200/1000V | The upper ranges on the dial measure up to 1000 V. That's more than enough for household robots. All together, there are five ranges on the DC voltage section of the dial: 0.2, 2, 20, 200, 1000. |
±0.8% + 2 | Indicates the highest setting range (1000 V) can measure accurately within eight-tenths of a percent, with the last digit being off possibly by 2 decimals. That's acceptable for amateur robotic work. I question why you're measuring something that is 1000 volts! |
AC Volts: 200/750V ±1.2% + 10 | Indicates only two ranges for AC (household outlet) voltage. This feature isn't needed for battery-based robots. Notice that this meter's accuracy is much worse for AC. |
DC Current: 200μ/2m/20mA/200mA±1.0% + 2 | Lowest current setting is 200 microamps (0.0002 amps). That's just fine. That means the meter is going to be able to measure current levels lower than 0.0002 amps, as the lowest setting on the dial measures up to 0.0002 amps. |
10A ±2% + 2 | Most multimeters leap at some point between low-current measurement and high-current measurement. When you switch the meter to measure high current, you need to move the positive (red) test probe to the high-current socket. Internally, the high-current socket connects to a fuse with a different rating. The disappointing aspect about this meter is that it can only measure up to 200 mA in low-current mode. Somewhere up around 500 mA would be preferable. This means you'll need to use the less accurate (but otherwise capable) 10 A range for all measurements that are likely to be above 150 mA (so that you don't blow the 200 mA fuse). |
Resistance: 200/2K/20K/200K/2M ±0.8% | Five ranges. Good minimum and maximum. The low end isn't indicating that it can't measure 1-ohm resistors. It means you can turn the dial to the 200-ohm setting for the best accuracy of measuring low-value resistors. |
HFE: 1 ~ 1,000 Transistor Test | That's a nice feature. It can test the gain of transistors. |
Diode Test | Good for testing LEDs. |
The ad said this meter has a capacitance test and a back light, neither of which is true. But, you can determine that from just looking at the photograph. There is no capacitance mode on the dial and there is no button for a backlight.
There are some features that I'd miss if I had only this multimeter: continuity test with buzzer, capacitance, frequency, duty cycle, autoranging, auto power off, rubber boot, and built-in stand.
In person, I discovered this meter has a very cheap plastic case, the probes don't fit tightly in the sockets, the battery snaps are soldered to the PCB (removing/adding the battery can break the meter), and the 200 mA fuse is soldered to the board (significant work to replace when you eventually accidently test more than 200 mA). Yet, this is perfectly fine as a disposable meter or for students who plan to take only one electrical engineering course. You'll understand why I'm so forgiving when you read how little this digital multimeter costs.
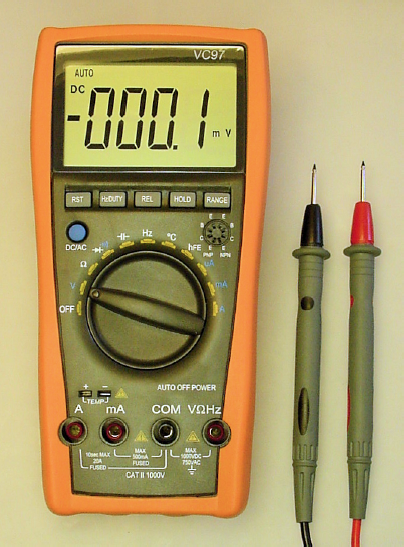
The VC97 Auto Range digital multimeter (see Figure 4-17) has all the features and more of the previously described multimeter.
3¾ Digit | This meter can display numbers up to 3999. |
Large display and units | Easier to read, particularly if the meter is off to the side of your work area. This meter also shows the units adjacent to the value on the display (mV, V, mA, A, μF, Ω, and so on) to indicate the mode and range. Nice touch. |
Autoranging | This is an especially useful feature for resistance and capacitance if you're sorting a pile of components. I strongly recommend that you obtain an autoranging meter. They aren't that much more expensive than most manual-dial meters. This is the very best reason to step-up from the low-end meter. |
Temperature measurement probe (−40°C to +1000°C) included | Some devices don't include the temperature probe, which could be difficult to obtain later. The temperature range is wonderfully broad, as is true with almost all meters that support temperature measurement. |
Frequency/Duty Cycle | An important feature to have, especially if you're tuning object-detection circuits. The manufacturer says the meter can measure up to 30 MHz, which is much higher than most meters. |
Capacitance | The meter tops out at 200 μF, which is a little lower than desired for electrolytic capacitors, but is perfectly acceptable for most capacitors. |
Auto power off | This saves plenty of batteries. |
500 mA low-current mode | This is a much more reasonable limit than the 200 mA limit in the previously discussed meter. |
Continuity test | Beeps when a connection is made. This is very useful as it allows you to concentrate on examining the circuit you're probing, rather than constantly looking away at the multimeter display. |
Rubber boot | Helps protect against breakage if you drop it. |
The advertisement for this meter includes the amusing specification "Strong antimagnetic and anti-jamming performance." I have no idea what that means, but those sound like features I definitely want in my meter.
In person, I found this meter to be well made and enjoyable to use. The test probes are higher quality than most. There are a number of features and modes that I haven't mentioned that are accessible via the soft buttons under the display. One quibble is that it doesn't have an off button. Instead, the dial must be turned to "off," which is located on the end of the dial rather than the middle.
The meter uses a pair of AAA batteries. Many meters are moving away from 9 V batteries to AA or AAA. This has an unfortunate consequence: those meters are unable to test blue and white LEDs in their diode test mode because over 3 V is required to do so.
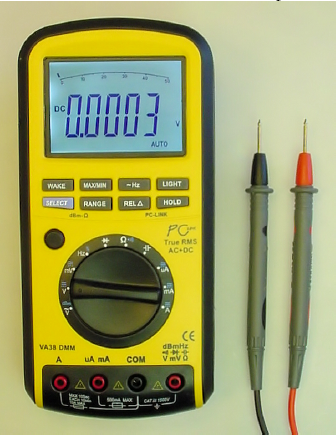
The VA38 meter is shown in Figure 4-18. It has all of the features of both of the previously described multimeters and some additional plusses.
40,000 count display | The display has five digits, which is quite a lot. The high number of digits in the display suggests this meter is capable of higher accuracy and precision than lower-end meters. |
DCV accuracy 0.03% | This is an order of magnitude more accurate than the least-expensive multimeter in this chapter, which was 0.5%. However, since the tolerance of most robot circuits is fairly rough and wide, the increased accuracy is really only necessary for professional designers. |
True RMS | Accurately measures the voltage of alternating current even if the signal shape is a little odd. Not of much value in DC circuits unless it's going to be used to measure some input or output signal. In that case, an oscilloscope would be better. |
50 segment bar display | I'm not sure this is valuable. I never use it. |
Backlight | It has a beautiful bluish-white backlight. Although I rarely use a meter in the dark, it is nice to know that this meter has that capability should I need it. |
9 V battery | The diode test lights up blue and white LEDs. |
Stand-alone power button | You don't need to turn the dial to another mode to turn off the meter. I can set up the meter, power it off when I want to take a break, and then power it back on when I return without having to reselect the correct measurement mode. |
Optical USB data output | This meter has a USB cable, unlike older multimeters that require a PC with a now-obsolete RS-232 port. The other end of the USB cable connects optically to the meter—which means the information is transmitted with light rather than an electrical connection. This avoids problems with the computer or household power contaminating the meter readings. The meter comes with the PC software, rather than being available separately for an additional cost. (Most commercial multimeter software is written only for Microsoft Windows. Keep that in mind if you use Linux or a Mac.) |
Complete with integrated protective holster, zipper pouch, and high-quality test leads | It's important to check to see if these items are included. Some higher-end meters require you to purchase these items separately. |
Interestingly, like most higher-end meters but unlike most mid-range meters, this doesn't include a transistor socket or temperature measurement. The more expensive meters focus on accuracy and precision (number of digits) instead of trying to be all-in-one tools. In fact, laboratory professionals often use highly accurate, highly specialized stand-alone tools (a voltmeter, an ammeter, an LCR meter, and so on) rather than combination multimeters.
Here are the prices I paid for the digital multimeters, including shipping:
$6.50 - Low-end DT-830B
$32.00 - Mid-range VC97
$165.00 - Higher-end VA38
Honestly, $6.50 for a digital multimeter! The least expensive meter would be acceptable for someone on a budget or as a spare. Just don't expect it to last very long. It measures the most important attributes with reasonable accuracy, although you will miss capacitance and frequency measurement. Often times, low-end meters like this are given away for free with a certain-size order. Look for those deals before actually buying a cheap meter.
The mid-range meter includes almost everything you could ever want for amateur robotics. You may have to hunt around on eBay to find this price, or expect to pay closer to $50. If you can afford to do so, aim to purchase an autoranging meter with these types of features. It will significantly increase your productivity and satisfaction.
The higher-end meter is very accurate. It's definitely constructed out of higher-quality materials. However, the resolution and accuracy are wasted, since only rough values are necessary for building, testing, and debugging homemade robot circuits.
Even more expensive meters with (believe it or not) fewer features are available. Those ultra-high-end meters (> $1000) provide amazing resolution and accuracy at a steep price. For certain specialized tasks, these certified meters are indispensable. However, for most people, a moderately priced multimeter and moderately priced oscilloscope would be a better purchase.
It is imperative to obtain a digital multimeter before proceeding too much further into this book. Although it is possible to simply read about the experiments, you will receive a more effective education with first-hand experience. Nearly every electronic component described in later chapters is accompanied by a procedure for testing the part on your multimeter.