
Chapter 9 Understanding .NET
In This Chapter
.NET was officially released in 2002 and was a small revolution in the Windows programming world. Inspired in many ways by the Java programming language, but learning from and improving on Java’s weaknesses (especially the speed of startup and of execution), the so-called “managed languages” (C#, VB.NET, and so on…) also brought with them a tremendous gain in productivity towards classic Windows programming technologies.
Together with .NET, many libraries and thousands of objects were released. It can be a little overwhelming at first, but thankfully we have the help of a great tool, a so-called Integrated Development Environment (IDE): Visual Studio.
When we tried to learn JavaScript in one chapter, you were warned that it was an ambitious goal, and yet we managed to understand enough JavaScript to program Silverlight. Now the task is even bigger! We dedicate more time to .NET and its use in Silverlight, but again this is not a definitive guide. Other books will help you to understand .NET in depth if needed. This introduction and the examples in further chapters will enable you to feel confident with basic and not so basic .NET operations.
History of .NET
The .NET framework contains multiple parts. The most famous are
![]() A web server framework, to program web applications, called ASP.NET
A web server framework, to program web applications, called ASP.NET
![]() A Windows programming framework named Windows Forms
A Windows programming framework named Windows Forms
![]() (From .NET 3.0) A Windows programming framework named Windows Presentation Foundation (WPF)
(From .NET 3.0) A Windows programming framework named Windows Presentation Foundation (WPF)
![]() (From .NET 3.0) A unified communication framework named Windows Communication Framework (WCF)
(From .NET 3.0) A unified communication framework named Windows Communication Framework (WCF)
![]() (From .NET 3.5) Silverlight
(From .NET 3.5) Silverlight
Versions, Versions, Versions
At the time of writing, there are 5 major versions of .NET available: 1.0, 1.1, 2.0, 3.0 and 3.5. Let’s review them shortly.
1.0, 1.1
.NET 1.0 was released in 2002. This version is not really current anymore, and most people upgraded to .NET 1.1 (or higher). Many existing applications still use version 1.1 of the framework, which requires Visual Studio 2003.
2.0
A big improvement was brought about with .NET 2.0 (Visual Studio 2005): additional libraries, improvement to the .NET programming languages, and so on. Upgrading an application from .NET 1.1 to .NET 2.0 was relatively painless, even though some constructs were marked deprecated.
.NET 2.0 is still very current. Many client applications are written in ASP.NET and Windows Forms 2.0.
3.0
.NET 3.0 was released in 2006, as a set of additional libraries on top of .NET 2.0. Some argued that this was not really a new version of the framework, rather an addition, but this is not really important.
More important is that the .NET 2.0 code base is stable and allows Microsoft to build new frameworks (such as WPF or WCF) without changing the core libraries.
3.5
.NET 3.5 was released officially in February 2008, but developers received the official RTM (Release To Market) version in December 2007. .NET 3.5 was released together with Visual Studio 2008, the latest (and best) installment of the IDE.
.NET 3.5 brings multiple improvements over .NET 3.0, especially the new so-called Language Integrated Query (LINQ), but also increased stability and a whole row of improvements in many areas.
In summer 2008, Microsoft released a major overhaul of .NET 3.5 under the name .NET 3.5 Service Pack 1 or .NET 3.5 SP1. This Service Pack addresses many concerns in .NET 3.5 and especially Windows Presentation Foundation, such as increased performance and stability, new controls, and so on.
Silverlight
Silverlight 2 is developed in parallel to the “full” .NET framework. You probably heard already that Silverlight is a subset of WPF. In fact, the Silverlight .NET framework is a subset of the .NET framework 3.5. With this, we mean that not all the libraries of the .NET framework 3.5 are available in Silverlight. It also means that Silverlight is widely compatible with .NET 3.5.
Managed Versus Unmanaged
Traditional Windows applications were (and still are) often programmed using a framework called Microsoft Foundation Classes (MFC). This code compiles to machine code, which is low-level, machine-near computer code. It is called unmanaged because it is directly executed by the processor, without an additional layer.
.NET code is different. The application is made of assemblies (EXE and DLLs) containing code written in intermediate language (IL). This code is not machine code. When the application runs, the code is executed by the .NET runtime, which in turn executes the corresponding machine code. The code is managed by the .NET runtime.
Managed code is typically slower than machine code, because of the additional layer between the code and the machine. However, the .NET framework offers many advantages over unmanaged code:
![]() A huge number of built-in high level libraries.
A huge number of built-in high level libraries.
![]() Stable code with fewer errors thanks to new safer programming languages. Most errors will be found when you compile the application already, instead of appearing only at runtime.
Stable code with fewer errors thanks to new safer programming languages. Most errors will be found when you compile the application already, instead of appearing only at runtime.
![]() Because the .NET runtime abstracts the machine (that is, stands between the machine and the code), the code doesn’t have to care about differences between processors, or even differences between operating systems.
Because the .NET runtime abstracts the machine (that is, stands between the machine and the code), the code doesn’t have to care about differences between processors, or even differences between operating systems.
In theory, .NET is machine-independent, and the same code can run on PC, Macintosh, Linux, and so on (as long as there is a .NET runtime available for these platforms). In practice, however, it’s not that easy. Silverlight is a big step forward in direction of the write once, run everywhere philosophy already applied to Java.
Downloading and Installing Visual Studio 2008
Maybe some of you already installed Visual Studio 2008 in Chapter 1, “Introducing Silverlight,” of this book, or even earlier. If you did, you are almost ready to program Silverlight! The links to Visual Studio 2008 (trial edition) and to all the tools needed to program Silverlight can be found at www.silverlight.net/GetStarted. At this point, you should install Visual Studio 2008 and the Silverlight Tools for Visual Studio 2008.
Creating a Silverlight 2 Application in Visual Studio 2008
We created Silverlight 2 applications in Expression Blend already, and now we will do the same in Visual Studio 2008 with the following steps.
1. Start the Visual Studio 2008 application.
2. From the menu select File, New, Project.
3. In the dialog, select Silverlight and then select Silverlight Application.
4. Enter a name (for instance MyFirstSilverlight) and a path for the new Silverlight Application, and then click OK (see Figure 9.1).
Figure 9.1 The New Project dialog in Visual Studio
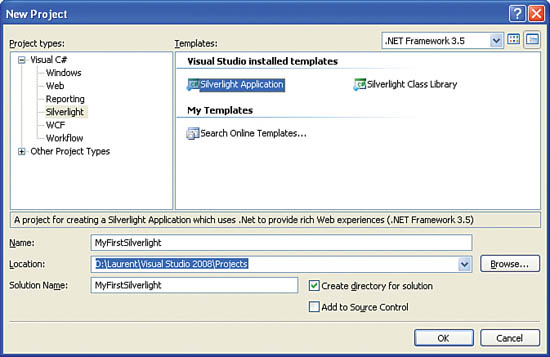
5. The next dialog prompts you to create either a Web Site, a Web Application, or an HTML test page to host the new application. Select the Add a New Web… button and then select Web Site from the Project Type combo box (see Figure 9.2).
Figure 9.2 The Add Silverlight Application dialog

Building and Running the Application
![]() Before running a Silverlight 2 application (or any other.NET application), you need to build it. This process (also called compiling) takes the source code (the *.xaml and *.cs files) and transforms them into one or more assemblies.
Before running a Silverlight 2 application (or any other.NET application), you need to build it. This process (also called compiling) takes the source code (the *.xaml and *.cs files) and transforms them into one or more assemblies.
![]() An assembly is either an EXE or a DLL file, containing intermediate language code. This code is not machine code (as discussed earlier) but is loaded by the .NET framework and executed.
An assembly is either an EXE or a DLL file, containing intermediate language code. This code is not machine code (as discussed earlier) but is loaded by the .NET framework and executed.
![]() The assemblies needed to run the application are copied to the bin folder. In addition, Silverlight 2 applications are “packed” in a XAP file, which is essentially just a Zip file with all the files needed for the Silverlight application to run. The XAP file will be sent to the client web browser, and executed.
The assemblies needed to run the application are copied to the bin folder. In addition, Silverlight 2 applications are “packed” in a XAP file, which is essentially just a Zip file with all the files needed for the Silverlight application to run. The XAP file will be sent to the client web browser, and executed.
![]() In Visual Studio, you can run the application in debug mode (by pressing F5) or in runtime mode (by pressing Ctrl+F5). In debug mode, the application runs in the debugger, and you can step into it and inspect variables. We talk about the debugger later.
In Visual Studio, you can run the application in debug mode (by pressing F5) or in runtime mode (by pressing Ctrl+F5). In debug mode, the application runs in the debugger, and you can step into it and inspect variables. We talk about the debugger later.
Finding Compilation Errors
Unlike JavaScript, .NET is compiled, and errors can be detected before the application even runs. Follow these steps to test it yourself:
1. Open the file Page.xaml.cs and try to modify the Page constructor as in Listing 9.1:
public Page()
{
// Required to initialize variables
InitializeComponent();
DoSomething();
}
2. Choose Build, Build Solution from the menu (press Ctrl+Shift+B). An error is displayed as shown in Figure 9.3.
Figure 9.3 Compilation error

3. A compilation error is displayed in the Error List pane. In that case, the error is that the code attempts to call a method that is not defined anywhere.
4. To correct the error, you can remove the call to the nonexistent method DoSomething.
Most compilation errors are displayed with enough information to find the cause relatively easily. Also, double-clicking on the error message will “jump” in the code at the error location. Remove the call to DoSomething and you should be able to build.
Exploring the Files
Let’s review the most important files created by Visual Studio in both the Web Site project and in the Silverlight project.
Web Site Project
This project, when published to an ASP.NET-enabled web server, will “serve” dynamic and static web pages. The contents of the dynamic web pages (ASPX) are modified by a .NET application before they are sent to the web browser.
In the context of Silverlight, we will use the ASP.NET Web Site project as a test environment for our application. A test page containing a Silverlight object tag will be sent to the web browser. Only when the page reaches the browser will the Silverlight control be created and the Silverlight application will start.
The most important files created by Visual Studio are shown in Table 9.1.
Table 9.1 Files Created by Visual Studio

The other files and folders are not relevant for the moment.
Static HTML Versus Dynamic ASPX
ASP.NET is outside the scope of this book. We will however talk about two ASP.NET controls used in the context of Silverlight in Chapter 24, “Silverlight: Continuing the Journey.” The main differences between an HTML page and an ASPX page are
![]() The HTML page is sent “as is” to the web browser, without any modification. The ASPX page, on the other hand, has parts that are built dynamically.
The HTML page is sent “as is” to the web browser, without any modification. The ASPX page, on the other hand, has parts that are built dynamically.
![]() The ASPX page typically has a source code file (code-behind) attached. This is not compulsory, but it’s usually the case.
The ASPX page typically has a source code file (code-behind) attached. This is not compulsory, but it’s usually the case.
For example, if a user wants to choose from a bicycle catalog, but only wants the bicycles suited for kids between 5 and 8 years old, you don’t want to have a separate HTML page for this kind of scenario. Instead, you will build just one ASPX page and use the code-behind to query a database and generate the corresponding HTML code in the dynamic page.
![]() If you open the page MyFirstSilverlightTestPage.aspx in Visual Studio, you will see a tag named
If you open the page MyFirstSilverlightTestPage.aspx in Visual Studio, you will see a tag named asp:Silverlight. This instructs the ASP.NET framework to generate (or render) the object tag that we studied earlier. Using the Silverlight ASP.NET control is handy, because you can use code-behind to set parameters before the actual HTML code is sent to the web browser. We talk more about this control in Chapter 24.
![]() On the other hand, the HTML page looks better known to us: It is pretty much the same HTML code as in the test page that we opened in Chapter 7, “Deploying to a Web Page.”
On the other hand, the HTML page looks better known to us: It is pretty much the same HTML code as in the test page that we opened in Chapter 7, “Deploying to a Web Page.”
The Silverlight Project
The files created for Silverlight 2 are similar to a Silverlight 2 application created by Expression Blend. Since we are already familiar with most of these files (we studied them in Chapter 4, “Expressing Yourself with Expression Blend”), let’s just mention the solution file and the AssemblyInfo file:
Tip
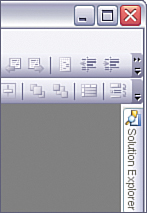
If you don’t see the Solution Explorer in Visual Studio, it might be closed or collapsed.
To open it if it is closed, select View, Solution Explorer from the menu.
To expand it if it is collapsed, check the side bar (it should be on the far right of the main window) and pass the mouse over the Solution Explorer tab (see Figure 9.4).
Figure 9.4 Collapsed Solution Explorer tab
![]() The Solution file (top-level file in the Solution Explorer) now contains two projects: The Web Site project used to test the application, and the Silverlight project.
The Solution file (top-level file in the Solution Explorer) now contains two projects: The Web Site project used to test the application, and the Silverlight project.
![]() The Properties folder contains the file AssemblyInfo.cs. This C# file will be compiled into the binary output file. It contains information about the application, such as Title, Description, Company, Copyright, Version, and so on. After compilation, this information is encoded in the file ClientBin/[ApplicationName].xap/[ApplicationName].dll visible for example in Windows Explorer.
The Properties folder contains the file AssemblyInfo.cs. This C# file will be compiled into the binary output file. It contains information about the application, such as Title, Description, Company, Copyright, Version, and so on. After compilation, this information is encoded in the file ClientBin/[ApplicationName].xap/[ApplicationName].dll visible for example in Windows Explorer.
The other files have been mentioned already. For details about these files, refer to Chapter 4.
Running the (Empty) Application
Let’s change our application so that we have something to see, and run it with the following steps:
1. In Visual Studio, open the file Page.xaml.
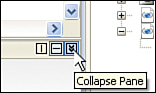
2. The very first time that you open an XAML file in Visual Studio, it opens in split view between the XAML editor and the visual designer. However, this mode is very slow and you probably shouldn’t use it at the moment. After all, we have Blend for visualizing our application. You can close the preview panel by clicking on the Swap Panes button to put the XAML view on top (Figure 9.5) and then on the Collapse Pane button (Figure 9.6). This setting is saved by Visual Studio, and XAML files will open faster.
Figure 9.5 Swap Panes button
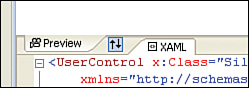
Figure 9.6 Collapse Panes button
3. Find the Grid named LayoutRoot and select the word White (content of the Background property).
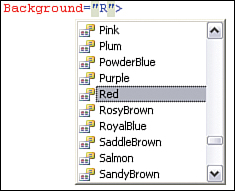
4. Start typing the word Red. Enter the letter “R”. A box should appear, with a list of all the colors starting with the letter “R”. This feature is called Intellisense (see Figure 9.7).
5. Set the page’s background to Red, so that we see something.
6. Add a TextBlock to the Grid. We will use this as a status line, displaying the result of our calculations.
Figure 9.7 Intellisense in XAML editor
TextBlock x:Name =″StatusLine″
Text=″Initializing…″/>
7. Right click on the web site MyFirstSilverlightWeb and choose Set as Startup Project from the context menu. Then right click on MyFirstSilverlightTestPage.html and choose Set As Start Page from the context menu. The startup project is displayed in bold in the Solution Explorer. You should always make sure that the correct project is selected as startup!
8. The first time you run the web site in debug mode, Visual Studio asks you if you want to modify it for debugging. Select the radio button labeled Modify the Web.config file… and click on OK.
9. Press F5. This builds the application and starts your favorite browser, displaying a red grid and the text “Initializing”.
We use and extend this application in the course of this chapter.
Intellisense
When you type code in Visual Studio’s editors, Intellisense offers you a choice of words automatically. This feature is called Intellisense. It helps you to write code faster and to avoid errors by proposing to you a choice according to what you are currently writing.
When Intellisense proposes a choice to you, you can use the key combination Ctrl+Spacebar to complete the word you started to type. Intellisense is used in multiple circumstances:
![]() When you declare a new variable by typing a class name, Intellisense offers you a choice of all the types currently available, grouped by namespace. A short documentation is also displayed (if available).
When you declare a new variable by typing a class name, Intellisense offers you a choice of all the types currently available, grouped by namespace. A short documentation is also displayed (if available).
![]() When you want to use a variable declared somewhere else, Intellisense proposes all variables currently accessible, as well as documentation, if available (see Figure 9.8).
When you want to use a variable declared somewhere else, Intellisense proposes all variables currently accessible, as well as documentation, if available (see Figure 9.8).
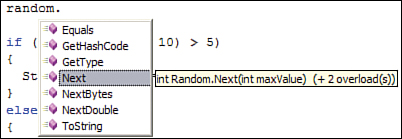
![]() When you type a class name followed by a period, or an instance name followed by a period, Intellisense presents all the methods available in the class (static methods) or in the instance. It also indicates the method’s signature (the number and type of the parameters) and the number of overloads (or method with the same name, but a different signature); here also, a short documentation about this method is shown, if available (see Figure 9.9).
When you type a class name followed by a period, or an instance name followed by a period, Intellisense presents all the methods available in the class (static methods) or in the instance. It also indicates the method’s signature (the number and type of the parameters) and the number of overloads (or method with the same name, but a different signature); here also, a short documentation about this method is shown, if available (see Figure 9.9).
Figure 9.8 Intellisense for types and variables
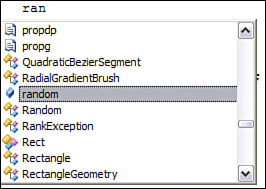
Figure 9.9 Intellisense for methods
![]() By passing the mouse cursor (without clicking) on any method, type, instance, parameter, and so on, Intellisense displays the short documentation for this member (if available).
By passing the mouse cursor (without clicking) on any method, type, instance, parameter, and so on, Intellisense displays the short documentation for this member (if available).
Tip
When an Intellisense pop-up is displayed, pressing the Ctrl key makes the pop-up transparent, so that you can read the code underneath.
You can also make an Intellisense pop-up appear at the cursor’s location by pressing Ctrl+Spacebar.
Intellisense is really an invaluable tool. With time, you will learn to use it to its fullest to improve your developer skills.
Programming C# with Basic Constructs
Mastering the basic constructs is the first step for every programming language. All of them support these constructs and operators in one form or another, because they are the basis needed to implement any algorithm.
We already saw some of the constructs discussed in the following section in Chapter 8, “Programming Silverlight with JavaScript,” and you will see that the C# syntax is similar. Both languages are descendants of the C programming language.
Types
.NET offers a very large choice in types, stored in libraries. Some of them are called basic types and are an intrinsic part of the .NET programming languages. Others are objects and can be compared to building blocks, which you will use to implement your applications.
Note
.NET specifies a list of basic types that have to be implemented by all the .NET programming languages. In addition, C# specifies built-in types such as int, long, bool, and so on. In a first approach, you can consider that C# built-in types are equivalent to the corresponding .NET type.
For more information go to http://
msdn2.microsoft.com/en-us/library/
ya5y69ds.aspx.
Integer Types
An integer is a nonfractional number. There are various types of integer that you can use:
![]()
byte—(System.Byte , 0 to 255)
![]()
sbyte—(System.SByte, -128 to 127)
![]()
short—(System.Int16, -32,768 to 32,767)
![]()
ushort—(System.UInt16, 0 to 65,535)
![]()
int—(System.Int32, -2,147,483,648 to 2,147,483,647)
![]()
uint—(System.UInt32, 0 to 4,294,967,295)
![]()
long—(System.Int64, –9,223,372,036,854,775,808 to 9,223,372,036,854,775,807)
![]()
ulong—(System.UInt64, 0 to 18,446,744,073,709,551,615)
As you can see, these types are different by their range (minimum value and maximum value); also, some types allow negative values and others don’t.
Warning
Since long covers such a large range and allows for negative values, why do we need other types? In fact, every type is optimized for a certain use.
The fastest and most efficient type on 32-bit operating systems such as Windows Vista 32 and Windows XP is the int type, and this is probably the one you will use the most.
long is less efficient because of the way the memory is organized on 32-bit systems, but if you need to deal with very big numbers, then this is the right choice.
Finally, unsigned integers can be very useful, for example to handle binary files.
Floating Point Types
The integer types we just saw are very useful, but we need more:
int result1 = 5 / 2; // stores 2 in result
The preceding operation stores 2 instead of 2.5 as expected, because integer types cannot handle fractional results. This is what floating point types are for!
double result2 = 5 / 2; // stores 2.0 in result
double result3 = 5.0 / 2.0; // stores 2.5 in result
Why does result2 contain 2.0 instead of 2.5 as expected? Because 5 and 2 are integer values, and dividing two integers produces an integer value too. On the other hand, 5.0 and 2.0 are explicitly floating point values.
Because .NET handles type strictly and wants to avoid any confusion, non-integer values must be marked explicitly to specify their type. For instance, 42.34567m is stored as a decimal (because of the “m” suffix) while 42.34567 is stored as a double (because this is the default type for floating point values).
![]()
decimal (System.Decimal, ±1.0 × 10⁻²⁸ to ±7.9 × 1028)
decimal myDecimal = 42.34567m;
This type is useful for operations where precision is important.
![]()
double (System.Double, ±5.0 × 10−324 to ±1.7 × 10308)
double myDouble1 = 5.0;
double myDouble2 = 5D;
![]()
float (System.Single, ±1.5 × 10−45 to ±3.4 × 1038)
float myFloat = 5F;
Here also, choose the type corresponding to the operation you want to perform. The type double is the standard floating point type. Note also that float has the lowest precision, and decimal the highest precision.
Other Types
In addition, .NET has two types for dealing with text, and the boolean type.
![]()
char (System.Char)—This type can store single characters of text.
char myChar = ′a′;
![]()
string (System.String)—Contains chains of characters.
string myString = ″Hello″;
![]()
bool (System.Boolean)—This well-known type can store the values true or false.
Type Conversion
You cannot simply assign an object from a type to a variable of another type. If there is a way to transform a type into another type, you must use it explicitly. Transforming a variable of one type into another type is called casting. For example, the type long cannot implicitly be converted into the type int.
long longNumber = 12;
int shortNumber = (int) longNumber;
The cast operator () transforms one type into another. You can use this operator on primitive types or on any object.
Another way to cast an object from one type into another type is the as operator. When you don’t know for sure what the type of an object you receive is, you can use the as operator in conjunction with the is operator, which returns true if an instance is of a certain type. The following code accepts an instance of type UIElement. But depending on whether it’s a TextBlock or another UIElement (such as Button, Checkbox, and so on), the code will execute different operations. Contrary to the cast operator (), the as operator applies only to objects, not to basic types, like in Listing 9.2:
public void MyMethod(UIElement control)
{
if (control is TextBlock)
{
(control as TextBlock).Text = ″Hello″;
}
// …
}
Note
The fact that a TextBlock is also a UIElement is an application of an important principle of object-oriented programming called polymorphism. We talk more about this in next chapters.
if then else
This conditional construct enables the programmer to execute a series of operations if a condition is true, and another series if the condition is false. For example, implement the following steps:
1. Open the file Page.xaml.cs of the application MyFirstSilverlight in Visual Studio.
2. Modify the Page constructor to look like Listing 9.3:
1 public Page()
2 {
3 // Required to initialize variables
4 InitializeComponent();
5
6 Random random = new Random();
7 if (random.Next(0, 2) == 0)
8 {
9 StatusLine.Text = ″Smaller″;
10 }
11 else
12 {
13 StatusLine.Text = ″Bigger″;
14 }
15 }
3. Execute the code by pressing Ctrl+F5.
4. In the web browser, refresh the page by pressing the F5 button.
Let’s take a moment to review the code:
![]() At line 6, we create an instance of type
At line 6, we create an instance of type Random. This built-in object is used to generate pseudo-random numbers. We name this new instance random, which is allowed because C# is case-sensitive.
![]() When we write the call to the method
When we write the call to the method Next on line 7, Intellisense shows that this method has three overloads. We choose the one where we can specify the maximum value and the minimum value. Careful: The minimum value is inclusive, and the maximum value is exclusive. So in fact, the values will be either 0 or 1.
![]() If you refresh the web page, you will see the text “Smaller” appear approximately 50% of the time.
If you refresh the web page, you will see the text “Smaller” appear approximately 50% of the time.
Warning
Do not get confused! F5 in Visual Studio compiles the code and runs the application in debug mode. F5 in the web browser refreshes the page and restarts the Silverlight application.
Every time you modify the C# code or the XAML markup, you need to rebuild the application!
for
Every programming language offers a number of loops. The most well-known is the for loop: A series of operations is executed a certain number of times, for example in Listing 9.4:
public Page()
{
// Required to initialize variables
InitializeComponent();
int counter = 1;
for (int index = 0; index < 5; index++)
{
counter = counter * 2;
}
StatusLine.Text = counter.ToString();
}
The preceding code displays the value 32 which is the value of 1*2*2*2*2*2.
Here again, a few notes:
![]() We loop from 0 (inclusive) to 5 (not inclusive). So we loop five times altogether. This way of doing is customary in C-based languages.
We loop from 0 (inclusive) to 5 (not inclusive). So we loop five times altogether. This way of doing is customary in C-based languages.
![]()
index++ means the same as index = index + 1. So we start at 0, and increase index by 1 at every loop. The value of index gets evaluated, and as long as the condition index < 5 is true, the loop continues.
![]() As in JavaScript, we can place multiple operations on one single line, as in the
As in JavaScript, we can place multiple operations on one single line, as in the for loop definition (the variable index is defined, assigned, tested against, and incremented, all on one line). The semicolon “;” is used to separate the operations.
![]() Note that in C#, the semicolon at the end of an operation is compulsory!
Note that in C#, the semicolon at the end of an operation is compulsory!
foreach
Here is a variation of the for loop. This loop takes every member of a collection and performs a series of operations on each.
There are multiple collections in .NET, and we will encounter some of them in later chapters. The simplest collection is the array: A group of “cells,” each cell of the same type as all others, such as in Listing 9.5:
1 public Page()
2 {
3 // Required to initialize variables
4 InitializeComponent();
5 string[] words = new string[5] { ″Hello″, ″to″, ″all″,
6 ″Silverlight″, ″fans″ };
7 string display = ″″;
8 foreach (string word in words)
9 {
10 display = display + word + ″ ″;
11 }
12 StatusLine.Text = display;
13 }
![]() Lines 5 and 6 create an array of five strings and initialize the content with five words.
Lines 5 and 6 create an array of five strings and initialize the content with five words.
![]() Line 7 creates a new variable of type
Line 7 creates a new variable of type string and initializes it with an empty string. Initializing the variable with an empty string is needed, or else the compiler will refuse to build the application. .NET doesn’t like unassigned variables, because their state is not clear.
![]() Lines 8 to 11 loop through the string array. At each loop, a temporary variable named
Lines 8 to 11 loop through the string array. At each loop, a temporary variable named word is created and is initialized with the content of the current cell.
![]() Line 10 adds the content of the variable
Line 10 adds the content of the variable word to the string named display, and then adds a “space.” The result is stored in display again. The strings (like any other variables) are moved and copied in memory by the Silverlight runtime.
![]() The variable
The variable word is discarded at the end of every loop. It is local only to the block between lines 9 and 11.
![]() The variable
The variable display is local to the block between lines 2 and 13, and thus can be used outside the foreach loop.
![]() Running this code displays the string “Hello to all Silverlight fans”.
Running this code displays the string “Hello to all Silverlight fans”.
while
Here is another loop! while executes a series of operations as long as a condition is true as shown in Listing 9.6. Note that depending on the condition, it is possible that the loop is never executed! It is also possible that the loop never ends once started (we will see an example of this in Chapter 24).
1 public Page()
2 {
3 // Required to initialize variables
4 InitializeComponent();
5
6 string display = ″″;
7 int index = 0;
8 while (index < 10)
9 {
10 display = display + index + ″ ″;
11 index++;
12 }
13 StatusLine.Text = display;
14 }
Note
Even though .NET is very strict about types, it is possible to “add” (concatenate) a string (display) and an integer (index). To do this, the integer must be converted to a string thanks to the built-in method ToString(). This method is available on every .NET object.
As a developer, when you create your own types, you may want to overload the built-in ToString method with your own.
![]() The variable
The variable index is created at line 7 and initialized to 0.
![]() At line 8, the value of
At line 8, the value of index is compared to 10. If it is strictly smaller the loop will execute.
![]() Line 10 adds the current value of
Line 10 adds the current value of index and a space to the string display.
![]() Line 11 increases the value of
Line 11 increases the value of index by 1. If you forget this line, you’ll have an infinite loop! The end condition will never be met, and the application will run forever.
Tip
If you create an endless loop, the only way to end the application is to kill the process. To learn how to do this, check the section named “Killing a Process” in Chapter 24.
![]() Running this code will display “0 1 2 3 4 5 6 7 8 9”.
Running this code will display “0 1 2 3 4 5 6 7 8 9”.
do…while
This is a variation of the while loop discussed previously, as in Listing 9.7:
public Page()
{
// Required to initialize variables
InitializeComponent();
string display = ″″;
int index = 0;
do
{
display = display + index + ″ ″;
index = index + 1;
}
while (index < 10);
StatusLine.Text = display;
}
The preceding code creates exactly the same output as the corresponding while loop. The only difference is that the operations in the loop will be executed once before the condition is even checked!
switch…case
This condition operator is a handy shortcut to replace multiple if… then…else operations. Often, you want to execute various operations depending on a condition, for example in Listing 9.8:
1 public Page()
2 {
3 // Required to initialize variables
4 InitializeComponent();
5
6 string display = ″″;
7 int index = 0;
8 while (index < 10)
9 {
10 switch (index)
11 {
12 case 1:
13 display = display + ″one ″;
14 break;
15 case 2:
16 display = display + ″two ″;
17 break;
18 case 3:
19 case 4:
20 case 5:
21 display = display + ″345 ″;
22 break;
23 default:
24 display = display + index + ″ ″;
25 break;
26 }
27
28 index = index + 1;
29 }
30 StatusLine.Text = display;
31 }
![]() According to the value of the variable
According to the value of the variable index, a different case is executed.
![]() A series of operations in a
A series of operations in a case must be terminated by a break.
![]() Note that you can group multiple values, like we do at lines 18, 19, and 20: The same code is executed for the values 3, 4, and 5.
Note that you can group multiple values, like we do at lines 18, 19, and 20: The same code is executed for the values 3, 4, and 5.
![]() If no corresponding
If no corresponding case is found, the programmer can specify (optionally) a default series of operations.
![]() The code outputs the string “0 one two 345 345 345 6 7 8 9”.
The code outputs the string “0 one two 345 345 345 6 7 8 9”.
We could have reached the same result by nesting a series of if…then…else operations, but a switch is really easier to maintain and extend, and easier to read.
Operators
C-based languages mostly share the same operators, and we already used some of them in JavaScript. Again, a great advantage of using C# and JavaScript for Silverlight!
Mathematical Operations
The usual operators +, -, *, and / are pretty obvious. Let’s just mention the fact that in C#, a developer can specify the way these operators act for a custom type. For example, a custom type Tree can specify that adding a Tree plus another Tree returns a Forest. Remember before, we added a string and an integer, and we got a string in return. This is the same type of operation.
In addition, C# offers useful operators such as the well-known ++ operator that gave its name to the famous language C++. This operator is a shortcut, and the following two lines are equivalent:
index++;
index = index + 1;
The operator -- is also available and means index = index - 1;.
Warning
The operators ++ and -- can be used before and after the variable they apply to. If they are placed before (++index), it means “increase by one and then perform an operation.” In the other case, it means “perform an operation and then increase by one” (index++).
One operator deserves a special mention, because it is not well known: The modulo operator—%. It returns the remainder of a division. For example in Listing 9.9:
int result = 5 % 3; // 5 modulo 3, stores 2 in result
result = 6 % 3; // Stores 0 in result
result = 7 % 3; // Stores 1 in result
Assignment
There are multiple ways to assign a value to a variable:
![]() If you don’t want to modify the assigned value, you simply use the
If you don’t want to modify the assigned value, you simply use the = operator:
anyNumber = 5;
![]() It often happens that you want to modify the value stored in a variable, and to assign the modified value to the same variable again. For instance:
It often happens that you want to modify the value stored in a variable, and to assign the modified value to the same variable again. For instance:
anyNumber = anyNumber + 10;
![]() This way of writing is annoying, however, because you must repeat the name of the variable. This is what the other assignment operators can help you with:
This way of writing is annoying, however, because you must repeat the name of the variable. This is what the other assignment operators can help you with:
anyNumber += 10;
![]() The preceding line has the same result as the previous statement. It adds 10 to the number already contained in the variable
The preceding line has the same result as the previous statement. It adds 10 to the number already contained in the variable anyNumber.
![]() Other such operators exist for each of the basic mathematical operations:
Other such operators exist for each of the basic mathematical operations:
anyNumber *= 2;
anyNumber /= 4;
anyNumber -= 10;
Conditional and Logical Operators
When handling boolean values, you want to be able to test for a value, but also to modify it. This is what conditional and logical operators are for.
The three main operators acting on boolean values are shown in Listing 9.10:
![]()
&&—AND, returns true only if both operands are true.
![]()
||—OR, returns true if at least one of the operands is true.
![]()
!—NOT, returns true if the single operand is false, and returns false if it is true.
bool value1 = true;
bool value2 = !value1; // stores false into value2
bool value3 = value1 && value2; // stores false into value3
bool value4 = value1 || value2; // stores true into value4
Relational and Equality Operators
These operators are used to test how a value compares to another, for example in Listing 9.11:
int number1 = 100;
int number2 = 1000;
bool test1 = (number1 < 100); // stores false in test1
bool test2 = (number1 <= 100); // stores true in test2
bool test3 = (number1 > 90); // stores true in test3
bool test4 = (number1 == number2); // stores false in test4
bool test5 = (number1 != number2); // stores true in test5
Conditional Operator
This last operator is a little confusing for beginners. It is a handy way to write an if…then…else operation in a short and elegant way. Using the conditional operator, you can add a conditional check in a line already containing other operations.
If a condition is true, the expression before the colon is evaluated. If it is false, the expression after the colon is evaluated. The evaluated expressions may be simple values or complex calculations, for example in Listing 9.12:
bool value = true;
int result1 = value ? 1 : 2; // stores 1 into result1
int result2 = (result1 == 2)
? (result1 * 2)
: (result1 + 5); // stores 6 into result2
Note
C# has additional operators that are not presented here. A complete list of the C# operators can be found online, at http://msdn2.microsoft.com/en-us/library/6a71f45d.aspx.
Using Parentheses
Parentheses have multiple purposes in C#. We saw before that they can be used to cast a variable from one type into another type. Another important use is to specify the order of the executed operations. For example:
int result1 = 5 + 2 * 3; // stores 11 in result1
int result2 = (5 + 2) * 3; // stores 21 in result2
The first result calculates 2 * 3 first, and then adds 5. This is because the multiplication operator has precedence over the addition operator.
When in doubt, use parentheses to explicitly set the order of the operations you want to execute.
Summary
In this chapter, we studied important basic concepts of programming in C# and .NET. Even though it was a lot of theory, this step will allow you to get a good understanding of the programming concepts. We continue this quest during the next chapter, and we use this knowledge to build applications. .NET has huge potential, and it is only the beginning of a long and wonderful journey.