
Chapter 12 Encoding Videos with Expression Encoder
In This Chapter
When Microsoft released Silverlight 1, they understood the need for the runtime framework to be available on as many computers as possible, and fast. If you want developers and designers to create content for any new platform, they need an audience. This is why the first release targeted Windows and the Macintosh operating system, making it potentially available on more than 95% of the market. (With Silverlight 2 being available for Linux too, this number is of course even higher.)
Something more was needed, though: The user needs a reason to install the runtime! Even though the installation experience is fast and rather painless, if the content is not attractive enough, the user won’t install. According to research, the most attractive online content nowadays is video, and this is exactly what Silverlight 1 targeted in the first place.
Today, the experience is even better. Expression Encoder 2, the tool that we use in this chapter, was released in May 2008 and brings video encoding and Silverlight integration one big step further.
Before We Start…
Expression Encoder is not the only application that can save videos in Silverlight format. The well-known publisher of video encoding applications Roxio released a new version of its video editor Roxio Buzz, which can upload encoded videos directly to Silverlight streaming websites.
This application (built in WPF) can be found at this website: www.roxio.com/enu/products/buzz/standard/features.html.
You will need video files to follow the steps described in this chapter. The best is to have three of them: One main file for the encoding part itself, one small file (for example a title) for the header, and one small file (for example credits) for the footer. If you don’t have video files, you can find some at www.galasoft.ch/SL2U/Chapter12.
Introducing Expression Encoder
This application’s main purpose is not directly related to Silverlight: Expression Encoder is there to encode video files. It is not a video editor though it has some video editing capabilities. It is not a Silverlight application editor, though it can produce Silverlight content.
Expression Encoder can be installed from the Expression website: www.microsoft.com/expression/try-it.
After the trial period expires, you will need to purchase the product (available currently for $199). Expression Encoder is also part of the full Expression Studio (available for $699 as of this writing). Unfortunately, Expression Encoder is currently not available in any MSDN subscription.
In this chapter, we discover how we can use Expression Encoder in relation with Silverlight. This is not a complete reference about video encoding, but rather a guide to creating videos that can be watched from a web page.
Setting Options
As usual when starting a new application for the first time, it is a good idea to check the options. In Encoder, the Options dialog can be displayed by selecting Tools, Options from the menu.
The Options dialog shows the following sections:
![]() Workspace—There is a similar section in Expression Blend. You can change the application’s skin and resize the workspace, in case you’re working on extra big or extra small screens. This is a hint that the application’s user interface was programmed in WPF.
Workspace—There is a similar section in Expression Blend. You can change the application’s skin and resize the workspace, in case you’re working on extra big or extra small screens. This is a hint that the application’s user interface was programmed in WPF.
![]() Logging—When you encode a lot of movies, it is interesting to create log files. The encoding process can last a long time, and if an error occurs, it is important to understand what happened exactly to correct the error. This section gives you the possibility to set up which attributes you want to log, and in which location the logs should be saved. You can also set a size limit, to avoid filling your hard disk too fast (though if you encode videos a lot, you’ll need more disk space soon anyway!).
Logging—When you encode a lot of movies, it is interesting to create log files. The encoding process can last a long time, and if an error occurs, it is important to understand what happened exactly to correct the error. This section gives you the possibility to set up which attributes you want to log, and in which location the logs should be saved. You can also set a size limit, to avoid filling your hard disk too fast (though if you encode videos a lot, you’ll need more disk space soon anyway!).
![]() Metadata Attributes—Custom attributes can be added in this section. These can be set later in your encoded video files. We learn more about metadata attributes later in this chapter.
Metadata Attributes—Custom attributes can be added in this section. These can be set later in your encoded video files. We learn more about metadata attributes later in this chapter.
![]() Compatibility—Many video formats are available on the market, and many of them are installed on your PC by third-party applications! When you import a video in Encoder, these filters can be used to convert the video to a format that Encoder understands. In some cases, this can cause compatibility issues. Using this section, you can disable specific filters in Expression Encoder. This section also features a check box enabling or disabling hardware acceleration when you import a video. Usually, hardware acceleration is enabled to speed up the process, but if you have issues, you may want to disable it.
Compatibility—Many video formats are available on the market, and many of them are installed on your PC by third-party applications! When you import a video in Encoder, these filters can be used to convert the video to a format that Encoder understands. In some cases, this can cause compatibility issues. Using this section, you can disable specific filters in Expression Encoder. This section also features a check box enabling or disabling hardware acceleration when you import a video. Usually, hardware acceleration is enabled to speed up the process, but if you have issues, you may want to disable it.
Understanding the Panels
The application has four main panels, as shown in Figure 12.1 and described in Table 12.1.
Figure 12.1. Expression Encoder panels

Table 12.1. Expression Encoder Panels
1 Viewer panel—Displays the video being encoded.
2 Timeline panel—Displays the video’s timeline, and various controls which we study in a moment.
3 Media content panel—Displays the content you imported in the application as well as the logs (if available).
4 Encode/Enhance/Metadata/Output panel—Here you can set up the way the video will be encoded. We review these sections soon.
Most of the commands available in the panels are also available as menus from the menu bar.
Importing a Video
The first operation you need to perform when you want to encode a video for Silverlight is to import it in the workspace.
Expression Encoder can read a lot of video types. In fact, you can import all the videos for which Encoder can find a filter. This means that if you can read the video in Windows Media Player, you can probably import it in Encoder too.
If you try to import a video for which you don’t have a filter installed, you get an error, as shown in Figure 12.2. The best way to solve this kind of issue is to attempt to find on the Internet the codec corresponding to the video type you are trying to import.
Figure 12.2. Error when importing a video

To import a video in Expression Encoder, follow the steps:
1. In the Media Content panel, click on the Import button.
2. Select one or more video file(s) to import. If the file you want to import is not visible, set the Files of Type box to All Files (*). Even video files with an unknown extension may be imported if a suitable filter is found.
3. Click on Open. The file is analyzed and, if the import is successful, the video appears in the Viewer panel.
4. Using the controls shown in Figure 12.3, you can do the following (from left to right):
![]() Go back to the previous marker (or to the beginning of the video, if no marker is found).
Go back to the previous marker (or to the beginning of the video, if no marker is found).
![]() Go back to the previous frame.
Go back to the previous frame.
![]() Play the video.
Play the video.
![]() Go to the next frame.
Go to the next frame.
![]() Go to the next marker (or to the end of the video, if no marker is found).
Go to the next marker (or to the end of the video, if no marker is found).
Figure 12.3. Video controls
![]()
5. If you want, you can also zoom the video in and out, using the combo box located in the bottom left of the Viewer panel. Note that you can also click and drag on this combo box to choose a zoom factor (see Figure 12.4).
Figure 12.4. Video zoom combo box

Saving your Changes
Before you start, it is useful to know how you can save all your changes, so that your work is preserved should anything happen. Simply follow the steps:
1. At any time, you can choose File, Save Job (Ctrl+S) from the menu.
2. If this is the first time you save your work, you will be asked to enter a name and location for the file.
Note
Encoder jobs files are saved with a .xej extension. In fact, they are saved in XML format. Remember when, in Chapter 2, “Understanding XAML,” we said that XML could be used for data? Here’s a real-life example!
3. If you exit the application (or if it crashes), you can reopen the saved XML file at a later time (by selecting File, Open Job from the menu). This reloads all the settings you saved.
4. If you want to make a copy of your current job, save it by selecting File, Save As.
Tip
Like Expression Blend, Expression Encoder saves a huge number of operations in memory, so that you can undo them if needed. Simply press Ctrl+Z to undo (select Edit, Undo from the menu), or Ctrl+Y to redo (select Edit, Redo from the menu).
Specifying the Output Type
Expression Encoder uses profiles to save the video encoding settings. If no profile is loaded, you must specify all the settings manually with the following steps:
1. In the Encode panel, choose a video format (see Figure 12.5). There are many predefined formats, from High Definition (HD 720p Intranet) to Motion thumbnail. As usual when you encode video, you must accept a trade-off between definition and file size. If you plan on putting your video on the Internet, a lower definition and smaller size are preferred.
Figure 12.5. Video and Audio profile settings
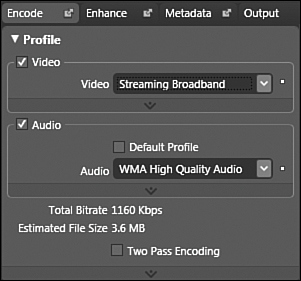
2. Did you notice that there is an “expander” right under the Video setting? Here you can see what each predefined profile means. This helps you to choose a profile suited for your needs, or to tweak the profile to suit your specific needs.
3. For each video profile, an audio setting is proposed. If you want to change this, uncheck the Default Profile check box and select a different audio format. Here you can expand two Advanced Properties sections.
4. You may notice a Two Pass Encoding check box. For a higher definition (but also a longer encoding time), you can check this check box. This check box is disabled for some video/audio profiles.
Explaining all the advanced properties is outside the scope of this book. If you need to modify the default settings for a profile, the user documentation can help you (select Help, User Guide from the menu), especially the sections under “Encode Your Video for Microsoft Silverlight and the Web.”
Editing the Video Size and Aspect
Even though Expression Encoder is not a video editor, some editing functionalities are available. These are very good for simple edits, or for last minute changes before encoding the video.
Changing the Size and Aspect Ratio
Under the Video Profile section, you can refine your settings for the current job with the following steps:
1. You may choose a different size for your video. You can choose between the following:
![]() Profile Adaptive—Resizes the video to the default size specified in the profile, but analyzes the video to find the video aspect ratio.
Profile Adaptive—Resizes the video to the default size specified in the profile, but analyzes the video to find the video aspect ratio.
![]() Profile—Resizes to the default profile size.
Profile—Resizes to the default profile size.
![]() Source—The original video’s size will be used.
Source—The original video’s size will be used.
![]() Custom—You may select the size you want.
Custom—You may select the size you want.
2. If you select Custom, you can resize the video directly in the Viewer panel, using a yellow border. If you uncheck the Maintain Aspect Ratio check box and set the Resize Mode to Stretch, you can even distort the video output.
Warning
Resizing a video works well when you make it smaller than the original. If you make it bigger, you will start seeing pixels, and the result will not be smooth. Remember, videos are raster graphics. We talked about that in Chapter 5, “Using Media,” in the section titled “Using Vector Graphics.”
3. In the advanced properties under the expander, you can select a different aspect ratio (4:3 or 16:9, or even set your own custom aspect ratio).
Cropping and Trimming the Video
You can crop the video to make it smaller or to focus on a certain region, for example with the following steps:
1. To change the output video’s size, you can use the Crop functionality. Check the Crop check box.
2. Using the red border in the Viewer panel, select which area of the video you want to output.
3. By unchecking the Maintain Aspect Ratio check box, you can select any shape you want (well, as long as it’s rectangular!).
Warning
If you select a small crop area, and depending on the chosen output size, the output video might appear pixelized. Make sure you check the video output carefully before you encode the video. We see in a moment how you can test the settings on a small portion of the video.
4. Depending on the aspect ratio you selected for the output, Encoder might add some black borders. If you want to remove them from the output video, check the Sync Size to Crop check box.
You may also want to trim the video or remove parts of it. To do this, you can either use the Timeline panel, or set a new Start Time and End Time in the Clip Edits section of the Enhance panel.
To use the Timeline panel, follow these steps:
1. Under the blue timeline, on the left-hand side, locate the Show Cut Regions (or Hide Cut Regions) button. Make sure that this button is set so that the cut sections are displayed.
2. Move both ends of the blue timeline bar until you select the segment that you want to encode (see Figure 12.6).
Figure 12.6. Cropping and Trimming the video
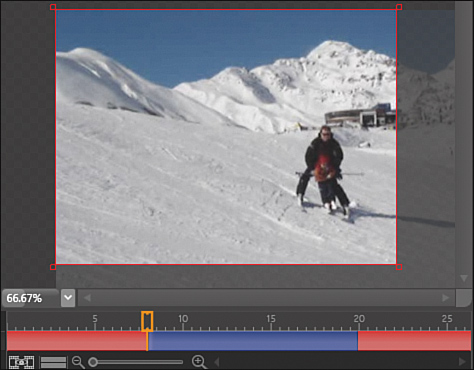
3. Using the Zoom % controls, you can zoom in and out of the timeline. This can be useful if you want to trim the output to a short segment of the initial video.
4. You can delete any edit you make to the video by moving the playhead on that section (that’s the orange rectangle located on top of the red/blue timeline bar). Then click the button with the Remove the Edit at the Playhead ToolTip.
Note that you can select multiple segments in a video. Follow these steps:
1. To add a segment, position the playhead inside one existing segment (blue section of the timeline).
2. In the Enhance panel, in the Clip Edits section, click on the Add button.
3. Move the ends of the new segment in the Timeline panel to set the start and end positions.
Advanced Processing and Codec Settings
These settings are outside the scope of this book. More information about them can be found in the Expression Encoder user guide (from the menu select Help, User Guide). In most standard cases, you can just leave the default settings untouched.
Adding a Leader and Trailer Video
You may want to add a leader and/or trailer video segment. This can be useful to add a title, credits, and so on. Follow the steps:
1. Click on the Add Leader to Source button, under the zoom controls below the timeline (see Figure 12.7).
Figure 12.7. The Add Leader button
![]()
2. Alternatively, you can also use the Auto Stitch section in the Enhance panel.
3. Select the video file you want to add. Here also, it can be any of the supported input formats, even a XAML animation. We will create XAML animations in Chapter 13, “Progressing with Videos,” for overlays. The same technique can be used for leaders and trailers.
Note
You cannot edit the leader/trailer video much. If you need to crop, trim, or otherwise edit that video, you must do it before you choose it as a leader/trailer.
4. If the leader or trailer video segment is of a different size, it must be resized to fit your video. You can set the resize mode to Letter Box (the aspect ratio will be preserved, and a black mask will be applied) or Stretch (the leader/trailer will fill the space, but may be distorted).
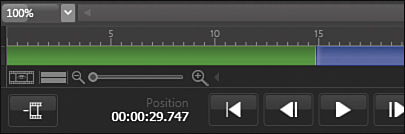
5. The leader or trailer appears in the Timeline panel (see Figure 12.8).
Figure 12.8. Video with a 15 seconds leader
Testing Before Encoding
Probably the most exciting feature of Expression Encoder is the ability to see the end result before you encode the whole video, and even to compare it with the original video file with the following steps!
1. In the Media Content panel, click on A/B Compare.
2. The video is “split,” with the original on the left, and a (currently) black pane on the right.
3. Using a combo box on top of the Media Content panel, you can change the Compare Mode from Split (one image only) to Side by Side (two images).
4. In the timeline, use the white markers to select a segment of the video you want to test (see Figure 12.9).
Figure 12.9. Segment for A/V Compare mode

5. In the Media Content panel, click on Build Preview. This encodes the portion of the video that you selected, and displays the output next to (or below) the original quality video (see Figure 12.10).
Figure 12.10. A/B Compare mode
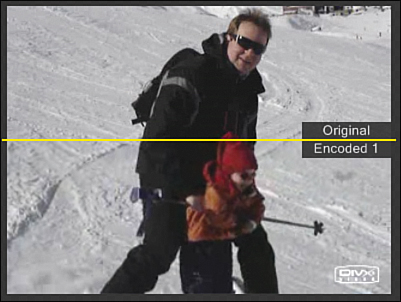
The preview builds faster than the real thing (that’s the idea!), so you can visualize the result.
![]() Notice how you can move the yellow splitter to compare what you will get with great precision.
Notice how you can move the yellow splitter to compare what you will get with great precision.
![]() Of course, you can also move the playhead to a specific position within the encoded segment.
Of course, you can also move the playhead to a specific position within the encoded segment.
![]() And you can even play the video to see the differences!
And you can even play the video to see the differences!
![]() To change the orientation of the yellow splitter, double-click on it!
To change the orientation of the yellow splitter, double-click on it!
You can also try encoding with different settings! Perform the following steps:
1. Without exiting the A/B mode, select another profile in the Encode panel.
2. Click on the Build Preview button.
3. You now see Encoded 2 in the video.
4. Using the combo boxes on the left of the Build Preview button, you can switch between Original, Encoded 1, Encoded 2, and select the best result.
After you verify that your settings are okay, you can exit the A/B Compare mode by clicking the corresponding button in the Media Content panel.
Setting Metadata
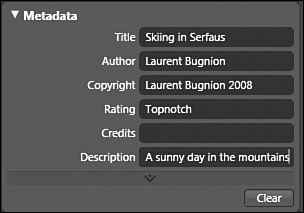
Using the Metadata panel, you can specify information that will be encoded in your video file. This is interesting if you want to publish your video on the Internet, for example, and embed your name, copyright information, and other such details.
Warning
Adding metadata to a video doesn’t mean that it cannot be “stolen.” The metadata information in the video file can be modified or deleted by malicious users. Once again, the old saying is true: If you don’t want anyone to steal your work, don’t publish it.
The following metainformation can be entered:
![]() Title, Author (your name), Copyright, Rating, Credits, and Description (see Figure 12.11).
Title, Author (your name), Copyright, Rating, Credits, and Description (see Figure 12.11).
Figure 12.11. Metadata
![]() And a lot of other information, which you can see if you expand the Advanced Properties section, right under the Description box.
And a lot of other information, which you can see if you expand the Advanced Properties section, right under the Description box.
For example, on Windows computers, this information is displayed in Windows Explorer in Details mode (see Figure 12.12). This information is also displayed in a ToolTip that appears when you place the mouse over the file.
Figure 12.12. Metadata displayed in Windows Explorer

Adding Your Own Metainformation
In the “Setting Options” section earlier in this chapter, we mentioned a section titled “Metadata Attributes” where you can specify custom metadata attributes. After you create them, they are available in the Metadata panel (you must expand the advanced properties to see the custom attributes).
If you enter a value for the custom attribute, it will be visible encoded in the video file’s metainformation, and can be retrieved by other video editing tools (see Figure 12.13).
Figure 12.13. Custom metainformation

This can be useful for specific cases, but in general, it is better to try and “stick” with the standard attributes. When you load your videos on another device, for example, a pocket video player, the custom attributes will probably be ignored, while the device can work with standard attributes (for example, displaying the video’s author and description).
Creating Chapters
If your video is long enough, it can be interesting to divide it into chapters. When you publish your video in Silverlight format, the chapters will be available in a built-in dialog, allowing the viewer to skip to a given section easily. Follow the steps:
1. In the Timeline panel, place the yellow playhead on the position in which you want to add a chapter.
2. In the Metadata panel, in the Markers section, click the Add button.
3. Expression Encoder adds a marker (see Figure 12.14). Note that you may enter “only” 1,000 markers to a video (including chapters, captions, and so on).
Figure 12.14. Creating chapters

Tip
A keyframe is a frame for which the whole picture information is saved in the video. For other frames, only the differences between the previous frame and the current frame are encoded. This reduces the size of the video, but also makes it more difficult to work with that particular frame.
4. If you want this marker to be a keyframe, check the corresponding check box (by checking the check box on top of the column, you force all markers to be keyframes).
5. Enter a name for the chapter in the Value text box.
6. If you want Encoder to create a thumbnail of the video at this particular moment, check the Thumbnails check box. Here also, checking the check box on top of the column forces the value for all markers.
7. If you want the Silverlight player (that we create later) to display a chapter list, you must create a thumbnail for each chapter.
8. To specify the look of the thumbnails, expand the Advanced Properties section just under the buttons Add, Remove, and so on. You can specify the format of the thumbnail (for example, JPG, PNG, GIF, BMP), its quality, and its size.
9. You can export (and import) markers using the corresponding buttons. The markers will be saved in XML format. We will see a use for the markers file in Chapter 24, “Silverlight: Continuing the Journey,” in the section titled “Using the MediaPlayer ASP.NET control.”
Creating Captions
How cool would it be to provide subtitles for your video, and to display them in the Silverlight player? With Expression Encoder, it is easy. You can use the captions as a way to translate your video, as titles for a given section of the video, and so on. You can add captions with the following steps:
1. In the Timeline panel, move the yellow playhead to the position in which you want to display a caption.
Note
Script commands can also be used to specify different types of events. In Chapter 13, we see how to interact with the Silverlight player using script commands.
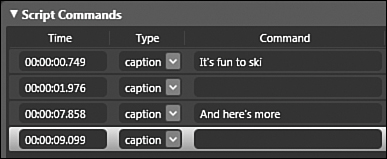
2. In the Metadata panel, in the Script Commands section, click on the Add button.
3. Set the type of the command to Caption. You might need to type this in the combo box in the Type column.
4. Enter the text you want to display in the Command column (see Figure 12.15).
Figure 12.15. Creating captions
If you want the caption to disappear from the screen after a certain time (for example, after 2 seconds), you must enter a new empty caption 2 seconds later. Follow these steps:
1. Move the timeline approximately 2 seconds after the caption you want to remove from the screen.
2. Add a new caption.
3. Select Caption from the Type combo box.
4. Delete the content of the Command text box.
Here also, you can export and import captions using the corresponding buttons.
Encoding the Video for Silverlight
After this rather long preparation, it’s time to specify the output and to encode it with the following steps:
1. In the Metadata panel, select the Output tab.
2. In the Thumbnail section, you can set Expression Encoder to create a thumbnail for your video:
![]() Specify the thumbnail’s type: You can choose the best frame of your video, the first frame, or any other time of your video. If you choose the Custom type, you can choose the time in the Timeline panel (yellow marker).
Specify the thumbnail’s type: You can choose the best frame of your video, the first frame, or any other time of your video. If you choose the Custom type, you can choose the time in the Timeline panel (yellow marker).
Tip
If you let Encoder export a thumbnail, it will be displayed in the Silverlight viewer while the video is buffering.
![]() Specify the output format and quality.
Specify the output format and quality.
![]() Specify the thumbnail’s size.
Specify the thumbnail’s size.
3. The Timeline panel displays all the markers, captions, thumbnail and so on (see Figure 12.16).
Figure 12.16. Timeline with two chapters (white), 2 captions (periods delimited by gray circles), and one thumbnail marker (yellow)

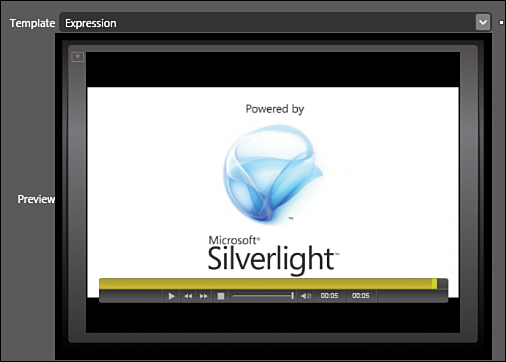
Now is the time to choose a player for your video. Expression Encoder lets you choose from a set of predefined Silverlight templates. We will experiment with these templates later.
1. In the Job Output section, you can choose from a set of Silverlight templates for the video player (see Figure 12.17). If you choose None, the video will be encoded, but no additional files will be created to play it.
Figure 12.17. Selecting a Silverlight template
2. Select the directory in which your video should be saved.
Tip
Depending on the size of the video, the speed of your PC, and the power of your graphics card, the encoding can take a long time. It’s wise to test your settings on smaller portions of the video before you encode the final result.
3. If you want the video to open automatically in your favorite web browser after it is encoded (to test the result), check the Preview in Browser check box.
4. If you want all the settings to be saved in the same folder as the video output, check the Save Job File check box.
5. If you want the video to be saved in a separate subfolder, check the Subfolder by Job ID check box. The video will be saved in a folder named [PC NAME] [DATE] [TIME].
6. In the Media Content panel, click on the Encode button.
Checking the Result
Note
Depending on the template you chose, the results may vary. The template displayed here is called the Expression template.
You did it: You just encoded your first video for Silverlight. Let’s check the result with the following steps:
1. If the file is not already visible in your web browser, go to the location where you saved the video output, and double-click the file Default.html.
2. In the web browser, notice how the player occupies the whole window. If you resize the window, the player resizes too. In Chapter 13, we see how to include the player in an existing web page.
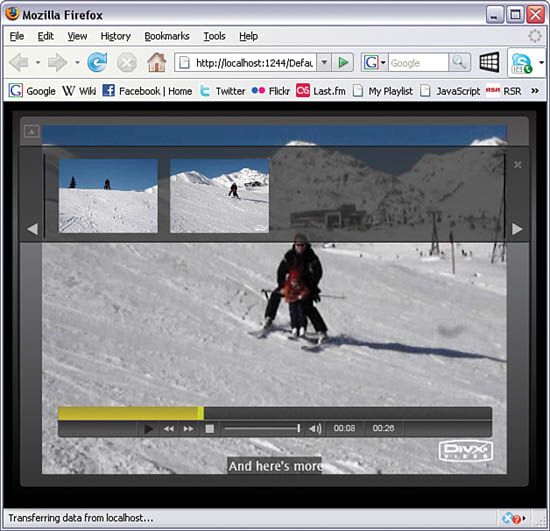
3. In the top-left corner, notice a small button. If you click it, the list of chapters opens.
4. In the bottom of the video, the video controls are hidden. Pass your mouse over this area of the screen to make the controls visible. You can play, pause, fast forward, rewind, and control the volume.
5. While the video is playing, notice how the captions appear and disappear, bringing additional information to the viewer (see Figure 12.18).
Figure 12.18. Silverlight video player in Firefox
Playing the Video in Full Screen
One nice feature of Silverlight is the ability to change to full-screen display. This is available for any Silverlight application (unless it was explicity disabled by the application), and the video players created by Expression Encoder also offer this functionality.
To test this, simply double-click on the movie being played. To exit the full-screen mode, press the Esc key.
Unfortunately, this function is not very intuitive. Additionally, some player templates have a Full Screen button, but the Expression template we use in this chapter doesn’t, and you cannot see anywhere on the screen that double-clicking the movie will switch to full screen. In Chapter 13, we see how to add a Full Screen button to the player.
Advanced Parameters
Before we finish this chapter, let’s follow the steps and take a look at advanced parameters you can see when you encode the video.
1. In the Output panel, in the Job Output section, open the expander at the very bottom.
2. The first option (Cue Video on Page Load), if checked, initiates a download as soon as the Silverlight application is loaded in the web browser. If you uncheck this option, the video player shows a Start button, as shown in Figure 12.19. The video download will start only when this button is clicked.
Figure 12.19. Start button

3. The option Automatically Start Video When Cued is self-explanatory. If it is unchecked, the video will be loaded by the browser, but it will not start until the user clicks the Play button.
4. Check Allow Closed Captions to Show if you want captions to be visible. If you uncheck this option, the closed captions (subtitles) will not be displayed when the video is playing.
5. Mute Player on Start is another self-explanatory option. Check this option to turn off sound.
6. Check Player Background Color to choose a color for the HTML page in which the Silverlight player is included. Note, however, that the player’s color is not modified by this option. We see in Chapter 13 how to edit a player template and how to modify its look and feel.
Summary
In this chapter, we learned how to encode a video to your hard disk (including a Silverlight player) and watch it locally in the Silverlight video player. We also learned how to add captions in your video to provide your viewers with more information, and how to divide your video into chapters.
In the next chapter, we learn how to publish on a perfectly standard website, how to add video to existing web pages, and even how to host short videos on Microsoft’s own streaming servers. Adding video to your website is easy with Expression Encoder!