
Chapter 10 Progressing with .NET
In This Chapter
In Chapter 9, “Understanding .NET,” we learned what we need to create basic .NET applications, but now we need more structure. This chapter introduces objects in .NET and explains how to program them in C#.
Programming with Objects in C#
In Chapter 8, “Programming Silverlight with JavaScript,” we saw a few definitions about object-oriented programming applied to JavaScript. The definitions we learned are valid in C#, too, though the implementation might be different. In the first part of this chapter, we define additional concepts.
Breaking Your Problem into Smaller Ones
Before object-oriented programming (OOP) took off, applications were written in a procedural way. The application had an entry point, which was calling global methods and saving data in global variables.
This way of programming proved to be difficult to maintain and to extend. When a bug was found, looking for the cause took a lot of time, due to the structure (or the lack of…) of the code.
OOP breaks the problems in much smaller structures, so you can concentrate on one problem after the other. Objects can be tested independently from the rest of the application, making it easier to isolate bugs, find their cause, and test the code in unusual circumstances.
Our environment is made of objects, each with a specific behavior. Building a plane is difficult. But a plane has two wings, so if you build one wing, you pretty much know how to build the second one. The differences between both wings can be expressed by a set of properties. They communicate with the rest of the plane using interfaces.
In turn, each wing is composed of a set of smaller, simpler objects. Similarly an application can be broken down into components and objects.
Note
When you start doing serious OOP work, you probably want to take a look at UML (Unified Modelling Language) editors. Many of them are available, varying in quality, features, and price. The most sophisticated can even generate code in various programming languages; they can also import existing source code and “reverse engineer” a visual representation. Other simpler editors allow drawing objects and their relationships to make analysis easier.
Namespaces and the using Directive
Namespaces are logical groups of objects, used to organize objects according to their functionality. Namespaces in C# don’t have an impact on the object they host other than simply offering them a place to dwell.
Namespaces can be spread over multiple assemblies, and one assembly can contain multiple namespaces.
You can only use namespaces defined in referenced assemblies. These are assemblies that the current project explicitly links to. Later we see how to reference an external assembly to access the functionality it contains. In Visual Studio, referenced assemblies can be seen in the References folder. Do not modify the content of this folder, or your Silverlight application will stop working!
A top namespace is automatically defined when you create a new project in Studio or Blend. By default, the top namespace is equal to the project name. For example, for a project named MySilverlightApplication, the top namespace will be MySilverlightApplication, and the assembly will be named MySilverlightApplication.dll.
This is a good convention, and it is recommended to keep it this way. Additionally, you may define subnamespaces in the same assembly, for example: MySilverlightApplication.Services and MySilverlightApplication.Utilities.
namespace MySilverlightApplication.Services
{
// ...
}
Adding a using Directive
If you want to use a namespace located in the current assembly or in a referenced assembly, you need to specify it explicitly in the source code. This is what the using directive is for.
In any Silverlight source code file created with Visual Studio 2008, you will see such a section, automatically added:
using System;
using System.Windows;
using System.Windows.Controls;
using System.Windows.Shapes;
// ...
By adding a namespace with a using directive, you expose all the public code it contains without explicitly mentioning it. For example, the Rectangle class is located in the namespace System.Windows.Shapes. If you use a Rectangle in your code, you can type:
Rectangle myRectangle = new Rectangle();
If you remove the directive using System.Windows.Shapes; you cannot compile the code anymore, unless you mention the namespace explicitly:
System.Windows.Shapes.Rectangle myRectangle
= new System.Windows.Shapes.Rectangle();
Visual Studio assists you in adding using directives with the following steps:
1. Having removed the statement using System.Windows.Shapes;, simply type the word Rectangle in your code.
2. Notice a small red underline appearing on the bottom right of the word Rectangle, as shown in Figure 10.1.
Figure 10.1. Automating a using directive (1)
![]()
3. Pass your mouse on this underline, and choose using System.Windows.Shapes (to add a using directive), as shown in Figure 10.2, or System.Windows.Shapes.Rectangle (to use the full name).
Figure 10.2. Automating a using directive (2)

4. You can expedite things by pressing the key combination Shift+Alt+F10 when the small red underline is displayed, instead of using the mouse.
Visibility
We saw that JavaScript cannot protect an object’s members against unwanted access. In C#, however, you can control who is allowed to use attributes, properties, and methods.
![]() private— This is the most restrictive qualifier. Private members can be used only inside the class that defines them. This is also the default visibility: If you don’t define it explicitly, private visibility will be used.
private— This is the most restrictive qualifier. Private members can be used only inside the class that defines them. This is also the default visibility: If you don’t define it explicitly, private visibility will be used.
Warning
Unlike the Java programming language, C# does not have a visibility restricted to the current namespace only.
![]() protected— These members can be used inside the class that defines them, and inside any derived class (see the “Inheritance” section later in this chapter).
protected— These members can be used inside the class that defines them, and inside any derived class (see the “Inheritance” section later in this chapter).
![]() internal— These members can be used only by classes located inside the same assembly as the class that defines them.
internal— These members can be used only by classes located inside the same assembly as the class that defines them.
![]() public— These members can be used by anyone, anytime, any place.
public— These members can be used by anyone, anytime, any place.
Properties
A property is a member somewhat between attributes and methods.
![]() Attributes should never be accessed directly, because the class that exposes them has no control over the way the accessing class uses or modifies them. That’s why attributes usually are private.
Attributes should never be accessed directly, because the class that exposes them has no control over the way the accessing class uses or modifies them. That’s why attributes usually are private.
![]() Methods offer better control, there is a body that is executed, and the class exposing the method can control what happens. But if you just want to get and set the value of an attribute, you need two methods (a setter and a getter) for each attribute, which is annoying to program.
Methods offer better control, there is a body that is executed, and the class exposing the method can control what happens. But if you just want to get and set the value of an attribute, you need two methods (a setter and a getter) for each attribute, which is annoying to program.
![]() Properties are right in the middle: They expose a setter and a getter, but also have a body, so the class exposing the property can control what happens and what value is set.
Properties are right in the middle: They expose a setter and a getter, but also have a body, so the class exposing the property can control what happens and what value is set.
![]() In C# 3.5, you can either declare a body for the property, or let the framework take care of it (if this is a simple setter/getter property). This is called an automatic property as shown in Listing 10.1:
In C# 3.5, you can either declare a body for the property, or let the framework take care of it (if this is a simple setter/getter property). This is called an automatic property as shown in Listing 10.1:
1 protected double Area1
2 {
3 get;
4 private set;
5 }
6
7 private double _area2;
8 protected double Area2
9 {
10 get
11 {
12 return _area2;
13 }
14 set
15 {
16 if (value < 0)
17 {
18 value = 0;
19 }
20 _area2 = value;
21 }
22 }
23
24 public void UseProperties()
25 {
26 Area1 = 20.0;
27 Area2 = 40.0;
28 DoSomething(Area2);
29 }
![]() Lines 1 to 5 define an automatic property with default setter and getter. Notice that even though the property itself is public, the setter is private, so it may only be used from inside the class itself. Note also that there is no attribute to store the value of
Lines 1 to 5 define an automatic property with default setter and getter. Notice that even though the property itself is public, the setter is private, so it may only be used from inside the class itself. Note also that there is no attribute to store the value of Area1. The storage is taken care of by the framework.
![]() Line 7 creates a private attribute. Because it is private, it can only be used inside the class that owns it.
Line 7 creates a private attribute. Because it is private, it can only be used inside the class that owns it.
![]() Lines 10 to 13 define a getter for the attribute. It simply returns the value of the attribute
Lines 10 to 13 define a getter for the attribute. It simply returns the value of the attribute _area2. Since the whole property is protected, it can only be used in this class and classes deriving from it.
![]() Lines 14 to 21 define a setter for the attribute. Because it is not explicitly set, its visibility is also protected. Note that value is a keyword, and represents what the setter’s caller passes to it (for example 40.0). In this setter, we check the value passed to the property, and if it is negative, we set it to 0.
Lines 14 to 21 define a setter for the attribute. Because it is not explicitly set, its visibility is also protected. Note that value is a keyword, and represents what the setter’s caller passes to it (for example 40.0). In this setter, we check the value passed to the property, and if it is negative, we set it to 0.
![]() Eventually, lines 26 to 28 use the properties we defined. Notice how a property can be used just like an attribute.
Eventually, lines 26 to 28 use the properties we defined. Notice how a property can be used just like an attribute.
![]()
Area1 and Area2 have been created differently, but the result is exactly the same. Area1 uses the new way allowed by .NET 3.5.
![]() By convention, attributes are often written with a preceding underline “_” and a small letter. Properties start with a capital letter.
By convention, attributes are often written with a preceding underline “_” and a small letter. Properties start with a capital letter.
Inheritance
Inheritance is a key concept in OOP. An object can have an ancestor (base type) and derived types.
Let’s consider a plane wing again: A 747 jet, a Cessna, and an F16 fighter all have wings. They do have shared characteristics, but they are also very different from each other. The basic physics is the same, however. So why not create a class Wing to take care of the basic functionality?
Then, we can create derived classes JumboWing, CessnaWing, and FighterWing. Each refines the base functionality, making it possible to adapt a Wing to any type of plane.
In Silverlight, the most obvious use of inheritance we have seen so far is within the framework itself, and the fact that (for instance) a TextBox is also a UIElement. Other Silverlight controls are also UIElements. This base class defines the base functionality, and the inherited control classes refine the implementation.
The fact that a TextBlock is also a UIElement thanks to inheritance is called polymorphism (“multiple shapes” in Greek), another key concept in OOP.
Checking the Inheritance Path
To check the inheritance path of a given element, the best place is the Silverlight documentation that we installed in Chapter 1, “Introducing Silverlight.” Follow the steps:
1. Open the CHM file by double-clicking on it.
2. Select the Search tab.
3. Enter the word “TextBlock” in the Search box and click on List Topics.
4. In the search results, scroll down until you find the topic TextBlock Class and double-click on it.
5. On top of the TextBlock class page, you find the namespace to which it belongs (System.Windows.Controls) as well as the assembly in which this class is defined (System.Windows.dll). This DLL is part of the default assembly set included in every Silverlight application by Visual Studio. You don’t need to do anything to use this element.
Note
In .NET, every element automatically inherits System.Object, even if this is not explicitly specified. This allows the developers to make certain assumptions about any instance in any application.
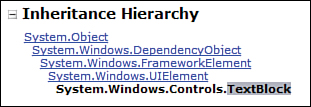
6. If you scroll down on the TextBlock class page, you see the inheritance hierarchy. We see that a TextBlock is also a UIElement, a FrameworkElement, a DependencyObject, and finally an Object (see Figure 10.3).
Figure 10.3. TextBlock inheritance hierarchy
7. The See Also section located at the bottom of the documentation page leads you to other related subjects. It is always interesting to check this section and to start browsing.
Adding Interactivity to the Thumbnails Application
Our Thumbnails application (we worked on it in Chapter 5, “Using Media,” and Chapter 6, “Blending a Little More”) is already a Silverlight 2 application, but now we want to add some interactivity. The user already has the possibility to play and pause a video thumbnail. We also want to use the Display frame we added in Chapter 6, and display an expanded version of the media, be it video or image.
Adding Event Handlers in Code
Every thumbnail in the application should do something when clicked. Our first move is to add a generic event handler that will handle all the Image and MediaElement controls. We will do this in Visual Studio with the following steps:
1. In the file Page.xaml, find the MediaElement named Media2 and remove the event handler for the MouseLeftButtonDown and the Cursor attribute. We need to remove the “old” event handler, because we will now use a generic event handler for all the images and videos, and take care of this in C# code. The new MediaElement code is shown in Listing 10.2:
<MediaElement x:Name=″Media2″
Source=″mov1.wmv″ AutoPlay=″False″
MediaEnded=″MediaElement_MediaEnded />
2. In Page.xaml.cs, modify the Page constructor as in Listing 10.3:
private FrameworkElement _expandedMedia = null;
public Page()
{
// Required to initialize variables
InitializeComponent();
FrameworkElement media = null;
int index = 0;
do
{
media = this.FindName(″Media″ + index++) as FrameworkElement;
if (media != null)
{
media.Cursor = Cursors.Hand;
media.MouseLeftButtonDown
+= new MouseButtonEventHandler(media_MouseLeftButtonDown);
}
}
while (media != null);
}
3. Note the presence of the attribute _expandedMedia. Because we want that attribute to store an Image or a MediaElement, we use the class FrameworkElement, which is the base class for both types. So we can say that an Image is a FrameworkElement, and a MediaElement is also a FrameworkElement.
Displaying the Expanded Media
1. Delete the whole method MediaElement_MouseLeftButtonDown (including the private attribute _isPaused) and replace it with the code in Listing 10.4:
1 void media_MouseLeftButtonDown(object sender,
2 MouseButtonEventArgs e)
3 {
4 FrameworkElement castedSender = sender as FrameworkElement;
5
6 // If needed, pause movie
7 if (_expandedMedia != null)
8 {
9 if (_expandedMedia is MediaElement)
10 {
11 (_expandedMedia as MediaElement).Pause();
12 }
13 // Hide currently displayed media
14 Display.Fill = new SolidColorBrush(Colors.Transparent);
15 FrameworkElement currentMedia = _expandedMedia;
16 _expandedMedia = null;
17
18 if (castedSender == currentMedia)
19 {
20 return;
21 }
22 }
23
24 // Set size and position of DisplayRectangle
25 double sizeFactor
26 = castedSender.ActualWidth / castedSender.ActualHeight;
27 Display.Width = Display.ActualHeight * sizeFactor;
28 double sideMargin
29 = (DisplayBackground.ActualWidth - Display.Width) / 2;
30 Display.Margin
31 = new Thickness(sideMargin, 10, sideMargin, 10);
32
33 // Set the Display and start movie (if needed)
34 if (castedSender is MediaElement)
35 {
36 VideoBrush brush = new VideoBrush();
37 brush.SetSource(castedSender as MediaElement);
38 (castedSender as MediaElement).Play();
39 Display.Fill = brush;
40 }
41 if (castedSender is Image)
42 {
43 ImageBrush brush = new ImageBrush();
44 BitmapImage source
45 = (castedSender as Image).Source as BitmapImage;
46 brush.ImageSource
47 = new BitmapImage(source.UriSource);
48 Display.Fill = brush;
49 }
50
51 _expandedMedia = castedSender;
52 }
2. To make this code work, you need to add a reference (a using) to the namespace System.Windows.Media.Imaging. To do this, place the cursor on the BitmapImage on line 44 and follow the steps we described earlier in the section titled “Adding a using Directive.”
Note
You will need to add using statements often in the course of this book (remember the Shift+Alt+F10 trick). We will not mention it explicitly every time, so make a mental note now for later!
![]() The method
The method media_MouseLeftButtonDown is called every time the user clicks on one of the thumbnails, because the event handler was added dynamically to each media thumbnail in the Page constructor.
![]() Since we don’t know whether the event sender is an Image or a MediaElement, we will mostly work with a parent class of these two objects: FrameworkElement. This parent class contains information about the sender’s size, its position, and so on. Since the
Since we don’t know whether the event sender is an Image or a MediaElement, we will mostly work with a parent class of these two objects: FrameworkElement. This parent class contains information about the sender’s size, its position, and so on. Since the sender is of the most generic type object, we cast (transform) sender to the FrameworkElement castedSender (line 4).
Note
Even though we have multiple references to the sender parameter, they all point to the same instance in memory. On line 4, we do not create a new instance, we merely store a reference to the same instance under a different name (and a different type, but that’s okay because of polymorphism).
![]() Lines 6 to 22 check whether an element is already displayed. Since the attribute
Lines 6 to 22 check whether an element is already displayed. Since the attribute _expandedMedia is initialized to null, this section will not be executed the first time the code runs. If, however, the _expandedMedia is not null, we check first whether the stored element is a MediaElement (using the is operator discussed in Chapter 9, in the section titled “Type Conversion”). If it is, we pause the movie.
![]() On line 14, we reset the
On line 14, we reset the Fill property of the Display element (that’s a rectangle we created in the XAML markup) to a solid Transparent. Effectively, this simply hides the displayed element.
![]() Lines 15 and 16 store the reference to the current element in a local variable
Lines 15 and 16 store the reference to the current element in a local variable currentMedia, and then we set the attribute _expandedMedia to null. In doing this, we break the reference between this private attribute and the actual element (see line 51).
![]() Finally, we check whether the saved
Finally, we check whether the saved currentMedia is the same as the sender. That would be the case if the user clicks on the same element that is currently being displayed. In that case, we exit the method by calling return. Usually, return is used to return a value to the method’s caller, but in that case we don’t have anything to return (that’s why our method is marked void).
Tip
We have multiple references to the same object in memory. When we set one of these references to null like we just did, the system will check whether other references are still available for this object. If that is the case, the object remains in memory. If, however, all the references to that object have been removed, the object is marked for garbage collection and will soon be removed from memory.
![]() Lines 24 to 31 calculate the size and position of the
Lines 24 to 31 calculate the size and position of the Display rectangle in which the expanded media is going to be shown. This is needed, because we have some vertical (narrow) and horizontal (wide) images. The calculation computes the size factor using the small thumbnail that we received as the sender. Since the object type doesn’t have any indication about the element’s size, we use instead the same element casted to the FrameworkElement type. Based on this calculation, we can position the element in the middle of the DisplayBackground rectangle using margins.
![]() Notice how we use the
Notice how we use the ActualHeight instead of Height. This is because Height might be set to Auto, in which case we don’t get a numeric value. On the other hand, ActualHeight is really useful, because it is always set to the real numeric size (in pixels) of the element!
![]() Lines 36 to 39 are executed only if the event’s sender is a MediaElement. In that case, we set the
Lines 36 to 39 are executed only if the event’s sender is a MediaElement. In that case, we set the Display rectangle’s Fill property to VideoBrush. We also start the movie.
![]() If on the other hand the sender is an Image, we build an ImageBrush instead. Note that the syntax to build an ImageBrush is different from a VideoBrush: Instead of using the MediaElement, we need to build a new BitmapImage object. The new BitmapImage object has the same
If on the other hand the sender is an Image, we build an ImageBrush instead. Note that the syntax to build an ImageBrush is different from a VideoBrush: Instead of using the MediaElement, we need to build a new BitmapImage object. The new BitmapImage object has the same Source as the sender.
![]() Finally, on line 51, we store the sender in the private attribute
Finally, on line 51, we store the sender in the private attribute _expandedMedia. Remember that we needed this attribute to stop a playing movie (if needed) from line 7 onward.
You can now execute the code by pressing Ctrl+F5.
![]() Click on the thumbnails to see the expanded view in the display, and see how the movie gets played/paused.
Click on the thumbnails to see the expanded view in the display, and see how the movie gets played/paused.
Note
As you can see, a lot of conversions (casts) take place in this code. C# is strongly typed and will not compile if the types are not explicitly defined. This is a major difference from JavaScript. Generally, C# code needs to be more precise and explicit than JavaScript code.
![]() If you click twice on the same element, the image (or video) is displayed first, and then hidden.
If you click twice on the same element, the image (or video) is displayed first, and then hidden.
Typing this code will show you how Intellisense helps you. Take some time to train your Intellisense skills, and you can type your C# code much faster and more accurately.
Overloading Methods
As mentioned a few times before, C# is very strongly typed. Because of this, a method made for a certain type (for example string) cannot be used for another type (for example int) as in Listing 10.5.
public void DoSomething(string myString)
{
// ...
}
public void UseMyMethod()
{
DoSomething(″hello″); // OK
DoSomething(2); // doesn’t compile
}
We already talked briefly about polymorphism (“multiple shapes”) earlier when we mentioned that a TextBlock is also a UIElement and a FrameworkElement (by inheritance). Another type of polymorphism is used to overload methods with multiple signatures. For example, you can write Listing 10.6:
1 public void DoSomething(string myString)
2 {
3 // ...
4 }
5 public void DoSomething(int myInt)
6 {
7 // ...
8 }
9 public void UseMyMethod()
10 {
11 DoSomething(″hello″); // OK
12 DoSomething(2); // OK
13 }
Thanks to the clearly defined type, the C# compiler knows that it must call the first method (with the string parameter) on line 11, and the second method (with the int parameter) on line 12.
This way to code has one disadvantage: If you want to handle multiple types, you need multiple methods, and that’s not really nice. Another solution is to use generics. We talk about generics in Chapter 20, “Taking Silverlight 2 One Step Further.”
Raising Events and Using Delegates
When an object wants to notify another object that something occurred, a good way is to raise an event.
![]() For the event’s sender, it is handy because it doesn’t need to know who is interested in the event. The event is raised, and all subscribers will be notified without the need for a direct reference.
For the event’s sender, it is handy because it doesn’t need to know who is interested in the event. The event is raised, and all subscribers will be notified without the need for a direct reference.
![]() For the event’s subscriber, you just need to register once, and you will get all the notifications asynchronously.
For the event’s subscriber, you just need to register once, and you will get all the notifications asynchronously.
We already saw how to register for an event exposed by another class:
media.MouseLeftButtonDown
+= new MouseEventHandler(media_MouseLeftButtonDown);
with:
void media_MouseLeftButtonDown(object sender, MouseEventArgs e)
{
// Do something
}
But how do we expose and consume a custom event in our own classes?
Creating an EventArgs
Often, you want to pass additional information to the event’s subscribers. By convention, an event always has two parameters:
![]() The event’s sender (declared as an object)
The event’s sender (declared as an object)
![]() An instance of EventArgs or of another class deriving from EventArgs.
An instance of EventArgs or of another class deriving from EventArgs.
If you don’t want to pass any information, simply create an empty instance of EventArgs and use it when you raise the event. This avoids breaking any application if you decide to change it later and to pass information using your own flavor of EventArgs.
For example, if you want to pass the date and time at which the event occurred, create the class in Listing 10.7:
public class SomethingOccurredEventArgs : EventArgs
{
public DateTime When
{
get;
internal set;
}
}
Notice how SomethingOccurredEventArgs inherits the EventArgs class (that’s what the “:” means on the first line), and defines an additional property to store information about the event.
By convention, the name of any class deriving from EventArgs will be suffixed with “EventArgs”.
Declaring the Event
First, we need to create a delegate. This special declaration looks much like a method but doesn’t have a body. In fact, it is a contract between the class raising the event and the class subscribing to it. It says “If you want to receive my event, you need to have, somewhere, a method looking like this delegate.”
Delegates have other uses than for event handlers (though it’s probably their main use). A delegate is something like a “method object” (sometimes people refer to delegates as a “method pointer”). You can pass a delegate to another object, and this object can invoke the method that the delegate represents.
By convention, the delegate’s name (for an event handler) ends with the suffix “Handler” to signify that this is an event handler, as in Listing 10.8:
public delegate void SomethingOccurredHandler(object sender,
SomethingOccurredEventArgs e);
Now we can declare the event itself in the class that will raise it. The event’s type is the delegate that we created just before (see Listing 10.9):
public class EventRaiser
{
public event SomethingOccurredHandler SomethingOccurred;
}
The last task that the EventRaiser class needs to do is provide a method to raise the event. By convention (again), such a method is named with the prefix “On” followed by the name of the event (like in Listing 10.10). This convention is not very strictly followed, and the “raising” method is often named differently.
Warning
Before raising the event, you need to make sure that there is at least one susbscriber. If nobody subscribed yet, the event SomethingOccurred will be null, and should not be raised.
If a method wants to raise the SomethingOccurred event, it can do so by creating a new SomethingOccurredEventArgs instance and then call the method OnSomethingOccurred:
public class EventRaiser
{
public event SomethingOccurredHandler SomethingOccurred;
public void OnSomethingOccurred(SomethingOccurredEventArgs e)
{
if (SomethingOccurred != null)
{
SomethingOccurred(this, e);
}
}
public void DoSomething()
{
// ...
SomethingOccurredEventArgs e = new SomethingOccurredEventArgs();
e.When = DateTime.Now;
OnSomethingOccurred(e);
// ...
}
}
Tip
When you type the string _raiser.SomethingOccurred and then add the += operator, Intellisense offers to automatically create an event handler with the correct signature. Simply press the Tab key twice to get a free event handler!
Subscribing to the Event
Subscribing to the event is simple, especially with the help of Intellisense (see Listing 10.11):
public class EventReceiver
{
private EventRaiser _raiser;
public EventReceiver()
{
_raiser = new EventRaiser();
_raiser.SomethingOccurred
+= new SomethingOccurredHandler(_raiser_SomethingOccurred);
}
void _raiser_SomethingOccurred(object sender,
SomethingOccurredEventArgs e)
{
Status.Text = ″Something occurred at ″ + e.When.ToShortDateString()
+ ″ ″ + e.When.ToLongTimeString();
}
}
Storing Data on the Client
In classic web applications made with HTML, JavaScript, and CSS, data persistence on the web client is achieved by saving a small piece of text called a cookie. This small text can be retrieved at a later time and is even saved if the browser is closed. This mechanism is rather primitive, however, and not suited to saving complex structures.
In Silverlight, a real file system is made available to the application. You can create or delete directories, save data (text or binary), and read or delete files.
Understanding the Isolated Storage Security Restrictions
The isolated storage is, like the name shows, isolated. The application has no way to find out where the files are located on the client computer. Code located in an application can only access the isolated storage for this particular application. Other files located on the client computer may not be accessed. Only the isolated storage is made available, for obvious security reasons.
The isolated storage is limited in size. However you can find out how much space remains in the store, and even require more space from the user. For more information about these advanced functionalities, check the documentation we installed in Chapter 1, especially the page titled “IsolatedStorageFile Class.”
Remember that you cannot be sure whether files saved on the client will be available the next time the application runs. If the data saved is critical, you should save it on the server, for example, in a server-side file or in a database.
Creating Objects
Following the advice to “break our problem into smaller ones,” we will create two objects to perform specific tasks:
![]() The User object will store the date and time of the last visit. This may seem a trivial task for an object, but it will be useful when we extend the application with multiple users in a later chapter.
The User object will store the date and time of the last visit. This may seem a trivial task for an object, but it will be useful when we extend the application with multiple users in a later chapter.
![]() The DataFile object will take care of reading and writing the information from and to the isolated storage.
The DataFile object will take care of reading and writing the information from and to the isolated storage.
Note
The User class is automatically placed in a new namespace Thumbnails.Data. While this is not an obligation, it is strongly recommended to create one class per C# file only, and to place each file in a folder corresponding to its namespace. This creates a cleaner file structure.
Tip
The ? is not a typo! The type DateTime? is called a nullable DateTime. Prior to .NET 3.5, a member of type DateTime always contained a value. With .NET 3.5, however, a nullable DateTime instance can be set to null. Similarly, other nullable types have been introduced, for example bool?, int?, and so on.
The User Class
To create and implement this specialized class, follow the steps:
![]() 1. Open the Thumbnails application in Visual Studio and right-click on the Thumbnails project in the Solution Explorer.
1. Open the Thumbnails application in Visual Studio and right-click on the Thumbnails project in the Solution Explorer.
![]() 2. Select Add, New Folder and name this folder Data.
2. Select Add, New Folder and name this folder Data.
![]() 3. Right-click on the Data folder and select Add, Class.
3. Right-click on the Data folder and select Add, Class.
![]() 4. Enter the name “User.cs” and click Add; the file opens automatically.
4. Enter the name “User.cs” and click Add; the file opens automatically.
![]() 5. In the User class, add the property in Listing 10.12:
5. In the User class, add the property in Listing 10.12:
public DateTime? LastVisit
{
get;
private set;
}
![]() 6. Add two constructors to the User object as in Listing 10.13. The first one is used to create a new, empty User. The second overload takes a line from the saved data file and uses this information to initialize the
6. Add two constructors to the User object as in Listing 10.13. The first one is used to create a new, empty User. The second overload takes a line from the saved data file and uses this information to initialize the LastVisit property.
public User()
{
LastVisit = null;
}
public User(string line)
{
try
{
LastVisit = DateTime.Parse(line);
}
catch (ArgumentNullException)
{
LastVisit = null;
}
catch (FormatException)
{
LastVisit = null;
}
}
![]() The second constructor tries to parse the line parameter and catches two different exceptions
The second constructor tries to parse the line parameter and catches two different exceptions
![]() ArgumentNullException is thrown by the DateTime
ArgumentNullException is thrown by the DateTime.Parse method if the line is null.
![]() FormatException is thrown (also by the DateTime
FormatException is thrown (also by the DateTime.Parse method) if the format is not recognized as a valid DateTime. In both cases, we catch the exception (avoiding that the application crashes), and we set the LastVisit to null.
7. An additional method is created to set the LastVisit property to the current date and time. This will be used before saving the information to the data file.
public void SetLastVisit()
{
LastVisit = DateTime.Now;
}
8. Finally, we want the User class to provide a method converting an instance of this class to a string. This process is called serialization. In this simplified example, we simply convert the LastVisit property to a string. Later, this method will be extended to convert additional properties too. Every .NET object inherits the basic class object (even though this is never explicitly specified in the class declaration). This is why each and every .NET object has a basic set of methods; one of them is the ToString method, used to serialize the instance to a string. However, the original ToString method cannot serialize the User instance and returns only a generic string with the class’s name. This is why we need to override this method and provide our own, in Listing 10.14:
Listing 10.14 Overriden ToString Method
public override string ToString()
{
if (LastVisit == null)
{
return ″″;
}
else
{
return LastVisit.ToString();
}
}
Our ToString method checks the value of LastVisit. If the nullable DateTime is null, we simply return an empty string. If it is set, we use the ToString method that the DateTime? type also defines. Build the application to check if there are any errors.
The DataFile Class
The other new class we create is responsible for handling the writing and reading to the isolated storage. Follow the steps to create and implement it:
1. Again, add a C# class to the Data folder. Name this DataFile.cs.
2. In the class, add a constant to store the name of the data file we will read from and write to.
private const string DATA_FILE_NAME = ″ThumbnailsData.txt″;
We will add two methods to this class (see Listing 10.15):
![]() The first method,
The first method, LoadUser, reads the data file and creates the User instance.
![]() The other method,
The other method, SaveUser, saves the User information to the data file.
Some of the namespaces we use in this class have to be added explicitly to the using section. Remember the Shift+Alt+F10 trick we learned before!
1 internal User LoadUser()
2 {
3 User user = null;
4
5 // Try to get the information about the last visit
6 using (IsolatedStorageFile store
7 = IsolatedStorageFile.GetUserStoreForApplication())
8 {
9 if (store.FileExists(DATA_FILE_NAME))
10 {
11 using (IsolatedStorageFileStream streamRead
12 = store.OpenFile(DATA_FILE_NAME, FileMode.Open))
13 {
14 using (StreamReader reader = new StreamReader(streamRead))
15 {
16 string line = reader.ReadLine();
17 if (line != null)
18 {
19 user = new User(line);
20 }
21 else
22 {
23 user = new User();
24 }
25 }
26 }
27 }
28 else
29 {
30 user = new User();
31 }
32 }
33 return user;
34 }
35
36 internal void SaveUser(User user)
37 {
38 using (IsolatedStorageFile store
39 = IsolatedStorageFile.GetUserStoreForApplication())
40 {
41 using (IsolatedStorageFileStream streamWrite
42 = store.OpenFile(DATA_FILE_NAME, FileMode.OpenOrCreate))
43 {
44 using (StreamWriter write = new StreamWriter(streamWrite))
45 {
46 writer.WriteLine(user.ToString());
47 }
48 }
49 }
50 }
Let’s review this code.
Reading from the Isolated Storage
![]() Lines 6 and 7 get a reference to the IsolatedStorageFile corresponding to this application. As we mentioned, one application can only write to a given store, and you cannot know where it is located on the client machine.
Lines 6 and 7 get a reference to the IsolatedStorageFile corresponding to this application. As we mentioned, one application can only write to a given store, and you cannot know where it is located on the client machine.
Note
Lines 6 and 7 create the IsolatedStorageFile instance by means of a using statement. This is not the same as the using section we discussed earlier in this chapter.
In this context, using allows creating special objects like readers and writers, and makes sure that all the files and other resources are closed properly when they are not needed anymore.
![]() Line 9 checks whether the file we want to read from already exists. If it doesn’t, we create a new empty User on line 26.
Line 9 checks whether the file we want to read from already exists. If it doesn’t, we create a new empty User on line 26.
![]() Lines 11 to 12 create a Stream in the isolated storage. A Stream is an object you can write to or read from. In this particular case, what you read from the stream comes from a file located in the isolated storage. Note that we created the Stream in the
Lines 11 to 12 create a Stream in the isolated storage. A Stream is an object you can write to or read from. In this particular case, what you read from the stream comes from a file located in the isolated storage. Note that we created the Stream in the Open mode. This mode is good to read from an existing file. Note also that we use the constant DATA_FILE_NAME we defined earlier.
![]() Line 14 uses the Stream we just created and wraps a StreamReader object around it. This object is good for reading text (as opposed to reading binary data).
Line 14 uses the Stream we just created and wraps a StreamReader object around it. This object is good for reading text (as opposed to reading binary data).
![]() Lines 16 to 20 read the first line from the text file and use it to create an instance of User. When a StreamReader reaches the end of the file (for example, if the file exists but is empty), it doesn’t create an error, but it returns null. In that case, we create a new empty user on line 19.
Lines 16 to 20 read the first line from the text file and use it to create an instance of User. When a StreamReader reaches the end of the file (for example, if the file exists but is empty), it doesn’t create an error, but it returns null. In that case, we create a new empty user on line 19.
![]() Line 17 is where the line is actually read from the file. The method
Line 17 is where the line is actually read from the file. The method ReadLine reads the current line until it finds an “end-of-line” character. Then it moves the cursor to the next line.
![]() Finally, line 30 returns the User instance we just created to the caller. This instance’s
Finally, line 30 returns the User instance we just created to the caller. This instance’s LastVisit may be initialized to a valid DateTime (if the file was found and parsed successfully), or to null (if the file was not found).
Writing to the Isolated Storage
The method SaveUser accepts a User instance as parameter and saves it to the file in the isolated storage.
![]() Lines 38 to 39 get the IsolatedStorageFile for this application.
Lines 38 to 39 get the IsolatedStorageFile for this application.
![]() Lines 41 to 42 create a new Stream, this time in
Lines 41 to 42 create a new Stream, this time in OpenOrCreate mode. This mode creates a new file if no existing file is found. If the file already exists, however, it reopens it and overwrites the content with the new data.
![]() Line 44 creates a StreamWriter, a good class to write text content to a stream.
Line 44 creates a StreamWriter, a good class to write text content to a stream.
Note
Here, we see the advantage of breaking our problem into smaller chunks. If we decide to add information to the User class, we don’t need to modify the DataFile class. This class is responsible for saving information to a file, and nothing else. The way the information is formatted is the responsibility of the User class only.
![]() Line 46 uses the
Line 46 uses the ToString method on the User instance to save the content of the instance to the data file.
Build the application and see if everything is OK. You’ll have to add two using directives.
Updating the User Interface
We still need to add a way to display the information to the user, and of course trigger the reading and saving of this information to the data file. Follow the steps:
1. Open the file Page.xaml.
2. Right after the TextBlock saying “Have some fun” (and in the same StackPanel), copy the following code:
<TextBlock x:Name=″LastVisitTextBlock″
Margin=″10″ />
3. Open the file Page.xaml.cs.
4. At the end of the Page constructor, below the do…while loop initializing the media elements, add the code in Listing 10.16:
1 DataFile dataFile = new DataFile();
2 User user = dataFile.LoadUser();
3 if (user.LastVisit == null)
4 {
5 LastVisitTextBlock.Text = ″(This is your first visit)″;
6 }
7 else
8 {
9 LastVisitTextBlock.Text = ″(Your last visit: ″
10 + user.LastVisit.Value.ToShortDateString()
11 + ″ ″ + user.LastVisit.Value.ToLongTimeString() + ″)″;
12 }
13 user.SetLastVisit();
14 dataFile.SaveUser(user);
![]() On line 1, we create a new DataFile instance. (You’ll have to add the
On line 1, we create a new DataFile instance. (You’ll have to add the Thumbnails.Data namespace to the using section.)
![]() On line 2, we load the User. Note how we don’t need to know any specifics. The DataFile class could be modified to save the data to a server without needing to change the user interface code.
On line 2, we load the User. Note how we don’t need to know any specifics. The DataFile class could be modified to save the data to a server without needing to change the user interface code.
![]() Lines 3 to 12 check the value of the
Lines 3 to 12 check the value of the LastVisit property:
![]() If it’s null, we set the
If it’s null, we set the LastVisitTextBlock to a default message.
![]() If it’s set, we use its
If it’s set, we use its Value to construct a message displaying the date and time in a readable form.
Run the application now (after adding yet a few more using directives). Every time that you run it, or that you refresh the page, your last visit will be listed. Since the data is saved to a file, you can close the web browser, and even switch your computer off. The data will be there the next time. This simple example could be solved with a cookie too, but more complex files (such as binary files, complex XML files, etc…) can also be saved to the isolated storage while a cookie wouldn’t be able to take care of these.
Multibrowser Compatibility
Interestingly, the isolated storage is allocated per application, but it doesn’t matter which web browser the application is running on. The following steps demonstrate this:
1. From Visual Studio, execute the Thumbnails application by pressing Ctrl+F5.
2. Without closing the Internet Explorer (or Firefox) web browser, copy the address displayed in the location bar.
3. Open Firefox (or Internet Explorer) and paste this address in the location bar; then press Enter to start the application.
4. The Last visit TextBlock is set correctly, even though your last visit was in another web browser. The isolated storage is shared between all the browsers on a given computer.
Summary
In this chapter, we used .NET for some exciting tasks. Reacting to events, storing and reading data—these are is the basis for any advanced application, and our Silverlight applications will evolve to become more and more complex. In addition, we had a “crash course” in object-oriented programming. Hopefully this will give you a taste for this fascinating way to create code and encourage you to study it more. Learning OOP is a long but rewarding process!