
Chapter 24 Silverlight: Continuing the Journey
In This Chapter
We will start this chapter with a few advanced topics that didn’t really fit anywhere else. Then, we will conclude with material that should facilitate the continuation of your journey in Silverlight… because even though this book is coming to an end, this is only the beginning!
Updating a Service Reference
We saw in Chapter 22, “Connecting to the Web,” how to make requests to a WCF service (and mentioned that it’s similar to making requests to “classic” ASMX web services). Remember how we added a service reference to our Silverlight application? In this process, the Visual Studio environment creates a proxy class representing the server-side service on the client application.
Obviously, when you change something in the service class, you need to update the client-based reference. Or else how would the Silverlight application know about the changes? Visual Studio assists you in updating the reference; let’s see how with the following steps:
1. Create a new Silverlight application, including a test website.
2. In the test website, add a new Silverlight-enabled WCF service (like we did in Chapter 22).
3. Modify the method DoWork’s implementation as in Listing 24.1, then build the application:
[OperationContract]
public string DoWork(string anyParameter)
{
return anyParameter;
}
4. In the Silverlight application, add a service reference.
5. Use the service in the Silverlight application, again as we did in Chapter 22. For example, call the method DoWork in the Page constructor.
6. Modify the name of the WCF service’s method DoWork in DoSomething.
7. Try to run your application in debug mode. After a few moments, you should get an error in the Reference.cs file saying “The requested page was not found”. The file Reference.cs is generated by Visual Studio when you add a service reference. The error “requested page not found” is the same as the one returned by a web server when a file can’t be found. Calling web services and WCF services happens over HTTP, and the same protocols and error codes are used. It simply means that the URI of the DoWork method doesn’t exist anymore on the web server.
8. In Visual Studio, right-click on the service reference in the Silverlight application (in the Solution Explorer). Then from the context menu, select Update Service Reference (see Figure 24.1).
Figure 24.1 Update Service Reference
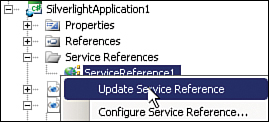
Visual Studio downloads the new service description and updates the proxy class. You need to update your client application now according to the new method signature, or the compilation will fail.
Killing a Process
We are only human… and so it happens that sometimes, we make errors in our code, and the application cannot recover. For example, if you create an infinite loop (such as a while loop for which the end condition is never met), the application will try to run as fast as possible, bringing your processor to run to almost 100% of its capacity.
In such a condition, the only way to recover is to “kill” the application. In this section, we see how to cause an infinite loop and then how to kill the Silverlight process in Windows with the following steps.
1. Create a new Silverlight application in Visual Studio.
2. Modify the code of the Page constructor as in Listing 24.2:
public Page()
{
InitializeComponent();
int index = 0;
while (index == 0)
{
// Do something
}
}
3. Run the code in normal mode, by pressing Ctrl+F5 in Visual Studio. Immediately, you will notice that your PC runs slower. Almost the whole processor time is used by your application, because the end condition is never met: index is never bigger than 0.
4. In Windows, right-click on the Windows Taskbar with your mouse and select Task Manager in the context menu.
5. In this application, select the Processes tab, shown in Figure 24.2.
Figure 24.2 Windows Task Manager
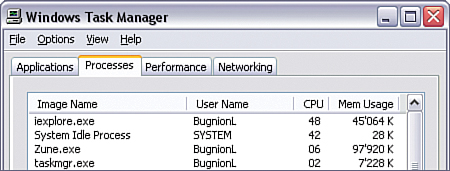
6. Click on the CPU column. This shows the amount of processor time used by each process. Clicking on the column sorts it according to the CPU percentage. You should see the process iexplore.exe pretty much on top of this column. Even though it is your Silverlight application that is caught in an infinite loop, the application is hosted by Internet Explorer, so this process appears in the list.
7. Right-click on the iexplore.exe process and select End Process from the context menu. Notice that the instance of Internet Explorer disappears completely, and your PC recovers and runs normally again.
Killing the Process in Debug Mode
When you run the same code in debug mode (by pressing the F5 key in Visual Studio), you don’t need to kill the process like we did before. Instead, you can simply stop the debugger in Studio with these steps:
1. Run the same code as before, by pressing the F5 key in Visual Studio.
2. Again, the PC will be slow because the Silverlight application uses all the CPU time.
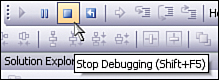
3. In Studio, click on the Stop Debugging button shown in Figure 24.3. Alternatively you can press Shift+F5 or select Debug, Stop Debugging from the menu. Note that stopping an application being debugged can take a few moments.
Figure 24.3 Stop Debugging in Visual Studio
About Protecting Your Work
The question “How do I protect my work” is often asked on JavaScript or other web-related forums. The answer is always the same: “If you really want to protect your work, don’t publish it.” This may sound like a joke, but it’s really not: To execute the code, the user has to download it to the web browser. From this moment on, it is available for the user to view.
![]() XAML and JS files are visible as clear text.
XAML and JS files are visible as clear text.
![]() Any image or video files are available “as-is,” to be viewed in a picture editor or a video player, respectively.
Any image or video files are available “as-is,” to be viewed in a picture editor or a video player, respectively.
![]() Compiled files (the DLLs in the ClientBin folder) are indeed compiled, but even DLLs can easily be decompiled, for example with the tool Reflector created by Lutz Roeder and currently managed by Red Gate.
Compiled files (the DLLs in the ClientBin folder) are indeed compiled, but even DLLs can easily be decompiled, for example with the tool Reflector created by Lutz Roeder and currently managed by Red Gate.
Protecting Your Work Anyway
So what can you do to protect your source code? In fact, the only totally foolproof measure is to keep the critical code on the web server. We saw that Silverlight applications can easily connect to the web server to call web services, WCF services, and so on.
Calling web services comes with a cost, however: It is much less responsive than doing calculations on the client. Each request/response sequence takes time. Additionally, the web server may be overloaded, or simply off the network for one reason or another.
As usual with engineering, deciding where to place which code is a matter of compromises. It is important to design your application with these considerations in mind, to create a flexible, safe, and reliable system.
Binding in Special Configurations
We talked about data binding in Silverlight in previous chapters. In this section, let’s review a couple of special cases, and how to set bindings to handle these. Expression Blend is a great help when you must create complex bindings. In this section, we see how to use the tool’s abilities. We also talk about advanced binding parameters.
Setting a Binding in Blend
We saw in Chapter 19, “Creating User Controls and Custom Controls,” how to use Blend to deal with data sources. You can use a similar workflow to create data binding in an easy way with the following steps.
1. Create a new Silverlight application in Blend and name it DataBindingSilverlight.
2. Right-click on the Solution in the Project panel and choose Edit in Visual Studio.
3. In Studio, add a new class to the project and name it MediaInfo.
4. Implement the class as in Listing 24.3:
public class MediaInfo : INotifyPropertyChanged
{
public event PropertyChangedEventHandler PropertyChanged;
private void OnPropertyChanged(string propertyName)
{
if (PropertyChanged != null)
{
PropertyChanged(this,
new PropertyChangedEventArgs(propertyName));
}
}
private DateTime _timestamp = DateTime.Now;
public DateTime Timestamp
{
get { return _timestamp; }
set
{
_timestamp = value;
OnPropertyChanged(″Timestamp″);
}
}
}
5. Choose File, Save All from the menu. Then, go back into Expression Blend. Because you added a new class to the project, Blend asks you if you want to reload it. Accept and wait until the project is reloaded.
6. In Expression Blend, add a TextBox and a TextBlock to the main Grid.
7. Select the TextBox and click on the small square next to the Text property. Then select Data Binding.
8. In the Create Data Binding dialog, click on + CLR Object.
9. In the Add CLR Object Data Source, select the class MediaInfo. Enter a name for this data source, for example MediaInfoSource. Then press OK.
10. In the Create Data Binding dialog, select the MediaInfo data source. In the Fields panel, expand the MediaInfo and select the Timestamp property.
11. On the bottom of the Create Data Binding dialog, expand the Advanced Properties.
12. Set the Binding Direction to TwoWay and click Finish.
13. Repeat step 10 for the TextBlock. This time leave the Binding Direction set to OneWay.
14. Run the application and change the date in the TextBox. Then press the Tab key to remove the focus from the TextBox and check that the value of the TextBlock changes too.
The Binding’s Path property can be complex. Remember when we talked about animations, and we saw that identifying the TargetProperty of a StoryBoard was difficult sometimes. It is exactly the same for bindings. Thankfully, Blend assists you, and you can find a property “buried” deep inside a list of objects rather easily thanks to the Create Data Binding dialog.
Handling Validation Errors
Since bindings can also update the source object (in TwoWay mode), you need to make sure that the value entered can be converted. In the case of a DateTime class, for example, if the user enters an invalid string, the framework won’t be able to create a DateTime instance with this value. The default behavior in this case is to just leave the source object untouched. This can be confusing, however, because the string in the TextBox will not be corrected, and the invalid value will still be displayed. You can test this in the application we created in the preceding section: Enter an invalid date string, for example 8/aa/2008 9:55:01 PM and press the Tab key. The TextBox keeps the invalid value, and the TextBlock remains unchanged.
To change this default behavior, you need to implement an event handler to the TextBox’s BindingValidationError event with the following steps. This event is available on every FrameworkElement.
1. Change back to Visual Studio and open the application DataBindingSilverlight’s Page.xaml.
2. In the TextBox we added to the application, handle the BindingValidationError event:
BindingValidationError=″TextBox_BindingValidationError″
3. Implement the event handler in Page.xaml.cs as in Listing 24.4. This event handler will be called when a validation error appears, but also when it disappears, making it handy to restore the element to its original state.
private void TextBox_BindingValidationError(object sender,
ValidationErrorEventArgs e)
{
if (e.Action == ValidationErrorEventAction.Added)
{
(sender as TextBox).Foreground = new SolidColorBrush(Colors.Red);
}
else
{
(sender as TextBox).Foreground = new SolidColorBrush(Colors.Black);
}
}
4. If you run the application now, nothing happens. We still need to notify the Binding that the event BindingValidationError must be raised. Two additional properties must be set on the Binding in the TextBox (Listing 24.5):
Listing 24.5 Validation Properties
Text=″{Binding Mode=TwoWay, Path=Timestamp,
Source={StaticResource MediaInfo},
NotifyOnValidationError=True,
ValidatesOnExceptions=True}″
This syntax is complex, but it is needed to be compatible with Windows Presentation Foundation where more advanced validation mechanisms are available.
Run the application and enter an invalid date in the TextBox. You see the text color turn to red. If later you place the cursor back in the TextBox and correct the value, the text goes back to black. You could also use this event handler to display a message to the user.
Binding Through a Converter, ConverterParameter, ConverterCulture
We already talked about value converters and how to implement one. We also mentioned shortly the ConverterParameter and ConverterCulture parameters. Let’s see how to use them with the following steps:
1. In the Silverlight application we just created, add a new class in Visual Studio and name it DateTimeConverter.cs. The code is in Listing 24.6:
public class DateTimeConverter : IValueConverter
{
public object Convert(object value, Type targetType,
object parameter, System.Globalization.CultureInfo culture)
{
double parameterAsDouble = 0.0;
if (parameter != null)
{
parameterAsDouble = Double.Parse(parameter.ToString());
}
DateTime valueAsDateTime
= (DateTime)value + TimeSpan.FromDays((parameterAsDouble));
return valueAsDateTime.ToString(culture);
}
public object ConvertBack(object value, Type targetType,
object parameter, System.Globalization.CultureInfo culture)
{
string valueAsString = value.ToString();
return DateTime.Parse(valueAsString, culture);
}
}
2. Add a new namespace in the UserControl tag, pointing to the DataBindingSilverlight namespace in which we implemented the converter:
xmlns:src=″clr-namespace:DataBindingSilverlight″
3. Add an instance of the Converter to the UserControl resources:
<src:DateTimeConverter x:Key=″DateTimeConverter″ />
4. Modify the TextBlock’s Text property’s binding as in Listing 24.7:
Text=″{Binding Mode=OneWay,
Path=Timestamp,
Source={StaticResource MediaInfo},
Converter={StaticResource DateTimeConverter},
ConverterParameter=2,
ConverterCulture=fr-CH}″
Running this code displays a different date (two days later) in the TextBlock than in the TextBox. Additionally, the culture specified is used and the display looks different.
Binding to an Object Rather Than a Property
Sometimes it can be interesting to bind to an object directly rather than to a property of this object. There are two possibilities:
![]() Setting the
Setting the Source of the Binding without setting the path. For example in Listing 24.8:
<Rectangle Fill=″{Binding Source={StaticResource MyBrush}}″
Width=″120″
Height=″240″ />
![]() Setting the
Setting the Binding to the DataContext directly. For example, if the DataContext of a Grid is set to a SolidColorBrush, you can do as in Listing 24.9:
<Grid DataContext=″{StaticResource MyBrush}″>
<Rectangle Fill=″{Binding}″
Width=″120″
Height=″240″ />
</Grid>
The {Binding} syntax is a bit weird, but remember that if the Source of the binding is not set explicitly, the DataContext is used. Since this object is inherited from parent to children, we can just set an “empty” binding.
This is particularly interesting for DataTemplates when you deal with an ItemsControl. Remember that the children of the ItemsControl are created dynamically, and that the DataContext of each is set to the data item that they represent. Knowing this, you can display a list of brushes using a Rectangle as DataTemplate, and set its Fill property to {Binding}.
Using the ASP.NET Controls Silverlight and MediaPlayer
When you run an ASP.NET website, you are used to dealing with ASPX pages and controls. With this method, you can build a web page by placing ASP.NET controls on the page and setting their parameters. For instance, you can drag and drop an ASP.NET control named DropDownList on the web page, set a few of its parameters as well as a list of items using a designer, and then run the application. In the ASPX page, the markup looks like Listing 24.10:
<asp:DropDownList ID=″DropDownList1″ runat=″server″>
<asp:ListItem Value=″0″>My value 0</asp:ListItem>
<asp:ListItem Value=″1″>My value 1</asp:ListItem>
</asp:DropDownList>
The generated HTML markup that is sent to the web browser looks different, however, as in Listing 24.11:
<select name=″DropDownList1″ id=″Select1″>
<option value=″0″>My value 0</option>
<option value=″1″>My value 1</option>
</select>
The ASP.NET engine translated the ASP.NET markup into HTML. ASP.NET pages can be created and programmed for example in Visual Web Developer Express Edition, available for free at www.microsoft.com/express/vwd.
Two ASP.NET controls are available for Silverlight. These controls will eventually render the HTML markup needed to run a Silverlight application into a web page. They are easy to use and make Silverlight even more accessible for ASP.NET developers.
Using the Silverlight ASP.NET Control
This ASP.NET control creates a Silverlight application according to its parameters. Let’s see how with these steps:
1. Open the application SilverlightDraw that we created in Chapter 16, “Digging Deeper into Silverlight Elements,” and modified in Chapter 18, “Data Binding and Using Data Controls.”
2. Add a new website to it: Right-click on the Solution in the Solution Explorer and select Add, New Web Site from the context menu. Name the new website SilverlightDraw.Web and place it into the same folder as the file SilverlightDraw.sln and the folder SilverlightDraw containing the Silverlight application. This is not compulsory, but it makes things much easier to manage.
3. Right-click on the website and select Property Pages.
4. In the Silverlight Applications section, add a link to the SilverlightDraw application.
Visual Studio creates two additional web pages for the website. One is an ASPX (dynamic page) named SilverlightDrawTestPage.aspx. The other is the static HTML page we already know.
5. Open the page SilverlightDrawTestPage.aspx and switch to Design mode with the buttons on the bottom-left corner.
You see two controls: One is a ScriptManager control, represented as a rectangle with the name ScriptManager in bold. It is used to generate JavaScript code dynamically. The Silverlight and MediaPlayer ASP.NET controls use the ScriptManager control to include JavaScript code (such as the one contained in Silverlight.js). The other control is the Silverlight control, and takes the whole page’s width.
6. Select the Silverlight control and press F4. This displays the Properties panel for this control.
7. Set the Width to 600px and the Height to 500px.
8. Switch to Source view. You should see the ASP.NET markup shown in Listing 24.12:
<asp:Silverlight ID=″Xaml1″ runat=″server″
Source=″˜/ClientBin/SilverlightDraw.xap″ MinimumVersion=″2.0.30904.0″
Width=″600px″ Height=″500px″ />
9. Right-click on the SilverlightDraw.Web website and select Set as StartUp Project. Right-click on SilverlightDrawTestPage.aspx and select Set as Start Page.
10. Run the application.
The SilverlightDraw application runs embedded inside the HTML page. The ASP.NET framework renders the HTML and JavaScript code needed to run Silverlight. Note that the ScriptManager control is not visible: it is a control running on the server only!
Using the MediaPlayer ASP.NET Control
The MediaPlayer is a control deriving from the Silverlight ASP.NET control we just discussed. This control is specialized to play video and audio files. It is in fact similar to the output of the Expression Encoder application that we created in Chapter 12, “Encoding Videos with Expression Encoder.” Follow the steps:
1. In Visual Studio, select File, Close Solution and then select File, New, Web Site.
2. In the New Web Site dialog, select ASP.NET Web Site. Enter a new name for your website, for example, TestMediaPlayer. Select a location and then click OK.
3. Right-click on the TestMediaPlayer project in the Solution Explorer and select New Folder. Name this folder MediaFiles.
4. Right-click on the new MediaFiles folder and select Add Existing Item.
5. Select a video file from your hard disk. It should be in WMV format. Remember that you can convert pretty much any video format to WMV using the application Expression Encoder that we studied in Chapter 12.
6. In Visual Studio, open the file Default.aspx and set the designer in Design mode.
7. In the toolbox, find the ScriptManager control (in the AJAX Extensions section). Drag and drop it from the Toolbox on the page. If you don’t see the toolbox, you can open it by selecting View, Toolbox from the menu.
8. Still from the toolbox, select the MediaPlayer control from the Silverlight section. Drag and drop it right under the ScriptManager control that we added previously (see Figure 24.4).
Figure 24.4 MediaPlayer in ASP.NET Design mode
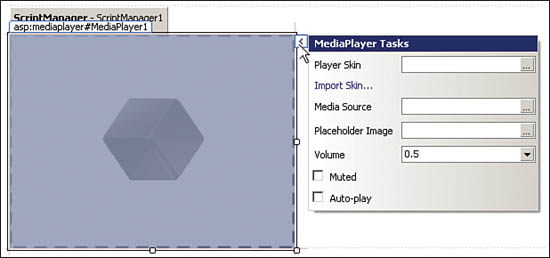
9. Expand the MediaPlayer Tasks panel and set the properties. Alternatively, you can also set them in the Properties panel (but their name is a bit different):
![]() Click on the link Import Skin… and locate a Skin file. You can find Media Player Skins in the SDK folder located in C:Program FilesMicrosoft SDKsSilverlightv2.0LibrariesServerMediaPlayerSkins.
Click on the link Import Skin… and locate a Skin file. You can find Media Player Skins in the SDK folder located in C:Program FilesMicrosoft SDKsSilverlightv2.0LibrariesServerMediaPlayerSkins.
![]() Set the Media Source (or the
Set the Media Source (or the MediaSource property) to the video file that you added just before in the MediaFiles folder.
![]() Set the other attributes as you want.
Set the other attributes as you want.
10. Resize the control to an appropriate size for your movie (or use the Height and Width properties).
11. Set the player’s ID to VideoPlayer in the Properties panel. Note that the ID must be unique throughout the whole web page.
12. Run the application and see the results!
Programming the Control in JavaScript
As we already did, you can also write JavaScript code to handle events raised by the control. For more information about the available events, check the reference documentation available at http://msdn.microsoft.com/en-us/library/system.web.ui.silverlightcontrols.mediaplayer(VS.95).aspx.
For example, you can force the video to play in a loop with these steps:
1. In Source view, add a JavaScript event handler in the head section of the ASPX page (Listing 24.13):
<script type=″text/javascript″>
function VideoPlayer_Ended(sender, args)
{
sender.play();
}
</script>
2. Add the OnClientMediaEnded attribute to the asp:MediaPlayer tag as in Listing 24.14, then run the application and start the movie. It will run in a loop.
<asp:MediaPlayer ID=″VideoPlayer″ runat=″server″
Height=″240px″ Width=″320px″ MediaSkinSource=″˜/Expression.xaml″
MediaSource=″˜/MediaFiles/mov1.wmv″
OnClientMediaEnded=″VideoPlayer_Ended″>
</asp:MediaPlayer>
Creating a Chapters List
A nice functionality of the MediaPlayer ASP.NET control is the possibility to define chapters in your movie simply by adding markup into the MediaPlayer tag. For example in Listing 24.15:
<asp:MediaPlayer ID=″VideoPlayer″ runat=″server″
Height=″240px″ Width=″320px″ MediaSkinSource=″˜/Expression.xaml″
MediaSource=″˜/MediaFiles/mov1.wmv″
OnClientMediaEnded=″VideoPlayer_Ended″>
<Chapters>
<asp:MediaChapter Position=″0″ Title=″Chapter 1″
ThumbnailSource=″˜/MediaFiles/thumb1.png″ />
<asp:MediaChapter Position=″2″ Title=″Chapter 2″
ThumbnailSource=″˜/MediaFiles/thumb2.png″ />
</Chapters>
</asp:MediaPlayer>
You can also use the visual designer to do this, with the following steps:
1. In Design mode, select the MediaPlayer control.
2. In the Properties panel, find the property named Chapters.
3. Click on the “…” button, and then use the dialog to add chapters.
Using this tool, you can add chapters with the same features as in Expression Encoder, such as a title and a thumbnail.
Handling an Expression Encoder Chapter File
Another way to create chapters is to use the XML file created by Expression Encoder. In Chapter 12, in the “Creating Chapters” section, we mentioned that you can export markers to an XML file. After you exported such a file, follow the steps:
1. Add the XML chapters file to your ASP.NET website.
2. Open the page Default.aspx containing the MediaPlayer control.
3. Make sure that the Design mode is selected.
4. Select the MediaPlayer control.
5. In the Properties panel, find the MediaDefinition property and set it to the location of the XML chapters file.
Creating Unit Tests for Silverlight
One popular new way of developing applications is called Test Driven Development (TDD). Many discussions are ongoing in the .NET developer community as to what is the “purest” way of doing TDD and what is the best TDD framework, but fundamentally it comes down to this:
![]() For each functionality that you implement in your application, implement a test first.
For each functionality that you implement in your application, implement a test first.
![]() Implement the functionality until the test passes, but not more. If you feel that you need additional features in this functionality, it means new tests.
Implement the functionality until the test passes, but not more. If you feel that you need additional features in this functionality, it means new tests.
![]() Every time you modify your application, run all the tests again to make sure that you didn’t break anything.
Every time you modify your application, run all the tests again to make sure that you didn’t break anything.
TDD gives a nice feeling of trust to the developers, because existing tests can be run again and again, and you can be sure that existing features still work, even though you add new features, refactor existing ones, and so on.
A test for a feature is named a unit test. It tests a unit of code. Typically, you create one test class per object being tested. Writing unit tests is difficult and requires honed developer skills. Put as much effort into your unit tests as you put into your code!
Silverlight comes with a unit test framework based on the one released by Microsoft for the full version of .NET (named MSUnit). In this section, we see how to install the unit test framework for Silverlight, and how to implement the TryFindResource functionality available in Windows Presentation Foundation.
Installing the Silverlight Unit Test Framework
The unit test framework is not part of the default Silverlight installation, and must be installed separately. Follow these steps:
1. Navigate to the page http://code.msdn.microsoft.com/silverlightut.
2. Follow the indications to download and install the test framework.
3. You should also install the Visual Studio project template and the class template. These two templates allow you to create new test projects and test classes with the Add New Project and Add New Item menus.
Creating a New Silverlight Test Application
Once the test framework is installed, we can use it to create a test application with the following steps:
1. Start in Visual Studio by creating a new Silverlight class library for our TryFindResource utility method. For this, in Visual Studio, choose File, New Project and select Silverlight Class Library from the Silverlight section.
2. Name the new project SilverlightUtility.
3. In the Solution Explorer, rename the Class1.cs to Extensions.cs. In the dialog asking whether you also want to rename the class, click Yes.
4. Modify the class declaration to make it static.
public static class Extensions
Now is the time to start writing tests. We write tests before we even write the first functionality. This is one important principle of TDD: Test first, implement later. Follow the steps:
1. Right-click on the Solution in the Solution Explorer and select Add, New Project from the context menu.
2. In the dialog, click on Visual C# and under My Templates, select the Silverlight Test Project.
3. Name this project SilverlightUtility.Test and click OK.
4. In the new test project, rename the file Test.cs to ExtensionsTest.cs. By convention, name each Test class according to the class you want to test, with the Test suffix.
Now we add a reference from the Test project to the class library with the following steps:
1. Right-click on the Test project and choose Add Reference. In the dialog, under the Projects tab, select the SilverlightUtility project.
2. Add a new Page to the test application by right-clicking on the Test project and choosing Add, New Item from the context menu. Select Silverlight User Control and name this new item TestControl.xaml.
We initialize the test class using a method named TestInitialize and marked with the special attribute TestInitialize. This notifies the test framework that the method must be executed first, before all the test methods. Note that the method may be named anything, only the attribute is important. Follow the steps:
1. In ExtensionsTest, add the attribute and method shown in Listing 24.16:
private FrameworkElement _element;
[TestInitialize]
public void TestInitialize()
{
TestControl control = new TestControl();
_element
= control.FindName(″LayoutRoot″) as FrameworkElement;
}
2. Rename the TestMethod method to TestTryFindResourceInLayoutRoot.
3. Modify the TestTryFindResourceInLayoutRoot method as in Listing 24.17:
[TestMethod]
public void TestTryFindResourceInLayoutRoot()
{
SolidColorBrush brush
= _element.TryFindResource(″BrushInRoot″) as SolidColorBrush;
Assert.AreNotEqual<Brush>(null, brush);
Assert.AreEqual(Colors.Red, brush.Color);
}
![]() As you understood already, all public methods marked with the
As you understood already, all public methods marked with the TestMethod attribute will be executed to test the functionality.
![]() The
The Assert class is used to test the conditions. If a condition is not met, the test fails. It contains a number of static methods that can be used to create various conditions for the functionality.
![]() The first
The first Assert checks that the object returned is not null.
![]() The second checks whether the
The second checks whether the brush is indeed red.
4. Make sure that the project SilverlightUtility.Test is set as Startup project (you can select this by right-clicking on the project and choosing Set as Startup Project) and run the application.
The application shouldn’t even compile, because there is no method named TryFindResource on the Grid control.
Creating the TryFindResource Extension Method
Let’s imagine that you want to add functionality to a class, but you cannot modify this class. For example, you want to add the functionality TryFindResource to every FrameworkElement (as in WPF). In .NET 3.5 and Silverlight, you can do this with so-called Extension Methods, with the following steps:
1. In the SilverlightUtility project, in the Extensions class, add the method shown in Listing 24.18:
public static object TryFindResource(this FrameworkElement element,
object resourceKey)
{
return null;
}
2. The first parameter of this method is a FrameworkElement marked with the keyword this. The compiler “adds” this method to any instance of the FrameworkElement class it finds in this application. The effect is just as if the method had been defined on the FrameworkElement class.
3. We add the TryFindResource method to the FrameworkElement class, because a look in the WPF documentation reveals that this is where the method is defined in the .NET framework. We want to be as compatible as we can. http://msdn.microsoft.com/en-us/library/system.windows.frameworkelement.tryfindresource.aspx.
4. The method’s signature is also compatible with the one defined in the full .NET framework (apart from the this parameter, of course).
If you compile the application now, you see that it builds. The extension method has been recognized and extends the FrameworkElement’s functionality.
5. Set the project SilverlightUtility.Test to the StartUp project and run the application now (do not run it in the debugger, but with Ctrl+F5). You see the Silverlight unit test framework window, and your test should fail (see Figure 24.5).
Figure 24.5 Silverlight unit test failed

Making the Test Pass
In this section, we will implement the functionality so that the test passes and turns green. We know that when a FrameworkElement has a resource in its own ResourceDictionary, the method TryFindResource should return it. Let’s implement this with the following steps:
1. Modify the method TryFindResource like Listing 24.19:
public static object TryFindResource(this FrameworkElement element,
object resourceKey)
{
if (element.Resources != null
&& element.Resources.Contains(resourceKey))
{
return element.Resources[resourceKey];
}
return null;
}
2. Additionally, our test is looking for a red SolidColorBrush, so let’s add it to the Grid LayoutRoot (Listing 24.20).
<Grid x:Name=″LayoutRoot″ Background=″White″>
<Grid.Resources>
<SolidColorBrush x:Key=″BrushInRoot″
Color=″Red″ />
</Grid.Resources>
</Grid>
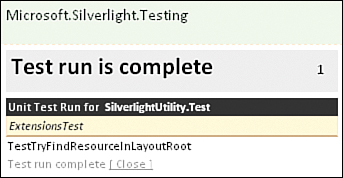
3. Run the application again. This time, the test should be successful, as shown in Figure 24.6.
Figure 24.6 Successful unit test
Implementing Recursion
Anyone who used the method TryFindResource in WPF knows that this method “walks the tree.” If the resource is not found on the element, the parent will be searched, then the parent’s parent, until the Application object. Let’s start by implementing the test for this with the following steps, and watch it fail:
1. Add two methods to the class ExtensionsTest in the project SilverlightUtility.Test, as in Listing 24.21:
[TestMethod]
public void TestTryFindResourceInParent()
{
SolidColorBrush brush
= _element.TryFindResource(″BrushInParent″)
as SolidColorBrush;
Assert.AreNotEqual<Brush>(null, brush);
Assert.AreEqual(brush.Color, Colors.Orange);
}
[TestMethod]
public void TestTryFindResourceInApplication()
{
SolidColorBrush brush
= _element.TryFindResource(″BrushInApplication″)
as SolidColorBrush;
Assert.AreNotEqual<Brush>(null, brush);
Assert.AreEqual(brush.Color, Colors.Blue);
}
2. Just to be thorough, let’s add a last test: Looking for a nonexistent resource. The method should return null. Add the test method shown in Listing 24.22:
[TestMethod]
public void TestTryFindResourceNotFound()
{
SolidColorBrush brush
= _element.TryFindResource(″BrushNonExisting″)
as SolidColorBrush;
Assert.AreEqual<Brush>(null, brush);
}
3. Run the application. The tests fail. However, the first test is still okay.
4. In TestControl.xaml, add the resources to the main UserControl as shown in Listing 24.23:
<UserControl.Resources>
<SolidColorBrush x:Key=″BrushInParent″
Color=″Orange″ />
</UserControl.Resources>
5. Then, add the following Brush to App.xaml (Listing 24.24):
<Application.Resources>
<SolidColorBrush x:Key=″BrushInApplication″
Color=″Blue″ />
</Application.Resources>
6. Modify the method TryFindResource in the class Extensions (in the project SilverlightUtility) as shown in Listing 24.25:
public static object TryFindResource(this FrameworkElement element,
object resourceKey)
{
if (element.Resources != null
&& element.Resources.Contains(resourceKey))
{
return element.Resources[resourceKey];
}
if (element.Parent != null
&& element.Parent is FrameworkElement)
{
FrameworkElement parent = element.Parent as FrameworkElement;
return parent.TryFindResource(resourceKey);
}
else
{
return Application.Current.TryFindResource(resourceKey);
}
}
Notice how we use recursion: We call the same method on the parent as the one we’re in already.
7. Notice how the last else block in Listing 24.25 calls the method TryFindResource on Application.Current. However, Application.Current is not a FrameworkElement, so this extension method doesn’t exist for that object type. To be able to compile, we must add an overload of the TryFindResource extension method, this time on the Application class. Add Listing 24.26 in the Extension class, under the existing TryFindResource method. Since the methods’ signatures (the number and type of parameters) are different, you can overload one method with the other. The Silverlight framework will select the correct method based on the type and number of parameters when you call it.
public static object TryFindResource(this Application application,
object resourceKey)
{
if (application.Resources != null
&& application.Resources.Contains(resourceKey))
{
return application.Resources[resourceKey];
}
return null;
}
8. Run the application again. All the tests should be green.
Even though we modified the method TryFindResource to add functionality, the first test still passes, so we’re sure that we didn’t break anything. This feeling of security is the main advantage of TDD.
Learning More About Unit Test
This section is by no means a complete reference about unit tests. Other attributes can be used to define expected behavior. For instance, the ExpectedException attribute can decorate a method to notify the test framework that the test method should throw an exception (you can even specify the Exception′s type). This can be useful to make sure that underlying code throws the correct error if something wrong happens.
For more information about Silverlight unit testing, check Jeff Wilcox’s blog mentioned in the beginning of this section. Other bloggers write often about unit tests in general and you can find much information about this programming technique on the Internet.
Reusing Microsoft Unit Tests
Microsoft is also using unit tests intensively on Silverlight and other projects. For example, all the Silverlight controls are intensively unit tested before they are released. Together with the source code, Microsoft is also publishing the unit tests that they are using on some components. This is a great way to learn how to write unit tests, how the controls are working, and also to extend and reuse the code when you extend the controls for your own use.
At the time of writing, the controls’ source code for the final version of Silverlight has not been released yet, but stay posted on MSDN and www.microsoft.com for announcements.
Making or Buying XAML Resources
Throughout this book, you saw how Silverlight enables a better workflow between developers and designers. The key to this collaboration is the XAML language, used as a bridge between both worlds.
When you develop a Silverlight (or Windows Presentation Foundation) application, you often need XAML resources. For example, you might need a special template for a button, or a fancy looking icon, or a nice brush with a highlight, and so on. Silverlight is new—very new—and XAML is still relatively young, even in computer years. In time, you will be able to find more and more XAML resources online, just like you can download today millions of raster icons and other graphical assets.
In the mean time, one possibility is of course to use Expression Blend to create this resource yourself. There are a few other possibilities that we will mention here.
Using Expression Design
One obvious choice to create XAML resources is Expression Design. A member of the Expression Suite (like Blend and Encoder), Design can be downloaded on the Expression website. Expression Design can only be purchased together with the rest of the Expression Studio. At the time of writing, the whole Expression Studio (including Blend, Encoder, Design, Web, and Media) costs $699.
Expression Design is a good editor for assets. In addition to exporting to XAML, it also allows exporting to other graphic formats. It also imports Adobe Illustrator files.
Describing Expression Design more is outside the scope of this book, but thankfully good, simple tutorials are available online. The best place to start is a hands-on lab created by one of Microsoft’s WPF evangelists Karsten Januszewski (see Figure 24.7). This lab guides you in learning to use Expression Design to create an XAML icon, and then to integrate it into a Windows Presentation Foundation application. It is available at http://wpf.netfx3.com/files/folders/labs/entry9074.aspx. Even though this document is for WPF, you can use this knowledge for Silverlight applications too.
Figure 24.7 Expression Design/Blend hands-on lab

Finding XAML Resources Online
Instead of making the resources yourself, you can also find some that others did for you. Here are a few options:
Silverlight Controls Skins
For Silverlight controls, we already mentioned Corrina Barber’s blog and especially her “Controls Skins” posts. Using these skins is easy with the following steps:
1. Create a new Silverlight application and add a button in the Grid LayoutRoot.
2. Navigate to Corrina’s blog and find the skin you want to use: http://blogs.msdn.com/corrinab.
3. Download the skin’s Zip file (for example, the “bubbly” skin from http://blogs.msdn.com/corrinab/archive/2008/07/20/8757236.aspx).
4. Extract the files from the Zip file to a temporary folder and open the Solution file in Visual Studio.
5. In Page.xaml, copy the three brushes BaseColorBrush, HoverBrush, and HyperlinkBrush from the UserControl.Resources to your own page’s resources. Alternatively, you can copy these brushes to the file App.xaml and place them in the Application’s resources.
6. Copy the ButtonStyle style from Corrina’s Page.xaml to your own page’s (or application’s) resources.
7. Finally, set the vsm prefix on the UserControl tag (in Page.xaml) or on the Application tag (in App.xaml).
xmlns:vsm=″clr-namespace:System.Windows;assembly=System.Windows″
8. Set the Style on your button as in Listing 24.27:
<Button Width=″80″ Height=″40″
Content=″Click me″
Style=″{StaticResource ButtonStyle}″/>
Here, too, it is certain that other designers will publish their own skins on the Web. Stay tuned to Silverlight-related blogs!
XAMLArchive.com
You can find free XAML resources online! One example is the XAML Archive website (http://www.xamlarchive.com). This website is still relatively new but should grow with time and add new XAML or Expression Design resources.
Purchasing XAML Templates
Another approach to this problem is to buy XAML templates. At the time of writing, one website is already active in the field of Windows Presentation Foundation (but not Silverlight yet): http://www.xamltemplates.net.
Keeping an eye on this website is probably a good idea. It’s possible to adapt WPF templates to Silverlight without too many headaches. Additionally, it’s probable that Silverlight support will be added sooner or later.
Converting Files to XAML
Other UI technologies have been around for a long time, and tons of resources are already available for these older frameworks. If a technology uses resources in vector format (as opposed to raster format like bitmaps), it is often possible to convert the vector-based resources from one format to another.
Adobe Illustrator and Flash
Mike Swanson (a Microsoft employee who published these tools on his free time) created two useful converters for existing Adobe-based designs:
![]() Adobe Illustrator to XAML converter—This Adobe Illustrator plug-in allows exporting an existing Adobe Illustrator design to Silverlight XAML (www.mikeswanson.com/xamlexport).
Adobe Illustrator to XAML converter—This Adobe Illustrator plug-in allows exporting an existing Adobe Illustrator design to Silverlight XAML (www.mikeswanson.com/xamlexport).
![]() Adobe Flash to XAML converter—This standalone tool can convert an Adobe Flash SWF file’s frame into a corresponding XAML file. As usual, this XAML file can then be imported into Expression Blend and integrated into a Silverlight application (www.mikeswanson.com/swf2xaml).
Adobe Flash to XAML converter—This standalone tool can convert an Adobe Flash SWF file’s frame into a corresponding XAML file. As usual, this XAML file can then be imported into Expression Blend and integrated into a Silverlight application (www.mikeswanson.com/swf2xaml).
These two free tools still have limitations and will probably be improved in time, so stay tuned! Mike also has a nice list of XAML-related tools on his blog: http://blogs.msdn.com/mswanson/articles/WPFToolsAndControls.aspx.
Another Impressive Flash Versus Silverlight Resource
Slightly out of the scope of this section, but really worth mentioning, a very impressive resource is found on the Shine Draw website at www.shinedraw.com.
This site compares Flash effects and Silverlight effects, and you can download the effect’s implementation. You can visually compare the effect in Flash and in Silverlight and you can even vote on which implementation you find better. It’s a very interesting way to help people with good Flash knowledge to transition to Silverlight, and a very good way for beginners in Silverlight to know about the graphical abilities of that technology compared to the well known Flash framework.
Microsoft Visio
Another impressive converter is the Microsoft Visio to XAML converter created by Saveen Reddy and available on CodePlex: www.codeplex.com/VisioExportToXAML.
Like all projects on CodePlex, this is an open source application, and you can contribute to it if you want. If you find any bugs or have enhancement wishes, don’t hesitate to collaborate.
Scalable Vector Graphics SVG
Scalable Vector Graphics SVG is another vector-based technology and is in many ways an ancestor of XAML. It is also XML-based and various web browser plug-ins allow this technology to be integrated into web pages.
There are a couple of SVG to XAML converters, one example being the project initiated by Thierry Bouquain on CodePlex: www.codeplex.com/XamlTune.
Using Third-Party Controls and Libraries
In addition to the external resources we talked about in this section, there are a few providers of third-party controls for Silverlight. It’s difficult to mention one at the risk of forgetting another. Probably the most well-known providers of third-party Silverlight controls are
![]() Infragistics—www.infragistics.com
Infragistics—www.infragistics.com
![]() SoftwareFX—www.softwarefx.com
SoftwareFX—www.softwarefx.com
![]() Xceed—http://xceed.com
Xceed—http://xceed.com
![]() Telerik—www.telerik.com
Telerik—www.telerik.com
![]() agTweener—An animation library in open source www.codeplex.com/agTweener
agTweener—An animation library in open source www.codeplex.com/agTweener
As usual in software engineering, the decision to “make or buy” depends on many factors: Time to market, total project cost, the developer’s (or designer’s) abilities, desire to learn, and so on.
Reading Silverlight-Related Blogs
There are many Silverlight-related blogs online, and a list would probably quickly become obsolete. A great starting point is Dave Campbell’s Silverlight Cream. Dave (a fellow Client Application Development expert in the Microsoft Most Valuable Professional program) puts a lot of effort and enthusiasm into this periodic summary of the planet Silverlight (www.silverlightcream.com).
Two must-read blogs are without a doubt those written by Adam Kinney and Tim Heuer. These two Developer Evangelists at Microsoft have rich content and make it a pleasure to learn and improve your Silverlight knowledge.
And of course, if you want to stay tuned with news about this book, download related material or simply contact the author for more information, check http://blog.galasoft.ch
Summary
This chapter wrapped up our journey through Silverlight. I hope that reading this book was fun. I am sure it was also hard sometimes. More than anything else, I wanted to show how interesting and how fun it is to develop Silverlight applications. I hope I brought you, my readers, to a point where you are able to program applications using the industry’s best practices, and to continue learning on your own. Even for experienced client application developers, I dare to believe that this book brought a better understanding of what happens “under the cover” and probably taught a few new things (or in any case helped recap and consolidate what you already knew).
Silverlight is evolving fast, and new resources appear every week. Thankfully, you will also find many additional ways to learn and become a better Silverlight developer. It’s a never ending journey, and it just started. Honestly, there are some concepts that I only understood after years of programming (and don’t repeat this, but there are some concepts that I still didn’t completely understand yet). This is an amazing profession/hobby, because it is one where we never stop learning. You can never say that you master software engineering. Learning is as much part of the job as programming (and by the way, every software firm should make continuous education one of its priorities, but it’s another story!). Reading this book was a great move, but it’s only the beginning of your journey in Silverlight. Check the Internet, read blogs, read more books, and more importantly, develop, develop, develop. And by all means, have fun while you code. Happy coding!