
An often-overlooked aspect of putting a plug-in-based application on the Internet is the experience of a brand-new user. Truthfully, plug-in apps aren't unique in this. I've seen many Windows client applications that depended on registry entries or other files created during normal use but not present at first install. It's easy to be sloppy about testing that scenario because it's so far removed from our day-to-day lives.
Nevertheless, not everyone in the world has Silverlight installed on their machines, and not everyone has your application in their download cache. Anything that gets between your user and using your application is a barrier that will cause attrition. You need to continue to entice users to install the plug-in and wait for your application to download (if it's large) in order not to lose them.
In this chapter, we'll first look at how to customize the initial plug-in install and upgrade experience. Then, because some applications can be really large and have lots of assets, we'll look at approaches for building a custom preloader using XAML and JavaScript.
Although Silverlight has achieved excellent market penetration since it was first introduced (it's around 60 percent at the time I'm writing this), you're still going to run into instances where the plug-in isn't installed on the user's machine. In those cases, the user will get the default Please Install Silverlight image, as shown in figure 25.1.

The default install badge is okay, but it almost certainly doesn't fit with the design of your application. More important, it offers no information about what your application will provide after Silverlight is installed.
Research has shown that in order to get users to install the plug-in, they need to see what immediate benefit they'll get by doing so. The usual way to handle this is to show information about your application—perhaps an explanation, almost certainly screenshots—as part of the appearance. You then provide your own Click Now to Install button over those graphics. One of the best examples of this is the Netflix player, shown in figure 25.2.

Figure 25.2. The Netflix player. This is an excellent example of a Silverlight install prompt. It includes a ghosted image of the player, information about the movie you've selected, and a clear call to action. (Image courtesy of Tim Heuer.)
This example has everything a good install prompt needs:
It's on-brand and consistent with the site. Using the default prompt would've been jarring. By using a screenshot of the existing player, you maximize consistency while also showing the purpose of the plug-in.
It's about the content, not the plug-in. The install prompt doesn't extol the virtues of Silverlight; it focuses on what you'll get (the movie Lean on Me) after you install it. Make the decision about the content and benefits, not the technology.
The call to action is simple. The only real action to take on this page is the install. If you look hard, there's a link with pop-up instructions, but there's no other prompting, account creation, or other cruft in the way.
In this section, you'll create a simple replacement plug-in install prompt, covering the changes to the object tag and the HTML within it. It won't be as pretty as the Netflix prompt, but it'll show how you can get there. We'll wrap up with a bit of information on how to further customize the experience.
The experience you create to prompt for the plug-in must exist without any plug-in installed. That means it's all HTML and JavaScript. Typically, it's some static images and perhaps some text. Truly complex versions could have an application walkthrough complete with a jQuery slideshow of screen shots of the application. The point is that you want something nice that entices the user to install the plug-in.
Whatever HTML you decide to provide, you can easily place it inside the object tag. Any HTML you include inside the object tag will be displayed when the plug-in isn't installed. For example, you could go with the silly text-only install prompt shown in figure 25.3.
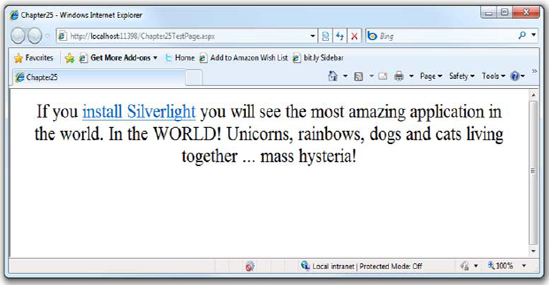
Figure 25.3. The new custom prompt to install Silverlight. I don't know about you, but I'm totally ready to install Silverlight now!
In reality, you probably want to try a little harder than that, but you get the idea. The URL I used came right from the default install experience includd with the template. Whatever design you or your web designers come up with is fair game here. Listing 25.1 shows how to insert the HTML into the object tag.
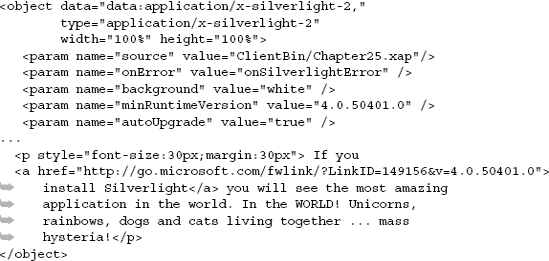
Everything not a param but otherwise inside the object tag will be invisible when Silverlight is installed and displayed when it's not. The sky is pretty much the limit for what you can do here.
By default, the tooling provides a link to the version you built against. But a better approach is to remove the version number completely, because you should always provide the latest plug-in to your users. To do that, remove everything after the link ID:
<a href="http://go.microsoft.com/fwlink/?LinkID=149156">
That will automatically grab the latest version of the plug-in when the user clicks the link. Note that the parameter LinkID is case-sensitive.
In the object tag, you saw the autoUpgrade and minRuntimeVersion properties. Those two properties work together to handle scenarios where the user has Silverlight installed, but it's an old version. If the user's version isn't the latest version, but it's equal to or higher than the minRuntimeVersion, the user won't be prompted to upgrade. But if your application requires a newer version and you have autoUpgrade set to true, the user will receive a standard Silverlight version dialog prompting them to upgrade.
If you prefer to handle the upgrade process yourself, you can set autoUpgrade to false and handle the 8001 - Upgrade required and 8002 - Browser restart required errors in the OnError function. Although those errors will fire regardless of the value of autoUpgrade, typically you'll only do something meaningful with them when you're handling the process manually.
Silverlight.js, discussed in chapter 3, includes a number of helper functions and properties such as getSilverlight, isInstalled, isBrowserRestartInstalled, and WaitForInstallCompletion that make the new install and upgrade experiences highly scriptable from JavaScript.
After you've tackled the "no plug-in installed" scenario or the upgrade scenario, and the user has the plug-in installed, you should then turn to the application-loading scenario and build a custom preloader or splash screen.
Silverlight applications come in all shapes and sizes. Many of the more complex applications take a few seconds or more to load, because they have many images, large binaries, media, or more. This is one place where the Flash developers had a real leg up due to all the prior art. Every Flash application I've ever used has had a custom pre-loader that displays appropriate branding and, often, real creativity. Blogs and even entire sites have been created with no purpose other than to show some of the awesome preloaders that exist out there. Take a peek for yourself: www.bing.com/search?q=best+flash+pre-loaders.
Preloaders can be image-based or XAML-based and can include application-specific branding. A preloader is a chance to provide something interesting and creative to increase anticipation and excitement for the application. Some preloaders even include mini-games; but unless your application takes 20 minutes to load, that may be overkill.
Think of the preloader like the start of a movie. Although you typically want the opening cuts to finish in short order so you can watch the movie, the best ones add to the overall story, increase awareness of what's to come, and help generate some excitement.
When it comes down to it, you can have the best-looking Silverlight application out there, but if it shows several seconds of the default Silverlight loading animation, no one will consider it a complete experience. Figure 25.4 shows the default "spinning blue ball" loading experience.

The default experience is there to ensure that your users know the application is doing something while the application or the application and required assets are downloaded.
In general, you want to avoid both the default loader and the double-download situation whenever possible. It's easy to create your own custom download experience, including downloading media assets and more.
Throughout this section, you'll learn how to create a custom preloader. The first step in this three-step process is creating the appearance of the preloader using XAML. After it's created, you can integrate the preloader with your solution to ensure it's used while a Silverlight application is being downloaded. While this download is proceeding, you can choose to monitor its progress and update the visuals. All these steps will be shown as a basic preloader is implemented.
Preloaders, or splash screens, are shown when the loading time of your application exceeds a certain threshold, roughly half a second. The first step in creating a custom splash screen is defining its appearance. You must take three important facts into consideration:
The preloader is used while a .xap file is being downloaded, so it doesn't make sense to create the splash screen's XAML inside of your Silverlight application. Instead, you must create the XAML within the web site that hosts your Silverlight application.
The preloader can't use managed code, so you must use a scripting language such as JavaScript for any runtime features of a custom splash screen.
You're not limited to the Silverlight 1.0 API. Enhancements were made to the JavaScript API post-Silverlight 1.0, such as additional panels and types of animation.
With these constraints in mind, you can move forward with creating your own preloader. Although a good preloader is a highly branded experience that seamlessly blends into the design for your application, you'll create a simple animation here for space and complexity considerations. Such an animation might be defined in an XML file on the web site called SilverlightLoader.xaml and look like the code in listing 25.2.
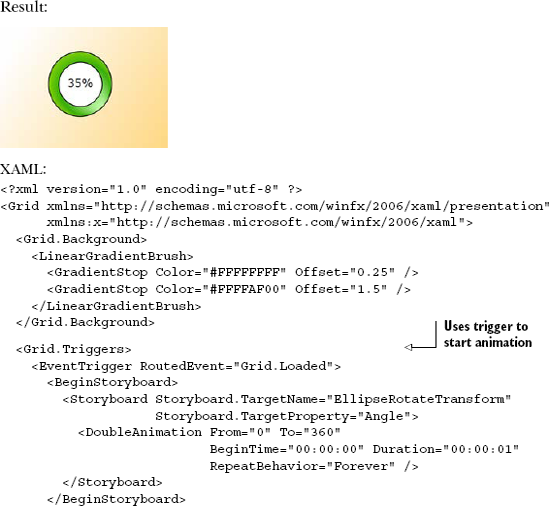
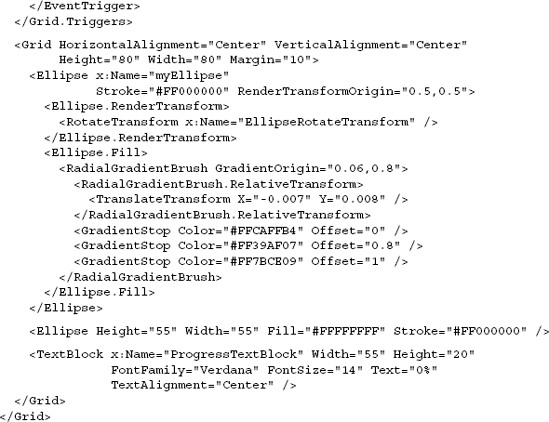
This listing defines a basic set of shapes and animation within a Grid element. This animation rotates an Ellipse around a TextBlock, which shows the progress of the download. The progress of the download will be updated as the download progresses.
Tip
If you want to try this yourself on an empty project, create a new Silverlight application with a web site as usual. Then, on the Silverlight app, embed some enormous file, such as a video or big zip file, into the .xap, so it's large. As long as the download takes more than 0.5 seconds or so, you'll see your preloader screen. The more latency you have, the more you'll see of your preloader. You can even constrain your download bandwidth (time to dig out the old 9600 bps Hayes compatible) to really help it show off.
The root element of a preloader must be one of the Panel elements mentioned in chapter 7, so you can't use a UserControl element as you would if you were defining a page. This has to do with the fact that managed code can't be used with a splash screen. After you've chosen a Panel and created the appearance of the splash screen, you can integrate it with your web application.
The second step of using a custom splash screen is integrating it with a web application. You reference the XAML of the splash screen when you create an instance of the Silverlight plug-in. You can reference this XAML by using the splashScreenSource property of the object tag, as shown in listing 25.3.
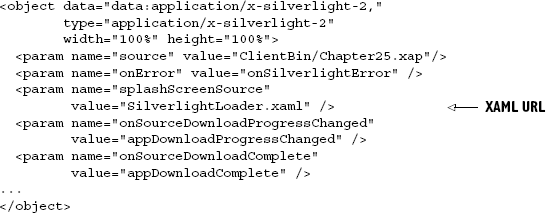
This listing uses the splashScreenSource property to reference the splash screen created in listing 25.2. This property isn't required by the createObjectEx function. By using this property, you can point to where a custom splash screen's XAML is stored. For security reasons, the XAML must be located on the same web site as the page with the object tag and the Silverlight .xap file. When the splash screen's XAML is loaded, you have the option of using the onSourceDownloadProgressChanged and onSourceDownloadComplete event handlers to monitor the load progress.
The third, but optional, step in creating a preloader is monitoring the load progress. To accomplish this, you wire up JavaScript event handlers to the onSourceDownloadProgressChanged and onSourceDownloadComplete events defined by the plug-in. These event handlers are shown in listing 25.4.
Example 25.4. The event handlers used for monitoring the download progress
JavaScript:
<script type="text/javascript">
function appDownloadProgressChanged(sender, args)
{
  var progressTextBlock = sender.findName("progressTextBlock");

  progressTextBlock.Text = (Math.round(args.progress * 100)) + "%";
}

function appDownloadComplete(sender, args)
{}
</script>
I typically include these event handlers in the same JavaScript script block that holds the default Silverlight error handler. This listing shows the onSourceDownloadProgressChanged and onSourceDownloadComplete event handlers referenced in listing 25.3. The onSourceDownloadProgressChanged event will fire any time the progress of a download has changed by 0.5 percent or more. If this event is triggered, you may access the total progress through the second parameter of the onSourceDownloadProgressChanged event. This parameter exposes a floating-point property called progress. The value of this property is between 0.0 and 1.0, so you must multiply the value by 100 in order to convert the value to a percentage. When the progress has reached 1.0, the onSourceDownloadComplete event will fire.
The onSourceDownloadComplete event will fire when the requested Silverlight application has been completely downloaded. Because the Silverlight application will automatically start when it's completely downloaded, you probably won't use this event. Instead, you'll probably use the in-application Application.Startup event mentioned earlier in this book, because at this point, you can begin using managed code instead of relying on scripted code.
Sometimes you need to provide more than just a preloader. Sometimes you need a way to download whole portions of the application on demand, or at least in a lazy way. For these scenarios, the Managed Extensibility Framework is the way to go.
A custom, branded install experience for the plug-in and a custom preloader are both extremely simple to create—far less work than the overall application. If you have a designer on-team, it can often be as simple as a few graphics and some basic XAML.
But those little touches are what differentiate a great application from a good application. They're also the types of changes that keep users engaged and reduce the drop-off of new users. The return is great compared to the effort involved.
The first customization is for the plug-in install. When a new user without the Silverlight plug-in comes to your application, you have the opportunity to engage them and get them to install Silverlight. It's through solid efforts in this space that Silverlight gains market penetration and becomes easier to use in your applications.
The second customization is for the application preloader or splash screen. This is what you want to show the user while your application is loading. Most applications with a significant number of images or other media, packaged into the .xap to avoid a multitude of lazy loads later, are really big and benefit from some download progress information. Sure, you could use the generic Silverlight spinning balls animation; but to look professional, you want to use something that fits the design of your application and seamlessly sits in your site.
Combine both customizations, and you have a winning combination that will help increase eyeballs and keep visitors interested and engaged.
I hope you've enjoyed this book; I welcome your comments! If you liked it, I encourage you to write an online review on your blog or on a retailer's web site (such as Amazon.com). The official forum for this book can be found on the publisher's web site at www.manning.com/pbrown, where you can ask questions, post comments, and report any errata. You can also reach me on twitter at @Pete_Brown and on my web site at http://10rem.net. I encourage you to join me in both places to get updates and expansions to the content in this book and more. Thank you!