
When the community stops worrying about how to do basic things in a particular technology and starts working out how to do complex things well, you know the technology has reached a point of maturity. The emergence of architectural patterns and testing capabilities for a platform are a good indicator that the technology is ready for real-world use in nontrivial applications.
One of the main patterns to be applied to Silverlight is the Model-View-ViewModel (MVVM) pattern, also known as the ViewModel pattern.
Note
MVVM or ViewModel Pattern? Different groups like to call it different things. I'll use both interchangeably until the community settles on one over the other. There are some influential folks on both sides of this debate.
As part of my job at Microsoft and my life as an MVP before that, I give a fair number of presentations, almost all of which include code demos. For timing and retention reasons, I'll often implement the code directly in the code-behind. At least 75 percent of audience members don't know anything about patterns such as MVVM, and the few times I've tried to include bits of that pattern in my demos, the audience was lost and completely missed the main thing I was teaching. So, I've taken to explaining MVVM at a high level before the talk and apologizing for not using it in the demo. Basically, I say "I'm doing this just to show X. Never write real code this way."
It sounds amusing, but in a way, it's a bit depressing. Many folks aren't exposed to the pattern, but many more are exposed and pass on it because they're presented the full pattern without any background or helpful ladder rungs to get to the full implementation. That's a real problem. In math class, I was always told to show my work, and I think the same applies here.
Rather than describe the pattern and take it chunk by chunk in this chapter, we'll look at the default technique—using the code-behind approach in order to get a baseline— and then start with an overview of MVVM and a simple implementation of the pattern. Next, you'll refactor it to take advantage of other best practices typically associated with the pattern such as using services, commands, and behaviors. I'll even throw in a bit of information on using interfaces, view model locators, and Inversion of Control. Finally, we'll follow that up with some testing approaches.
My point in this chapter isn't to provide one official implementation of the MVVM pattern or tell you how you need to build your applications. Instead, I'm providing you with the groundwork so you can see how the spectrum of implementations of MVVM/ViewModel fits into your application development and make informed choices about how to use (or not use) the pattern in your next project.
In addition, I'm not going to use a particular MVVM toolkit in this chapter. Those toolkits are great, but much like that expensive calculator in math class, they do a lot of the work for you, so you don't learn much.
In the end, you'll have a spectrum of implementations to choose from, any of which may be used on your projects as your own requirements dictate. You'll also gain a better understanding of what each additional bit of complexity provides you in return.
You may wonder why I'd start a chapter on MVVM with a bunch of code-behind code. To understand where you can go, you need to start with where you are. The code-behind approach is by far the way most applications on the Microsoft stack are built these days. Acceptance of patterns such as MVVM and MVC is changing that, but slowly.
Starting with the code-behind approach will serve two purposes. First, it'll give us a working application baseline for refactoring. Second, it'll allow us to easily compare the approaches as we move through the chapter
In this section, you'll create a project that'll serve you for the rest of the chapter. It'll be a Silverlight navigation application, much like the one covered in chapter 15. You'll then take that project and add in some service calls to get data from a SQL Server database, using WCF as the intermediary. Finally, you'll add a list form and a pop-up details form to round out the project.
This solution will be based on the Silverlight Navigation Application template covered in chapter 15. Create a new solution named MvvmApplication using that template. Figure 16.1 shows the New Project dialog with the appropriate selections. When prompted, be sure to host the application in a new web site (the default setting).
After you have the overall solution structure in place, follow the instructions in appendix A to set up the database connection and entity data model. When complete, you should have a solution with an untouched Silverlight Navigation Application template– based client and a web project with access to the AdventureWorks database via the entity data model.
The next step is to set up a web service to allow the Silverlight client to access that data.
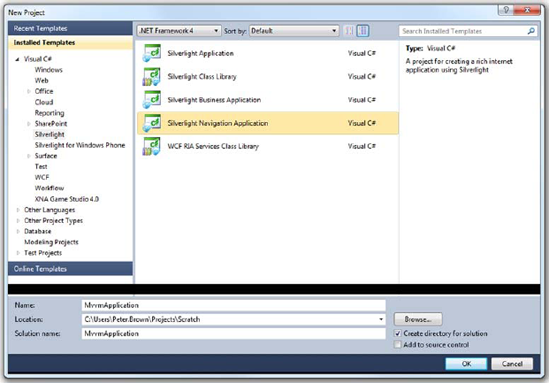
Figure 16.1. For this solution, you'll use the Navigation Application template introduced in chapter 15.
Silverlight applications run on the client and can talk to server-side databases only via a service of some sort. You can choose multiple types of services. For example, you could go with a REST-based solution (chapter 14) or something using WCF RIA Services (chapter 17). For this, you'll use a regular Silverlight-enabled WCF service: a SOAP web service built using WCF. Create a folder named Services in the web project, and add into it a new Silverlight Enabled WCF Service named EmployeeService.svc. Listing 16.1 shows the code for that service.
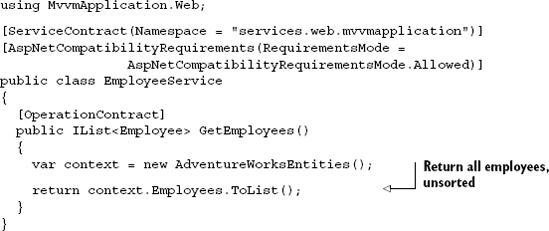
The service is a basic Silverlight-enabled web service. It uses the entity data model to return the list of all employees in the database. You could also use a LINQ expression to be more selective about the list, narrow down the number of columns returned (which would also require a new return type), or sort the data. The function could also return an IQueryable<Employee> to enable better client-side LINQ integration.
When the service has been created, add a web reference from the Silverlight application to the newly created service. Be sure to do a build first, or the service reference will typically fail. Name the service reference namespace Services. Be sure to refer to chapter 14 as needed for more information on services and service references.
Next, in the Views folder, add a new view (Silverlight Page) named EmployeeList.xaml. For information on adding pages to Silverlight navigation applications, please see chapter 15. The EmployeeList.xaml markup should look like listing 16.2. (Note: Drag the DataGrid onto the design surface from the toolbox in order to get all the references and namespaces automatically set up.)
Example 16.2. EmployeeList.xaml markup
<Grid x:Name="LayoutRoot">
  <sdk:DataGrid AutoGenerateColumns="True"
                Margin="12,55,119,12"
                x:Name="EmployeesGrid" />
<Button Content="More Vacation!"
Height="23" Width="101" Margin="0,55,12,0"
HorizontalAlignment="Right" VerticalAlignment="Top"
x:Name="AddMoreVacation" />
<Button Content="Edit"
Height="23" Width="101" Margin="0,110,12,0"
HorizontalAlignment="Right" VerticalAlignment="Top"
x:Name="EditEmployee" />
<Grid x:Name="LoadingProgress"
Background="#CCFFFFFF"
Visibility="Collapsed">
<ProgressBar Height="25" Width="200"
IsIndeterminate="True" />
</Grid>
</Grid>Listing 16.2 includes a DataGrid that contains all the employees, as well as two buttons for manipulating the data. Finally, a semitransparent white overlay named LoadingProgress is displayed when the data is being fetched.
Next, add the new employee list page to the navigation menu. The process to do this was covered in chapter 15; but for reference, you'll need to add a new hyperlink button and divider to the LinksStackPanel in MainPage.xaml:
<HyperlinkButton x:Name="EmployeeListLink"
                 Style="{StaticResource LinkStyle}"
                 NavigateUri="/EmployeeList" TargetName="ContentFrame"
                 Content="employees" />

<Rectangle Style="{StaticResource DividerStyle}" />
After the employee list view is set up, you'll add an employee detail view.
In the Views folder, add a new ChildWindow named EmployeeDetail.xaml. This will be a pop-up window used to edit a subset of the fields of the Employee object. This window, in the designer, looks like figure 16.2.
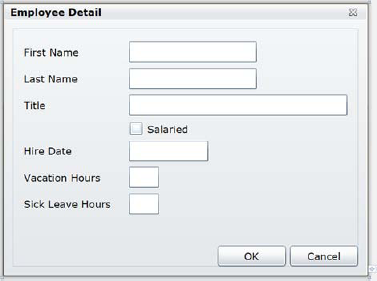
After the button definitions in the EmployeeDetail ChildWindow XAML, add the XAML from listing 16.3.
You'll use this project for the remainder of the chapter. You may change a few binding statements later, but for the most part, the XAML will stay the same.
With the UI in place, it's time to turn our attention to the code. As promised, we'll first look at a typical code-behind approach.
The first stop along the way to structuring your applications with the ViewModel pattern is to look at what, for most applications of any complexity, can be considered an antipattern: the heavy code-behind approach. Unfortunately, the tooling and information all help you fall into writing code this way. That's because it's easy for beginners to grasp, and it's perfectly acceptable for smaller applications.
So far, you have XAML for two views and a service you can use to populate them. The next step is to put in some code to call the service and populate the DataGrid. Listing 16.4 shows the code-behind for the Employee List page.
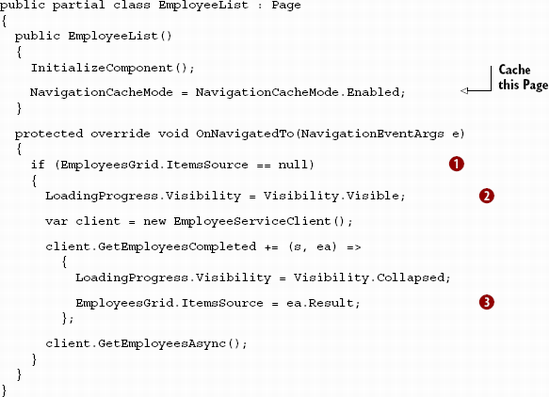
Listing 16.4 includes enough code to load the DataGrid. When the page is navigated to, you first check to see whether the DataGrid already has data ![]() . If it doesn't, you show the
. If it doesn't, you show the LoadingProgress overlay ![]() and then call the service, loading the result into the
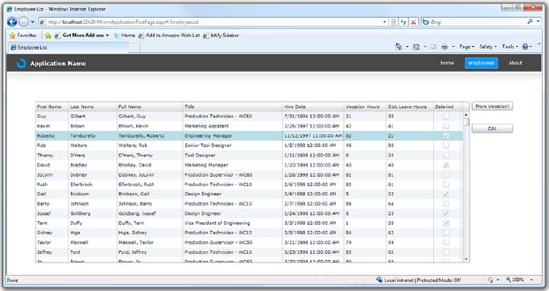
and then call the service, loading the result into the DataGrid ![]() . This check is done because the pages are cached (per the setting in the constructor), and you'd rather not make extra service calls. When you run the application, it should look like figure 16.3.
. This check is done because the pages are cached (per the setting in the constructor), and you'd rather not make extra service calls. When you run the application, it should look like figure 16.3.
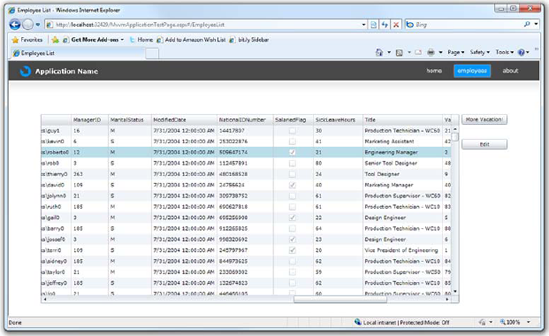
Figure 16.3. The Employee List page shown with an item selected in the grid. Note that the scrollbar is scrolled to the right to get past the columns you don't need.
As you can see by the grid results, you haven't done anything to reduce the number of columns showing up nor to display the values from the nested class. This could be easily accomplished by manually defining columns in the DataGrid or by using a specialized purpose-built class as the return value from the service. Although you'll fix that when we talk about MVVM, it's not a deficiency with the code-behind pattern itself.
Next, you need to add the code-behind for the Employee Detail window and then come back to this list page to fill out the rest of the code.
The Employee Detail ChildWindow needs code to take in an Employee object and bind the UI. Listing 16.5 shows this code.
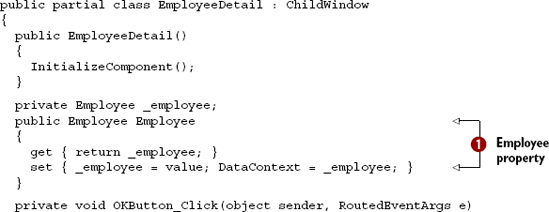
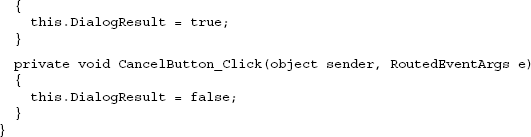
Listing 16.5 shows the additions to the ChildWindow code-behind. Specifically, the additions are the Employee member variable and property, and the setting of the DataContext ![]() when the employee property is set. This last bit, the setting of the
when the employee property is set. This last bit, the setting of the DataContext, allows the binding system to use the _employee object as the base for all binding statements in XAML.
One issue you'll see in the code-behind is that you don't clone the Employee or something to allow for undo/cancel. That's certainly doable in this instance, but I've left it out for this example. As was the case with the column definitions in the list view, this isn't a limitation of the code-behind approach itself.
With the ChildWindow code in place, we'll turn our attention to the last two bits of code: the functionality of the two buttons on the main Employee List view. Listing 16.6 shows this code.

Note that in listing 16.6, you go back and modify the EmployeeList constructor to add the two event handlers. This could be done in XAML, but we'll look at alternatives to event handlers when we discuss the MVVM version of this code.
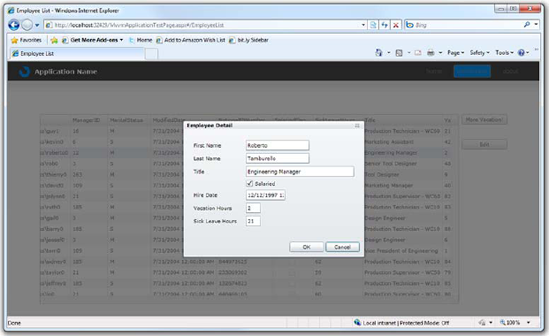
The code in this listing enables the pop-up EmployeeDetail ChildWindow as well as a simple function to add 10 vacation hours to the selected employee. Run the application, select a row in the grid, and click the Edit button. You should see a pop-up that looks like figure 16.4.
That's it for the code-behind version of the application. For space reasons, and because it doesn't change your approach, I've left out deleting and saving changes. For a solid way to handle those, look at WCF RIA Services in the next chapter.
The main things I needed to demonstrate here are filling a list from a service call and passing information from one view to another. Now that the basic application is set up and covers both of these scenarios, we'll look at an MVVM version.
Originally conceived for WPF around 2005, and first presented in a blog posting by John Gossman,[1] the MVVM pattern has become the most popular architectural pattern for Silverlight and WPF applications
The MVVM pattern is a specialization of the PresentationModel pattern by Martin Fowler. Whereas Fowler's pattern was platform independent, Grossman's specialization was created to take advantage of the capabilities of WPF and Silverlight. Otherwise, they're conceptually identical.
If you're familiar with the Model View Controller (MVC) pattern, you'll find similarities. But the MVVM pattern is optimized more for modern UI models whereas the UI markup is completely separated from the logic, using messages and binding to pass information back and forth, assuming the UI and ViewModel can both be stateful.
By default, you build applications with a good bit of your code in the code-behind, just as you saw in the previous section. You may use external services or entities and even reusable logic, but at the end of the day, the vast majority of programs still end up with critical logic buried in the code-behind.
A typical code-behind approach looks like figure 16.5.
This comes in degrees, of course. Some code-behind applications are better architected than others. You'll find, though, that those that are architected well tend to have less logic in the code-behind. Instead, they have UI support code, or maybe binding wire-up. Critical calculations and similar functionality take place outside of the code-behind.
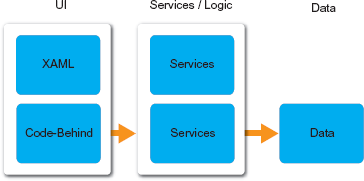
Figure 16.5. In the usual code-behind approach, a fair bit of logic is tightly coupled to the UI and to other layers. Services in this case mean both web services and logical services (utility functions, reusable business logic, and so on).
Why is that important? Why take the extra step to move this code out from the code-behind?
Testing is certainly one reason. After you decouple the logic from the user interface, you're then able to test the logic. Ease of UI design is another. With a well-architected application with a strong separation of concerns between the logic and the UI, a designer can create the user interface and drop it into the project. As a developer, you can even provide the designer with mock interfaces or dummy classes to use to design against, as long as those classes adhere to the same interface or contract as your own support classes.
One reason I think the MVVM pattern works well for developers is because it eliminates many of the binding problems you run into when coding in code-behind. Often, developers find they have to work some convoluted code to get the XAML to bind to a DependencyProperty defined in the code-behind, messing with overriding DataContext at different layers or otherwise making a horrible mess of the code and XAML. It happens to the best of us. It's a pit that you can easily fall into this when you don't follow a pattern such as MVVM.
What does a MVVM application look like in contrast to a code-behind application? Figure 16.6 shows the architecture of a basic MVVM implementation.
As figure 16.6 shows, when using the MVVM pattern, the application is made up of three main parts: the Model, the View, and the ViewModel. Table 16.1 describes their function.
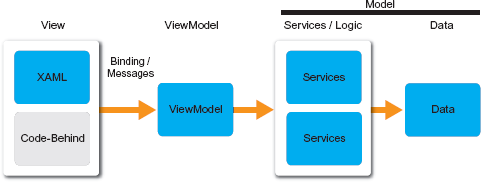
Figure 16.6. In the MVVM pattern, the View contains minimal code-behind and uses binding and messages (actions or commands) to communicate with the ViewModel. The ViewModel provides a single façade into the rest of the system, optimized for that specific view. Keep in mind that services doesn't always mean web services; they're anything that provide a service to the application.
Table 16.1. The three main parts of the MVVM pattern
Part | Description |
|---|---|
a. One of the tech reviewers suggested I put this in a blink tag or marquee or something to make sure the point is driven home. The ViewModel has no knowledge of the view. Perhaps if you break the rule, you should have to put a big red label on the code: "Warning! Lark's Vomit!" (thank you, Mr Cleese). | |
Model | The model of the business or the model of the data, sometimes also called the model of the application. This can contain entities and services (web services, business services, logic services, and so on), data access, and more. |
View | The XAML file and its code-behind. Its sole responsibility is interaction with the user. The only code here should be code that's logically part of the View itself (managing interactions between view elements or animations, for example). The View typically has enough knowledge of the structure of the ViewModel to bind to it but knows nothing of the rest of the system. |
ViewModel | The interface between the View and the Model. This is part entity, part façade, and part controller, but it contains minimal logic of its own. Use binding to let the View pull/push data, and commands or behaviors (messages) to call methods. The ViewModel has no knowledge of the structure of the view.a |
Taken to logical ends, the structure of an MVVM application would include interfaces at all the key points, allowing you to easily swap out individual layers or objects for equivalents either manually or via dependency injection. We'll investigate those scenarios later in this chapter.
In this section, you'll take your code-behind solution from the first section and refactor it into a basic MVVM application. You'll pull the code-behind apart, put much of the functionality into a ViewModel class, and ready it for additional refactoring and application of patterns later in this chapter.
So far, you have a simple and tight code-behind application running. It's small. In fact, it's small enough that showing you the MVVM version will make you wonder why you're adding so much code. Like many examples, we have to start small both to get the concepts across and to fit in a publication like this. (I'm pretty sure bookshelves everywhere would protest if this book hit 1,000 pages.)
That said, if you stick with me throughout this section, I think you'll see how the structure set up by the MVVM pattern makes it possible to add functionality to the application without shoehorning it into some dank corner of code.
In this section, you'll make basic changes to factor some of the code out of the code-behind and into a ViewModel. Although this isn't a "full" ViewModel/MVVM implementation, it provides many of the benefits and is a good, understandable place to start. Most of my early experiments with the pattern looked much like what we'll cover in this section.
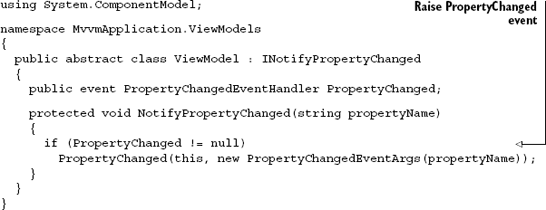
The first step in working with the pattern is to create a short base class from which all ViewModel classes will derive.
The base ViewModel class provides the common INotifyPropertyChanged implementation. As you may recall from chapter 11 on binding, INotifyPropertyChanged is required whenever other classes may be bound to your class, except when using dependency properties—which don't really belong in a ViewModel.
In a larger implementation, the base ViewModel class may contain other useful functionality or may be factored into several classes to support specialized types of View-Model implementations. Regardless, this is the class you'll use as the base class for the other ViewModels created in this project, starting with the list page ViewModel.
In the Silverlight project, add a new folder named ViewModels. In the ViewModels folder, add a class named ViewModel. Listing 16.7 shows the code that makes up this class.
In my own implementations, I often have a base class named Observable that includes the functionality shown in this ViewModel class. I then derive a ViewModel base class from Observable. This enables me to support INotifyPropertyChanged with entities and other non-ViewModel classes and still have a base ViewModel that can be used for other shared functionality.
Typically, each view in the ViewModel pattern has its own dedicated ViewModel. This isn't written in stone, but it's how most applications end up being designed. A 1:1 relationship between View and ViewModel eliminates the need to shoehorn in the inevitable compromises, because Views that share the ViewModels diverge in functionality when many Views share the same ViewModel. It's also acceptable, when using smaller ViewModels or nested UserControls, to have a 1:n relationship between the View and the ViewModel. The situation to avoid in most cases is n:1 between View and ViewModel.
Tip
When naming your ViewModel, pick a consistent convention. I typically name mine with the view name plus ViewModel, so the EmployeeList view has an EmployeeListViewModel class. Some MVVM toolkits expect you to follow a convention so their locator services can find the correct ViewModel for a View.
In the ViewModels folder, create a new class named EmployeeListViewModel. This ViewModel will include the functionality required for the EmployeeList page, including calling the web service and providing the functionality currently located in the button click code.
Listing 16.8 includes the code for the EmployeeListViewModel implementation.
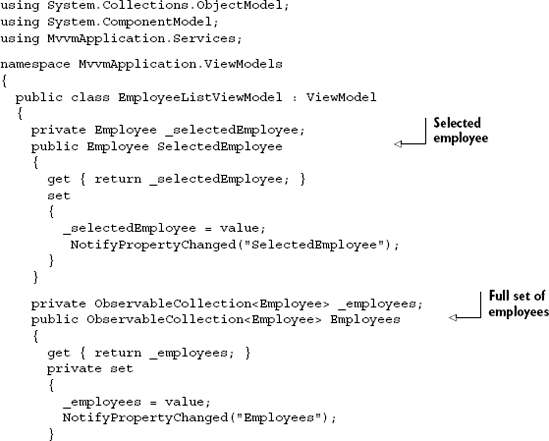
In this listing, you have the full implementation of a basic ViewModel class. This includes all the functionality required to load the list of employees and make it available to the DataGrid on the view.
The Employees property contains the collection with all the employees returned from the service call. This is used to populate the DataGrid but, because it's available here, it could also be manipulated in ViewModel code to sort, filter, or perform other operations.
The SelectedEmployee property is used to keep track of which employee is selected in the grid. Exposing it in your ViewModel keeps the responsibility for maintaining this information away from the UI control. This makes it easier to use different types of controls in the UI. In addition, you can manipulate this property from within the ViewModel (for example, to highlight something based on a search or hotkey), and the UI will automatically respond.
The following code includes the updates to the view to bind the DataGrid to the Employees collection and the SelectedEmployee property:
<sdk:DataGrid AutoGenerateColumns="True"
       ItemsSource="{Binding Employees}"
       SelectedItem="{Binding SelectedEmployee, Mode=TwoWay}"
       Margin="12,55,119,12"
       x:Name="EmployeesGrid" />
The updates to the DataGrid element involved first setting the ItemsSource to the Employees collection on the ViewModel and then binding the SelectedItem to the SelectedEmployee property of the ViewModel. Note that the binding on SelectedEmployee is TwoWay, so both the DataGrid and code may update this value
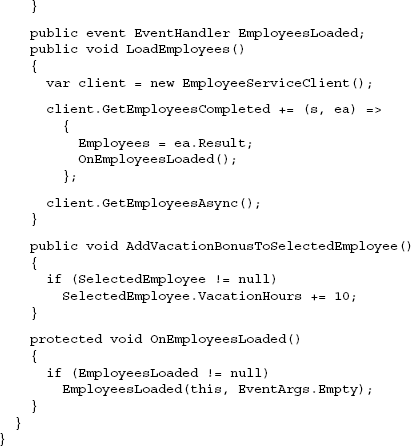
With the addition of the ViewModel and the changes to the XAML, you need to make some changes to the code-behind for the EmployeeList page. Listing 16.19 includes the new code-behind with those changes included.
The OnNavigatedTo function ![]() now includes code to create the ViewModel
now includes code to create the ViewModel ![]() if it's not already present, and to call the
if it's not already present, and to call the LoadEmployees method ![]() on the ViewModel. In addition, the event handler for the Add More Vacation! button now calls directly into the ViewModel to execute the code
on the ViewModel. In addition, the event handler for the Add More Vacation! button now calls directly into the ViewModel to execute the code ![]() .
.
Now you have the same functionality as the code-behind solution, but with quite a bit more code. In fact, you have just as much code-behind as you did in the code-behind-only solution! Keep in mind, this is just the first layer of the onion, so you haven't received all the benefits of MVVM yet. What you have gained is subtle:
The
DataGridis now divorced from the code-behind, using solely binding to get its items and synchronize the selected item. A designer could now change theDataGridto be aListBoxor some other type of control if desired, and the code wouldn't need to change.The data access (service call) is now removed from the page, giving you the potential to substitute a different type of service call without making any changes to the page code. You'll find an even better spot for it later in this chapter.
The business logic to add the vacation bonus to the selected employee is now pulled out of the page. Like the service call, you can do better, and you will later in this chapter.
The code-behind is no longer manipulating the
Employeetype directly. This makes it easier to replace theEmployeetype later, should you want to do so.
At this point, you have a ViewModel that's essentially the code-behind for the View. You've taken your first steps into the MVVM pattern and away from packing all your code in the code-behind. To build on this, it'd be nice if you could refactor to take advantage of some best practices associated with the ViewModel pattern and with coding in general. In the next section, we'll dive deeper into the pattern and show how to factor out common code such as service access and business rules.
The Single Responsibility Principle (SRP) states (surprisingly enough) that every object should have a single responsibility,[2] and that every object should have one and only one reason to change. I don't try to adhere to this as though it were dogma but rather make informed decisions based on this principle representing the perfect state.
SRP can sometimes be difficult to apply to something as façade-like as a ViewModel class, but it's obvious we didn't even try here. The ViewModel class for the list page is responsible for tracking page state, calling the web service to load data, and applying a vacation bonus to selected employees. If the vacation bonus changes, this class must also change. If the service access changes, this class must change. You need to do something about that.
In this section, you'll do a little refactoring to make the ViewModel class a bit lighter and allow reuse of code, starting with the business logic to add the vacation bonus.
The easiest thing to pull out of the EmployeeListViewModel is the code that adds the vacation bonus. You can deal with this several ways—I prefer using a service approach. That is, rather than bake the bonus into a special employee class, you have a service you can call that deals with bonuses using a simple function call. This is distinct from the idea of a web service.
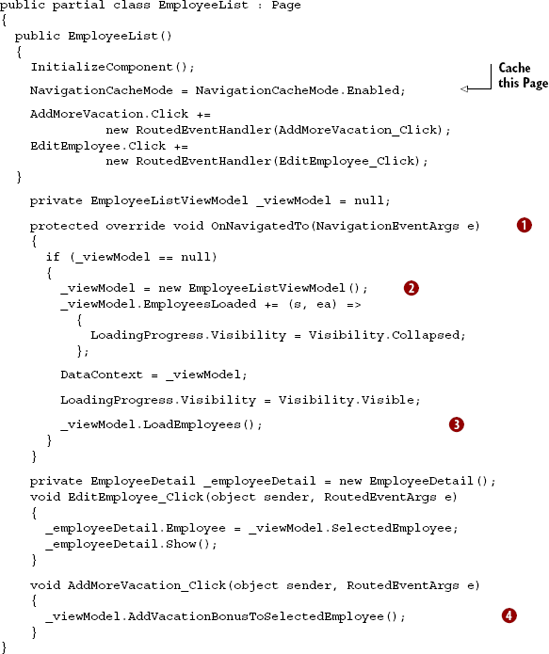
Create a new folder named Services in the Silverlight client. In that folder, add a class named EmployeeVacationBonusService. Listing 16.10 shows the code for this class.
The vacation bonus algorithm has been beefed up. Rather than a blanket 10 hours, you use some of the data to reward those with the longest time at the company. You also implement the functionality using static methods here. Some developers prefer to use instance methods. Either way is fine as long as you understand why you're doing it and what flexibility you lose when going with static methods (such as the ability to mock), and you have some consistency to your decisions.
There are also multiple ways you can model this class. For example, it could modify the class directly as shown here or it could return a bonus amount based on a set of parameters such as current vacation hours, date of hire, some sort of level information, and so on. Taking in individual parameters like that, rather than passing in an Employee object, helps reinforce the SRP and decouple from the rest of the system because the class no longer needs to be changed if the Employee class changes.
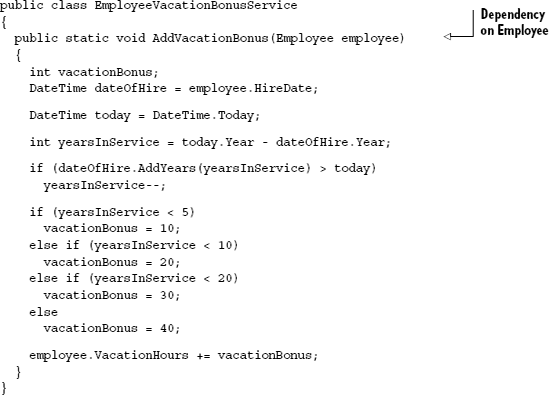
Listing 16.11 shows the final version of this service, taking individual parameters rather than the Employee object.
Example 16.11. A better version of the EmployeeVacationBonusService class
public class EmployeeVacationBonusService
{
  public static int GetVacationBonus(DateTime dateOfHire)
  {
    int vacationBonus;

    DateTime today = DateTime.Today;

    int yearsInService = today.Year - dateOfHire.Year;

    if (dateOfHire.AddYears(yearsInService) > today)
      yearsInService--;

    if (yearsInService < 5)
      vacationBonus = 10;
    else if (yearsInService < 10)
      vacationBonus = 20;
    else if (yearsInService < 20)
      vacationBonus = 30;
    else
      vacationBonus = 40;

    return vacationBonus;
  }
}
In this version, it's the responsibility of the calling code to add the bonus to whatever employee class it happens to be working with. That removes the dependency from this class and makes it reusable in places where you may have different employee entities or perhaps just a few key fields.
With that change made, the EmployeeListViewModel code to add the employee vacation bonus now looks like this:
public void AddVacationBonusToSelectedEmployee()
{
  if (SelectedEmployee != null)
  {
   SelectedEmployee.VacationHours +=
           (short)EmployeeVacationBonusService.GetVacationBonus(
                   SelectedEmployee.HireDate);
  }
}
The EmployeeListViewModel class is no longer responsible for calculating the vacation bonus. That's one extra responsibility down. Now, let's look at that web service logic.
In Silverlight, it's a given that data will come from a web service. Or will it? Who says the data can't come from reading a local file in elevated trust mode, or from isolated storage? Perhaps with the new Elevated Trust mode, one of the pure-.NET SQL databases will be an option. Plus, for all you know, a future version of Silverlight may have local database access built in.
If every ViewModel class in the project is making a web service call to get the data, that means you have to change each and every one of them if anything about the service call changes—obviously, not great design. In a small project like this, it's not a huge problem; but when you get into an application with dozens of pages and View-Models, it gets pretty ugly.
I've seen lots of great examples of how to abstract service or data access calls away from the rest of the application. Some use singleton classes with names like ApplicationData to host a number of collections and load functions, with built-in caching. Others use individual classes, each responsible for a specific type of data. Others use combinations of the two ideas, but with no singleton involved so dependency injection works better. I'm not going to weigh in on the merits of the various approaches; I don't think there's a one-size-fits-all solution. Instead, you'll create a simple example to solve just the problem at hand. The version I'm showing doesn't support cross-view data caching, because you'd need to keep an instance of the data service alive in a locator class or an IoC container.
In the Services folder, add a new class named EmployeeDataService. The code for this class is shown in listing 16.12
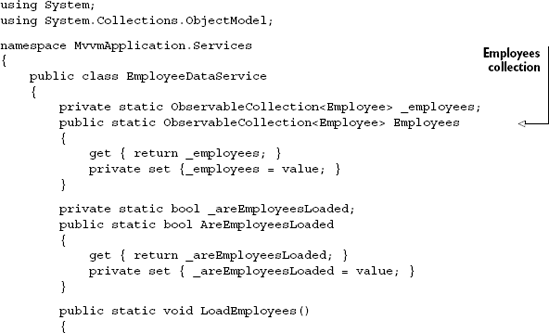
The sole purpose of this class is to provide an interface to the employee data. In this case, that's performed using a service call. In a larger system with more moving parts, you may want to factor this class into two pieces: one that provides connection information for the web service and this class, which makes the service call. You may also consider caching this class on the client (via a locator or similar collection of classes) so the data can be shared across multiple ViewModels. The AreEmployeesLoaded property has been defined with that in mind.
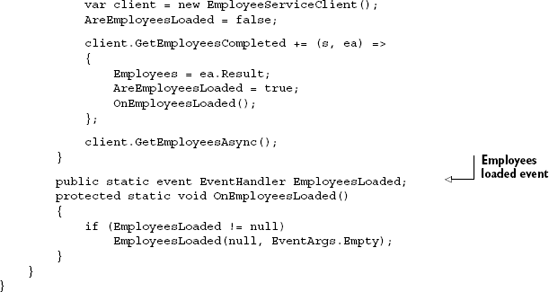
Listing 16.13 shows the changes needed in the EmployeeListViewModel class to support the user of the new EmployeeDataService class.
With this example, you now have a ViewModel class that's responsible only for passing through information and functionality specific to the related View. This makes the code more easily reused, as well as more easily testable. You still have a fair bit of code in the code-behind, though, including some event handlers that could be handled differently. In the next section, you'll work to remove this extra layer and provide better View-to-ViewModel communication without so much event-handler code.
"Good fences make good neighbors." As it turns out, good fences (or perhaps, good chasms)—strong separation between otherwise independent classes—make for better code. You've already seen how pulling code out of the code-behind and into the View-Model, and then out of the ViewModel and into services, has made the code less brittle and more reusable. At the end of this chapter, you'll also see that it has made the code more testable.
One of a few places where you're still tightly coupled is via the use of events and event handlers to intercept clicks from the UI and call functions on the ViewModel. This isn't horrible; it just limits the things that can listen for and respond to the UI actions, and it makes testing a little harder because there's code in the code-behind that must be duplicated in the test.
In this section, we'll look at two ways you can have elements in XAML invoke methods in the ViewModel. The first approach, ICommand, is the traditional way initially introduced in WPF and supported in most MVVM toolkits. The second, the CallMethodAction behavior, is a new approach introduced with Expression Blend 4.
Structured method invocation isn't the only way to separate the UI from the rest of the system. Some slightly more insidious couplings have made it through right under our noses; we'll need to address them. The first is the use of entities coming from your database model. You can do this if you really want, but for a number of reasons to be explained, I don't like to. The second coupling is through the use of concrete types referenced from your various classes. In section 16.4.4, we'll take a conceptual look at what's involved in reducing this coupling.
The commanding system in WPF and Silverlight isn't tied directly to the ViewModel pattern. Instead, it's a generic approach to wiring functionality directly to buttons in XAML UI. In the commanding system, rather than respond to something in a button click event, you bind the command to the button and allow the button to execute it directly.
In WPF, this approach was first used for application-wide commands and to allow menu options, keystrokes, and toolbars to all execute the same functionality and keep their UI state in sync.
When the MVVM pattern was introduced, the commanding system was incorporated into it to wire the XAML UI to the ViewModel class. But because the ViewModel held the functionality, different types of commands were created to allow forwarding or relaying the call to the ViewModel.
The ICommand interface is the core of the commanding system in Silverlight. The button-derived controls (and menus) that support binding to commands do so through the ICommand interface. Similarly, the custom commands created for the MVVM pattern also implement this interface. Table 16.2 shows the three members of ICommand.
Table 16.2. The ICommand interface members
Member | Description |
|---|---|
| Property that returns true if this command is allowed to execute. For example, if the command is an undo command, this returns |
| Method that executes the function the command represents. |
| Event raised when the value of |
A commonly used implementation of ICommand for the MVVM pattern is a command that accepts delegates for both the Execute and CanExecute members. This allows you to reuse the same command implementation rather than create unique commands for every logical command.
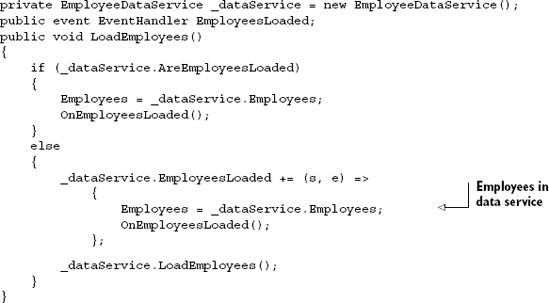
In the Silverlight project, in the ViewModels folder, add a new class named ViewModelCommand. The code for the generic command is shown in listing 16.14.
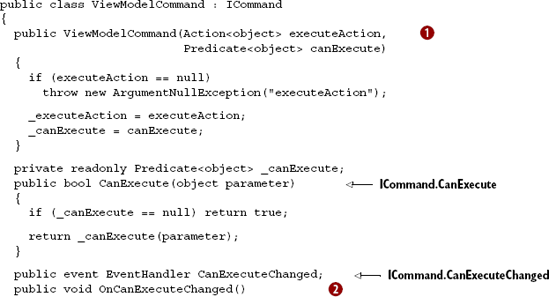
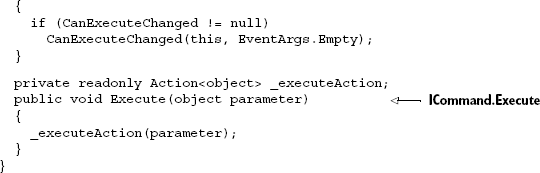
This command implementation atakes in delegates ![]() for
for CanExecute and Execute and exposes a public method OnCanExecuteChanged ![]() to force raising the
to force raising the CanExecuteChanged event. In the ViewModel, any code that affects the CanExecute function should call this method to raise the event.
There are lots of implementations of this type of command. If you pick an MVVM toolkit to work with, you're almost guaranteed to have a command similar to this one included in the library. It may be called something similar to DelegateCommand or RelayCommand.
To surface the command to the page, hang it off the ViewModel as a public property. Listing 16.15 shows how to do this for the vacation bonus functionality on the EmployeeListViewModel class.
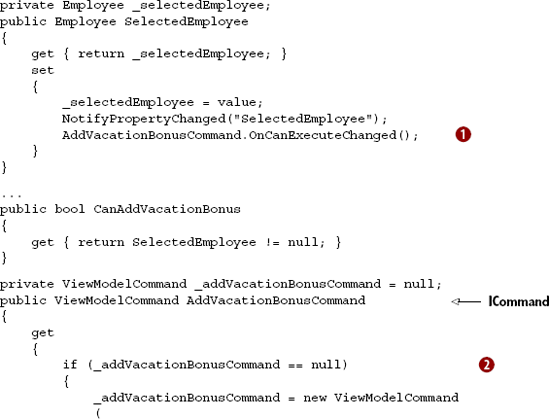
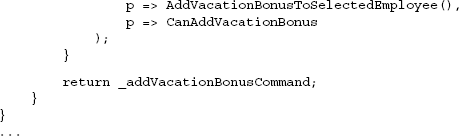
These changes to the ViewModel show both the call to OnCanExecuteChanged ![]() and the exposing of the
and the exposing of the AddVacationBonusCommand. This command is created as needed ![]() the first time it's referenced. I've also seen implementations where these commands were created as static members in the class.
the first time it's referenced. I've also seen implementations where these commands were created as static members in the class.
The command is then wired up to the UI directly in the XAML. Because the View-Model has already been set as the data context, a simple binding statement on the button is all you need:
<Button Height="23" Width="101" Margin="0,55,12,0"
        HorizontalAlignment="Right" VerticalAlignment="Top"
        Content="More Vacation!"
        x:Name="AddMoreVacation"
        Command="{Binding AddVacationBonusCommand}" />
The last line of XAML is the new line, binding the Command property to the new command you added to the ViewModel. Don't forget to remove the event handler wireup from the code-behind. This button no longer needs that.
You'll notice now that the More Vacation! button is disabled by default and enabled only when you select a row in the DataGrid. That's a function of the CanExecute property and the CanExecuteChanged event working together and being updated from within the SelectedEmployee property setter. The Button class has built-in code to change its enabled state based on the command's CanExecute property.
Commands are the traditional and still most common way of performing this functionality. They have deep support in WPF and decent support in Silverlight. A new approach to accomplishing this has recently been introduced by the Expression Blend team. This approach eschews commands and instead uses designer-friendly behaviors.
Introduced with Expression Blend 4, the CallMethodAction behavior provides an easy and designer-friendly way to wire any event from any control to a method. In some ways, it's an alternative to using ICommand and may even seem redundant. But many applications will use both approaches due to the usefulness of ICommand with buttons and menus and CallMethodAction's support for other controls, and events other than Click.
You can either install Expression Blend 4 or download the Blend 4 SDK. In either case, add a project reference to the Blend SDK assembly from your main MvvmApplication project. The main assembly you want is Microsoft. Expression. Interactions.dll. You'll also need System.Windows.Interactivity.dll to support that.
The behavior approach doesn't give you everything the command approach does—specifically, it lacks the ability to enable or disable the button—but it provides support for controls other than buttons—a key limitation of the command approach.
Listing 16.16 shows how to use the CallMethodAction behavior to create the link between the More Vacation! button and the ViewModel method that implements that behavior.
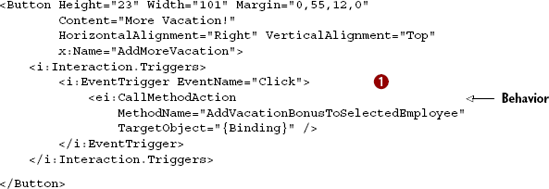
The EventTrigger ![]() responds to the firing of the click event. The action taken is the
responds to the firing of the click event. The action taken is the CallMethodAction, which is responsible for calling the method on the current object in the data context: in this case, the ViewModel. It's a simple and elegant solution that works with just about any event and any parameterless function.
In support of this, the following two namespaces were added to the top of the XAML file:
xmlns:i="http://schemas.microsoft.com/expression/2010/interactivity"
xmlns:ei="http://schemas.microsoft.com/expression/2010/interactions"
Those namespaces are required for the EventTrigger and CallMethodAction to be visible to XAML. Both are implemented inside the Blend SDK DLL you added as a reference.
Despite the limitations (a potential performance hit due to use of reflection, and the inability to set the IsEnabled property automatically), the CallMethodAction behavior is a good low-code-overhead approach to wiring up method calls. And remember, unlike ICommand, the CallMethodAction is supported on just about any event on any control.
Commands and behaviors are a great way to help separate the View from the View-Model, keeping the contract at just a binding statement or name of a method. But they've done nothing to fix the tight coupling problem you have between the database, the ViewModel, and the UI. For that, you'll turn to creating View-specific entities or ViewModels.
So far, you've been passing the data entities straight through to the user interface. Although this is common, it's often not a great idea; you've introduced coupling from your UI all the way back to the database. A change to the database entity now means changes throughout the application. Take, for example, the columns you see in the grid. There's a fair bit of information that's not helpful at the UI level but that's required to maintain data integrity. One way to handle that would be to ignore it at the UI layer by defining columns directly in the DataGrid. Another way would be to have the web service return a purpose-built entity with only the columns you want.
Neither of those solutions is helpful from a reuse standpoint. In many systems, different screens show different aspects of what could be the same entity. Others, such as this example, have to compose two data entities into a single displayable result. Working with entities shaped like that can be a pain. Returning only a subset of the information back from the web service may help, but only if no other information is required for a successful update and no other areas of the system need the remaining information.
One way to deal with situations like this is to create per-View entities. The View-Model surfaces a collection of these View-specific entities, doing the shaping behind the scenes. This way, the designer of the View need not be concerned with composing entities, combining fields such as first and last name, and more.
In the MVVM pattern, those entities are frequently promoted up as ViewModels themselves. If you consider that the definition of a ViewModel includes both the data and the functionality required for a View, this makes sense. Consider that these View-Models can provide the functionality for calling the vacation bonus service and can then be reused in the detail pop-up, and you can quickly see how these entity-like ViewModel classes can be helpful.
For this example, you'll update the application to use new EmployeeViewModel classes in all the client-side places that once used the Employee data entity. First, listing 16.17 shows the new EmployeeViewModel class. Add it as a new class in your View-Model folder.
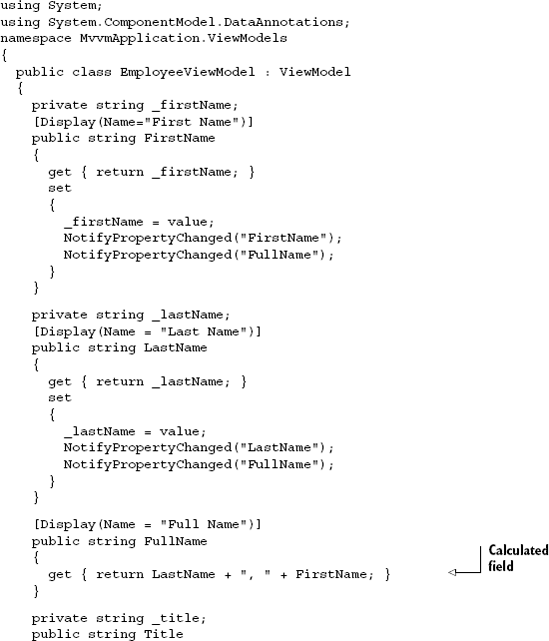
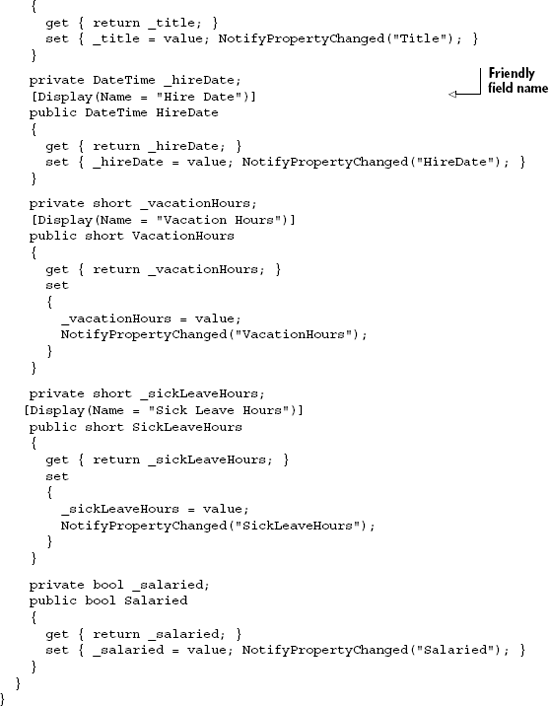
Note that this class looks like most entity classes. There's a calculated field for the FullName, as well as direct exposure of each of the other properties of interest in the employee data class. You use Display annotations from System.ComponentModel.DataAnnotations to make the DataGrid show friendly column names for these properties. Annotating for display was discussed in chapter 12. You could also include validation annotations from chapter 13, but that's unnecessary for this example.
Whether you consider this class to be a ViewModel depends on how you'll use it. If you add functionality to call services, for example, it becomes more clear-cut in most people's eyes that this is a real ViewModel. For me, ViewModel or entity isn't a huge issue, as long as you follow the separation of concerns you've been working toward throughout this chapter.
The EmployeeListViewModel class also needs to change to support the new EmployeeViewModel class. Listing 16.18 shows the changed properties and methods of the EmployeeListViewModel class. Note that the other properties and methods, including the AddVacationBonusToSelectedEmployee method, the OnEmployeesLoaded method, the CanAddVacationBonus property, and the AddVacationBonus command property, all stay the same.
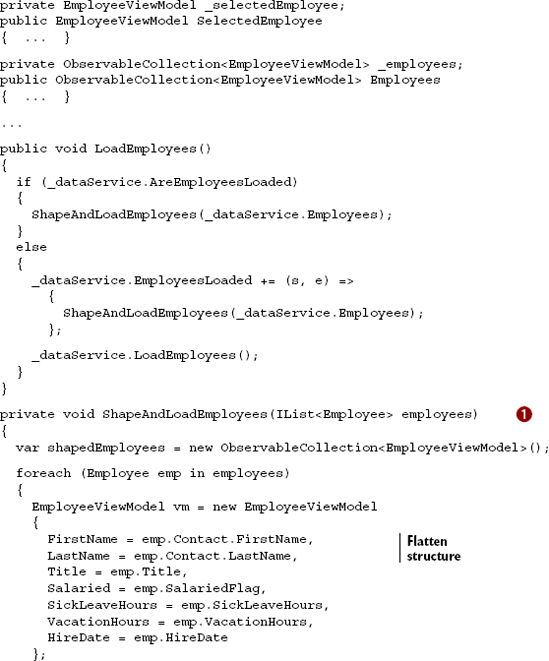
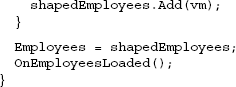
The largest change in this class is the LoadEmployees method. You add a bit of data shaping and flatten the two-class Employee/Contact combination into a single EmployeeViewModel class with only a few properties. The majority of this work is done in the ShapeAndLoadEmployees method ![]() . It iterates through the employees in the data service and builds out the ViewModel classes, assigns the collection to the
. It iterates through the employees in the data service and builds out the ViewModel classes, assigns the collection to the Employees property, and then raises the data-loaded event.
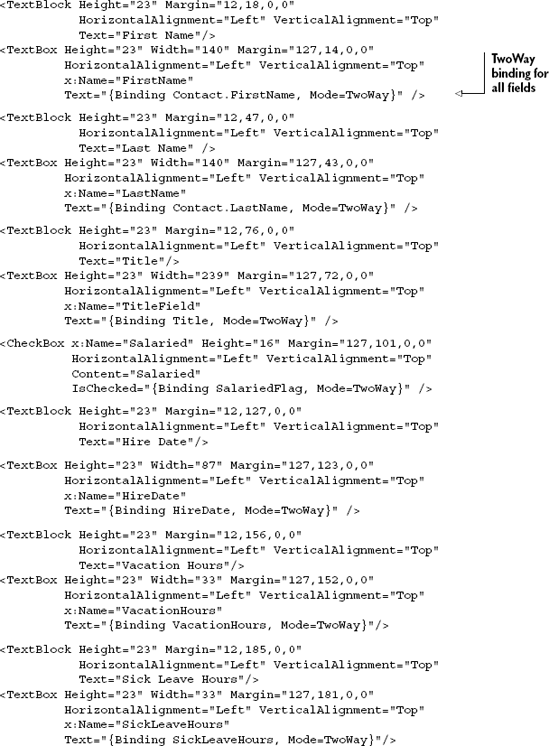
The last place affected by this change is the EmployeeDetail ChildWindow. Listing 16.19 shows the changes to the two TextBox instances and one CheckBox instance in the EmployeeDetail pop-up XAML.
Example 16.19. Changes to EmployeeDetail.xaml
<TextBox Height="23" Width="140" Margin="127,14,0,0"
         HorizontalAlignment="Left" VerticalAlignment="Top"
         x:Name="FirstName"
         Text="{Binding FirstName, Mode=TwoWay}" />
...
<TextBox Height="23" Width="140" Margin="127,43,0,0"
         HorizontalAlignment="Left" VerticalAlignment="Top"
         x:Name="LastName"
         Text="{Binding LastName, Mode=TwoWay}" />
...
<CheckBox x:Name="Salaried" Height="16" Margin="127,101,0,0"
          HorizontalAlignment="Left" VerticalAlignment="Top"
          Content="Salaried"
          IsChecked="{Binding Salaried, Mode=TwoWay}" />
The only changes required here are the binding statements, due to the different property names and property paths for the new simplified class. Contact.FirstName becomes FirstName, Contact.LastName becomes LastName, and SalariedFlag becomes Salaried. The code-behind requires even fewer changes—just the Employee property, in this case:
private EmployeeViewModel _employee;
public EmployeeViewModel Employee
{
  get { return _employee; }
  set { _employee = value; DataContext = _employee; }
}
The EmployeeList.xaml and related code-behind require no changes. With all the other changes in place, run the application. The first thing you'll notice is the reduced column count in the DataGrid, as well as the friendly column headers. Figure 16.7 shows the newly refactored application. There's also the calculated Full Name field, which was unavailable in the entity data model.
So far, all the changes you've made have improved the separation of concerns in the application and have helped its overall structure. But although you may have eliminated onerous coupling, such as that between the UI and the database, each of the classes are still tightly coupled to each other. For example, the View is tightly coupled to a ViewModel, using a new statement in the code-behind to create it. Similarly, that EmployeeListViewModel is tightly coupled to the EmployeeDataService and the EmployeeVacationBonusService.
At first glance, you may think "So?" and I wouldn't blame you. This is definitely one area where the benefits are highly proportional to the size of the system and the amount of code churn. If you have a highly active development project or a really large system, you'll want to pay extra attention.
By implementing ViewModels and services as interfaces, you can allow them to be swapped in and out with alternative implementations. This can be useful when you're developing and don't yet have the real data store, when you're designing the UI and don't want the designer to have to have the full development environment, and when you're testing where you may want to substitute scenario-driven classes and data that will return specific results each time.
Inversion of Control (IoC) enables developers to design the system in such a way that they don't new up (directly create) any objects of consequence in their code. Instead, they ask an IoC container to resolve for an object of a given type. The IoC container can make a number of decisions based on the request—returning a test version or a production version, for example. The IoC container can also serve up a single shared class instance, effectively a singleton without the singleton plumbing.
Some developers use interface-based development and IoC for everything because they've mastered its use and have found it to speed up their work. I'm not one of those developers, but I can certainly appreciate where mastery of this pattern can allow effective use across projects regardless of size or complexity.
Another interesting concept is that of the ViewModel locator. Often, ViewModel locators are themselves implemented using IoC.
Closely related to IoC is the idea of a ViewModel locator. A ViewModel locator is a service that can supply a ViewModel instance to a View. That instance may be internally cached, hard-coded, or delivered via IoC. I've even seen some interesting implementations that use the Managed Extensibility Framework (MEF).
An extremely simple ViewModel locator that keys off the view name may look something like listing 16.20. Create the ViewModelLocator class in the ViewModels folder.
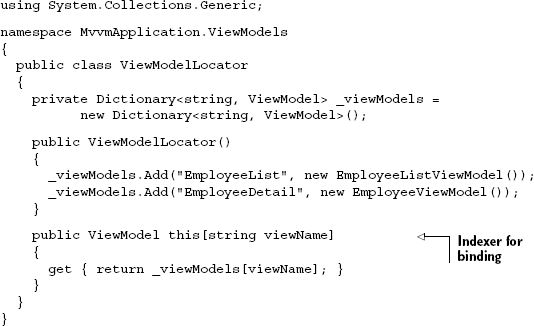
In practice, a real locator would have a much more robust mechanism for discovering and adding ViewModel instances to its internal list. In this example, they're all hard-coded, and you don't allow for more than one instance of any specific type. Additionally, the only usable one is the EmployeeListViewModel, because the EmployeeDetail would need instancing.
The ViewModel locator is surfaced as a resource to be used in binding. The resource itself would be defined in a resource dictionary merged into App.xaml in order to have applicationwide scope. Listing 16.21 shows an updated App.xaml with this resource included and a new Resources.xaml file in the Assets folder.
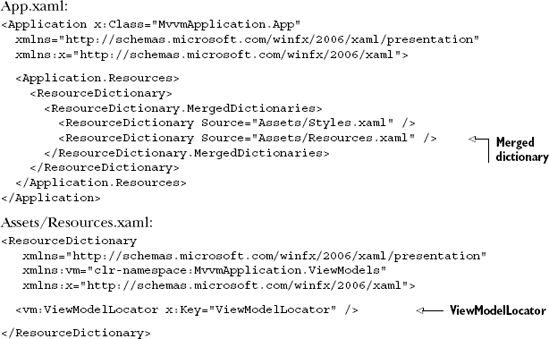
To use this locator, you eliminate the ViewModel creation from the code-behind and bind to this resource. In the EmployeeList.xaml file, this is as easy as adding the following line to the navigation:Page element.
That bit sets the DataContext of the page to the value returned from the calling the ViewModelLocator's indexer function, passing in the string EmployeeList.
You then change the EmployeeList code-behind so the OnNavigatedTo event uses the ViewModel provided by the locator rather than one created in the code-behind. Listing 16.22 shows the updated OnNavigatedTo method.
Example 16.22. Updated OnNavigatedTo method in EmployeeList code-behind
private EmployeeListViewModel _viewModel = null;

protected override void OnNavigatedTo(NavigationEventArgs e)
{
  _viewModel = DataContext as EmployeeListViewModel;
  _viewModel.EmployeesLoaded += (s, ea) =>
    {
      LoadingProgress.Visibility = Visibility.Collapsed;
    };

  LoadingProgress.Visibility = Visibility.Visible;

  _viewModel.LoadEmployees();
}
Note that this is one place where an interface makes good sense: have the locator return a class that implements the interface, and have the code in the code-behind aware only of that interface, not of the concrete class itself. After all, if you're going to go through the effort to dynamically resolve the ViewModel, it makes little sense to work with concrete types that could be instantiated.
A larger discussion around these topics, especially interface-based development and IoC, would take more room that I have in this chapter, but I did want to make you aware of them because they're often used with the ViewModel pattern. Many MVVM toolkits include support for interface-based design as well as various types of locators. When evaluating those toolkits, you'll now know how they're used.
Commands and behaviors help decouple the user interface from the code that supports it. Rather than having concrete compile-time hooks into various other classes in the system, the hooks are more dynamic and resolved via binding or even string lookup at runtime. One of the more egregious couplings in the system was the entity data-model types permeating all layers, effectively tying the entire application to the database schema. Fixing that by introducing the entity-type ViewModel goes a long way toward freeing the front end from the back end. Finally, the use of interfaces, ViewModel locators, and patterns such as Inversion of Control take the decoupling to a higher level, making the application as a whole more resilient to change and easier to maintain. In addition, this loose coupling makes it easier to break these pieces apart, especially for testing
In the next section, we'll cover how to test Silverlight applications, specifically those that have been designed with the principles in this chapter taken to heart.
Testing is a heavily overloaded word. For some people, it's a way to spec out a system, using tests as the drivers and documentation. For others, it means running through a few verification steps as part of a build process. For still others, it's a project manager banging away at a keyboard and "trying to break the system."
Each of those definitions has tools that best support it. Many great unit-testing, test-driven development, and keyboard-jockey testing tools are available out there, both free and open source as well as commercial.
For this section, I'll focus on unit testing of Silverlight functionality, using the free Silverlight Unit Testing Framework. You'll first try a few tests that have nothing to do with your application. Then, because it must be broken apart to support testing, you'll refactor the application into two projects. When the refactoring is complete, you'll try three simple tests to exercise synchronous logic through the ViewModel class. The final test will be an asynchronous data-loading test, used to verify that the employees are being correctly downloaded from the server.
The Silverlight Unit Testing Framework consists of a test runner and test metadata developed as part of the Silverlight toolkit. To use the Silverlight Unit Testing Framework, you'll need to install the Silverlight Toolkit. If you don't already have it installed, you can grab the latest version from http://silverlight.codeplex.com.
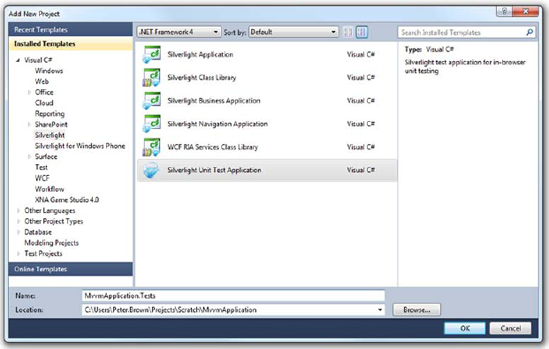
Figure 16.8. Adding a new Silverlight Unit Test Application to the solution. I named the project MvvmApplication.Tests, but the name isn't important.
When you have the bits installed, you'll get a new template in Visual Studio. Continuing with the same solution you've been working with for this chapter, add a new Silverlight Unit Test Application project. I named mine MvvmApplication.Tests. Figure 16.8 shows the Add New Project dialog with the correct options selected.
The project template automatically includes a single default test. You'll replace that with three simple tests that show how to use the Assert object and its functions. Listing 16.23 shows the three tests in place in the default Tests class.
Example 16.23. Simple tests
namespace MvvmApplication.Tests
{
[TestClass]
public class Tests
{
[TestMethod]
public void TestToMakeSureTrueIsActuallyTrue()
{
Assert.IsTrue(true);
}
[TestMethod]
public void TestToMakeSureTheListObjectIsNotNull()
{
List<int> l = new List<int>();
Assert.IsNotNull(l);
}
[TestMethod]
public void ThisTestShouldFail()
{
Assert.IsTrue(false);
}
}
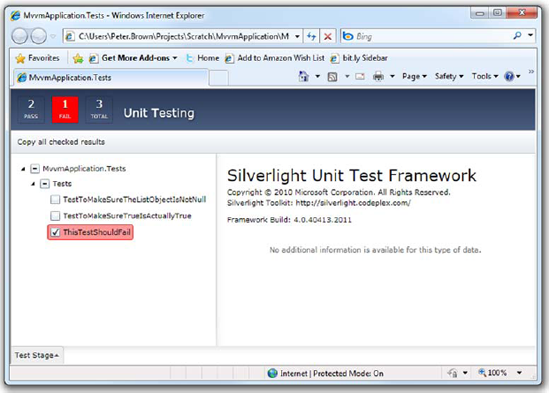
}The tests include two that should pass without any issue and one that should fail 100% of the time. Set the automatically added test .aspx file in the web project to the start page, and run (run; don't start in debug mode unless you want to break on the exception). When you do, it'll look something like figure 16.9.
Simple tests are... simple. They help you understand how the test system works, but they're not doing anything useful for you yet. You want to test functionality in the application itself. To do that, you'll need to put all the testable stuff into one or more class libraries. To keep things simple, you'll move everything but the views into a single core project.
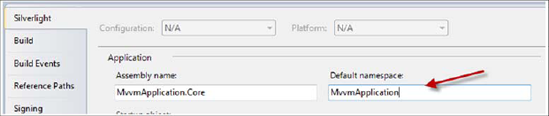
Create a Silverlight Class Library named MvvmApplication.Core. Then, go into its project properties and set the default namespace to be MvvmApplication, as shown in figure 16.10.
Setting the namespace will allow you to keep everything the same as it was in the main Silverlight application.
Next, create a Services folder and a ViewModels folder in the new class library project. Drag the contents of those folders from the old project to the new, and then remove the folders and their contents from the old project.
The next step is to swap the service reference over to the new project. In the MvvmApplication. Core project, right-click, and choose Add Service Reference. Pick the web service in the web project, and set the namespace to Services as you did in the original project. Then, delete the service reference from the original Silverlight project.
Before you do any in-code/markup cleanup, you need to add a project reference from the main application to the core application. Right-click the MvvmApplication project, choose Add Reference, and select the MvvmApplication.Core project.
Do a build, and clean up the errors. You'll need to add a reference to System.ComponentModel. DataAnnotations in the core project. When that's done, you'll need to crack open the Resources.xaml file and change the vm prefix to point to
The last step is to delete the old ServiceReferences.ClientConfig from the MvvmApplication Silverlight project and then add the one from core as a reference. When you've deleted the old file, right-click the MvvmApplication project and choose Add > Existing Item. Navigate to the core project, and select the ServiceReferences.ClientConfig file. Click the drop-down arrow on the Add button, and select the option to add as a link, as shown in figure 16.11.
If you do this correctly, you'll now see the ServiceReferences.ClientConfig file in the main MvvmApplication project. Its icon will have the standard shortcut arrow overlay, which indicates it's a link. The build action should be automatically set to Content.
The last step is to add a project reference from the MvvmApplication.Tests project to the MvvmApplication.Core project. Right-click the MvvmApplication.Tests project, select Add Reference, and select the MvvmApplication.Core project.
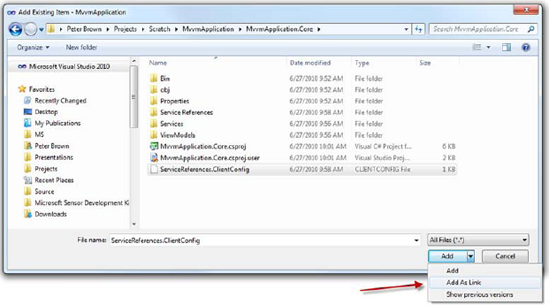
Figure 16.11. Add the ServiceReferences.ClientConfig file from the core project to the main project using the Add As Link option.
When you've completed all these steps, set the application test page in the web project as the start page, and run the solution. Make sure the Silverlight app is running and working as it did before. If everything is good, you're ready to move on to doing some real testing.
In a well-architected MVVM application, testing the ViewModel covers the majority of the scenarios you'd normally test through UI automation. The more value converters or UI magic in use, the less meaningful the ViewModel test becomes. I don't want to scare you away from using awesome things such as value converters or validation annotations, but it's something you need to keep in mind when you're testing.
Caveats aside, testing the ViewModel will give you a pretty high level of confidence that the majority of the system is working as designed, so let's start there. In the test project, remove the test class you created earlier. Add a new Silverlight Test Class file to the MvvmApplication.Tests project, and name it EmployeeListViewModelTests. Listing 16.24 shows your first two tests.


The first test tests the utility of the SelectedEmployee property. It checks to see that when you assign an object to the property, the object can be retrieved. The second test exercises the vacation bonus logic. Note that this test doesn't have 100 percent coverage for the full domain of hire dates and vacation hours; to do that, every value from zero through some reasonable upper bound would need to be tested.
Both of these tests cover synchronous functionality only—you do something and hang around until the result comes back. If you want to test anything network-related in Silverlight, you need to use an asynchronous test.
Testing asynchronous operations takes a little extra work. You'll need a different test base class and the asynchronous methods it exposes. Listing 16.25 shows an asynchronous call test against the EmployeeDataService class.
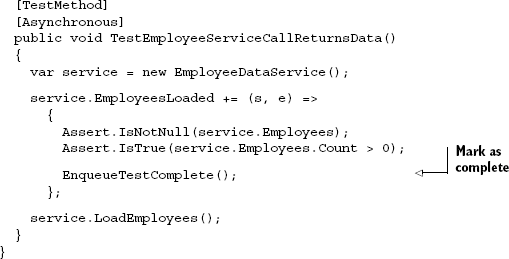
This example shows the test class inherited from the SilverlightTest base class. This immediately makes your class fall outside of code compatibility with the full Visual Studio testing framework. That's a concern only if you want to share your tests with full .NET projects, or if you have plans to migrate them to another testing platform in the future.
The SilverlightTest base class supplies the critical EnqueueTestComplete method. That method tells the test framework that the method is complete, and the framework can release it from the holding pattern created by the [Asynchronous] attribute.
Before running the test, there's one more step. Just as you did when breaking the original Silverlight project in two, you need to add the ServiceReferences.ClientConfig file to the MvvmApplication.Tests project, as a link. That file is generated by the project that has the service reference, but it must be located by the project that is the main entry point of execution.
The Silverlight Unit Testing Framework is a capable test framework for Silverlight. When it first came out, there were no other supported Silverlight testing frameworks. Now you have several choices.
The Silverlight Unit Testing Framework has some trade-offs, such as not being integrated with any build processes and requiring a run to see the results rather than keeping an open window or a docked pane in the IDE. You'll need to evaluate those for your own projects and stack up the framework against other robust unit-testing frameworks.
When you structure your application using MVVM principles and good coding and architecture practices, it makes your applications much easier to test. It's important to test. It's important to unit-test functionality and to keep those tests up to date. It's beneficial to use tests to drive functionality using a TDD-derived approach. If there were no way to test Silverlight code, you definitely wouldn't be in your happy place. I hope the simplicity of the Silverlight Unit Testing Framework will help you integrate testing into your own application development cycle.
When you get into developing applications of complexity beyond basic samples, your code can get pretty ugly quickly if you don't follow a good architectural pattern such as MVVM. In this chapter, we've moved from a basic-but-common code-behind solution to a decent MVVM implementation. To take it to the next level, you'll want to incorporate an MVVM toolkit and use the facilities built into that.
MVVM, or the ViewModel pattern, isn't scary when you peel the onion back layer by layer, refactoring between each and incorporating features as you understand them. Silverlight includes support for behaviors and commands to help separate the UI from the functions the UI calls. The patterns you follow will help you reuse code between different ViewModels or between different parts of the system.
When you have an application with decent separation of concerns between components and layers, you open up the ability to easily test the components. The Silverlight Unit Testing Framework is a nice in-box (well, in-toolkit) solution for unit-testing Silverlight applications. It's not the only game in town, but it's certainly a decent player.
While we're looking at what it takes to build real systems, we'll turn to WCF RIA Services in the next chapter.