
If you ask most non-Silverlight developers what Silverlight is, 8 out of 10 will probably say it's Microsoft's web media player. Part of that reputation comes from Silverlight 1.0, which was only good as a media player. The other part comes from the incredible advances the Silverlight team has made in making Silverlight a first class media platform for the web.
Silverlight excels at delivering high-quality HD media. In fact, it was one of the first web technologies to support true 720p and 1080p HD media over decent but not abnormal network pipes. Silverlight has been the driving media force behind Netflix, as well as many online events such as the Olympics and March Madness. Media is what has helped Silverlight expand onto the majority of internet-connected desktops.
Allowing your users to experience digital media in a meaningful and personal manner can be challenging and exciting. Throughout this chapter, you'll learn how to use items from within the System.Windows.Controls namespace to help accomplish this. You'll first see the flexible MediaElement control. Then, you'll learn how to manage the media experience through the use of playlists and interactive playback. From there, you'll learn about accessing protected content, an essential feature for large content publishers such as Netflix. We'll also learn about creating raw video and audio using the MediaStreamSource API. We'll wrap up this chapter with an examination of the webcam and microphone API introduced with Silverlight 4.
Integrating media into a Silverlight application is incredibly simple. To include a rich media experience, you employ a MediaElement object. This general-purpose object empowers you to deliver rich audio and video content. For a user to enjoy this high-fidelity content, though, the media item must first be loaded and configured.
Throughout the course of this section, you'll learn how to load and configure audio and video content. This section will begin with an in-depth discussion about the MediaElement's Source property. From there, you'll see the properties that you can use to configure both audio and video items. Next, you'll see the items directly related to audio content. We'll then shift toward a focus on video content. This section will conclude with an explanation of the lifecycle of a media file within a MediaElement.
The Source property of the MediaElement specifies the location of the audio or video file to play. This file can be referenced by using either a relative or absolute URL. If you have a video file called video.wmv in a subdirectory called Media within your web application, you could use it by setting the Source property to Media/video.wmv. This example shows a MediaElement that uses a relative media file:
<Grid x:Name="LayoutRoot" Background="White">
  <MediaElement x:Name="myMediaElement" Source="Media/video.wmv" />
</Grid>
This shows a video that belongs to the same web application as the Silverlight application. Note the use of the forward slash (/) in the Source property. This property allows you to use forward slashes, but not backslashes (). In addition, the Source property also has support for cross-domain URIs.
Cross-domain URIs allow you to specify an absolute path to a media file. This feature gives you the flexibility to use a media asset stored on another server. If you choose to use this approach, it's important to gain permission to use the file before doing so. You do have our permission to reference the video shown here:
<Grid x:Name="LayoutRoot">
  <MediaElement x:Name="myMediaElement"
            Source="http://www.silverlightinaction.com/video2.wmv" />
</Grid>
This example shows a video, which doesn't include sound, being accessed from a remote server. When accessing content from a remote server, you must use one of the three acceptable protocols. Silverlight supports the HTTP, HTTPS, and MMS protocols. In addition, the Source property expects certain formats.
Have you ever wanted a snack or soda and accidently put foreign currency in your local vending machine? Or, have you ever accidently put a DVD into a CD player? What happened? Most likely, either nothing happened or some type of error was displayed. These scenarios show that devices are created with specific formats in mind. Likewise, the MediaElement expects certain formats.
The MediaElement supports a powerful array of audio and video formats that empower you to deliver high-quality media experiences over the internet. The accepted audio formats ensure a truly high-fidelity aural experience. At the same time, the supported video formats ensure a viewing experience that can scale from mobile devices all the way up to high-definition displays. Table 20.1 shows the formats supported by the MediaElement.
Table 20.1. Media containers and codecs supported by Silverlight
Container | Codec |
|---|---|
Windows Media | Windows Media Audio 7, 8, 9 (WMA Standard) Windows Media Audio 9, 10 (WMA Professional) WMV1 (Windows Media Video 7) WMV2 (Windows Media Video 8) WMV3 (Windows Media Video 9) |
MP4 | H.264 (ITU-T H.264 / ISO MPEG-4 AVC), AAC-LC |
MP3 | ISO MPEG-1 Layer III (MP3) |
By targeting these media formats, the Silverlight runtime can be a self-contained environment for media experiences. Once your users install the Silverlight runtime, they can run all the supported media formats without having to download and install additional codecs.
The format for media is important, but the delivery method is equally so. Table 20.2 lists the delivery methods Silverlight recognizes for audio and video.
Table 20.2. Supported media delivery methods
Delivery method | Supported containers |
|---|---|
Progressive download | Windows Media, MP4, MP3, ASX |
Windows Media Streaming over HTTP | Windows Media Server-Side Play List (SSPL) |
Smooth Streaming | fMP4 |
ASX | Windows Media, MP4, ASX |
MP4 | |
Server-side playlist | Windows Media |
| Any container, as long as you write a parser for it |
In addition to the progressive download formats, table 20.2 shows two different streaming methods: Smooth Streaming and Windows Media Streaming over HTTP.
Smooth Streaming is an HTTP-based multiple bit rate (MBR) adaptive media streaming service implemented on Internet Information Server (IIS) on Windows servers. Smooth Streaming dynamically detects client bandwidth and CPU usage and adapts to conditions in close to real-time. Smooth Streaming provides:
Automatic adaptation to CPU constraints
Automatic adaptation to bandwidth constraints
Simplified caching and support for content delivery networks (CDN)
For example, if you're watching an HD video on your client and suddenly you start a CPU-intensive process such as a large compile, rather than drop frames, Smooth Streaming detects the condition and lowers the quality of the video (lowers the bit rate, which typically means a lower resolution) so your viewing sessions continues uninterrupted.
Similarly, if you're watching an HD video and someone in your house starts a large download, effectively taking up a large portion of your internet bandwidth, Smooth Streaming will adapt to that as well, lowering the bit rate to fit into the available bandwidth.
Finally, Smooth Streaming supports simplified caching of content, as the individual chunks are individual files, easily cached using standard HTTP file caching mechanisms. The caches need not know anything about media formats; the bits are just files. For the same reasons, proxies work just as well, requiring no special open ports or knowledge of the formats.
Smooth Streaming delivers small content fragments (about two to four seconds worth of video) to the client, and verifies (with the help of Silverlight) that the content all arrived on time and played at the expected quality level. If a fragment doesn't meet these requirements due to bandwidth or processor restrictions, the next fragment will be delivered at a lower quality level. If the conditions were favorable, the next fragment will be delivered at the same or higher quality level.
Similarly, if the video is available in 1080p HD, but the user is watching it on a display at 720p resolution, Smooth Streaming will send down only the 720p size chunks, saving bandwidth and processing time.
On the server, this requires that the videos be encoded to several different formats. IIS Smooth Streaming keeps all the chunks for a given format in a single MP4 file, but delivers the chunks as individual logical files. This makes server file management (and file access) easier, while still providing for caching of chunks by local proxies and downstream servers. Smooth Streaming files have the extension .ismv for video plus audio, and .isma for audio-only. Figure 20.1 shows the structure of the Smooth Streaming file on the server.
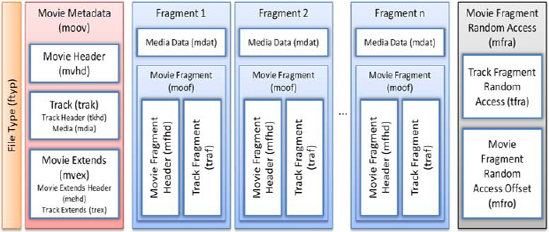
The file includes a file type header to let us know this is the smooth streaming file. Next, it includes Movie Metadata (moov) that describes what the file contains. Following that are the individual two-second fragments for the entire movie. Each fragment contains header information for the fragment, as well as the fragment bits themselves. The file closes with an "mfra" index that allows for easy and accurate seeking within the file.[1]
In addition to the media file described here, Smooth Streaming also uses a .ism manifest file for the server, which describes the relationships between the different server files, and a .ismc client manifest file, describing the available streams, codecs, bit rates, markets, and so on. This .ismc file is what's first delivered to the client when the video is requested.
An online example of Smooth Streaming with IIS and Silverlight may be seen on the IIS Smooth Streaming site here: http://www.iis.net/media/experiencesmoothstreaming. Other examples of Smooth Streaming through a CDN may be seen at http://www.smoothhd.com.
To encode video for use with Smooth Streaming, you use Microsoft Expression Encoder. Once the videos are encoded, you can use the Expression Encoder Smooth Streaming template to serve as the start of your video player, or you can use the Silverlight Media Framework, covered in section 20.5.
The Silverlight Media Framework (SMF) is the easiest way to incorporate Smooth Streaming into your application. Before we cover that, let's look at other forms of streaming and downloading available to us.
Though now generally out of favor due to the introduction of Smooth Streaming, Silverlight still supports streaming media content over HTTP through server-side play lists and the MMS protocol. The MMS protocol was built for sending many short messages to a client, and uses a URI that begins with mms:// instead of http:// or https://. When a media file is streamed through this protocol, your Silverlight application maintains an open connection with the hosting server. This has two advantages. It enables you to jump to any point in time within a media file, and streaming usually provides a more cost-effective approach for delivering audio and video content because only the requested content is downloaded, plus a little extra. This content is configurable through the BufferingTime property.
Tip
When evaluating media streaming options for HD content, lean toward IIS Smooth Streaming over Windows Media Streaming. IIS Smooth Streaming is better optimized to provide a great user experience with high bit rate content, such as HD video.
The BufferingTime property enables you to view or specify how much of a buffer should be downloaded. By default, this TimeSpan value is set to buffer 5 seconds worth of content. If you're streaming a 1-minute video, the video won't begin playing until at least 5 seconds of it has been retrieved. While this retrieval is occurring, the Current-State property of the MediaElement (which we'll discuss shortly) will be set to Buffering. While the MediaElement is in a Buffering state, it'll halt playback. You can check to see what percentage of the buffering is completed by checking the BufferingProgress property.
The BufferingProgress property gives you access to the percentage of the completed buffering. Because this property value is always between 0.0 and 1.0, you need to multiply it by 100 to get the percentage. When this property changes by a value greater than 5 percent, the BufferingProgressChanged event will be fired. This event gives you the flexibility to keep your users informed through a progress bar or some other UI construct. As you can imagine, this type of component can be valuable when you're streaming content.
Often, streamed content can be quite lengthy. Because of this, it can be advantageous to use MBR) files. MBR files enable you to provide the highest quality experience based on the available bandwidth. The really cool part is that the MediaElement will automatically choose which bit rate to use based on the available bandwidth. In addition, the MediaElement will automatically attempt to progressively download the content if it can't be streamed. That's thinking progressively.
Progressive downloading involves requesting a media file over the HTTP or HTTPS protocol. When this occurs, the requested content is temporarily downloaded to a user's computer, enabling the user to quickly access any part of the media that has been downloaded. In addition to fast access, using a progressive download generally provides a higher-quality media experience. Progressive downloading usually requires a longer initial wait time than streaming, so you may want to keep your users informed of how much wait time is left.
Keeping your users informed is made possible through two key items within the MediaElement. The first item is a property called DownloadProgress. It gives you access to the percentage of the content that has been downloaded. The other item is an event called DownloadProgressChanged. This event gives you the ability to do something such as update a progress bar whenever the DownloadProgress property changes. In listing 20.1, both these items are used to show the percentage of requested content that's available.
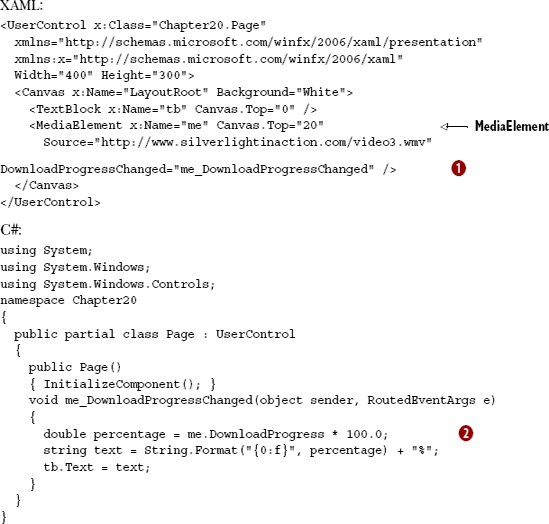
This example shows a large video file (~13MB) being progressively downloaded ![]() . As this download progresses, the completion percentage is calculated
. As this download progresses, the completion percentage is calculated ![]() . This percentage is then formatted and presented to the user as the video is downloaded.
. This percentage is then formatted and presented to the user as the video is downloaded.
Whether you stream content or progressively download it, the MediaElement expects certain formats. These file formats are then retrieved over one of the accepted protocols (HTTP, HTTPS, or MMS). The Source property simplifies this retrieval process, and it works with both audio and video files. Once the media source is loaded, the MediaElement can be used to configure the playback of a media item or obtain status information. These items are available through a set of commonly used properties.
The MediaElement provides a number of properties that are common to both audio and video files. Interestingly, you've already seen several—the Source, BufferingTime, BufferingProgress, and DownloadProgress properties. There are five other properties so fundamental to the MediaElement that we should discuss them now. These properties are AutoPlay, CanPause, CurrentState, NaturalDuration, and Position.
The AutoPlay property specifies whether the MediaElement will automatically begin playing. By default, a MediaElement will begin playing as soon as the content referenced in the Source property is loaded. You can disable this default behavior by changing the AutoPlay bool property to false. As you can imagine, once a media file has begun playing, there may be times when you want to be able to pause it.
Sometimes you may want to allow a user to halt the playback of a MediaElement. By default, the MediaElement will allow you to do this. But, by setting the CanPause property of the MediaElement to false, you can prevent your users from pausing the playback. If you allow the pausing function and a user decides to halt the playback, it'll change the value of the CurrentState property.
The CurrentState property represents the mode the MediaElement is in. This mode is exposed as a value of the System.Windows.Media.MediaElementState enumeration. This enumeration provides all the possible states a MediaElement can be in. These states are listed and described in table 20.3.
Table 20.3. The options available within the MediaElementState enumeration
Option | Description |
|---|---|
| Occurs while a protected file is obtaining a license key (see section 20.4.3). |
| This signals that the |
| The media has been unloaded from the |
| Occurs while Silverlight is obtaining PlayReady components (see section 20.4.2). |
| The |
| This represents that the |
| This signals that the |
| The |
Table 20.3 shows the options available within the MediaElementState enumeration. This enumeration is used by the read-only CurrentState property. Considering that this property is read-only, how does it get set? This property is altered through a variety of methods you'll learn about later in this chapter. Anytime the Current-State property value is changed, an event called CurrentStateChanged is fired. The state of the media item is a natural part of working with the MediaElement, as is the duration.
The NaturalDuration property gives you access to the natural duration of a media item. This duration is available once the MediaElement has successfully opened a media stream, so you shouldn't use the NaturalDuration property until the MediaOpened event has fired. Once the MediaOpened event has fired, you can access the total length of a media item, as shown here:
void me_MediaOpened(object sender, RoutedEventArgs e)
{
  tb.Text = "Your video is " + me.NaturalDuration + " long.";
}
This example displays the total length of a media item in an assumed TextBlock. This task takes place when the MediaOpened event of a MediaElement has triggered, so you can assume that the media stream has been successfully accessed. Then, you use the NaturalDuration property to show the length of the media stream. This length is stored as a TimeSpan within the NaturalDuration property.
The NaturalDuration property is a System.Windows.Duration entity. This type of entity is a core element of the .NET Framework, and it exposes a property called Has-TimeSpan that signals whether a TimeSpan is available. In the case of a MediaElement, this property value will always be true, enabling you to access highly detailed information about the length of a media stream through the TimeSpan property. This property is demonstrated in this example:
void me_MediaOpened(object sender, RoutedEventArgs e)
{
  StringBuilder sb = new StringBuilder();
  sb.Append("Your video is ");
  sb.Append(me.NaturalDuration.TimeSpan.Minutes);
  sb.Append(" minutes, ");
  sb.Append(me.NaturalDuration.TimeSpan.Seconds);
  sb.Append(" seconds, and ");
  sb.Append(me.NaturalDuration.TimeSpan.Milliseconds);
  sb.Append("milliseconds.");
  tb.Text = sb.ToString();
}
This shows how to access detailed information about the length of a media item. As you probably know, this information, as well as the position of the playback, is part of almost any online media player.
The Position property represents a point, or location, within a MediaElement. This value can be read regardless of the CurrentState of the MediaElement, and it can be set if the MediaElement object's CanSeek property is true.
The CanSeek property determines whether the Position can be programmatically changed. This read-only property is set when a media item is loaded into a MediaElement. If the referenced media item is being streamed, this property will be set to false. If the referenced media item is being downloaded progressively, the CanSeek property will be set to true.
When the CanSeek property is set to true, you can set the Position property to any TimeSpan value. It's recommended that you use a TimeSpan within the NaturalDuration of a MediaElement. If you use a TimeSpan beyond the NaturalDuration, the MediaElement will jump to the end of the media item.
The Position is an important part of any media item—and so are the other common properties shared across audio and video files. These properties include NaturalDuration, CurrentState, CanPause, and AutoPlay. Additional properties are specific to the audio part of a media stream.
The MediaElement exposes several properties directly linked to audio features. These features can be used to give users greater control over their listening experiences and to engulf your users in your Silverlight application. These features can be delivered through the AudioStreamCount, AudioStreamIndex, Balance, IsMuted, and Volume properties.
Occasionally, audio or video files will contain more than one audio track. As an example, a song may have one track for the guitar, one for the drums, and one for the vocals. Usually, you won't work with these kinds of audio files. Instead, you may come across multilingual videos where each language has its own track. In both these situations, you can access the track-related information through the AudioStreamCount and AudioStreamIndex properties.
The AudioStreamCount and AudioStreamIndex properties give you access to the individual audio tracks of a media file. The read-only AudioStreamCount property stores the number of tracks available. The AudioStreamIndex property specifies which of the available tracks to play (or is playing). Neither of these properties means anything until the MediaOpened event has fired.
When the MediaOpened event is fired, the AudioStreamCount and AudioStreamIndex properties get set on the client's machine. When this occurs, the audio tracks in the media file are read. While these tracks are being read, a collection is being created in the background. When this collection is fully created, the AudioStreamCount property is set to match the number of tracks in the collection. Then, the AudioStreamIndex property is set to begin using the first track in the collection.
Alternatively, if the AudioStreamIndex property is set at design time, that track will be used. Either way, once an audio track is playing, it's important to make sure that the sound is balanced.
The Balance property enables you to effortlessly simulate sounds such as a wave gently lapping a sandy shoreline or a swirling wind. These types of sounds often involve sound shifting from one ear to the other; it would be startling if the sounds spastically jumped from one ear to the other. The balance of the volume across your ears makes these sounds much more natural.
With the Balance property, you can gracefully spread out your sounds by specifying a double-precision value between –1.0 and 1.0. If you set the property value to -1, you can project sound entirely from the left-side speakers. If you set the value to 1, the sound will leap from the right speakers. If you're seeking a balance between the left and right speakers, you set the value to 0.
This property is more than an enumerator between the left, right, and center positions. It gives you the flexibility to do things like project 70 percent of a sound from the right speaker by using a value of 0.7. The remaining 30 percent projects from the left speaker. As you can imagine, you can easily depict a lifelike audible environment. Sometimes it's nice to shut out the sounds of life—enter IsMuted.
Anything with an audio source should expose the ability to temporarily mute the audio. Thankfully, the MediaElement exposes an IsMuted property.
This property allows you to programmatically determine whether the sound associated with a MediaElement is audible. If a MediaElement is playing and this boolean property is set to true, the MediaElement will continue to play, but it won't be audible.
As a bool, the IsMuted property is all or nothing. Usually, you'll need to find a happy medium between audible and inaudible. Silverlight also gives you this type of control through the Volume property.
The Volume property is a double-precision, floating-point value that specifies the audible level of a MediaElement. This property value can range from an inaudible (0.0) all the way up to a room-shaking 1.0. The room-shaking capabilities are ultimately restrained by the user's computer volume. By default, the Volume value is in the middle of this range at 0.5.
The Volume property is one of the five properties that address audio-related features. The other properties are the IsMuted, Balance, AudioStreamCount, and AudioStreamIndex properties. The MediaElement also exposes a pair of properties that are specific to the visual part of a media file.
The MediaElement exposes four properties directly related to videos. The first two are the DroppedFramesPerSecond and RenderedFramesPerSecond properties, both of which deal with video frame rates. The other two properties, NaturalVideoHeight and NaturalVideoWidth, deal with the dimensions of a video.
The MediaElement exposes two read-only double-precision values related to the frame rate of a video. RenderedFramesPerSecond gives you the number of frames that are rendered per second. The other property, DroppedFramesPerSecond, lets you know how many frames are being dropped per second. You can use these two properties to monitor the smoothness of a video. If a video begins to become jerky, the DroppedFramesPerSecond value will increase. In this scenario, you may want to consider using a video with smaller natural dimensions.
The natural dimensions of a video are provided through two read-only properties. The NaturalVideoHeight property represents the height of a video, the NaturalVideoWidth property represents the video's width. These int properties are both read-only because they represent the original dimensions, in pixels, of a requested video. These values are useful when a video is the primary focus of your UI. If you're using an audio file instead of a video file, these two properties will stay at their default values of 0. For this reason, these properties are specific to video scenarios. Both video and audio files are involved in a standard lifecycle.
Throughout this section, you've seen a wide variety of properties. Some of these property values are likely to change throughout the life of a media file, so it's beneficial to listen for those changes. As you might expect, the MediaElement provides a rich set of events that enables you to watch for those changes (see table 20.4).
Table 20.4. The events of the MediaElement
Event | Description |
|---|---|
| Triggered anytime the |
| Fired anytime the |
| Occurs whenever the |
| Discussed in section 20.3.2. |
| Fired when the |
| Triggered if the media item referenced in the |
| Occurs after the information associated with the media has been read and the media stream has been validated and opened. |
This table shows the events exposed by the MediaElement. Note that some state changes trigger multiple events. For instance, if a video file runs its route within a MediaElement, the CurrentStateChanged and MediaEnded events will both fire. As a result, you may need to create checks and balances within your code. To better understand the typical life of a media file, please review figure 20.2.
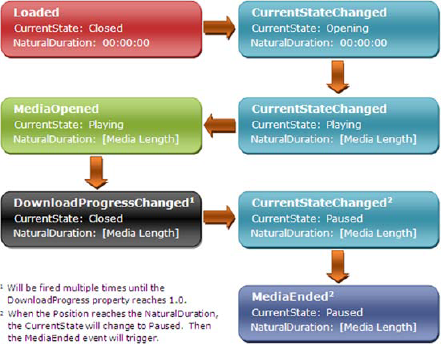
This figure shows the lifecycle of a media item that has played progressively through a MediaElement. The Loaded event used in the figure is of the FrameworkElement variety. This event shows when the NaturalDuration is set. As you can see, this property is set when the CurrentState is switched to Playing.
If you reference a media item that can't be found, the MediaFailed event will fire, but the CurrentStateChanged event won't be triggered. In other words, if you reference a media file that doesn't exist, only the Loaded and MediaFailed events will be triggered.
The events of the MediaElement reflect the lifecycle of a media item. This item can be impacted by a variety of audio- or video-related properties. Several properties are common to both audio and video files. One of these properties represents the Source of the media and can be referenced through a relative or remote Uri. Even more interesting is the fact that you can use the Source property to reference playlists.
A playlist is a list of audio or video tracks arranged in a specific order. These lists give you a way to manage media elements that are part of a larger scheme such as a CD. Playlists are more than ordered media items, though. Playlists give you a way to generate revenue through advertising. Regardless of how you intend to use them, Silverlight has support for two playlist types.
Throughout this section, you'll learn about the two types of playlists supported in Silverlight. The first kind of playlist, a client-side playlist, enables your Silverlight application to fully control interaction with the playlist. The other kind of playlist, a server-side playlist (SSPL), gives the hosting server complete control over the media experience.
A client-side playlist is an XML file that can be interpreted by a MediaElement. This XML file follows a special format known as ASX, which we'll detail in a moment. Once this file has been parsed by a MediaElement, the MediaElement will decide whether to begin playing. This decision will be based on the AutoPlay property. If this property is set to true, each of the items in the client-side playlist will begin playing one after the other. Amazingly, all this happens naturally by pointing the Source property to an ASX file as shown here:
<MediaElement x:Name="myMediaElement"
  Source="http://www.silverlightinaction.com/myPlaylist.asx" />
This shows how to request a client-side playlist. Note that this playlist uses the .asx file extension. This file extension is the one typically used for client-side playlists, but you can reference an ASX file with an extension of .asx, .isx, .wax, .wvx, .wmx, or .wpl. This restriction may seem odd considering that an ASX file is an XML file. Without this distinction, the MediaElement would be unable to quickly tell the difference between a client-side playlist and any of the other supported formats.
A client-side playlist can be an effective way to deliver multiple media tracks. To take advantage of client-side playlists, you must understand how to masterfully use ASX files. These files can have rich descriptive information, known as metadata, surrounding each of the tracks.
Client-side playlists are defined as Advanced Stream Redirector (ASX) files—this is just a fancy name for a specific XML format. Because this format is XML, you can create a client-side playlist with your favorite text editor, Windows Media Player, or server-side application. Regardless of your choice, this file will always follow a common structure, which is shown in this example:
<ASX Version="3.0">
  <Title>Silverlight in Action Videos</Title>
  <Entry>
    <Title>Greetings</Title>
    <Author>Chad Campbell</Author>
    <Ref Href="http://www.silverlightinaction.com/video1.wmv" />
  </Entry>
  <Entry>
    <Title>City Scape</Title>
    <Author>Dan Herrenbruck</Author>
    <Ref Href="http://www.silverlightinaction.com/video2.wmv" />
  </Entry>
</ASX>
This example shows a pretty basic client-side playlist that uses a small portion of the full ASX schema. This segment isn't that far off from the full schema supported within Silverlight. Silverlight only supports a subset of the full ASX schema, but this subset still provides plenty of elements that can be used to deliver a rich client-side playlist (see table 20.5).
Table 20.5. The ASX elements supported within Silverlight
Element | Description |
|---|---|
| Provides a description for a client-side playlist or an entry within the playlist. This element exposes an attribute called |
| The root element of a client-side playlist. |
| Specifies the name(s) of the individual(s) that created a client-side playlist or an entry within the playlist. Only one |
| Represents a URL that will get prepended before playing within the client. |
| States the copyright information for an |
| Defines an item in a client-side playlist. This element provides a boolean attribute called |
| Enables you to specify a URL that provides more detailed information about the playlist or media item. |
| Represents a custom parameter associated with a media item. |
| This element is the item that specifies which file to refer to for a media clip. The |
| Signifies the moniker of a playlist or media item. For instance, if a playlist represents a CD, the |
This table shows the ASX elements supported within Silverlight. As you can see, an ASX file is more than a list of URLs that point to media files. The ASX file format gives you the opportunity to provide a lot of valuable metadata with a playlist. In fact, the ASX format lets you specify metadata for the media items within the playlist, so it's important to understand how to access that metadata.
The metadata for a media item can be found within a read-only property called Attributes. This member of the MediaElement class exposes the metadata as a Dictionary<string, string>. There are two interesting characteristics about this property that deserve mentioning.
The first is in regard to what metadata is exposed. Surprisingly, the metadata embedded within a media item isn't included. Unfortunately, there isn't an elegant way to get this information. The descriptive information stored within the ASX file is included, so if you're using client-side playlists you should provide as much metadata as you can.
The other interesting item is related to the lifecycle of the Attributes property. This property stores the metadata associated with an individual media item, so the Attributes property is cleared and repopulated each time a different track in an ASX file is started. If you're changing your UI based on the values within the Attributes property, you may consider doing this in the MediaOpened event. Alternatively, you may decide to bypass client-side playlists altogether and use a server-side playlist.
Server-side playlists empower content administrators to dynamically determine what content is played, and when. The server streaming the content has complete control over how the content is distributed. This approach provides several advantages over client-side playlists, including:
Lower bandwidth costs—Generally client-side playlists serve content as separate streams for each entry. This causes your Silverlight application to reconnect to the server multiple times, wasting precious bandwidth. Because serverside playlists use a continuous stream, the Silverlight application only has to connect once.
Dynamic playlist creation—Server-side playlists allow you to change a playlist even after a Silverlight application has connected.
To take advantage of these features, you must write a script using the Synchronized Multimedia Integration Language (SMIL). This script must be placed inside of a file with the .wsx extension. As you've probably guessed, this file extension is used for server-side playlists. Once these server-side playlists are created, you can use a MediaElement to reference them.
Server-side playlists are defined as .wsx files. These files are XML files that follow a specific XML format, which is demonstrated in the following sample .wsx file:
<?wsx version="1.0"?>
<smil>
  <seq id="sq1">
    <media id="advertisement1" src="advertisement1.wmv" />
    <media id="movie" src="myMovie.wmv" />
    <media id="advertisement2" src="advertisement2.wmv" />
  <seq>
</smil>
This XML example shows a basic .wsx file. This playlist uses three of the elements supported by the SMIL format in Silverlight—Media, Seq, and Smil. Silverlight supports a total of five elements, which are listed and described table 20.6.
The elements listed in the table give a content administrator the flexibility to control how content is distributed. To distribute this content, you use a MediaElement to reference the .wsx file.
Table 20.6. The SMIL elements supported within Silverlight
Element | Description |
|---|---|
| "Exclusive." A container for media items. These items can be played in any order, but only one will be played at a time. |
| References an audio or video file through an |
| "Sequential." A container for media items. These items will be played in sequential order. |
| The root element for a server-side playlist. |
| A container for a series of items that can be interchanged if one of the items fails. |
After your .wsx file has been created, you can publish it on your server. You must publish a server-side playlist before a Silverlight application can use it. Although publishing a server-side playlist is beyond the scope of this book, connecting to one isn't. You can do this from a MediaElement as shown in this example:
<MediaElement Source="mms://www.silverlightinaction.com:1234/myPlaylist" />
This line of markup shows how to reference a server-side playlist from a MediaElement. You may have noticed that the playlist doesn't include the .wsx file extension. This extension usually gets removed during the publishing process. A MediaElement must use the MMS protocol to request a server-side playlist. This playlist can be used to stream content but can't be used to serve downloadable content in Silverlight.
Server-side playlists provide a way for content administrators to control the distribution of their content. Client-side playlists turn that control over to the requesting application. Either way, both options give you a way to distribute that web-based mixtape you've always wanted to send. Of course, playlists (and media players in general) aren't very useful without providing control over the playback.
As you've seen up to this point, Silverlight makes it easy to deploy media content with the MediaElement. This content could come in the form of an individual media item or playlist. Regardless of where that media comes from, users generally want to control their own media experiences, and Silverlight makes it easy to make each experience an interactive one.
The interactive playback features of Silverlight enable you to interact with media in a variety of ways. Over the course of this section, you'll see three key items that can enhance a media experience. For starters, you'll see how to control the play state on-the-fly. Then, you'll learn about interacting with your users throughout the course of an audio or video file. Finally, you'll see how to take advantage of Silverlight's fullscreen mode to deliver a memorable media experience.
The MediaElement gives you the ability to programmatically change the play state of a media item. This can be useful for providing things such as play, pause, and stop buttons. Note that you can't change the play state directly through the read-only CurrentState property; you must rely on three basic methods to control the momentum of a media item. These methods are part of the MediaElement class and are described in table 20.7.
Table 20.7. The methods that control the progress of a MediaElement
Method | Description |
|---|---|
| Begins moving the |
| Halts the playback of a media item at the current |
| Stops the downloading, buffering, and playback of a media item. In addition, this method resets the |
This table shows the three methods that can be used to control the play state. These methods are fairly straightforward and hardly worth mentioning, but this section would be incomplete without them. You probably expected the ability to play and stop a media item before seeing this list. In addition, you probably expected the ability to pause an item, but you may not have anticipated the fact that pausing a media item isn't always an option.
The Pause method will only work if the CanPause property is set to true. This readonly property will be set to true if the user's machine has the ability to halt playback of a media file. Regardless of the user's machine, a streaming media file will always set the CanPause property to false. In these situations where the CanPause property is false, you can still call the Pause method—it just won't do anything.
Providing an interactive experience often involves controlling the play state. This ability enables users to send a message to the MediaElement about what they want. Significantly, the MediaElement lets you send something back to the user when you want. That's only partially true. You'll see what I mean as you learn about interacting with your users in a timely fashion.
The MediaElement enables you to interact with your users at specific points in time. This can be a great way to provide captions or subtitles in your videos. In addition, this feature enables you to deliver advertisements, or other types of information, that are relevant to a portion of a video. Regardless of your need, time-sensitive information can be bundled with your media in the form of a timeline marker.
A timeline marker is metadata that's relevant to a specific point in time. This information is generally part of a media file itself and is bundled during encoding. Significantly, there are two different kinds of timeline markers. The first type is known as a basic marker. It's intended to be used when you need to provide fixed information. The other kind of timeline marker is a script command; it can be used to run a piece of code. Both kinds of markers will be represented as a TimelineMarker whose properties are shown in table 20.8.
Table 20.8. The properties associated with a TimelineMarker
Property | Description |
|---|---|
| A value associated with marker. This |
| The position of the marker within the media. This position is represented as a |
| This |
In general, these properties get populated when a TimelineMarker gets created. TimelineMarker objects are usually created when a MediaElement initially reads a media file. During this process, the metadata within the header of the file is used to create TimelineMarker objects. These objects then are added to a publicly visible collection called Markers.
The Markers collection is a collection of timeline markers associated with a media file. The items associated with this collection can't be added through XAML, unlike the majority of other collections in Silverlight, because the markers come from the media item set as the Source of the owning MediaElement. Whenever one of these timeline-marker element's Time has come, the MediaElement will fire the Marker-Reached event. This event provides an opportunity to recapture the data associated with a marker, which can be useful for any number of things, including showing a caption (see listing 20.2).
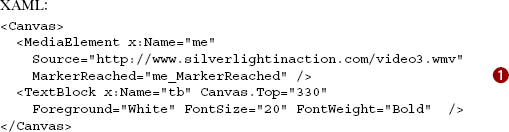

This listing shows one way you can use the MarkerReached event ![]() . This event provides a
. This event provides a TimelineMarkerRoutedEventArgs parameter that gives you access to the TimelineMarker that tripped the event. Common uses for this event are captioning, displaying ads (the text contains an ID or URL), text overlays, or displaying links to videos related to that marker. Many sites such as YouTube use similar functionality to display notes you add at specific points in the video.
Markers add a whole new level of interactivity to your media player. To support basic interaction, the MediaElement provides three simple methods that let you control the play state. Regardless of how you intend to control the media experience, it must come from some server. Interestingly this server may serve up the experience as protected content.
The interactive playback features within Silverlight can be used to give your users an engaging media experience. Sometimes you may want to control who has access to this experience. To enable you to do this, Silverlight has built-in support for a client-access technology known as PlayReady for Silverlight.
PlayReady for Silverlight, or PlayReady, is a content-access technology that enables you to protect your media assets. These assets may be requested from a Silverlight application through a MediaElement instance. This control's Source property can be used to request protected content from a hosting server. Throughout this section, you'll see an overview of how Silverlight uses PlayReady technology. This overview includes requesting protected content, retrieving PlayReadycomponents, and unlocking protected content.
A Silverlight application can request protected content, which may be in the form of a protected stream or media file. This item can be requested through the Source property of a MediaElement, so it's safe to say that there's no difference on the client side between requesting protected and unprotected content. In fact, Silverlight doesn't know if content is protected until it's downloaded. This download happens naturally when a request is made, as shown in figure 20.3.
Figure 20.3 shows the general idea of requesting protected content from a fictional domain. After this request is made, the server will send an encrypted version of the protected file back to the Silverlight application. This file will have a special header that tells the Silverlight runtime that it's a protected file. This header will provide the location of the licensing server to Silverlight. But before the licensing server can be reached, Silverlight must ensure that the user has the necessary PlayReady components installed.

By default, Silverlight has the infrastructure for PlayReady, but the Play-Ready components aren't installed along with the Silverlight runtime. Instead, they're automatically downloaded and installed when a user requests a protected item. During this one-time installation process, Silverlight goes to the Microsoft.com site and grabs the necessary components. This transparent process is shown in figure 20.4.

Figure 20.4. The process of installing the content access components. This one-time process happens the first time a user attempts to use a protected item. Future attempts to access protected content won't go through the process of downloading and installing PlayReady.
Figure 20.4 shows how the content access components are retrieved. These components may be customized for a user's machine, solely for the sake of ensuring a robust licensing experience. The user's machine is sometimes referred to as an individualized DRM client. This process happens automatically behind the scenes—you don't have to do a thing. Even after the PlayReady components have been installed, the content is still locked. To unlock this content, a request must be made to the licensing server.
Once a protected item has been downloaded to your Silverlight application, it's still encrypted. This encryption can only be unlocked by a key sent from a licensing server, so if you try to play an encrypted file, Silverlight will search the encrypted file's header for the location of a licensing server. Silverlight will use this location to automatically request a key from the licensing server to decrypt the protected content.
When a licensing server retrieves a request for a key, it can either accept or deny the request. The licensing server can be used to implement some custom logic to make that decision. This custom logic must be implemented using the server-side PlayReady SDK. Unfortunately, this SDK is outside the scope of this book, but you can probably imagine how it could be used in a key request. A basic key request is shown in figure 20.5.

Figure 20.5. The media content in this figure is locked until a key is retrieved from the licensing server. This server can implement custom logic through the PlayReady SDK.
This figure shows what the request for a content-access key looks like. If this request is accepted, the licensing server will return a key. This key will unlock the protected content and begin playing it within the requesting MediaElement. If the request is denied, a key won't be returned. Instead, the requesting MediaElement will raise a MediaFailed event.
Silverlight has built-in support for the PlayReady content-access technology, which works behind the scenes to retrieve and unlock protected content—audio and video. One of the easiest ways to use PlayReady DRM and support HD video is to use the Silverlight Media Framework.
The Silverlight Media Framework (SMF) is Microsoft's open source scalable and customizable media player for IIS Smooth Streaming. Like IIS Smooth Streaming itself, its history dates to the Olympics video player and massive amounts of high-quality, protected video that needed to be served up in real-time during the event. It has since evolved into an excellent multipurpose media player.
If you're building an HD media player, evaluating this framework should be at the top of your task list. Key features of the framework include:
Support for IIS Smooth Streaming with bit rate monitoring, as well as progressive download and Windows Media Streaming
Modular, supporting plug-ins
Support for popular ad standards
Full styling support
The framework supports much more than that, of course, but those are the top compelling features. It has multiple points of extensibility, and if those aren't enough, full source code is provided.
In this section, we'll first look at what it takes to get the appropriate libraries for the Silverlight Media Framework, then build a simple player that supports IIS Smooth Streaming.
You can get the Silverlight Media Framework version 2 at http://smf.codeplex.com. The downloads include both the binaries and the full source code. Also, like other CodePlex projects, you can browse the full source code right on the site or download it as part of a release. Be sure to get the latest version, which at the time of this writing is version 2. Don't bother with the older version 1. Significant changes were made after the first version.
To install the player, first download and install the IIS Smooth Streaming Client player SDK using the Web Platform Installer at http://www.iis.net/download/smoothclient. If the WebPI (Web Platform Installer) doesn't work for you, there's a link right below it for downloading the MSI directly.
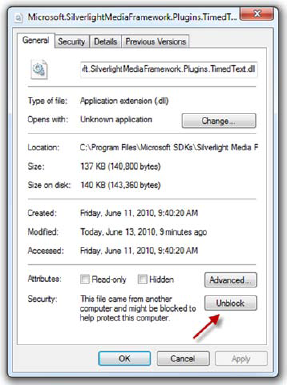
Next, download the Silverlight Media Framework v2 release (or the latest release available at the time you're reading this) and install that on your machine. At the time of this writing, the installer was a zip file with the DLLs. If that's the case when you use it, place them in a common location (but not a system folder such as Program Files) that you'll easily find from within Visual Studio. If copied from a zip and not an installer, be sure to unblock the files individually per this KB article so you can use them: http://go.microsoft.com/fwlink/?LinkId=179545. Figure 20.6 shows the dialog with the Unblock button.
Once you have everything installed and unblocked, creating a complete media player experience is as simple as referencing the SMF DLLs and creating an instance of the player in XAML. Figure 20.7 shows the default player appearance.
Listing 20.3 shows how to instantiate the player from XAML. There are a few key namespaces to keep in mind for Smooth Streaming projects. Under the Microsoft.SilverlightMediaFramework namespace, there are the .Core, .Plugins, and .Utilities namespaces and their associated assemblies. Be sure to reference them for all types of SMF projects. For regular Smooth Streaming, there's the Microsoft.Web.Media.SmoothStreaming.dll assembly. For progressive download projects, use the Micosoft.SilverlightMediaFramework.Plugins.Progressive. dll assembly instead.
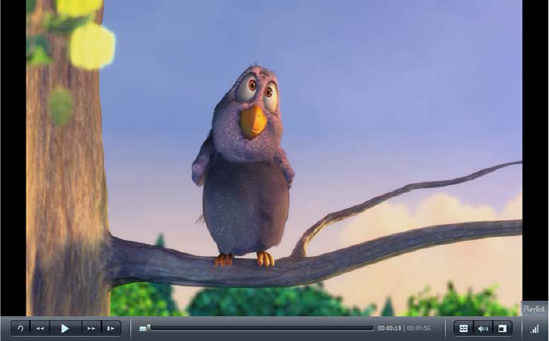
Figure 20.7. The default SMF media player with Big Buck Bunny, an IIS Smooth Streaming video, loaded
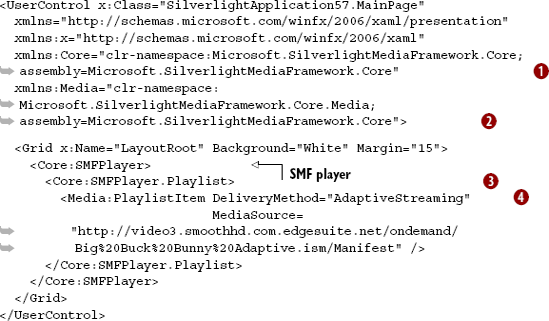
The Silverlight Media Framework player requires two namespaces to be included. The first ![]() ,
, Core, is for the player itself. The second ![]() ,
, Media, is for the playlists and features related to the media supported in the player. Due to the flexibility of the player, loading media takes a few more lines than the usual MediaElement. In particular, the player supports a playlist ![]() with one or more playlist items queued in it. Each playlist item includes a single piece of media with a specified delivery method
with one or more playlist items queued in it. Each playlist item includes a single piece of media with a specified delivery method ![]() . The valid values for
. The valid values for DeliveryMethod are shown in table 20.9.
Table 20.9. Possible values for DeliveryMethod for the SMF player
Value | Description |
|---|---|
| The default value. This will attempt to use the first media plug-in loaded. As this can be unreliable in players that support more than one type of media delivery method, always specify one of the following below. |
| The player will use IIS Smooth Streaming. |
| The player will use a progressive download approach for playing the media. This approach requires no server-side support. |
| The player will use Windows Media Streaming to play the media. |
It's important to realize that the delivery methods supported are entirely controlled by what plug-ins you package with your Silverlight application. If you leave out the Progressive Download plug-in, for example, your player won't support that delivery method.
The Silverlight Media Framework is an excellent way to get a fully functional and feature-rich player up and running in a minimum amount of time. It's perfect for traditional video and audio. But what about media that ventures further into the nontraditional? How about managed codecs or real-time-generated media? For those, collectively called raw media, we have the Media Stream Source API.
Silverlight has a strong but finite set of codecs it natively supports for audio and video playback. If you want to use a format not natively supported, such as the WAV audio file format or the AVI video format, that wasn't an option until the Media Stream Source (MSS) API was added.
The MSS API was included in Silverlight 2, but that version required you to transcode into one of the WMV/WMA/MP3 formats natively supported by Silverlight. In Silverlight 3, the MSS API was augmented to support raw media formats where you send the raw pixels or audio samples directly through the rest of the pipeline. This made its use much easier, as it required knowledge only of the format you want to decode. For the same reason, it runs faster, as an extra potentially CPU-intensive encoding step is avoided.
The MediaStreamSource API supports simultaneous video and audio streams. In this section, we'll look at creating raw video as well as raw audio. In both cases, we'll use algorithmically derived data to drive the raw media pipeline.
To implement your own custom stream source, derive a class from MediaStream-Source. As the name suggests, this class will be used as the source for a MediaElement on the page. Table 20.10 shows that MediaStreamSource has several methods that you must override in your implementation.
Table 20.10. MediaStreamSource virtual methods
Method | Description |
|---|---|
| Sets the next position to be used in |
| Used to return diagnostic information. This method can be a no-op as it's not critical. If used, call |
| Used to change between configured media streams. This method can be a no-op as it's not critical. If used, call |
Required. Get the next sample and return it using | |
| Required. Set up the metadata for the media and call |
| Any shutdown and cleanup code should go here. |
One thing you'll notice about the functions is that many of them are asynchronous. The pattern followed in those methods is to perform the processing and then call a ReportComplete method, the name of which varies by task, when finished.
The asynchronous nature of the API helps keep performance up and keeps your code from slowing down media playback.
Listing 20.4 shows the skeleton of a MediaStreamSource implementation, including the methods I just described. We'll continue to build on this throughout the remaining raw media sections.
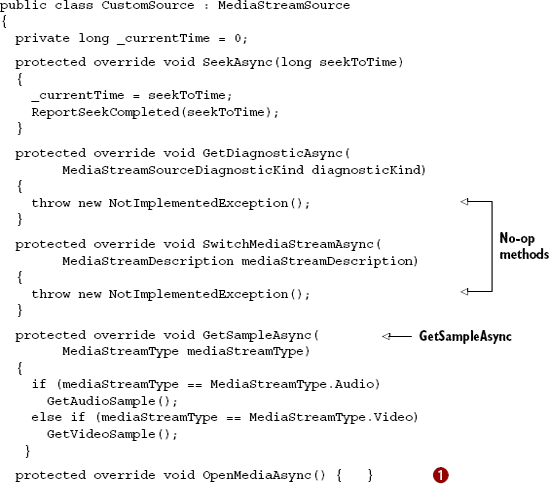

The most important methods for our scenario are the OpenMediaAsync method ![]() and the two methods
and the two methods ![]() that are used to get the next sample. Those two methods are called from the
that are used to get the next sample. Those two methods are called from the GetSampleAsync method whenever an audio or video sample is requested.
Once we have the CustomSource class created, we'll need to use it as the source for a MediaElement on a Silverlight page. Listing 20.5 shows how to wire this up using XAML for the user interface and C# code for the actual wire-up.
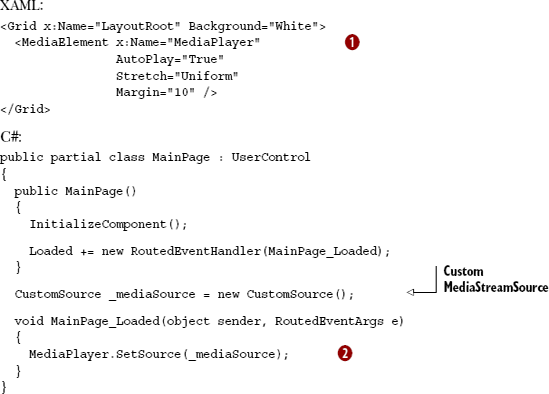
In this listing, I first create a MediaElement ![]() that will span the size of the page, then assign the
that will span the size of the page, then assign the CustomSource instance to the source property ![]() using the
using the SetSource method of the MediaElement. Once that's completed, the MediaElement is set to play and will start requesting samples from the CustomSource class.
Right now, our CustomSource class doesn't return any samples, so running the application would show nothing. We'll modify the class to return both video and audio, starting with video.
Being able to create video from raw bits is pretty exciting—it opens up all sorts of scenarios from bitmap-based animation to custom video codecs. I first played with raw video when I created my Silverlight Commodore 64 emulator (mentioned in chapter 5). I tried a few different video presentation approaches before I settled on generating the video display in real-time as a 50fps MediaStreamSource video at 320 × 200.
For this video example, we're going to generate white noise, much like you see on an analog TV when the signal is lost. When complete, the application will look like figure 20.8. If you lived in the US prior to cable TV, this is what you saw after the national anthem finished playing.
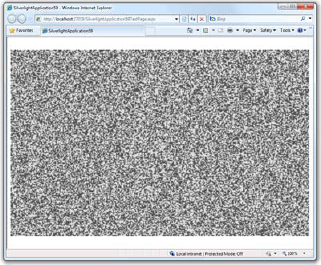
Figure 20.8. The completed white noise video generator. When I was a boy, I used to imagine I was watching an epic ant battle from high overhead. Well, until I saw Poltergeist, which forever changed the nature of white noise on the TV.
We'll start with the logic required to set up the video stream, and follow it up quickly with the code that returns the individual frame samples.
When creating raw video, the first step is to set up the video stream parameters. The parameters include things such as the height and width of the frame, the number of frames per second, and the actual video format.
Silverlight supports a number of different video formats, each identified by a FourCC code. FourCC is a standard four-character code that's used to uniquely identify video formats. In addition to all of the existing formats (for example, H264 for h.264 video), two new formats were added specifically for use raw media and the MediaStreamSource API. Those are listed in table 20.11.
Table 20.11. Supported raw media FourCC codes in Silverlight
FourCC code | Description |
|---|---|
RGBA | Raw, uncompressed RGB pixels with an alpha component. Silverlight currently ignores the alpha component during processing. |
YV12 | YUV 12. This is a common media output format used in many codecs. |
In the example in this section, we'll use the RGBA format to push raw pixels without any special processing or encoding. It's the easiest format to use, requiring no algorithm other than providing a single pixel with a single color. Listing 20.6 shows the video setup code for our simple white noise generator.
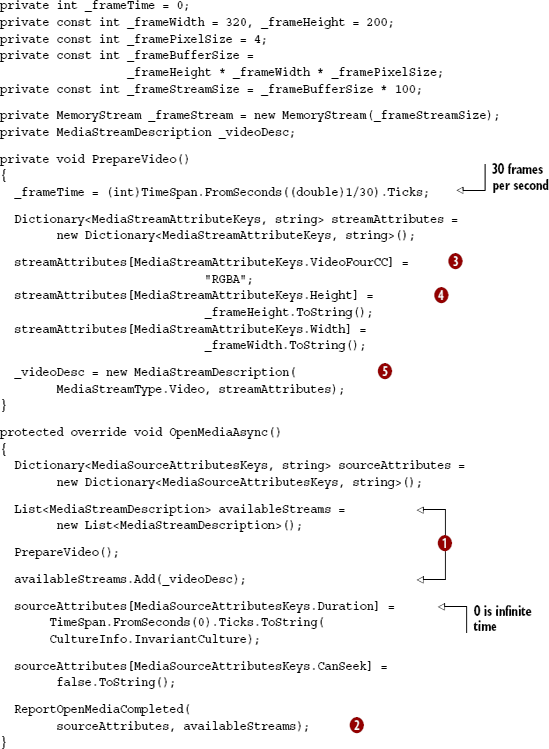
Listing 20.6 shows two functions: OpenMediaAsync and PrepareVideo. They've been broken up that way because OpenMediaAsync will also need to support audio later in this section.
When the class is wired up to a MediaElement, Silverlight will first call the OpenMediaAsync function. In that function, you need to tell Silverlight what streams are available ![]() , a single video stream in this case. Then you need to set up attributes for the duration of the video, infinite in our case, and whether you allow seeking. You take that information and pass it into the
, a single video stream in this case. Then you need to set up attributes for the duration of the video, infinite in our case, and whether you allow seeking. You take that information and pass it into the ReportOpenMediaCompleted method ![]() to tell Silverlight you're ready.
to tell Silverlight you're ready.
The PrepareVideo method sets up some variables that will be used when we generate the samples. First, we identify the amount of time per frame. This can vary over the course of the video, but it'll be easier on the developer if you pick a constant frame rate. Then we set up a dictionary of attributes that identifies the format of the video ![]() and the dimensions of each frame
and the dimensions of each frame ![]() . Finally, that's all packed into a
. Finally, that's all packed into a MediaStreamDescription ![]() to be used when we start generating frames.
to be used when we start generating frames.
Once the video stream is set up, the next thing to do is to start pumping out frames to be displayed.
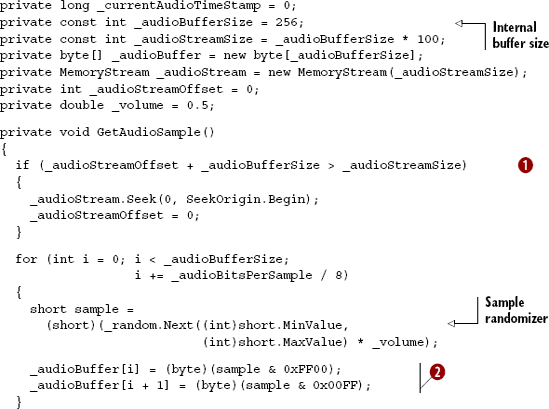
The main purpose of a MediaStreamSource implementation is to return samples. In the case of video, a sample is one complete frame, ready to be displayed. Listing 20.7 shows the GetVideoSample function, called by GetSampleAsync.
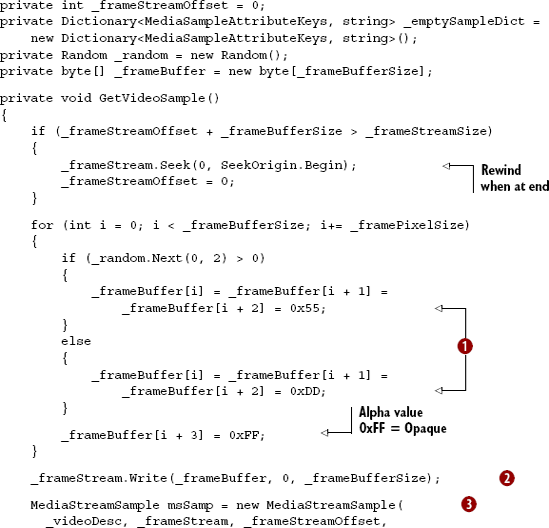
The GetVideoSample function first checks to see whether we're approaching the end of the allocated video buffer. If so, it rewinds back to the beginning of the buffer. This is an important check to make, as you don't want to allocate a complete stream for every frame, but a stream can't be boundless in size.
Once that's done, I loop through the buffer, moving four bytes at a time (the size of a single pixel in the buffer) and generate a random pixel value. The pixel will either be almost white or almost black ![]() . When playing with the sample, I found that pure black and white was far too harsh, and these two slightly gray values looked more natural. Though not obvious here, when setting the pixel values you need to do so in Blue, Green, Red, Alpha (BGRA) order.
. When playing with the sample, I found that pure black and white was far too harsh, and these two slightly gray values looked more natural. Though not obvious here, when setting the pixel values you need to do so in Blue, Green, Red, Alpha (BGRA) order.
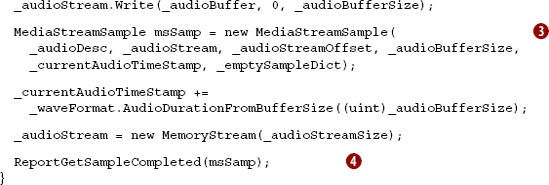
The next step is to write the buffer to the stream ![]() . In this simple example, I could've written the bytes directly to the stream and eliminated the buffer. But in anything more complex than this, you're likely to have at least two buffers (a read-from and a write-to buffer), and even more likely to have a queue of frame buffers used for preloading the individual frames.
. In this simple example, I could've written the bytes directly to the stream and eliminated the buffer. But in anything more complex than this, you're likely to have at least two buffers (a read-from and a write-to buffer), and even more likely to have a queue of frame buffers used for preloading the individual frames.
Once the stream is populated, I then create the media stream sample ![]() , increment our time counters, and call
, increment our time counters, and call ReportGetSampleCompleted to return the sample to Silverlight.
One interesting note in this is how sample time is used rather than frame numbers. The use of a time for each frame allows Silverlight to drop frames when it starts to lag behind. This was a key reason why I chose MediaStreamSource over other approaches in the Silverlight C64 emulator. When the user's machine is busy, or in case it's too slow to run the emulator at full frame rate, I continue to chug along and let Silverlight skip frames it doesn't have time to show. This helps keep everything in sync time-wise, which is crucial when you're also creating audio.
In the previous section, we created a white noise video generator. Let's take that all the way and add in white noise audio. Surprisingly, audio is somewhat more complex to set up than video. This is due to the number of options available to you: audio can have different sample bit sizes, be mono or stereo, have different sample rates, and more.
All this information is stored in a class known as WaveFormatEx. In order to fit the listing into this book, I'm going to use a greatly simplified, but still functional, version of this class. Listing 20.8 shows the class. Create this as a separate class file in your project.
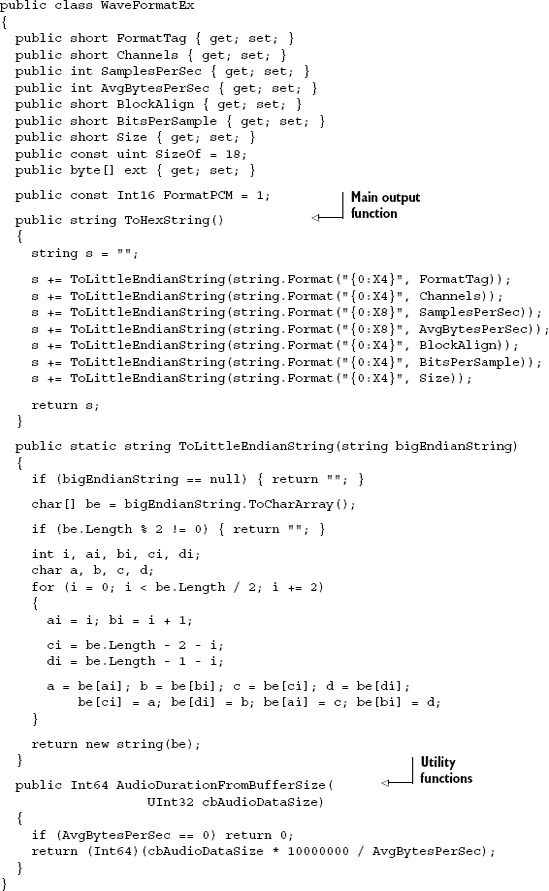
The WaveFormatEx class is simply a way to specify the format to be used for PCM wave data in Silverlight. It's a standard structure, forming the header of the .WAV file format, which is why you get oddities such as the big-to-little-endian format conversions. The class-based version here includes a single helper utility function AudioDuration-FromBufferSize, which will be used when we output the PCM samples.
There are more complete implementations of WaveFormatEx to be found on the web, including one in my Silverlight Synthesizer project at http://10rem.net. Those implementations typically include a validation function that makes sure all the chosen options are correct.
With that class in place, we'll turn our eye to the actual stream setup.
The first step in setting up the sound source is to modify the OpenMediaAsync function. That function currently includes a call to PrepareVideo followed by adding the video stream description to the list of available streams. Modify that code so that it also includes the audio description information as shown here:
...
PrepareVideo();
PrepareAudio();

availableStreams.Add(_videoDesc);
availableStreams.Add(_audioDesc);
...
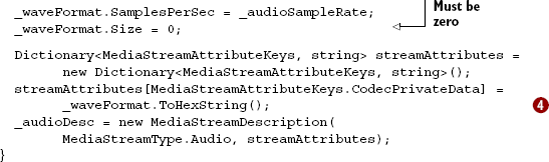
Once those changes are in place, we'll add the PrepareAudio function to the class. The PrepareAudio function is the logical equivalent to the PrepareVideo function; it sets up the format information for Silverlight to use when reading our samples. Listing 20.9 shows the code for that function and its required class member variables and constants.
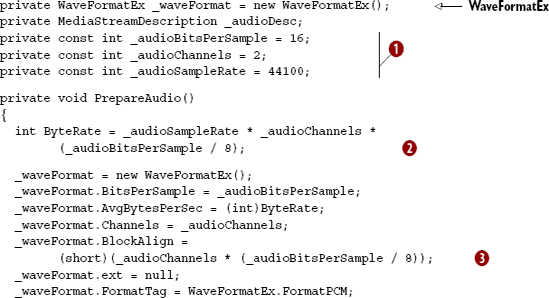
The most important parts of this listing are the constants controlling the sample format ![]() . For this example, we're generating 16-bit samples, in two channels (stereo sound), at a sample rate of 44,100 samples per second: CD-quality audio.
. For this example, we're generating 16-bit samples, in two channels (stereo sound), at a sample rate of 44,100 samples per second: CD-quality audio.
Once those constants are established, they're used to figure out almost everything else, including the number of bytes per second ![]() and the block alignment
and the block alignment ![]() . Once the
. Once the WaveFormatEx structure is filled out with this information, I set it as the Codec Private Data ![]() using its little-endian hex string format. Finally, I create the audio description from that data, to be used when reporting samples back to Silverlight.
using its little-endian hex string format. Finally, I create the audio description from that data, to be used when reporting samples back to Silverlight.
The final step is to output the audio samples. This requires generating the individual samples and returning them in chunks of predefined size. We'll use a random number generator to generate the noise, much like we did with video. Listing 20.10 shows how to fill a buffer with audio and return those samples to Silverlight.
The process for generating the white noise audio sample is similar to generating the frames of video. But instead of having a fixed-width x height buffer we must fill, we can generate as long or as short a sample as we want. This is controlled by the audio buffer size set in code. In general, you want this number to be as low as possible, as larger numbers typically introduce latency as well as skipped video frames—the system is too busy generating audio to show the video frame. But set the number too low, and the audio will stutter. If you find the white noise stuttering on your machine, up the buffer to 512 or so and see how that works for you.
Tip
To help with latency, you can also play with the AudioBufferLength property of the MediaStreamSource class. In most cases, you won't be able to get that below 30ms or so, but that value is itself very hardware-dependent. That property is my own contribution to the class, as I was the only one insane enough to be writing a Silverlight-based audio synthesizer at the time. I ran into problem after problem with the triple-buffering (my buffer, plus Silverlight MSS buffer, plus underlying DirectX buffer), to the point where all audio was delayed by about 2-3 seconds. The team worked with me to identify where the issues were, and then added this knob into the base class to help tweak for latency-sensitive applications like mine.
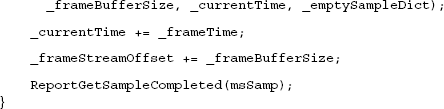
Once the buffer size is established, I perform the same stream overrun check ![]() that we did for video, and for the same reasons. Then, I loop through the buffer, 2 bytes (16 bits) at a time, and generate a white noise sample. Once the sample is generated, I get the 2 bytes from it using a little bit-masking
that we did for video, and for the same reasons. Then, I loop through the buffer, 2 bytes (16 bits) at a time, and generate a white noise sample. Once the sample is generated, I get the 2 bytes from it using a little bit-masking ![]() , and then write those bytes into the buffer. Once the buffer is filled, it's copied into the stream and the sample response built
, and then write those bytes into the buffer. Once the buffer is filled, it's copied into the stream and the sample response built ![]() . After incrementing the time counters, the last step is to report the sample to Silverlight
. After incrementing the time counters, the last step is to report the sample to Silverlight ![]() .
.
If you run the application at this point, you should have a short delay while the startup code is executed and the Silverlight internal buffers are filled, followed by simultaneous audio and video white noise. On the surface, this may not seem impressive. But when you consider that the video and audio is completely computer generated, it's considerably more impressive.
Raw audio and video also allow you to display any type of media for which you can write a decoder. Much of the IIS Smooth Streaming client for Silverlight, for example, is written using a custom MediaStreamSource implementation. Though writing a typically hardware-implemented 1080p HD codec in managed code may not lead to good performance, there are many other popular formats which don't have native Silverlight support, but which would benefit from a custom MediaStream-Source implementation.
So far, we've seen a number of ways to get video and audio into Silverlight. The easiest, of course, is to use a video format Silverlight supports and just point the MediaElement to it. Another way is to use the MediaStreamSource class to implement your own managed codec. One final way to get video and audio into Silverlight is to use the webcam and microphone APIs. A segment of the API, especially the VideoSink and AudioSink classes, is conceptually similar to the MediaStreamSource code we've completed in this section, but thankfully much simpler.
Silverlight 4 introduced the ability to capture media from video capture devices and audio capture devices. Though designed with other devices (such as TV capture cards) in mind, the current implementation handles only webcams and microphones. These devices enable the Silverlight developer to capture raw video and audio data, as well as snapshot stills. Though the first release of this isn't suitable for conferencing scenarios (there's no built-in compression or encoding), it's excellent for local capture and storage and upload scenarios.
If you've ever tried to use an arbitrary webcam (or microphone) using another technology such as WPF, you'll appreciate how simple the Silverlight team has made this. Not only do you get to avoid DirectShow and similar technologies, but the webcam and mic access works cross-platform. As far as device abstraction layers go, this is pretty sweet.
In this section, we'll first cover how to gain access to the webcam and microphone in Silverlight. Then we'll examine how to work with the default webcam and microphones for the platform, including how to capture video and still images. Then, because most machines have more than one audio capture device, and some even more than one video capture device, we'll look at what's required to allow the user to select a specific webcam or microphone.
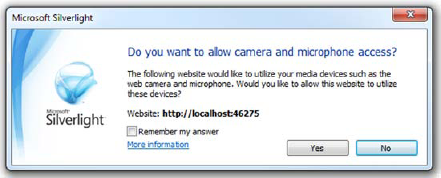
In sandboxed applications, the application must request access to the webcam from a user-initiated event, such as a button click. This is to ensure that a rogue application on a web site doesn't start photographing you without your consent. The request is explicit as shown here:
if (CaptureDeviceConfiguration.AllowedDeviceAccess ||
    CaptureDeviceConfiguration.RequestDeviceAccess())
{ ... }
The first check is to see whether the application has already been granted access; this is true if it's running under elevated trust or the user has already allowed access. The second check runs only if the first check is false; it causes the webcam and microphone device access confirmation dialog to be displayed, as shown in figure 20.9.
Once the user has confirmed access, you can begin to capture using a specific device or the default devices. Typically, you'll use the default device.
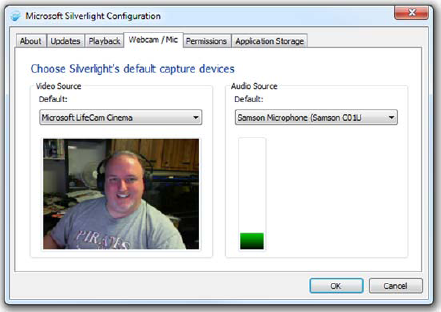
Silverlight allows the user to set the default webcam and default microphone. This is done by right-clicking on any Silverlight application and selecting the Silverlight menu option. Alternatively, the user can open Microsoft Silverlight from his program shortcuts. Once there, select the Webcam/Mic tab and pick from the list of available options. You'll see a preview of the webcam to the left and an audio level meter for the microphone on the right. Figure 20.10 shows the configuration dialog.
The settings start out using default capture devices on your machine. You can change it from there. The changes will globally affect all Silverlight applications that use the webcam or microphone.
With the default device set in Silverlight, it's time to write a little code to capture information from the default webcam.
To get the default webcam, you need only call the GetDefaultVideoCaptureDevice method of the CaptureDeviceConfiguration class. If this method returns null, there's no recognized webcam on the machine.
Once you have a capture device, capturing video requires wiring up a capture source and using it as the input source for a VideoBrush. The VideoBrush is then used to fill a shape, typically a rectangle, on the Silverlight surface.
Listing 20.11 shows how to create a simple webcam viewer using the default webcam at a default capture resolution.
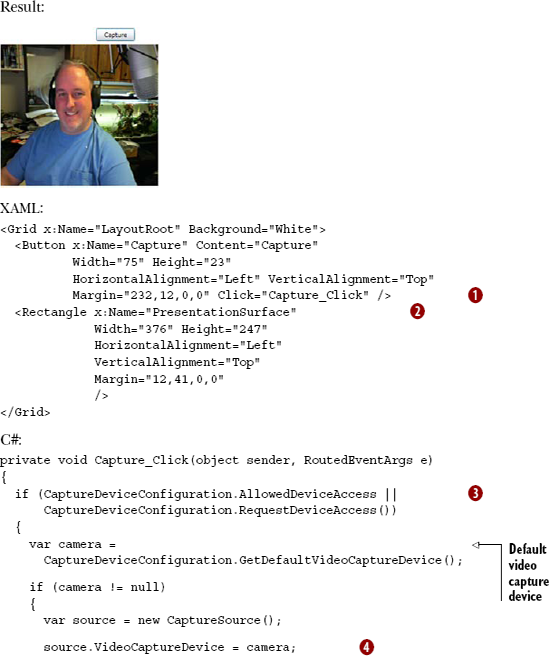
In listing 20.11, we first set up the button for the user-initiated video capture ![]() and the rectangle to hold the rendered output
and the rectangle to hold the rendered output ![]() , both in XAML. In the code, we perform the check to see whether we have access, or request it if not
, both in XAML. In the code, we perform the check to see whether we have access, or request it if not ![]() . Then we get the default video capture device and assign it as the capture device for the
. Then we get the default video capture device and assign it as the capture device for the CaptureSource ![]() . The video display isn't a
. The video display isn't a MediaElement. Instead, we create a VideoBrush, set its source to our CaptureSource ![]() , and then paint the rectangle with the output. Finally, we start the capture itself.
, and then paint the rectangle with the output. Finally, we start the capture itself.
This example used the default capture resolution. That's okay for an example, but in a real application, you'll likely want to pick a specific video format based on screen resolution or even the frames per second (FPS).
Webcams typically support a number of resolutions and video formats. I have a Microsoft LifeCam Cinema on my PC, and it handles everything from the smallest of postage stamps to 720p HD video. As the capabilities vary from model to model, you'll need a way to query the webcam to identify its supported video formats.
The VideoCaptureDevice class contains a number of properties. The one of interest to us in this case is the SupportedFormats collection. SupportedFormats is a collection of VideoFormat objects, the properties of which are displayed in table 20.12.
Table 20.12. The VideoFormat class
Member | Description |
|---|---|
| A floating-point value indicating the number of frames per second. |
| Currently, the only valid pixel format is 32 bits per pixel, ARGB. |
| The height of the frames in pixels. |
| The width of the frames in pixels. |
| The number of bytes in a single horizontal line of the frame. Divide this by |
To query the formats for my own camera, I injected this bit of code into the listing at the beginning of this section:
foreach (VideoFormat format in camera.SupportedFormats)
    Debug.WriteLine(
        format.PixelWidth + "x" +

        format.PixelHeight + " at " +
        format.FramesPerSecond + " fps " +
        format.PixelFormat.ToString());
The resulting list included (among many others) these entries:
640x480 at 30.00003 fps Unknown
160x120 at 30.00003 fps Unknown
160x120 at 30.00003 fps Unknown
1280x720 at 15.00002 fps Unknown
1280x720 at 15.00002 fps Unknown
960x544 at 30.00003 fps Unknown
960x544 at 30.00003 fps Unknown
800x448 at 30.00003 fps Unknown
800x448 at 30.00003 fps Unknown
800x600 at 30.00003 fps Unknown
...
Oddly enough, the pixel format came across as Unknown in all cases. Try it with your own webcam and the results will likely vary. Once you see a video format that works for you, you can choose it by assigning it to the DesiredFormat property of the VideoCaptureDevice. This example uses a LINQ expression to grab the first format with the highest resolution:
var format = (from VideoFormat f in camera.SupportedFormats
              orderby f.PixelWidth * f.PixelHeight descending
              select f).FirstOrDefault<VideoFormat>();
if (format != null)
  camera.DesiredFormat = format;
That will pick the format with the highest total pixel count. You can modify the statement to pick just the largest width, or the largest size that will fit within a given box, and so forth. Figure 20.11 shows the 720p HD version of the webcam shot from the previous listing.
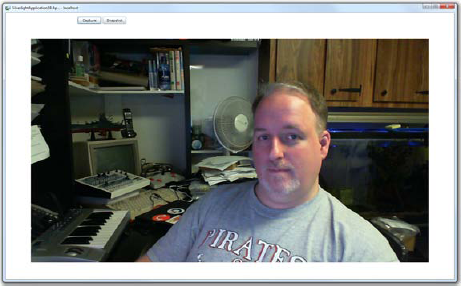
Figure 20.11. Webcam screen shot at 720p HD, selected using the Desired-Format property and LINQ. I'm practicing my raised-eyebrow news anchor face. I'll try harder next time. Dig the C128 in the background!
One reason you may want to capture at a high resolution is to support the capturing of still images. The Silverlight webcam API allows you to use the webcam as a simple still image camera, returning individual images as WriteableBitmap instances.
Now that you have a reasonably high resolution selected, taking still photos makes much more sense. The Silverlight webcam API supports taking still photos by using an asynchronous capture method. You click a button and call a function, and a few fractions of a second later, the event fires with the image data.
In this section, we'll augment our webcam display application to include a ListBox filled with captured still images. Figure 20.12 shows the final application.

Figure 20.12. Capturing the largest video size, plus a series of still photos bound to a ListBox on the right. Did I get the anchor look any better? Maybe I need a suit.
Listing 20.12 shows the new XAML required to create the display shown in figure 20.12. Note the use of the DataTemplate for displaying the bound image information.
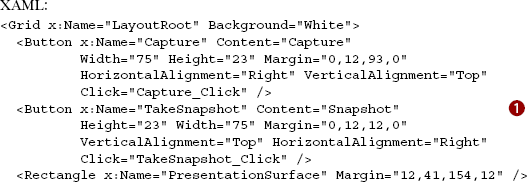
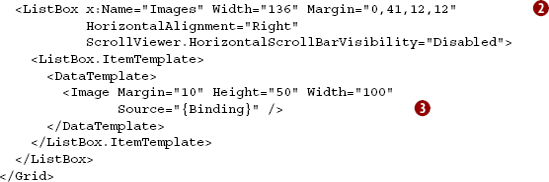
The XAML in listing 20.12 creates a second button, for requesting a snapshot ![]() , and adds a
, and adds a ListBox ![]() to hold the images. The
to hold the images. The DataTemplate for the ListBox is pretty simple; all it includes is a single image with its source set to be the item bound to it ![]() .
.
Once you have the XAML in place, using the code in listing 20.13 to update the code-behind.
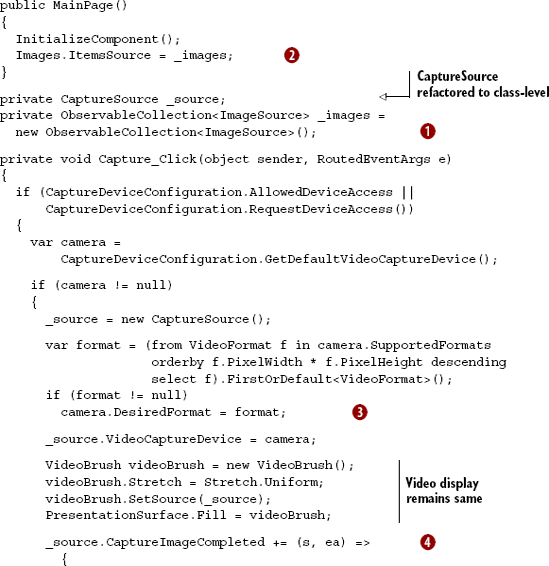
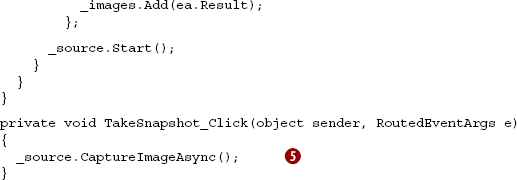
Listing 20.13 builds on our previous code, refactoring some things out to class-level variables, and adding in some new code. In addition to refactoring the Capture-Source out to class level, I added a new ObservableCollection of ImageSource ![]() to the class members. This will be used as the items source for the
to the class members. This will be used as the items source for the ListBox ![]() to support the binding of images using the
to support the binding of images using the DataTemplate.
The majority of the code inside Capture_Click is the same as what we've built so far. I included the LINQ method ![]() for obtaining the highest resolution, as we saw in previous examples. Toward the end of the method, before starting the webcam capture, I added an event handler
for obtaining the highest resolution, as we saw in previous examples. Toward the end of the method, before starting the webcam capture, I added an event handler ![]() to add the captured image to the
to add the captured image to the ObservableCollection ![]() . This image is a
. This image is a WriteableBitmap (covered in chapter 21) so we could do additional manipulation with it if we wanted. Finally, the button click handler for the snapshot button calls the CaptureImageAsync method ![]() of the capture source.
of the capture source.
With that code in place, our webcam display app can now capture stills alongside displaying the output from the webcam. In theory, you could treat those stills like individual frames in a video, but a better way to access the frame data is to use a custom VideoSink.
Obviously, capturing still images at random frames is no substitute for being able to get at the raw video bits. Currently, the only way to access the raw video stream is to create your own VideoSink class. This is a class that will take a video capture source and let the capture source push samples to it. It's possible then to get access to the raw bytes for the frames, but they'll be uncompressed. I have to stress that without fast compression, a video conferencing or chat application would be out of the question. Though possible to perform this compression from code inside Silverlight, it's unlikely to perform well enough to use on a real production application.
Disclaimers aside, let's see how to implement this ourselves. The first thing is to create the custom VideoSink class. Listing 20.14 shows how to do this. The class has no real implementation, as it'd completely depend on what you want to do with the bits. I've seen some examples that write out uncompressed (huge) AVI files, for example.
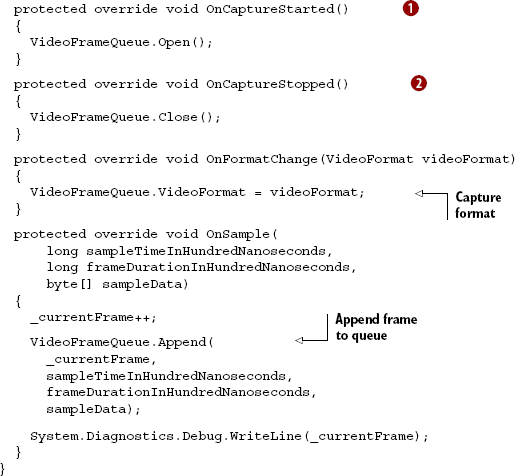
In this example, CustomVideoSink derives from the VideoSink class. That class provides four overridable members of interest. The OnCaptureStarted ![]() and
and OnCaptureStopped ![]() methods are used for startup and shutdown code. In those methods, I open and close a fictional
methods are used for startup and shutdown code. In those methods, I open and close a fictional VideoFrameQueue class. The implementation of that class would vary significantly based on what you intend to do with the raw bytes, so I've left it out of this example.
One other utility method is OnFormatChanged. This is executed when the video format is changed, and will always fire at least once, at the beginning of the capture. Once you know the video format, you can start doing something useful with the bytes that make up each frame. The OnSample method provides those bytes to us.
In the OnSample method, you'll almost certainly want to write the bytes and other required information to a queue to be processed. I've represented that with the VideoFrameQueue member. The queue would likely have a worker on a background thread that would write the frame to a larger file format, or do some simple encoding/compression as required. If you try to do that all inside this method, you'll run into timing issues.
The last step is to hook your custom video sink in to the processing pipeline. First, in the code-behind of the listing from the start of this chapter, add the following private member variable:
private CustomVideoSink _sink = new CustomVideoSink();
Then, in the same listing, modify the capture block in the button click event handler to look like listing 20.15.
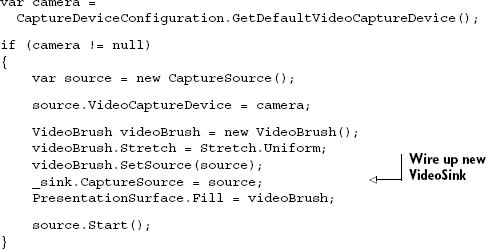
In listing 20.15, we've wired our new CustomVideoSink into the existing code. The new line in the event handler assigns the capture source, so the sink is now wired up to the webcam. Note that you can have more than one video sink attached to any capture source, but the processor utilization will rise proportionally.
Video is seldom captured alone. More often than not, you'll want to capture audio as well. The Silverlight webcam and microphone API supports capturing audio independently, or along with video.
The Silverlight Microphone API is almost identical to the Webcam API, so we'll leave it out for space reasons. The primary difference is that instead of a VideoCaptureDevice, you'll have an AudioCaptureDevice. There's no native way to output the raw audio, so you'll need to create an AudioSink just like we created a VideoSink for grabbing video frames. Of course, just as I noted with the VideoSink, what you do in the AudioSink is going to depend upon what your plans are for encoding. The data format that comes from Silverlight is raw PCM audio.
The Silverlight Webcam API is a powerful way to integrate video capture devices into your application. Already I've seen some novel uses including stop-motion animation, image and gesture recognition, Facebook photo uploading, and more. The API is simple to use, providing us with the device capabilities and a simple way to request access. It works cross-platform and abstracts away all the little details you'd normally need to understand to work with webcam and microphone devices on various machines.
One of Silverlight's main strengths is in media delivery. Looking at all the options presented in this chapter, it's no wonder. Silverlight supports multiple formats of SD and HD video and audio right out of the box. There's an excellent CodePlex project called the Silverlight Media Framework that provides support for IIS Smooth Streaming for extremely high quality adaptive streaming.
If Silverlight doesn't support a media format you want to use, it has a provision for allowing you to create managed codecs, decoding your own format and sending the raw unencoded bytes to Silverlight. This API is so complete, I've even been able to use it to generate video and audio from code, without any original media source files.
Finally, not all media comes from files or algorithms. Sometimes, media comes from you, in the form of captured video, audio, and still images from a webcam and microphone. Silverlight has excellent support for all types of webcams and mics, crossbrowser and cross-platform.
In the webcam still image capture demo, we used a couple image classes, including the WriteableBitmap returned in the snapshot callback. Images are often used hand-in-hand with video, both as still captures and as video thumbnails. Images are also prevalent throughout most applications as button icons and other design elements. In the next chapter, we'll go through all the ways you can work with images in Silverlight, including loading image files, generating images from scratch, and working with enormous images with Deep Zoom.
[1] 1 IIS Smooth Streaming Technical Overview, Alex Zambelli, Microsoft, March 2009. http://bit.ly/Smooth-StreamingTech