In several examples in this book, including those in reporting (see chapter 19), MVVM (see chapter 16), and WCF RIA Services (see chapter 17), we need to work against database data and an entity data model. For this you'll need SQL Server with the AdventureWorks database loaded.
In this appendix, we'll install the database, and create the database connection and the entity data model. The entity data model will be added to the ASP.NET web project in your Silverlight solution.
If your database installation doesn't already contain the AdventureWorks database, visit http://msftdbprodsamples.codeplex.com/ to download the latest version for your database version.
The CodePlex database sample site includes a number of database releases for the various editions of SQL Server, currently up to SQL Server 2008 R2. My own dedicated database server is running SQL Server 2008, and I have a local SQL Server Express 2008 database instance that came with Visual Studio 2010. The sample databases will install on either one.
In this setup and in all of my examples, I'm using SQL Server 2008 on a dedicated server. You can install locally or use a separate server or virtual machine (VM). Though I haven't tested with older versions, this should also work on SQL Server 2005. A default installation of Visual Studio 2010 up-level versions (such as Pro and Ultimate) includes SQL Server Express 2008. If you have an MSDN subscription, you can also download the developer editions of SQL Server through your subscription program.
If you have a full SQL Server 2008 installation, you can download the full MSI and install the suite of databases. Once the database is installed, you can set up the database connection and create the entity data model.
The CodePlex site includes a walkthrough (kept current with the releases) showing how to install the sample databases. Depending on the engine you're using and the options selected when you installed your database server, some databases may not be available to you. The only database we use in this book is AdventureWorks, also called AdventureWorks OLTP. You can ignore the warehousing and reporting databases if you wish, as I don't use them in the examples in this book.
If you're not using a full dedicated installation of SQL Server, you'll want to install using SQL Server Express.
SQL Server Express comes with most editions of Visual Studio and installs by default. It's the default database server used for ASP.NET membership, role, and session information on a development machine. But since it doesn't install any client tools, many folks don't realize it's there.
As with the dedicated SQL Server instance install, you can download the full MSI and install the suite of databases. You can safely ignore the warehousing and reporting databases. Once the database is installed, you can set up the database connection and create the entity data model.
If you're not running a full instance of SQL Server, the databases will install locally with SQL Server Express. When using SQL Server Express, you have two options:
Install the databases locally, then use them like any other SQL Server installation (doesn't work in all install scenarios)
Install the databases locally, then drag the AdventureWorks.mdb file into your
App_Datafolder on the asp.net project
I prefer the second option, as it simplifies the creation of the database connection, and is supported in almost every installation scenario. But either option will typically work.
Regardless of whether you used a local SQL Server instance or a remote one, once you have the AdventureWorks database installed, you'll need to create the database connection and the entities.
First create a new Silverlight project for the example you're following. Make sure you create the associated web project (the default action), as that's where the connection information and any services will live. The new project dialog for the default Silverlight project type will look like figure A.1. The dialog for the Silverlight Business Application template will be different, and will have the options already set.
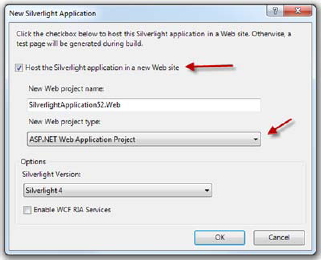
Figure A.1. When creating the Silverlight application, be sure to host the application in a new Web Application.
Once you have the project created, the next step is to add the database connection and create entities.
Right-click the web project in the solution explorer and choose Add New Item. In the Data section of the installed templates, select ADO.NET Entity Data Model. Name that entity data model Adventure-WorksEntities.edmx. figure A.2 shows the dialog with the correct template selected and named.
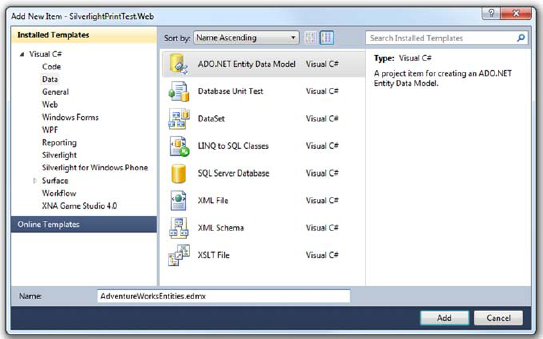
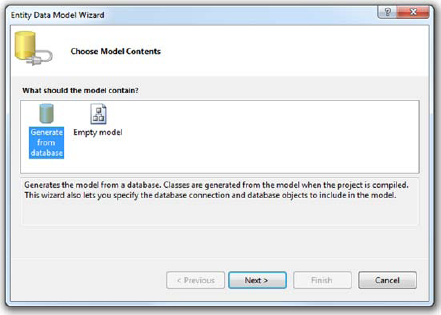
Figure A.7. The first step of the Entity Data Model Wizard. Be sure to choose Generate from Database.
Once you click Add, Visual Studio will walk you through a wizard that makes the process of generating the model pretty easy. In the first page of the wizard, choose Generate from database and hit Next. The other option, Empty model, would require you to build the entities from scratch. figure A.3 shows the wizard dialog with the correct option selected.
You'll then be presented with the Choose Your Data Connection step, as shown in figure A.4. If the AdventureWorks database isn't located in the connection list, click the New Connection button and create a new Microsoft SQL Server (SqlClient) connection to your database.
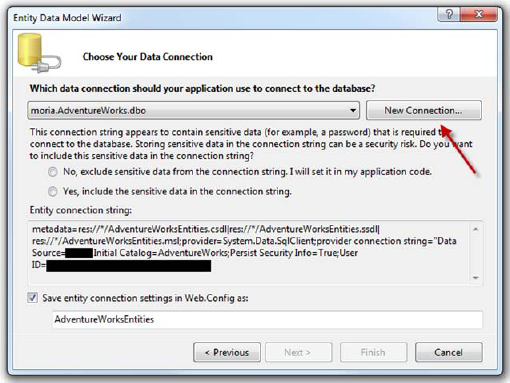
Figure A.7. The Choose Your Data Connection dialog box. If you don't already have an AdventureWorks connection created, click the New Connection button. This screenshot shows the data connection dialog with a valid data connection already selected by default.
If you already have a connection for AdventureWorks set up, select that. The authentication method chosen will differ depending upon your SQL Server setup. figure A.5 shows how my dialog looks, with all the interesting bits redacted.
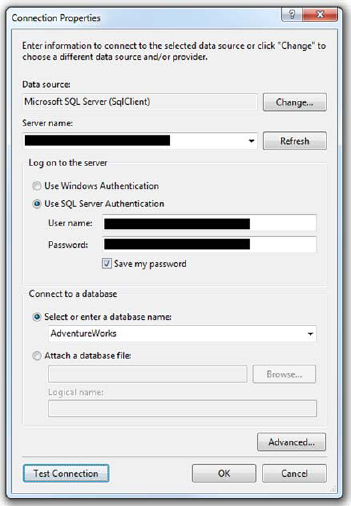
Figure A.5. Creating a new connection to the Adventure-Works database. Be sure to test the connection.
Once the connection is created, allow the dialog to save the entity connection string as AdventureWorksEntities. Also, if you're using SQL Server authentication, check the option to include the sensitive data (password) in the connection string, as shown in the two radio buttons in the middle of figure A.4.
If saving the connection information makes you uncomfortable, you can either try with Windows Authentication (depends on machine/network setup) or create a dedicated SQL Server account with limited rights just for the sample. Of the choices, I recommend the dedicated SQL Server account.
Once the connection is picked or newly set up, you'll be prompted to select the entities to be added to the model.
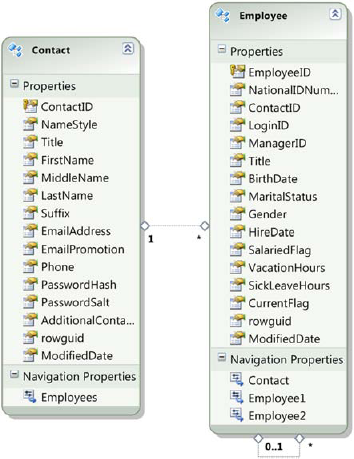
On the Choose Your Database Objects page, select the Employee (Human Resources) table and the Contact (Person) table. Leave the other options as is, including setting the namespace to AdventureWorksModel. figure A.6 shows the correct selected tables and the correct model name.
You can of course name the model anything you'd like. But to follow the examples in the book and use the code listings, you'll want to use the names indicated in the screenshots here.
At this point, you're able to finish the wizard. The wizard will process for a few seconds, then add the connection information to your configuration file, and the model .edmx and .edmx.cs files to your web project. The created .edmx file should look something like figure A.7 when opened in the designer.
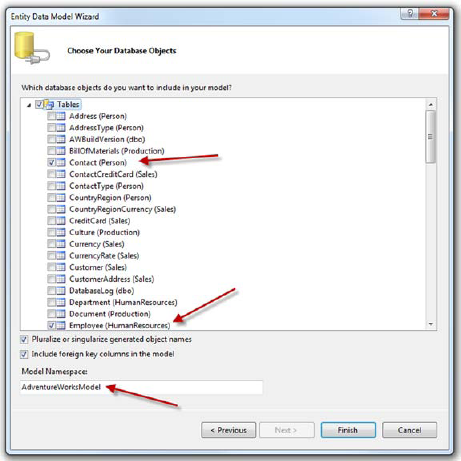
Figure A.6. Select the Contact and Employee tables from the AdventureWorks database. Leave the model namespace set to AdventureWorksModel.
Once you have the data model in place, build the solution to get all the types loaded, and continue with the rest of the sample in the chapter.