
Silverlight 4 is the first release that can be considered truly "ready for business." The support for binding and validation, WCF RIA Services, and out-of-browser trusted applications are all major factors in this. One equally important reason is the added support for printing.
Many business applications need to print paper forms and reports as a standard part of their process. Very large-scale applications typically farm that functionality out to a server somewhere with centralized print systems. Most other applications use printers directly mapped and available on the client workstation. For those applications, platform support for printing is essential.
Printing support opens up other nonbusiness scenarios as well. Now you can make that coloring-book creator or recipe application you've had in your "cool app ideas" folder. I joke about printing, but I used to print directions before I had a GPS, and flight information before it was synchronized to my phone via exchange. There are still many interesting and legitimate uses of printing inside and outside of business.
In our tour of printing, we'll take a look under the hood to understand how printing works in Silverlight, then handle the use case of printing onscreen content. From there, we'll look at considerations that come into play when building multipage documents. Wrapping up, we'll look at an example of a simple report writer with headers, footers, and items rows.
When designing the printing system, the Silverlight team wanted something that would work with all current onscreen visuals, while not adding a large feature payload to the overall runtime. Team members also wanted something that would work cross-platform and be available in all modes of operation: in-browser, out-of-browser trusted applications, and out-of-browser sandboxed applications.
For those reasons, the printing process resembles the overall screen layout process (see chapter 6), with additional printing-specific steps tagged on. Figure 19.1 shows the printing process at a high level.
The printing process starts by creating a PrintDocument object and calling its Print method. The PrintDocument then raises the BeginPrint event if there are any listeners. Your own startup code can run inside that event handler. Then, for each page to be printed, the PrintDocument raises the PrintPage event. Inside the handler for that event, you'll set the page visual and tell Silverlight if there are any more pages. The printing system then lays out the content and rasterizes it into a bitmap to send to the printer driver. Once that page is sent to the printer driver, Silverlight raises the PrintPage event if you've indicated that there are more pages, or raises the EndPrint event if not. During this process, the primary object you're interacting with, the object raising the three mentioned events, is the PrintDocument class.
In this section, we'll start with the PrintDocument class, covering its properties, methods, and events. In detail, we'll cover the PrintPage event and the actions you take within it. After that, we'll take a deeper look at the rasterization step and how that affects the process.
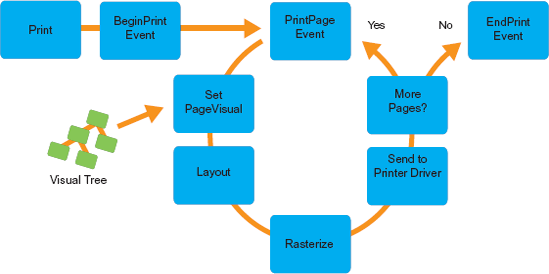
Figure 19.1. The printing process at a high level. User code may be run inside the BeginPrint, PrintPage, and EndPrint events.
The heart of printing in Silverlight is the PrintDocument class, located in the System. Windows.Printing namespace. The PrintDocument class includes the single Print method required to kick off the process, a helper property to provide access to the page count, and three important events raised at different points in the process. Table 19.1 describes each of these members.
Table 19.1. PrintDocument members
Member | Description |
|---|---|
| Displays the Printer dialog and, if accepted, raises the |
| A dependency property containing the total number of pages printed. |
| Events fired at the beginning and ending of the print job, respectively. |
| The most important event. This is the event that enables you to build and print a single page. |
In the remainder of this section, we'll look at these properties, methods, and events in more detail, starting with the Print method.
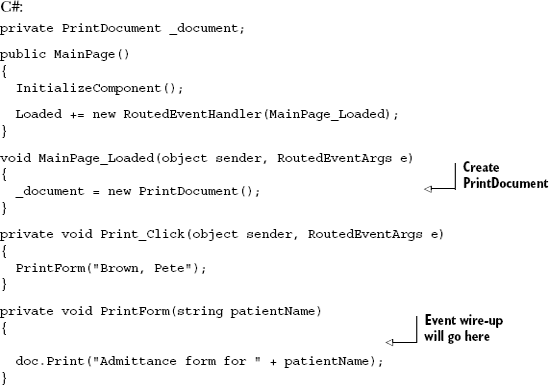
The first step after instantiating the PrintDocument class is to call the Print method. The Print method takes in a parameter specifying the name of your document. This document name is what shows up in the operating system print spooler. The name should be descriptive, containing the title of your report or document. If your application plans to print many of these, you may want to add an identifier such as the patient's name in the case of a medical report, or perhaps some criteria used to generate the report. Listing 19.1 shows how to use the Print method.
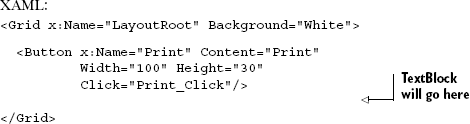
This example doesn't do anything meaningful yet—it doesn't print anything. We'll use this as the base for the rest of the examples centered around PrintDocument. Specifically, the placeholders for the TextBlock and the event wire-up will be filled out in later examples.
As written, the code is fairly simple. It sets up the required PrintDocument class instance and calls the Print method. The Print method is asynchronous: it immediately returns once you call it. But it raises all of its events back on the calling thread, so the UI thread can still be blocked.
Note that in untrusted applications, the Print method must be called from a user-initiated event, such as a button click event. Trusted out-of-browser applications (see chapter 5) eliminate this restriction. Once you wire up the PrintPage event (coming up shortly), you'll see that the print spool entry document name will contain the value passed into the Print method. Figure 19.2 shows the Windows 7 print spooler with a Silverlight print document spooled.
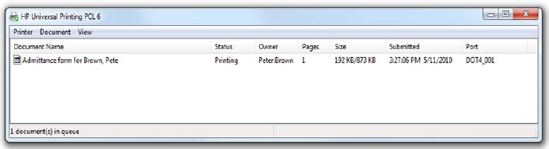
Figure 19.2. The Windows 7 print spooler showing the Silverlight document titled "Admittance form for Brown, Pete," created in listing 19.1.
The PrintDocument supports multipage printing. While printing, you'll find it useful to get the current number of pages that have been printed, in order to report the print status to your user. The PrintedPageCount property provides us with this information.
The PrintedPageCount property contains the number of pages sent to the print driver. This doesn't necessarily correspond to the number of pages physically printed, as printers are typically much slower than the PC they're attached to. But it's useful as a general way of reporting status to the user.
PrintedPageCount is a read-only dependency property, so you can bind to that in XAML. Continuing from our example in listing 19.1, we can modify the code and XAML as shown in listing 19.2 to support this. Add the TextBlock in the XAML to the spot reserved with the comment.
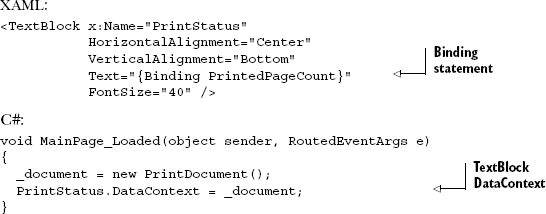
Now, when you print a multipage document, the status text will display the number of pages that have been printed so far. This is similar to what you see when you print a document in Microsoft Word, where a status dialog appears with a number showing the progress.
Tip
The PrintedPageCount property is incremented after the PrintPage event returns. Any check you do after setting the PageVisual will need to take into account that the PrintedPageCount hasn't yet been incremented.
In addition to the PrintedPageCount property, two other events can be used for status reporting, as well as for startup and shutdown code: BeginPrint and EndPrint.
The BeginPrint and EndPrint events are raised at the beginning and end of the print job, respectively. Specifically, BeginPrint is raised before the first call to the Print-Page event, but after the printer dialog is shown, and EndPrint is raised after the last call to EndPrint completes or if the user cancels printing in-progress.
If the user cancels printing from the printer selection dialog, neither BeginPrint nor EndPrint will be raised. Similarly, if Silverlight can't print due to issues with paper format or memory allocation, BeginPrint may not be called.
Continuing our example, the following code shows how to wire up the two events. We won't do anything with BeginPrint in this example, but we'll show a message box when completed using the EndPrint event handler. The event handlers should be inserted into the listing 19.1 code, in the PrintForm method, where the event wire-up comment is located:
_document.BeginPrint += (s, e) =>
    {
    };
_document.EndPrint += (s, e) =>
  {
    MessageBox.Show("Print job completed.");
  };
The BeginPrint and EndPrint methods may be used for status reporting or for doing document build-up and tear-down. Unlike the PrintPage event, their event arguments don't contain any actionable information. It's not essential to wire them up, but you'll find that a complete printing solution typically requires one or both of them.
One event that's not optional is the PrintPage event.
The PrintPage event is the heart of the user-code side of the printing system in Silverlight. This is where you'll obtain key layout information from the system and use it to create or otherwise lay out the visuals you use to represent the page. It's also the event where the assignment of the printer page root visual occurs, and the event where the decision is made as to how many pages the print document will contain.
For each page that will be printed, the PrintDocument class raises the PrintPage event. The PrintPage event passes in an instance of the PrintPageEventArgs class, specific to that page. Table 19.2 shows the properties of the class.
Table 19.2. PrintPageEventArgs members
Member | Description |
|---|---|
| Gets the margins of the page as set by the printer driver settings. Represented at 96dpi. |
| The size (width and height) of the printable area inside the margins of the page. This is represented at 96dpi. |
| Set to true if there are additional pages after this one. |
| Set this to the root element (typically a panel) that makes up the page content. |
We'll cover each of the properties next, starting with the properties that report the size of the area you can use for content: PageMargins and PrintableArea.
The PageMargins property is a standard Thickness property like those used for margins throughout the rest of Silverlight. It reports the size of the margins set in the printer configuration dialogs in your system.
The PrintableArea property is a Size property that indicates the width and height of the area within the margins. This is the area in which you can lay out your content.
It's important to note that the PageMargins and PrintableArea measurements are all provided at 96 dpi, consistent with screen layout. My printer handles resolutions up to 1200 dpi (normally set to 600 dpi). Despite that, the printable page area comes through at 784 × 1024 and the margins come through at 16,16,16,16. Add 32 (right and left margin) to 784 and divide by 96, and you get 8 1/2 inches. Do the same for the height and you get 11 inches. 8 1/2 × 11 inches is, in the US, the size of a standard sheet of letter-sized paper. The print quality itself is better than that, but still not as good as what you may be used to.
Note
Silverlight is currently limited to printing documents sized at A3 or smaller. Large-format pages may work in certain situations, but aren't supported. For reasons why, see the section on rasterization.
Similarly, if you print using the Microsoft XPS Document print driver (a great test driver), you'll see that it has no enforced margins, and therefore provides a size of 816 × 1056.
If the content you have won't fit on a single page, Silverlight will clip it to the dimensions specified in PrintableArea. In those cases, you may want to handle manually clipping and saving the remaining elements for the next page. To indicate additional pages, use the HasMorePages property.
Printed documents may consist of more than one page. But without precalculating all the page content (not a bad idea, but not required), you won't know the number of pages until you're done printing. Similarly, you don't necessarily know if a page is the last page until you try to fit all the content into the printable area and see what fits.
For those reasons, the PrintPage event includes the boolean HasMorePages property. Simply assign true to this property to indicate that the current page isn't the last page to be printed. This will cause Silverlight to raise another PrintPage event upon the completion of the current one. When you have no more pages to print, set Has-MorePages to false (the default value) to end printing. The following code expands upon listing 19.1 to do a simple check against a hard-coded number of pages. The -1 is because the PrintedPageCount is incremented after the PrintPage event returns:
int numberOfPages = 5;

_document.PrintPage += (s, e) =>
  {
    Debug.WriteLine("Printing page");
e.PageVisual = LayoutRoot;
e.HasMorePages =
_document.PrintedPageCount < numberOfPages - 1;
};Note also that we're effectively doing a print-screen in this example, by passing the LayoutRoot in as the PageVisual to be printed. We'll discuss PageVisual in detail in a moment.
You can also allow the user to cancel printing by setting HasMorePages to false when he hits a cancel button. Doing so will terminate printing after the current page. To do that, you'll need to set a flag in your class and have your code in the print method check for this flag. Additionally, if you know the user has hit cancel before you set the PageVisual, you can both skip setting the PageVisual and set HasMorePages to false to avoid printing the current page and any subsequent pages.
The PageVisual property is the property you use to assign the root element of your page. Think of your root element like LayoutRoot on a typical Silverlight page. This will usually be a panel of some sort, but any UIElement will work.
Before assigning the element to the PageVisual property, you need to ensure that it has all of its children in place. When PageVisual is set, it's then measured and laid out. Since it's not part of the proper Silverlight visual tree, adding elements to the visual doesn't cause an automatic measure and layout pass (see chapter 6 for more information on measuring and layout). You can either manually force a measure and layout, or simply populate the visual completely prior to assigning it to the PageVisual property.
Figure 19.3. The result of assigning the page visual prior to adding child elements to a part of the visual. Layout doesn't happen automatically, so all the elements are stacked on top of each other.
Figure 19.3 shows the result of adding child elements after assigning the
PageVisual.
When assigning the PageVisual, keep in mind that any content outside
the rectangle defined by the PrintableArea will be clipped. If you
need to fit more content on the page, you can apply a scale transform (see chapter 6) to shrink the content down by a ratio that will fit it all on-page.
We'll cover more on setting the PageVisual when we look at some specific printing use cases in sections 19.2 and 19.3.
Once the PageVisual is set and the PrintPage event returns, Silverlight prepares the page for printing by first calling Measure and Arrange (the layout pass described in chapter 6), and rasterizing it to a single bitmap representing the page.
In chapter 6, we discussed the rendering process for onscreen elements. One step of that process was the rasterization of vector and text elements, and the included blitting of raster (bitmap) elements. Printing follows the same general process, down to the rasterization step.
When you print a tree of elements by assigning it as the page visual, those elements are all rasterized into a page-sized bitmap (or larger if you overrun the size of the page), clipped to the page dimensions, and sent to the printer.
If you're familiar with how printing normally works when using printer languages such as PCL or PostScript, you may find the rasterization approach a little odd. In typical document printing, the print driver sends a list of commands to the printer; those commands contain information such as drawing commands, raster images, font and style specifications, and text commands. The end result is a smaller payload, and the printer is free to optimize the printing for its own capabilities and resolution.
The bitmap-based approach in Silverlight is flexible, is functional across platforms, and supports anything Silverlight can render onscreen. But it's fairly time- and memory-intensive. A Microsoft Word document with text and images prints fairly quickly on my HP LaserJet 1320, taking just a few seconds between my hitting the Print button and seeing output on the printer. A similar document printed through Silverlight takes considerably longer because it's treated as one (approximately) 8 1/2 × 11 inches bitmap.
For those reasons, I don't consider the printing API in Silverlight to be a good choice for large reporting solutions. You'll be waiting quite a long time for a 50-page report to come off the printer. The actual speed is as much a function of the printer hardware as anything, so your own mileage may vary.
Caveats aside, we'll now turn to a few common printing use cases and walk through how to implement them using the Silverlight printing system, starting with printing content as it appears onscreen.
If a user wants to print the entire web page, she can do so using the browser's Print button. This will also print the contents of any Silverlight control, but only what's visible onscreen. If you have content in a ListBox, for example, and want to have it expand to show its entire contents, you won't be able to do that. If your Silverlight application extends below the fold on the browser (if it's taller than the visible portion of the browser page), you're also out of luck.
Additionally, if you want to print only the contents of your Silverlight page and not the surrounding web page, that's not something most browsers will support. For that scenario, you'll want to use the printing API.
In this section we'll explore three ways of printing onscreen content: printing it as is, providing a new root so it can perform layout specific to the printer page, and a combination of providing a new root and using a ScaleTransform to ensure the content fits on the printed page.
The easiest way to print content is to simply hand off the root of your UI and print it as is. This simple approach works for things that fit onscreen, or to provide the equivalent of a print-screen function for your application. Figure 19.4 shows an example application with a fixed height and width. We'll want to perform the equivalent of a print-screen on this application.
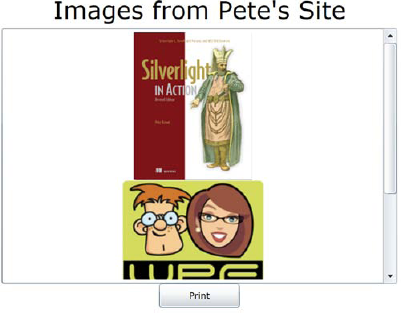
Figure 19.4. The example application from listing 19.3. The application has a fixed height and width.
Figure 19.4 shows the results of listing 19.3. Note that the application doesn't automatically scale to the size of the page, as it has a hard-coded height and width. Not also that not all the content fits onscreen due to the hard-coded size.
Listing 19.3 shows the markup for a little application that lists several images from my web site. We'll use this application markup throughout the rest of the examples in this section.
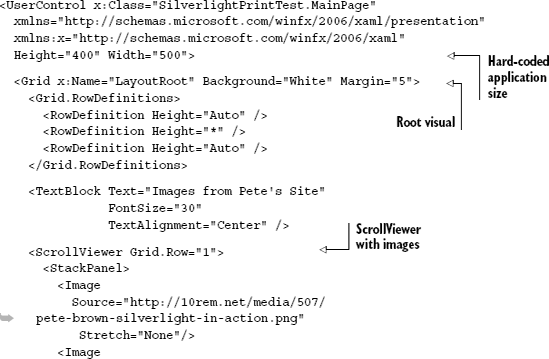
If you use the browser to print that same content, all you'll see is what's visible on the browser page. To get the same effect from Silverlight, you'll simply assign the User-Control or LayoutRoot to PageVisual in the printing code. Listing 19.4 shows how to do that in the code-behind, using the XAML from listing 19.3.
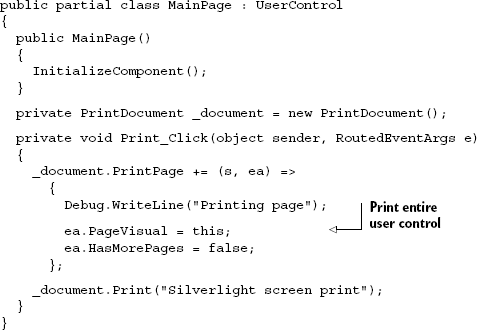
When you hit the Print button, the result is exactly what you see onscreen, but on a printed page. Note that you could also assign the LayoutRoot as the element you wanted to print. As the LayoutRoot already belongs to another visual tree, it won't be resized or anything when assigned to the PageVisual. One way around this is to reroot the root element.
One way around the issue with fixed-size content is to take the LayoutRoot (or another element) and reroot (or reparent) it in a printer-specific root element. That new root element is sized to fit the printer page. Listing 19.5 shows how to reroot the element using the BeginPrint and EndPrint events for setup and repair.
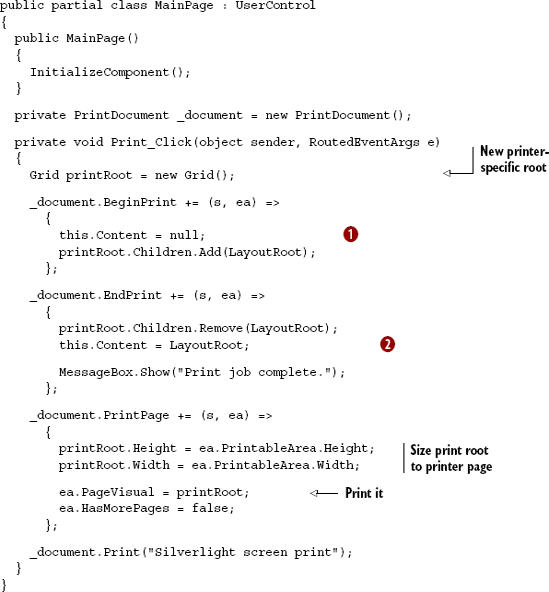
The process is picky, but relatively straightforward. Before you can move an element to be a child of another element, you must first remove it from its current parent ![]() . In
. In BeginPrint, we remove LayoutRoot from the page (its current parent) and add it to the children of the new printer root. In EndPrint, we reverse the process ![]() . When
printing, we simply size the new printer root to the dimensions provided by the printing system, then assign to the
. When
printing, we simply size the new printer root to the dimensions provided by the printing system, then assign to the PageVisual the new printer root element as opposed to the user control itself.
This whole swapping process exists only to allow us to provide layout dimensions that differ from the onscreen dimensions. If you could resize the elements onscreen, that would also work, but may be jarring to the user watching the process.
Depending upon the complexity of what you're trying to do, this could be tricky. For example, there may be unintended consequences associated with additional layout passes for controls you're using, or you may have binding information or resources that are no longer accessible once rerooted. It's not an approach I recommend without first testing for your specific scenario. That being said, it gets around the issue with having fixed-size page content and wanting to print the content in full.
Another option is to scale the content to fit. Similar to this approach, you'll need to make a decision whether to do it live onscreen or scale using an offscreen visual tree.
Scaling the content to fit on a single page is another way to print onscreen elements. As was the case with the previous approaches, you can scale the content onscreen, in the live visual tree, or you can reroot and scale the print-specific visual tree.
In most cases, it'd be pretty jarring to scale the onscreen content, so for this example, we'll use the print-specific visual tree.
In this example, I duplicated the content inside the ScrollViewer five times, in order to provide sufficient content to illustrate the example. Simply copy and paste the three Image elements in the XAML so they each appear five times.
Next, modify the code from example 19.5 so it does an automatic scale using a ScaleTransform (see chapter 6 for information on render transforms). Listing 19.6 shows the changed code in the two affected event handlers.
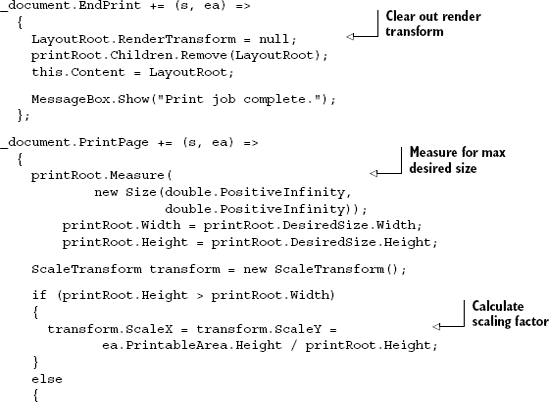
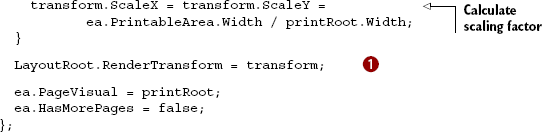
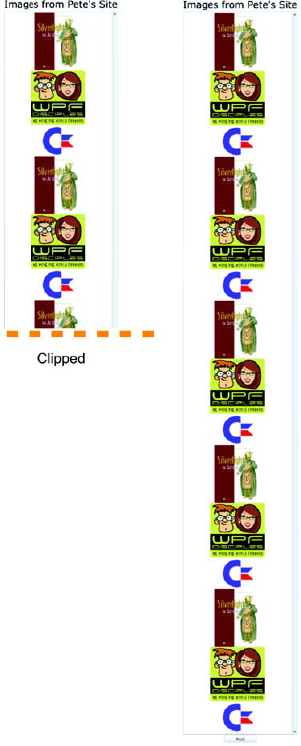
Figure 19.5. The content on the left had the transform applied directly to the PageVisual. It was clipped prior to transforming. The content on the right had the transform applied one level below the Page-Visual, at the Layout-Root. The LayoutRoot was transformed, and the PageVisual was clipped, providing the result we were looking for.
If you look closely, you can see that in listing 19.6 I did something strange: I assigned the render transform to LayoutRoot ![]() instead of
instead of printRoot. Why did I do that?
It turns out that the print clipping is applied directly to the PageVisual you supply. If you also have a transform attached to that visual, it'll transform the clipping rectangle as well. The effect is having something that's sized to fit the page, but is clipped in exactly the same spot it would be if it were at 100% scale— not what we want.
There are a couple ways you could solve this. You could put yet another visual between the PageVisual and the LayoutRoot, or if it suits you, attach the transform to the element one level below the PageVisual: the LayoutRoot in this case. Figure 19.5 illustrates how this clipping and transforms interact.
The figure shows what happens when you put the transform on the same level as the clip (left image) or one level down, as shown on the right-side image.
If you apply a transform to resize content and you attach it to an onscreen
visual, make sure you remove it when complete. If the content already has a transform applied to it, you'll need to either create a transform group, or—my recommendation—inject a second visual between your element and the PageVisual.
Printing the onscreen content is certainly useful, and often a desirable feature in applications. More common is printing information specifically created for the printer. Such content often spans more than one page, so we'll look at printing purpose-built trees and supporting multipage documents in the next section.
Multipage printing comes in many flavors. You could be printing documents or letters, perhaps with mail-merge fields. You may be printing a long tabular report, or you may have to print a complex multipage form. All three have two things in common: they may span more than one page and they contain information formatted specifically for the printer.
Before we continue, let me reiterate: Silverlight printing isn't currently optimized for large multipage documents. Each page is a large bitmap, and takes some time to print—how much depends on the printer and driver. If your application needs to do a lot of printing, consider sending it through a server printer or another approach, such as using COM automation to generate a report using Microsoft Word or Excel.
That out of the way, I'll show you how and let you figure out whether it works in your situation. In the remainder of this section, we're going to build a simple report with a page header and footer, and a number of lines in-between. This isn't a full report writer, although I do have something akin to that on http://silverlightreporting.codeplex.com. We'll start with building a little infrastructure, then print out pages with just the line items. From there, we'll add simple headers and footers to each page. First, let's set up our report data.
For this example, we'll use the same AdventureWorks database and entity model used in other chapters. Please refer to appendix A for instructions on setting up the database, connection, and entity model in your web project.
Once you have the database connection information and model set up, we can turn our attention to creating a WCF service to surface the data to the Silverlight client.
Continuing in the web project, it's time to create the service. The first step is to create a folder named Services and into it add a new Silverlight Enabled WCF Service. Figure 19.6 shows the Add New Item dialog with the correct template selected and named.

For this demo, we're only interested in read-only data, so we're going to create a basic service method that returns data from the Adventure Works entity model. We won't support create, update, or delete options. If you're interested in options for that functionality, read chapter 17 on WCF RIA Services.
We'll implement the service methods soon. Before we can do that, we need to create the EmployeeReportItem class.
The EmployeeReportItem class represents a single row of data for our report. We could simply send down the complete entities from the model, but that would be wasteful and perhaps even confusing. Instead, we'll create a denormalized entity that contains properties from both the Employee and the Contact classes.
In the Services folder of the web project, create a new class named EmployeeReportItem. Listing 19.7 shows the implementation of this class.
Example 19.7. The EmployeeReportItem class
public class EmployeeReportItem
{
    public int EmployeeID { get; set; }
    public string FirstName { get; set; }
    public string LastName { get; set; }
    public string Title { get; set; }
    public string EmailAddress { get; set; }
    public string Phone { get; set; }
    public DateTime HireDate { get; set; }
}
Note that since we're using .NET 4 on the server, we don't need to include DataContract and DataMember attributes in the class. WCF will serialize all public members by default.
Once the EmployeeReportItem class is in place, we can use it from our service.
The last step on the server-side of the project is to add the implementation of the GetEmployeeReportData method of the service. This implementation will join the two entities and pull out fields from them to create EmployeeReportItem instances. Those instances will then be returned to the caller, our Silverlight client in this case. Listing 19.8 lists the code required in the service.
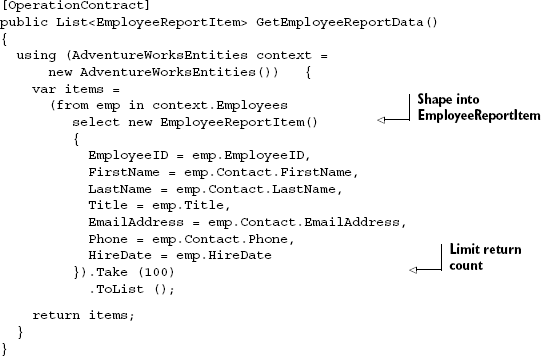
The service pulls information from the AdventureWorks database, using LINQ to both limit the number of items returned to a reasonable number (100) as well as merge the entities to create a single EmployeeReportItem for each row of data.
The final required step before we get into the report itself is to add a reference to the WCF service. First build the solution and ensure that there are no errors. Then, right-click the Silverlight project and choose Add Service Reference.
In the dialog, click Discover to find the services in your solution. If successful, you'll see something like figure 19.7.
In the namespace area, enter the name Services. On the Silverlight client, that will be the namespace (under our root namespace) into which the service client proxy and the EmployeeReportItem class will be generated.
Before we move into printing, let's add one last step: testing. This is optional, but I recommend doing it to ensure that all the other bits are working correctly.
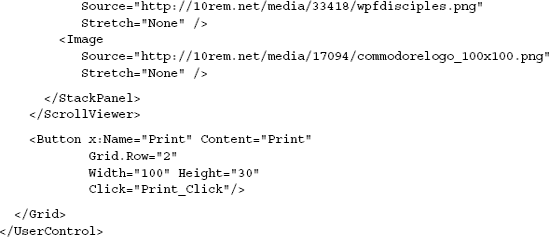
In the code-behind for the main page of your project, add the code shown in listing 19.9. Be sure to right-click AdventureWorksServiceClient and choose Resolve (or hit Alt-Shift-F10) to automatically add the correct using statement to the code file. public MainPage()
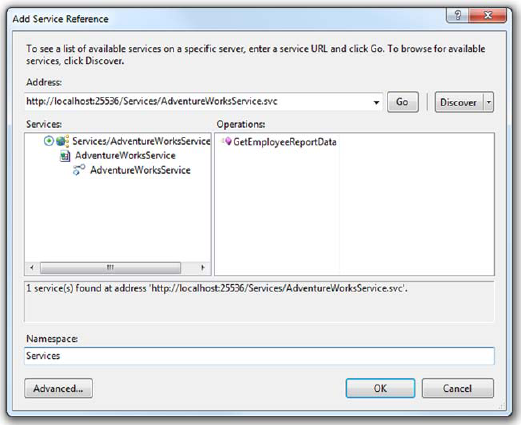
Figure 19.7. Adding a service reference from our Silverlight project to the WCF Service in the web project
Example 19.9. Code to test the service reference from Silverlight
{
  InitializeComponent();

  Loaded += new RoutedEventHandler(MainPage_Loaded);
}

void MainPage_Loaded(object sender, RoutedEventArgs e)
{
  var client = new AdventureWorksServiceClient();

  client.GetEmployeeReportDataCompleted += (s, ea) =>
    {
      if (ea.Result != null)
      {
        foreach (EmployeeReportItem item in ea.Result)
        {
          Debug.WriteLine(item.LastName + ", " + item.FirstName);
        }
      }
    };
  client.GetEmployeeReportDataAsync();
}
When you run the project, take a look at your Output window and see if it displays 100 names. If it does, you're good. If not, debug any error you receive and try again. Once it's working, you're ready to build the report, starting with the line items. Be sure to remove the test code from the project.
For the report, we're going to build a custom print-optimized visual tree using a combination of code and data templates.
Note
This report is optimized for learning the concepts and fitting into a book. It's not meant to be a reusable report class, but rather a starter to provide insight into how you might create your own reports in Silverlight.
In this and the following sections, we'll first get the data from the WCF service into the report class. Then we'll print a single-page version of the report using just the line items and a data template. The next step is modifying the report to support page breaks. From there, we'll add a header and footer before wrapping up.
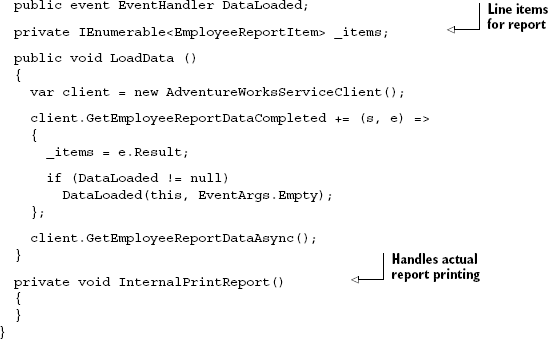
The first step is to create, in the Silverlight project, a class named EmployeeReport. Into that class, we'll add code to call the service and load the data. The code to load the data will be similar to the test code in listing 19.9. Listing 19.10 shows the class with a LoadData method and the shell of the Print method.
I chose to derive from FrameworkElement for two reasons:
I need to derive from some
DependencyObject-derived class in order to support the dependency properties that will be used for the templates.I want the element to be on-page and accessible in XAML.
For more on FrameworkElement, see chapter 6.
Listing 19.10 forms the shell of our new report class. Because we'll use it in XAML, in addition to deriving from FrameworkElement, I needed to include a default constructor. It's an empty constructor, but its presence means that it can be instantiated in XAML. Additionally, as we need to support a user-initiated print process, I raise a DataLoaded event when the data is loaded. The UI can then capture that and allow the user to click a button to perform the printing.
Now that the class has been created, we'll add support for the first template: the item template.
The next step is to add a dependency property for the item template used to format items on the report. The DependencyProperty will hold a DataTemplate containing visuals and binding statements for the items rows. Listing 19.11 shows the code you'll need to add to the EmployeeReport class.
Example 19.11. The ItemTemplate on the EmployeeReport class
public DataTemplate ItemTemplate
{
  get { return (DataTemplate)GetValue(ItemTemplateProperty); }
  set { SetValue(ItemTemplateProperty, value); }
}

public static readonly DependencyProperty ItemTemplateProperty =

DependencyProperty.Register("ItemTemplate",
typeof(DataTemplate), typeof(EmployeeReport),
new PropertyMetadata(null));
We'll have a few more dependency properties to add before we're through. Before we do that, let's crack open the MainPage XAML and add a reference to the EmployeeReport type and flesh out the data template for the item rows.
Listing 19.12 shows the MainPage XAML file with a reference to the local namespace, and an instance of the report with an appropriate yet simple data template. I've also added a Print button (with a click handler in the code-behind) to provide a way to print the report.
Example 19.12. MainPage markup with an instance of our report and template
<local:EmployeeReport x:Name="Report">
  <local:EmployeeReport.ItemTemplate>
    <DataTemplate>
      <Grid>
        <Grid.ColumnDefinitions>
          <ColumnDefinition Width="40" />
          <ColumnDefinition Width="180" />
          <ColumnDefinition Width="180" />
          <ColumnDefinition Width="210" />
          <ColumnDefinition Width="100" />
          <ColumnDefinition Width="70" />
        </Grid.ColumnDefinitions>

        <TextBlock Grid.Column="0"
                   Text="{Binding EmployeeID}" />
        <StackPanel Grid.Column="1" Orientation="Horizontal">
          <TextBlock Text="{Binding LastName}" />
          <TextBlock Text=", " />
          <TextBlock Text="{Binding FirstName}" />
        </StackPanel>

        <TextBlock Grid.Column="2"
                   Text="{Binding Title}" />

        <TextBlock Grid.Column="3"
                   Text="{Binding EmailAddress}" />

        <TextBlock Grid.Column="4"
                   Text="{Binding Phone}" />

        <TextBlock Grid.Column="5"
                   Text="{Binding HireDate, StringFormat='{}{0:d}'}" />
      </Grid>
    </DataTemplate>
  </local:EmployeeReport.ItemTemplate>
</local:EmployeeReport>
The local namespace is mapped to the project the code and markup reside within. The ItemTemplate contains a DataTemplate that has a grid column for each column displayed on the report. Each column contains one or more fields bound to the properties of the EmployeeReportItem class. The EmployeeReport element itself resides in the LayoutRoot grid, left out of the listing for space considerations. Also in the LayoutRoot grid is the button previously mentioned:
<Button x:Name="Print" Content="Print" Width="100" Height="30"
        IsEnabled="False"
        Click="Print_Click"/>
Note that the button isn't enabled by default. We'll enable it once the data is loaded from the service. The code to run the report can't be included in the service return event handler, because (in normal trust applications) it must be run from a user-initiated event.
Listing 19.13 shows the code-behind with the code to load the report data and handle the print report button click.
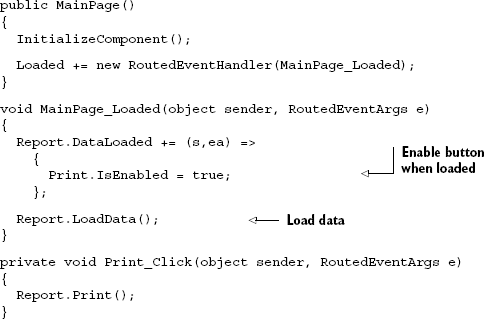
With the item template in place, and our print button wired up, we'll turn our eyes back to the PrintDocument class and the PrintPage event.
The EmployeeReport class currently has a Print method that does nothing. We'll flesh that out a little more to include the usual trifecta of print event handlers, as shown in listing 19.14.
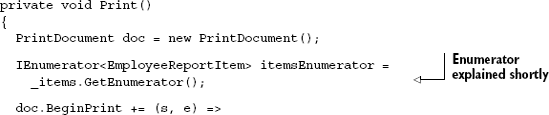
From this point forward, the majority of the code will go into the PrintPage method. For space considerations, I won't show the other event handlers or the Internal-PrintReport function itself.
When I was in college, they made me learn COBOL. Not just any old COBOL, but COBOL on an unforgiving editor on a VAX/VMS computer. If you've never written in COBOL, give it a try—it'll make you appreciate how little typing you need to get things done in C#. Perhaps my interest in curly-brace languages like C# is actually the result of the trauma I sustained in that class.
Anyway, I digress. One thing that the COBOL class did teach was how to build reports from code. That's one skill that I've been able to use in most technologies since. Up until now, though, I hadn't been able to use that in Silverlight. Luckily, that's about to change.
Normally when you process a bunch of rows of data, you'd use a LINQ statement or a for each loop. Neither approach will work particularly well here, as we need to keep a pointer to our position in the data while allowing Silverlight to raise separate events for each page. Though we could use a simple for next loop and an index that we keep track of externally, this is the type of scenario just built for IEnumerator<T>.
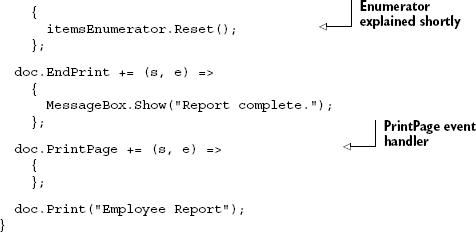
In listing 19.16, you can see the enumerator declared inside the Print method. This will be used to keep track of our current position in the report data. In the BeginPrint event handler, I reset the enumerator. Doing so allows Print to be called multiple times on the same data, without running into an enumerator problem.
The enumerator approach is similar to what you might use in COBOL or in recordset/rowset processing in another language, where there's the concept of a "current" record as opposed to an external loop index.
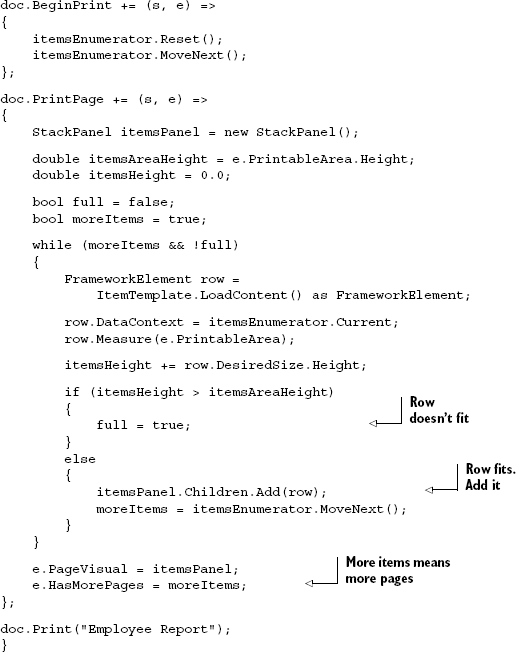
In listing 19.15, I first create a StackPanel that will be used to hold the rows of data. I then move through each row of data, instantiate the template, and add the resulting element to the panel. Finally, the panel is set as the page visual, ready for Silverlight to print.
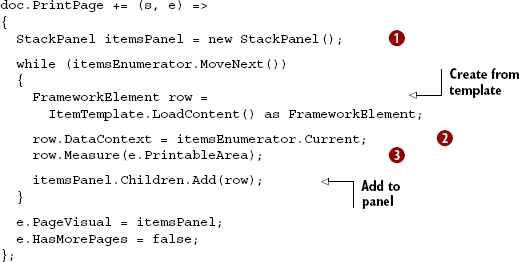
The code in listing 19.15 includes the majority of the important logic required to print a report. It first creates a StackPanel ![]() used to hold the content. It then loops through the line items, creating a template-based element to be the row's contents, and then setting the data context
used to hold the content. It then loops through the line items, creating a template-based element to be the row's contents, and then setting the data context ![]() of that element to be the row data itself. It then measures
of that element to be the row data itself. It then measures ![]() the element, providing it the bounds of the page, and finally adds it to the stack panel. Once all elements have been created, the page visual is set to the stack panel and the "more pages" flag is set to false.
the element, providing it the bounds of the page, and finally adds it to the stack panel. Once all elements have been created, the page visual is set to the stack panel and the "more pages" flag is set to false.
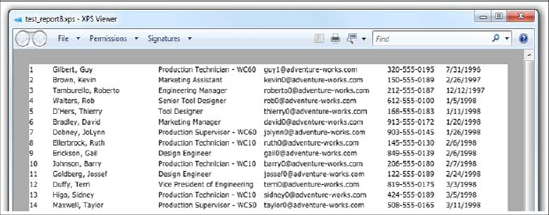
In setting HasMorePages to false and not dealing with page breaks, the code in listing 19.15 blindly prints, ignoring the end of the page. If this were old traditional printing, green-bar fan-fold paper would be flying off the printer faster than we could catch it, with printing on the seams and everywhere else. Silverlight will clip this, of course, so the result will be only a single page that doesn't overrun its boundaries. Figure 19.8 shows the top of the report page for reference, as it appears when using the XPS document print driver.
A short single page is nice, but losing data off the bottom isn't. What we really want is to support multiple pages and wrap contents on to those subsequent pages.
In order to support multiple pages, we need to keep track of the size of the report at every row. You could precalculate the number of rows that will fit, but then you'd lose the flexibility to have dynamically sized rows that change height based upon their content.
Listing 19.16 shows what I did to keep track of the page size and ensure the content will fit on the page. Note the addition of the !full check in the while loop.
The approach I used here to move things to the next page is a little hokey. For one thing, that MoveNext in BeginPrint assumes the report will always have at least one row of data. For another, there's a wasted measure call when you reach the point of moving to a new page.
To really do multipage support correctly, you need to precalculate your pages. This is the approach I took in the version I put up on CodePlex. But for the simple example here, I decided to reserve a bit of buffer space at the bottom of the page, equal to the size of one row. Of course, this assumes fixed-height rows. To support dynamically sized rows, you'll need to measure and then move the item to the next page if it doesn't fit—something much easier to do in a precalculation routine.
Whatever approach you use, once you have some measuring infrastructure in place, it becomes fairly easy to add a header and footer.
The approach we'll use to add a header and footer is similar to the items approach. The header and footer will each have an associated DataTemplate property that will be populated in XAML with the appropriate content. Listing 19.17 shows the property declarations in the EmployeeReport class.
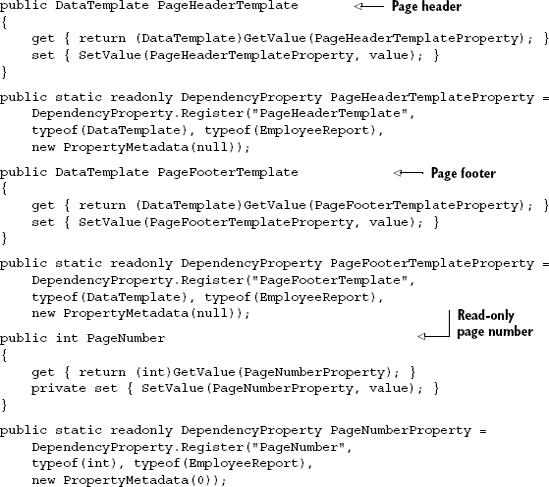
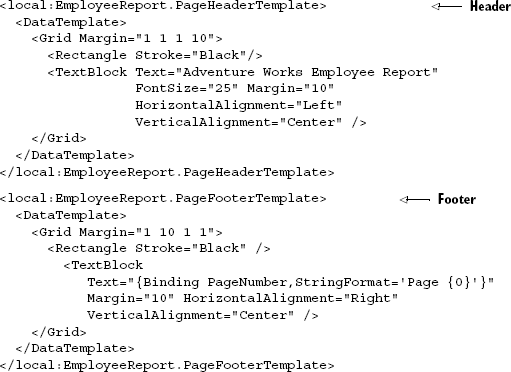
Note that I added a third dependency property to hold the page number. We'll use that inside the templates to show the current page number via a binding statement. The two other dependency property declarations are pretty straightforward. We'll have one data template for the page header and another for the page footer. The XAML data templates for listing 19.17 are shown in listing 19.18.
To support the page numbering used in listing 19.18, I had to add another reset line to the BeginPrint event. This line resets PageNumber to 0, assuming we may print the report more than once. Here's the additional line of code, shown in context:
doc.BeginPrint += (s, e) =>
{
    itemsEnumerator.Reset();
    itemsEnumerator.MoveNext();
    PageNumber = 0;
};
You could leave out the PageNumber reset, and the worst that would happen would be that your page numbers would continue to increment from report to report during the same Silverlight session.
That brings us to the real core of the multipage support: the PrintPage changes. PrintPage gains a significant number of lines of code because we now need to build a grid to contain the header, footer, and content rows. The StackPanel is still there, in the central cell in the grid, but it's now positioned between two other grid rows. Listing 19.19 shows the method, with the exception of the code right above and inside the while loop, which remains untouched.
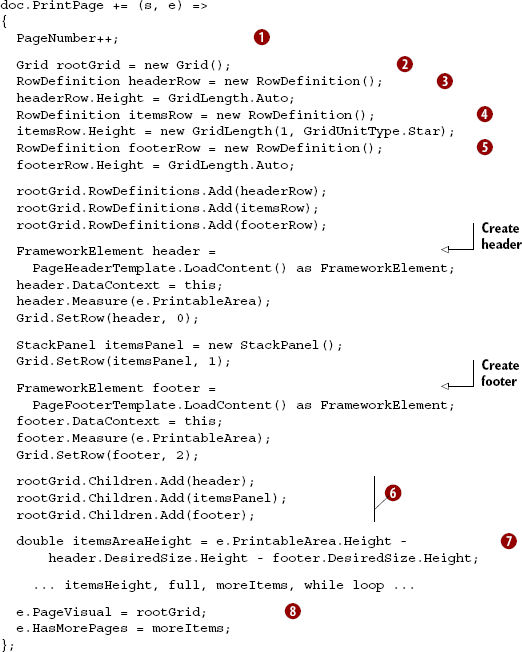
The additions in listing 19.19 are long, but easily understood. I first increment the page number ![]() so we can use that in the bound header and footer. I then create a new root element
so we can use that in the bound header and footer. I then create a new root element ![]() , this time a grid. Three rows are added to the grid: the header row
, this time a grid. Three rows are added to the grid: the header row ![]() , the items row
, the items row ![]() , and the footer row
, and the footer row ![]() . The header and footer rows are autosized; the middle items row is set to take up the remaining available space. I then create the elements from the header and footer templates and add them to the appropriate rows in the grid along with the
. The header and footer rows are autosized; the middle items row is set to take up the remaining available space. I then create the elements from the header and footer templates and add them to the appropriate rows in the grid along with the StackPanel used to hold items ![]() . Their data contexts are set to the report object, so they can pick up the
. Their data contexts are set to the report object, so they can pick up the PageNumber property. The final new step before the loop is to modify the way the itemsAreaHeight is calculated, so it takes into account the size of the header and footer ![]() . Finally, rather than assign the items panel to the
. Finally, rather than assign the items panel to the PageVisual, I assign the entire grid, header, items, footer, and all ![]() .
.
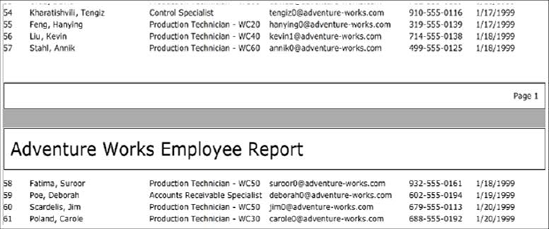
Figure 19.9. The footer from page 1 and the header from page 2. Note the page number on the first page.
Figure 19.9 shows the header and footer at the page break between page 1 and page 2.
It's relatively easy to get the page number, as you see in the example code. It's more difficult to get a total page count. One common request for reports is the ability to show the page number as "Page x of y" where x is the current page and y is the total count of pages. Should you desire to do this, you'll need to precalculate the pages prior to printing—the approach I took in the version posted to CodePlex.
Supporting multipage printing with headers and footers is easily done, given the flexibility of data templates and the "no assumptions" low-level nature of the Silverlight printing API. Though the performance of the printing system isn't quite up to par for huge multipage reports, the API does nothing to prevent you from creating those types of print jobs should they be appropriate to your project.
Combining the print API with binding and templates offers a good reuse story, and allows you to spend more time in XAML using design tools and less time in code. You could even extend the template model to include a report footer for totals, or modify it further to support nested groups. The sky's the limit.
In order for Silverlight to be taken seriously in the business world, it had to support a flexible printing API. Though you can sometimes punt and skip on printing support in consumer applications, the business world is less forgiving.
With Silverlight 4, the product team delivered a very flexible printing API. It may still be rough around the edges, especially in performance and, in some cases, raster quality of the output, but it's still a 1.0 API, and quite usable at that.
The printing API in Silverlight can be used for anything from printing simple onscreen content to complex multipage reports with headers, footers, grouping, and more. In this chapter we saw how to print content as it appears onscreen, then looked at a few ways to handle scaling that content so it better fit the printer. We also looked at content that was purpose-built specifically for the printer, whether a simple single-page list or a multipage report including headers and footers.
The information in this chapter can serve as a foundation upon which you can build your own printing and reporting systems in your applications. But, should you want to take the knowledge and simply apply it to someone else's code, David Poll and I have created a simple report writer project on CodePlex at http://silverlightreporting.codeplex.com. We plan to use that as a test bed for new ideas and provide something real that you can build upon to meet your own requirements. Take a look at it, if only to see some of the other techniques described in this chapter, such as precalculating pages.
In the next chapter, we'll look at the media capabilities of Silverlight, including the exciting webcam and microphone APIs introduced in Silverlight 4, and the media APIs introduced in Silverlight 3.