
Application is an overloaded term that means different things to different people. Some may question what level of footprint, functionality, or other metrics you need to meet before something can be called an application. For example, is the weather tracker sidebar gadget in Windows an application? What about Notepad? The code for the sidebar gadget is almost certainly more complex than Notepad, but most people would see Notepad as an application and the sidebar gadget as, well, a gadget.
In my participation in the Silverlight community, I've been asked on a number of occasions what to call the Silverlight "thing" that the plug-in loads in the browser. How I answer that depends on the context of the question and the nature of the Silverlight thing. In this chapter we're going to talk about Silverlight applications. In the context of this chapter, we'll use the term application in the technical sense of the word: a compiled runnable Silverlight project. The application can be as small as a tiny menu widget or a "punch the monkey" ad on a web page or as complex as some of the Microsoft and Adobe tools I've used to write this book. We'll leave the other question of when something can be called an application open so we have something interesting to debate at code camp.
Regardless of our own individual definitions of application, a Silverlight application consists of a .xap file with our compiled code, entry-point information, potentially some resources, and a host for the Silverlight plug-in.
As we saw in chapter 1, you can get up and running with Silverlight with little understanding of these concepts, thanks to the great templates provided by Microsoft. But as a developer, you have a natural curiosity to dig deeper and learn more about what's going on when the magic happens and the Silverlight content lights up on the web page, both because you'll need the knowledge once your applications reach more than "Hello World!" complexity, and also because it's neat stuff. The core information upon which we'll build in the rest of this book is the Silverlight application model and the Silverlight plug-in.
Silverlight applications consist of at least one or more compiled .NET dynamic-link libraries (DLLs) and a manifest file, all compressed into a file known as XAP (pronounced "zap"). This is all loaded into the plug-in at runtime and then executed at a specific entry point to start your application.
The .xap file is the key deployment mechanism for all Silverlight managed code applications. When we talk about deploying a Silverlight application, we're really talking about two things:
Surfacing the .xap to the client via some URI
Instantiating the Silverlight plug-in on the web page or within a hosting out-of-browser process
That's it. There's no additional installation, no .msi to install, no registry entries, no elevation prompts (unless you request elevated rights). It's all about getting content down to the end user and instantiated in the plug-in with as little friction as possible. The subtleties of how that process works are what I find particularly interesting.
When I first learned ASP.NET—back when a 17-inch display would take up your whole desk, contain more glass than your car, and weigh about 200 lb—one of the things I was most curious about was the startup cycle and the order of events when a request was made. If you want to understand how to target a particular application platform, you really need to know how it's going to run your application, when things get loaded, when they're rendered, and how key decisions are made—the application startup process.
What happens when you enter a web page that contains a Silverlight application? The application startup process is shown in figure 3.1. The flowchart includes the details for Silverlight 1 through 4 but doesn't address dynamic languages. The "XAML or XAP" step is what makes the decision between the old Silverlight 1.0 model and the current Silverlight 2+ model. That decision is based on a combination of the source (a .xaml or .xap file) and the specified type property of the plug-in.
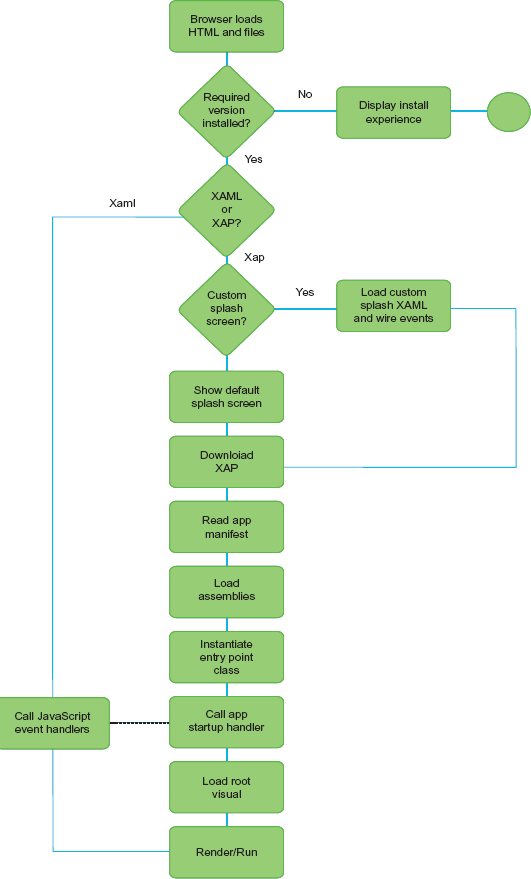
Figure 3.1. The Silverlight startup process. This flowchart describes the loading process from the load of the HTML page through to the execution of the events on the root visual of a Silverlight application.
The dotted line between the JavaScript and the managed code event handlers is there because, though you typically wouldn't do it, you can have both JavaScript and managed handlers active for the load event of the application. The order in which they fire in relation to each other isn't guaranteed.
Some additional parts of the process aren't displayed in figure 3.1 but are interesting nonetheless. For example, when the Silverlight plug-in determines it'll have a managed code .xap file to work with, it loads the Silverlight .NET CLR (CoreCLR) into the memory space of the browser.
Apparent in all this is that the most important artifact in the process is the Silverlight application itself: the .xap file.
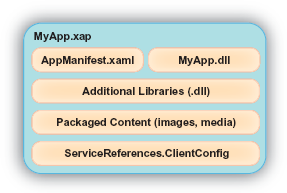
A managed code Silverlight application is packaged into a .xap when built. A .xap is simply a ZIP file and may be inspected by renaming it to .zip and opening it with any zip-compatible archiver. The contents of a typical .xap file are shown in figure 3.2.
This compressed file will always contain a manifest file named AppManifest.xaml. In addition, there will always be a .dll file that serves as the entry point into the Silverlight application. This application may require other Silverlight libraries, service connection information, or other types of content. Content items and additional libraries may be in the application .xap file or downloaded at runtime; either way, they represent the dependencies of the application.
Because the .xap file is a ZIP-compatible compressed archive, you may alter its contents and rezip it after compilation. Reasons for doing this include updating the service references to move from (for example) a test environment to a production environment or altering other environment or customer-specific XML configuration files, branding assets, or other content.
You can also slightly decrease a .xap file's size by rezipping it with an efficient ZIP tool such as 7-Zip, at the expense of a slightly slower decompression and application startup time on older machines. This may be important in situations where bandwidth is at an extreme premium.
The .xap contains a number of different files. One of which is the file that tells Silverlight what other files the .xap contains and where to find the application entry point—the application manifest file.
The manifest file is responsible for describing the Silverlight application to the Silverlight runtime. This file is created at build time by Visual Studio and is typically not hand edited.
The Silverlight runtime reads the AppManifest.xaml file beginning with the root-most element, Deployment. This element exposes two attributes that tell the Silverlight runtime how to start the Silverlight application, as shown here:
<Deployment
  xmlns="http://schemas.microsoft.com/client/2007/deployment"
  xmlns:x="http://schemas.microsoft.com/winfx/2006/xaml"
  EntryPointAssembly="MyApp" EntryPointType="MyApp.App"
  RuntimeVersion="4.0.50401.0">
  <Deployment.Parts>
    <AssemblyPart x:Name="MyApp" Source="MyApp.dll" />
  </Deployment.Parts>
</Deployment>
This example shows a basic manifest file, which uses the EntryPointAssembly and EntryPointType attributes to launch the Silverlight application. The first attribute, EntryPointAssembly, will always reference one of the AssemblyPart elements in the Deployment.Parts section. The second attribute, EntryPointType, explains which class should be used to start the Silverlight application. The third attribute, called RuntimeVersion, broadcasts the version of the Silverlight runtime that the Silverlight application was built with.
Note
AppManifest.xaml is generated during project compilation based on the settings found in the project's property pages. If you change the name and/or namespace of the startup application class (App), then you must adjust the Startup object setting in the Silverlight property page. If you forget to make these changes, you'll get a runtime error mentioning an invalid or missing Silverlight application.
The Deployment section of the manifest contains two sections:
Deployment.PartsDeployment.ExternalParts
We'll cover Deployment.ExternalParts in section 3.1.6 when we discuss assembly caching because it's only used in caching situations. Deployment.Parts is used regardless of the caching strategy used.
The Deployment.Parts section includes a collection of AssemblyPart entries, each of which corresponds to a DLL in our application. In a complete application, at least one of the DLLs will be the entry point assembly.
As we saw here, the application manifest contains a reference to the startup object type and assembly. The startup object is always the Silverlight application object.
The entry point into the Silverlight application is the App object. This object is defined in the App.xaml and App.xaml.cs files and derives from the System.Windows.Application type. This type allows you to interact with the three events affecting the application's lifecycle—the start of the application, the unhandled errors in the application, and the exit of the application. In addition to these events, you can also read the settings of the hosting plug-in.
Once the App object has been created, the Startup event fires. By default, this event loads the default XAML page into view. You can also use this event to perform any other type of application initialization task. For instance, you may want to use this event to set application-wide resources or properties. Or, you may want to use this event to load the initParams that were passed into the application (see section 3.3.4). Either way, this type of task can be accomplished by using the Startup event:
private void Application_Startup(object sender, StartupEventArgs e)
{
  foreach (string key in e.InitParams.Keys)
  {
    // Process the initParam from the createObjectEx function
  }

  this.RootVisual = new MainPage();
}
This particular event handler shows how to parse the initParams that may have been passed into the application. The Startup event creates a StartupEventArgs variable that assists in the initialization tasks. The first iterates through the initialization parameters. You could access the individual dictionary entries by a string key. The second task in this listing displays the first page of the application. Both of these tasks introduce important facts about the Silverlight application lifecycle.
The first important fact is that the StartupEventArgs type is created only by the Startup event. No other event in Silverlight will create a StartupEventArgs object. Because of this, it's logical to deduce that the InitParams used in the preceding code are only available during application startup. If you're going to use initialization parameters, the Startup event is your only chance to use them. If you need to access them throughout the application, you'll want to store them in the singleton application settings or the data class of your own creation. In addition to the initialization parameters, you should consider the RootVisual.
The RootVisual is the content that Silverlight will load into the root of the object tree. (For more on object trees, see chapter 2.) Typically, this is a master-page style application page. In the default Silverlight templates, it's MainPage.
Once set, the RootVisual of the application can't be changed for the lifetime of the application. This may cause confusion because you may wonder how to switch pages in a Silverlight application. Think of the root visual in a complex multipage application more as a container for other content pages. We'll get to that when we discuss navigation in chapter 15. For now, know that when the Startup event has completed, the RootVisual will be loaded and rendered. At this point, a Silverlight application will be visible to your users, so let's begin discussing how to guard against unforeseen errors.
The Application.UnhandledException event enables you to handle uncaught exceptions. Any Exception that hasn't been caught by a try-catch block in the application will be sent here. This is the last chance to gracefully deal with an unknown problem by displaying a message or perhaps logging to a service or isolated storage:
private void Application_UnhandledException(object sender,
  ApplicationUnhandledExceptionEventArgs e)
{
  LogError(e.ExceptionObject);
  e.Handled = true;
}
This shows a basic UnhandledException event handler. The event handler uses an argument to assist in properly handling an unhandled exception. This argument is of the ApplicationUnhandledExceptionEventArgs type, which gives you access to the Exception that caused the event through the ExceptionObject property. Once this Exception has been dealt with, you need to signal that you've found an acceptable solution. You can accomplish this by setting the ApplicationUnhandledExceptionEventArgs object's Handled property.
The Handled property is a bool value that signals whether an exception has been addressed. By default, this property value is set to false but you have the opportunity to set it to true within your code. By setting this property to true, you signal that your Silverlight application should continue to run. If this property remains false, the Silverlight plug-in will unload the application, causing the plug-in's onError event to be fired. We'll discuss this event in section 3.3.3. Note that this unnatural way of ending an application won't trigger the Application.Exit event.
The Application.Exit event is the last thing that occurs before an application is shut down and provides one last opportunity to wrap things up. This event can be useful for logging information or performing last-minute saves. The Application.Exit event is fired when one of the following happens:
The user closes the browser window.
The user closes the browser tab that the Silverlight application is running in.
The user navigates away from the Silverlight application (such as going from
www.mySilverlightApplication.comtowww.silverlightinaction.com).The HTML element associated with the Silverlight plug-in is removed from the HTML Document Object Model (DOM).
This event doesn't have any special event handling parameters like the Startup and UnhandledException events, but it can still read settings associated with the plug-in, if needed. Note that, when this event is fired, the browser has already been closed (if closing was the cause) and the Silverlight application has already disappeared. Therefore, displaying XAML UI or attempting to prevent the browser page from closing isn't supported. You may display an HTML message box if you absolutely must get some UI in front of the user:
private void Application_Exit(object sender, EventArgs e)
{
    MessageBox.Show("Daisy, daisy...");
}
But you can still obtain information about the HTML page that's hosting the application. For example, this displays a message box containing the URL of the page hosting the Silverlight application, even though that page is no longer visible:
private void Application_Exit(object sender, EventArgs e)
{
    HtmlDocument doc = System.Windows.Browser.HtmlPage.Document;
    MessageBox.Show(doc.DocumentUri.ToString());
}
Keep in mind that other dynamic elements on the HTML page may have their own shutdown handling, so be careful of how much you access from this event. A best practice is to do as little as possible in this event, keeping in mind that you no longer have the Silverlight UI displayed to the user.
One thing you can do in this event (and the others) is read plug-in settings.
Once the Silverlight application has been loaded, you can retrieve information about the hosting plug-in. This plug-in exposes information set during the creation of the plug-in (createObjectEx; see section 3.2.3). This information is useful throughout the entire life of the application and can be accessed through the Host property of the Application:
Application.Current.Host;
The Host property on the Application object is a SilverlightHost, which gives you access to information about the plug-in. The information is listed and described in table 3.1.
This table shows the properties available through the SilverlightHost object. These properties give you access to most of the information discussed in this chapter, which enables you to dynamically create a truly integrated experience. This experience will have a beginning, which can be managed through the Startup event. In addition, this experience will have an ending, which can be handled through the Exit event. These are the main events affecting the life of an Application. In addition, this Application may have other types of content that it depends upon. This content makes up what are known as the application dependencies.
Table 3.1. The properties of the SilverlightHost object
Property | Description |
|---|---|
| Retrieves the background |
| The |
| Returns whether the hosting plug-in has completed loading. |
| The |
| The |
Application dependencies are items that your application needs to run correctly. These items include assemblies, images, audio or video files, fonts, XAML files, configuration files, or any other type of file. Each file that'll be used by the Silverlight application can be included in the .xap file. This approach can ensure a faster access time, but it can also cause a slower initial download of your application.
To help you overcome long load times, Silverlight allows you to divide your application into smaller chunks that can be downloaded as they're needed. This approach can ensure a faster initial application download, but it doesn't happen automatically. Instead, you must rely on a class called WebClient, which is discussed in chapter 14, or use the built-in partitioning functionality from the Managed Extensibility Framework (MEF). For now, just know that you have a way of including application dependencies.
Application dependencies belong to just one set of the items you may find in a .xap file. This file also includes a DLL, which contains an Application. This Application is described by the AppManifest.xaml file, which is used by the Silverlight runtime to start the application.
Other DLLs required on initial load of the application must either be included in the .xap file or found through the assembly cache.
Assembly caching was introduced with Silverlight 3 to provide a way to avoid packaging common DLLs into every application .xap. Since the DLLs are usually hosted on your own server, you may include both third-party DLLs as well as DLLs common across your own applications. This can reduce initial application load time and make subsequent upgrades to your application easy to deploy and superfast to download.
To use assembly caching, select the Reduce XAP Size by Using Application Library Caching option on the project Silverlight property page, as shown in figure 3.3.
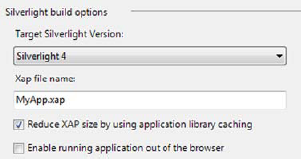
Figure 3.3. Setting the assembly caching option via the project property pages for the Silverlight project
Note that assembly caching is available only for browser-hosted applications—it doesn't currently work for out-of-browser applications.
Here's the Deployment.Parts section of the application manifest for a simple application that uses one Microsoft assembly not included in the core runtime:
<Deployment.Parts>
  <AssemblyPart x:Name="AssemblyCaching"
                Source="AssemblyCaching.dll" />
  <AssemblyPart x:Name="System.ComponentModel.DataAnnotations"
                Source="System.ComponentModel.DataAnnotations.dll" />
</Deployment.Parts>
Note that we have our application assembly AssemblyCaching.dll and the Microsoft assembly all packaged in the same .xap file. The resulting file size is 29 KB. Hardly large by web standards, but we know it could be even smaller.
Once we select the option to use cached framework extension assemblies, the manifest changes to include a new section named Deployment.ExternalParts:
<Deployment.Parts>
  <AssemblyPart x:Name="AssemblyCaching" Source="AssemblyCaching.dll" />
</Deployment.Parts>
<Deployment.ExternalParts>
  <ExtensionPart Source="System.ComponentModel.DataAnnotations.zip" />
</Deployment.ExternalParts>
The ExtensionPart entries in the Deployment.ExternalParts section correspond to the Microsoft DLL that was originally packaged in our application. Now, instead of including them in the application package, they'll be downloaded from your server on first access and then cached locally for future use. Upon compiling your application, you'll see that the ClientBin folder on the website will have one ZIP file added for each ExtensionPart included in the manifest. Each ZIP file contains just the compressed DLL—no additional baggage.
Tip
If you want to reduce per-application load time on a site that uses Silverlight on various pages, you could preload the cache by creating a small headless Silverlight application on a landing page and ensuring that it references all of the required assemblies and has assembly caching turned on. Your decision depends on the nature of the site and the landing page and whether you consider it okay to download several KB of binaries that may not be used.
Assembly caching is available for any assembly you use. The core Microsoft DLLs have a built-in support because they include <dllname>.extmap.xml files for each DLL in the software development kit (SDK). If you want to add support for your own (or a third party) DLLs, you'll need to create an .extmap.xml file for each DLL. The .extmap.xml file looks like this:
<?xml version="1.0"?>
<manifest xmlns:xsi="http://www.w3.org/2001/XMLSchema-instance"
          xmlns:xsd="http://www.w3.org/2001/XMLSchema">
  <assembly>
    <name>System.ComponentModel.DataAnnotations</name>
    <version>2.0.5.0</version>
    <publickeytoken>31bf3856ad364e35</publickeytoken>
    <relpath>System.ComponentModel.DataAnnotations.dll</relpath>
    <extension downloadUri="System.ComponentModel.DataAnnotations.zip" />
  </assembly>
</manifest>
If you provide an absolute URI, the assembly will be served up by that URI. This is useful for third parties or independent software vendors (ISVs) who may want to offer hosting of their DLLs or for organizations that want to have a centralized location for common application DLLs. Note that the server hosting the DLL will need to adhere to cross-domain restrictions by providing a ClientAccessPolicy.xml file to support clients calling it from other servers.
The files are cached in the default browser cache for the current browser so they can be used by any other Silverlight application that has enabled assembly caching. If you use multiple browsers, you'll need to download and cache for each browser just like any other web content. Similarly, the content can be cleared from the cache like any other browser content.
The end result is a .xap that weighs in at all of 4 KB, much smaller than most onpage icons and an almost instantaneous download for your users. Assembly caching can really make a difference in the load time of your applications.
At this point, we've covered all the core bits of a Silverlight application, including the startup process, key events, packaging applications, and sharing assemblies between applications. Next we'll discuss how to surface those applications on a web page using the Silverlight plug-in.
The Silverlight plug-in is a lightweight cross-platform browser plug-in responsible for rendering Silverlight content. To ensure cross-platform and cross-browser support, the Silverlight plug-in must take advantage of each browser's plug-in technology. This requirement forces the plug-in to be packaged differently across platforms. For instance, when Silverlight runs within Microsoft's Internet Explorer browser, the ActiveX model is used. Alternatively, if Safari or Chrome is used, the WebKit model is used. When any other browser is used, the plug-in uses the Netscape Server API (NSAPI) plug-in approach. Regardless of the combination of browsers a user chooses, Silverlight only needs to be installed one time on a workstation to work across all supported browsers.
The Silverlight installation is extremely compact, weighing in at around 5 to 6 MB on Windows. This installation requires that users have administrative privileges on their machines. If they don't have these privileges, an administrator will need to assist them. Once the Silverlight plug-in is installed on their machines, users are free to enjoy rich Silverlight content in the browser of their choice without additional installation requirements.
The goal of creating a Silverlight plug-in is to host a Silverlight application. This plug-in can be created in at least three different ways. One approach is to use the HTML object tag directly. Another is to use the deprecated Silverlight server control that's part of the Silverlight 2 SDK, but is no longer included with Silverlight 3+.
Another approach for creating a Silverlight plug-in enables you to easily deliver Silverlight content through any server technology while ensuring maximum flexibility on the client. You can use Silverlight along with a variety of technologies including PHP, JSP, ASP, and ASP.NET. To get Silverlight to work with these technologies, you use the two steps covered in this section. The first step is to reference the required Silverlight JavaScript utility file. The second step involves writing the JavaScript that'll create an instance of the Silverlight plug-in.
The pros and cons of the three approaches are covered in table 3.2.
Table 3.2. Pros and cons of the three plug-in creation approaches
Approach | Pros | Cons |
|---|---|---|
ASP.NET Silverlight control | Simple to use Server-side access to plug-in properties, including initialization parameters | Deprecated in Silverlight 3+ but still available as part of the Silverlight 2 SDK. No longer recommended for new projects. |
HTML object tag | No additional libraries No server dependency | Basic installation experience Older versions of Internet Explorer displayed a warning dialog |
Silverlight.js utility functions | Complete control over the installation experience for various client configurations No server dependency | Additional effort Requires keeping the Silverlight.js file up to date |
Since the ASP.NET approach is no longer supported, we'll skip that and instead cover the object tag approach. After that, we'll dig right into using the Silverlight.js utility functions.
You may choose to explicitly create the object tag that hosts your Silverlight application. This approach is used in the "Instantiating a Silverlight Plug-In" section of the Silverlight SDK. The reason I use the Silverlight.js approach in this book is because there are additional methods, such as buildPromptInstall and isInstalled, in the Silverlight.js file. If you want to explicitly create an object tag, you can do so by embedding the code similar to the following:
<div id="mySilverlightHost" style="height:100%;">
  <object
    id="SilverlightPlugInID"
    data="data:application/x-silverlight-2,"
    type="application/x-silverlight-2"
    width="100%" height="100%">
    <param name="source" value="ClientBin/MySilverlightApp.xap" />
  </object>
</div>
Note that the data and type are both x-silverlight-2. The -2 in this case doesn't mean Silverlight 2; it means version 2 of the Silverlight MIME type. If, in the future, Microsoft decides to change the object tag signature in some way, they may introduce an x-silverlight-3 for MIME type version 3 even though the related version of Silverlight may be something like Silverlight 8. That's not expected at this time.
In general, the properties specific to the Silverlight plug-in can be set through the param elements. There are some exceptions to this. If you decide to explicitly create the object tag, we recommend referring to the documentation in the Silverlight SDK.
The Silverlight.js utility file is part of the free Silverlight SDK and also part of the Visual Studio Silverlight project templates. The Silverlight SDK is available through the Silverlight web site at http://silverlight.net/getstarted, and installed as part of the Silverlight tools installation package. Once you've downloaded the SDK, you can find the Silverlight.js file in the installation's Tools directory. This file is an integral part of every Silverlight application, so you should know where to find it. Then, you can distribute and reference this file within your applications. Once it's referenced, you can use any number of the valuable features exposed by this file.
Note
Microsoft periodically releases new versions of the Silverlight.js file, related files such as Silverlight.supportedUserAgent.js, and associated documentation. To facilitate distribution to developers, Microsoft created a Code Gallery project for Silverlight.js. You can download the latest version of Silverlight. js from http://code.msdn.microsoft.com/silverlightjs.
The Silverlight.js file is licensed under the Microsoft Public License (Ms-PL), which allows you to modify the file to suit your own needs if necessary. Referencing the Silverlight. js file is as easy as referencing any other script file: you set the src property of an HTML script tag:

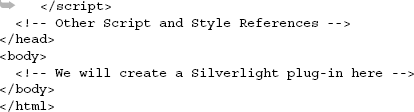
You gain the ability to create a Silverlight plug-in by adding a reference to the Silverlight. js JavaScript file. Let's look at what's inside.
The Silverlight.js file exposes a number of valuable functions. These functions give you the flexibility to tailor a custom experience within a web application. Table 3.3 describes the primary utility functions in alphabetical order.
Table 3.3. The primary utility functions exposed through the Silverlight.js utility file
Function name | Function description |
|---|---|
| Returns the HTML that creates the Silverlight installation prompt. Takes a Silverlight object in order to determine the prompt to build. |
| Initializes and creates a Silverlight plug-in. The details and a sample of this method are posted in the next section. |
| Initializes and creates a Silverlight plug-in. The details and a sample of this method are posted in the next section. In addition, the next section will explain the difference between the |
| Performs some basic operations to encode a string into an HTML-encoded string. This internal function was primarily designed to be used only within the realm of the Silverlight.js file, so use caution. Here's an example: var result =
Silverlight.HtmlAttributeEncode('"Hello"'), |
| Returns whether a specific version of the Silverlight runtime is available. This method takes one parameter, a string that represents a version number. Here's an example: var result = Silverlight.isInstalled("3.0"); |
These methods provide a powerful arsenal of options to help deliver the appropriate experience to your users. But two options encapsulate most of the other functions under one roof—the createObject and createObjectEx functions. These two utility functions shoulder the responsibility of creating an instance of the Silverlight plug-in.
To initialize and create a Silverlight plug-in, you use one of two utility functions: createObject or createObjectEx. These methods do the same thing; in fact, createObjectEx calls createObject. But the createObjectEx function uses the more verbose JavaScript Object Notation (JSON) approach to pass in the necessary parameters. For this reason, we'll use createObjectEx in this book.
The createObjectEx function requires an HTML element as a parameter. This element ultimately serves as the host for the Silverlight plug-in. Because of this, you must first either identify or create the HTML element to serve as the host. Then within that element, you call the createObjectEx method to add a Silverlight control as a child to the hosting HTML element. The creation process is shown in listing 3.1.
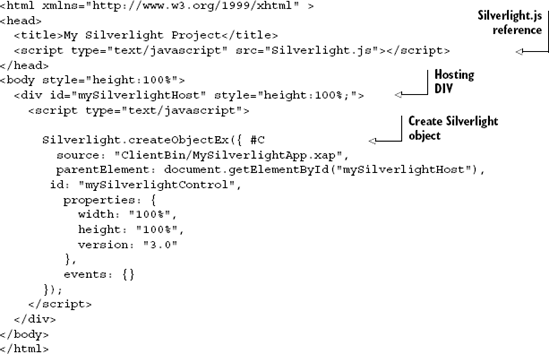
This listing demonstrates the two main steps of creating a Silverlight plug-in. The first step is to reference the Silverlight.js utility file. Once this file is referenced, you create an instance of the Silverlight plug-in, in a specific HTML <div> tag, using the createObjectEx function.
This function accepts a wide range of parameters, which are responsible for specifying which Silverlight application to run and how it should be integrated within a web page. Because a Silverlight application will ultimately be integrated within a web page, even if only as the installation source for an out-of-browser application, we need to discuss how to integrate a Silverlight control with the surrounding page.
Once you've decided to create a Silverlight plug-in, you must ensure that it integrates nicely within your web page. This integration must not only look right but it must also behave properly. So, let's study the items you can control. At a high level, these items give you the ability to:
Relate your Silverlight application to the HTML DOM.
Clarify the initial experience.
Handle plug-in events.
Send initialization parameters.
These general tasks cover a lot of ground, but we're going to dive into the details that make each task possible.
The first three parameters of createObjectEx function build the relationship between a Silverlight application and the HTML DOM. These parameters are called source, parentElement, and id.
The source parameter specifies the URI of the Silverlight content that should be loaded. In a managed code application, this content is bundled up as a .xap file, as discussed earlier in this chapter. The source property can reference a .xap file on the hosting server or on a remote server. This gives you the ability to easily share your Silverlight applications and improve server performance through load balancing. This isn't as easy with Silverlight 1.0.
Silverlight 1.0 didn't have support for .xap files. Instead, Silverlight 1.0 relied on setting the source of a plug-in through one of two approaches. The first approach involves referencing a .xaml file that exists on the hosting server. The other approach is to reference XAML content defined in the hosting web page. This type of XAML content is known as inline XAML. Either way, both of these approaches are dependent upon the JavaScript programming model. Silverlight 2+ still supports these approaches so that the source property in Silverlight 4 can be used in three different ways, all of which are shown in table 3.4.
Table 3.4. The three approaches for referencing a Silverlight application
Approach | File extension | Examplea |
|---|---|---|
Packaged | .xap |
|
Loose | .xaml |
|
Inline | [none] |
|
We won't be discussing the loose and inline approaches in detail because the packaged approach is the most widely used and is the only option that supports the managed code Silverlight 2+ APIs. It's recommended because of its flexible, compact, and portable nature. Regardless of the approach you choose, the Silverlight plug-in is always placed inside the parentElement.
The parentElement parameter specifies the HTML object that hosts the Silverlight plug-in. It's important to recognize that this property requires an object and not just the ID of the parent. You may need to use the HTML DOM approach of retrieving an object using document.getElementById. Once the object is retrieved, a new HTML element will be appended to it when the Silverlight plug-in is created.
The specific type of object that is created is based on the user's browser. If the user is using Internet Explorer or Firefox, an HTML OBJECT element is created. Alternatively, if the user is using Safari, an HTML EMBED element is created. Regardless of the type of object, it gets appended to the element you defined as the parentElement.
This newly created HTML object is given the unique identifier you set in the id parameter.
The unique identifier of the Silverlight plug-in is specified by the third parameter of the createObjectEx method, id. The value you must supply to this parameter is the id attribute of the OBJECT or EMBED element mentioned in the previous section. This parameter is the primary hook from the HTML DOM to the Silverlight plug-in. You can easily access a Silverlight plug-in using the document.getElementById function. This function is available within the HTML DOM Document object, and you can use it from a scripting environment such as JavaScript. This fact will come into play at the end of this chapter. But we should first discuss how to clarify a user's default experience.
While a Silverlight plug-in is being initialized, a number of properties clarify how that plug-in will initially render. These properties are demonstrated here:
Silverlight.createObjectEx({
  source: "ClientBin/MySilverlightApp.xap",
  parentElement: document.getElementById("mySilverlightHost"),
  id: "mySilverlightControl",
  properties: {
    height: "100%",
    width: "100%",
    background: "blue",
    isWindowless: "true",
    frameRate: "30",
    inplaceInstallPrompt: true,
    version: "4.0",
    ignoreBrowserVer: "true",
    enableHtmlAccess: "true"
  },
  events: {}
});
These properties can be used to define an initial experience. (All the properties listed here use pretend values to show the syntax.) We'll explain the details of each of these properties in the order they're shown. In addition, these properties will be logically grouped together when possible, such as height and width.
The height and width properties specify the boundaries of the rectangular region that the Silverlight application will be presented within. By default, these property values represent a rectangle with no height and no width. You can change this by providing either a pixel or percentage value, as you can with other HTML elements to provide either absolute or relative sizing.
Relative sizing is a widely used technique within the HTML world, so it's nice to see that the Silverlight plug-in provides this option to simplify integration efforts. To further integrate your Silverlight content within the HTML page, you need to use the background and isWindowless properties.
The background property allows you to specify the color of the rectangular region where the Silverlight plug-in will appear. By default, this property is set to null, which is the same as white. There are two techniques for setting this property value. The first is to use a hexadecimal color value. The second is to use a color name recognized by the user's browser, such as Silver. Perhaps the most interesting option, though, enables you to hide the background entirely.
By setting the background property to transparent, you can make the background of the plug-in region invisible. At the same time, your Silverlight application is still completely visible. Before you get too excited, we strongly recommend searching for alternatives before using this option. When the background property is set to transparent, your Silverlight applications will incur a significant performance hit, which may detract from a user's experience, especially when playing media or doing heavy animation. In addition, if you choose to use the transparent option, it's important to take the isWindowless property into consideration.
The isWindowless property lets you determine whether the plug-in allows any underlying HTML content to display through any transparent areas. By default, this property is set to false, meaning that your Silverlight plug-in will appear on top of any underlying HTML content. The reason why this property defaults to false is because, once again, when this value is set to true, your Silverlight application will take a significant performance hit.
Setting the isWindowless property to true does have an advantage. When this property is true, any underlying HTML content will show through the transparent areas of the Silverlight plug-in. This option is most useful when you want seamless integration with an HTML page such as flyovers and overlays. As figure 3.4 shows, the background and isWindowless properties are somewhat reliant upon each other.
It's critical to your integration efforts to understand how the background and isWindowless properties cooperate. As the third image in figure 3.4 shows, setting the background property to transparent is only half the battle. The fourth image shows that you truly have the ability to seamlessly integrate Silverlight content within your web assets by setting both the background and isWindowless properties. The process of integration will become clearer once we begin discussing the actual Silverlight content in the next chapter.
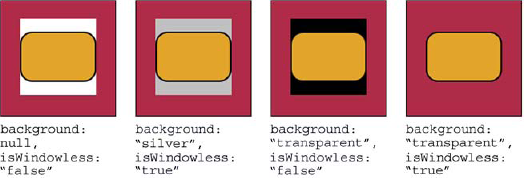
Figure 3.4. The consequences of various background and isWindowless property combinations. The outermost rectangle represents a section of HTML within a web page. The inner rectangle represents the region occupied by a Silverlight plugin. The rounded rectangle is the pure Silverlight content that will be explained later.
The frameRate property (object tag and ASP.NET property name: MaxFrameRate) enables you to determine the maximum number of frames you want to render per second. This built-in throttling mechanism ensures that your Silverlight plug-in doesn't hog the system resources. By default, this property is set to render 60, which is more than most non-media applications need, so feel free to experiment. Ultimately, the frame rate is based on the available system resources. For more on frame rate and the rendering process, see section 6.2.
To view the actual frame rate, set the EnableFrameRateCounter plug-in property (enableFrameRateCounter in JavaScript) to true. This will show the actual and max frame rates in the browser status bar as seen in figure 3.5. Note that this feature only works in Internet Explorer on Windows.

When instantiating a Silverlight plug-in, you need to set the version property in the createObjectEx function. This property represents the minimum runtime version required by your Silverlight application. If users don't have at least this version of the Silverlight runtime installed, they'll be greeted by a default installation prompt. This installation prompt looks like figure 3.6.

Figure 3.6. The default Silverlight installation badge displayed when the user doesn't have the required Silverlight version installed.
You can override this default image and show something that may be branded or more appropriate for your specific application. We'll cover that in chapter 25 when we discuss optimizing the install experience. This figure shows the default visual prompt users will see if they don't have the necessary version of Silverlight installed.
Once Silverlight is installed, it'll automatically install future versions of Silverlight if configured to do so. These updates will continue to be installed as long as the users don't disable this feature in the Silverlight Configuration dialog box. Figure 3.7 shows the Silverlight Configuration dialog box, which can be accessed by right-clicking any Silverlight application in the browser.
Note
Windows 7 and Windows Vista users with User Account Control (UAC) enabled will not have the option to install updates automatically. In those instances, Silverlight will require permission to download and install updates when new updates are found. Windows Vista and Windows 7 users are encouraged to choose the second option shown in figure 3.7 to check for updates and be prompted to install new versions when available.
As you can see, this dialog box gives you the option of turning off automatic updates of Silverlight. But, by default, users' machines will typically have the latest and greatest version of Silverlight.
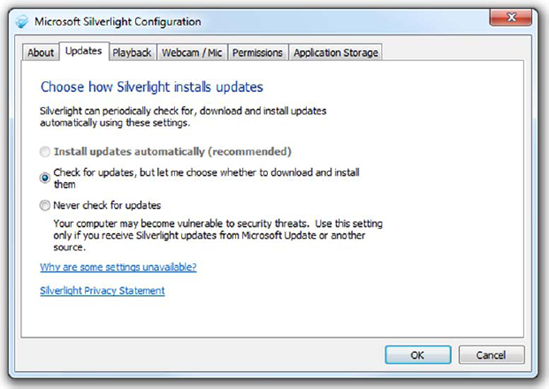
Figure 3.7. The Silverlight Configuration dialog box (Silverlight 4 adds a Webcam/Mic tab). This dialog box is accessible by right-clicking Silverlight content within a web browser. Administrators may configure the Silverlight auto-updater for all users, thereby disabling the ability to change options on this screen.
The ignoreBrowserVer option empowers you to specify whether you should check to see if Silverlight can run within the browser environment. By default, this parameter is set to false, which ensures that only supported browsers will run a Silverlight application. You can set this property value to true to bypass this safety check. This brute-force approach can slightly speed up the plug-in initialization process but can lead to undesired effects. If you want to support browsers that mostly work but aren't officially supported, update the user agent file (available on http://code.msdn.microsoft.com/SLsupportedUA) instead, so you still maintain control over the spectrum of browsers that'll access your application.
The final Boolean property in the Silverlight plug-in initialization provides an extra layer of security. This property, called enableHtmlAccess, specifies whether the managed code running within a plug-in instance can access the HTML DOM. By default, this property is set to true for the same domain applications and false for cross-domain applications. This ensures a safe-by-default development experience. You can set this property value to true for cross-domain applications, but you should first consider the ramifications.
Note
Cross-domain applications are applications that run on one domain but are sourced from another. For example, if you host a web page at http://www.mycoolsite.com and the .xap file used by the Silverlight plug-in on that page is served up from http://PetesHouseOfXap.org, which would be a cross-domain application.
Let's pretend for a second that a political candidate, we'll call him Gill Thrives, has created a Silverlight application that everybody wants. This application is so amazing that even the competing political candidate, named Loth Slivering, wants it. Gill makes this control available for free download via a third-party control site. Gill has deceptively added code that will edit the hosting web page's DOM to say Vote for Gill on a future date before the election. Unfortunately for Loth, Loth added this application to his web site, and now his campaign site has been trashed with "Vote for Gill" all over it. What an embarrassment!
Loth could've easily avoided this time-bomb embarrassment by explicitly setting the enableHtmlAccess property value to false. When this property value is false, any managed code associated with the plug-in instance that attempts to access the HTML DOM will trigger an error. And, fortunately, an error is just a type of event, which Silverlight enables you to elegantly handle (more on that in a moment).
The enableHtmlAccess property is but one of the many configuration options you have. The others include ignoreBrowserVer, inplaceInstallPrompt, version, isWindowless, background, height, and width. Collectively, these options are all set through the properties nested object within createObjectEx. This nested object syntax may seem awkward at first but it's just a part of JSON syntax. This syntax gives you a way to logically group together items, making it easy to separate the items that define the look of a Silverlight plug-in instance from its behavior. The behavioral items are part of the events nested object.
At this point, we've covered all of the items required to create an instance of the Silverlight plug-in. Remember that this plug-in has events that affect it and, in turn, your application. These events are onLoad and onError. We'll discuss each in detail in a moment. But, first, let's look at how to wire these event handlers up with a plug-in instance. This can be done in the createObjectEx function in the events subobject, as shown here:
Silverlight.createObjectEx({
...
  properties: {
...
  },
  events: {
    onLoad:plugin_Load,
    onError:plugin_Error
  }
});
This shows how to wire up the two events associated with a Silverlight plug-in. In reality, neither of these has to be set. But, by setting them, you can create a more tailored experience when loading or handling an unexpected error. Either way, you can accomplish what you need to by responding to the onLoad and onError events.
The onLoad event occurs immediately after your Silverlight application has been loaded. By default, nothing special will happen when this event occurs. You do have the option of creating an event handler for when this event fires. Regardless of how you intend to use it, you can create an event handler by using JavaScript like this:
function plugin_Load(sender, context, source)
{
  alert("loaded");
}
This shows an extremely basic onLoad event handler with the three parameters that are passed with the onLoad event. These three parameters are sender, context, and source. The purpose of these parameters is described in table 3.5.
Table 3.5. The parameters of the onLoad event handler
Parameter | Description |
|---|---|
| A handle to the Silverlight plug-in itself |
| A value specified to distinguish the plug-in instance; this value is provided by a developer |
| The root element of the content loaded into the plug-in |
In addition to the parameters of this event, you should know that there are times when this event won't fire. This event won't be triggered if you attempt to reference a Silverlight application that doesn't exist. Along the same lines, the onLoad event won't fire if there's an error in your createObjectEx function call. You may think that an error will fire the onError event; in reality, the onError event will fire only after the Silverlight application has loaded.
The onError event is triggered when an exception hasn't been handled by managed code in your application. But, some errors, such as image and media errors, can't be handled with a managed code unhandled exception handler (they must be handled in specific events or the onError handler in JavaScript). Because of this, you may want to create an error handler at the plug-in level. This can be accomplished by using an onError event handler such as the following:
function plugin_Error(sender, errorArgs)
{
  errorType = errorArgs.ErrorType;

  if (errorType == "ImageError" || errorType == "MediaError")
    return;
  alert("An unexpected error has occurred.");
}
This all-purpose onError event handler can be used to gracefully handle errors that haven't been caught elsewhere. When called, the value in the sender parameter represents the plug-in where the error occurred. The second parameter, errorArgs, describes the error. This description is accessible through a variety of publicly visible properties. These properties are listed and described in table 3.6.
Table 3.6. The properties associated with the errorArgs parameter
Property | Description |
|---|---|
| A numeric code associated with the error; this property can't be set |
| A read-only description of the error |
| The category of the error |
| The name of the object that caused the error |
You can learn a lot about an error through the errorArgs parameter. This parameter is a valuable part of the onError event handler. As hinted at earlier, this event handler is useful for some situations that can't be covered by application-level error handling. Examples of such an error would be a stack-overflow exception or the media errors shown earlier. Regardless of the error, it's nice to know that there's a way to handle those errors that can't be handled elsewhere. It's also nice to know how to pass some initialization information to a Silverlight application when it starts.
A Silverlight application is a lot like any other .NET application. As an example, imagine a basic command-line program. This program allows you to pass parameters to it before it starts. Then, when the application does start, it's responsible for parsing the parameters. Once parsed, the application decides what to do with these parameters. This is exactly how Silverlight uses initialization parameters as well.
The initialization parameters in Silverlight are sent through a parameter named initParams. initParams is another parameter in the createObjectEx function. Likewise, there's a parameter called context. This parameter allows you to uniquely tag a Silverlight plug-in instance. Both parameters are shown here:
Silverlight.createObjectEx({
...
  properties: {
...
  },
  events: { },
  initParams: "key1=value1, key2=123, keyX=valueY",
  context: "27d3b786-4e0c-4ae2-97a3-cee8921c7d3d"
});
This code demonstrates the basic usage of the initParams and context parameters. Each of these parameters serves its own special purpose. In reality, you'll probably only use the initParams parameter because the context parameter doesn't have as much value in the Silverlight 4 world. The reason is because each Silverlight application runs within its own domain and code sharing isn't necessary like it is in the scripting world of Silverlight 1.0. Regardless, we'll cover them both in detail for the sake of completeness.
The initParams parameter enables you to send any number of user-defined, keyvalue pairs to a Silverlight application. The application is then responsible for reading and interpreting the key-value pairs when it starts as shown in section 3.1.4. But first, let's build an understanding of how these key-value pairs are created.
The key-value pairs are represented in typical dictionary [key]=[value] form, separated by commas. Naturally, the entire string of initParams represents a collection of key-value pairs. This is different from initParams in Silverlight 1.0.
In Silverlight 1.0, the initParams parameter took a list of comma-delimited values. This is important to recognize if you're promoting your Silverlight 1.0 application to Silverlight 4 because this approach isn't valid in 4. If you are, in fact, doing this kind of migration, you may want to consider how the context parameter is used as well.
The context parameter gives you a way to uniquely identify a Silverlight plug-in. This plug-in passes the value of the context parameter to the onLoad event associated with the plug-in. The event then uses this string value to distinguish the plug-in from others without having to check the HTML DOM. This empowers you to share scripted code across multiple Silverlight plug-ins that exist on the same web page.
The context and initParams serve as valuable initializers in the plug-in creation process, which involves deciding how to handle the onError and onLoad events impacting the plug-in. The initial look of this plug-in is set up through a variety of property settings declared within the properties sub-object.
Initialization parameters and context are great ways to get simple values to Silverlight applications running in the browser. But, keep in mind that those values don't currently carry over to applications running out of the browser—something we'll cover in chapter 5.
One of the most important things you can learn about any given platform or technology is how it handles the concept of an application, including the packaging of that application and the startup process. Back when I used to write straight C code, and everything started at int main(int argc, char **argv) with statically linked libraries into a single .exe or .com file, this was trivial to understand. In more complex technologies such as Silverlight, both the packaging and the startup processes are significantly more involved, but the benefits are great. Because of that, we get great things like Internet deployment, browser integration, hands-off memory management, an event-driven input model, full media, and rich graphics. Who could've foreseen that back when code editors only handled a line at a time, compiles were initiated from the command prompt, ASCII graphics were popular, and the presence of a working TCP/IP stack wasn't a given?
Once the plug-in is installed on the end-user machines and the hosting page set up, deploying the application can be as simple as those C programs of yore: just copy the deployment file (the .xap) to a known location and have at it. The various options available for creating the plug-in allow us to support just about any server environment and installation experience we'd like. In fact, we'll talk more about custom installation experiences in chapter 25.
In this chapter we covered HTML page integration primarily from a plug-in-centric view. In the next chapter we'll talk more about how to integrate Silverlight with a web page, including interacting with JavaScript and the DOM.