
Silverlight started as an in-browser technology, primarily used for media and simple games. It later evolved into a more capable business technology and added some useful but basic desktop integration with additions such as isolated storage and the OpenFileDialog. With version 3, Silverlight gained the ability to run outside of the browser as a sandboxed desktop application. Starting with Silverlight 4, the sandbox has been expanded and a whole new wave of desktop-integration capabilities included.
Elevated trust mode is one of the most exciting things to happen to out-of-browser applications. Now we have access to more local files and resources, fewer confirmation prompts, and a better integrated experience. On Windows, we also have all the power provided by COM automation. We get all this as the result of a single setting and a user confirmation dialog; no messing around with browser settings or code access security.
Elevated trust mode even lets you control the out-of-browser window, from simple sizing and location all the way through to creating your own custom window chrome—the borders, title bars, buttons, and other elements that decorate a typical window on a given operating system.
Sometimes what you want isn't a separate window but rather to take your in-browser or out-of-browser application and make it run in full screen. Silverlight supports that as well, a killer feature for media players and kiosk applications. When run in the elevated trust mode, full-screen applications have even more capabilities.
Even in the default partial-trust mode, Silverlight 4 gains new out-of-browser capabilities including the new notification API, or toast, as it's commonly called.
Applications both in and out of the browser need to integrate with the local OS at varying levels. In this chapter, we'll look at some of those local desktop integration features and dive deeply into out-of-browser capabilities using both the default partial trust mode introduced with Silverlight 3 and the elevated trust mode introduced with Silverlight 4. From there we'll look at the full-screen mode and isolated storage. Before we get into some of the deeper topics, it's fundamental to understand the out-of-browser mode.
One of the most exciting new features introduced with Silverlight 3 and enhanced in Silverlight 4 is support for out-of-browser (OOB) applications. OOB applications give us the best of Silverlight's cross-platform support along with a locally installed and offline-enabled experience.
Out-of-browser Silverlight applications aren't hosted in a real browser instance—at least not in the way we'd typically think of a browser—and, therefore, don't have access to the HTML DOM described in the previous chapter. Instead, the applications must be full-page, self-contained applications, without reliance on HTML, JavaScript, or other in-page assets.
Out-of-browser Silverlight applications are already seeing significant uptake within corporations, behind the firewall, due to their simple installation and update models and their presentation and data manipulation capabilities.
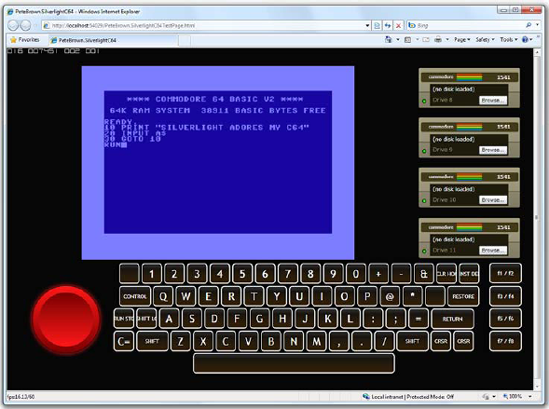
Out-of-browser Silverlight applications look just like their full-page in-browser equivalents but without all of the extra browser chrome. A sample OOB Silverlight application may be seen in figure 5.1 and its in-browser version in figure 5.2.
Between the two screenshots, you can see that the Silverlight portion of the experience remains identical (with the exception of the frame rate display I've turned on when in the browser). The code and the .xap file are the same in both instances. What changes is how much chrome surrounds the application and how much real estate is made available to Silverlight rather than to browser functionality.
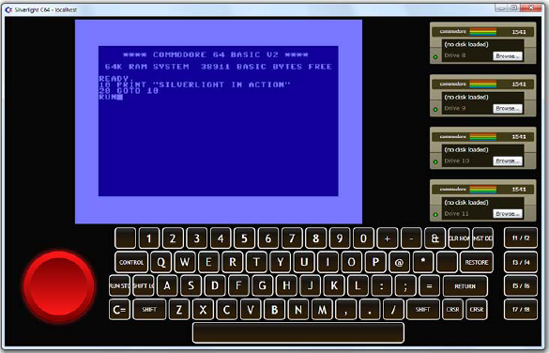
Figure 5.1. My first out-of-browser Silverlight application—a Commodore 64 emulator using the updated MediaStreamSource API described in chapter 20
Silverlight provides APIs for detecting and responding to changes in network connectivity as well as an API for indentifying whether the application is running in or out of the browser and if there are any updates available. All of these, combined with the already rich set of capabilities offered by Silverlight, make for a compelling out-of-browser application platform.
Before deciding on creating an out-of-browser application, it's important to understand both the capabilities and restrictions.
Out-of-browser Silverlight applications work just like in-browser Silverlight applications with some minor differences:
Isolated storage quota for out-of-browser applications is 25 MB by default as opposed to 1 MB for in-browser applications. In both cases, this can be extended by prompting the user.
Out-of-browser applications provide access to keys that the browser normally captures, such as function keys.
Out-of-browser applications can be pinned to the Start menu or taskbar on Windows systems and display custom icons but otherwise can't integrate with the Windows 7 taskbar without using COM automation in the elevated trust mode.
Out-of-browser applications require an explicit check for a new version, whereas in-browser versions automatically update.
Out-of-browser applications support the elevated trust mode, discussed in section 5.3.1.
Out-of-browser applications can't receive initialization parameters or take advantage of any of the plug-in parameters while running out of the browser.
Out-of-browser applications can't interact with the HTML DOM—there's no DOM to work with.
If you want those capabilities and can live with those restrictions, then an out-of-browser application may be for you. If you need more power and fewer restrictions, consider creating a click-once WPF application.
The end-user experience for installing Silverlight applications is slightly more complex than just hitting a web page and running Silverlight content but not nearly as involved as a regular platform application (.exe) install.
An end-user visiting your site will see a typical Silverlight application. If the application is out-of-browser enabled, he or she will be able to right-click on the surface to install it locally, assuming you've left that capability intact. In addition, you may provide a onscreen button to perform the installation without requiring the right click. The default experience is shown in figure 5.3.
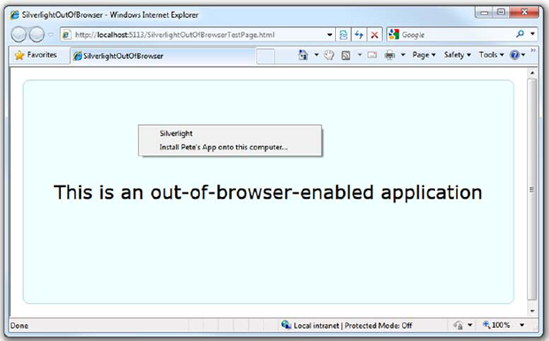
Figure 5.3. The install menu for an out-of-browser-enabled application is accessed by right-clicking on the Silverlight surface.
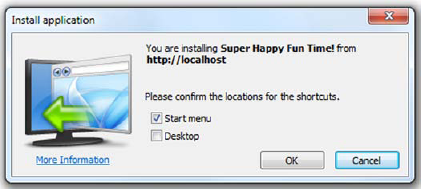
The installation process is painless, being simply a copy of files to an obfuscated location on the local machine. There are no registry entries required, no additional platform DLLs, and no admin rights—nothing extra. As seen in figure 5.4, there's only a choice of where to put shortcuts (Start menu and/or desktop) and whether to approve or cancel the install—a very low-friction experience compared to a typical platform application install.
Once the user takes the application out of the browser, the .xap will be rerequested from the server and stored in a low-trust location on the local machine along with the information about the original URI of the .xap and the download timestamp. It'll then appear in the places the user selected (Start menu and/or desktop) via the dialog shown in figure 5.4 and also on the taskbar. The user may, as with any other application, pin the shortcut to the Start menu or (in Windows 7) to the taskbar for convenience.
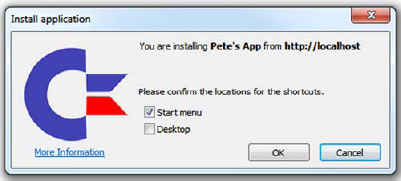
Figure 5.4. The install dialog gives the user the option to place shortcuts on the Start menu and on the desktop. The install icon on the left is customizable, as is the application name.
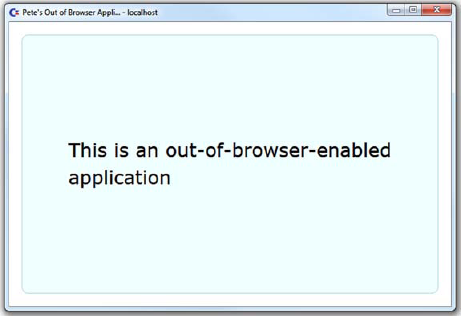
Figure 5.5. The application is running in the out-of-browser mode. Note that both the application window title and source domain (localhost in this case) are displayed in the title bar.
The application will also immediately launch in the out-of-browser mode, as seen in figure 5.5. At this point, the user may close the browser window if she wishes to do so.
Figures 5.6 and 5.7 show a Silverlight application (the Commodore 64 emulator) pinned to the Start menu and the taskbar on a Windows 7 machine. Note the use of custom icons and information about the name of the application.
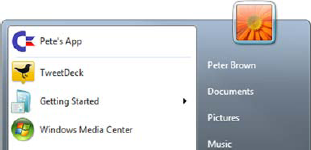
Figure 5.6. An out-of-browser Silverlight application with custom icons pinned to the Start menu in Windows 7. The application below it, TweetDeck, is an Adobe AIR application, another competing out-of-browser RIA technology.
To uninstall the application, the user may right-click the Silverlight application and select the menu option Remove This Application or use the control panel's Add/Remove Programs applet. Again, no special rights are required and the process is painless.
As you can see, out-of-browser Silverlight applications look and act much like any other desktop application while providing a simple installation experience for the end user. You get the local experience of a desktop application with the ease of deployment of a web application. Next, we'll look at how to configure and code your applications for out-of-browser support.

An out-of-browser application may be as simple as an existing Silverlight application enabled to be run outside the browser chrome or something more complex that uses the Silverlight APIs to check the network state and support offline scenarios. Perhaps it even has a very different user interface when running out of the browser, building upon those APIs and those for runtime mode detection. Before covering the more advanced scenarios, let's start with the minimal changes needed common for all three cases—the settings file.
As we saw in chapter 3, the application manifest file tells the Silverlight plug-in all about the components of your Silverlight application. What it doesn't include is information about the out-of-browser configuration. That information is included in the out-of-browser configuration file OutOfBrowserSettings.xml (see listing 5.1).
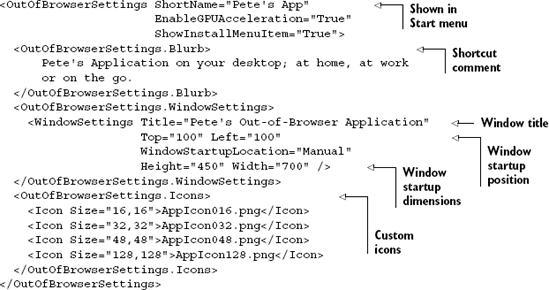
The short name of the application is what's displayed in the right-click Silverlight menu, the installation dialog, and the created shortcuts. The title, when combined with the domain name, is shown in the title bar of the window hosting your application.
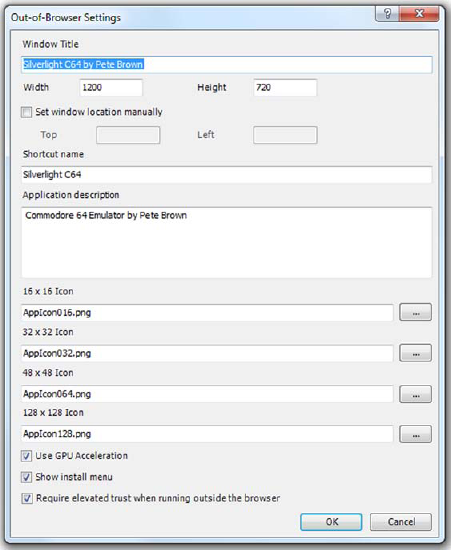
Typically, you won't edit the settings file directly. Instead, you'll use the Out-of-Browser Settings dialog from the project properties, as seen in figure 5.8.
This dialog is displayed when you click the Out-of-Browser Settings button on the Silverlight tab of the project properties. One of the options is Show Install Menu, which allows you to toggle whether the default right-click install experience is displayed. If you uncheck that option, you must provide another way for users to install your application out of the browser.
The default right-click installation experience is adequate, but there may be times when you want to provide a more controlled experience both with custom icons and with a more obvious way to take the application out of the browser. We'll cover that next.
Silverlight provides several useful APIs for both detaching your application from the browser and for checking the current state of your application. The first is the Application.Current.InstallState value. The values for InstallState are shown in table 5.1.
When the installation state is changed, the Application object will raise an InstallStateChanged event that informs you to look at InstallState for the latest state.
You can extend this concept to force an out-of-browser-only mode in your application simply by refusing to display the application UI unless running outside of the browser. In that case, your in-browser application would simply be an install-me-locally splash screen. Listing 5.2 shows how to set up your application so that it provides a meaningful experience only when run out of the browser.
Table 5.1. The various values of InstallState
State | Meaning |
|---|---|
| The application has been installed by the user. Note that the current instance of the application may still be running in the browser. This value only tells you it's available in the locally installed mode for the current user/machine. |
| The application tried to install, but failed. |
| The application is currently installing. This is a good place to download the required assets if you intend to allow the application to run offline as well as out of the browser. |
| This value indicates that the application hasn't been locally installed. |


The experiences resulting from the code in listing 5.2 are shown in figures 5.9 and 5.10. Note that the Install method may only be called from a user-generated UI event, such as a button click. This is to prevent applications from self-installing without explicit user intervention.
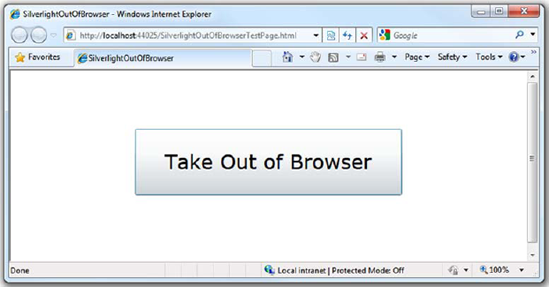
Figure 5.9. The experience a user will see if he hasn't installed this application. Clicking the button calls Application.Current.Install().

Figure 5.10. The same application after it's detected that it was installed and is running outside of the browser. Note that the browser-hosted version responded to the InstallStateChanged event by changing its own UI.
So though you can't exactly force an application to install locally, you can design it to show different interfaces depending upon its installation state and current mode of operation. Think carefully before you use this type of code in your own applications; if there's no compelling reason to force an application to run out of the browser only, don't force the user.
The next step in customizing the experience is to change the icons displayed in the install dialog, the application window, the Start menu, and the taskbar.
The next step in creating a customized out-of-browser experience is changing the icons used in the application. The icons, which must be .png files, are typically provided in four sizes from 128×128 to 16×16. The 128×128 size is used in the installation dialog. The other sizes are used in the Start menu, the window icon, shortcuts, and in the Apple OS X application list. Though you don't need to provide every size, I highly recommend that you do because they may not scale at runtime in quite the way you want them to. The approach is similar to exploding a typical Windows .ico file into four .png files.
To include icons, the OutOfBrowserSettings.Icons section is added to the OutOfBrowserSettings.xml inside the OutOfBrowserSettings section, as shown:
<OutOfBrowserSettings ...>
...
  <OutOfBrowserSettings.Icons>
    <Icon Size="16,16">AppIcon016.png</Icon>
    <Icon Size="32,32">AppIcon032.png</Icon>
    <Icon Size="48,48">AppIcon048.png</Icon>
    <Icon Size="128,128">AppIcon128.png</Icon>
  </OutOfBrowserSettings.Icons>
</OutOfBrowserSettings>
The icons themselves are included in your project as Content and copied into the .xap file at compile time. In the preceding example, they're in the project root but you certainly may include them in a subfolder. The filenames can be anything you want as long as the actual resolution of the file matches up with the known resolution assigned to it in the Size property.
That's it for customizing the install experience. Next, we'll look at how to handle two common scenarios for out-of-browser applications: changing the network state and updating the application.
You'll use two mechanisms to check the network state in your Silverlight application: the GetIsNetworkAvailable method and the NetworkAddressChanged event. Both are available in an out of the browser but are more commonly used in out-of-browser scenarios.
The NetworkInterface and NetworkChange classes included in the System.Net.NetworkInformation namespace provide access to the network state information. Typically, you'll use them together like this:
NetworkChange.NetworkAddressChanged += new
   NetworkAddressChangedEventHandler(OnNetworkAddressChanged);

...

void OnNetworkAddressChanged(object sender, EventArgs e)
{
  if (NetworkInterface.GetIsNetworkAvailable())
  {
    // Connected to some network
  }
  else
  {
    // Not connected to any network
  }
}
The call to GetIsNetworkAvailable will tell us only that there's some sort of network connection. It doesn't guarantee that we can access required services or even the Internet in general. On machines with network connections between the host and a virtual PC (VPC), which is typical in development environments, this may even detect the VPC connection as a valid network connection and return true.
Rather than rely just on this call, it's a good practice to first check to see whether any network is available and, if so, ping or call a known service on the server you plan to reach before assuming you're connected. Since the network state can change during the application runtime, you may want to call these methods on a timer or in the exception handlers in your network service interface layer.
One thing that can only happen when you're connected to the network is updating the application.
A real benefit of browser-based applications is the ability to automatically update the application without requiring any sort of explicit installation or push to the client machine. Out-of-browser Silverlight applications aren't very different in that regard, except that the developer controls the update process.
The Silverlight Application object includes a CheckAndDownloadUpdateAsync method that, as its name indicates, will check for any available .xap updates and download, if present. When the method completes, it fires the CheckAndDownloadUpdateCompleted event.
The code is fairly simple and, if you use a little lambda expression sugar to create the delegate, you can even fit it all into a single short function:
private void CheckForUpdates()
{
  Application.Current.CheckAndDownloadUpdateCompleted +=
    (s, e) =>
    {

    if (e.UpdateAvailable)
    {
      MessageBox.Show("A new version was downloaded.");
    }
  };
Application.Current.CheckAndDownloadUpdateAsync();
}
When the CheckForUpdates call is made, Silverlight looks at the stored origin URI of the .xap file and makes a normal background HTTP request to that location to verify that the latest version is installed. If a new version is available, Silverlight will receive that in the background and programmatically indicate that a new version is available by setting the UpdateAvailable property to true in the returned event arguments class. Unless you prompt the user to shut down and relaunch the application, he'll still be running the old version. It's not until the next run that he'll execute the newly downloaded version.
But, when you detect that a new version is available, you can display a dialog to the user and request a restart. If the nature of the application allows it, you can also be more draconian and completely block all of the UI functionality until the user restarts the application. What you can't do is force an application to restart programmatically. A best practice is to gently inform your user (perhaps soothing music and pastel colors will help) that a new version is available and let him restart at his convenience. At the worst, he'll get the new version during the next session.
Once you've decided to take your application out of the browser, one of the capabilities you'll enable is the notification API, introduced in Silverlight 4.
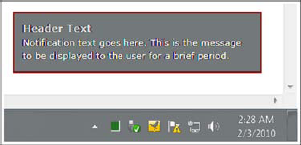
Windows notifications have been nicknamed toast due to their way of popping up from the bottom right of the desktop, like a piece of toast in an old toaster. Notification is used for everything from displaying new email messages in Outlook, to new tweets in the popular Twitter programs, to new items in the queue of a business application. Notifications are an essential tool for alerting the user when the application is sitting in the background or on another screen.
Creating a simple notification window is easy. All you need to do is create an instance of NotificationWindow, set the size, and set the content. The result will be less than stellar, though; it'll be a simple opaque white rectangle with your text overlaid:
if (Application.Current.IsRunningOutOfBrowser)
{
  NotificationWindow notify = new NotificationWindow();
  notify.Height = 75;
  notify.Width = 300;

  TextBlock text = new TextBlock();
  text.Text = "Basic Notification";

  notify.Content = text;

  notify.Show(5000);
}
The Show method takes a number of milliseconds representing how long to show the window. The value of 5000 milliseconds used in this example is 5 seconds.
To really use NotificationWindow, you'll need to fill it up with something more meaningful. Typically you'll create a user control to represent the content and assign that rather than a simple TextBlock. Figure 5.11 shows an example of a user control with a red and black border, gray header text, and white body text.
On Windows, the notification windows will always display on the bottom-right corner on the screen. On Mac OS X, they display at the top-right corner.
The window may be closed by simply timing out or by calling the NotificationWindow.Close method. In either case, the NotificationWindow.Closed event is fired, allowing you to take action as necessary.
Notifications are one of many capabilities enabled when you run your application out-of-browser. Before we delve more deeply into other capabilities, let's take a detour into the implementation specifics of out-of-browser applications.
When developing and debugging out-of-browser applications, it can be essential to understand how Silverlight implements them under the covers. This is especially important when you're developing a true cross-platform application and need to ensure consistent behavior.
On Windows, out-of-browser Silverlight applications run in a process named sllauncher.exe. That process hosts the IE rendering surface mshtml.dll hosted in shdocvw. The rendering surface is where your Silverlight application exists, visually. Similarly, on Apple OS X, the process hosts the Safari/WebKit rendering surface and related libraries. In both cases, Silverlight doesn't rely on the entire browser stack, just the core functionality required to host Silverlight content inside the native operating system window chrome.
Though the Silverlight team has gone through great pains to ensure performance is similar on all supported operating systems, understanding the limitations of Safari/WebKit and Internet Explorer can really help with diagnosing performance issues. For example, current implementations of Safari use a plug-in compositing mode that's not as efficient as Internet Explorer. If your application has lots of animation and internal compositing going on, it's a good idea to test performance on OS X before the release.
As in the case with process-isolated tabs in the browser, each out-of-browser Silverlight application will have its own process, app domain, and instance of the CoreCLR.
Out-of-browser Silverlight support now enables us to create a new class of applications that combine the best of Silverlight web development with the great experience of a desktop application. If you want to enable out-of-browser and offline scenarios, need access to keys normally swallowed by the browser, or just want more screen real estate, you take advantage of the new OOB features. Best of all, the partial-trust applications are just as safe and secure as their browser-hosted versions and easier to install than typical desktop applications.
As compelling as that is, sometimes you need a bit more power. Silverlight 4 adds even more desktop-like functionality in the form of the new elevated trust mode.
Silverlight 4 introduces the concept of elevated-trust applications. Elevated-trust applications are out-of-browser applications that have access to additional capabilities on the machine on to which they're installed. For all intents and purposes, elevated-trust applications are actually full-trust applications. For example, elevated-trust applications can use the new COM automation capabilities discussed in section 5.2.2, as well as make web network requests without first checking for a client access policy. The full list of capabilities enabled by elevated trust includes:
Using COM for native Windows integration.
Calling web services and making network requests without requiring a client access policy check and without any cross-domain or cross-scheme restrictions.
Relaxed user consent for clipboard, webcam, and microphone access.
Relaxed user initiation requirements. For example, you can enter the full-screen mode in an
Application.Startupevent handler rather than requiring a button click or other user-initiated event.Reading and writing files in user document folders.
Using the full-screen mode without keyboard restrictions and without the Press ESC to exit overlay and staying in full-screen mode even if the user switches focus to another window or display.
Controlling the size, position, and ordering of the host window.
That's a pretty powerful list; it addresses most of the restrictions developers have been bothered by since the initial release of Silverlight 2. In particular, the ability to make network calls without worrying about cross-domain, and the new COM automation capability, both open up entirely new areas for Silverlight development.
We'll first cover how to create elevated trust applications and the important step of how to sign them and then follow that up with sections covering specific elevated trust features you'll use in your own applications—including enhancements to local file access and the COM automation support introduced in Silverlight 4.
To mark your application as requiring elevated trust, first you must make the application support the out-of-browser mode. Then, it's as simple as a check box on the Out-of-Browser Settings page, shown in figure 5.8 earlier in this chapter.
It may seem simple to just mark all out-of-browser applications as requiring elevated trust, but the end-user install prompt is slightly scarier when elevated trust is used. Figure 5.12 shows the normal out-of-browser installation prompt. It's pretty tame, since the application is still running in a pretty tight sandbox.
Once you move into the elevated trust mode, the dialogs rightfully get scarier to encourage the user to install applications only from the sources they trust.
Figure 5.13 shows the elevated trust install dialog, in the case of an unsigned application. It's a pretty scary dialog that'll give most users pause. For that reason alone, it's good to be judicious about which applications really require elevated trust or perhaps even offer alternative versions of your application (perhaps the in-browser version) that don't require additional permissions.
If you want to have a friendly elevated trust installation dialog, you'll need to sign the application (sign the .xap) using a certificate from a trusted certificate authority.
The only way to have an elevated trust application without a scary dialog is to sign the .xap using a certificate from a trusted authority such as VeriSign, Thawte, GoDaddy, or Comodo. Once you sign the .xap, you'll get a much friendlier dialog, as seen in figure 5.14.
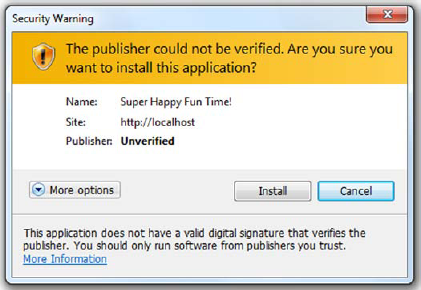
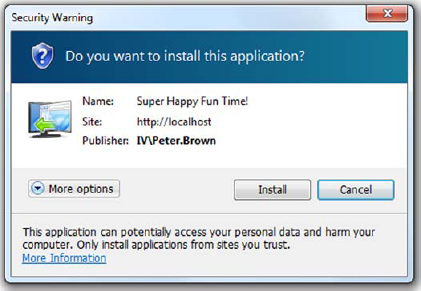
Users are much more likely to install an application with the friendlier dialog and your publisher information than with the yellow-bannered "unverified source" shown in figure 5.13.
For testing purposes, you can self-sign your .xap using a test certificate. Visual Studio, via the options on the Signing tab for the Silverlight project, will generate the test cert for you. You'll then need to add the certificate to your own store in the Trusted Certificate Root. Anyone else who's going to test the application will also need to install the certificate. The fewer people with your test cert, the better, so be sure to get a real certificate early in the process.
Once you have a certificate, you can use it in Visual Studio 2010 to sign your .xap. This is accomplished via the Signing tab in the project properties window for the Silverlight application. Figure 5.15 shows a .xap file signed by my own test certificate.
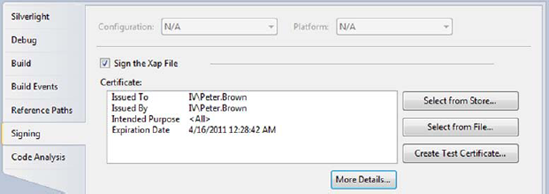
Once you have the certificate installed and it's recognized by your target machines, you're good to test and deploy. Make sure you get the certificate early in the process because it typically is not a simple, quick, or completely online process. Nevertheless, this is the same process you'll go through for certificates for any use, including application signing and secure sockets.
Tip
Jeff Wilcox from the Silverlight team at Microsoft put together a great walkthrough of purchasing and installing a certificate for personal use. You can find it on his blog here: http://www.jeff.wilcox.name/2010/02/codesigning101/.
Trusted applications have a lot going for them, but users can still reject elevated permissions. If you're going to build elevated trust applications and potentially share any code with a normal trust application, one thing you'll need to do is check to see whether the user has actually granted you elevated permissions.
Before enabling certain features in your application, it's a good practice to check to see if you're running in elevated trust mode. The Application object exposes the HasElevatedPermissions property, which allows you to do just that:
if (Application.Current.HasElevatedPermissions)
{
    /* Light up the awesomeness */
}
Checking for elevated permissions allows you to take alternative approaches in cases where the permissions weren't granted. Graceful downgrading of functionality is always a good idea when it comes to web applications. You can provide the users with the level of features they're comfortable with while maximizing the number of people you serve.
We've now turned on the elevated trust mode and considered what it takes to detect it. One of the areas that's available in Silverlight by default but is enhanced by elevated trust mode is local file access.
Since version 2, Silverlight has offered the ability to load data from local files but it was restricted to isolated storage and to streams loaded via the OpenFileDialog. Starting with Silverlight 4 and the new elevated trust mode, you now have the ability to open any file in the My Documents folder (and the equivalent folder on the Mac) without injecting additional user interface in the process.
The paths to the special folders are accessed using Environment.GetFolderPath and passing it a value in the Environment.SpecialFolder enumeration. An example of enumerating all of the files in the My Music folder would look like this:
var music = Directory.EnumerateFiles(
  Environment.GetFolderPath(Environment.SpecialFolder.MyMusic));
The result would be an IEnumerable<string> containing all of the files in the C:UsersPete.BrownMusic folder on my machine.
The full list of special folders currently supported in Silverlight is shown in table 5.2. The enumeration itself has quite a few other values, but those are for compatibility with the full framework. Using them in Silverlight will throw an exception.
Table 5.2. The values of SpecialFolder currently supported in Silverlight
Enum value | Description |
|---|---|
| The My Computer folderNote: The |
| The My Music folderExample: C:UsersPete.BrownMusic |
| The My Pictures folderExample: C:UsersPete.BrownPictures |
| The My Videos folderExample: C:UsersPete.BrownVideos |
| The directory that serves as a common repository for documents This is the same as |
| The My Documents folderExample: C:UsersPete.BrownDocuments |
In addition to enumerating files, you'd expect to be able to read from and write to the files in those directories, and you'd be correct.
You may read from a file rooted in one of the allowed directories using the File object and opening a stream:
if (Application.Current.HasElevatedPermissions)
{
  string path = Environment.GetFolderPath(
                  Environment.SpecialFolder.MyDocuments);
  string fileName = System.IO.Path.Combine(path, "sltest.txt");

  if (File.Exists(fileName))
  {
    using (StreamReader reader = File.OpenText(fileName))
    {
      string contents = reader.ReadToEnd();

      // do something with contents

      reader.Close();
    }
  }
}
If you try to open from an unsupported location, Silverlight will throw an exception and you'll be unable to open the file.
In addition to reading files from the supported locations, you'll probably want to write files.
Writing to a file works just as you'd expect it to, using the File object and a StreamWriter, as long as you root your file in one of the allowed folders. Again, it's a good idea to check for elevated permissions before taking any action:
if (Application.Current.HasElevatedPermissions)
{
  string path = GetFolderPath(Environment.SpecialFolder.MyDocuments);
  string fileName = System.IO.Path.Combine(path, "sltest.txt");

  using (StreamWriter writer = File.CreateText(fileName))
  {
    writer.WriteLine("Test from Silverlight.");
    writer.Close();
  }
}
Reading and writing to files in the My Documents folder is great but still falls short of what full-fledged desktop applications enable. Should you desire to do so, COM automation will allow you to gain access to any folder the user would normally have access to. It also provides a lot of great new capabilities such as calling Windows APIs and automating programs like Excel.
One of the more interesting capabilities introduced in Silverlight 4 in the System.Windows.Interop namespace is the ability to use COM automation to integrate with native code and applications on the desktop. The primary intent of this feature is to allow automation of other applications, including Microsoft Office. Secondarily, this feature may be used to gain access to a subset of the Windows APIs, specifically those that support IDispatch. Although there are hacks to make it work, it was not a goal of this feature to allow access to custom COM DLLs you may write or the third parties provide and which you package and install along with your Silverlight application or to allow access to the full desktop CLR.
With that disclaimer out of the way, the COM automation feature of Silverlight is an incredibly powerful way to extend the sandbox, both for good and for evil. Once you have access to an IDispatch-compatible API, you can do anything you want with it. It doesn't respect the sandbox otherwise enforced by Silverlight; the only security that comes into play is operating system-level security.
COM automation may not be available in any particular running instance of your application. Reasons for this may be that it's running in the browser, the user has declined the elevation request, or the application is running on a platform other than Windows. In those cases, you want to nicely degrade the functionality in a way that both respects the user and still provides a good experience.
In addition to checking for elevated permissions as described in section 5.2.1, Silverlight provides some calls you may use to detect the presence of COM automation. The first is the call to check that you're running on Windows. The primary reason to get used to coding this check is that the future versions of Silverlight may include automation of scripting capabilities on other platforms and you'd want to branch to them here.
switch (System.Environment.OSVersion.Platform)
{
    // Mac
    case PlatformID.MacOSX:
        break;

    // Unix/Linux
    case PlatformID.Unix:
        break;

    // Windows
    case PlatformID.Win32NT:
        break;
}
I recommend using the OS check sparingly. You never know if capabilities available only on one platform may show up in another in the future. Rather than drive that based on the OS, drive it based on feature availability. The exception to this is COM automation, which is a Windows-only feature. We may have an approach to accomplish the same thing on Mac OS X in the future, but the implementation will differ substantially.
Once you check for the OS, the next logical check is to see that you're running out of the browser. While this isn't strictly necessary, you may want to do this to provide a different downgrade experience than the in-browser version:
if (Application.Current.IsRunningOutOfBrowser)
{
    /* Out-of-browser coolness goes here */
}
The final check is to see if COM automation is available. Technically, this is the only call you're required to make but, if I kept this book just to the required bits, it'd be a rehash of our documentation on msdn.microsoft.com and would seem too much like work:
if (AutomationFactory.IsAvailable)
{
    /* do awesome stuff */
}
Once you ensure automation is available, you can start using it to interact with other applications or operating system APIs. It truly is a powerful level of integration with the native code bits of the system. Let's look at some cool things you can do with it.
As an example of one of the neat OS-level things you can do with the API, let's look at speech. System.Speech, available as part of the full .NET framework, makes speech easily accessible to any desktop or server application. But System.Speech simply wraps and makes .NET-friendly the Speech API (SAPI) native to Windows. As luck would have it, SAPI supports a script- and Silverlight-friendly IDispatch interface. The code here shows a simple "Hello World!" speech application using the C# dynamic keyword and Silverlight 4's new COM automation feature:

In order to use the C# dynamic keyword, you need to have a reference to Microsoft. CSharp.dll. The DLL is delivered with the Silverlight SDK.
Another interesting use of COM automation is access to the Windows 7 Sensor and Location API.
I'm writing this part of the chapter on the return trip from speaking at an event in Iceland (in-flight power and limitless coffee are a real win, in spite of how hot my US power supply is from the 240V power). Right above my multi-touch tablet screen is a small seat-back console that displays the graphical representation of our geographical position on the world map. (For reference, we're above Canada between the amusingly named Goose Bay and Gander.)
Watching that reminded me that all the nifty GPS work I've done with WPF on Windows 7 is also available in Silverlight because the native API supports IDispatch. Location-aware Silverlight applications? Awesome.
Access to location information was first offered as part of the full .NET 4 framework in the System.Device.Location namespace. Much like System.Speech, System.Device.Location simply (or not so simply if you're the one who had to write it) wraps and makes .NET-friendly the Windows 7 Location API. Though you do lose some convenience such as the INotifyPropertyChanged implementation (see chapter 9) by going directly against the native COM API, it's still pretty usable.
The following example shows how to access location information, specifically the latitude and longitude reported by a GPS receiver such as the u-blox device included with Microsoft Streets and Trips 2010. Note that this example requires a version of Windows 7 that supports the Sensor and Location API (all versions except the Starter edition):
if (AutomationFactory.IsAvailable)
{
  using (dynamic factory =
    AutomationFactory.CreateObject("LocationDisp.LatLongReportFactory"))
  {
    AutomationEvent newReportEvent =
      AutomationFactory.GetEvent(factory, "NewLatLongReport");

    newReportEvent.EventRaised += (s, ev) =>
    {

      using (dynamic report = factory.LatLongReport)
      {

        LatitudeDisplay.Text = factory.Latitude.ToString();
        LongitudeDisplay.Text = factory.Longitude.ToString();
      }
    };

    factory.ListenForReports(1000);
  }
}
In addition to working only on a Windows 7 PC (I don't check for that in this example, but you should), this code will only work if you have a GPS attached to your PC and you're in a spot where you can get a satellite signal. If you don't have a different Location APIcompatible receiver, I recommend getting the inexpensive u-blox one and downloading the Location API drivers from www.ublox.com/en/usb-drivers/windows-7-driver.html. The device itself is fairly simple, reporting only latitude and longitude (no altitude, speed, or heading) but is otherwise quite capable.
Speech and location are fun and likely to be used by lots of applications, but the one example requested more than any else and the one feature many people have requested of Silverlight is the automation of Microsoft Office applications such as Outlook and Excel.
Finally, the canonical example of using COM automation in Silverlight is to automate Excel to populate data. Listing 5.3 shows an example of creating a worksheet with data and a chart.

The resulting worksheet with data and chart looks like figure 5.16. Note that the communication need not be one way as shown in this example. You can also wire up Excel data change events to update the data back in your own Silverlight application.
That's pretty impressive from what's otherwise thought of as a web application technology. Though you can't actually embed Office UI (such an Excel worksheet) into your application, the ability to automate Excel and other Office applications really helps to make Silverlight ready for business.
You can do quite a bit with elevated trust mode applications in Silverlight 4 and above. The local file access capability makes for an even richer cross-platform experience and enables scenarios previously restricted to platform-specific desktop applications.
Special among the elevated trust features, the COM capabilities are almost endless but should be used with discretion and caution. This feature provides yet another option for creating Windows client applications.
COM automation is exciting, powerful, and a little scary. The sky is the limit with what you can do. Coming back down to Earth on the elevated trust capabilities, we'll next cover the control you have over the window hosting the out-of-browser application.

To create a truly differentiated out-of-browser experience, you'll probably want to have complete control over the title bar, resize bar, window buttons, and other elements that make up the window chrome. You may want to just change the color or you may want to provide a completely different look and feel that blends seamlessly with the application, without any jarring window borders.
Silverlight supports several levels of customization to the out-of-browser window. The simplest is setting the size and position of the window. From there, you can also set it to be a topmost window—one that floats above all others. You can also programmatically activate it.
Those are all easy controls, but often you need to go a step further. Silverlight supports customizing the out-of-browser window chrome. It even includes functions and properties that make it possible for you to easily replicate the normal window behavior, including minimizing, maximizing/restoring, closing, moving, and resizing the window.
In this section we'll start with the basic properties, but as they're simple and pretty self-explanatory, we won't linger there. Instead, we'll hop right into the meatier topics of changing the window chrome, modifying the window state, and moving and resizing the window.
Elevated trust applications can change the properties of the host window at runtime, including size, location, and even the chrome. The Window class used is similar to the one used by WPF, so many of the properties and methods may be familiar to you. The list of important properties and functions is shown in table 5.3.
Table 5.3. Runtime-controllable properties of the out-of-browser host window
Member | Description |
|---|---|
| Gets or sets the position of the window |
| Gets of sets the size of the window |
| Set to |
| Get or set the state of the window Possible values are |
| Read-only Returns a Boolean indicating whether the window is currently active |
| Attempts to activate the application window by bringing it to the foreground and setting focus to it |
The following example uses all of these properties and functions to size and position the window, set its state, ensure it's topmost, and then activate if it's not already activated. We'll cover the window state changes after we cover customizing the window chrome because that's where the window state typically comes into play:
if (Application.Current.HasElevatedPermissions)
{
  Window win = Application.Current.MainWindow;

  win.TopMost = true;
  win.Height = 200;
  win.Width = 200;

  win.Left = 150;
  win.Top = 150;

  if (!win.IsActive)
    win.Activate();
}
Setting the size and state of the window is important, but that's not changing the look of the window chrome itself. To do that, you'll need to use a few more features introduced with Silverlight 4.
Silverlight applications tend to be highly visual and highly branded experiences. When an out-of-browser application with a custom look gets wrapped in the standard OS window chrome, it can really ruin the experience. What you really want is edge-to-edge control over the look of your application, including the borders, buttons, and title bar.
Elevated trust out-of-browser applications enable you to control the window chrome. You can choose to have the default OS chrome, no border, or borderless rounded corners. At this point, you can't have irregularly shaped windows or windows with transparency, but that may show up in a future version. Figure 5.17 shows the various options inside the out-of-browser configuration dialog in Visual Studio 2010.
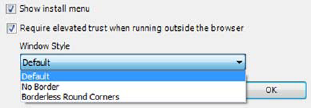
The setting here adds an attribute to the Window element in the OutOfBrowserSettings. xml file. The possible values for the style are shown in table 5.4.
Table 5.4. Window styles for out-of-browser applications
Value | Description |
|---|---|
(unspecified element) | The default window chrome is based on the operating system in use. |
| The window is drawn with a 5-pixel corner radius on all four corners. |
None | The window is a rectangular shape with no border. |
Figure 5.18 shows a close-up of the corner of the window when using the BorderlessRoundCornersWindow as the window style. The result is a rectangle with a 5 px corner radius on all four corners, with no anti-aliasing or operating system drop shadow. This is a clipping function in Silverlight; you don't need to make any changes to your layout to accommodate the rounded corner, unless you want to.

Figure 5.18. A close-up view of the top-left corner of a black window using the round-corners setting. The radius is fixed by Silverlight itself.
When you create custom chrome for your windows, you're suddenly responsible for the full behavior of the window, including creating a title bar (should you want one), adding your own minimize, maximize, and close buttons, and handling moving and resizing. Luckily, Silverlight provides several functions and events to help you do this.
Most chrome implementations will have at least three buttons on the upper right of the window: Minimize, Maximize/Restore, and Close. When you use the normal OS chrome, those buttons are provided for you. When using custom chrome, you'll need to set the window state or call the Close method on the Application.Current.MainWindow object. Listing 5.4 shows how to handle these functions in an application with custom chrome. The Grid is assumed to be the main layout root in MainPage.xaml.


In this example, you can see how easy it is to add your own window state management buttons to the elevated trust out-of-browser application. That gets you half way there. The other half of the required functionality is the ability to move your window by dragging it with the mouse.
There are three approaches to moving your window in Silverlight: making the whole window draggable, making an element (such as the title bar) draggable, or not bothering. The last option isn't going to make you any friends unless you're writing some sort of a docking tool that can only sit on certain positions on the screen, so that leaves the first two.
Silverlight includes the DragMove method on the MainWindow object we used in the previous examples. DragMove can be called from anything but is typically called from the MouseLeftButtonDown event of a title bar, or of the window itself. Listing 5.5 builds on the previous example by adding a grid to represent the title bar and one event handler.

The DragMove method is interesting because it takes over the mouse management until the mouse is released. For that reason, you don't need to wire up any mouse movement events, or worry about the mouse getting outside the bounds of the window, or any of the other cruft you may have thought would be required.
Silverlight provides one more method for window management, this one to allow the user to resize the window when using custom chrome.
While all of the other functions are considered pretty essential to window management, resizing is completely optional. Some applications don't allow resizing by the end user. But, since Silverlight makes it so simple to rescale or resize elements when the window is resized, this decision should be made only for aesthetic reasons and not for lack of time to implement.
To support resizing, DragMove has a sister function named DragResize. The DragResize move works much like DragMove, except it takes in a parameter that allows you to specify exactly where in the window the user is resizing. Listing 5.6 builds on the previous examples and shows how to use DragResize with a typical corner resize. Keep in mind that you can specify any edge by using multiple resize elements and calling DragResize with the appropriate parameter.

Controlling the main window when running in the out-of-browser mode is an essential addition to the Silverlight platform. It enables you to write applications that really look and feel like native operating system apps—if you want them to. It also enables you to create truly branded experiences that extend all the way to the edges of the window.
Silverlight provides a number of ways you can control the window, from simply setting its size and position, to floating it above other windows, all the way to using custom chrome. Silverlight also provides functions and properties to make window manipulation easier when you implement your own chrome.
Sometimes what you want isn't actually a host window in an out-of-browser application but rather just the ability to take your in- or out-of-browser application to full screen, overlaying even the operating system shell UI elements. Yes, Silverlight can do that too.
Most browsers support the ability to run in the full-screen mode, typically by pressing F11 or selecting the Full Screen option from the Tools menu equivalent. Though this mode is nice, the amount of real estate given over to the application isn't consistent between browser versions. For example, the older versions of Internet Explorer kept the status bar and some other elements on the screen. Internet Explorer 8+ and Google Chrome both allow the browser to take over the entire screen, without any additional, ahem, chrome visible. Firefox (as of this writing) shows a small gray bar at the top used as a hotspot for the toolbar. All of these also require the user to navigate a browser-specific menu or press a browser-specific (but currently identical) hotkey. The other problem is that there is no way to handle this when running in the out-of-browser mode.
Silverlight also supports its own full-screen mode, available both in and out of the browser. The experience is the same across browsers and the mode may be invoked via a button you provide in the Silverlight application. This allows you to keep the user's focus inside the application (no "Best viewed in full-screen mode, accessed by F11" prompts) and enable the functionality in a way that's consistent with your application's experience.
In a sandboxed application in the browser or a non-elevated application out of the browser, Silverlight's full-screen support limits the types of keyboard entry just to those typically used in media players and games (arrow keys, page navigation keys, and so on). The reason for this is to prevent taking over the entire screen and spoofing an operating system login experience, thereby capturing the user's password and perhaps sending it off to some scary site to be used to gain access to your private information, like your tax returns for the past five years and that passwords.txt file you thought no one would notice.
There are some significant differences between the capabilities enabled by full screen in the partial-trust mode and full screen in the elevated-trust mode. Let's tackle them separately.
In keeping with the promise of delivering rich interactive experiences, Silverlight goes far beyond the standard web capabilities by providing a full-screen mode. This mode enables a user to enjoy immersive visual experiences and interactive media outside the bounds of the web browser. This full-screen experience comes with some limitations that you'll see in a bit. Because of these limitations, the full-screen mode is generally used strictly with media. This section will show you the differences between the full-screen and the normal screen modes. Then, you'll learn how to programmatically toggle between the screen modes.
If a Silverlight application is put in the full-screen mode, the user will be greeted with a brief overlay message that looks like figure 5.19.
Note that full-screen mode doesn't support the OpenFileDialog and SaveFileDialog classes nor does it support multi-touch input (covered in chapter 8). But full-screen mode is supported whether running in-browser or out.
Figure 5.19 shows the prompt shown to users when they enter the full-screen mode. This message will overlay the Silverlight content for approximately 3.5 seconds. After that time, the prompt will gracefully fade out of view. This prompt can't be customized and, in the normal partial trust mode, it can't be turned off because this prompt is designed to prevent spoofing.
Spoofing is a security attack used by malicious developers who try to deceptively mask their application as another or as Windows itself. The purpose of this malicious attempt is to collect otherwise sensitive information such as bank account numbers and passwords.
Because of the severity of this type of attack, Silverlight imposes two safeguards when running in the partial trust mode. The first safeguard limits user input to the arrow, Tab, Enter, Home, page up, page down, and space keys, as well as mouse events. Additional information entered through the keyboard won't be passed to the Silverlight application. The second safeguard ensures that the full-screen mode can only be entered through a user-initiated event such as a button click. Once this happens, you can switch the Silverlight plug-in into the full-screen mode through the host.
The SilverlightHost class gives you access to the information associated with a plug-in instance. The switch to the full-screen mode is made using the Content property, which exposes a bool property of its own called IsFullScreen. As you might expect, this property can be used to toggle between the full-screen and the embedded modes:
private void GoFullScreen_Click(object sender, RoutedEventArgs e)
{
  Application.Current.Host.Content.IsFullScreen = true;
}
This example shows how to switch a plug-in into the full-screen mode. As you probably already guessed, you can set the IsFullScreen property to false to go back to the embedded mode. Regardless of which direction you're going, a change in the screen mode will cause the FullScreenChanged event to be triggered. This event is useful for resizing the content so that it scales to an appropriate size based on the screen mode.
If you want to avoid the onscreen message, keyboard restrictions, and the requirement for user initiation, you'll need to run in the elevated trust mode.
Out-of-browser applications can go full screen whether they're running in the normal partial trust mode or in the elevated trust mode. The mechanisms for going full screen and detecting the mode are the same. But the elevated trust mode provides some real benefits to applications that require it.
First of all, elevated-trust applications allow you to enter the full-screen mode from any branch of code and not just something that's user-initiated. For example, you can go full screen from the Loaded event of the main page:
private void MainPage_Loaded(object sender, RoutedEventArgs e)
{
  if (Application.Current.HasElevatedPermissions)
  {
      Application.Current.Host.Content.IsFullScreen = true;
  }
}
Elevated trust also eliminates the "Press ESC to exit full-screen mode" prompt that's displayed when the full-screen mode is first entered. At the same time, it eliminates the use of the Escape key for this purpose altogether. You'll need to provide the user with another way to exit the full-screen mode either by capturing the Escape key and/or providing a button to drop out of full screen.
The keyboard restrictions on the partial-trust full-screen mode make it suitable for only a small class of applications. The full-screen mode in the elevated trust also provides access to all the keys you get in the normal out-of-browser mode. This is a huge boon that makes the mode acceptable for kiosks, full-screen games, interactive media players with chat, and many other application types.
The full-screen mode works whether running in or out of the browser, in partial trust or elevated trust. Once in the full-screen mode, you can simulate an entire desktop, provide your own window management, and so forth. It effectively gives you a work space that's larger than what we'd traditionally consider a window.
So far, we've covered a number of different ways Silverlight can integrate with the local machine. One final area of local machine integration, available both in and out of the browser, is isolated storage.
Even in the out-of-browser mode, Silverlight is a browser-based plug-in so, by default, it has the lowest of security privileges to ensure a safe browsing experience for your users. This safety restriction introduces a number of development challenges, such as working with data across browser sessions. Although working with data across browser sessions may not be a problem if the data is stored on a web server, it can be a problem if the data needs to be stored locally.
Isolated storage is a mechanism that allows you to preserve data across browser sessions on a user's machine. This storage area is tied to an individual user and helps you overcome the 4 KB limitation of a cookie. Unlike a cookie, isolated storage lies outside of the browser cache—if a user clears the browser history, the items within isolated storage will remain in place. In order to access this storage area, you use the System.IO.IsolatedStorage namespace.
The System.IO.IsolatedStorage namespace provides the functionality to work with a user's isolated storage area. This area can be accessed through the IsolatedStorageFile class, which exposes two statically visible methods that retrieve an IsolatedStorageFile. These methods are GetUserStoreForApplication and GetUserStoreForSite. The GetUserStoreForApplication can be used to retrieve a user's isolated storage for a specific Silverlight application, defined by the full URL to the .xap. The GetUserStoreForSite method gets a user's isolated storage for an entire domain. As you may have guessed, this method gives you the ability to share information across multiple Silverlight applications.
Note
The GetUserStoreForSite method doesn't exist in the full .NET framework. You should consider this fact if you want to promote your Silverlight application to WPF down the road.
Either way, an example of retrieving an IsolatedStorageFile is shown here:
IsolatedStorageFile isoFile =
  IsolatedStorageFile.GetUserStoreForApplication();
This code gives you access to a user's isolated storage area. Once you've retrieved an IsolatedStorageFile, you can use it to manage a virtual filesystem, which gives you the ability to read and write files and directories. This information can be leveraged through the IsolatedStorageFile and IsolatedStorageFileStream classes.
The IsolatedStorageFile class represents a virtual filesystem that a Silverlight application can manage. Note the word virtual; outside of the elevated security mode, you can't directly access the user's local filesystem due to security constraints. As the previous example showed, you can still access data related to the requesting Silverlight application but, in reality, the term filesystem is a probably a stretch.
The IsolatedStorageFile object represents a specific partition within the isolated storage area. This partition is tied to both the user and the application. It's easiest to think of this partition as a specific folder or directory. And, like a regular directory, the isolated storage area enables you to perform several operations, including the ability to list the contents of a directory. This directory can have other files or directories added to or removed from it, so you should probably keep track of the isolated storage usage statistics to ensure you don't run out of space. Fortunately, the IsolatedStorageFile allows you to check these statistics and request more space if you need it.
The IsolatedStorageFile class provides two methods that enable you to retrieve the items within a storage area. The first method, GetDirectoryNames, enables you to retrieve the names of the directories that match a certain pattern; the GetFileNames method allows you to search for files that match a particular filter. To gain a solid understanding of how these filters work, look at the sample isolated storage area structure in figure 5.20.
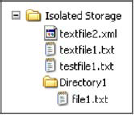
The isolated storage area depicted in figure 5.20 contains a number of common filesystem items. For instance, there are three text files, one XAML file, and one subdirectory. With this hierarchical structure in mind, let's turn our focus to mastering the filtering string syntax used for searching the isolated storage area.
The first and most verbose approach involves searching for a specifically named item. This approach works with both the GetDirectoryNames and GetFileNames methods. To perform the search, you simply provide the exact path to the file or directory. If the filename or directory is found, a string array with one element will be returned. Otherwise, an empty result set will be returned. Both approaches are shown here:
string[] directory1 = isoFile.GetDirectoryNames("Directory1");
string[] noDirFound = isoFile.GetDirectoryNames("Directory2");
string[] testfile1 = isoFile.GetFileNames("testfile1.txt");
string[] noFileFound = isoFile.GetFileNames("testfile2.txt");
string[] nestedFile = isoFile.GetFileNames("Directory1/file1.txt");
Similarly, wildcard characters may be used to pattern-match file names. Following normal Windows operating system rules, the * character matches any number of characters, and the ? character matches any single character:
string[] results1 = isoFile.GetFileNames("*");
string[] results2 = isoFile.GetFileNames("Directory1/*");
string[] results3 = isoFile.GetFileNames("textfile*");
string[] results4 = isoFile.GetFileNames("*.txt");
The * and ? wildcard characters are applicable within the GetDirectoryNames method as well. Once you have the file you're looking for, you can open it and work on it just like you would any other file, including deleting it.
The IsolatedStorageFile class exposes two utility methods that enable you to remove items from the storage area. The first method, DeleteDirectory, is used to remove a directory from the isolated storage area. The second method, DeleteFile, similarly allows you to remove a file. The usage of the DeleteFile method is illustrated here:
soFile.DeleteFile("testfile1.txt");
isoFile.DeleteFile("Directory1/file1.txt");
As this example shows, you must explicitly provide the absolute path to the file you want to delete. If you provide an invalid path, an IsolatedStorageException will be thrown. In addition, this same exception will be thrown if you attempt to remove a directory that isn't empty. Other than that, the syntax is the same when using the DeleteDirectory method. But, before you can delete a directory, it needs to be created.
The IsolatedStorageFile class exposes a method called CreateDirectory that enables you to create a directory within the isolated storage space. There isn't anything too shocking about the syntax associated with this method—to create a directory, you state the name of the folder:
isoFile.CreateDirectory("Directory1");In addition to creating directories at the root of the isolated storage area, the CreateDirectory method enables you to create subdirectories. To do this, you use a URLstyle syntax that uses forward slashes as separators:
isoFile.CreateDirectory("Directory1/SubDirectory1");
isoFile.CreateDirectory("Directory1/Sub2/Leaf");
The first line of code is pretty simple; it creates a subdirectory under an existing directory. The second line of code shows an additional feature. If you provide an absolute path to a subdirectory further down the line, all missing directories along the way will automatically be added. Once a directory exists, you can add files to it. We'll discuss adding files later in this section. But first, let's make sure there's space for a new file.
The IsolatedStorageFile class exposes two read-only properties that inform you of an isolated storage area's memory situation. The first property, Quota, holds the total number of bytes allocated to the storage area. The other property, AvailableFreeSpace, represents the number of bytes remaining in the storage area. You can use these properties together to create a cool little memory quota bar (see listing 5.7). Note that this sample will only show the green bar if you pair it with other code that actually uses some space in isolated storage; otherwise the bar will be white, showing zero quota usage.


Listing 5.7 shows one way you can put the AvailableFreeSpace and Quota properties to use. These properties are used to set the widths of the Rectangle elements based on the available and used space. In this example, we divided these values by 10024 (a convenient number for sizing the control) and then multiplied them by 2 to create a reasonably sized quota bar.
By default, the Quota property value is set to 1,048,576. The reason why is because, by default, each isolated storage area is given 1 MB of space. If you remember that the Quota property represents the number of bytes allocated to an isolated storage area, you can see how 1,048,576 bytes equals 1024 KB, which equals 1 MB. Significantly though, you have the option to ask the user for more space should your application need it.
The IsolatedStorageFile class enables the application to ask the user for more storage space. This request can be made by calling the IncreaseQuotaTo method, which accepts a long parameter that represents the new quota size you want. This size signals the total number of bytes you want to allocate to the isolated storage area; it doesn't represent the number of bytes by which you want to increase the storage. When the IncreaseQuotaTo method is called, the user will be shown a dialog box, as shown in listing 5.8.

This listing shows how to request more space for an application from a user. You also have the option of asking for more storage for a domain if you retrieve the IsolatedStorageFile through the GetUserStoreForSite method. Either way, the IncreaseQuotaTo method can only be called from a user-initiated event such as a button click. Once this request is made, the dialog box shown in listing 5.8 will be displayed to the user. This dialog box displays the name of the website requesting the new quota. This value is automatically set behind the scenes to prevent malicious coding. In addition, this dialog box shows how much space is currently being used and the quota size being requested. The user's accept or deny decision will be returned from the IncreaseQuotaTo method in the form of a bool.
The IsolatedStorageFile represents a virtual filesystem. This file system gives you the flexibility to create, navigate, and remove items from within it. To make sure that you have space to create items, you may need to check the AvailableFreeSpace property, which represents the number of bytes available within the allocated storage Quota. If you need more space, you can request it using the IncreaseQuotaTo method. Requesting more space can come in handy as you read and write files.
Files stored within the isolated storage area can be created and retrieved through a file stream. This file I/O task is like any other in the .NET framework but, because you're working within a special area that provides additional security features, you must use a specific type of file stream. This particular type of file stream is appropriately named IsolatedStorageFileStream.
The IsolatedStorageFileStream object provides in-memory access to a file stored within the isolated storage area. With this object, you can create, update, and read a file from the isolated storage area. Because a file must exist before you can read it, it makes sense to first discuss how to create and update files within isolated storage.
Creating a file within a user's isolated storage area is a simple process. This process hinges on the System.IO.StreamWriter object. You can use a StreamWriter to write content into a file stored within isolated storage. Listing 5.9 shows the process of writing a text file to the user's isolated storage area.
Example 5.9. Creating a text file within a user's isolated storage area
using (IsolatedStorageFile isoFile =
  IsolatedStorageFile.GetUserStoreForApplication())
{
  using (IsolatedStorageFileStream stream =
         new IsolatedStorageFileStream(
             "file1.txt", FileMode.Create, isoFile))
  {
    using (StreamWriter writer = new StreamWriter(stream))
    {
      writer.Write("Hello, from the isolated storage area!");
    }
    stream.Close();
  }
}
Listing 5.9 shows how easily you can write a text file into the isolated storage area. The first step is to retrieve a user's isolated storage area. Then, you create an IsolatedStorageFileStream that represents a file within isolated storage. The contents of this file are created using a StreamWriter. This StreamWriter gives you the flexibility to write either binary data or plain text. This is important to recognize because the contents of an isolated storage area aren't encrypted automatically. Because of this, you may want to manually encrypt your data when writing it to a file.
You may have noticed the use of the FileMode enumeration. This value determines how the file will be opened. In all, there are six different ways to open a file. All six options are explained in table 5.5.
Table 5.5. The FileMode enumeration
FileMode | Description |
|---|---|
| Opens an existing file and prepares to add content onto the end |
| A brute-force approach to creating a new fileIf a file of the same name exists, it'll be overwritten. Either way, a new, empty file with the specified name will be created. |
| Attempts to create a new fileIf a file of the same name exists, an |
Attempts to open a file with the given nameIf the file exists, the | |
| Opens a file if it exists. If the file doesn't exist, a new one will be created with the given name. |
| Open an existing file and removes all its contents. This |
The FileMode options shown in this table cover a wide variety of file operations. These values are useful when you're creating files or attempting to read a file from isolated storage.
The process of reading a file from a user's isolated storage area is similar to writing to a file. Instead of taking advantage of a StreamWriter, you use of a StreamReader. The process of using a StreamReader to read a file is shown in listing 5.10.
Example 5.10. Reading a file from the user's isolated storage area
using (IsolatedStorageFile isoFile =
  IsolatedStorageFile.GetUserStoreForApplication())
{
  using (IsolatedStorageFileStream stream =
    new IsolatedStorageFileStream("file1.txt", FileMode.Open, isoFile))
  {
    using (StreamReader writer = new StreamReader(stream))
    {
      myTextBlock.Text = writer.ReadToEnd();
    }
    stream.Close();
  }
}
As this example shows, reading a file is almost identical to creating a file. The first step involves retrieving the user's isolated storage area. Then, you create an IsolatedStorageFileStream object—this time using the FileMode.Open option. Once the file is opened, you can read through it using a StreamReader.
Both the StreamReader and StreamWriter classes provide a lot of features for working with character-based and binary input and output. These I/O features provide a lot of flexibility in regard to the client-side storage within the isolated storage area. Once an isolated storage area is created, you may need to remove it for testing during development. For this reason, it's beneficial to know how to administer it.
Administering an isolated storage area involves interacting with the physical filesystem. The reason you'd want to do this is to test a user's initial interaction with a Silverlight application. During development, it can be easy to get lost in the action and forget a user's initial experience with an application. Because the isolated storage area is separate from the browser's cache, you need an easy way to remove information from the isolated storage area, so you should know where the isolated storage area is located on the physical filesystem.
The isolated storage area is located in different locations based on the user's operating system. The specific location for each operating system is shown in table 5.6.
Table 5.6. The base location of the isolated storage area on each operating system supported in Silverlight
This table shows the base location for the isolated storage area. Each unique Silverlight application that uses isolated storage will create a new directory under this location. This new directory will be given a name that appears encrypted, but don't let this fool you. The data stored in the isolated storage area isn't encrypted so you shouldn't store sensitive information, such as passwords, in the isolated storage.
Isolated storage is a great way to store nonpermanent data on the end user's local machine. It's flexible in that it works in all modes of Silverlight operation (inbrowser, out-of-browser, elevated out-of-browser) and works as a virtual filesystem. When combined with the other features described in this chapter, it really helps round out a feature set that makes for extremely capable connected and disconnected rich Internet applications.
For a web technology, Silverlight provides an unprecedented level of desktop integration. With Silverlight 4, we now have the ability to run in and out of the browser in the partial trust mode or out of the browser in the elevated trust mode.
When running out of the browser in partial trust, you gain additional storage capacity without prompting, additional keyboard information, and a reduction in host chrome that allows you to take a greater advantage of screen real estate and provide a truly custom experience. For many behind-the-firewall business applications, and both custom experiences and self-contained Internet-delivered applications, this is a compelling option with no real downside.
When running in the elevated trust mode, your Silverlight applications gain a level of desktop integration rivaled only by the native applications. You can access the local files on all supported operating systems, eliminate many of the user confirmation prompts, have a truly usable full-screen mode, have almost complete control over the window chrome, and even automate installed applications and call native APIs when running on Windows.
In either out-of-browser mode, you have access to the notification APIs to provide a richer desktop experience as well as access to the virtual file system in the isolated storage.
With both in-browser and out-of-browser support, you get access to the new network connectivity detection APIs to allow you to create an even more robust application that can work online or offline, in the browser or on the desktop. You get the ability to run full screen to provide a truly differentiated experience. You also get the simplicity of web-based deployment combined with the confidence that the application is secure and sandboxed.
With both approaches, you get the full Silverlight application model discussed in chapter 3 as well as support for great user experience capabilities, including the layout and transformation capabilities we'll discuss in the next chapter. It's hard not to get excited about something so compelling.