
Silverlight has always been a web technology, integrated into the web page. Even when a Silverlight application took over the entire browser client area, it was still contained within several layers of HTML tags. Given the history, it makes sense that a Silverlight plug-in would have complete access to the Document Object Model (DOM) on the page in which it resides. In fact, the access is so complete that a Silverlight application could take over all of the functionality normally provided by JavaScript if you wanted to go that route.
Despite the out-of-browser capability introduced with Silverlight 3, as a RIA technology, Silverlight is and will remain for the foreseeable future most popular as a browser plug-in. There's just too much synergy between the nature of a HTML application and the power of a .NET-based RIA plug-in like Silverlight to completely abandon that approach.
Silverlight 4 added the ability for Silverlight to host HTML within itself. Though currently restricted to out-of-browser applications (the topic of the next chapter), the integration is provided by the default browsing engine in the operating system and supports some script integration.
We'll start where Silverlight started, in the browser, where it can take advantage of the DOM. From there, we'll drill deeper into the HTML DOM and discuss the embedded Silverlight control. This control, which is also known as the Silverlight plug-in, ultimately hosts your Silverlight content. Finally, we'll move on to hosting HTML within our Silverlight application.
As mentioned in chapter 1, Silverlight is a browser-based plug-in. This plug-in was designed to be consistent with the well-established web architecture. This design decision ensures that you can integrate Silverlight content within any new or existing web property. The web property could be anything from a web page to a blog, intranet portal, or desktop gadget. As shown in figure 4.1, this decision gives you the flexibility to use as little or as much Silverlight as you want.
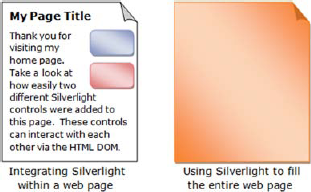
Figure 4.1. Two theoretical in-browser uses of Silverlight. The shaded areas represent Silverlight applications on web pages.
Figure 4.1 shows the amount of flexibility you have when it comes to using Silverlight. In reality, you can place Silverlight anywhere you want within a web property. This is accomplished through Silverlight's harmonious relationship with the well-known HTML DOM. The DOM allows you to embed a Silverlight plug-in within it. Once embedded, the overall application tree expands to something similar to that shown in figure 4.2.
The HTML DOM enables you to easily access and manage content in a web page. As illustrated in figure 4.2, this content is represented as a structured tree of elements. These elements represent children and contain attributes and text that give them definition. Each child of the tree can be accessed through the HTML DOM. This gives you the ability to add, edit, or remove content as needed. Unfortunately, as the tree has grown, it has become somewhat unwieldy.
In 1998, the World Wide Web Consortium (W3C) published the first version of the HTML DOM specification. Since then, this specification has been implemented, at least in some form, by every web browser. Over time, developers of some web browsers have decided to augment the original specification to provide additional functionality, causing a number of inconsistencies that can make it difficult to deliver platform-neutral content.
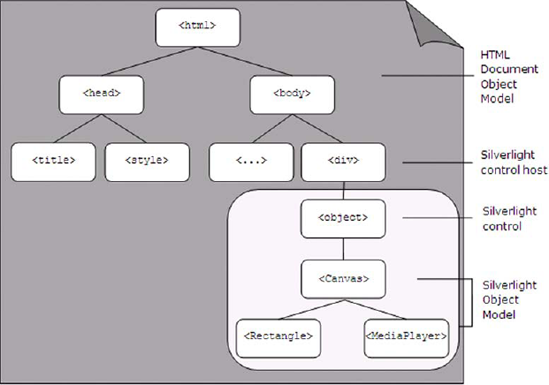
Figure 4.2. The darkly shaded area represents the HTML DOM. The lightly shaded area represents the Silverlight control. This control hosts the Silverlight Object Model.
To ensure that Silverlight could deliver platform-neutral content, the browsers supported by Silverlight had to be identified. Each of these browsers uses one of the Silverlight-supported DOM variants. These DOM variants and their descriptions are shown in table 4.1.
Table 4.1. The DOM variants officially supported by Silverlight
Specification | Browser(s) | Description |
|---|---|---|
DHTML Object Model | Internet Explorer | The DHTML Object Model gives developers programmatic access to the individual elements within a web property. |
Gecko DOM | Firefox Mozilla Netscape Safari Chrome | The Gecko DOM approach parses and renders HTML content and utilizes the HTML DOM. |
Most web browsers implement one of the DOM variants supported by Silverlight. Regardless, these DOM variants enable you to programmatically access and manipulate the HTML DOM. Because of this, you can easily add an instance of the Silverlight plug-in to a new or existing web page.
At this point, you should have a basic understanding of what a Silverlight application is. If you don't, that's okay because it'll become clearer throughout this book. When a Silverlight application resides on a web page, you can use it to interact with the HTML DOM. To do this, you use the System.Windows.Browser namespace.
The System.Windows.Browser namespace exposes a number of classes that encapsulate the features of the HTML DOM. The entry point into this DOM is accessible through the HtmlPage class. This statically visible class gives you the ability to manage a web page from managed code. In addition, you can use the HtmlPage class to interact with users through their browser windows. What's perhaps most interesting, the System.Windows.Browser namespace enables you to completely bridge the scripting and managed code worlds.
The HtmlPage object exposes a property called Document. This property is an HtmlDocument object that embodies the currently loaded HTML page and gives you admission to all OF the elements available within the page. This may sound familiar because the Document object within the HTML DOM exposes the same kind of functionality. The Silverlight version gives you the ability to do all OF this from managed code. This enables you to navigate the contents of a web page, work with individual element properties and styles, and retrieve information from the query string.
The HtmlDocument gives you two entry points into the currently loaded document. These entry points are represented as properties and are shown in table 4.2.
Table 4.2. The entry points into the HtmlDocument
Property | Description |
|---|---|
| This property represents the root element of the HTML DOM. It always represents the |
| This property gives you immediate access to the contents of the |
These properties represent great ways to enter into an HtmlDocument. More specifically, these items are geared toward navigating an HtmlDocument using a top-down approach. For situations where you need to dive into the middle of the action and find a nested element, you have two other options. These are shown in table 4.3.
This table introduces the powerful and often-used GetElementById and GetElementsByTagName methods. Note that these method names match their HTML DOM equivalents, so you have a familiar approach for retrieving elements from managed code:
HtmlDocument document = HtmlPage.Document;
HtmlElement element = document.GetElementById("myDiv");
Table 4.3. The navigation methods of an HtmlDocument
Description | |
|---|---|
| It empowers you to find any element within an |
| It finds all of the elements with a specified tag name. The results are returned as a collection of browser elements. |
This example shows how to access an HTML element, in this case myDiv, via managed code. Note that the myDiv element is simply an HTML DIV element within the HTML page hosting the Silverlight plug-in. The example also introduces the important HtmlElement class. This class represents a strongly typed wrapper for any element in the HTML DOM. This wrapper exposes properties, listed in table 4.4, that enable you to interact with an HTML element from managed code.
Table 4.4. The navigation properties of an HtmlElement
Property | Description |
|---|---|
| A collection of items hosted by the current |
| The name of the Cascading Style Sheet (CSS) class in use by the |
| The unique identifier of the |
| The |
| The name of the tag used by the |
This table shows the properties that define an HtmlElement. The Children and Parent properties give you the ability to navigate a web page from a specific element. Each element will have a specific tag associated with it, which can be viewed through the TagName property. If this tag is an input tag, you can give it the focus by calling a method that's appropriately named Focus(). Beyond the Focus method and the properties listed in table 4.4, each HTML tag may contain several unique properties. Let's look at how to work with these element-specific properties.
Each element in the HTML DOM exposes a number of descriptive properties. Some of these properties are shared with all other elements in the HTML DOM (such as TagName). At the same time, some properties are only relevant to some HTML elements—for example, the value property of an HTML input tag. Because this property is only relevant to one kind of element, you may be wondering how HtmlElement works in these situations.
HtmlElement exposes two utility methods designed to interact with the properties of an HTML element. The first method, GetProperty, retrieves the value assigned to a property. The other method, SetProperty, can be used to assign a value to a property. These general methods give you the flexibility to work with any kind of HtmlElement:
HtmlDocument document = HtmlPage.Document;
HtmlElement myTextField = document.GetElementById("myTextField");
int value = Convert.ToInt32(myTextField.GetProperty("value"));
value = value + 1;
myTextField.SetProperty("value", Convert.ToString(value));
This code demonstrates how the GetProperty and SetProperty methods can be used. Note that this sample retrieves the value associated with the value attribute of an HTML Input field. This value is incremented by one and assigned back to the field. The GetProperty method takes a string that represents the name of the property value to retrieve. This value is then returned as a string. In a similar fashion, the SetProperty method takes a string that represents the value to set to a property. This property is identified by the first parameter in the SetProperty method. From this, you can see that it's pretty easy to work with property values programmatically. Thankfully, it's just as easy to work with an element's CSS information.
Elements within the HTML DOM are designed to separate content from presentation. The presentation information is stored in a variety of styles that describe how the element should be shown, which are set through a number of attributes that belong to the CSS recommendation. These attributes have values that can be accessed or assigned from managed code, similar to the following:
HtmlDocument document = HtmlPage.Document;
HtmlElement myDiv = document.GetElementById("myDiv");
myDiv.SetStyleAttribute("backgroundColor", "gray");
The first step in accessing a style attribute from managed code is to retrieve the HtmlElement whose style needs to be used. Then, the style can be set using the SetStyleAttribute method. Alternatively, you can retrieve the current style of an HtmlElement by using the GetStyleAttribute method. Both of these methods require you to reference a style using the scripting naming approach.
The scripting naming approach is used to interact with styles from JavaScript. This approach uses CamelCase for style names. This is slightly different than the HTML approach, which uses dashes to separate words. This means that the HTML name for the backgroundColor property used in the previous example is background-color. If you're an experienced web developer, you've probably run into this discrepancy before. Note that Silverlight requires the scripting approach. If you try to reference a style using the HTML approach, an exception won't be thrown but the style value also won't be set or retrieved. Either way, it's nice to know there are ways to get and set style attributes. It's also nice to know how to retrieve values from the query string.
One common approach for managing state in a web application involves using the query string. The query string empowers you to store small amounts of data relevant to a user's session. In addition, the query string can be used as a sort of a bookmark to allow a user to come back to a specific location at a later point in time. As an example, let's pretend we want to send you the search results for a query on Silverlight; we could email you the following web address:
http://search.msn.com/results.aspx?q=Silverlight&mkt=en-us&FORM=LVCP
This web address enables you to see the search results we're referring to. This is more convenient than telling someone to go to a search engine, enter "Silverlight" into the query box, and wait for the results. This simpler approach is made possible through the values that are stored after the ? (question mark)—values that represent the QueryString of the Uri for an HtmlDocument.
The QueryString is readable through a collection of key/value pairs. This collection is part of a larger entity known as the DocumentUri. The DocumentUri represents the Uri of the current page, allowing you to always gain your current bearings within an application. Figure 4.3 shows how the parts of the DocumentUri are related.
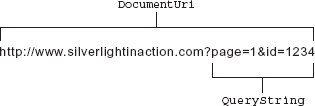
This figure shows the breakdown of a web address. Note that, significantly, the QueryString starts after the ? in a web address. In addition, each key/value pair is separated by an & (ampersand). The QueryString in figure 4.3 has two key/value pairs, which could be read using this code:
HtmlWindow window = HtmlPage.Window;
HtmlDocument document = HtmlPage.Document;
foreach (string key in document.QueryString.Keys)
{
  window.Alert("Key: " + key + "; Value: " + document.QueryString[key]);
}
Note that you can't set the key/value pairs of this collection from code. Instead, if you need to set the QueryString values, you'll need to use the navigation techniques shown table 4.6. This will reset the values associated with the QueryString, as well as the contents of the page. Once the contents of the page are loaded, you can use the HtmlDocument to navigate the page.
The hosting browser window is represented as an HtmlWindow object. This object can't be instantiated from code, but you can get the current instance of the hosting browser's HtmlWindow through the HtmlPage class's Window property. This can be accomplished by using the following code:
HtmlWindow window = HtmlPage.Window;
Once you have a handle to it, you can use the HtmlWindow to display prompts to a user. Alternatively, you can use this object to navigate the browser to a different location using the Navigate method. Either way, this browser window stores valuable information that can be discovered and used to enhance the user's experience.
The HtmlWindow class enables you to deliver HTML prompts to your users. It's important to note that these prompts aren't Silverlight items. Instead, these prompts are constructed entirely by the user's browser window, so you have a limited ability to customize how these prompts are displayed. The good news is that these prompts provide a quick way to show or collect information from your users. The three prompt options available through the HtmlWindow class are listed in table 4.5.
Table 4.5. The prompt options available through the HtmlWindow class
Method | Description |
|---|---|
| It shows a single message in an HTML alert window. |
| It prompts the user to agree or disagree with a statement or question. This prompt displays two buttons: OK and Cancel. The text of these buttons can't be customized. If a user selects OK, this method will return |
| It creates a dialog window that displays a single message. In addition, this dialog displays a single text box that the user can enter information into. If the user selects the OK button from this dialog window, the value of that text box will be returned as a |
These prompt options mimic the prompt choices available through the HTML DOM Window object. Using Silverlight, you can launch these prompts from managed code. This example shows one way to display an alert to a user using C#:
HtmlWindow window = HtmlPage.Window;
window.Alert("Welcome!");
Note how easy it is to deliver an HTML prompt to a user. It's also important to note that these prompts prevent the execution of succeeding code until the user responds to the prompt—they're blocking operations. Either way, you can use this approach to use the other prompt types shown in table 4.5.
Silverlight 3 introduced another easy way to alert the user. The MessageBox.Show method encapsulates the HtmlWindow.Alert functionality to provide a more discoverable way to display alerts. More importantly, the MessageBox.Show method also works for out-of-browser applications where there's no valid HtmlPage and has no dependence on the underlying JavaScript capabilities.
Most .NET Windows developers are used to MessageBox.Show and will find it just as intuitive in Silverlight:
MessageBox.Show("Welcome!");The Show method also takes some additional parameters to allow you to set the window caption and display either the OK button or both the OK and the Cancel buttons:
MessageBox.Show("Format your C drive?",
                "Windows Caption",
                MessageBoxButton.OKCancel);
Just as in the case with Alert and the other methods, this is a blocking operation and will suspend your application until the user closes the window.
The MessageBox class and the HtmlWindow methods make it easy to display confirmation messages to the user via the browser. Luckily, it's just as easy to perform navigation tasks through the browser window.
Navigation is an important part of any web application. There may be times when you want to redirect a user to another web page or perhaps you want to launch another browser window and load a web page into it. Either way, the HtmlWindow class provides two methods you can use to get the job done. These are shown in table 4.6.
Table 4.6. The navigation options available through the HtmlWindow class
Method | Description |
|---|---|
| This method will redirect the browser window to the provided URI. This URI can be loaded in an optional target window. The specifications of this target window can be set via an optional third parameter. The name and specification of the target window parameters match those used by the HTML DOM |
| This method is used to navigate to a location within the current HTML page. |
It's important to recognize that these navigation methods can have undesired effects on your Silverlight application. For instance, if you redirect the hosting browser window away from the hosting web page, your Silverlight application will be unloaded. You should strongly consider loading a different web page into a new browser window, as shown here:
Uri uri = new Uri("http://10rem.net");
HtmlWindow window = HtmlPage.Window;
window.Navigate(uri, "_blank");
One of the key items to notice from this code is the fact that you must always use a Uri for a web address. In addition, you can still use a target with an address, just like in HTML, making it easy to fully control the experience.
In addition to the properties of the windows or elements in the DOM, you may also want to obtain information about the browser itself.
The statically visible BrowserInformation property exposes detailed information about a user's browser. This information is stored within a System.Windows.Browser.BrowserInformation object that corresponds nicely to the Navigator object available within the HTML DOM. Table 4.7 shows the properties exposed by the BrowserInformation object and the equivalent Navigator property.
Table 4.7. Descriptions of the BrowserInformation properties and their corresponding Navigator properties
BrowserInformation | Navigator | Description |
|---|---|---|
|
| Represents the platform and version associated with the browser |
|
| Specifies whether cookies are enabled within the browser |
|
| The name of the browser |
|
| The operating system |
|
| The value of the user-agent header that will be sent from the browser to a server |
Based on these options, you can see that you have access to a lot of information. This information can be useful for creating a statistical analysis of your application's users. To accomplish this, you must first get to the BrowserInformation by using code similar to this:
BrowserInformation browserInfo = HtmlPage.BrowserInformation;
HtmlWindow window = HtmlPage.Window;
window.Alert(browserInfo.Name);
This information can be useful if you're modifying the HTML DOM from managed code because of the rendering differences between different browsers. With the BrowserInformation class, you can easily code against these inconsistencies.
The BrowserInformation class provides a way to learn about the user's browser window, which is represented by the HtmlWindow class. With this class, you can navigate to locations within a web page or on the Internet. In addition, you can reach out to users and communicate with them through HTML prompts, if needed. These prompts are something you're probably familiar with if you've developed web applications using JavaScript. If you've used JavaScript in the past, you'll probably be excited to know that there are ways to bridge the scripting world with the managed code world.
Silverlight allows you to create a bridge between the scripting and managed code worlds to allow you to leverage each platform for the area in which it excels. For example, you can use Silverlight purely for its rich and powerful .NET features; Silverlight can provide value even if you don't need a rich vivid user interface. To take advantage of these features, you need to learn to call managed code from JavaScript. In addition, you'll also learn how to use JavaScript from managed code.
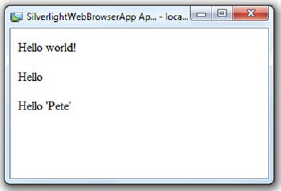
Calling managed code from JavaScript is a fairly simple process—it consists of three basic steps intended to expose managed code elements to the scripting world. Once these tasks have been performed, you're free to reference the managed elements from JavaScript. To demonstrate this, let's pretend you want to use a method from managed code to call a web service.
The first step in calling managed code from JavaScript involves using the ScriptableType attribute. This attribute, which is part of the System.Windows.Browser namespace, makes a class accessible to the JavaScript world. This attribute doesn't expose any special properties, so you can apply it to any class using the following approach:
[ScriptableType]
public partial class MainPage : UserControl
This C# code shows how to make a type accessible to JavaScript by exposing the default Silverlight page to JavaScript. In reality, you can make any class accessible to the scripting world and will typically create a dedicated class or classes just for that interface. Once a class has been marked as a ScriptableType, all public properties, methods, and events are available to JavaScript. Alternatively, you can decide to only expose select member items. Fortunately, this is also an easy process.
To expose member items, you use a similar but different attribute—ScriptableMember. The ScriptableMember attribute may be applied to the events, methods, and properties that can be used with script. You add the attribute as shown in this C# code:
[ScriptableMember]
public void ExecuteWebService()
{
  // Make a call to a web service
}
This attribute gives you the ability to set a scripting alias if you so desire, which you can accomplish by setting the string-typed ScriptAlias property. This may be useful if you want to prevent naming conflicts within script. Everything you've seen up to this point is pretty basic, but we haven't created the bridge to JavaScript yet.
To create the bridge to the scripting world, you must register an instance of the class to be exposed by using the statically visible RegisterScriptableObject method. This method, which belongs to the HtmlPage class, empowers you to give a class instance an alias. This alias can then be used from script. You can accomplish this using the RegisterScriptableObject method shown in the following C# code:
public MainPage()
{
  InitializeComponent();
  HtmlPage.RegisterScriptableObject("bridge", this);
}
This method accepts an instance of a class described as being a ScriptableType. The object is registered with the scripting engine by passing it as the second parameter to the RegisterScriptableObject method, which then uses the first parameter to create an alias for the class instance. This alias is appended to the content property of the hosting Silverlight plug-in.
The Silverlight plug-in exposes a subobject called content, which exposes the content of a Silverlight plug-in; this is the scripting version of the Content property of the SilverlightHost class previously discussed. You can access your scriptable object by first retrieving the plug-in instance and then referencing the ScriptableMember you want, as demonstrated in listing 4.1.

This listing demonstrates how a scriptable object can be accessed from a plug-in instance. This plug-in gives you the ability to use managed code from JavaScript. This can be valuable in situations where you don't need the rich visual features of Silverlight. For instance, you may decide to create something known as a headless Silverlight application.
A headless Silverlight application is an application that doesn't have a UI. Instead, it uses objects registered as ScriptableType elements as the brains for a traditional web page. This approach allows you to write nonvisual components using the .NET Framework and integrate existing code libraries. This type of application is valuable because you can use it to perform tasks that the browser's JavaScript engine can't do. For instance, you may choose to use a headless Silverlight application to make cross-domain requests or listen to a socket (both items discussed in chapter 14). Regardless, you may still need to rely on the features of a preexisting JavaScript library. For these situations, you can use Silverlight to call JavaScript from managed code.
Silverlight gives you the flexibility to call JavaScript from managed code and, in turn, the ability to call any method on an HTML or JavaScript object. This can be useful if you're integrating Silverlight with a preexisting web application. There's one spot in particular where this feature is especially valuable: printing.
Silverlight has basic printing capabilities (see chapter 19), but the Window object in the HTML DOM also exposes a print method. You can use Silverlight's ability to call a function on a JavaScript object to deliver this functionality. To accomplish this, you use a method called Invoke. This method can be used to execute a JavaScript function from managed code, as demonstrated in the following C# code:
HtmlWindow window = HtmlPage.Window;
window.Invoke("print", new object[]{});
This code can be used to print the current web page, including your Silverlight application. The Invoke method can be applied to any HtmlDocument, HtmlElement, or HtmlWindow object. The first parameter of this method represents the name of the function to be invoked. The second parameter represents the arguments that will be passed to this function when it's called. As you can see, this parameter is an array of objects, so you have the flexibility to pass anything you need to a JavaScript function.
Silverlight gives you the ability to execute JavaScript code from managed code. In addition, you can go the other way and call managed code from JavaScript. These two features show how you can use Silverlight to bridge the scripting and managed code worlds. This is important because you need to use this approach if you want to communicate between two different types of plug-ins, such as Flash and Silverlight, or between technologies such as AJAX and Silverlight.
Silverlight gives you the ability to bridge scripting and managed code running inside the browser. In addition, you can use Silverlight to learn about the user's browser window. What's perhaps even more interesting, you can use managed code to interact with the HTML DOM. All this is made possible by the rich HTML DOM API that's an integral part of Silverlight.
Running Silverlight in the browser is the primary use case for the technology. But Silverlight 3 introduced a new way of running your applications: out of the browser, on the user's desktop.
Silverlight 4 added the ability to host arbitrary HTML content on the Silverlight plug-in surface. This feature was added primarily to support advertising scenarios such as Flash and animated GIF banner ads, but can be used to display anything the web browser can display, including instances of other Silverlight applications.
Note
Internally, this feature was implemented by hosting an instance of the system browser within Silverlight. On the Mac, this is the WebKit-based Safari; on Windows, it's Internet Explorer. This is an operating system setting independent from what browser you set as the default to open web content. Because you've now brought back the variability in rendering that's inherent across the spectrum of web browsers, I recommend you use this feature sparingly.
HTML hosting in Silverlight currently works only in out-of-browser applications (covered in chapter 5). When displayed in an in-browser application, you'll simply get a gray or otherwise boring-looking rectangle on the screen, as seen in figure 4.4. If your application supports running both in and out of the browser, you'll want to dynamically add or enable the control based on a runtime check to see which mode you're running in.
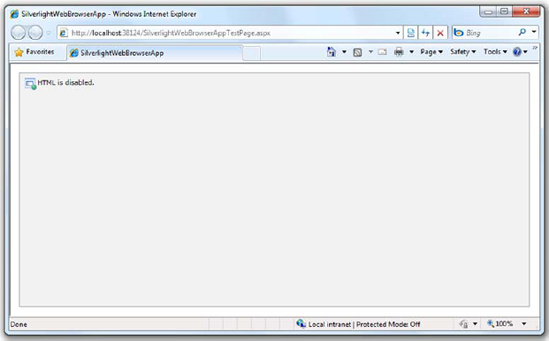
Figure 4.4. When running in the browser, HTML hosting features are disabled. This example shows the WebBrowser control.
There are two ways to host HTML content in your Silverlight application: you can host the WebBrowser control or you can use the WebBrowserBrush to paint HTML over other elements.
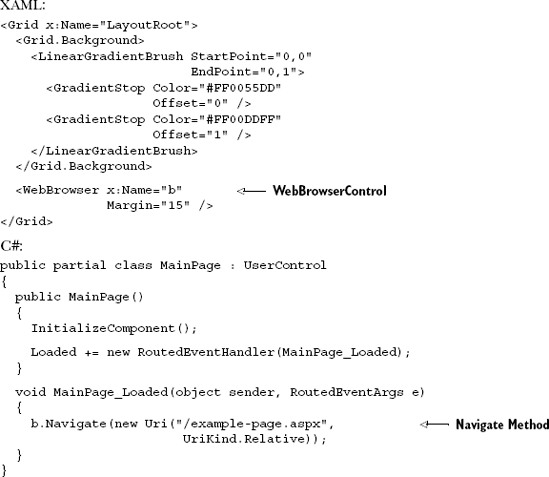
The WebBrowser control allows you to display a rectangular region on the screen containing a functional and interactive web browser. There are three ways you can load content into the control: the Source property and the Navigate and NavigateToString methods.
The Source property is the XAML-friendly way to host content for the control. Simply set the Source to a valid URI on the same domain that originally served the Silverlight application:
<Grid x:Name="LayoutRoot" Background="White">
  <WebBrowser Source="http://www.mydomain.com" Margin="15" />
</Grid>
In the case of a cross-domain error, you'll simply get a blank control for the display and an XamlParseException (attribute out of range), which may be trapped in the application-level exception handler. If you want to host cross-domain content, you'll need to use the NavigateToString method and host an iframe.
Because Source isn't a dependency property and, therefore, doesn't support binding, its utility in real-world applications is pretty low. Instead, you'll want to use the Navigate method.
The Navigate method is the counterpart to the Source property. Though it doesn't support binding like the Source property, you have more control over exception handling when the page is cross-domain. Listing 4.2 shows how to load a local page using the Navigate method.
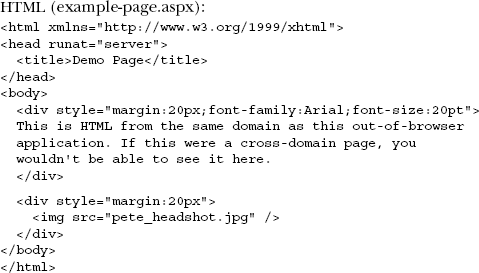
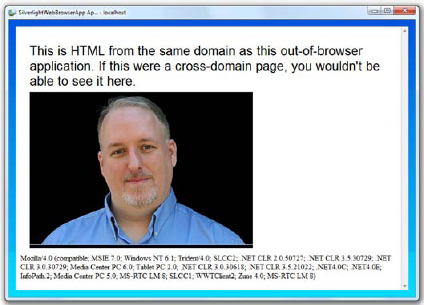
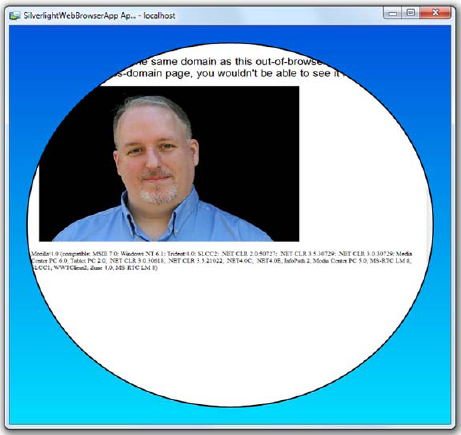
Note that the URI is relative to the position of the .xap so, in this case, example-page. aspx is sitting in the ClientBin folder on the project. When you run this app, you get the result shown in figure 4.5, assuming you happen to have a gigantic photo of me hanging around for just such the occasion.
Like the Source property, we still have the cross-domain restrictions that make this method less than useful for the majority of circumstances. The most flexible approach for loading content into the WebBrowser control is to use the NavigateToString method.
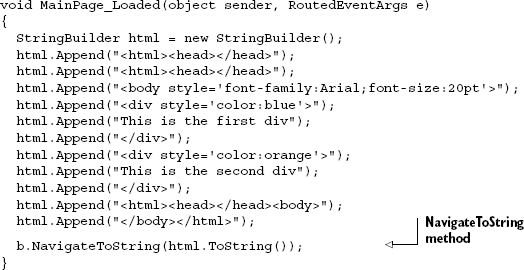
NavigateToString allows you to build and display arbitrary HTML in the control. This can be useful if, say, you're building an RSS reader or similar application where the source isn't exactly an HTML page but has HTML content you want to display. To use this method, simply provide a string containing the HTML source, as shown in listing 4.3. (Use the same XAML as in listing 4.2.)
When run, the resulting application looks like figure 4.6. Note that the styles all came through just as you'd expect it from any other browser page.
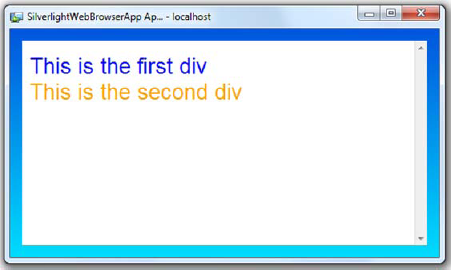
Figure 4.6. Runtime-generated HTML loaded into the Silverlight WebBrowser control via the NavigateToString method
NavigateToString will allow you to host an iframe to enable loading content from another web domain. In this way, you can get around the same-domain limitations imposed by the Navigate method and Source properties. Simply change the HTMLgenerating code in listing 4.3 to this:
html.Append("<html><head></head><body>");
html.Append("<iframe width='100%' height='100%'");
html.Append("src='http://windowsclient.net/learn/video.aspx?v=289850'/>");
html.Append("<html><head></head><body>");
html.Append("</body></html>");
The resulting page will look like figure 4.7. Note that, on this page, we have a Silverlight media player with a loaded video and several animated GIF ads. This provides all the flexibility you'd need to be able to create your own Silverlight web browser or to incorporate browsing capabilities into your own application.
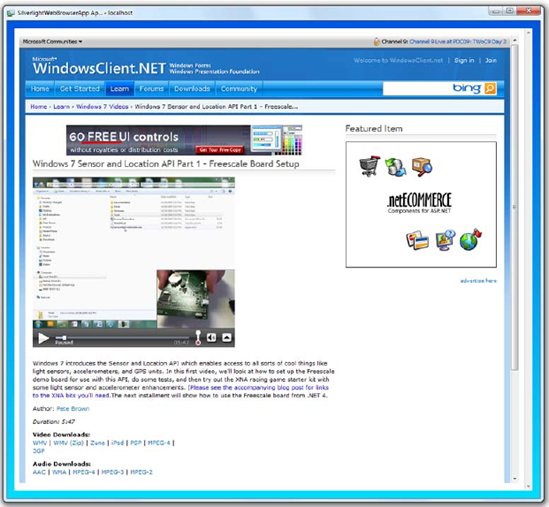
Figure 4.7. We're loading http://windowsclient.net in an iframe using the NavigateToString method. Note the embedded Silverlight player and animated gif ads, all hosted in the control inside our Silverlight out-of-browser application.
You can use normal HTML attributes and techniques to avoid the scrollbars and deal with overflow content just as you would on any other web page. Remember, though, the more HTML you put in your string, the more you'll have to test across the browsers. One of the biggest benefits of Silverlight is that it looks and behaves the same across different browsers. Relying too much on HTML content largely negates this benefit.
Though having an interactive web browser control may be enough for most cases, sometimes you may want to run scripts on the page or save the content off to a file.
Up until now, the web page loaded in the WebBrowser control has been a black box. The user can type into it, but the application can't do anything other than load the content and let it fly. Sometimes you need to invoke behavior on the web page. The WebBrowser control includes two overloads of the InvokeScript method just for that.
Listing 4.4 shows how to invoke a script both with a parameter and without.
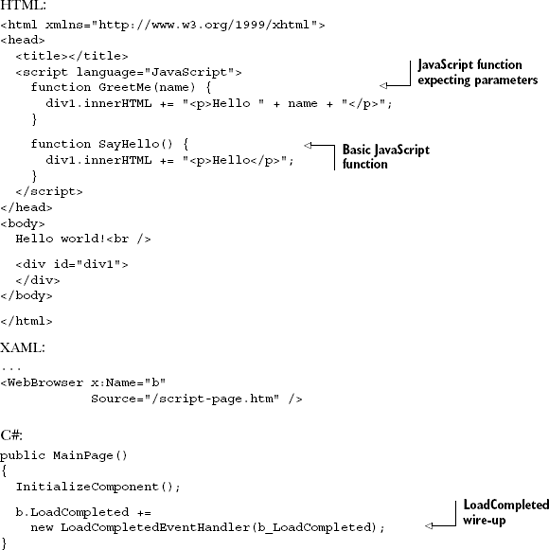

You must ensure you wait for the LoadCompleted event before you attempt to call any scripts. Otherwise, there's no guarantee that the script functions are available. The resulting application looks like figure 4.8.
Another task you may want to perform with the web page is to render its content to a string for use elsewhere in the application. Though this could be done via a separate WebRequest, the information is already here and there's a handy function to expose the content to your application code.
The WebBrowser control includes the SaveToString method, which takes the currently loaded HTML and, well, saves it to a string. From there you can upload it to a service, save it locally, display it to the user or do pretty much anything else you'd like with it:
string html = BrowserControlInstance.SaveToString();
But if the content is from a cross-domain location, you'll receive a SecurityException. This restricts the use of the control to saving the HTML generated by your local server.
The WebBrowser control forms the core of the embedded HTML in Silverlight applications. Building upon that and providing flexibility that's both useful and fun is the WebBrowserBrush.
If you play with the WebBrowser control, you'll eventually notice that you can't overlay other Silverlight content on top of it. On Windows, the WebBrowser control has a separate hWnd or handle to a window in Windows (the equivalent thing happens on the Mac) and, therefore, has what we call airspace issues, in that it'll be on top of anything else you draw. If you want to have the content behave like normal Silverlight content, allowing transforms and otherwise respecting z-order, you'll need to use the WebBrowserBrush but at the cost of interactivity.
The WebBrowserBrush takes a WebBrowser control as its source and is then used to paint on any arbitrary path or shape. It doesn't allow the user to interact with the web page. During PDC09, Scott Guthrie demonstrated an application that puzzlefied a You-Tube page with a Rick Astley video playing in a Flash player. This was accomplished using the Web Browser brush on the individual puzzle shapes.
Listing 4.5 shows how to use the WebBrowserBrush to show the contents of a web page within an ellipse. The HTML used is the same as that from listing 4.2.
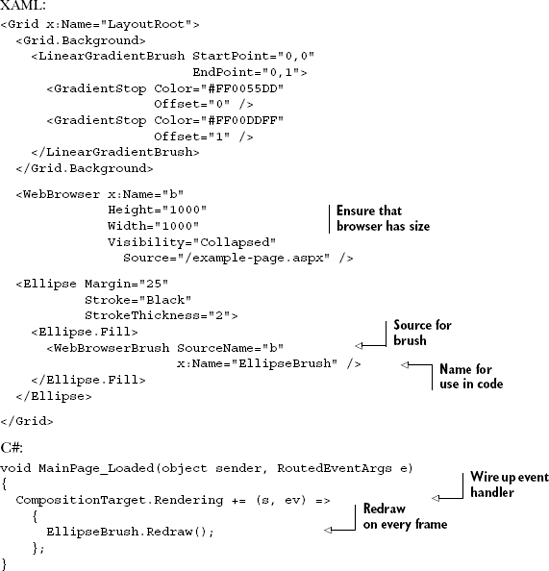
The resulting application looks like figure 4.9.
In listing 4.5, the code is redrawing the control during the CompositionTarget.Rendering event. That event typically fires once for every frame being drawn. For a static web page, this is overkill, and you can simply use the LoadCompleted event of the WebBrowser control. But, if you have video content or a web page that otherwise constantly changes its appearance, you'll need to wire up to this event or to a timer to update the display.
Another point to note is that the WebBrowser control must have a size. What's rendered by the WebBrowserBrush is the same as what would be rendered by the WebBrowser if it were visible. If the WebBrowser was sized to 10×10, the WebBrowserBrush would show that 10×10 content, scaled up to the size specified by the brush's stretch setting.
That's everything you need to be able to paint HTML all over your out-of-browser application whether running in a window or full screen.
Silverlight has always been, first and foremost, a web technology. As such, it has excellent integration with the hosting browser. Anything you can do from JavaScript can be done from within Silverlight.
When running in the browser, Silverlight provides you with enough control that you could automate the entire page without any JavaScript, if you desired, while benefitting from the capabilities and development model offered by managed code languages. The other end of the spectrum is a full-page Silverlight application hosted in a thin HTML shell. For many applications, a middle ground using the in-browser experience integrated with an existing web property or into a system such as SharePoint will be the way to go.
In the next chapter, we'll look at how Silverlight reaches beyond the browser both to interact with the local operating system while running in the browser and how to run Silverlight applications out of the browser, a capability first introduced in Silverlight 3.