Some years ago, I was skiing in the beautiful Carpathian mountains when I witnessed this funny scene. About ten, maybe fifteen people were queuing up to get into the cabin to go to the top of the ski slope. A well-known pop artist showed up, accompanied by two bodyguards. He confidently strode up, expecting to skip the queue because he was famous. Reaching the head of the line, he got a surprise. “Ticket, please!” said the person managing the boarding, who then had to explain, “Well, you first need a ticket, and second, there is no priority line for this boarding, sorry. The queue ends there.” He pointed to the end of the queue. As in most cases in life, it doesn’t matter who you are. We can say the same about software applications. It doesn’t matter who you are when trying to access a specific functionality or data!
Up to now, we’ve only discussed authentication, which is, as you learned, the process in which the application identifies the caller of a resource. In the examples we worked on in the previous chapters, we didn’t implement any rule to decide whether to approve a request. We only cared if the system knew the user or not. In most applications, it doesn’t happen that all the users identified by the system can access every resource in the system. In this chapter, we’ll discuss authorization. Authorization is the process during which the system decides if an identified client has permission to access the requested resource (figure 7.1).

Figure 7.1 Authorization is the process during which the application decides whether an authenticated entity is allowed to access a resource. Authorization always happens after authentication.
In Spring Security, once the application ends the authentication flow, it delegates the request to an authorization filter. The filter allows or rejects the request based on the configured authorization rules (figure 7.2).
To cover all the essential details on authorization, in this chapter we’ll follow these steps:
-
Gain an understanding of what an authority is and apply access rules on all endpoints based on a user’s authorities.
-
Learn how to group authorities in roles and how to apply authorization rules based on a user’s roles.

Figure 7.2 When the client makes the request, the authentication filter authenticates the user. After successful authentication, the authentication filter stores the user details in the security context and forwards the request to the authorization filter. The authorization filter decides whether the call is permitted. To decide whether to authorize the request, the authorization filter uses the details from the security context.
In chapter 8, we’ll continue with selecting endpoints to which we’ll apply the authorization rules. For now, let’s look at authorities and roles and how these can restrict access to our applications.
7.1 Restricting access based on authorities and roles
In this section, you learn about the concepts of authorization and roles. You use these to secure all the endpoints of your application. You need to understand these concepts before you can apply them in real-world scenarios, where different users have different permissions. Based on what privileges users have, they can only execute a specific action. The application provides privileges as authorities and roles.
In chapter 3, you implemented the GrantedAuthority interface. I introduced this contract when discussing another essential component: the UserDetails interface. We didn’t work with GrantedAuthority then because, as you’ll learn in this chapter, this interface is mainly related to the authorization process. We can now return to GrantedAuthority to examine its purpose. Figure 7.3 presents the relationship between the UserDetails contract and the GrantedAuthority interface. Once we finish discussing this contract, you’ll learn how to use these rules individually or for specific requests.

Figure 7.3 A user has one or more authorities (actions that a user can do). During the authentication process, the UserDetailsService obtains all the details about the user, including the authorities. The application uses the authorities as represented by the GrantedAuthority interface for authorization after it successfully authenticates the user.
Listing 7.1 shows the definition of the GrantedAuthority contract. An authority is an action that a user can perform with a system resource. An authority has a name that the getAuthority() behavior of the object returns as a String. We use the name of the authority when defining the custom authorization rule. Often an authorization rule can look like this: “Jane is allowed to delete the product records,” or “John is allowed to read the document records.” In these cases, delete and read are the granted authorities. The application allows the users Jane and John to perform these actions, which often have names like read, write, or delete.
Listing 7.1 The GrantedAuthority contract
public interface GrantedAuthority extends Serializable {
  String getAuthority();
}
The UserDetails, which is the contract describing the user in Spring Security, has a collection of GrantedAuthority instances as presented in figure 7.3. You can allow a user one or more privileges. The getAuthorities() method returns the collection of GrantedAuthority instances. In listing 7.2, you can review this method in the UserDetails contract. We implement this method so that it returns all the authorities granted for the user. After authentication ends, the authorities are part of the details about the user that logged in, which the application can use to grant permissions.
Listing 7.2 The getAuthorities() method from the UserDetails contract
public interface UserDetails extends Serializable {
  Collection<? extends GrantedAuthority> getAuthorities();

  // Omitted code
}
7.1.1 Restricting access for all endpoints based on user authorities
In this section, we discuss limiting access to endpoints for specific users. Up to now in our examples, any authenticated user could call any endpoint of the application. From now on, you’ll learn to customize this access. In the apps you find in production, you can call some of the endpoints of the application even if you are unauthenticated, while for others, you need special privileges (figure 7.4). We’ll write several examples so that you learn various ways in which you can apply these restrictions with Spring Security.
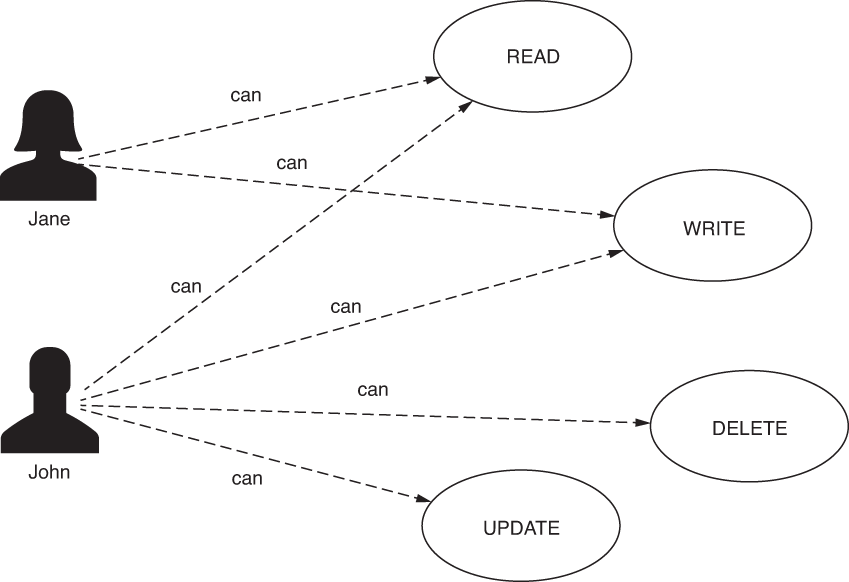
Figure 7.4 Authorities are actions that users can perform in the application. Based on these actions, you implement the authorization rules. Only users having specific authorities can make a particular request to an endpoint. For example, Jane can only read and write to the endpoint, while John can read, write, delete, and update the endpoint.
Now that you remember the UserDetails and GrantedAuthority contracts and the relationship between them, it is time to write a small app that applies an authorization rule. With this example, you learn a few alternatives to configure access to endpoints based on the user’s authorities. We start a new project that I name ssia-ch7-ex1. I show you three ways in which you can configure access as mentioned using these methods:
-
hasAuthority()--Receives as parameters only one authority for which the application configures the restrictions. Only users having that authority can call the endpoint. -
hasAnyAuthority()--Can receive more than one authority for which the application configures the restrictions. I remember this method as “has any of the given authorities.” The user must have at least one of the specified authorities to make a request.I recommend using this method or the
hasAuthority()method for their simplicity, depending on the number of privileges you assign the users. These are simple to read in configurations and make your code easier to understand. -
access()--Offers you unlimited possibilities for configuring access because the application builds the authorization rules based on the Spring Expression Language (SpEL). However, it makes the code more difficult to read and debug. For this reason, I recommend it as the lesser solution and only if you cannot apply thehasAnyAuthority()orhasAuthority()methods.
The only dependencies needed in your pom.xml file are spring-boot-starter-web and spring-boot-starter-security. These dependencies are enough to approach all three solutions previously enumerated. You can find this example in the project ssia-ch7-ex1
<dependency>
  <groupId>org.springframework.boot</groupId>
  <artifactId>spring-boot-starter-security</artifactId>
</dependency>
<dependency>
  <groupId>org.springframework.boot</groupId>
  <artifactId>spring-boot-starter-web</artifactId>
</dependency>
We also add an endpoint in the application to test our authorization configuration:
@RestController
public class HelloController {

  @GetMapping("/hello")
  public String hello() {
    return "Hello!";
  }
}
In a configuration class, we declare an InMemoryUserDetailsManager as our UserDetailsService and add two users, John and Jane, to be managed by this instance. Each user has a different authority. You can see how to do this in the following listing.
Listing 7.3 Declaring the UserDetailsService and assigning users
@Configuration
public class ProjectConfig {

  @Bean                                                  ❶
  public UserDetailsService userDetailsService() {
    var manager = new InMemoryUserDetailsManager();      ❷

    var user1 = User.withUsername("john")                ❸
                    .password("12345")
                    .authorities("READ")
                    .build();

    var user2 = User.withUsername("jane")                ❹
                    .password("12345")
                    .authorities("WRITE")
                    .build();

    manager.createUser(user1);                           ❺
    manager.createUser(user2);

    return manager;
  }

  @Bean                                                  ❻
  public PasswordEncoder passwordEncoder() {
    return NoOpPasswordEncoder.getInstance();
  }
}
❶ The UserDetailsService returned by the method is added in to SpringContext.
❷ Declares an InMemoryUserDetailsManager that stores a couple of users
❸ First user john has the READ authority
❹ Second user jane has the WRITE authority
❺ The users are added and managed by the UserDetailsService.
❻ Don’t forget that a PasswordEncoder is also needed.
The next thing we do is add the authorization configuration. In chapter 2 when we worked on the first example, you saw how we could make all the endpoints accessible for everyone. To do that, you extended the WebSecurityConfigurerAdapter class and overrode the configure() method, similar to what you see in the next listing.
Listing 7.4 Making all the endpoints accessible for everyone without authentication
@Configuration
public class ProjectConfig extends WebSecurityConfigurerAdapter {

  // Omitted code

  @Override
  protected void configure(HttpSecurity http) throws Exception {
    http.httpBasic();

    http.authorizeRequests()
          .anyRequest().permitAll();      ❶
    }
}
❶ Permits access for all the requests
The authorizeRequests() method lets us continue with specifying authorization rules on endpoints. The anyRequest() method indicates that the rule applies to all the requests, regardless of the URL or HTTP method used. The permitAll() method allows access to all requests, authenticated or not.
Let’s say we want to make sure that only users having WRITE authority can access all endpoints. For our example, this means only Jane. We can achieve our goal and restrict access this time based on a user’s authorities. Take a look at the code in the following listing.
Listing 7.5 Restricting access to only users having WRITE authority
@Configuration
public class ProjectConfig extends WebSecurityConfigurerAdapter {

  // Omitted code

  @Override
  protected void configure(HttpSecurity http) throws Exception {
    http.httpBasic();

    http.authorizeRequests()
         .anyRequest()
          .hasAuthority("WRITE");      ❶
  }
}
❶ Specifies the condition in which the user has access to endpoints
You can see that I replaced the permitAll() method with the has-Authority() method. You provide the name of the authority allowed to the user as a parameter of the hasAuthority() method. The application needs, first, to authenticate the request and then, based on the user’s authorities, the app decides whether to allow the call.
We can now start to test the application by calling the endpoint with each of the two users. When we call the endpoint with user Jane, the HTTP response status is 200 OK, and we see the response body “Hello!” When we call it with user John, the HTTP response status is 403 Forbidden, and we get an empty response body back. For example, calling this endpoint with user Jane,
curl -u jane:12345 http://localhost:8080/hello
Hello!
Calling the endpoint with user John,
curl -u john:12345 http://localhost:8080/hello
{
  "status":403,
  "error":"Forbidden",
  "message":"Forbidden",
  "path":"/hello"
}
In a similar way, you can use the hasAnyAuthority() method. This method has the parameter varargs; this way, it can receive multiple authority names. The application permits the request if the user has at least one of the authorities provided as a parameter to the method. You could replace hasAuthority() in the previous listing with hasAnyAuthority("WRITE"), in which case, the application works precisely in the same way. If, however, you replace hasAuthority() with hasAnyAuthority ("WRITE", "READ"), then requests from users having either authority are accepted. For our case, the application allows the requests from both John and Jane. In the following listing, you can see how you can apply the hasAnyAuthority() method.
Listing 7.6 Applying the hasAnyAuthority() method
@Configuration
public class ProjectConfig extends WebSecurityConfigurerAdapter {

  // Omitted code

  @Override
  protected void configure(HttpSecurity http) throws Exception {
    http.httpBasic();

    http.authorizeRequests()
          .anyRequest()
            .hasAnyAuthority("WRITE", "READ");      ❶
  }
}
❶ Permits requests from users with both WRITE and READ authorities
You can successfully call the endpoint now with any of our two users. Here’s the call for John:
curl -u john:12345 http://localhost:8080/hello
Hello!
curl -u jane:12345 http://localhost:8080/hello
Hello!
To specify access based on user authorities, the third way you find in practice is the access() method. The access() method is more general, however. It receives as a parameter a Spring expression (SpEL) that specifies the authorization condition. This method is powerful, and it doesn’t refer only to authorities. However, this method also makes the code more difficult to read and understand. For this reason, I recommend it as the last option, and only if you can’t apply one of the hasAuthority() or hasAnyAuthority() methods presented earlier in this section.
To make this method easier to understand, I first present it as an alternative to specifying authorities with the hasAuthority() and hasAnyAuthority() methods. As you learn in this example, you have to provide a Spring expression as a parameter to the methods. The authorization rule we defined becomes more challenging to read, and this is why I don’t recommend this approach for simple rules. However, the access() method has the advantage of allowing you to customize rules through the expression you provide as a parameter. And this is really powerful! As with SpEL expressions, you can basically define any condition.
Note In most situations, you can implement the required restrictions with the hasAuthority() and hasAnyAuthority() methods, and I recommend that you use these. Use the access() method only if the other two options do not fit and you want to implement more generic authorization rules.
I start with a simple example to match the same requirement as in the previous cases. If you only need to test if the user has specific authorities, the expression you need to use with the access() method can be one of the following:
-
hasAuthority('WRITE')--Stipulates that the user needs theWRITEauthority to call the endpoint. -
hasAnyAuthority('READ', 'WRITE')--Specifies that the user needs one of either theREADorWRITEauthorities. With this expression, you can enumerate all the authorities for which you want to allow access.
Observe that these expressions have the same name as the methods presented earlier in this section. The following listing demonstrates how you can use the access()method.
Listing 7.7 Using the access() method to configure access to the endpoints
@Configuration
public class ProjectConfig extends WebSecurityConfigurerAdapter {

  // Omitted code

  @Override
  protected void configure(HttpSecurity http) throws Exception {
    http.httpBasic();

    http.authorizeRequests()
          .anyRequest()
            .access("hasAuthority('WRITE')");      ❶
  }
}
❶ Authorizes requests from users with the WRITE authority
The example presented in listing 7.7 proves how the access() method complicates the syntax if you use it for straightforward requirements. In such a case, you should instead use the hasAuthority() or the hasAnyAuthority() method directly. But the access() method is not all evil. As I stated earlier, it offers you flexibility. You’ll find situations in real-world scenarios in which you could use it to write more complex expressions, based on which the application grants access. You wouldn’t be able to implement these scenarios without the access() method.
In listing 7.8, you find the access() method applied with an expression that’s not easy to write otherwise. Precisely, the configuration presented in listing 7.8 defines two users, John and Jane, who have different authorities. The user John has only read authority, while Jane has read, write, and delete authorities. The endpoint should be accessible to those users who have read authority but not to those that have delete authority.
NOTE In Spring apps, you find various styles and conventions for naming authorities. Some developers use all caps, other use all small letters. In my opinion, all of these choices are OK as long as you keep these consistent in your app. In this book, I use different styles in the examples so that you can observe more approaches that you might encounter in real-world scenarios.
It is a hypothetical example, of course, but it’s simple enough to be easy to understand and complex enough to prove why the access() method is more powerful. To implement this with the access() method, you can use an expression that reflects the requirement. For example:
"hasAuthority('read') and !hasAuthority('delete')"
The next listing illustrates how to apply the access() method with a more complex expression. You can find this example in the project named ssia-ch7-ex2.
AListing 7.8 pplying the access() method with a more complex expression
@Configuration
public class ProjectConfig extends WebSecurityConfigurerAdapter {

  @Bean
  public UserDetailsService userDetailsService() {
    var manager = new InMemoryUserDetailsManager();

    var user1 = User.withUsername("john")
            .password("12345")
            .authorities("read")
            .build();

    var user2 = User.withUsername("jane")
            .password("12345")
            .authorities("read", "write", "delete")
            .build();

    manager.createUser(user1);
    manager.createUser(user2);

    return manager;
  }

  @Bean
  public PasswordEncoder passwordEncoder() {
    return NoOpPasswordEncoder.getInstance();
  }

  @Override
  protected void configure(HttpSecurity http)
    throws Exception {

    http.httpBasic();

    String expression =
           "hasAuthority('read') and       ❶
           ➥ !hasAuthority('delete')";     ❶

    http.authorizeRequests()
         .anyRequest()
         .access(expression);
  }
}
❶ States that the user must have the authority read but not the authority delete
Let’s test our application now by calling the /hello endpoint for user John:
curl -u john:12345 http://localhost:8080/hello
Hello!
And calling the endpoint with user Jane:
curl -u jane:12345 http://localhost:8080/hello
{
    "status":403,
    "error":"Forbidden",
    "message":"Forbidden",
    "path":"/hello"
}
The user John has only read authority and can call the endpoint successfully. But Jane also has delete authority and is not authorized to call the endpoint. The HTTP status for the call by Jane is 403 Forbidden.
With these examples, you can see how to set constraints regarding the authorities that a user needs to have to access some specified endpoints. Of course, we haven’t yet discussed selecting which requests to be secured based on the path or the HTTP method. We have, instead, applied the rules for all requests regardless of the end- point exposed by the application. Once we finish doing the same configuration for user roles, we discuss how to select the endpoints to which you apply the authorization configurations.
7.1.2 Restricting access for all endpoints based on user roles
In this section, we discuss restricting access to endpoints based on roles. Roles are another way to refer to what a user can do (figure 7.5). You find these as well in real-world applications, so this is why it is important to understand roles and the difference between roles and authorities. In this section, we apply several examples using roles so that you’ll know all the practical scenarios in which the application uses roles and how to write configurations for these cases.
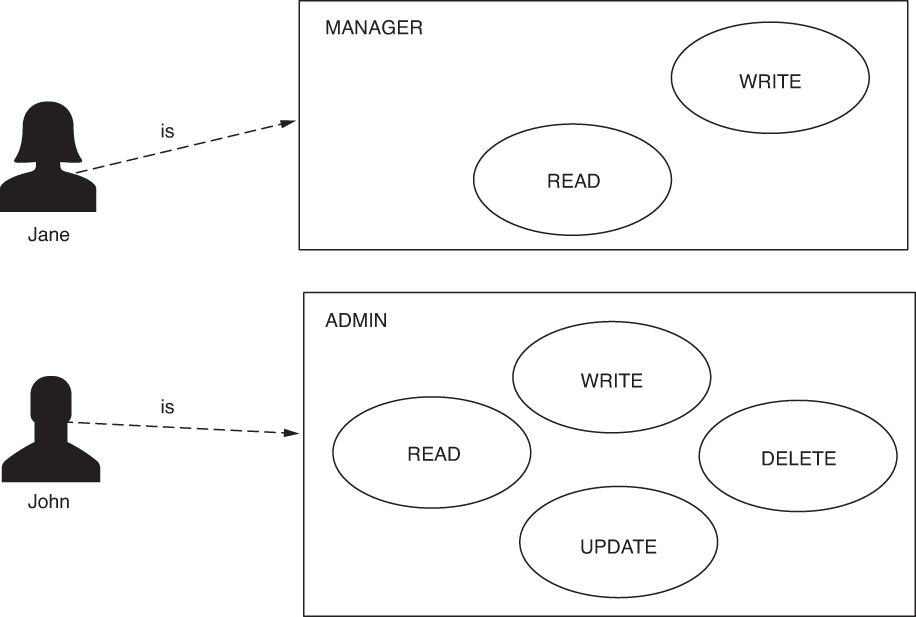
Figure 7.5 Roles are coarse grained. Each user with a specific role can only do the actions granted by that role. When applying this philosophy in authorization, a request is allowed based on the purpose of the user in the system. Only users who have a specific role can call a certain endpoint.
Spring Security understands authorities as fine-grained privileges on which we apply restrictions. Roles are like badges for users. These give a user privileges for a group of actions. Some applications always provide the same groups of authorities to specific users. Imagine, in your application, a user can either only have read authority or have all: read, write, and delete authorities. In this case, it might be more comfortable to think that those users who can only read have a role named READER, while the others have the role ADMIN. Having the ADMIN role means that the application grants you read, write, update, and delete privileges. You could potentially have more roles. For example, if at some point the requests specify that you also need a user who is only allowed to read and write, you can create a third role named MANAGER for your application.
NOTE When using an approach with roles in the application, you won’t have to define authorities anymore. The authorities exist, in this case as a concept, and can appear in the implementation requirements. But in the application, you only have to define a role to cover one or more such actions a user is privileged to do.
The names that you give to roles are like the names for authorities--it’s your own choice. We could say that roles are coarse grained when compared with authorities. Behind the scenes, anyway, roles are represented using the same contract in Spring Security, GrantedAuthority. When defining a role, its name should start with the ROLE_ prefix. At the implementation level, this prefix specifies the difference between a role and an authority. You find the example we work on in this section in the project ssia-ch7-ex3. In the next listing, take a look at the change I made to the previous example.
Listing 7.9 Setting roles for users
@Configuration
public class ProjectConfig extends WebSecurityConfigurerAdapter {

  @Bean
  public UserDetailsService userDetailsService() {
    var manager = new InMemoryUserDetailsManager();

    var user1 = User.withUsername("john")
                    .password("12345")
                    .authorities("ROLE_ADMIN")         ❶
                    .build();

    var user2 = User.withUsername("jane")
                    .password("12345")
                    .authorities("ROLE_MANAGER")
                    .build();

    manager.createUser(user1);
    manager.createUser(user2);

    return manager;
  }

  // Omitted code

}
❶ Having the ROLE_ prefix, GrantedAuthority now represents a role.
To set constraints for user roles, you can use one of the following methods:
-
hasRole()--Receives as a parameter the role name for which the application authorizes the request. -
hasAnyRole()--Receives as parameters the role names for which the application approves the request. -
access()--Uses a Spring expression to specify the role or roles for which the application authorizes requests. In terms of roles, you could usehasRole()orhasAnyRole()as SpEL expressions.
As you observe, the names are similar to the methods presented in section 7.1.1. We use these in the same way, but to apply configurations for roles instead of authorities. My recommendations are also similar: use the hasRole() or hasAnyRole() methods as your first option, and fall back to using access() only when the previous two don’t apply. In the next listing, you can see what the configure() method looks like now.
Listing 7.10 Configuring the app to accept only requests from admins
@Configuration
public class ProjectConfig extends WebSecurityConfigurerAdapter {

  // Omitted code

  @Override
  protected void configure(HttpSecurity http) throws Exception {
    http.httpBasic();

    http.authorizeRequests()
         .anyRequest().hasRole("ADMIN");      ❶
  }
}
❶ The hasRole() method now specifies the roles for which access to the endpoint is permitted. Mind that the ROLE_ prefix does not appear here.
NOTE A critical thing to observe is that we use the ROLE_ prefix only to declare the role. But when we use the role, we do it only by its name.
When testing the application, you should observe that user John can access the endpoint, while Jane receives an HTTP 403 Forbidden. To call the endpoint with user John, use
curl -u john:12345 http://localhost:8080/hello
Hello!
And to call the endpoint with user Jane, use
curl -u jane:12345 http://localhost:8080/hello
{
  "status":403,
  "error":"Forbidden",
  "message":"Forbidden",
  "path":"/hello"
}
When building users with the User builder class as we did in the example for this section, you specify the role by using the roles() method. This method creates the GrantedAuthority object and automatically adds the ROLE_ prefix to the names you provide.
NOTE Make sure the parameter you provide for the roles() method does not include the ROLE_ prefix. If that prefix is inadvertently included in the role() parameter, the method throws an exception. In short, when using the authorities() method, include the ROLE_ prefix. When using the roles() method, do not include the ROLE_ prefix.
In the following listing, you can see the correct way to use the roles() method instead of the authorities() method when you design access based on roles.
Listing 7.11 Setting up roles with the roles() method
@Configuration
public class ProjectConfig extends WebSecurityConfigurerAdapter {

  @Bean
  public UserDetailsService userDetailsService() {
    var manager = new InMemoryUserDetailsManager();

    var user1 = User.withUsername("john")
                    .password("12345")
                    .roles("ADMIN")            ❶
                    .build();

    var user2 = User.withUsername("jane")
                    .password("12345")
                    .roles("MANAGER")
                    .build();

    manager.createUser(user1);
    manager.createUser(user2);

        return manager;
  }

  // Omitted code
}
❶ The roles() method specifies the user’s roles.
7.1.3 Restricting access to all endpoints
In this section, we discuss restricting access to all requests. You learned in chapter 5 that by using the permitAll() method, you can permit access for all requests. You learned as well that you can apply access rules based on authorities and roles. But what you can also do is deny all requests. The denyAll() method is just the opposite of the permitAll()method. In the next listing, you can see how to use the denyAll() method.
Listing 7.12 Using the denyAll() method to restrict access to endpoints
@Configuration
public class ProjectConfig extends WebSecurityConfigurerAdapter {

  // Omitted code

  @Override
  protected void configure(HttpSecurity http) throws Exception {
    http.httpBasic();

    http.authorizeRequests()
         .anyRequest().denyAll();     ❶
  }
}
❶ Uses denyAll() to restrict access for everyone
So, where could you use such a restriction? You won’t find it used as much as the other methods, but there are cases in which requirements make it necessary. Let me show you a couple of cases to clarify this point.
Let’s assume that you have an endpoint receiving as a path variable an email address. What you want is to allow requests that have the value of the variable addresses ending in .com. You don’t want the application to accept any other format for the email address. (You’ll learn in the next section how to apply restrictions for a group of requests based on the path and HTTP method and even for path variables.) For this requirement, you use a regular expression to group requests that match your rule and then use the denyAll() method to instruct your application to deny all these requests (figure 7.6).

Figure 7.6 When the user calls the endpoint with a value of the parameter ending in .com, the application accepts the request. When the user calls the endpoint and provides an email address ending in .net, the application rejects the call. To achieve such behavior, you can use the denyAll() method for all endpoints for which the value of the parameter doesn’t end with .com.
You can also imagine an application designed as in figure 7.7. A few services implement the use cases of the application, which are accessible by calling endpoints available at different paths. But to call an endpoint, the client requests another service that we can call a gateway. In this architecture, there are two separate services of this type. In figure 7.7, I called these Gateway A and Gateway B. The client requests Gateway A if they want to access the /products path. But for the /articles path, the client has to request Gateway B. Each of the gateway services is designed to deny all requests to other paths that these do not serve. This simplified scenario can help you easily understand the denyAll() method. In a production application, you could find similar cases in more complex architectures.
Applications in production face various architectural requirements, which could look strange sometimes. A framework must allow the needed flexibility for any situation you might encounter. For this reason, the denyAll() method is as important as all the other options you learned in this chapter.

Figure 7.7 Access is done through Gateway A and Gateway B. Each of the gateways only delivers requests for specific paths and denies all others.
Summary
-
Authorization is the process during which the application decides if an authenticated request is permitted or not. Authorization always happens after authentication.
-
You configure how the application authorizes requests based on the authorities and roles of an authenticated user.
-
In your application, you can also specify that certain requests are possible for unauthenticated users.
-
You can configure your app to reject any request, using the
denyAll()method, or permit any requests, using thepermitAll()method.