
-
Testing integration with Spring Security configurations for endpoints
-
Testing integration with Spring Security for method-level security
The legend says that writing unit and integration tests started with a short verse:
Track one down, patch it around,
There’s 113 little bugs in the code.”
With time, software became more complex, and teams became larger. Knowing all the functionalities implemented over time by others became impossible. Developers needed a way to make sure they didn’t break existing functionalities while correcting bugs or implementing new features.
While developing applications, we continuously write tests to validate that the functionalities we implement work as desired. The main reason why we write unit and integration tests is to make sure we don’t break existing functionalities when changing code for fixing a bug or for implementing new features. This is also called regression testing.
Nowadays, when a developer finishes making a change, they upload the changes to a server used by the team to manage code versioning. This action automatically triggers a continuous integration tool that runs all existing tests. If any of the changes break an existing functionality, the tests fail, and the continuous integration tool notifies the team (figure 20.1). This way, it’s less likely to deliver changes that affect existing features.
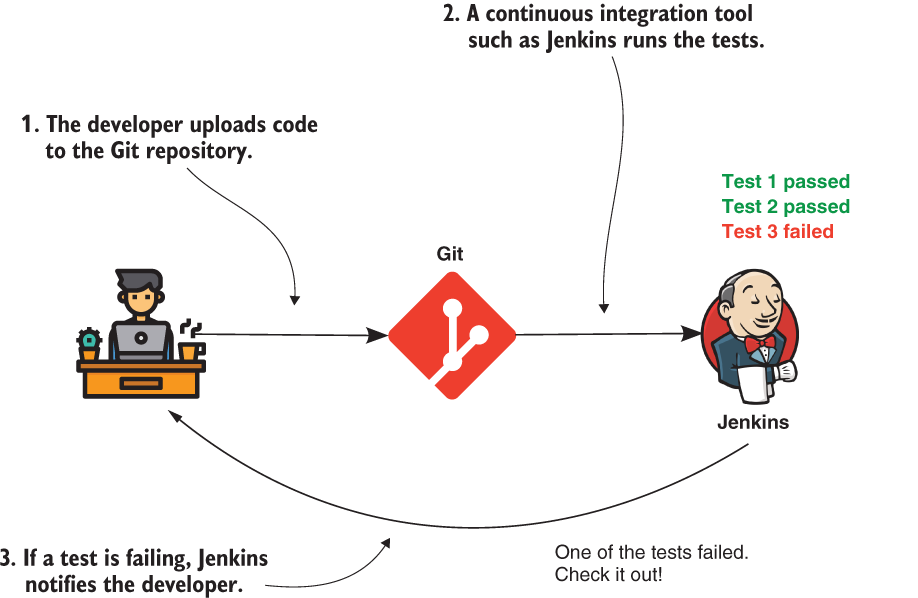
Figure 20.1 Testing is part of the development process. Anytime a developer uploads code, the tests run. If any test fails, a continuous integration tool notifies the developer.
NOTE By using Jenkins in this figure, I say neither that this is the only continuous integration tool used or that it’s the best one. You have many alternatives to choose from like Bamboo, GitLab CI, CircleCI, and so on.
When testing applications, you need to remember it’s not only your application code that you need to test. You need to also make sure you test the integrations with the
frameworks and libraries you use, as well (figure 20.2). Sometime in the future, you may upgrade that framework or library to a new version. When changing the version of a dependency, you want to make sure your app still integrates well with the new version of that dependency. If your app doesn’t integrate in the same way, you want to easily find where you need to make changes to correct the integration problems.
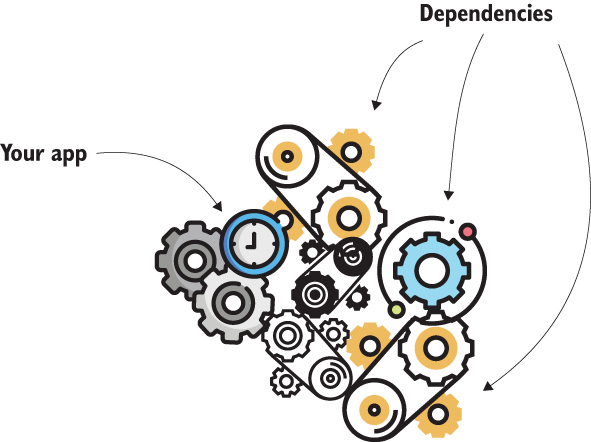
Figure 20.2 The functionality of an application relies on many dependencies. When you upgrade or change a dependency, you might affect existing functionality. Having integration tests with dependencies helps you to discover quickly if a change in a dependency affects the existing functionality of your application.
So that’s why you need to know what we’ll cover in this chapter--how to test your app’s integration with Spring Security. Spring Security, like the Spring framework ecosystem in general, evolves quickly. You probably upgrade your app to new versions, and you certainly want to be aware if upgrading to a specific version develops vulnerabilities, errors, or incompatibilities in your application. Remember what we discussed right from the first chapter: you need to consider security from the first design for the app, and you need to take it seriously. Implementing tests for any of your security configurations should be a mandatory task and should be defined as part of your definition of “done.” You shouldn’t consider a task finished if security tests aren’t ready.
In this chapter, we’ll discuss several practices for testing an app’s integration with Spring Security. We’ll go back to some of the examples we worked on in previous chapters, and you’ll learn how to write integration tests for implemented functionality. Testing, in general, is an epic story. But learning this subject in detail brings many benefits.
In this chapter, we’ll focus on testing integration between an application and Spring Security. Before starting our examples, I’d like to recommend a few resources that helped me understand this subject deeply. If you need to understand the subject more in detail, or even as a refresher, you can read these books. I am positive you’ll find these great!
-
JUnit in Action, 3rd ed. by Cătălin Tudose et al. (Manning, 2020)
-
Unit Testing Principles, Practices, and Patterns by Vladimir Khorikov (Manning, 2020)
-
Testing Java Microservices by Alex Soto Bueno et al. (Manning, 2018)
Our adventure in writing tests for security implementations starts with testing authorization configurations. In section 20.1, you’ll learn how to skip authentication and define mock users to test authorization configuration at the endpoint level. Then, in section 20.2, you’ll learn how to test authorization configurations with users from a UserDetailsService. In section 20.3, we’ll discuss how to set up the full security context in case you need to use specific implementations of the Authentication object. And finally, in section 20.4, you’ll apply the approaches you learned in the previous sections to test authorization configuration on method security.
Once we complete our discussion on testing authorization, section 20.5 teaches you how to test the authentication flow. Then, in sections 20.6 and 20.7, we’ll discuss testing other security configurations like cross-site request forgery (CSRF) and cross-origin resource sharing (CORS). We’ll end the chapter in section 20.8 discussing integration tests of Spring Security and reactive applications.
20.1 Using mock users for tests
In this section, we discuss using mock users to test authorization configuration. This approach is the most straightforward and frequently used method for testing authorization configurations. When using a mock user, the test completely skips the authentication process (figure 20.3). The mock user is valid only for the test execution, and for this user, you can configure any characteristics you need to validate a specific scenario. You can, for example, give specific roles to the user (ADMIN, MANAGER, and so on) or use different authorities to validate that the app behaves as expected in these conditions.

Figure 20.3 We skip the shaded components in the Spring Security authentication flow when executing a test. The test directly uses a mock SecurityContext, which contains the mock user you define to call the tested functionality.
NOTE It’s important to know which components from the framework are involved in an integration test. This way, you know which part of the integration you cover with the test. For example, a mock user can only be used to cover authorization. (In section 20.5, you’ll learn how to deal with authentication.) I sometimes see developers getting confused on this aspect. They thought they were also covering, for example, a custom implementation of an AuthenticationProvider when working with a mock user, which is not the case. Make sure you correctly understand what you’re testing.
To prove how to write such a test, let’s go back to the simplest example we worked on in this book, the project ssia-ch2-ex1. This project exposes an endpoint for the path /hello with only the default Spring Security configuration. What do we expect to happen?
-
When calling the endpoint without a user, the HTTP response status should be 401 Unauthorized.
-
When calling the endpoint having an authenticated user, the HTTP response status should be 200 OK, and the response body should be
Hello!.
Let’s test these two scenarios! We need a couple of dependencies in the pom.xml file to write the tests. The next code snippet shows you the classes we use throughout the examples in this chapter. You should make sure you have these in your pom.xml file before starting to write the tests. Here are the dependencies:
<dependency>
   <groupId>org.springframework.boot</groupId>
   <artifactId>spring-boot-starter-test</artifactId>
   <scope>test</scope>
   <exclusions>
      <exclusion>
         <groupId>org.junit.vintage</groupId>
         <artifactId>junit-vintage-engine</artifactId>
      </exclusion>
   </exclusions>
</dependency>
<dependency>
   <groupId>org.springframework.security</groupId>
   <artifactId>spring-security-test</artifactId>
   <scope>test</scope>
</dependency>
NOTE For the examples in this chapter, we use JUnit 5 for writing tests. But don’t be discouraged if you still work with JUnit 4. From the Spring Security integration point of view, the annotations and the rest of the classes you’ll learn work the same. Chapter 4 of JUnit in Action by Cătălin Tudose et al. (Manning, 2020), which is a dedicated discussion about migrating from JUnit 4 to JUnit 5, contains some interesting tables that show the correspondence between classes and annotations of versions 4 and 5. Here’s the link: https://livebook.manning.com/book/junit-in-action-third-edition/chapter-4.
In the test folder of the Spring Boot Maven project, we add a class named MainTests. We write this class as part of the main package of the application. The name of the main package is com.laurentiuspilca.ssia. In listing 20.1, you can find the definition of the empty class for the tests. We use the @SpringBootTest annotation, which represents a convenient way to manage the Spring context for our test suite.
Listing 20.1 A class for writing the tests
@SpringBootTest          ❶
public class MainTests {

}
❶ Makes Spring Boot responsible for managing the Spring context for the tests
A convenient way to implement a test for the behavior of an endpoint is by using Spring’s MockMvc. In a Spring Boot application, you can autoconfigure the MockMvc utility for testing endpoint calls by adding an annotation over the class, as the next listing presents.
Listing 20.2 Adding MockMvc for implementing test scenarios
@SpringBootTest
@AutoConfigureMockMvc       ❶
public class MainTests {

  @Autowired
  private MockMvc mvc;      ❷

}
❶ Enables Spring Boot to autoconfigure MockMvc. As a consequence, an object of type MockMvc is added to the Spring context.
❷ Injects the MockMvc object that we use to test the endpoint
Now that we have a tool we can use to test endpoint behavior, let’s get started with the first scenario. When calling the /hello endpoint without an authenticated user, the HTTP response status should be 401 Unauthorized.
You can visualize the relationship between the components for running this test in figure 20.4. The test calls the endpoint but uses a mock SecurityContext. We decide what we add to this SecurityContext. For this test, we need to check that if we don’t add a user that represents the situation in which someone calls the endpoint without authenticating, the app rejects the call with an HTTP response having the status 401 Unauthorized. When we add a user to the SecurityContext, the app accepts the call, and the HTTP response status is 200 OK.

Figure 20.4 When running the test, we skip authentication. The test uses a mock SecurityContext and calls the /hello endpoint exposed by HelloController. We add a mock user in the test SecurityContext to verify the behavior is correct according to the authorization rules. If we don’t define a mock user, we expect the app to not authorize the call, while if we define a user, we expect that the call succeeds.
The following listing presents this scenario’s implementation.
Listing 20.3 Testing that you can’t call the endpoint without an authenticated user
@SpringBootTest
@AutoConfigureMockMvc
public class MainTests {

  @Autowired
  private MockMvc mvc;

  @Test
  public void helloUnauthenticated() throws Exception {
    mvc.perform(get("/hello"))                           ❶
         .andExpect(status().isUnauthorized());
  }

}
❶ When performing a GET request for the /hello path, we expect to get back a response with the status Unauthorized.
Mind that we statically import the methods get() and status(). You find the method get() and similar methods related to the requests we use in the examples of this chapter in this class:
org.springframework.test.web.servlet.request.MockMvcRequestBuildersAlso, you find the method status() and similar methods related to the result of the calls that we use in the next examples of this chapter in this class:
org.springframework.test.web.servlet.result.MockMvcResultMatchers
You can run the tests now and see the status in your IDE. Usually, in any IDE, to run the tests, you can right-click on the test’s class and then select Run. The IDE displays a successful test with green and a failing one with another color (usually red or yellow).
NOTE In the projects provided with the book, above each method implementing a test, I also use the @DisplayName annotation. This annotation allows us to have a longer, more detailed description of the test scenario. To occupy less space and allow you to focus on the functionality of the tests we discuss, I took the @DisplayName annotation out of the listings in the book.
To test the second scenario, we need a mock user. To validate the behavior of calling the /hello endpoint with an authenticated user, we use the @WithMockUser annotation. By adding this annotation above the test method, we instruct Spring to set up a SecurityContext that contains a UserDetails implementation instance. It’s basically skipping authentication. Now, calling the endpoint behaves like the user defined with the @WithMockUser annotation successfully authenticated.
With this simple example, we don’t care about the details of the mock user like its username, roles, or authorities. So we add the @WithMockUser annotation, which provides some defaults for the mock user’s attributes. Later in this chapter, you’ll learn to configure the user’s attributes for test scenarios in which their values are important. The next listing provides the implementation for the second test scenario.
Listing 20.4 Using @WithMockUser to define a mock authenticated user
@SpringBootTest
@AutoConfigureMockMvc
public class MainTests {

  @Autowired
  private MockMvc mvc;

  // Omitted code

  @Test
  @WithMockUser                                        ❶
  public void helloAuthenticated() throws Exception {
    mvc.perform(get("/hello"))                         ❷
         .andExpect(content().string("Hello!"))
         .andExpect(status().isOk());
  }

}
❶ Calls the method with a mock authenticated user
❷ In this case, when performing a GET request for the /hello path, we expect the response status to be OK.
Run this test now and observe its success. But in some situations, we need to use a specific name or give the user specific roles or authorities to implement the test. Say we want to test the endpoints we defined in ssia-ch5-ex2. For this example, the endpoints return a body depending on the authenticated user’s name. To write the test, we need to give the user a known username. The next listing shows how to configure the details of the mock user by writing a test for the /hello endpoint in the ssia-ch5-ex2 project.
Listing 20.5 Configuring details for the mock user
@SpringBootTest
@AutoConfigureMockMvc
public class MainTests {

  // Omitted code

  @Test
  @WithMockUser(username = "mary")                     ❶
  public void helloAuthenticated() throws Exception {
    mvc.perform(get("/hello"))
         .andExpect(content().string("Hello, mary!"))
         .andExpect(status().isOk());
    }
}
❶ Sets up a username for the mock user
In figure 20.5, you find a comparison between how using annotations to define the test security environment differs from using a RequestPostProcessor. The framework interprets annotations like @WithMockUser before it executes the test method. This way, the test method creates the test request and executes it in an already configured security environment. When using a RequestPostProcessor, the framework first calls the test method and builds the test request. The framework then applies the RequestPostProcessor, which alters the request or the environment in which it’s executed before sending it. In this case, the framework configures the test dependencies, like the mock users and the SecurityContext, after building the test request.
Like setting up the username, you can set the authorities and roles for testing authorization rules. An alternative approach to creating a mock user is using a RequestPostProcessor. We can provide a RequestPostProcessor the with() method, as listing 20.6 presents. The class SecurityMockMvcRequestPostProcessors provided by Spring Security offers us lots of implementations for RequestPostProcessor, which helps us cover various test scenarios.
In this chapter, we also discuss the frequently used implementations for Request-PostProcessor. The method user() of the class SecurityMockMvcRequestPostProcessors returns a RequestPostProcessor we can use as an alternative to the @WithMockUser annotation.
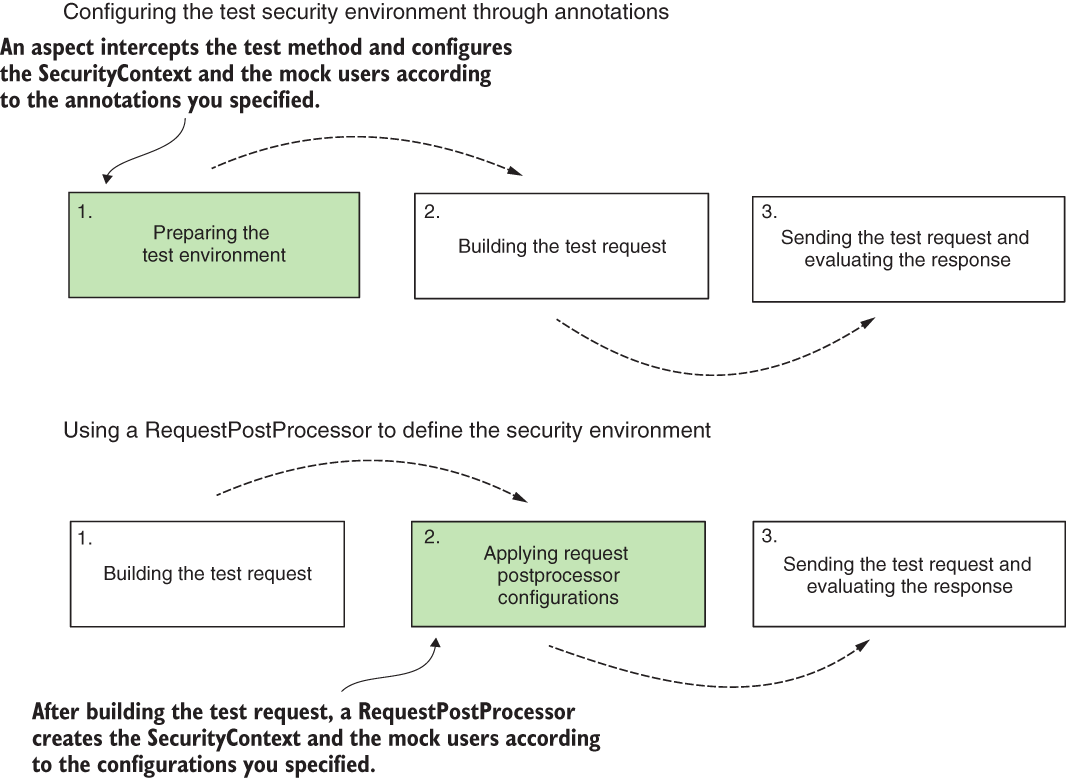
Figure 20.5 The difference between using annotations and the RequestPostProcessor to create the test security environment. When using annotations, the framework sets up the test security environment first. When using a RequestPostProcessor, the test request is created and then changed to define other constraints like the test security environment. In the figure, I shaded the points where the framework applies the test security environment.
Listing 20.6 Using a RequestPostProcessor to define a mock user
@SpringBootTest
@AutoConfigureMockMvc
public class MainTests {

  // Omitted code

  @Test
  public void helloAuthenticatedWithUser() throws Exception {
    mvc.perform(
          get("/hello")
            .with(user("mary")))                 ❶
        .andExpect(content().string("Hello!"))
        .andExpect(status().isOk());
  }
}
❶ Calls the /hello endpoint using a mock user with the username Mary
As you observed in this section, writing tests for authorization configurations is fun and simple! Most of the tests you write for Spring Security integration with functionalities of your application are for authorization configurations. You might be wondering now why didn’t we also test authentication. In section 20.5, we’ll discuss testing authentication. But in general, it makes sense to test authorization and authentication separately. Usually, an app has one way to authenticate users but might expose dozens of endpoints for which authorization is configured differently. That’s why you test authentication separately with a handful of tests and then implement these individually for each authorization configuration for the endpoints. It’s a loss of execution time to repeat authentication for each endpoint tested, as long as the logic doesn’t change.
20.2 Testing with users from a UserDetailsService
In this section, we discuss obtaining the user details for tests from a UserDetailsService. This approach is an alternative to creating a mock user. The difference is that, instead of creating a fake user, this time we need to get the user from a given UserDetailsService. You use this approach if you want to also test integration with the data source from where your app loads the user details (figure 20.6).

Figure 20.6 Instead of creating a mock user for the test when building the SecurityContext used by the test, we take the user details from a UserDetailsService. This way, you can test authorization using real users taken from a data source. During the test, the flow of execution skips the shaded components.
To demonstrate this approach, let’s open project ssia-ch2-ex2 and implement the tests for the endpoint exposed at the /hello path. We use the UserDetailsService bean that the project already adds to the context. Note that, with this approach, we need to have a UserDetailsService bean in the context. To specify the user we authenticate from this UserDetailsService, we annotate the test method with @WithUserDetails. With the @WithUserDetails annotation, to find the user, you specify the username. The following listing presents the implementation of the test for the /hello endpoint using the @WithUserDetails annotation to define the authenticated user.
Listing 20.7 Defining the authenticated user with the @WithUserDetails annotation
@SpringBootTest
@AutoConfigureMockMvc
public class MainTests {

  @Autowired
  private MockMvc mvc;

  @Test
  @WithUserDetails("john")                              ❶
  public void helloAuthenticated() throws Exception {
    mvc.perform(get("/hello"))
        .andExpect(status().isOk());
  }

}
❶ Loads the user John using the UserDetailsService for running the test scenario
20.3 Using custom Authentication objects for testing
Generally, when using a mock user for a test, you don’t care which class the frame-work uses to create the Authentication instances in the SecurityContext. But say you have some logic in the controller that depends on the type of the object. Can you somehow instruct the framework to create the Authentication object for the test using a specific type? The answer is yes, and this is what we discuss in this section.
The logic behind this approach is simple. We define a factory class responsible for building the SecurityContext. This way, we have full control over how the SecurityContext for the test is built, including what’s inside it (figure 20.7). For example, we can choose to have a custom Authentication object.
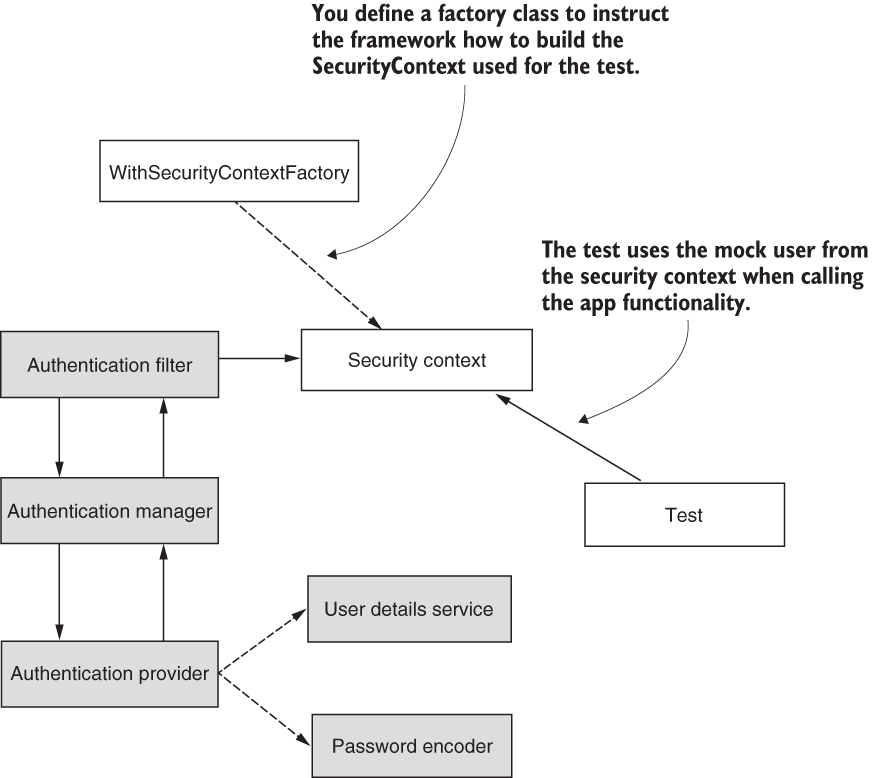
Figure 20.7 To obtain full control of how the SecurityContext for the test is defined, we build a factory class that instructs the test on how to build the SecurityContext. This way, we gain greater flexibility, and we can choose details like the kind of object to use as an Authentication object. In the figure, I shaded the components skipped from the flow during the test.
Let’s open project ssia-ch2-ex5 and write a test in which we configure the mock SecurityContext and instruct the framework on how to create the Authentication object. An interesting aspect to remember about this example is that we use it to prove the implementation of a custom AuthenticationProvider. The custom AuthenticationProvider we implement in our case only authenticates a user named John. However, as in the other two previous approaches we discussed in sections 20.1 and 20.2, the current approach skips authentication. For this reason, you see at the end of the example that we can actually give any name to our mock user. We follow three steps to achieve this behavior (figure 20.8):
-
Write an annotation to use over the test similarly to the way we use
@WithMockUseror@WithUserDetails. -
Write a class that implements the
WithSecurityContextFactoryinterface. This class implements thecreateSecurityContext()method that returns the mockSecurityContextthe framework uses for the test. -
Link the custom annotation created in step 1 with the factory class created in step 2 via the
@WithSecurityContextannotation.
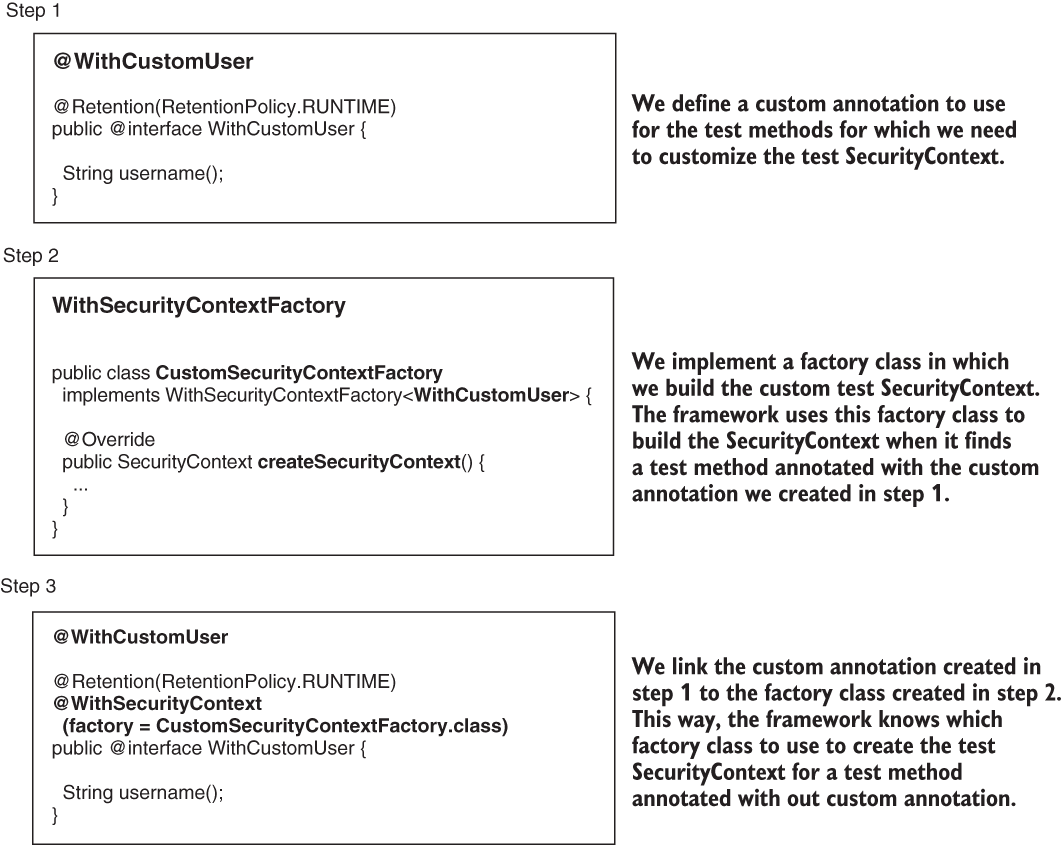
Figure 20.8 To enable the test to use a custom SecurityContext, you need to follow the three steps illustrated in this figure.
Step 1: Defining a custom annotation
In listing 20.8, you find the definition of the custom annotation we define for the test, named @WithCustomUser. As properties of the annotation, you can define whatever details you need to create the mock Authentication object. I added only the username here for my demonstration. Also, don’t forget to use the annotation @Retention (RetentionPolicy.RUNTIME) to set the retention policy to runtime. Spring needs to read this annotation using Java reflection at runtime. To allow Spring to read this annotation, you need to change its retention policy to RetentionPolicy.RUNTIME.
Listing 20.8 Defining the @WithCustomUser annotation
@Retention(RetentionPolicy.RUNTIME)
public @interface WithCustomUser {

  String username();
}
Step 2: Creating a factory class for the mock SecurityContext
The second step consists in implementing the code that builds the SecurityContext that the framework uses for the test’s execution. Here’s where we decide what kind of Authentication to use for the test. The following listing demonstrates the implementation of the factory class.
Listing 20.9 The implementation of a factory for the SecurityContext
public class CustomSecurityContextFactory                  ❶
  implements WithSecurityContextFactory<WithCustomUser> {

  @Override                                                ❷
  public SecurityContext createSecurityContext(
    WithCustomUser withCustomUser) {
      SecurityContext context =                            ❸
        SecurityContextHolder.createEmptyContext();

      var a = new UsernamePasswordAuthenticationToken(
        withCustomUser.username(), null, null);            ❹

      context.setAuthentication(a);                        ❺

      return context;
    }
}
❶ Implements the WithSecurityContextFactory annotation and specifies the custom annotation we use for the tests
❷ Implements createSecurityContext() to define how to create the SecurityContext for the test
❸ Builds an empty security context
❹ Creates an Authentication instance
❺ Adds the mock Authentication to the SecurityContext
Step 3: Linking the custom annotation to the factory class
Using the @WithSecurityContext annotation, we now link the custom annotation we created in step 1 to the factory class for the SecurityContext we implemented in step 2. The following listing presents the change to our @WithCustomUser annotation to link it to the SecurityContext factory class.
Listing 20.10 Linking the custom annotation to the SecurityContext factory class
@Retention(RetentionPolicy.RUNTIME)
@WithSecurityContext(factory = CustomSecurityContextFactory.class)
public @interface WithCustomUser {

    String username();
}
With this setup complete, we can write a test to use the custom SecurityContext. The next listing defines the test.
Listing 20.11 Writing a test that uses the custom SecurityContext
@SpringBootTest
@AutoConfigureMockMvc
public class MainTests {

  @Autowired
  private MockMvc mvc;

  @Test
  @WithCustomUser(username = "mary")                   ❶
  public void helloAuthenticated() throws Exception {
    mvc.perform(get("/hello"))
         .andExpect(status().isOk());
  }
}
❶ Executes the test with a user having the username “mary”
Running the test, you observe a successful result. You might think, “Wait! In this example, we implemented a custom AuthenticationProvider that only authenticates a user named John. How could the test be successful with the username Mary?” As in the case of @WithMockUser and @WithUserDetails, with this method we skip the authentication logic. So you can use it only to test what’s related to authorization and onward.
20.4 Testing method security
In this section, we discuss testing method security. All the tests we wrote until now in this chapter refer to endpoints. But what if your application doesn’t have endpoints? In fact, if it’s not a web app, it doesn’t have endpoints at all! But you might have used Spring Security with global method security as we discussed in chapters 16 and 17. You still need to test your security configurations in such scenarios.
Fortunately, you do this by using the same approaches we discussed in the previous sections. You can still use @WithMockUser, @WithUserDetails, or a custom annotation to define your own SecurityContext. But instead of using MockMvc, you directly inject from the context the bean defining the method you need to test.
Let’s open project ssia-ch16-ex1 and implement the tests for the getName() method in the NameService class. We protected the getName() method using the @PreAuthorize annotation. In listing 20.12, you find the implementation of the test class with its three tests, and figure 20.9 represents graphically the three scenarios we test:
-
Calling the method without an authenticated user, the method should throw
AuthenticationException. -
Calling the method with an authenticated user that has an authority different than the expected one (write), the method should throw
AccessDeniedException. -
Calling the method with an authenticated user that has the expected authority returns the expected result.
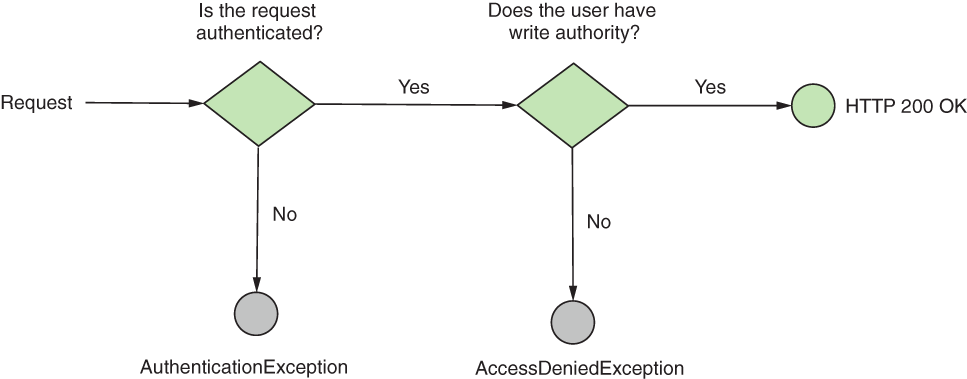
Figure 20.9 The tested scenarios. If the HTTP request is not authenticated, the expected result is an AuthenticationException. If the HTTP request is authenticated but the user doesn’t have the expected authority, the expected result is an AccessDeniedException. If the authenticated user has the expected authority, the call is successful.
Listing 20.12 Implementation of the three test scenarios for the getName() method
@SpringBootTest
class MainTests {

  @Autowired
  private NameService nameService;

  @Test
  void testNameServiceWithNoUser() {
    assertThrows(AuthenticationException.class,
            () -> nameService.getName());
  }

  @Test
  @WithMockUser(authorities = "read")
  void testNameServiceWithUserButWrongAuthority() {
    assertThrows(AccessDeniedException.class,
            () -> nameService.getName());
  }

  @Test
  @WithMockUser(authorities = "write")
  void testNameServiceWithUserButCorrectAuthority() {
    var result = nameService.getName();

    assertEquals("Fantastico", result);
  }
}
We don’t configure MockMvc anymore because we don’t need to call an endpoint. Instead, we directly inject the NameService instance to call the tested method. We use the @WithMockUser annotation as we discussed in section 20.1. Similarly, you could have used the @WithUserDetails as we discussed in section 20.2 or designed a custom way to build the SecurityContext as discussed in section 20.3.
20.5 Testing authentication
In this section, we discuss testing authentication. Previously, in this chapter, you learned how to define mock users and test authorization configurations. But what about authentication? Can we also test the authentication logic? You need to do this if, for example, you have custom logic implemented for your authentication, and you want to make sure the entire flow works. When testing authentication, the test implementation requests work like normal client requests, as presented in figure 20.10.
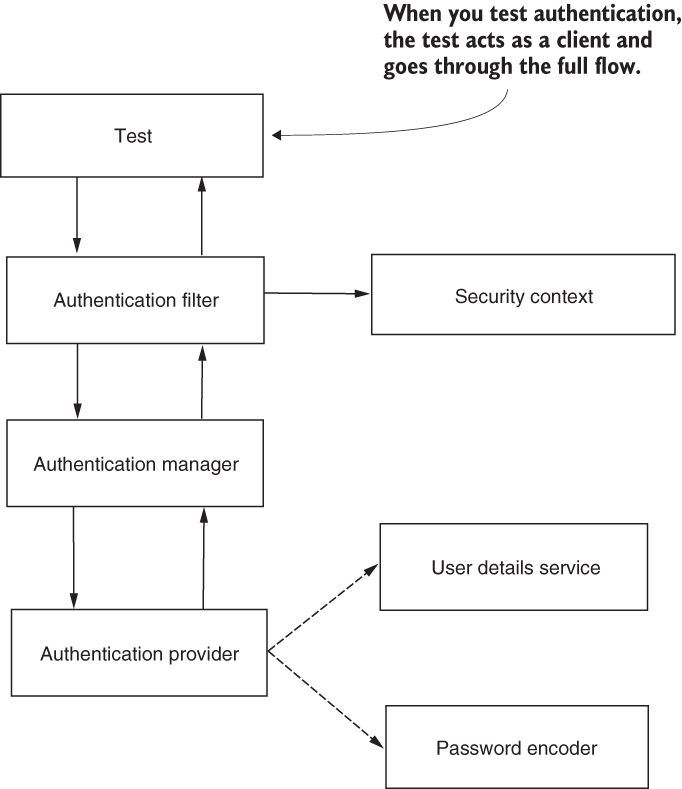
Figure 20.10 When testing authentication, the test acts as a client and goes through the full Spring Security flow discussed throughout the book. This way, you can also test, for example, your custom AuthenticationProvider objects.
For example, going back to project ssia-ch2-ex5, can we prove that the custom authentication provider we implemented works correctly and secure it with tests? In this project, we implemented a custom AuthenticationProvider, and we want to make sure that we secure this custom authentication logic as well with tests. Yes, we can test the authentication logic as well.
The logic we implement is straightforward. Only one set of credentials is accepted: the username "john" and the password "12345". We need to prove that, when using valid credentials, the call is successful, whereas when using some other credentials, the HTTP response status is 401 Unauthorized. Let’s again open project ssia-ch2-ex5 and implement a couple of tests to validate that authentication behaves correctly.
Listing 20.13 Testing authentication with httpBasic() RequestPostProcessor
@SpringBootTest
@AutoConfigureMockMvc
public class AuthenticationTests {

  @Autowired
  private MockMvc mvc;

  @Test
  public void helloAuthenticatingWithValidUser() throws Exception {
    mvc.perform(
       get("/hello")
         .with(httpBasic("john","12345")))      ❶
         .andExpect(status().isOk());
  }

  @Test
  public void helloAuthenticatingWithInvalidUser() throws Exception {
    mvc.perform(
       get("/hello")
         .with(httpBasic("mary","12345")))      ❷
         .andExpect(status().isUnauthorized());
  }
}
❶ Authenticates with the correct credentials
❷ Authenticates with the wrong credentials
Using the httpBasic() request postprocessor, we instruct the test to execute the authentication. This way, we validate the behavior of the endpoint when authenticating using either valid or invalid credentials. You can use the same approach to test the authentication with a form login. Let’s open project ssia-ch5-ex4, where we used form login for authentication, and write some tests to prove authentication works correctly. We test the app’s behavior in the following scenarios:
-
When authenticating with a valid set of credentials, but the user doesn’t have a valid authority according to the implementation we wrote in the
AuthenticationSuccessHandler -
When authenticating with a valid set of credentials and a user that has a valid authority according to the implementation we wrote in the
AuthenticationSuccessHandler
In listing 20.14, you find the implementation for the first scenario. If we authenticate using invalid credentials, the app doesn’t authenticate the user and adds the header “failed” to the HTTP response. We customized an app and added the “failed” header with an AuthenticationFailureHandler when discussing authentication back in chapter 5.
Listing 20.14 Testing form login failed authentication
@SpringBootTest
@AutoConfigureMockMvc
public class MainTests {

  @Autowired
  private MockMvc mvc;

  @Test
  public void loggingInWithWrongUser() throws Exception {
    mvc.perform(formLogin()                               ❶
          .user("joey").password("12345"))
          .andExpect(header().exists("failed"))
          .andExpect(unauthenticated());
  }
}
❶ Authenticates using form login with an invalid set of credentials
Back in chapter 5, we customized authentication logic using an Authentication-SuccessHandler. In our implementation, if the user has read authority, the app redirects them to the /home page. Otherwise, the app redirects the user to the /error page. The following listing presents the implementation of these two scenarios.
Listing 20.15 Testing app behavior when authenticating users
@SpringBootTest
@AutoConfigureMockMvc
public class MainTests {

  @Autowired
  private MockMvc mvc;

  // Omitted code

  @Test
  public void loggingInWithWrongAuthority() throws Exception {
    mvc.perform(formLogin()
                .user("mary").password("12345")
            )
            .andExpect(redirectedUrl("/error"))     ❶
            .andExpect(status().isFound())
            .andExpect(authenticated());
    }

  @Test
  public void loggingInWithCorrectAuthority() throws Exception {
    mvc.perform(formLogin()
                 .user("bill").password("12345")
            )
            .andExpect(redirectedUrl("/home"))      ❷
            .andExpect(status().isFound())
            .andExpect(authenticated());
    }
}
❶ When authenticating with a user that doesn’t have read authority, the app redirects the user to path /error.
❷ When authenticating with a user that has read authority, the app redirects the user to path /home.
20.6 Testing CSRF configurations
In this section, we discuss testing the cross-site request forgery (CSRF) protection configuration for your application. When an app presents a CSRF vulnerability, an attacker can fool the user into taking actions they don’t want to take once they’re logged into the application. As we discussed in chapter 10, Spring Security uses CSRF tokens to mitigate these vulnerabilities. This way, for any mutating operation (POST, PUT, DELETE), the request needs to have a valid CSRF token in its headers. Of course, at some point, you need to test more than HTTP GET requests. Depending on how you implement your application, as we discussed in chapter 10, you might need to test CSRF protection. You need to make sure it works as expected and protects the endpoint that implements mutating actions.
Fortunately, Spring Security provides an easy approach to test CSRF protection using a RequestPostProcessor. Let’s open the project ssia-ch10-ex1 and test that CSRF protection is enabled for an endpoint /hello when called with HTTP POST in the following scenarios:
-
If we don’t use a CSRF token, the HTTP response status is 403 Forbidden.
-
If we send a CSRF token, the HTTP response status is 200 OK.
The following listing shows you the implementation of these two scenarios. Observe how we can send a CSRF token in the response simply by using the csrf() RequestPostProcessor.
Listing 20.16 Implementing the CSRF protection test scenarios
@SpringBootTest
@AutoConfigureMockMvc
public class MainTests {

  @Autowired
  private MockMvc mvc;

  @Test
  public void testHelloPOST() throws Exception {
    mvc.perform(post("/hello"))                           ❶
          .andExpect(status().isForbidden());
  }

  @Test
  public void testHelloPOSTWithCSRF() throws Exception {
    mvc.perform(post("/hello").with(csrf()))              ❷
          .andExpect(status().isOk());
  }
}
❶ When calling the endpoint without a CSRF token, the HTTP response status is 403 Forbidden.
❷ When calling the endpoint with a CSRF token, the HTTP response status is 200 OK.
20.7 Testing CORS configurations
In this section, we discuss testing cross-origin resource sharing (CORS) configurations. As you learned in chapter 10, if a browser loads a web app from one origin (say, example.com), the browser won’t allow the app to use an HTTP response that comes from a different origin (say, example.org). We use CORS policies to relax these restrictions. This way, we can configure our application to work with multiple origins. Of course, as for any other security configurations, you need to also test the CORS policies. In chapter 10, you learned that CORS is about specific headers on the response whose values define whether the HTTP response is accepted. Two of these headers related to CORS specifications are Access-Control-Allow-Origin and Access-Control-Allow-Methods. We used these headers in chapter 10 to configure multiple origins for our app.
All we need to do when writing tests for the CORS policies is to make sure that these headers (and maybe other CORS-related headers, depending on the complexity of your configurations) exist and have the correct values. For this validation, we can act precisely as the browser does when making a preflight request. We make a request using the HTTP OPTIONS method, requesting the value for the CORS headers. Let’s open project ssia-ch10-ex4 and write a test to validate the values for the CORS headers. The following listing shows the definition of the test.
Listing 20.17 Test implementation for CORS policies
@SpringBootTest
@AutoConfigureMockMvc
public class MainTests {

  @Autowired
  private MockMvc mvc;

  @Test
  public void testCORSForTestEndpoint() throws Exception {
    mvc.perform(options("/test")                                 ❶
            .header("Access-Control-Request-Method", "POST")
            .header("Origin", "http://www.example.com")
      )                                                          ❷
      .andExpect(header().exists("Access-Control-Allow-Origin"))
      .andExpect(header().string("Access-Control-Allow-Origin", "*"))
      .andExpect(header().exists("Access-Control-Allow-Methods"))
      .andExpect(header().string("Access-Control-Allow-Methods", "POST"))
      .andExpect(status().isOk());
  }

}
❶ Performs an HTTP OPTIONS request on the endpoint requesting the value for the CORS headers
❷ Validates the values for the headers according to the configuration we made in the app
20.8 Testing reactive Spring Security implementations
In this section, we discuss testing the integration of Spring Security with functionalities developed within a reactive app. You won’t be surprised to find out that Spring Security provides support for testing security configurations also for reactive apps. As in the case of non-reactive applications, security for reactive apps is a crucial aspect. So testing their security configurations is also essential. To show you how to implement tests for your security configurations, we go back to the examples we worked on in chapter 19. With Spring Security for reactive applications, you need to know two approaches for writing your tests:
Using the @WithMockUser annotation is straightforward because it works the same as for non-reactive apps, as we discussed in section 20.1. The definition of the test is different, however, because being a reactive app, we can’t use MockMvc anymore. But this change isn’t related to Spring Security. We can use something similar when testing reactive apps, a tool named WebTestClient. In the next listing, you find the implementation of a simple test making use of a mock user to verify the behavior of a reactive endpoint.
Listing 20.18 Using the @WithMockUser when testing reactive implementations
@SpringBootTest
@AutoConfigureWebTestClient            ❶
class MainTests {

  @Autowired                           ❷
  private WebTestClient client;

  @Test
  @WithMockUser                        ❸
  void testCallHelloWithValidUser() {
    client.get()                       ❹
            .uri("/hello")
            .exchange()
            .expectStatus().isOk();
  }
}
❶ Requests Spring Boot to autoconfigure the WebTestClient we use for the tests
❷ Injects the WebTestClient instance configured by Spring Boot from the Spring context
❸ Uses the @WithMockUser annotation to define a mock user for the test
❹ Makes the exchange and validates the result
As you observe, using the @WithMockUser annotation is pretty much the same as for non-reactive apps. The framework creates a SecurityContext with the mock user. The application skips the authentication process and uses the mock user from the test’s SecurityContext to validate the authorization rules.
The second approach you can use is a WebTestClientConfigurer. This approach is similar to using the RequestPostProcessor in the case of a non-reactive app. In the case of a reactive app, for the WebTestClient we use, we set a WebTestClientConfigurer, which helps mutate the test context. For example, we can define the mock user or send a CSRF token to test CSRF protection as we did for non-reactive apps in section 20.6. The following listing shows you how to use a WebTestClientConfigurer.
Listing 20.19 Using a WebTestClientConfigurer to define a mock user
@SpringBootTest
@AutoConfigureWebTestClient
class MainTests {

  @Autowired
  private WebTestClient client;

  // Omitted code

  @Test
  void testCallHelloWithValidUserWithMockUser() {
    client.mutateWith(mockUser())                  ❶
           .get()
           .uri("/hello")
           .exchange()
           .expectStatus().isOk();
    }
}
❶ Before executing the GET request, mutates the call to use a mock user
Assuming you’re testing CSRF protection on a POST call, you write something similar to this:
client.mutateWith(csrf())
         .post()
         .uri("/hello")
           .exchange()
           .expectStatus().isOk();
Summary
-
Writing tests is a best practice. You write tests to make sure your new implementations or fixes don’t break existing functionalities.
-
You need to not only test your code, but also test integration with libraries and frameworks you use.
-
Spring Security offers excellent support for implementing tests for your security configurations.
-
You can test authorization directly by using mock users. You write separate tests for authorization without authentication because, generally, you need fewer authentication tests than authorization tests.
-
It saves execution time to test authentication in separate tests, which are fewer in number, and then test the authorization configuration for your endpoints and methods.
-
To test security configurations for endpoints in non-reactive apps, Spring Security offers excellent support for writing your tests with
MockMvc. -
To test security configurations for endpoints in reactive apps, Spring Security offers excellent support for writing your tests with
WebTestClient. -
You can write tests directly for methods for which you wrote security configurations using method security.