In chapters 12 through 15, we discussed in detail how an OAuth 2 system works and how you implement one with Spring Security. We then changed the subject and in chapters 16 and 17, you learned how to apply authorization rules at any layer of your application using global method security. In this chapter, we’ll combine these two essential subjects and apply global method security within an OAuth 2 resource server.
Besides defining authorization rules at different layers of our resource server implementation, you’ll also learn how to use a tool named Keycloak as the authorization server for your system. The example we’ll work on this chapter is helpful for the following reasons:
-
Systems often use third-party tools such as Keycloak in real-world implementations to define an abstraction layer for authentication. There’s a good chance you need to use Keycloak or a similar third-party tool in your OAuth 2 implementation. You’ll find many possible alternatives to Keycloak like Okta, Auth0, and LoginRadius. This chapter focuses on a scenario in which you need to use such a tool in the system you develop.
-
In real-world scenarios, we use authorization applied not only for the endpoints but also for other layers of the application. And this also happens for an OAuth 2 system.
-
You’ll gain a better understanding of the big picture of the technologies and approaches we discuss. To do this, we’ll once again use an example to reinforce what you learned in chapters 12 through 17.
Let’s dive into the next section and find out the scenario of the application we’ll implement in this hands-on chapter.
18.1 The application scenario
Say we need to build a backend for a fitness application. Besides other great features, the app also stores a history of users’ workouts. In this chapter, we’ll focus on the part of the application that stores the history of workouts. We presume our backend needs to implement three use cases. For each action defined by the use cases, we have specific security restrictions (figure 18.1). The three use cases are these:
-
Add a new workout record for a user. In a database table named workout, we add a new record that stores user, the start and the end times of the workout, and the difficulty of the workout, using an integer on a scale from 1 to 5.
The authorization restriction for this use case asserts that authenticated users can only add workout records for themselves. The client calls an endpoint exposed by the resource server to add a new workout record.
-
Find all the workouts for a user. The client needs to display a list of workouts in the user’s history. The client calls an endpoint to retrieve that list.
The authorization restriction in this case states that a user can only get their own workout records.
-
Delete a workout. Any user having the admin role can delete a workout for any other user. The client calls an endpoint to delete a workout record.
The authorization restriction says that only an admin can delete records.
We need to implement three use cases for which we have two acting roles. The two roles are the standard user, fitnessuser, and the admin, fitnessadmin. A fitnessuser can add a workout for themselves and can see their own workout history. A fitnessadmin can only delete workout records for any user. Of course, an admin can also be a user, and in this case, they can also add workouts for themselves or see their own recorded workouts.

Figure 18.1 Whether it’s a workout history or a bank account, an application needs to implement proper authorization rules to protect user data from theft or unwanted changes.
The backend that we implement with these three use cases is an OAuth 2 resource server (figure 18.2). We need an authorization server as well. For this example, we use a tool named Keycloak to configure the authorization server for the system. Keycloak offers all possibilities to set our users either locally or by integrating with other user management services.

Figure 18.2 The actors in the system are the user, the client, the authorization server, and the resource server. We use Keycloak to configure the authorization server, and we implement the resource server using Spring Security.
We start the implementations by configuring a local Keycloak instance as our authorization server. We then implement the resource server and set up the authorization rules using Spring Security. Once we have a working application, we test it by calling the endpoint with cURL.
18.2 Configuring Keycloak as an authorization server
In this section, we configure Keycloak as the authorization server for the system (figure 18.3). Keycloak is an excellent open source tool designed for identity and access management. You can download Keycloak from keycloak.org. Keycloak offers the ability to manage simple users locally and also provides advanced features such as user federation. You could connect it to your LDAP and Active Directory services or to different identity providers. For example, you could use Keycloak as a high-level authentication layer by connecting it to one of the common OAuth 2 providers we discussed in chapter 12.

Figure 18.3 As part of the hands-on application we implement in this chapter, we follow three major steps. In this section, we configure Keycloak as the authorization server for the system as the first step.
Keycloak’s configuration is flexible, although it can become complex, depending on what you want to achieve. For this chapter, we discuss only the setup we need to do for our example. Our setup only defines a few users with their roles. But Keycloak can do much more than this. If you plan to use Keycloak in real-world scenarios, I recommend you first read the detailed documentation at their official website: https://www.keycloak.org/documentation. In chapter 9 of Enterprise Java Microservices by Ken Finnigan (Manning, 2018), you can also find a good discussion on securing microservices where the author uses Keycloak for user management. Here’s the link:
https://livebook.manning.com/book/enterprise-java-microservices/chapter-9
(If you enjoy a discussion on microservices, I recommend you read Ken Finnigan’s entire book. The author provides excellent insights on subjects anyone implementing microservices with Java should know.)
To install Keycloak, you only need to download an archive containing the latest version from the official website https://www.keycloak.org/downloads. Then, unzip the archive in a folder, and you can start Keycloak using the standalone executable file, which you find in the bin folder. If you’re using Linux, you need to run standalone.sh. For Windows, you run standalone.bat.
Once you start the Keycloak server, access it in a browser at http://localhost:8080. In Keycloak’s first page, you configure an admin account by entering a username and a password (figure 18.4).

Figure 18.4 To manage Keycloak, you first need to set up your admin credentials. You do this by accessing Keycloak the first time you start it.

Figure 18.5 Once you set up your admin account, you can log in to Keycloak’s Administration Console using the credentials you just set up.
That’s it. You successfully set up your admin credentials. Thereafter, you log in with your credentials to manage Keycloak as presented in figure 18.5.
In the Administration Console, you can start configuring the authorization server. We need to know which OAuth 2-related endpoints Keycloak exposes. You find those endpoints in the General section of the Realm Settings page, which is the first page you land on after logging in to the Administration Console (figure 18.6).

Figure 18.6 You find the endpoints related to the authorization server by clicking the OpenID Endpoint Configuration link. You need these endpoints to obtain the access token and to configure the resource server.
In the next code snippet, I extracted a part of the OAuth 2 configuration that you find by clicking the OpenID Endpoint Configuration link. This configuration provides the token endpoint, the authorization endpoint, and the list of supported grant types. These details should be familiar to you, as we discussed them in chapters 12 through 15.
{

  "issuer":
    "http://localhost:8080/auth/realms/master",

  "authorization_endpoint":
    "http://localhost:8080/auth/realms/master/
    ➥ protocol/openid-connect/auth",

   "token_endpoint":
    "http://localhost:8080/auth/realms/master/
    ➥ protocol/openid-connect/token",

   "jwks_uri":
"http://localhost:8080/auth/realms/master/protocol/
➥ openid-connect/certs",

   "grant_types_supported":[
      "authorization_code",
      "implicit",
      "refresh_token",
      "password",
      "client_credentials"
   ],
...
}

Figure 18.7 To test the application, we manually generate access tokens, which we use to call the endpoints. If you define a short lifespan for the tokens, you need to generate them more often, and you might get annoyed when a token expires before you can use it.
You might find testing the app more comfortable if you configured long-lived access tokens (figure 18.7). However, in a real-world scenario, remember not to give a long lifespan to your tokens. For example, in a production system, a token should expire within a few minutes. But for testing, you can leave it active for one day. You can change the length of a token’s lifespan from the Tokens tab, shown in figure 18.8.

Figure 18.8 You might find testing more comfortable if an issued access token doesn’t expire quickly. You can change its lifespan in the Tokens tab.
Now that we’ve installed Keycloak, set up the admin credentials, and made a few adjustments, we can configure the authorization server. Here’s a list of the configuration steps.
-
Register a client for the system. An OAuth 2 system needs at least one client recognized by the authorization server. The client makes authentication requests for users. In section 18.2.1, you’ll learn how to add a new client registration.
-
Define a client scope. The client scope identifies the purpose of the client in the system. We use the client scope definition to customize the access tokens issued by the authorization server. In section 18.2.2, you’ll learn how to add a client scope, and in section 18.2.4, we’ll configure it to customize the access token.
-
Add users for our application. To call the endpoints on the resource server, we need users for our application. You’ll learn how to add users managed by Keycloak in section 18.2.3.
-
Define user roles and custom access tokens. After adding users, you can issue access tokens for them. You’ll notice that the access tokens don’t have all the details we need to accomplish our scenario. You’ll learn how to configure roles for the users and customize the access tokens to present the details expected by the resource server we’ll implement using Spring Security in section 18.2.4.
18.2.1 Registering a client for our system
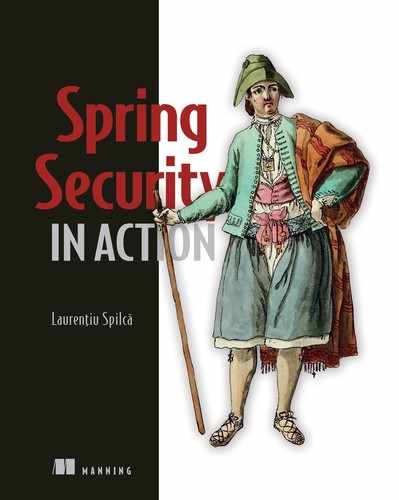
In this section, we discuss registering a client when using Keycloak as an authorization server. Like in any other OAuth 2 system, we need to register the client applications at the authorization server level. To add a new client, we use Keycloak Administration Console. As presented in figure 18.9, you find a list of clients by navigating to the Clients tab on the left-hand menu. From here, you can also add a new client registration.
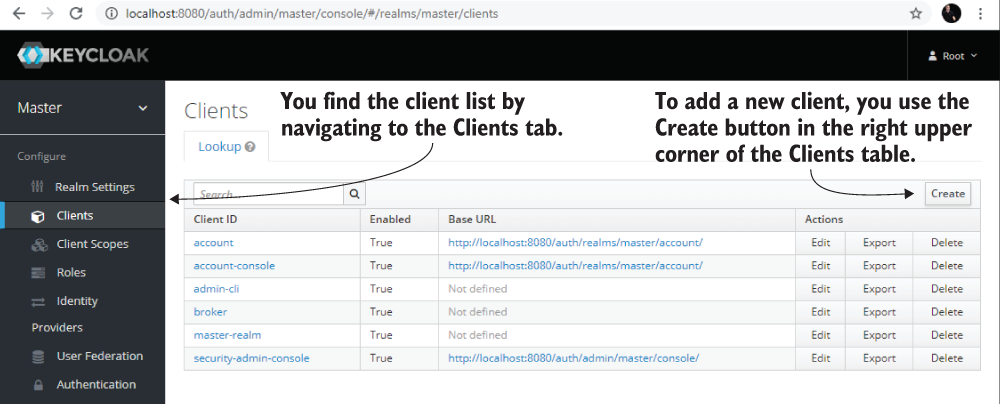
Figure 18.9 To add a new client, you navigate to the clients list using the Clients tab on the left-hand menu. Here you can add a new client registration by clicking the Create button in the upper-right corner of the Clients table.
I added a new client that I named fitnessapp. This client represents the application allowed to call endpoints from the resource server we’ll implement in section 18.3. Figure 18.10 shows the Add Client form.
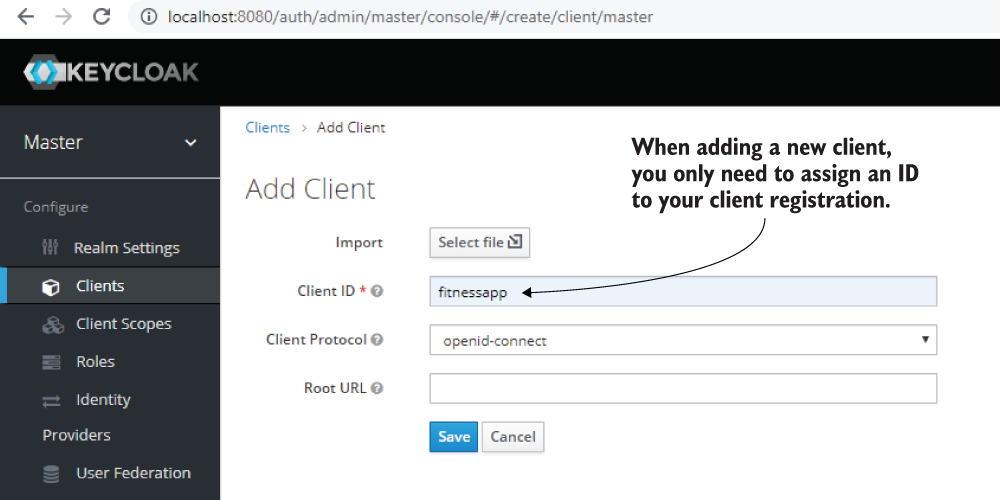
Figure 18.10 When adding a client, you only need to assign it a unique client ID (fitnessapp) and then click Save.
18.2.2 Specifying client scopes
In this section, we define a scope for the client we registered in section 18.2.1. The client scope identifies the purpose of the client. We’ll also use client scope in section 18.2.4 to customize the access token issued by Keycloak. To add a scope to the client, we again use the Keycloak Administration Console. As figure 18.11 presents, you find a list of client scopes when navigating to the Client Scopes tab from the left-hand menu. From here, you can also add a new client scope to the list.

Figure 18.11 For a list of all client scopes, navigate to the Client Scopes tab. Here, you add a new client scope by clicking the Create button on the upper-right corner of the Client Scopes table.
For the app that we build in this hands-on example, I added a new client scope named fitnessapp. When adding a new scope, also make sure that the protocol for which you set the client scope is openid-connect (figure 18.12).
NOTE The other protocol you can choose is SAML 2.0. Spring Security previously offered an extension for this protocol that you can still find at https://projects.spring.io/spring-security-saml/#quick-start. We don’t discuss using SAML 2.0 in this book because it’s not actively developed anymore for Spring Security. Also, SAML 2.0 is less frequently encountered than OAuth 2 in applications.

Figure 18.12 When adding a new client scope, give it a unique name and make sure you define it for the desired protocol. In our case, the protocol we want is openid-connect.
Once you create the new role, you assign it to your client as figure 18.13 presents. You get to this screen by navigating to the Clients menu and then selecting the Client Scopes tab.

Figure 18.13 Once you have a client scope, you assign it to a client. In this figure, I already moved the scopes I need into the right-hand box named Assigned Default Client Scopes. This way, you can now use the defined scope with a specific client.
18.2.3 Adding users and obtaining access tokens
In this section, we create and configure users for our application. Previously, we configured the client and its scope in sections 18.2.1 and 18.2.2. But besides the client app, we need users to authenticate and access the services offered by our resource server. We configure three users that we use to test our application (figure 18.14). I named the users Mary, Bill, and Rachel.

Figure 18.14 By navigating to the Users tab from the menu on the left, you’ll find a list of all the users for your apps. Here you can also add a new user by clicking Add User in the upper-right corner of the Users table.
When adding a new user in the Add User form, give it a unique username and check the box stating the email was verified (figure 18.15). Also, make sure the user has no Required User Actions. When a user has Required User Actions pending, you cannot use it for authentication; thus, you cannot obtain an access token for that user.
Figure 18.15 When adding a new user, give the user a unique username and make sure the user has no Required User Actions.
Once you create the users, you should find all of them in the Users list. Figure 18.16 presents the Users list.
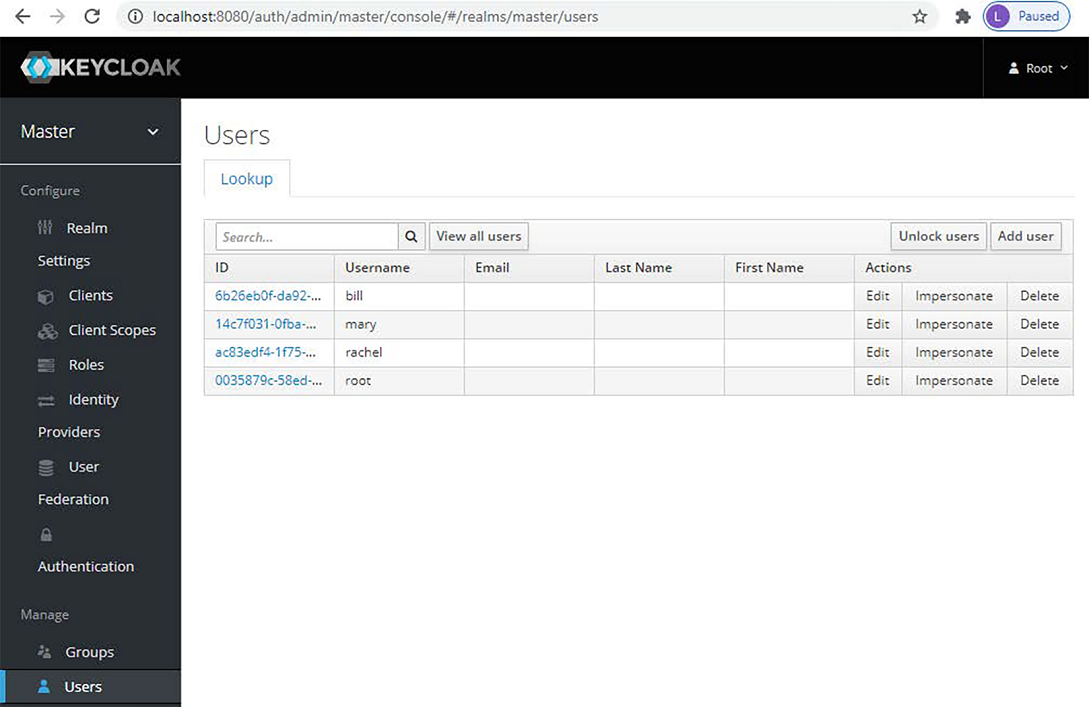
Figure 18.16 The newly created users appear now in the Users list. You can choose a user from here to edit or delete.
Of course, users also need passwords to log in. Usually, they’d configure their own passwords, and the administrator shouldn’t know their credentials. In our case, we have no choice but to configure passwords ourselves for the three users (figure 18.17). To keep our example simple, I configured the password “12345” for all users. I also made sure that the password isn’t temporary by unchecking the Temporary check box. If you make the password temporary, Keycloak automatically adds a required action for the user to change the password at their first login. Because of this required action, we wouldn’t be able to authenticate with the user.
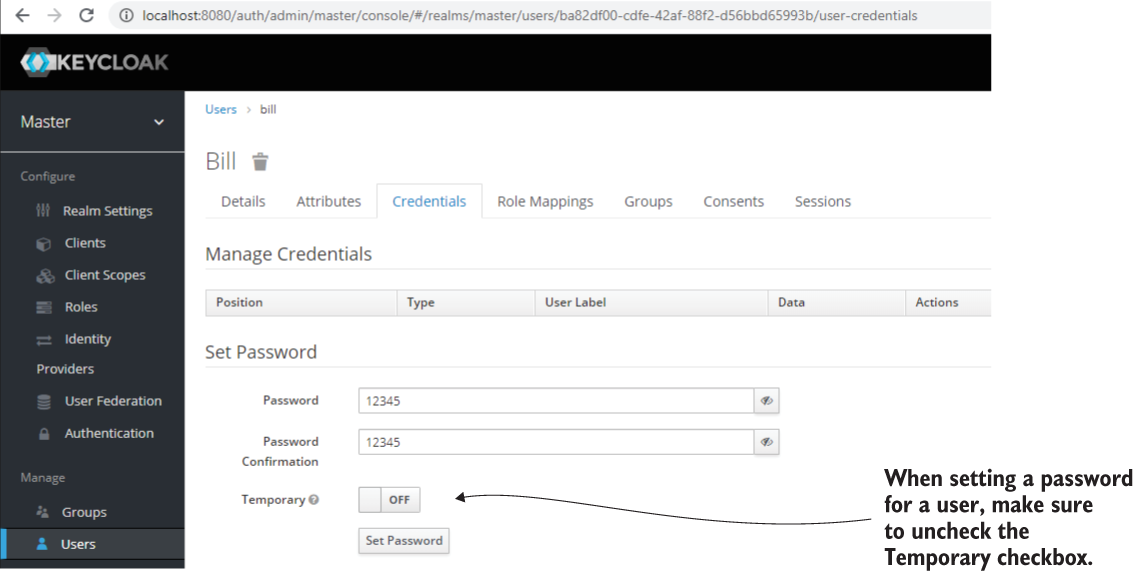
Figure 18.17 You can select a user from the list to change or configure its credentials. Before saving changes, remember to make sure you set the Temporary check box to OFF. If the credentials are temporary, you won’t be able to authenticate with the user up front.
Having the users configured, you can now obtain an access token from your authorization server implemented with Keycloak. The next code snippet shows you how to obtain the token using the password grant type, to keep the example simple. However, as you observed from section 18.2.1, Keycloak also supports the other grant types discussed in chapter 12. Figure 18.18 is a refresher for the password grant type that we discussed there.
To obtain the access token, call the /token endpoint of the authorization server:
curl -XPOST "http://localhost:8080/auth/realms/master/protocol/openid-connect/token"
-H "Content-Type: application/x-www-form-urlencoded"
--data-urlencode "grant_type=password"
--data-urlencode "username=rachel"
--data-urlencode "password=12345"
--data-urlencode "scope=fitnessapp"
--data-urlencode "client_id=fitnessapp"

Figure 18.18 When using the password grant type, the user shares their credentials with the client. The client uses the credentials to obtain an access token from the authorization server. With the token, the client can then access the user’s resources exposed by the resource server.
You receive the access token in the body of the HTTP response. The next code snippet shows the response:
{
  "access_token":"eyJhbGciOiJIUzI...",
  "expires_in":6000,
  "refresh_expires_in":1800,
  "refresh_token":"eyJhbGciOiJIUz... ",
  "token_type":"bearer",
  "not-before-policy":0,
  "session_state":"1f4ddae7-7fe0-407e-8314-a8e7fcd34d1b",
  "scope":"fitnessapp"
}
Note In the HTTP response, I truncated the JWT tokens because they’re long.
The next code snippet presents the decoded JSON body of the JWT access token. Taking a glance at the code snippet, you can observe that the token doesn’t contain all the details we need to make our application work. The roles and username are missing. In section 18.2.4, you’ll learn how to assign roles to users and customize the JWT to contain all the data the resource server needs.
{
  "exp": 1585392296,
  "iat": 1585386296,
  "jti": "01117f5c-360c-40fa-936b-763d446c7873",
  "iss": "http://localhost:8080/auth/realms/master",
  "sub": "c42b534f-7f08-4505-8958-59ea65fb3b47",
  "typ": "Bearer",
  "azp": "fitnessapp",
  "session_state": "fce70fc0-e93c-42aa-8ebc-1aac9a0dba31",
  "acr": "1",
  "scope": "fitnessapp"
}
18.2.4 Defining the user roles
In section 18.2.3, we managed to obtain an access token. We also added a client registration and configured the users to obtain the tokens. But still, the token doesn’t have all the details our resource server needs to apply the authorization rules. To write a complete app for our scenario, we need to add roles for our users.
Adding roles to a user is simple. The Roles tab in the left-hand menu allows you to find a list of all roles and add new roles, as presented in figure 18.19. I created two new roles, fitnessuser and fitnessadmin.

Figure 18.19 By accessing the Roles tab in the left-hand menu, you find all the defined roles, and you can create new ones. You then assign them to users.
We now assign these roles to our users. I assigned the role fitnessadmin to Mary, our administrator, while Bill and Rachel, who are regular users, take the role fitnessuser. Figure 18.20 shows you how to attach roles to users.

Figure 18.20 From the Role Mappings section of the selected user, you assign roles. These role mappings appear as the user’s authorities in the access token, and you use these to implement authorization configurations.
Unfortunately, by default, these new details won’t appear in the access token. We have to customize the token according to the requirements of the application. We customize the token by configuring the client scope we created and assigned to the token in section 18.2.2. We need to add three more details to our tokens:
-
Roles--Used to apply a part of the authorization rules at the endpoint layer according to the scenario
-
Username--Filters the data when we apply the authorization rules
-
Audience claim (aud)--Used by the resource server to acknowledge the requests, as you’ll learn in section 18.3.
The next code snippet presents the fields that are added to the token once we finish setup. Then we add custom claims by defining mappers on the client scope, as figure 18.21 presents.
{
  // ...

  "authorities": [
    "fitnessuser"
  ],
  "aud": "fitnessapp",
  "user_name": "rachel",

  // ...
}

Figure 18.21 We create mappers for a specific client scope to customize the access token. This way, we provide all the details the resource server needs to authorize requests.
Figure 18.22 shows how to create a mapper to add the roles to the token. We add the roles with the authorities key in the token because this is the way the resource server expects it.
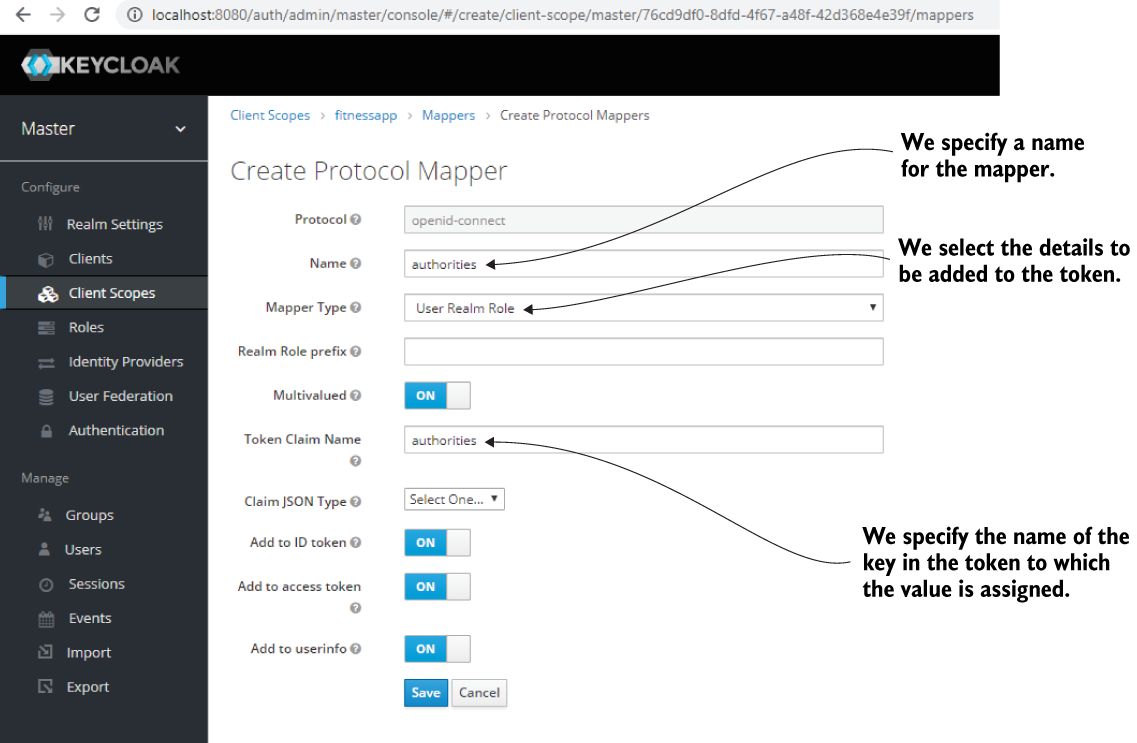
Figure 18.22 To add roles in the access token, we define a mapper. When adding a mapper, we need to provide a name for it. We also specify the details to add to the token and the name of the claim identifying the assigned details.
With an approach similar to the one presented in figure 18.22, we can also define a mapper to add the username to the token. Figure 18.23 shows how to create the mapper for username.

Figure 18.23 We create a mapper to add the username to the access token. When adding the username to the access token, we choose the name of the claim, user_name, which is how the resource server expects to find it in the token.
Finally, we need to specify the audience. The audience claim (aud) defines the intended recipient of the access token. We set up a value for this claim, and we configure the same value for the resource server, as you’ll learn in section 18.3. Figure 18.24 shows you how to define the mapper so that Keycloak can add the aud claim to the JWT.

Figure 18.24 The aud claim representing the mapper type, Audience, defines the recipient of the access token, which, in our case, is the resource server. We configure the same value on the resource server side for the resource server to accept the token.
If you obtain an access token again and decode it, you should find the authorities, user_name, and aud claims in the token’s body. Now we can use this JWT to authenticate and call endpoints exposed by the resource server. Now that we have a fully configured authorization server, in section 18.3, we’ll implement the resource server for our scenario presented in section 18.1. The following code snippet shows the token’s body:
{
  "exp": 1585395055,
  "iat": 1585389055,
  "jti": "305a8f99-3a83-4c32-b625-5f8fc8c2722c",
  "iss": "http://localhost:8080/auth/realms/master",
  "aud": "fitnessapp",                                  ❶
  "sub": "c42b534f-7f08-4505-8958-59ea65fb3b47",
  "typ": "Bearer",
  "azp": "fitnessapp",
  "session_state": "f88a4f08-6cfa-42b6-9a8d-a2b3ed363bdd",
  "acr": "1",
  "scope": "fitnessapp",
  "user_name": "rachel",                                ❶
  "authorities": [                                      ❶
    "fitnessuser"                                       ❶
  ]                                                     ❶
}
❶ The custom-added claims appear now in the token.
18.3 Implementing the resource server
In this section, we use Spring Security to implement the resource server for our scenario. In section 18.2, we configured Keycloak as the authorization server for the system (figure 18.25).

Figure 18.25 Now that we have set the Keycloak authorization server, we start the next step in the hands-on example--implementing the resource server.
To build the resource server, I created a new project, named ssia-ch18-ex1. The class design is straightforward (figure 18.26) and is based on three layers: a controller, a service, and a repository. We implement authorization rules for each of these layers.
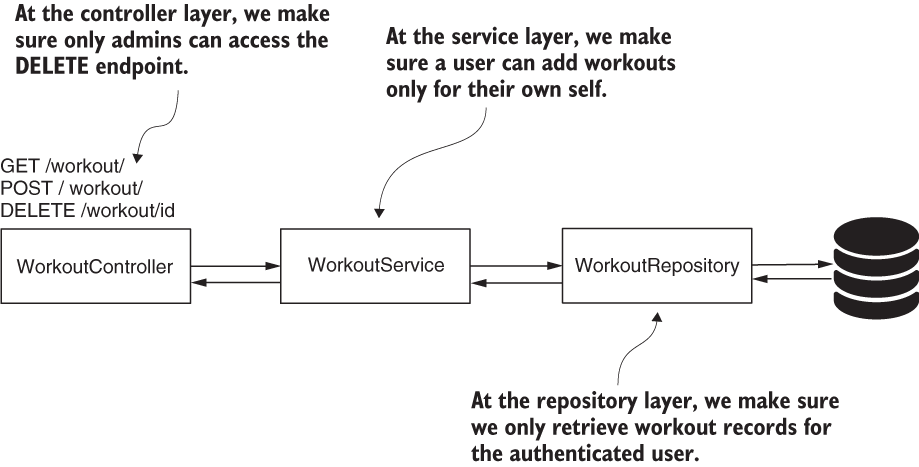
Figure 18.26 The class design for the resource server. We have three layers: the controller, the service, and the repository. Depending on the implemented use case, we configure the authorization rules for one of these layers.
We add the dependencies to the pom.xml file:
<dependency>
   <groupId>org.springframework.boot</groupId>
   <artifactId>spring-boot-starter-security</artifactId>
</dependency>
<dependency>
   <groupId>org.springframework.boot</groupId>
   <artifactId>spring-boot-starter-web</artifactId>
</dependency>
<dependency>
   <groupId>org.springframework.cloud</groupId>
   <artifactId>spring-cloud-starter-oauth2</artifactId>
</dependency>
<dependency>
   <groupId>org.springframework.boot</groupId>
   <artifactId>spring-boot-starter-data-jpa</artifactId>
</dependency>
<dependency>
   <groupId>org.springframework.security</groupId>
   <artifactId>spring-security-data</artifactId>
</dependency>
<dependency>
   <groupId>mysql</groupId>
   <artifactId>mysql-connector-java</artifactId>
   <scope>runtime</scope>
</dependency>
Because we store the workout details in a database, we also add the schema.sql and data.sql files to the project. In these files, we put the SQL queries to create the database structure and some data that we can use later when testing the application. We only need a simple table, so our schema.sql file stores only the query to create this table:
CREATE TABLE IF NOT EXISTS `spring`.`workout` (
  `id` INT NOT NULL AUTO_INCREMENT,
  `user` VARCHAR(45) NULL,
  `start` DATETIME NULL,
  `end` DATETIME NULL,
  `difficulty` INT NULL,
  PRIMARY KEY (`id`));
We also need some records in the workout table to test the application. To add these records, you write some INSERT queries in the data.sql file:
INSERT IGNORE INTO `spring`.`workout`
(`id`, `user`, `start`, `end`, `difficulty`) VALUES
(1, 'bill', '2020-06-10 15:05:05', '2020-06-10 16:10:07', '3');

INSERT IGNORE INTO `spring`.`workout`
(`id`, `user`, `start`, `end`, `difficulty`) VALUES
(2, 'rachel', '2020-06-10 15:05:10', '2020-06-10 16:10:20', '3');

INSERT IGNORE INTO `spring`.`workout`
(`id`, `user`, `start`, `end`, `difficulty`) VALUES
(3, 'bill', '2020-06-12 12:00:10', '2020-06-12 13:01:10', '4');

INSERT IGNORE INTO `spring`.`workout`
(`id`, `user`, `start`, `end`, `difficulty`) VALUES
(4, 'rachel', '2020-06-12 12:00:05', '2020-06-12 12:00:11', '4');
With these four INSERT statements, we now have a couple of workout records for user Bill and another two for user Rachel to use in our tests. Before starting to write our application logic, we need to define the application.properties file. We already have the Keycloak authorization server running on port 8080, so change the port for the resource server to 9090. Also, in the application.properties file, write the properties needed by Spring Boot to create the data source. The next code snippet shows the contents of the application.properties file:
server.port=9090

spring.datasource.url=jdbc:mysql://localhost/spring ?useLegacyDatetimeCode=false&serverTimezone=UTC
spring.datasource.username=root
spring.datasource.password=
spring.datasource.initialization-mode=always
Now, let’s first implement the JPA entity and the Spring Data JPA repository. The next listing presents the JPA entity class named Workout.
Listing 18.1 The Workout class
@Entity
public class Workout {

  @Id
  @GeneratedValue(strategy = GenerationType.IDENTITY)
  private int id;
  private String user;
  private LocalDateTime start;
  private LocalDateTime end;
  private int difficulty;

  // Omitted getter and setters
}
In listing 18.2, you find the Spring Data JPA repository interface for the Workout entity. Here, at the repository layer, we define a method to retrieve all the workout records for a specific user from the database. As you learned in chapter 17, instead of using @PostFilter, we choose to apply the constraint directly in the query.
Listing 18.2 The WorkoutRepository interface
public interface WorkoutRepository
  extends JpaRepository<Workout, Integer> {
    @Query("SELECT w FROM Workout w WHERE
    ➥ w.user = ?#{authentication.name}")       ❶
    List<Workout> findAllByUser();
}
❶ A SpEL expression retrieves the value of the authenticated username from the security context.
Because we now have a repository, we can continue with implementing the service class called WorkoutService. Listing 18.3 presents the implementation of the WorkoutService class. The controller directly calls the methods of this class. According to our scenario, we need to implement three methods:
Listing 18.3 The WorkoutService class
@Service
public class WorkoutService {

  @Autowired
  private WorkoutRepository workoutRepository;

  @PreAuthorize                                 ❶
  ➥ ("#workout.user == authentication.name")
  public void saveWorkout(Workout workout) {
    workoutRepository.save(workout);
  }

  public List<Workout> findWorkouts() {         ❷
    return workoutRepository.findAllByUser();
  }

  public void deleteWorkout(Integer id) {       ❸
    workoutRepository.deleteById(id);
  }
}
❶ By preauthorization, ensures the method isn’t called if the workout record doesn’t belong to the user
❷ For this method, we already applied filtering at the repository layer.
❸ Applies authorization for this method at the endpoint layer
NOTE You may be wondering why I chose to implement the authorization rules precisely like you see in the example and not in a different way. For the deleteWorkout() method, why did I write the authorization rules at the endpoint level and not at the service layer? For this use case, I chose to do so to cover more ways for configuring authorization. It would be the same as in previous examples had I set the authorization rules for workout deletion at the service layer. And, in a more complex application, like in a real-world app, you might have restrictions that force you to choose a specific layer.
The controller class only defines the endpoints, which further call the service methods. The following listing presents the implementation of the controller class.
Listing 18.4 The WorkoutController class
@RestController
@RequestMapping("/workout")
public class WorkoutController {

  @Autowired
  private WorkoutService workoutService;

  @PostMapping("/")
  public void add(@RequestBody Workout workout) {
    workoutService.saveWorkout(workout);
  }

  @GetMapping("/")
  public List<Workout> findAll() {
    return workoutService.findWorkouts();
  }

  @DeleteMapping("/{id}")
  public void delete(@PathVariable Integer id) {
    workoutService.deleteWorkout(id);
  }
}
The last thing we need to define to have a complete application is the configuration class. We need to choose the way the resource server validates tokens issued by the authorization server. We discussed three approaches in chapters 14 and 15:
Because we already know the authorization server issues JWTs, the most comfortable choice is to rely on the cryptographic signature of the token. As you know from chapter 15, we need to provide the resource server the key to validate the signature. Fortunately, Keycloak offers an endpoint where public keys are exposed:
http://localhost:8080/auth/realms/master/protocol/openid-connect/certs
We add this URI, together with the value of the aud claim we set on the token in the application.properties file:
server.port=9090

spring.datasource.url=jdbc:mysql://localhost/spring
spring.datasource.username=root
spring.datasource.password=
spring.datasource.initialization-mode=always
claim.aud=fitnessapp
jwkSetUri=http://localhost:8080/auth/realms/master/protocol/openid-connect/certs
Now we can write the configuration file. For this, the following listing shows our configuration class.
Listing 18.5 The resource server configuration class
@Configuration
@EnableResourceServer
@EnableGlobalMethodSecurity                    ❶
  (prePostEnabled = true)
public class ResourceServerConfig              ❷
  extends ResourceServerConfigurerAdapter {

  @Value("${claim.aud}")                       ❸
  private String claimAud;

  @Value("${jwkSetUri}")                       ❸
  private String urlJwk;

  @Override
  public void configure(ResourceServerSecurityConfigurer resources) {
    resources.tokenStore(tokenStore());        ❹
    resources.resourceId(claimAud);            ❹
  }

  @Bean
  public TokenStore tokenStore() {
    return new JwkTokenStore(urlJwk);          ❺
  }

}
❶ Enables global method security pre-/postannotations
❷ Extends the ResourceServerConfigurerAdapter to customize the resource server configurations
❸ Injects from the context the key’s URI and the aud claim value
❹ Sets up the token store and the value expected for the aud claim
❺ Creates the TokenStore bean that verifies tokens based on the keys found at the provided URI
To create an instance of TokenStore, we use an implementation called JwkTokenStore. This implementation uses an endpoint where we can expose multiple keys. To validate a token, JwkTokenStore looks for a specific key whose ID needs to exist in the header of the provided JWT token (figure 18.27).
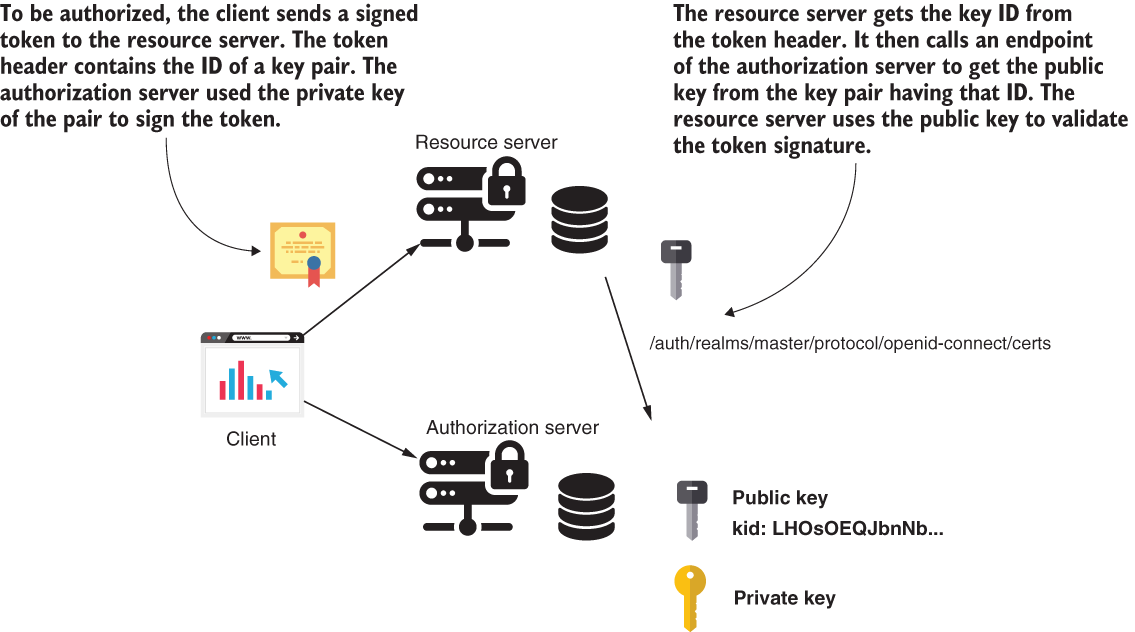
Figure 18.27 The authorization server uses a private key to sign the token. When it signs the token, the authorization server also adds an ID of the key pair in the token header. To validate the token, the resource server calls an endpoint of the authorization server and gets the public key for the ID found in the token header. The resource server uses this public key to validate the token signature.
NOTE Remember, we took the path /openid-connect/certs to the endpoint from Keycloak, where Keycloak exposed the key, at the beginning of the chapter. You may find other tools to use a different path for this endpoint.
If you call the keys URI, you see something similar to the next code snippet. In the HTTP response body, you have multiple keys. We call this collection of keys the key set. Each key has multiple attributes, including the value of the key and a unique ID for each key. The attribute kid represents the key ID in the JSON response.
{
  "keys":[
    {
     "kid":"LHOsOEQJbnNbUn8PmZXA9TUoP56hYOtc3VOk0kUvj5U",   ❶
     "kty":"RSA",
     "alg":"RS256",
     "use":"sig",
      ...
    }
  ...
  ]
}
The JWT needs to specify which key ID is used to sign the token. The resource server needs to find the key ID in the JWT header. If you generate a token with our resource server as we did in section 18.2 and decode the header of the token, you can see the token contains the key ID as expected. In the next code snippet, you find the decoded header of a token generated with our Keycloak authorization server:
{
  "alg": "RS256",
  "typ": "JWT",
  "kid": "LHOsOEQJbnNbUn8PmZXA9TUoP56hYOtc3VOk0kUvj5U"
}
To complete our configuration class, let’s add the authorization rules for the endpoint level and the SecurityEvaluationContextExtension. Our application needs this extension to evaluate the SpEL expression we used at the repository layer. The final configuration class looks as presented in the following listing.
Listing 18.6 The configuration class
@Configuration
@EnableResourceServer
@EnableGlobalMethodSecurity(prePostEnabled = true)
public class ResourceServerConfig
  extends ResourceServerConfigurerAdapter {

  @Value("${claim.aud}")
  private String claimAud;

  @Value("${jwkSetUri}")
  private String urlJwk;

  @Override
  public void configure(ResourceServerSecurityConfigurer resources) {
    resources.tokenStore(tokenStore());
    resources.resourceId(claimAud);
  }

  @Bean
  public TokenStore tokenStore() {
    return new JwkTokenStore(urlJwk);
  }

  @Override
  public void configure(HttpSecurity http) throws Exception {
    http.authorizeRequests()                                   ❶
        .mvcMatchers(HttpMethod.DELETE, "/**")
            .hasAuthority("fitnessadmin")
        .anyRequest().authenticated();
  }

  @Bean                                                        ❷
  public SecurityEvaluationContextExtension
    securityEvaluationContextExtension() {

    return new SecurityEvaluationContextExtension();
  }

}
❶ Applies the authorization rules at the endpoint level
❷ Adds a SecurityEvaluationContextExtension bean to the Spring context
18.4 Testing the application
Now that we have a complete system, we can run some tests to prove it works as desired (figure 18.28). In this section, we run both our authorization and resource servers and use cURL to test the implemented behavior.
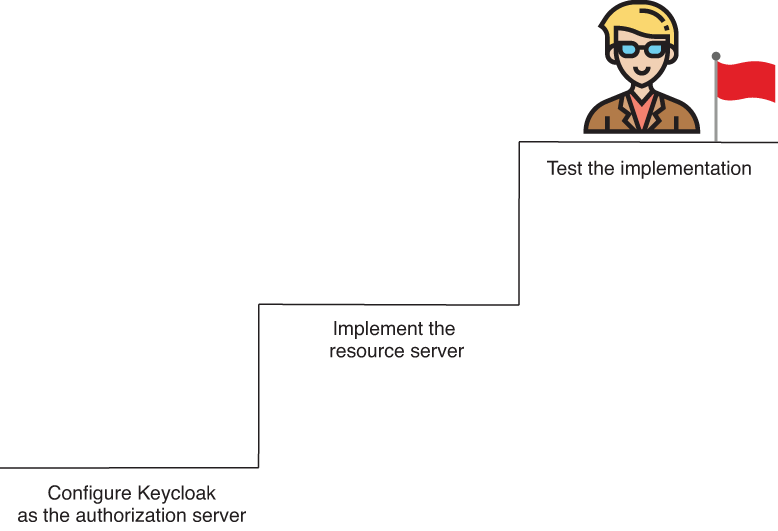
Figure 18.28 You got to the top! This is the last step of implementing the hands-on application for this chapter. Now we can test the system and prove that what we configured and implemented works as expected.
The scenarios we need to test are the following:
In my case, the Keycloak authorization server runs on port 8080, and the resource server I configured in the application.properties file runs on port 9090. You need to make sure you make calls to the correct component by using the ports you configured. Let’s take each of the three test scenarios and prove the system is correctly secured.
18.4.1 Proving an authenticated user can only add a record for themself
According to the scenario, a user can only add a record for themself. In other words, if I authenticate as Bill, I shouldn’t be able to add a workout record for Rachel. To prove this is the app’s behavior, we call the authorization server and issue a token for one of the users, say, Bill. Then we try to add both a workout record for Bill and a workout record for Rachel. We prove that Bill can add a record for himself, but the app doesn’t allow him to add a record for Rachel. To issue a token, we call the authorization server as presented in the next code snippet:
curl -XPOST 'http://localhost:8080/auth/realms/master/protocol/openid-connect/token'
-H 'Content-Type: application/x-www-form-urlencoded'
--data-urlencode 'grant_type=password'
--data-urlencode 'username=bill'
--data-urlencode 'password=12345'
--data-urlencode 'scope=fitnessapp'
--data-urlencode 'client_id=fitnessapp'
Among other details, you also get an access token for Bill. I truncated the value of the token in the following code snippet to make it shorter. The access token contains all the details needed for authorization, like the username and the authorities we added previously by configuring Keycloak in section 18.1.
{
    "access_token": "eyJhbGciOiJSUzI1NiIsInR...",
    "expires_in": 6000,
    "refresh_expires_in": 1800,
    "refresh_token": "eyJhbGciOiJIUzI1NiIsInR5cCI...",
    "token_type": "bearer",
    "not-before-policy": 0,
    "session_state": "0630a3e4-c4fb-499c-946b-294176de57c5",
    "scope": "fitnessapp"
}
Having the access token, we can call the endpoint to add a new workout record. We first try to add a workout record for Bill. We expect that adding a workout record for Bill is valid because the access token we have was generated for Bill.
The next code snippet presents the cURL command you run to add a new workout for Bill. Running this command, you get an HTTP response status of 200 OK, and a new workout record is added to the database. Of course, as the value of the Authorization header, you should add your previously generated access token. I truncated the value of my token in the next code snippet to make the command shorter and easier to read:
curl -v -XPOST 'localhost:9090/workout/'
-H 'Authorization: Bearer eyJhbGciOiJSUzI1NiIsInR5cCIgOi...'
-H 'Content-Type: application/json'
--data-raw '{
        "user" : "bill",
        "start" : "2020-06-10T15:05:05",
        "end" : "2020-06-10T16:05:05",
        "difficulty" : 2
}'
If you call the endpoint and try to add a record for Rachel, you get back an HTTP response status of 403 Forbidden:
curl -v -XPOST 'localhost:9090/workout/'
-H 'Authorization: Bearer eyJhbGciOiJSUzI1NiIsInR5cCIgOi...'
-H 'Content-Type: application/json'
--data-raw '{
        "user" : "rachel",
        "start" : "2020-06-10T15:05:05",
        "end" : "2020-06-10T16:05:05",
        "difficulty" : 2
}'
{
    "error": "access_denied",
    "error_description": "Access is denied"
}
18.4.2 Proving that a user can only retrieve their own records
In this section, we prove the second test scenario: our resource server only returns the workout records for the authenticated user. To demonstrate this behavior, we generate access tokens for both Bill and Rachel, and we call the endpoint to retrieve their workout history. Neither one of them should see records for the other. To generate an access token for Bill, use this curl command:
curl -XPOST 'http://localhost:8080/auth/realms/master/protocol/openid-connect/token'
-H 'Content-Type: application/x-www-form-urlencoded'
--data-urlencode 'grant_type=password'
--data-urlencode 'username=bill'
--data-urlencode 'password=12345'
--data-urlencode 'scope=fitnessapp'
--data-urlencode 'client_id=fitnessapp'
Calling the endpoint to retrieve the workout history with the access token generated for Bill, the application only returns Bill’s records:
curl 'localhost:9090/workout/'
-H 'Authorization: Bearer eyJhbGciOiJSUzI1NiIsInR5cCIgOiAiSl...'
[
    {
        "id": 1,
        "user": "bill",
        "start": "2020-06-10T15:05:05",
        "end": "2020-06-10T16:10:07",
        "difficulty": 3
    },
    . . .
]
Next, generate a token for Rachel and call the same endpoint. To generate an access token for Rachel, run this curl command:
curl -XPOST 'http://localhost:8080/auth/realms/master/protocol/openid-connect/token'
-H 'Content-Type: application/x-www-form-urlencoded'
--data-urlencode 'grant_type=password'
--data-urlencode 'username=rachel'
--data-urlencode 'password=12345'
--data-urlencode 'scope=fitnessapp'
--data-urlencode 'client_id=fitnessapp'
Using the access token for Rachel to get the workout history, the application only returns records owned by Rachel:
curl 'localhost:9090/workout/'
-H 'Authorization: Bearer eyJhaXciOiJSUzI1NiIsInR5cCIgOiAiSl...'
[
    {
        "id": 2,
        "user": "rachel",
        "start": "2020-06-10T15:05:10",
        "end": "2020-06-10T16:10:20",
        "difficulty": 3
    },
    ...
]
18.4.3 Proving that only admins can delete records
The third and last test scenario in which we want to prove the application behaves as desired is that only admin users can delete workout records. To demonstrate this behavior, we generate an access token for our admin user Mary and an access token for one of the other users who are not admins, let’s say, Rachel. Using the access token generated for Mary, we can delete a workout. But the application forbids us from calling the endpoint to delete a workout record using an access token generated for Rachel. To generate a token for Rachel, use this curl command:
curl -XPOST 'http://localhost:8080/auth/realms/master/protocol/openid-connect/token'
-H 'Content-Type: application/x-www-form-urlencoded'
--data-urlencode 'grant_type=password'
--data-urlencode 'username=rachel'
--data-urlencode 'password=12345'
--data-urlencode 'scope=fitnessapp'
--data-urlencode 'client_id=fitnessapp'
If you use Rachel’s token to delete an existing workout, you get back a 403 Forbidden HTTP response status. Of course, the record isn’t deleted from the database. Here’s the call:
curl -XDELETE 'localhost:9090/workout/2'
--header 'Authorization: Bearer eyJhbGciOiJSUzI1NiIsIn...'
Generate a token for Mary and rerun the same call to the endpoint with the new access token. To generate a token for Mary, use this curl command:
curl -XPOST 'http://localhost:8080/auth/realms/master/protocol/openid-connect/token'
-H 'Content-Type: application/x-www-form-urlencoded'
--data-urlencode 'grant_type=password'
--data-urlencode 'username=mary'
--data-urlencode 'password=12345'
--data-urlencode 'scope=fitnessapp'
--data-urlencode 'client_id=fitnessapp'
Calling the endpoint to delete a workout record with the access token for Mary returns an HTTP status 200 OK. The workout record is removed from the database. Here’s the call:
curl -XDELETE 'localhost:9090/workout/2'
--header 'Authorization: Bearer eyJhbGciOiJSUzI1NiIsIn...'
Summary
-
You don’t necessarily need to implement your custom authorization server. Often, in real-world scenarios, we use tools such as Keycloak to implement the authorization server.
-
Keycloak is an open source identity and access management solution that offers great flexibility in dealing with user management and authorization. Often, you might prefer using such a tool over implementing a custom solution.
-
Having solutions such as Keycloak doesn’t mean that you never implement custom solutions for authorization. In real-world scenarios, you’ll find situations in which stakeholders of an application you need to build don’t consider third-party implementations trustworthy. You need to be prepared to deal with all the possible cases you might encounter.
-
You can use global method security in a system implemented over the OAuth 2 framework. In such a system, you implement global method security restrictions at the resource server level, which protects user resources.
-
You can use specific OAuth 2 elements in your SpEL expressions for authorization. To write such SpEL expressions, you need to configure an
OAuth2WebSecurityExpressionHandlerto interpret the expressions.